2015 MERCEDES-BENZ G-CLASS SUV change wheel
[x] Cancel search: change wheelPage 8 of 274

Power washer ................................ 211
Rear view camera .......................... 211
Roof lining ...................................... 212
Seat belt ........................................212
Seat cover ..................................... 212
Sensors ......................................... 211
Tail pipes ....................................... 211
Trim pieces ................................... .212
Washing by hand ........................... 211
Wheels .......................................... .211
Windows ........................................ 211
Wiper blades .................................. 211
Wooden trim .................................. 212
Cargo compartment cover
Installing/removing ....................... 197
Notes/how to use ......................... 196
Opening and closing ..................... .196
Cargo compartment enlargement
Important safety notes .................. 194
Cargo tie down rings ......................... 196
CD
see also Digital Operator's Man-
ual ................................................. .172
CD player/CD changer (on-board
computer) .......................................... 147
Center console
Overview .......................................... 36
Upper section .................................. 36
Central locking
Automatic locking (on-board com-
puter) ............................................. 147
Locking/unlocking (SmartKey) ....... .72
Changing bulbs
Side marker lamps .......................... .94
Changing gears .................................. 107
Child
Restraint system .............................. 56
Child seat
BabySmart™ air bag deactivation
system ............................................ .59
Forward-facing restraint system ...... 61
LATCH-type (ISOFIX) child seat
anchors ............................................ 57
On the front-passenger sea t............ 60
Problem (malfunction) ..................... 62
Rearward-facing restraint system .... 61
Top Tether ....................................... 58 Child-proof locks
Important safety notes .................... 62
Rear doors ....................................... 63
Children
Special seat belt retractor ............... 56
Cigarette lighter ................................ 197
Cleaning
Trailer tow hitch ............................. 211
Clear button ....................................... 180
Climate control
Controlling automaticall y............... 100
Cooling with air dehumidification .. 100
Defrosting the window s................. 100
Defrosting the windshield .............. 100
Dual-zone automatic climate con-
trol ........................................... 99, 100
Important safety notes ............ 98, 100
Indicator lamp ................................ 100
Maximum cooling .......................... 100
Notes on using dual-zone auto-
matic climate control ..................... 100
Overview of systems ........................ 98
Problem with the rear window
defroster ........................................ 100
Problems with "cooling with air
dehumidification" ........................... 100
Refrigerant ..................................... 263
Refrigerant filling capacity ............. 263
Setting the air distribution ............. 100
Setting the airflow ......................... 100
Setting the temperature ................ 100
Switching air-recirculation modeon/of f............................................ 100
Switching on/of f........................... 100
Switching residual heat on/off ...... 100
Switching the rear window
defroster on/of f............................ 100
Switching the ZONE function on/
off .................................................. 100
Windshield defroster ...................... 100
Cockpit
Overview .......................................... 32
see Instrument cluster
COMAND
Display ........................................... 175
Examples of operation ................... 180
Menu overview .............................. 176
6Index
Page 30 of 274
If you make any changes to the vehicle elec-
tronics, the general operating permit is ren-
dered invalid.
!There is a risk of damage to the vehicle if:
R the vehicle becomes stuck, e.g. on a high
curb or an unpaved road
R you drive too fast over an obstacle, e.g. a
curb or a hole in the road
R a heavy object strikes the undercarriage
or parts of the chassis
In situations like this, the body, the under-
carriage, chassis parts, wheels or tires
could be damaged without the damage
being visible. Components damaged in this way can unexpectedly fail or, in the case of
an accident, no longer withstand the strain
they are designed to.
If the underbody paneling is damaged,
combustible materials such as leaves,
grass or twigs can gather between the
underbody and the underbody paneling. If
these materials come in contact with hot
parts of the exhaust system, they can catch fire.
In such situations, have the vehicle
checked and repaired immediately at a
qualified specialist workshop. If on con-
tinuing your journey you notice that driving
safety is impaired, pull over and stop the
vehicle immediately, paying attention to
road and traffic conditions. In such cases,
consult a qualified specialist workshop.
Declarations of conformity
Vehicle components which receive
and/or transmit radio waves
USA: "The wireless devices of this vehicle
comply with Part 15 of the FCC Rules. Oper-
ation is subject to the following two condi-
tions: 1) These devices may not cause harm-
ful interference, and 2) These devices must
accept any interference received, including
interference that may cause undesired oper-
ation. Changes or modifications not expressly approved by the party responsible for com-
pliance could void the user’s authority to
operate the equipment." Canada:
"The wireless devices of this vehicle
comply with Industry Canada license-exempt
RSS standard(s). Operation is subject to the
following two conditions: (1) These devices
may not cause interference, and (2) These
devices must accept any interference, includ- ing interference that may cause undesired
operation of the device."
Qualified specialist workshop
An authorized Mercedes-Benz Center is a
qualified specialist workshop. It has the nec-
essary specialist knowledge, tools and quali-
fications to correctly carry out the work
required on your vehicle. This is especially the
case for work relevant to safety.
Observe the notes in the Maintenance Book- let.
Always have the following work carried out at an authorized Mercedes-Benz Center:
R work relevant to safety
R service and maintenance work
R repair work
R alterations, installation work and modifica-
tions
R work on electronic components
Correct use
If you remove any warning stickers, you or
others could fail to recognize certain dangers.
Leave warning stickers in position.
Observe the following information when driv- ing your vehicle: R the safety notes in this manual
R the technical data section in this manual
R traffic rules and regulations
R laws and safety standards pertaining to
motor vehicles
28Introduction
Page 77 of 274
Doors
Important safety notes
GWARNING
When leaving the vehicle, always remove the
SmartKey from the ignition lock. Always take
the SmartKey with you and lock the vehicle.
Do not leave children unsupervised in the
vehicle, even if they are secured in a child
restraint system, and do not give them accessto an unlocked vehicle. A child's unsupervised
access to a vehicle could result in an accident
and/or serious personal injury. They could: R injure themselves on vehicle parts
R be seriously or fatally injured by extreme
heat or cold
R injure themselves or have an accident with
vehicle equipment that may still be in oper-
ation even after the SmartKey has been
removed from the ignition, such as the seat
adjustment, steering wheel adjustment or
memory function.
If children open a door, they could cause
severe or even fatal injury to other persons; if they get out of the vehicle, they could injure
themselves when doing so or be seriously or
even fatally injured by any passing traffic.
Do not expose the child restraint system to
direct sunlight. The child restraint system's
metal parts, for example, could become very
hot, and a child could be burned on these
parts.
GWARNING
Do not carry heavy or hard objects in the
passenger compartment or cargo compart-
ment unless they are firmly secured in place.
Unsecured or improperly positioned cargo
increases a child's risk of injury in the event of
R strong braking maneuvers
R sudden changes of direction
R an accident
GWARNING
If children are left unsupervised in the vehicle,
they could:
R open the doors, thus endangering other
people or road users.
R get out and disrupt traffic.
R operate the vehicle's equipment.
Additionally, children could set the vehicle in
motion if, for example, they:
R release the parking brake.
R shift the automatic transmission out of park
position P or shift manual transmission into
neutral.
R start the engine.
There is a risk of an accident and injury.
When leaving the vehicle, always take the
SmartKey with you and lock the vehicle. Never leave children or animals unattended in the
vehicle. Always keep the SmartKey out of
reach of children.
Information in the Digital Operator's
Manual
In the Digital Operator's Manual you will find
information on the following topics: R Unlocking and opening doors from the
inside
R Centrally locking and unlocking the vehicle
from the inside
R Automatic locking feature
R Power closing
R Unlocking the driver's door (mechanical
key)
R Locking the vehicle (mechanical key)
R Opening and closing the rear door
Doors75
Opening and closing
Z
Page 78 of 274
Rear door
Important safety notes
GWARNING
When leaving the vehicle, always remove the
SmartKey from the ignition lock. Always take
the SmartKey with you and lock the vehicle.
Do not leave children unsupervised in the
vehicle, even if they are secured in a child
restraint system, and do not give them accessto an unlocked vehicle. A child's unsupervised
access to a vehicle could result in an accident
and/or serious personal injury. They could: R injure themselves on vehicle parts
R be seriously or fatally injured by extreme
heat or cold
R injure themselves or have an accident with
vehicle equipment that may still be in oper-
ation even after the SmartKey has been
removed from the ignition, such as the seat
adjustment, steering wheel adjustment or
memory function.
If children open a door, they could cause
severe or even fatal injury to other persons; if they get out of the vehicle, they could injure
themselves when doing so or be seriously or
even fatally injured by any passing traffic.
Do not expose the child restraint system to
direct sunlight. The child restraint system's
metal parts, for example, could become very
hot, and a child could be burned on these
parts.
GWARNING
Do not carry heavy or hard objects in the
passenger compartment or cargo compart-
ment unless they are firmly secured in place.
Unsecured or improperly positioned cargo
increases a child's risk of injury in the event of
R strong braking maneuvers
R sudden changes of direction
R an accident
GWARNING
Combustion engines emit poisonous exhaust
gases such as carbon monoxide. If the rear
door is open when the engine is running, par-
ticularly if the vehicle is moving, exhaust
fumes could enter the passenger compart-
ment. There is a risk of poisoning.
Turn off the engine before opening the rear
door. Never drive with the rear door open.
!The tailgate swings out to the side when
opened. Therefore, make sure that there is sufficient clearance.
iDo not leave the SmartKey in the cargo
compartment. Otherwise, you could lock
yourself out.
Opening
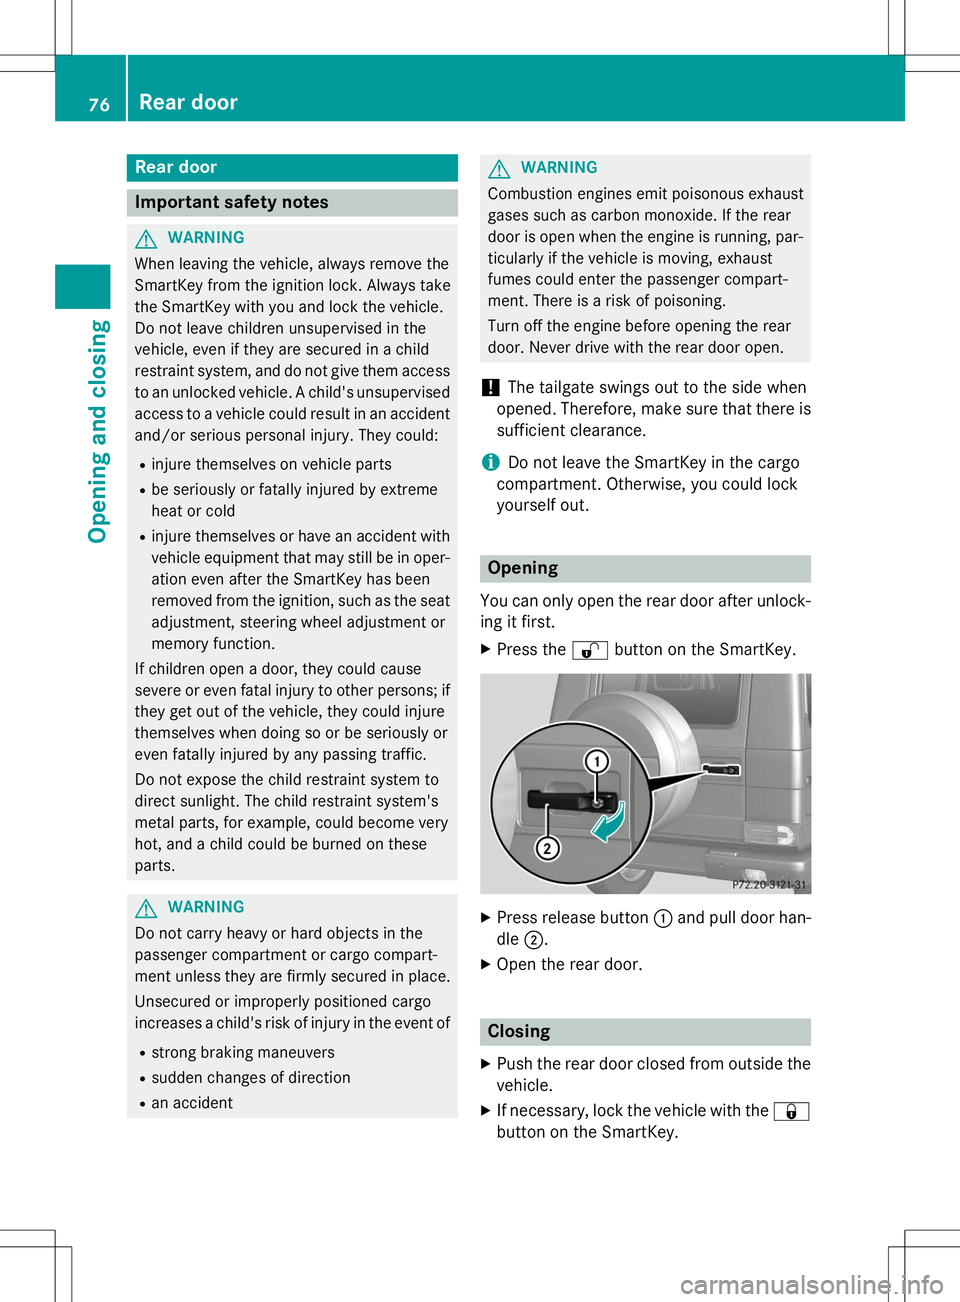
You can only open the rear door after unlock- ing it first.
X Press the %button on the SmartKey.
X
Press release button :and pull door han-
dle ;.
X Open the rear door.
Closing
X Push the rear door closed from outside the
vehicle.
X If necessary, lock the vehicle with the &
button on the SmartKey.
76Rear door
Opening and closing
Page 94 of 274

Combination switch
:High-beam headlamps
;Turn signal, right
=High-beam flasher
?Turn signal, left
In the Digital Operator's Manual you will find
information on the following topics: R Turn signals
R High-beam headlamps
R High-beam flasher
Cornering light function
The cornering light function improves the illu-
mination of the road over a wide angle in the direction you are turning, enabling better vis-
ibility in tight bends, for example. The corner- ing light function can only be activated if the
low-beam headlamps are switched on and the
fog lamps are switched off.
Active: if you are driving at speeds below
25 mph (40 km/ h)and switch on the turn
signal or turn the steering wheel. Not active:
if you are driving at speeds above
25 mph (40 km/h) or switch off the turn sig-
nal or turn the steering wheel to the straight-
ahead position.
The cornering lamp may remain lit for a short
time, but is automatically switched off after
no more than three minutes.
Interior lighting
An overview of the interior lighting and the
overhead control panel can be found in the
"At a glance" section.
In the Digital Operator's Manual you will find
information on the following topics: R Automatic interior lighting control
R Manual interior lighting control
R Courtesy lighting in the front doors
Replacing bulbs
Important safety notes
GDANGER
Xenon bulbs carry a high voltage. You can get
an electric shock if you remove the cover of
the Xenon bulb and touch the electrical con-
tacts. There is a risk of fatal injury.
Never touch the parts or the electrical con-
tacts of the Xenon bulb. Always have work on
the Xenon bulbs carried out at a qualified spe-
cialist workshop.
GWARNING
Bulbs, lamps and connectors can get very hot when operating. If you change a bulb, you
could burn yourself on these components.
There is a risk of injury.
Allow these components to cool down beforechanging a bulb.
Do not use a bulb that has been dropped or if
its glass tube has been scratched.
92Replacing bulbs
Lights and windshield wipers
Page 109 of 274
Information in the Digital Operator's
Manual
In the Digital Operator's Manual you will find
information on the following topics: RTransmission position and drive program
display
R Transmission positions
R Changing gear
R Driving tips
R Program selector button
R Steering wheel paddle shifters
R Automatic drive program
R Manual drive program
R Shift ranges
R Problems with the transmission
Manual drive program
General information
The manual drive program is only available on AMG vehicles . In manual drive program M,
you can permanently change gear yourself by
using the steering wheel paddle shifters. The
transmission must be in position D. The gear
currently selected and engaged is shown in
the multifunction display.
Manual drive program Mdiffers from drive
programs Eand Swith regard to spontaneity,
responsiveness and smoothness of gear
changes.
Switching on the manual drive program
X Shift the transmission to position D.
X Press the program selector button repeat-
edly until Mappears in the multifunction
display, see Digital Operator's Manual.
Upshifting
!In manual drive program M, the automatic
transmission does not shift up automati-
cally even when the engine limiting speed
for the current gear is reached. When the engine limiting speed is reached, the fuel
supply is cut to prevent the engine from
overrevving. Always make sure that the
engine speed does not reach the red area of
the tachometer. There is otherwise a risk of
engine damage.
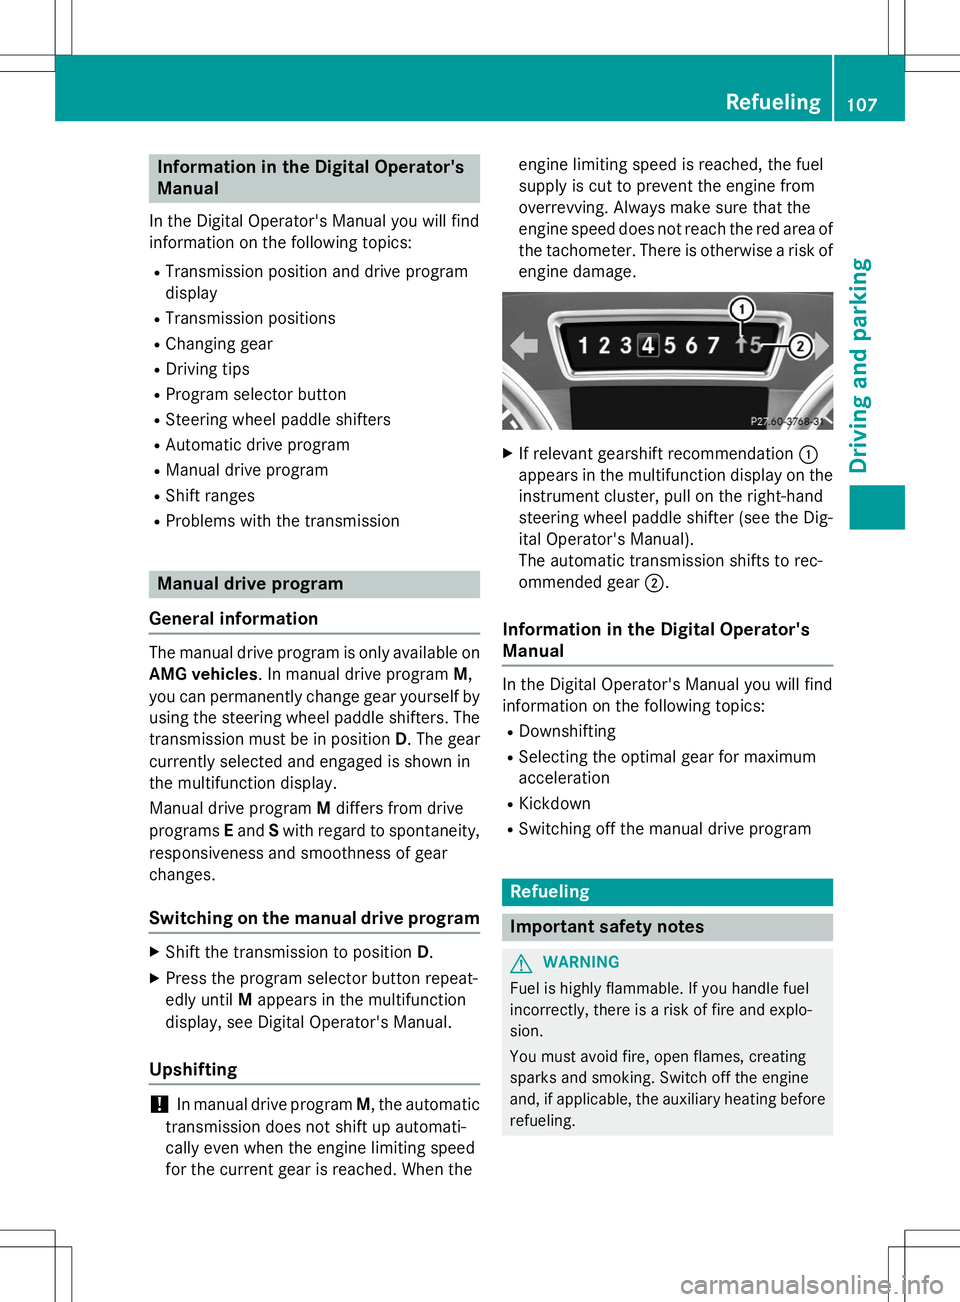
X If relevant gearshift recommendation :
appears in the multifunction display on the instrument cluster, pull on the right-hand
steering wheel paddle shifter (see the Dig-
ital Operator's Manual).
The automatic transmission shifts to rec-
ommended gear ;.
Information in the Digital Operator's
Manual
In the Digital Operator's Manual you will find
information on the following topics:
R Downshifting
R Selecting the optimal gear for maximum
acceleration
R Kickdown
R Switching off the manual drive program
Refueling
Important safety notes
GWARNING
Fuel is highly flammable. If you handle fuel
incorrectly, there is a risk of fire and explo-
sion.
You must avoid fire, open flames, creating
sparks and smoking. Switch off the engine
and, if applicable, the auxiliary heating before
refueling.
Refueling107
Driving and pa rking
Z
Page 134 of 274
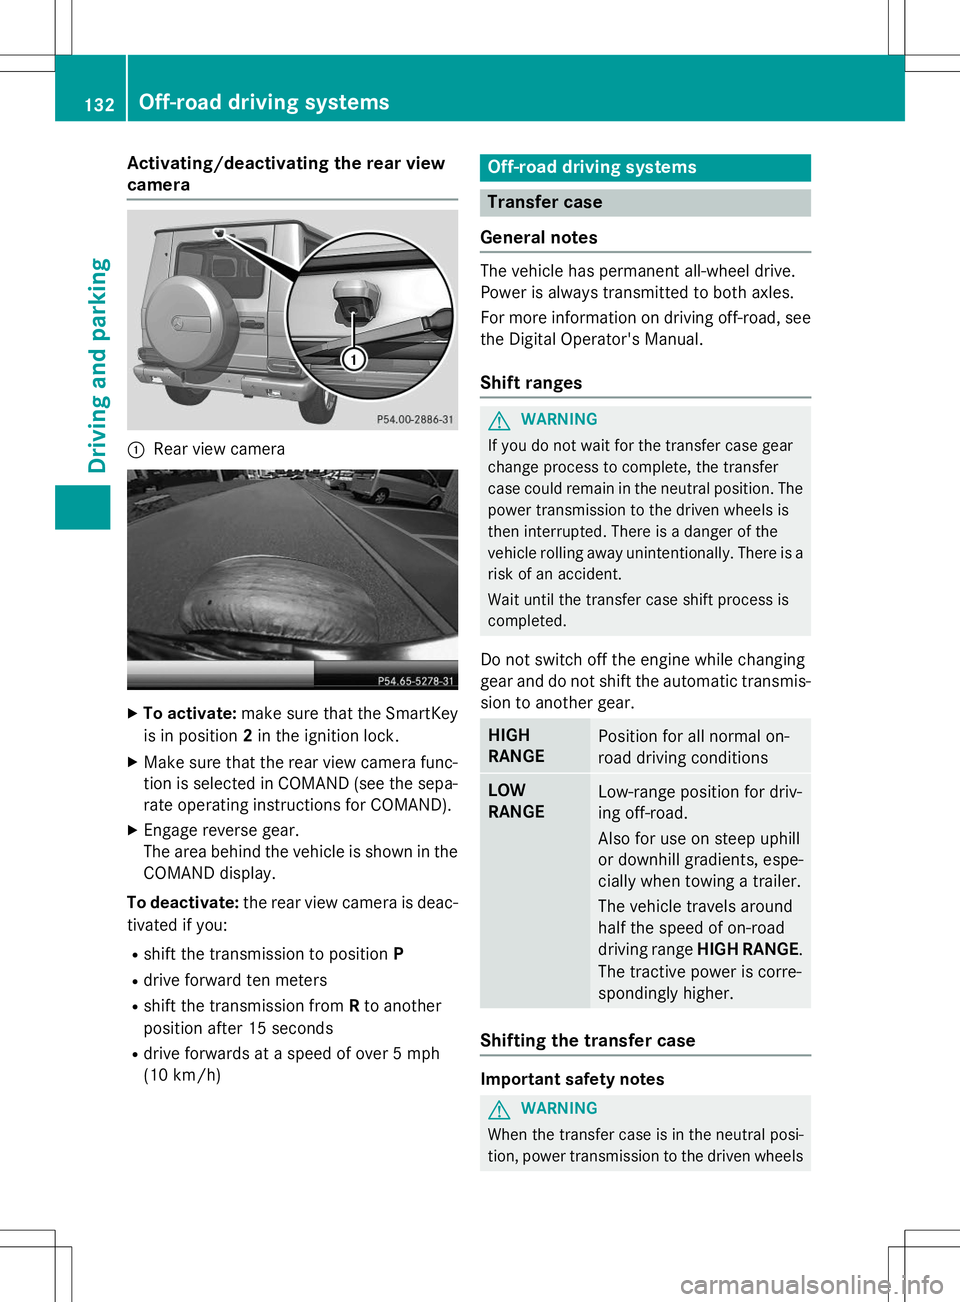
Activating/deactivating the rear view
camera
:Rear view camera
XTo activate: make sure that the SmartKey
is in position 2in the ignition lock.
X Make sure that the rear view camera func-
tion is selected in COMAND (see the sepa-
rate operating instructions for COMAND).
X Engage reverse gear.
The area behind the vehicle is shown in the
COMAND display.
To deactivate: the rear view camera is deac-
tivated if you:
R shift the transmission to position P
R drive forward ten meters
R shift the transmission from Rto another
position after 15 seconds
R drive forwards at a speed of over 5 mph
(10 km/h)
Off-road driving systems
Transfer case
General notes
The vehicle has permanent all-wheel drive.
Power is always transmitted to both axles.
For more information on driving off-road, see the Digital Operator's Manual.
Shift ranges
GWARNING
If you do not wait for the transfer case gear
change process to complete, the transfer
case could remain in the neutral position. The power transmission to the driven wheels is
then interrupted. There is a danger of the
vehicle rolling away unintentionally. There is a
risk of an accident.
Wait until the transfer case shift process is
completed.
Do not switch off the engine while changing
gear and do not shift the automatic transmis-
sion to another gear.
HIGH
RANGEPosition for all normal on-
road driving conditions
LOW
RANGELow-range position for driv-
ing off-road.
Also for use on steep uphill
or downhill gradients, espe-
cially when towing a trailer.
The vehicle travels around
half the speed of on-road
driving range HIGH RANGE .
The tractive power is corre-
spondingly higher.
Shifting the transfer case
Important safety notes
GWARNING
When the transfer case is in the neutral posi-
tion, power transmission to the driven wheels
132Off-road driving systems
Driving and pa rking
Page 135 of 274
is interrupted. As a result, the vehicle could
roll away. There is a risk of an accident.
Secure the vehicle with the parking brake, andon uphill or downhill gradients, also secure it
with a device such as a wheel chock.
Always wait for the gear change process from HIGH RANGE toLOW RANGE and from
LOW RANGE toHIGH RANGE to complete.
Do not switch off the engine while changing
gear and do not shift the automatic transmis-
sion to another gear.
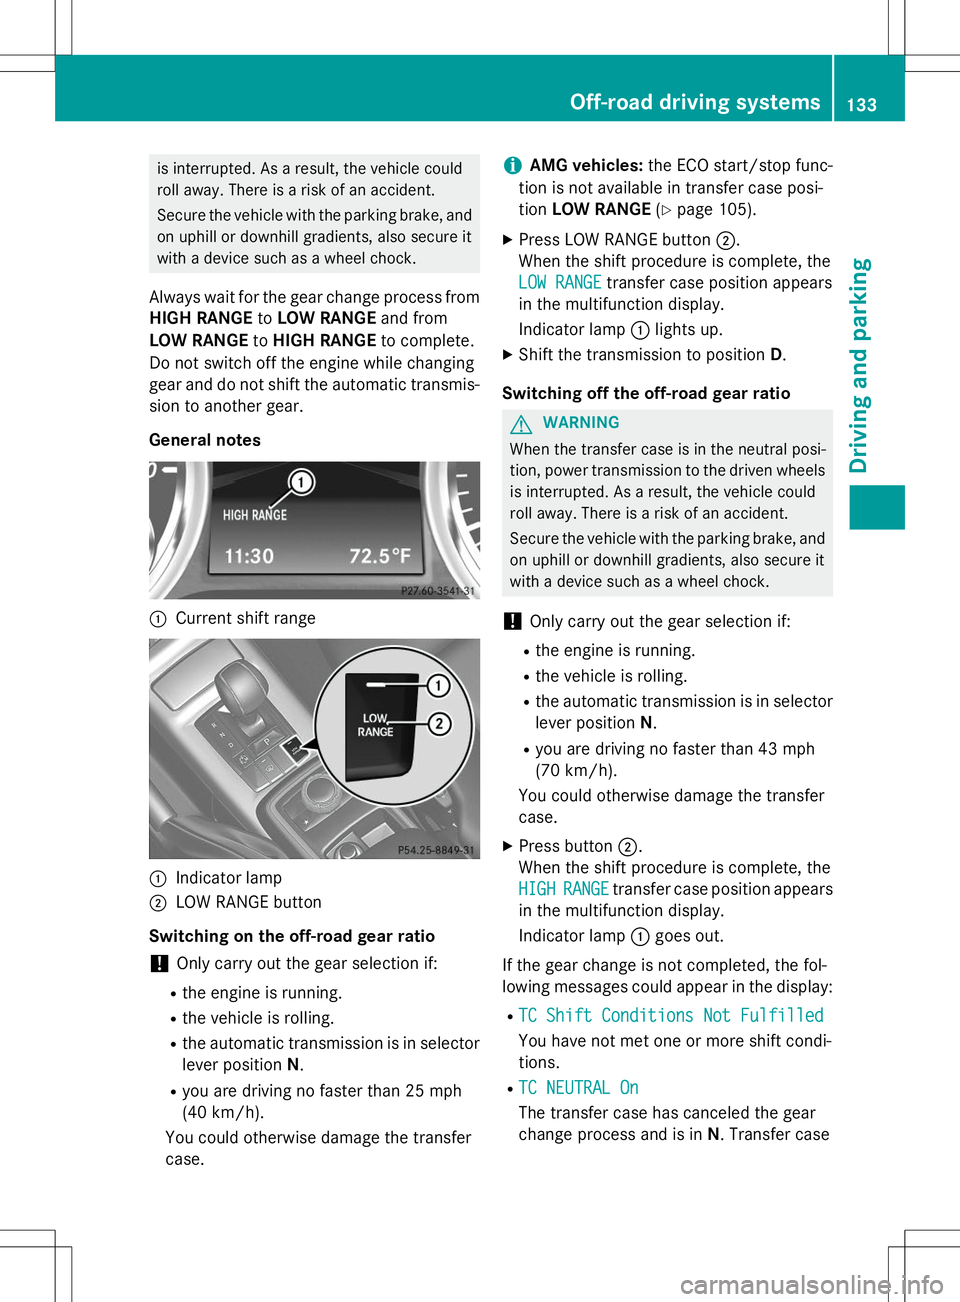
General notes
:Current shift range
:Indicator lamp
;LOW RANGE button
Switching on the off-road gear ratio
!Only carry out the gear selection if:
R the engine is running.
R the vehicle is rolling.
R the automatic transmission is in selector
lever position N.
R you are driving no faster than 25 mph
(40 km/h).
You could otherwise damage the transfercase.
iAMG vehicles: the ECO start/stop func-
tion is not available in transfer case posi- tion LOW RANGE (Y page 105).
X Press LOW RANGE button ;.
When the shift procedure is complete, the
LOW RANGEtransfer case position appears
in the multifunction display.
Indicator lamp :lights up.
X Shift the transmission to position D.
Switching off the off-road gear ratio
GWARNING
When the transfer case is in the neutral posi-
tion, power transmission to the driven wheels
is interrupted. As a result, the vehicle could
roll away. There is a risk of an accident.
Secure the vehicle with the parking brake, and on uphill or downhill gradients, also secure it
with a device such as a wheel chock.
!Only carry out the gear selection if:
R the engine is running.
R the vehicle is rolling.
R the automatic transmission is in selector
lever position N.
R you are driving no faster than 43 mph
(70 km/h).
You could otherwise damage the transfercase.
X Press button ;.
When the shift procedure is complete, the
HIGHRANGEtransfer case position appears
in the multifunction display.
Indicator lamp :goes out.
If the gear change is not completed, the fol-
lowing messages could appear in the display: R
TC Shift Conditions Not Fulfilled
You have not met one or more shift condi-
tions.
R
TC NEUTRAL On
The transfer case has canceled the gear
change process and is in N. Transfer case
Off-road driving systems133
Driving and parking
Z