2015 MERCEDES-BENZ E-CLASS SALOON boot
[x] Cancel search: bootPage 362 of 497

Position the load on the roof carrier in such
aw ay that the vehicle will not sustain dam-
age even when it is in motion.
Make sure that if the roof carrier is fitted:
R the sliding sunroof/panorama sliding
sunroof can be fully raised, depending on
the vehicle's equipment.
R the boot lid/ tailgate can be fully opened.
R the aerial on the roof does not touch the
roof carrier.
! To avoid damaging or scratching the cov-
ers, do not use metallic or hard object sto
open them.
You will find information on the maximum roof
load in the "Technical data" section
(Y page 481).
An incorrectly secured roof carrier or roof
load may become detached from the vehicle. You must therefore ensure that you observe
the roof carrier manufacturer's installation
instructions. Attaching the roof carrier (Saloon) Vehicles with
asteel roof or sliding sunroof (illus-
tration) Vehicles with
apanorama sliding sunroof
X Open covers :carefully in the direction of
the arrow.
X Fold covers :upwards.
X Only secure the roof carrier to the anchor-
age points under covers :.
X Observe the manufacturer's installation
instructions.
Attaching the roof carrier (Estate) X
Secure the roof carrier to the roof rails.
X Observe the manufacturer's installation
instructions. Stowage areas
359Stowing and features Z
Page 365 of 497
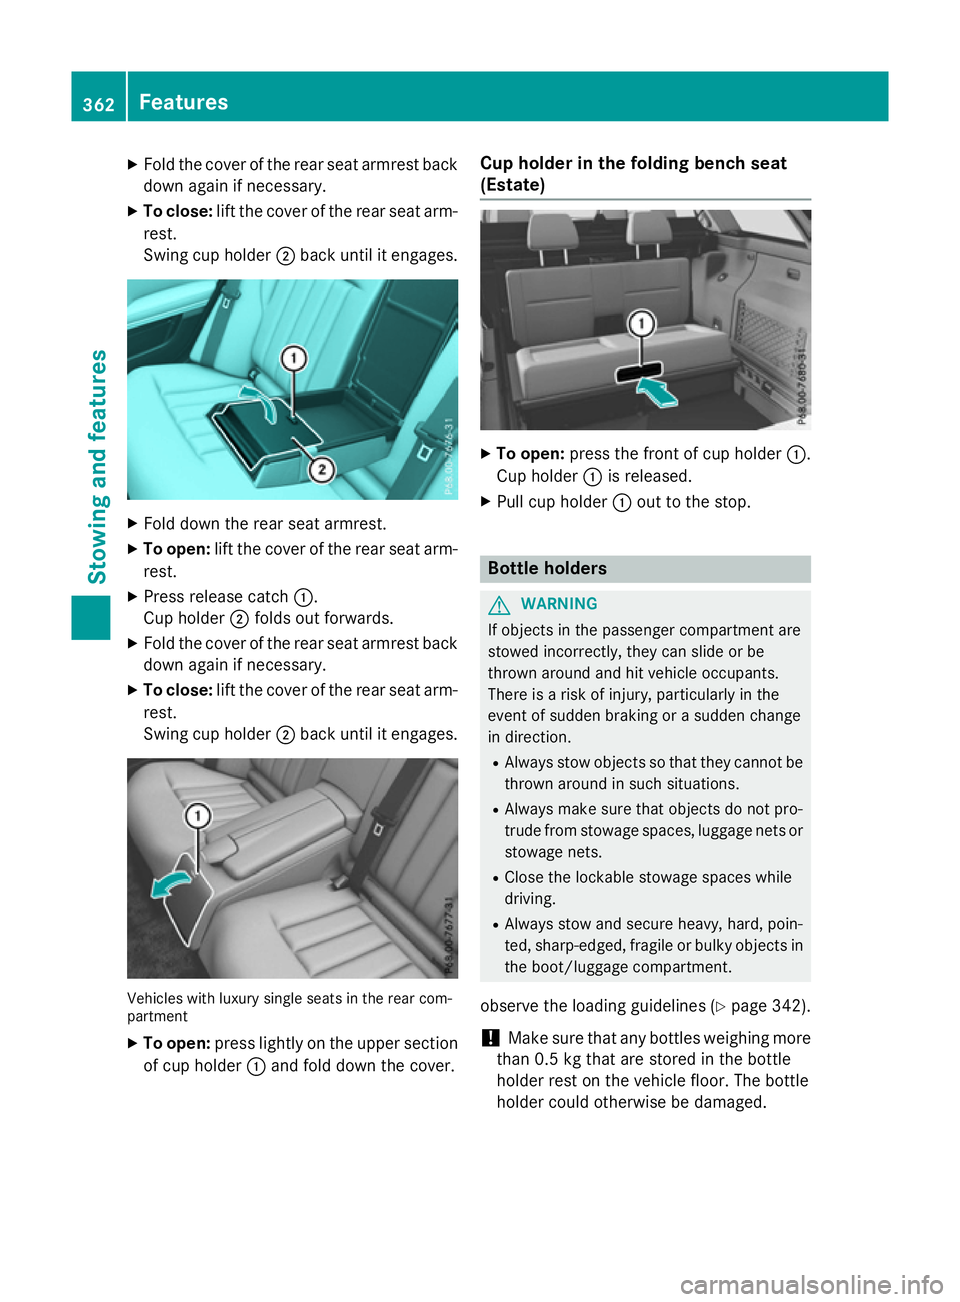
X
Fold the cover of the rea rsea tarmrest back
dow nagain if necessary.
X To close: lift the cover of the rea rsea ta rm-
rest.
Swing cup holder ;back unti litengages. X
Fold dow nthe rea rseata rmrest.
X To open: lift the cover of the rea rsea ta rm-
rest.
X Pres srelease catch :.
Cu ph older ;folds ou tforwards.
X Fold the cover of the rea rsea tarmrest back
dow nagain if necessary.
X To close: lift the cover of the rea rsea ta rm-
rest.
Swing cup holder ;back unti litengages. Vehicles with luxury single seats in the rea
rcom-
partment
X To open: press lightl yonthe upper section
of cup holder :and fol ddownthe cover. Cup holder in the folding benc
hseat
(Estate) X
To open: press the front of cup holder :.
Cu ph older :is released.
X Pull cup holder :outtot he stop. Bottle holders
G
WARNING
If objects in the passenger compartment are
stowed incorrectly ,they can slide or be
throw naround and hit vehicle occupants.
There is ariskofi njury, particularly in the
event of sudden braking or asudden change
in direction.
R Alway sstow objects so that they cannot be
throw naround in such situations.
R Alway smake sur ethat objects do not pro-
trud efrom stowag espaces, luggage nets or
stowag enets.
R Close the lockabl estowag espaces while
driving.
R Alway sstow and secure heavy, hard, poin-
ted, sharp-edged ,fragil eorb ulky objects in
the boot/luggage compartment.
observe the loading guidelines (Y page 342).
! Make sure that any bottles weighing more
than 0.5 kg that are store dinthe bottle
holder rest on the vehicle floor. The bottle
holder could otherwise be damaged. 362
FeaturesStowinga
nd features
Page 389 of 497
!
Do not park up the vehicle for an extended
period straight after cleaning it, particularly after having cleaned the wheels with wheel cleaner. Wheel cleaners could cause
increased corrosion of the brake discs and
brake pads/linings. For this reason, you
should drive for afew minutes after clean-
ing. Braking heats the brake discs and the
brake pads/linings, thus drying them. The
vehicle can then be parked up.
Regular care of your vehicle is acondition for
retaining the quality in the long term.
Use care products and cleaning agents rec-
ommended and approved by Mercedes-Benz. Washing the vehiclea
nd cleaning the
paintwork
Automatic car wash G
WARNING
Braking efficiency is reduced after the vehicle has been washed.T here isarisk of an acci-
dent.
After washing the vehicle, brake carefully
while paying attention to the traffic conditions in order to restore full braking efficiency.
! When DISTRONIC PLUS or the HOLD
function is activated, the vehicle brakes
automaticallyinc ertain situations.
To avoid damage to the vehicle, deactivate DISTRONIC PLUS and the HOLD function in
the following or similars ituations:
R when towing away
R in ac ar wash
! Make sure that:
R the side windows and sliding sunroof are
closed completely.
R the blowerf or the ventilation/heating is
switched off (OFF button is depressed).
R the windscreen wiper switch is at posi-
tion 0.
The vehicle could otherwise be damaged. !
In car washes with
atowing mechanism,
make sure that the automatic transmission
is in transmission position N;otherwise,
the vehicle could be damaged.
R Vehicles with DIRECT SELECT lever and
key:
do not remove the key from the ignition
lock. Do not open the driver's door or
front-passenger door when the engine is
switched off. Otherwise, the automatic
transmission selects park position P
automaticallya nd locks the wheels. You
can prevent this by shifting the auto-
matic transmission to Nbeforehand.
R Vehicles with DIRECT SELECT lever and
KEYLESS-GO:
do not open the driver's door or front-
passenger door when the engine is
switched off. Otherwise, the automatic
transmission selects park position P
automaticallya nd locks the wheels.
! If the key is within the rear detection
range of KEYLESS-GO, situations such as
the following could lead to the uninten-
tional opening of the boot lid/tailgate:
R using acar wash
R using ahigh-pressure cleaner
Make sure that the key is at least 3maway
fro mt hevehicle.
Observe th efollowing to mak esure that the
automatic transmission on vehicles with
DIRECT SELECT stays in position N:
X Make sure th evehicle is stationar yand the
ignitio nisswitche doff.
X Turn th ekey to position 2(Y page 179) in
th ei gnitio nlock.
Use th ekey instead of th eStart/Sto pbut-
to nonv ehicles with KEYLESS-GO.
X Depress th ebrak epedal and kee pit
depressed.
X Shift th eautomatic transmission to posi-
tion N.
X Release th ebrak epedal. 386
CareMaintenance and care
Page 397 of 497
Useful information
i This Owner's Manual describes all mod-
els, series and optional equipment for your
vehicle that were available at the time of
going to press. National variation sare pos-
sible. Not ethat your vehicle may not be
equipped with all of the function sdescri-
bed. This is also the case for system sand
function srelevan ttosafety.
i Read the information on qualified special-
ist workshops: (Y page 27). Wher
ewillIfind...? Warning triangle
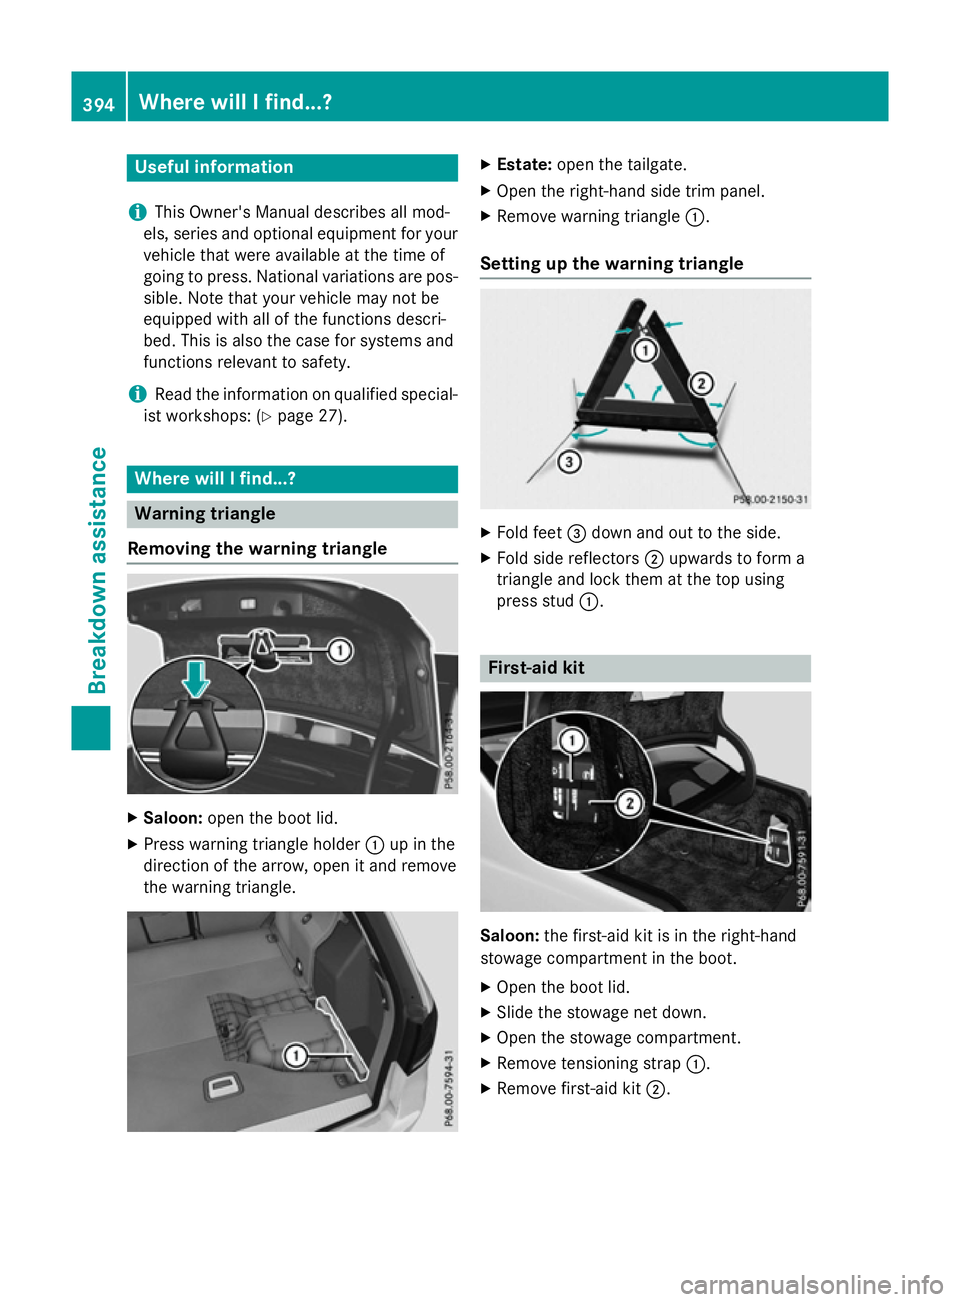
Removing the warning triangle X
Saloon: open the boot lid.
X Press warnin gtriangle holder :up in the
direction of the arrow, open it and remove
the warnin gtriangle. X
Estate: open the tailgate.
X Open the right-han dside trim panel.
X Remove warnin gtriangle :.
Setting up the warning triangle X
Fold feet =down and out to the side.
X Fold side reflectors ;upwards to form a
triangle and lock them at the top using
press stud :. First-aid kit
Saloon:
the first-aid kit is in the right-hand
stowage compartment in the boot.
X Open the boot lid.
X Slide the stowage net down.
X Open the stowage compartment.
X Remove tensionin gstrap :.
X Remove first-aid kit ;.394
Wher
ewillIfind...?Breakdown assistance
Page 399 of 497
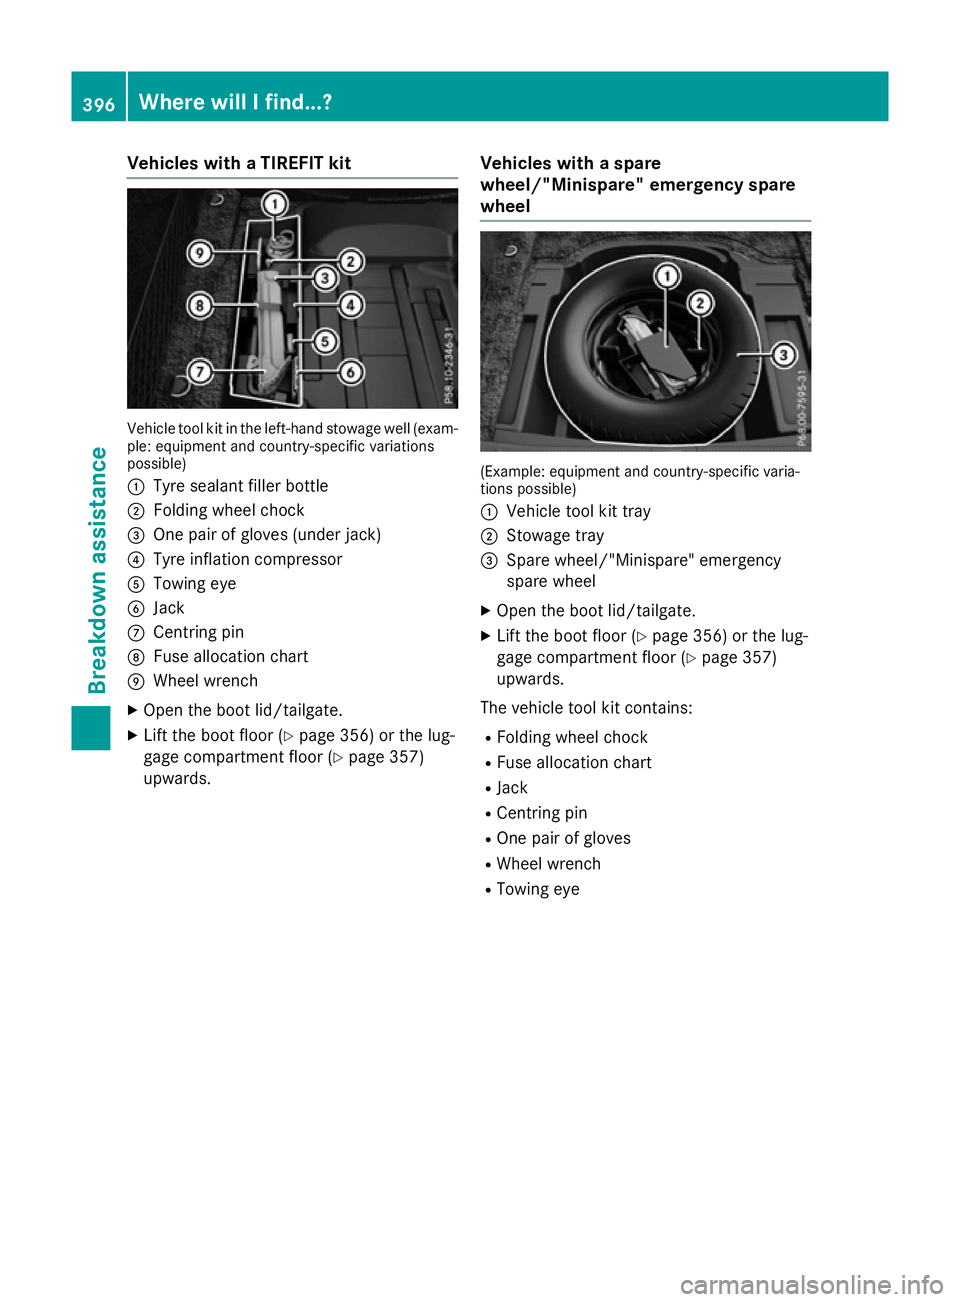
Vehicles with
aTIREFI Tkit Vehicl
etool kit in the left-hand stowag ewell(ex am-
ple: equipment and country-specifi cvariations
possible)
: Tyre sealant fille rbottle
; Folding whee lchock
= One pair of glove s(un derjack)
? Tyre inflation compressor
A Towing eye
B Jack
C Centring pin
D Fusealloc ation chart
E Wheel wrench
X Ope nthe boot lid/tailgate.
X Lif tthe boot floor (Y page 356) or the lug-
gage compartment floor (Y page 357)
upwards. Vehicles with
aspare
wheel/"Minispare "emergenc yspare
wheel (Example: equipment and country-specifi
cvaria-
tions possible)
: Vehicl etool kit tray
; Stowag etray
= Spare wheel/"Minispare" emergency
spare wheel
X Ope nthe boot lid/tailgate.
X Lif tthe boot floor (Y page 356) or the lug-
gage compartment floor (Y page 357)
upwards.
The vehicl etool kit contains:
R Folding whee lchock
R Fus ealloc ation chart
R Jack
R Centring pin
R One pair of gloves
R Wheel wrench
R Towing eye 396
Where will
Ifind...?Breakdo wn assis tance
Page 400 of 497
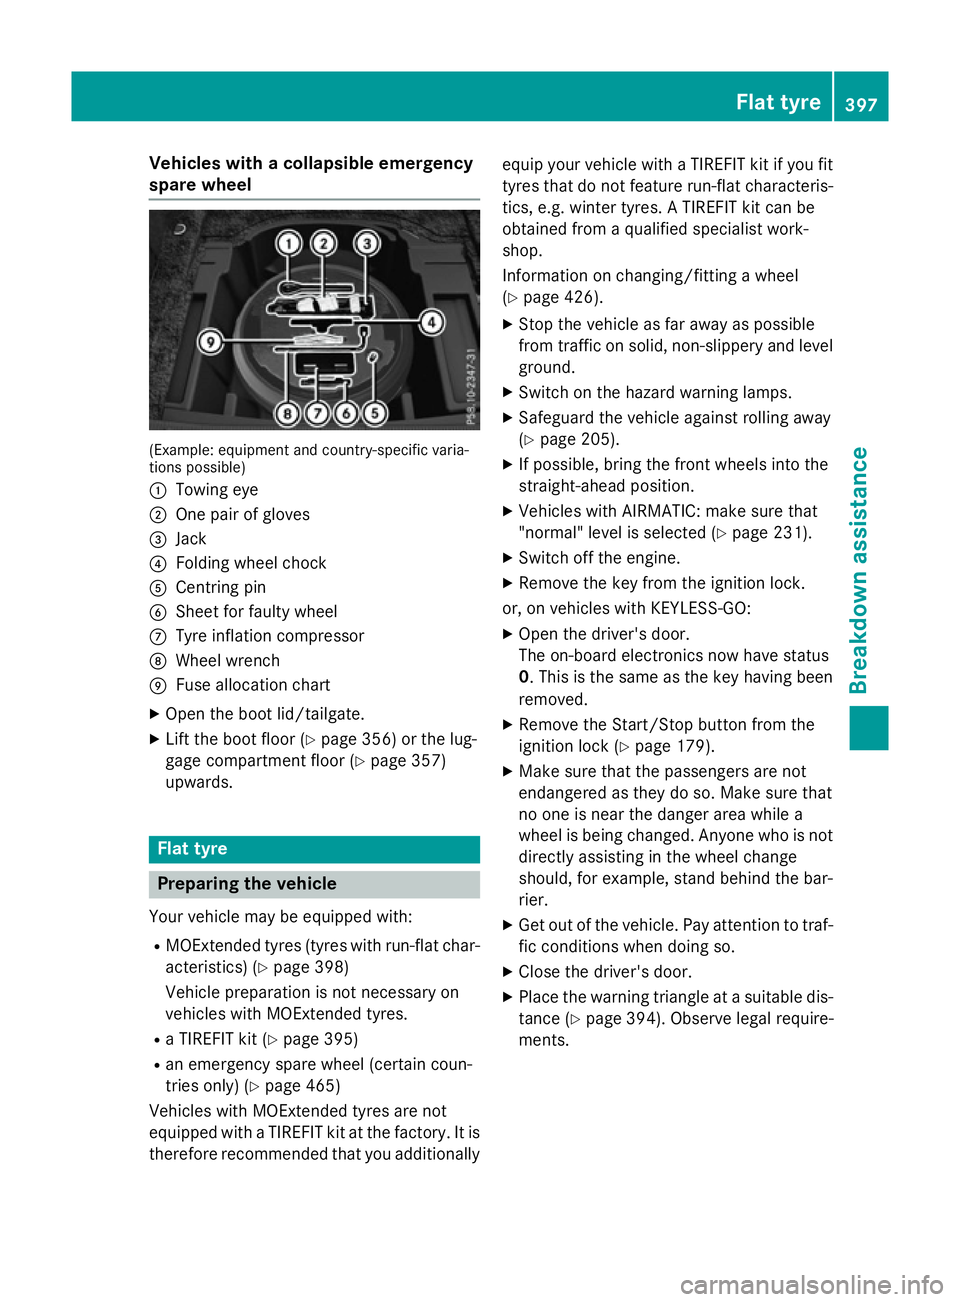
Vehicles with
acolla psibl eemergency
spare wheel (Example: equipment and country-specifi
cvaria-
tions possible)
: Towing eye
; One pair of gloves
= Jack
? Folding whee lchock
A Centring pin
B Shee tfor faulty wheel
C Tyre inflation compressor
D Wheel wrench
E Fusealloc ation chart
X Ope nthe boot lid/tailgate.
X Lif tthe boot floor (Y page 356)orthe lug-
gage compartment floor (Y page 357)
upwards. Flat tyre
Preparin
gthe vehicle
Your vehicl emaybe equipped with:
R MOExtende dtyres (tyres with run-fla tchar-
acteristics )(Ypage 398)
Vehicl epreparatio nisn ot necessary on
vehicles with MOExtende dtyres.
R aT IREFIT kit (Y page 395)
R an emergency spare whee l(certai ncoun-
trie sonly) (Y page 465)
Vehicles with MOExtende dtyres ar enot
equipped with aTIREFIT kit at the factory .Itis
therefore recommende dthatyou additionally equi
pyourvehicl ewithaT IREFIT kit if yo ufit
tyres tha tdon ot feature run-fla tcharacteris-
tics ,e.g.w inter tyres. ATIREFIT kit can be
obtained from aquali fied specialist work-
shop.
Informatio nonchanging/fitting awheel
( Y page 426).
X Stop the vehicl easfar away as possible
from traffic on solid ,non-slippery and level
ground.
X Switch on the hazard warning lamps.
X Safeguar dthe vehicl eagain st rolling away
(Y page 205).
X If possible, bring the front wheels into the
straight-ahea dposition.
X Vehicles with AIRMATIC: make sure that
"normal" level is selecte d(Ypage 231).
X Switch off the engine.
X Remove the key from the ignition lock.
or, on vehicles with KEYLESS‑ GO:
X Ope nthe driver' sdoor.
The on-boar delectronics now have status
0.T hisist he same as the key having been
removed.
X Remove the Start/Sto pbutton from the
ignition lock (Y page 179).
X Make sure tha tthe passenger sarenot
endangere dasthey do so. Make sure that
no one is nea rthe danger area whil ea
whee lisbeing changed .Anyone wh oisnot
directl yassis ting in the whee lchange
should, for example, stand behind the bar-
rier.
X Ge toutof the vehicle. Pa yattentio ntotraf-
fic conditions when doing so.
X Close the driver' sdoor.
X Place the warning triangl eatasuitabl edis-
tance (Y page 394). Observe lega lrequire-
ments. Flat tyre
397Breakdown assis tance
Page 402 of 497
TIREFI
Tkit
Important safety notes TIREFIT is
atyres ealan t.
Yo uc an us eTIREFIT to seal punctures of up to
4m m, particularly thos einthe tyr etread. You
can us eTIREFIT at outside temperatures
down to Ò20 †. G
WARNING
In the following situations, the tyr esealant is
unabl etop rovidesufficient breakdow nassis-
tance ,asitisu nabletos ealthe tyr eproperly:
R there ar ecuts or punctures in the tyre
large rtha nt hos em entione dabove.
R the whee lrim is damaged.
R youh aved riven at ver ylow tyrep ressures
or on aflatt yre.
There is ariskofana ccident.
Do not drive any further. Contact aquali fied
specialis tworkshop. G
WARNING
The tyr esealant is harmfu land causes irrita-
tion. It must not come into contact with your
skin, eyes or clothing or be swallowed. Do not inhal eTIREFIT fumes .Keept yres ealant away
fro mc hildren. There is ariskofi njury.
If yo ucome into contact with the tyr esealant,
observe the following:
R Rinse off the tyr esealant fro myours kin
immediatel ywithw ater.
R If the tyr esealant come sinto contact with
your eyes, immediatel yrinse the mthor-
oughl ywithc lean water.
R If tyr esealant is swallowed, immediately
rinse your mouth ou tthoroughl yand drink
plenty of water. Do not induce vomiting,
and see kmedica lattentio nimmediately.
R Immediately change ou tofclothing which
ha sc ome into contact with tyr esealant.
R If an allergi creactio noccurs, see kmedical
attentio nimmediately. !
Do not operate the tyr
einflation com-
presso rfor longe rtha ne ight minute sata
time withou tabreak. It ma yotherwise
overheat.
The tyr einflation compressor can be oper-
ate dagain once it ha scoole ddown.
Compl ywitht he manufacturer's safety
instructions on the sticker on the tyr einfla-
tio nc ompressor.
Usin gthe TIREFI Tkit X
Do not remove any foreign objects which
have penetrated the tyre, e.g .screws or
nails.
X Remov ethe tyr esealan tbottle ,the accom-
panying TIREFIT sticker and the tyr einfla-
tio nc ompressor fro mthe stowag espace
under the boot floor/luggage compart-
ment floor (Y page 395).
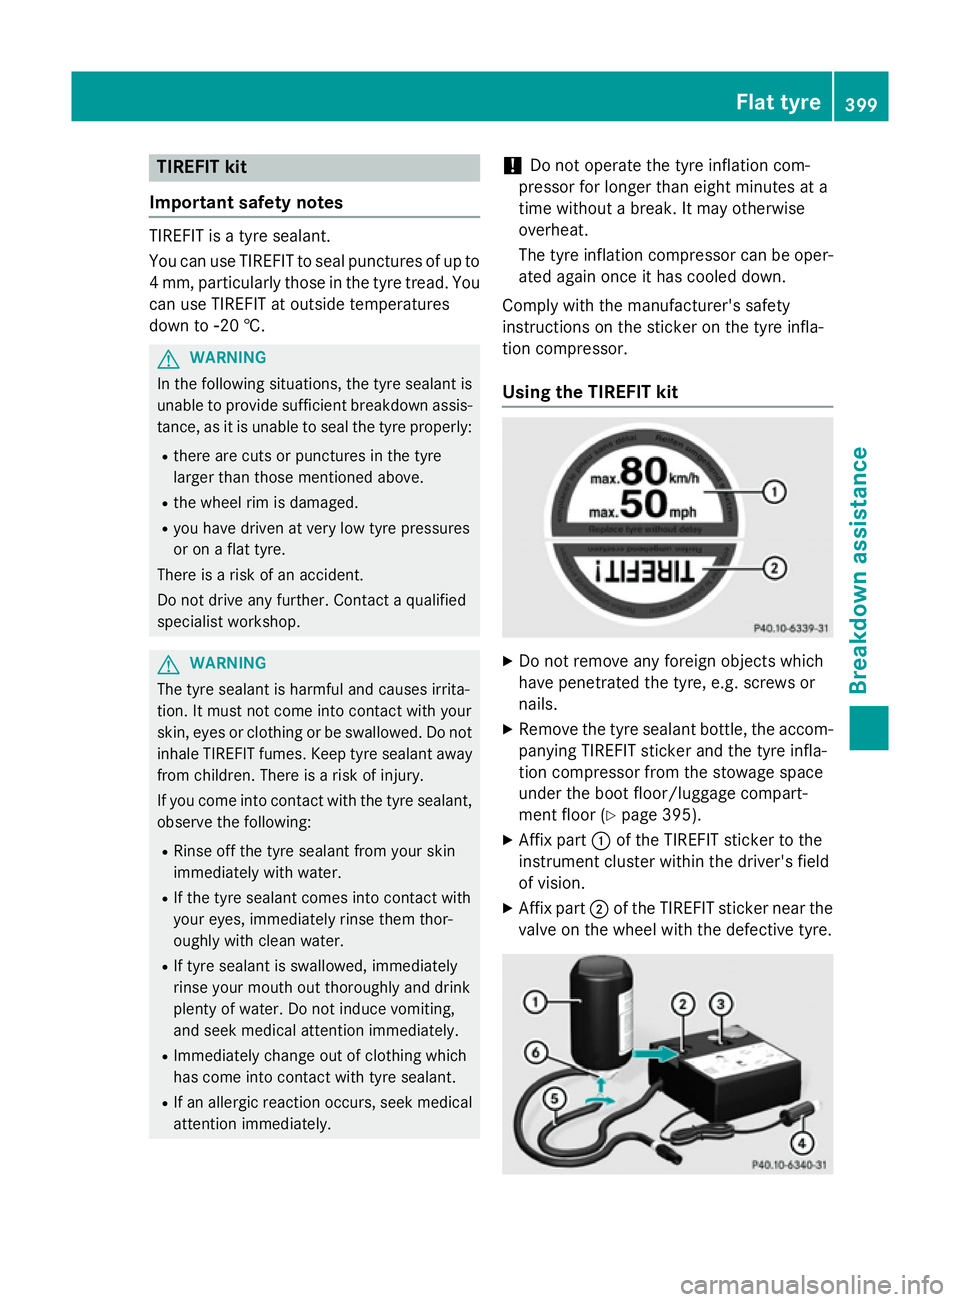
X Affi xpart :of the TIREFIT sticker to the
instrument cluster withi nthe driver's field
of vision.
X Affi xpart ;of the TIREFIT sticker nea rthe
valve on the whee lwitht he defective tyre. Flat tyre
399Breakdow nassistance Z
Page 415 of 497
X
Safeguard the vehicl eagains trolling away
(Y page 205).
X Switch off the engine.
X Switch off al lelectrical consumers.
X Remove the key from the ignition lock.
or, on vehicles with KEYLESS‑GO,
X Ope nthe driver' sdoor.
The on-board electronics now have status
0.T hisist he same as the key having been
removed.
The driver' sdoorc an be closed again.
All indicator lamps in the instrument cluster
mus tbeo ff.
The fuses are locate dinvarious fus eboxes:
R fus ebox in the engine compartment on the
left-hand sid eofthe vehicle, when viewed
in the direction of travel
R fus ebox in the boot/luggage compartment
on the right-hand sid eofthe vehicle, when
viewe dinthe direction of travel
The fus ealloc ation chart is locate dinthe
vehicl etool kit in the stowag ecompartment
under the boot/luggage compartment floor
(Y page 395). Fus
eboxin the engine compartment
Pa ya ttention to the important safety notes
(Y page 411). G
WARNING
Whe nthe bonne tiso pen, and the windscreen
wipers are set in motion, yo ucan be injured by
the wipe rlinkage. There is ariskofi njury.
Alway sswitch off the windscreen wipers and
the ignition before opening the bonnet.
! Make sure tha
tnomoisture can enter the
fus eb ox when the cove risopen.
! Whe
nclosing the cover, make sure tha tit
is lying correctly on the fus ebox. Moisture
seeping in or dirt could otherwise impair
the operation of the fuses. X
Make sure tha tthe windscreen wipers are
switche doff.
X Ope nthe bonnet.
X Remove any existing moisture from the
fus eb ox using adry cloth.
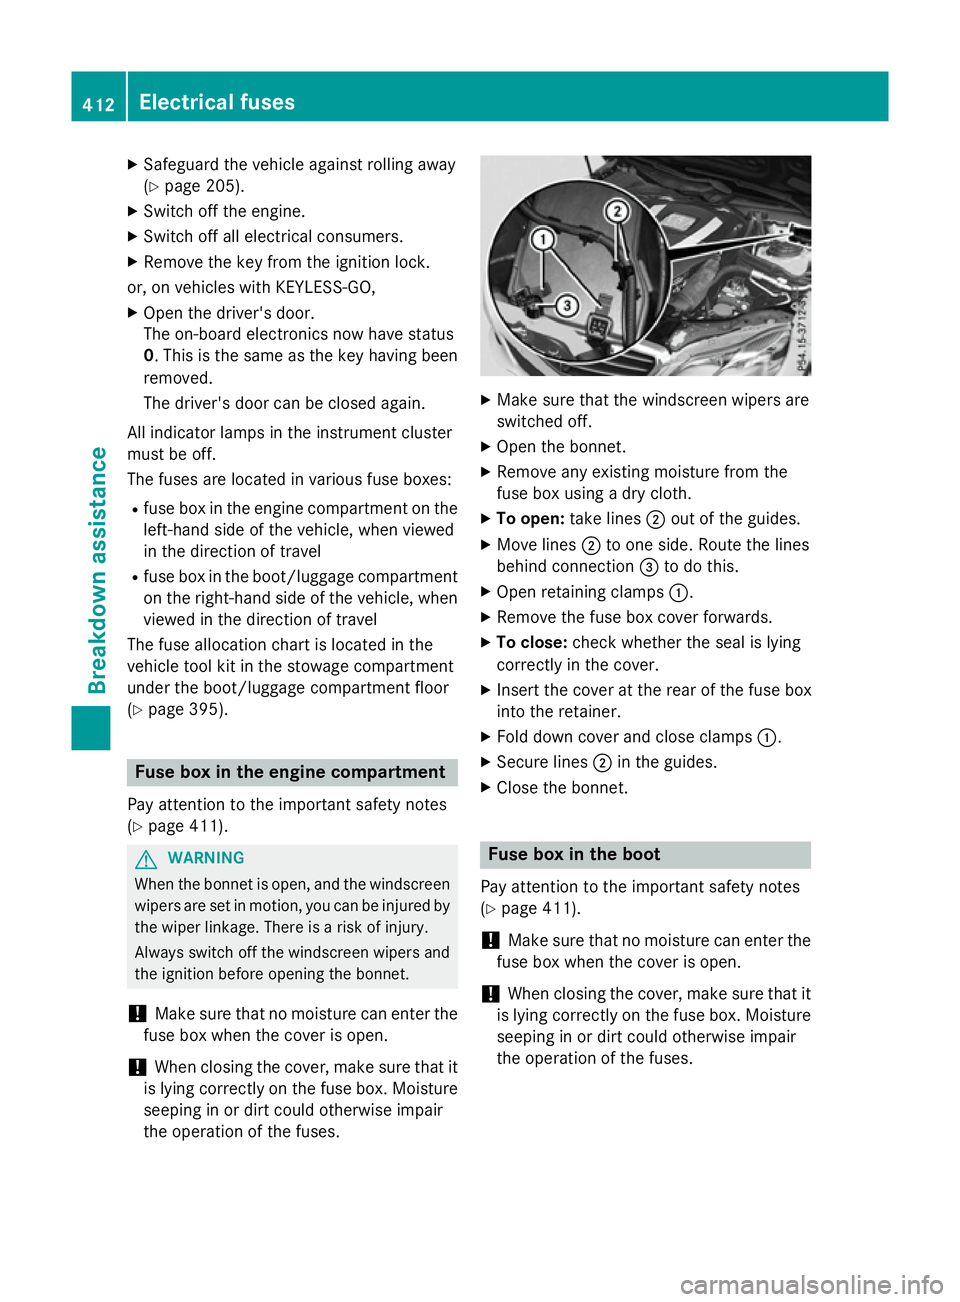
X To open: take lines ;outoft he guides.
X Mov elines ; to one side. Route the lines
behind connection =to do this.
X Ope nretaining clamps :.
X Remove the fus ebox cove rforwards.
X To close: check whethe rthe sea lislying
correctly in the cover.
X Insert the cove ratthe rea rofthe fus ebox
into the retainer.
X Fol dd ownc ove rand close clamps :.
X Secure lines ;in the guides.
X Close the bonnet. Fus
eboxin the boot
Pa ya ttention to the important safety notes
(Y page 411).
! Make sure tha
tnomoisture can enter the
fus eb ox when the cove risopen.
! Whe
nclosing the cover, make sure tha tit
is lying correctly on the fus ebox. Moisture
seeping in or dirt could otherwise impair
the operation of the fuses. 412
Electrical fusesBreakdown assistance