2015 MERCEDES-BENZ E-CLASS SALOON boot
[x] Cancel search: bootPage 110 of 497

Example: Saloon
R Alway sensure tha tyou onl ym akeak icking
movement withi nthe detection range of
sensors :.
R Stand at leas t30cmawayfrom the rear
area whil edoing so.
R Do not come into contact with the bumper
whil emaking the kicking movement. Oth-
erwise, the sensors ma ynot functio ncor-
rectly.
R HANDS-FREE ACCESS does not function
when the engine is started.
R IfaK EYLESS-GO key is withi nthe rear
detection range of KEYLESS-GO ,HANDS-
FREE ACCESS could be triggered .The boot
lid/tailgate could therefore open or close
unintentionally, e.g .ifyou:
- sitd ow nont he edge of the boot/edg eof
the luggage compartment
- set down or lift up an object behind the
vehicle
- polish the rea rofthe vehicle
Do not carry the KEYLESS-GO key about
your perso ninsuchs ituations. Yo ucan
thu savoid unintentionall yopening or clos-
ing the boot lid/tailgate.
R Dirt caused by roa dsalta round sensors :
ma yrestrict functionality.
R Using HANDS-FREE ACCESS with apros-
theti cleg ma yrestrict functionality. Operation
Example: Saloon
X To open/close: kick into sensor detection
range :under the bumpe rwithy ourfoot.
Saloon: youw illh earaw arning tone while
the boot li disclosing.
Estate: youw illh earaw arning tone while
the tailgate is opening or closing.
X If the boot lid/tailgate doe snotopen
afte rsever al attempts: wait at leastten
second sthen kick under the bumpe ronce
again.
i If yo
uholdy ourfoo tunder the bumpe rfor
too long, the boot lid/tailgate does not
open or close. Repeat the kicking move-
ment more quickl yifthiso ccurs.
Saloon: to cance lthe closing procedure:
R kick with your foo tinsensor detection
range :under the bumper
R pull the handl eonthe outside of the boot lid
R press the closing button in the boot lid, or
R press the Fbutton on the key
If the closing procedur eofthe boot li dis
cancelled ,the boot li dopens agai nauto-
matically.
Estate: to stop the opening or closing proce-
dure:
R kick with your foo tinsensor detection
range :under the bumper
R pull the handl eonthe outside of the tailgate Boot/luggage compartment
107Opening and closing Z
Page 111 of 497
R
press the closin gorlocking button on the
tailgate or
R press the Fbutton on the key
If the tailgate closin gprocedure has been
stopped:
R move your foot under the bumper again and
the tailgate will open
If the tailgate openin gprocedure has been
stopped:
R move your foot under the bumper again and
the tailgate will close Opening/closing automatically from
the inside
Importan tsafet ynotes G
WARNING
Parts of the body could become trapped dur-
ing automatic closin gofthe boot lid or tail-
gate. Moreover, people, e.g. children ,may be
standing in the closin garea or may enter the
closin garea during the closin gprocess. There
is ar isk of injury.
Make sure that nobody is in the vicinity of the closin garea during the closin gprocess.
Use one of the following option stostop the
closin gprocess:
R press the Fbutton on the key
R pull or press the remot eoperatin gswitch
on the driver' sdoor
R press the closin gorlocking button on the
boot lid/tailgate
R pull the handle on the boot lid/tailgate
! The boot lid/tailgate swings upwards and
to the rear when opened. Therefore, make
sure that ther eissufficient clearance
above and behind the boot lid/tailgate.
i Boot lid/tailgate openin
gdimensions
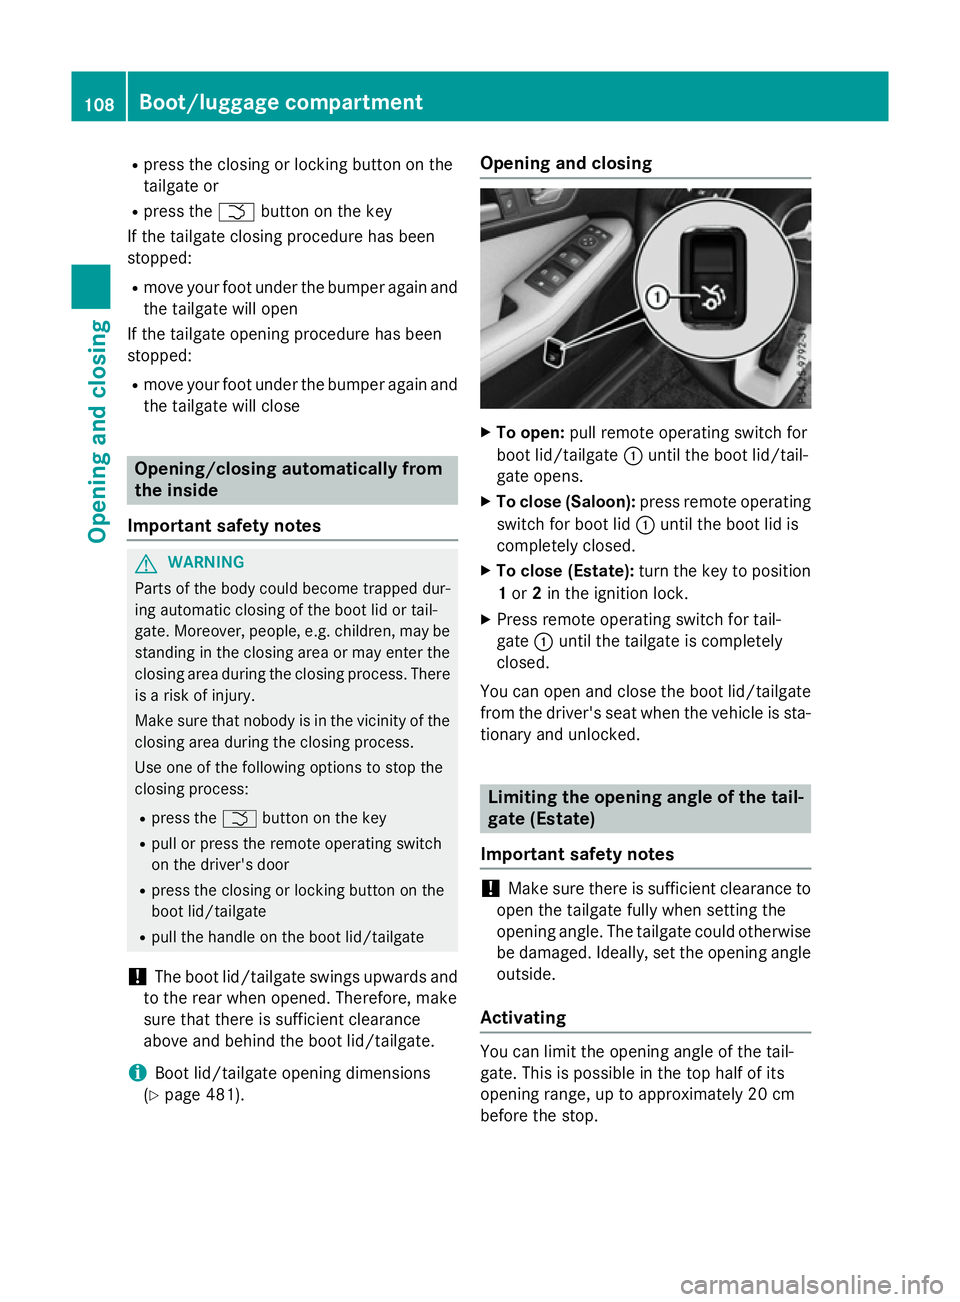
(Y page 481). Opening and closing
X
To open: pull remot eoperatin gswitc hfor
boot lid/tailgate :until the boot lid/tail-
gate opens.
X To close (Saloon): press remoteoperating
switc hfor boot lid :until the boot lid is
completely closed.
X To close (Estate): turn the key to position
1 or 2in the ignition lock.
X Press remot eoperatin gswitc hfor tail-
gate :until the tailgate is completely
closed.
You can open and close the boot lid/tailgate from the driver' sseat when the vehicle is sta-
tionary and unlocked. Limiting the opening angle of the tail-
gate (Estate)
Importan tsafet ynotes !
Make sure ther
eissufficient clearanc eto
open the tailgate fully when setting the
openin gangle. The tailgate could otherwise
be damaged. Ideally, set the openin gangle
outside.
Activating You can limit the openin
gangle of the tail-
gate. This is possible in the top half of its
openin grange, up to approximately 20 cm
before the stop. 108
Boot/luggage compartmentOpening and closing
Page 112 of 497
X
To ope nthe tailgate: pull the handl eon
the tailgate.
X To sto pthe opening procedure at the
desire dposition: press the closing button
(Y page 105 )inthe tailgate or pull the han-
dl eont he outside of the tailgate again.
X To store the position: press and holdthe
closing button in the tailgate unti lyou hear
as hort tone.
The opening angle limite risactivated .The
tailgate then stop sinthe stored position
when opened.
Deactivating X
Press and hol dthe closing button
(Y page 105 )inthe tailgate unti lyou hear
two short tones. Opening the tailgate from inside the
vehicle (Estate with afolding bench
seat)
General notes !
The tailgate swing
supwar ds and to the
rea rwheno pened. Therefore ,makes ure
tha tther eiss ufficient clearance above and
behind the tailgate.
i Opening dimensions of the tailgate
(Y page 481)
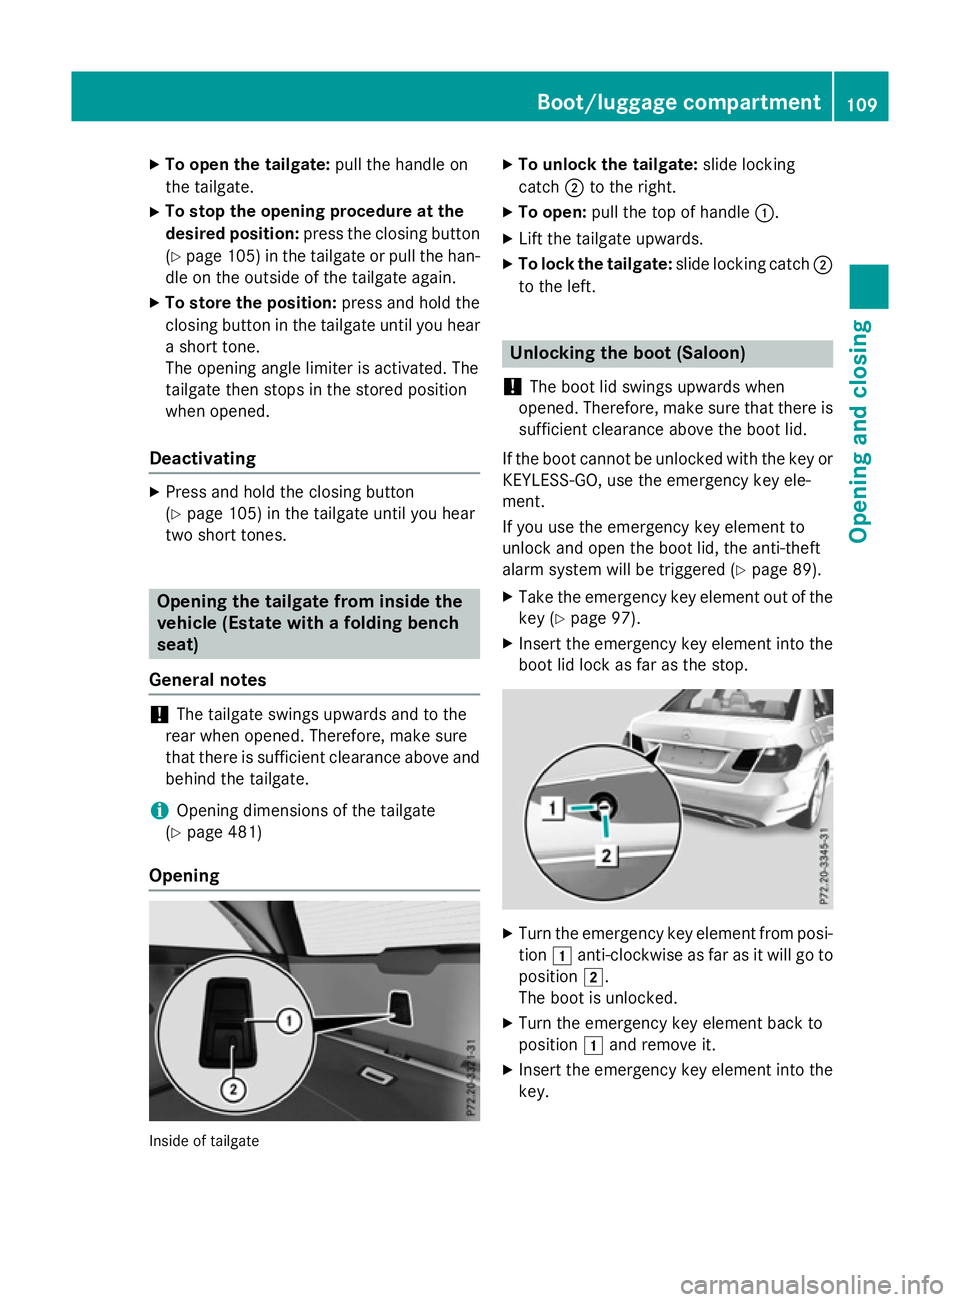
Opening Inside of tailgate X
To unloc kthe tailgate: slideloc king
catch ;to the right.
X To open: pull the top of handle :.
X Lif tthe tailgate upwards.
X To lock the tailgate: slideloc king catch ;
to the left. Unlockin
gthe boot (Saloon)
! The boot li
dswing su pwar ds when
opened. Therefore ,makes uret hatther eis
sufficient clearance above the boot lid.
If the boot canno tbeu nlocke dwitht he key or
KEYLESS-GO ,use the emergency key ele-
ment.
If yo uusethe emergency key element to
unlock and open the boot lid, the anti-theft
alar msystem will be triggered (Y page 89).
X Take the emergency key element ou tofthe
key (Y page 97).
X Insert the emergency key element into the
boot li dlocka sfar as the stop. X
Turn the emergency key element from posi-
tion 1anti-clockwise as fa rasitwillgoto
position 2.
The boot is unlocked.
X Turn the emergency key element back to
position 1and remove it.
X Insert the emergency key element into the
key. Boot/luggage compartment
109Opening and closing Z
Page 205 of 497
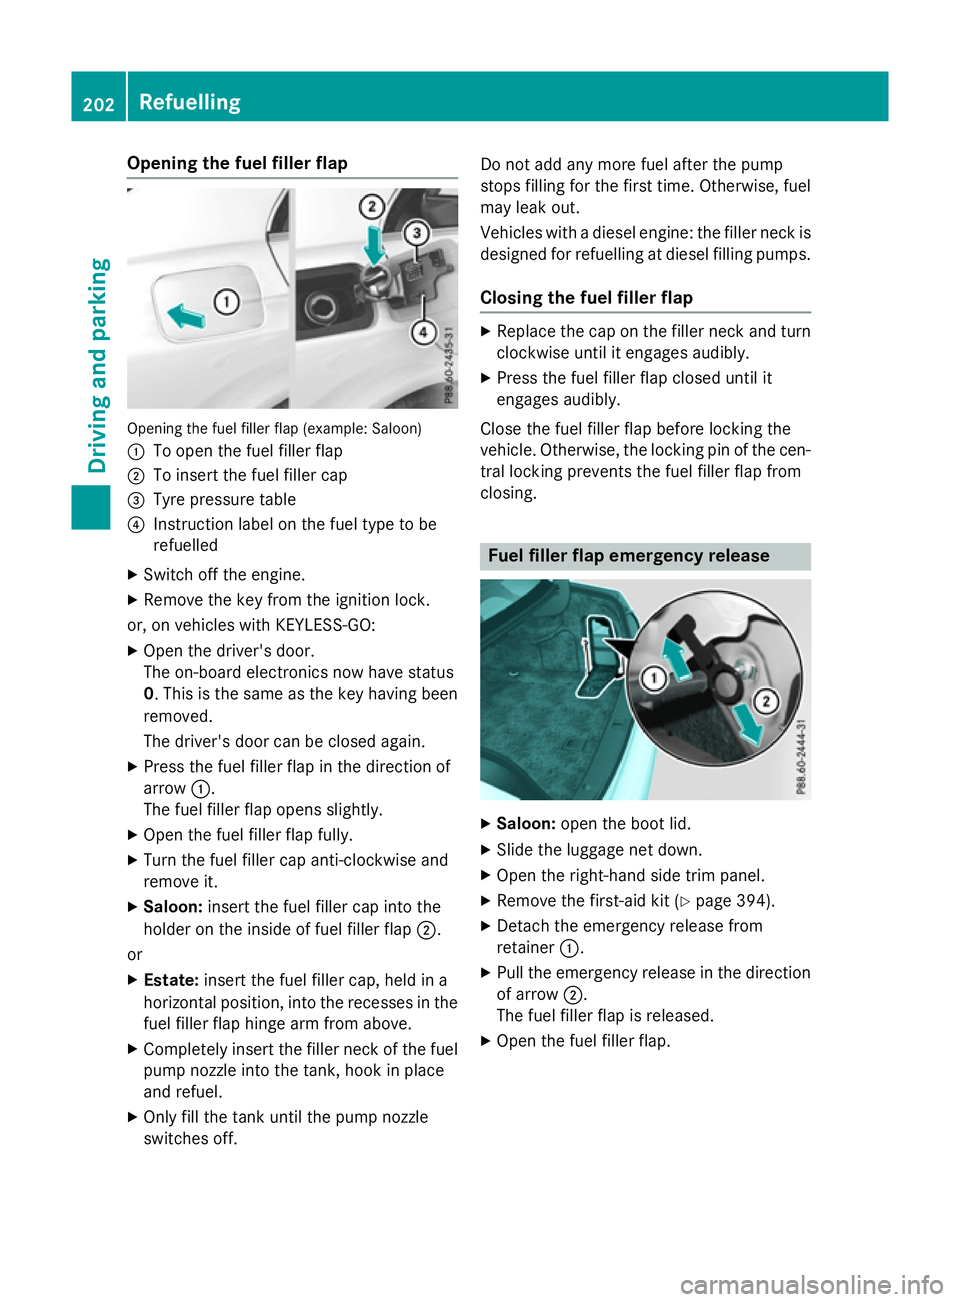
Opening the fuel filler flap
Openin
gthe fuel filler flap (example: Saloon)
: To open the fuel filler flap
; To insert the fuel filler cap
= Tyre pressure table
? Instruction label on the fuel type to be
refuelled
X Switc hoff the engine.
X Remove the key from the ignition lock.
or, on vehicles with KEYLESS‑GO: X Open the driver's door.
The on-board electronics now have status
0.T his is the same as the key having been
removed.
The driver's door can be closed again.
X Press the fuel filler flap in the direction of
arrow :.
The fuel filler flap opens slightly.
X Open the fuel filler flap fully.
X Turn the fuel filler cap anti-clockwise and
remove it.
X Saloon: insert the fuel filler cap intot he
holder on the inside of fuel filler flap ;.
or
X Estate: insert the fuel filler cap, held in a
horizontal position ,intot he recesses in the
fuel filler flap hinge arm from above.
X Completely insert the filler neckoft he fuel
pump nozzle intot he tank,hook in place
and refuel.
X Only fill the tank until the pump nozzle
switches off. Do not add any more fuel after the pump
stops filling for the first time. Otherwise, fuel
may leak out.
Vehicles with adiesel engine: the filler neckis
designed for refuelling at diesel filling pumps.
Closing the fuel filler flap X
Replace the cap on the filler necka nd turn
clockwise until it engages audibly.
X Press the fuel filler flap closed until it
engages audibly.
Close the fuel filler flap before lockin gthe
vehicle. Otherwise, the lockin gpin of the cen-
tral lockin gprevents the fuel filler flap from
closing. Fuel filler flap emergency release
X
Saloon: open the boot lid.
X Slide the luggage net down.
X Open the right-hand side trim panel.
X Remove the first-aid kit (Y page 394).
X Detach the emergency release from
retainer :.
X Pull the emergency release in the direction
of arrow ;.
The fuel filler flap is released.
X Open the fuel filler flap. 202
RefuellingDriving and parking
Page 208 of 497
Problem
Possible causes/consequences and
M
MSolutions The key battery is discharged or nearly discharged.
X Unlock the vehicle using the emergency key element
(Y page 96).
X Open the boot lid or the tailgate.
X Manuallyu nlock the fuel filler flap using the emergency release
(Y page 202). The fuel filler flap is unlocked, but the opening mechanism is jam-
med.
X Consult aqualified specialist workshop. Parking
Important safety notes
G
WARNING
Flammable material such as leaves, grass or
twigs may ignite if they come into contact with hot parts of the exhaust system or exhaust
gas flow. There is arisk of fire.
Park the vehicle so that no flammable mate-
rial can come into contact with hot vehicle
components. In particular, do not park on dry grassland or harvested grain fields. G
WARNING
If you switch off the ignition while driving,
safety-relevant functions are only available
with limitations, or not at all. This could affect, for example, the power steering and the brake
boosting effect.Y ou will require considerably
more effort to steer and brake. There is arisk
of an accident.
Do not switch off the ignition while driving. G
WARNING
If you leave children unattended in the vehi-
cle, they may be able to set the vehicle in
motion if, for example, they:
R release the parking brake
R shift the automatic transmission out of park
position Por shift manual transmission into
neutral
R start the engine
In addition, they may operate vehicle equip-
ment and become trapped. There is arisk of
an accident and injury.
When leaving the vehicle, always take the key with you and lock the vehicle. Never leave
children unattended in the vehicle.
! Always secure the vehicle correctly
against rolling away.O therwise, the vehicle
or its drivetrain could be damaged.
To ensure that the vehicle is safeguarded
against rolling away unintentionally:
R the parking brake must be applied
R on vehicles with manual transmission,
engage 1st gear or reverse gear
R on vehicles with automatic transmission,
the transmission must be in position Pand Parking
205Driving and parking Z
Page 238 of 497

25 mm
.The leve lchange also occurs when
stationary.
If you drive faster than 170 km/h, the rear
axle leve lisset to amiddle level. Thi sincrea-
ses road safety and reduces airr esistance. If
you then drive slower than 150 km/h, the
leve loft he rear axle is again adjusted to cor-
respond to the selected suspension mode.
Load compensation
The vehicle can compensate differences in
the vehicle leve lbyraising or lowering the
rear axle .Thisist he case ,for example, when
people get out of the vehicle or whe nlug gage
is removed.
Al oadc ompensation occurs if:
R ad oor, the boot lid or the tailgate is opened
R the parked vehicle is unlocked
The engine needs to be running for larger level
changes. 4MATIC (permanent all-whee
ldrive)
If you fai ltoadapt you rdriving style, 4MATIC
can neither reduce the risk of an accident nor override the laws of physics. 4MATIC cannot
take account of road ,weather and traffic con-
ditions. 4MATIC is only an aid. You are
responsibl efor the distance to the vehicle in
front, for vehicle speed, for braking in good
time, and for staying in lane.
If ad rive wheel spins due to insufficient grip:
R whe npulling away,o nly depress the accel-
erato rpedal as far as is necessary.
R accelerate les swhend riving.
! Never tow the vehicle with one axle
raised. Thi smay damage the transfer case.
Damag eofthis sort is not covered by the
Mercedes-Benz implied warranty. All
wheels must remain eithe ronthe ground or
be fully raised. Observe the instructions for towing the vehicle with allw heels in full
contact with the ground.
i In wintry driving conditions, the maximum
effect of 4MATIC can only be achieved if you use winter tyres
(M+S tyres), with snow
chains if necessary.
4MATIC ensures that allf our wheels are per-
manently driven. Together with ESP ®
,it
improves the traction of you rvehicle when-
ever adrive wheel spins due to insufficient
grip. PARKTRONIC
Important safety notes PARKTRONI
Cisanelectronic parking aidw ith
ultrasoni csensors .Itmonitors the area
around you rvehicle using six sensors in the
front bumper and six sensors in the rear
bumper. PARKTRONI Cindicates visually and
audibly the distance between you rvehicle
and an object.
PARKTRONI Cisonly an aid. It is not asubsti-
tute for you rattention to the immediate sur-
roundings. The responsibility for safe
manoeuvring and parking remains with you.
Make sure that there are no persons, animals
or objects in range while manoeuvring and
parking.
! When parking, pay particular attention to
objects above or below the sensors ,such
as flower pots or trailer drawbars.
PARKTRONI Cdoes not detect such objects
whe nthey are in the immediate vicinity of
the vehicle. You coul ddamage the vehicle
or the objects.
The sensors may not detect snow and
objects which absorb ultrasoni csources.
Ultrasonic sources, such as an automatic
car wash, alorry's compressed-air brakes
or ap neumatic drill, coul dcause
PARKTRONI Ctomalfunction.
PARKTRONI Cmay not function correctly on
uneve nterrain. Driving systems
235Driving and parking Z
Page 248 of 497

Important safety notes
The reversing camera is only an aid. It is no
ta
substitut efor your attention to th eimmediate
surroundings. The responsibilit yfor safe
manoeuvrin gand parking remains wit hyou.
Mak esure that there are no persons, animals
or objects in range while manoeuvrin gand
parking.
Under th efollowin gcircumstances, the
reversing camera will no tfunction ,orwill
function in alimited manner:
R if th eboot lid or tailgat eisopen
R in heav yrain ,sno worf og
R at night or in ver ydark places
R if th ecamera is expose dtoveryb right light
R if th earea is lit by fluorescent bulbs or LED
lighting (the display may flicker)
R if there is asudde nchang eint emperature,
e.g. when driving int oaheated garag ein
winter
R if th ecamera len sisdirtyoro bstructed.
Observ ethe note sonc leaning
(Y page 390)
R if th erear of your vehicl eisdamaged. In this
case, have th ecamera position and setting
checke dataq ualified specialist workshop
The field of vision and other function softhe
reversing camera may be restricted due to
additional accessories on th erear of th evehi-
cle (e.g. licence plat eholder, bicycle rack).
On vehicles wit hheight-adjustable chassis,
leaving th estandard height can result in inac-
curacie sintheguide lines, depending on
technical conditions.
i The reversing camera is protected from
raindrops and dust by mean sofaflap.
When th ereversing camera is activated,
this flap opens.
The flap closes again when:
R you have finishe dthe manoeuvrin gproc-
ess
R you switch off th eengine
R you open th eboot Se
et he note sonc leaning (Y page 390).
Fo rtechn ical reasons, th eflap may remain
open briefly after th ereversing camera has
been deactivated.
Activating/deactivating th ereversing
camera X
To activate: makesure that th ekeyis in
position 2in th eignition lock.
X Mak esure that the ActivationbyR
Activatio nbyR
gear
gear function is selected in Audio 20 or
COMAND Online; see th eDigital Owner's
Manual.
X Engage revers egear.
The reversing camera flap opens. The area
behind th evehicl eiss hown wit hguide lines
in th eAudio 20 or COMAND Onlin edisplay.
The imag efromt hereversing camera is
available throughout th emanoeuvring
process.
X To switch th efun ction mod efor vehi-
cles with traile rtow hitch: usingthe con-
troller ,select symbol :for th e"Reverse
parking "function or symbol ;for "Cou-
plin gupat railer".
The symbol of th eselected function is high-
lighted.
To deactivate: ther eversing camera deacti-
vates if you shif tthe transmission to Por after
driving forwards ashort distance. Driving systems
245Driving and parking Z
Page 253 of 497
Distance
smeasured by PARKTRONI Cwill
also be opticall ydisplayed:
R as red or yellow brackets around the vehi-
cle symbo lintop view in split-screen mode
or
R at the bottom righ tasred or yellow brack-
ets around the vehicl esym bolinf ull-s creen
mode
Th elinet hicknes sand colou rofthe brackets
sho whow fart he vehicl eisfromano bject.
R yellow brackets with thi nlines:
PARKTRONI Cisactive
R yellow brackets with normal lines :an
object is present in close range of the vehi-
cle
R red line: an object is present in the imme-
diate close range of the vehicle
Important safety notes Th
e3 60° camera is onl yanaidand ma yshow
ad istorted view of obstacles, sho wthem
incorrectly or not at all. Th e360° camera is
not asubst itute for attentiv edriving.
Th er esponsibility for safe manoeuvring and
parking remains with you. Make sure that
there ar enopersons, animals or objects in
range whil emanoeuvring and parking.
Yo ua realways responsibl efor safety ,and
must always pa yattentio ntoyours urround-
ing sw henp arking and manoeuvring. This
applie stothe area sbehin d, in front of and
beside the vehicle. Yo ucould otherwise
endanger yourself and others.
Th e3 60° camera will not functio norwill
functio nonlyinal imited manner:
R if the doors ar eopen
R if the exterior mirrors ar efolde din
R if the boot lid/tailgate is open
R in heav yrain, sno worfog
R at night or in ver ydarkp laces
R if the camera sareexpose dtoveryb right
light
R if the area is li tbyfluorescent bulb sorLED
lighting (th edisplay mayflicker) R
if there is asudde nchange in temperature,
e.g .whend riving into aheatedg arag ein
winter
R if the camera lense saredirty or covered
R if the vehicl ecomponents in which the
camera sarefitte daredamaged. In this
event, have the camera positio nand setting
checked at aquali fied specialis tworkshop.
Do not us ethe 360° under such circumstan-
ces .You could otherwis einjure others or
damage objects when parking the vehicle.
Guid elines ar ealway sshown at roa dlevel.In
trailer mode, the guid elines ar eshown at the
level of the trailer coupling.
On vehicles with height-adjustabl echassis,
depending on technica lconditions ,leavi ng
the standard height can resul tin:
R inaccuracie sinthe guid elines
R inaccuracie sinthe displa yofgenerated
images (to pview)
Activatio nconditions Th
e3 60° camera imag ecan be displaye dif:
R your vehicl eisequippe dwitha3 60° cam-
era
R the key is in position 2in the ignition lock
R COMAND Online/Audi o20isswitched on
R the 360°camera
360 °camera functio niss witched on
Activatin gthe 360° camera X
Press the Øbutton in the centr econ-
sol efor longe rtha nt wo seconds.
Th ef ollowing appear sdepen ding on
whether transmission position Dor Ris
selected:
R as plit- screen with top view and the
imag efromt he front camera or
R as plit- screen with top view and the
imag efromt he reversing camera
or 250
Driving systemsDriving an
dparking