2015 MERCEDES-BENZ E-CLASS ESTATE door lock
[x] Cancel search: door lockPage 389 of 497
!
Do not park up the vehicle for an extended
period straight after cleaning it, particularly after having cleaned the wheels with wheel cleaner. Wheel cleaners could cause
increased corrosion of the brake discs and
brake pads/linings. For this reason, you
should drive for afew minutes after clean-
ing. Braking heats the brake discs and the
brake pads/linings, thus drying them. The
vehicle can then be parked up.
Regular care of your vehicle is acondition for
retaining the quality in the long term.
Use care products and cleaning agents rec-
ommended and approved by Mercedes-Benz. Washing the vehiclea
nd cleaning the
paintwork
Automatic car wash G
WARNING
Braking efficiency is reduced after the vehicle has been washed.T here isarisk of an acci-
dent.
After washing the vehicle, brake carefully
while paying attention to the traffic conditions in order to restore full braking efficiency.
! When DISTRONIC PLUS or the HOLD
function is activated, the vehicle brakes
automaticallyinc ertain situations.
To avoid damage to the vehicle, deactivate DISTRONIC PLUS and the HOLD function in
the following or similars ituations:
R when towing away
R in ac ar wash
! Make sure that:
R the side windows and sliding sunroof are
closed completely.
R the blowerf or the ventilation/heating is
switched off (OFF button is depressed).
R the windscreen wiper switch is at posi-
tion 0.
The vehicle could otherwise be damaged. !
In car washes with
atowing mechanism,
make sure that the automatic transmission
is in transmission position N;otherwise,
the vehicle could be damaged.
R Vehicles with DIRECT SELECT lever and
key:
do not remove the key from the ignition
lock. Do not open the driver's door or
front-passenger door when the engine is
switched off. Otherwise, the automatic
transmission selects park position P
automaticallya nd locks the wheels. You
can prevent this by shifting the auto-
matic transmission to Nbeforehand.
R Vehicles with DIRECT SELECT lever and
KEYLESS-GO:
do not open the driver's door or front-
passenger door when the engine is
switched off. Otherwise, the automatic
transmission selects park position P
automaticallya nd locks the wheels.
! If the key is within the rear detection
range of KEYLESS-GO, situations such as
the following could lead to the uninten-
tional opening of the boot lid/tailgate:
R using acar wash
R using ahigh-pressure cleaner
Make sure that the key is at least 3maway
fro mt hevehicle.
Observe th efollowing to mak esure that the
automatic transmission on vehicles with
DIRECT SELECT stays in position N:
X Make sure th evehicle is stationar yand the
ignitio nisswitche doff.
X Turn th ekey to position 2(Y page 179) in
th ei gnitio nlock.
Use th ekey instead of th eStart/Sto pbut-
to nonv ehicles with KEYLESS-GO.
X Depress th ebrak epedal and kee pit
depressed.
X Shift th eautomatic transmission to posi-
tion N.
X Release th ebrak epedal. 386
CareMaintenance and care
Page 400 of 497
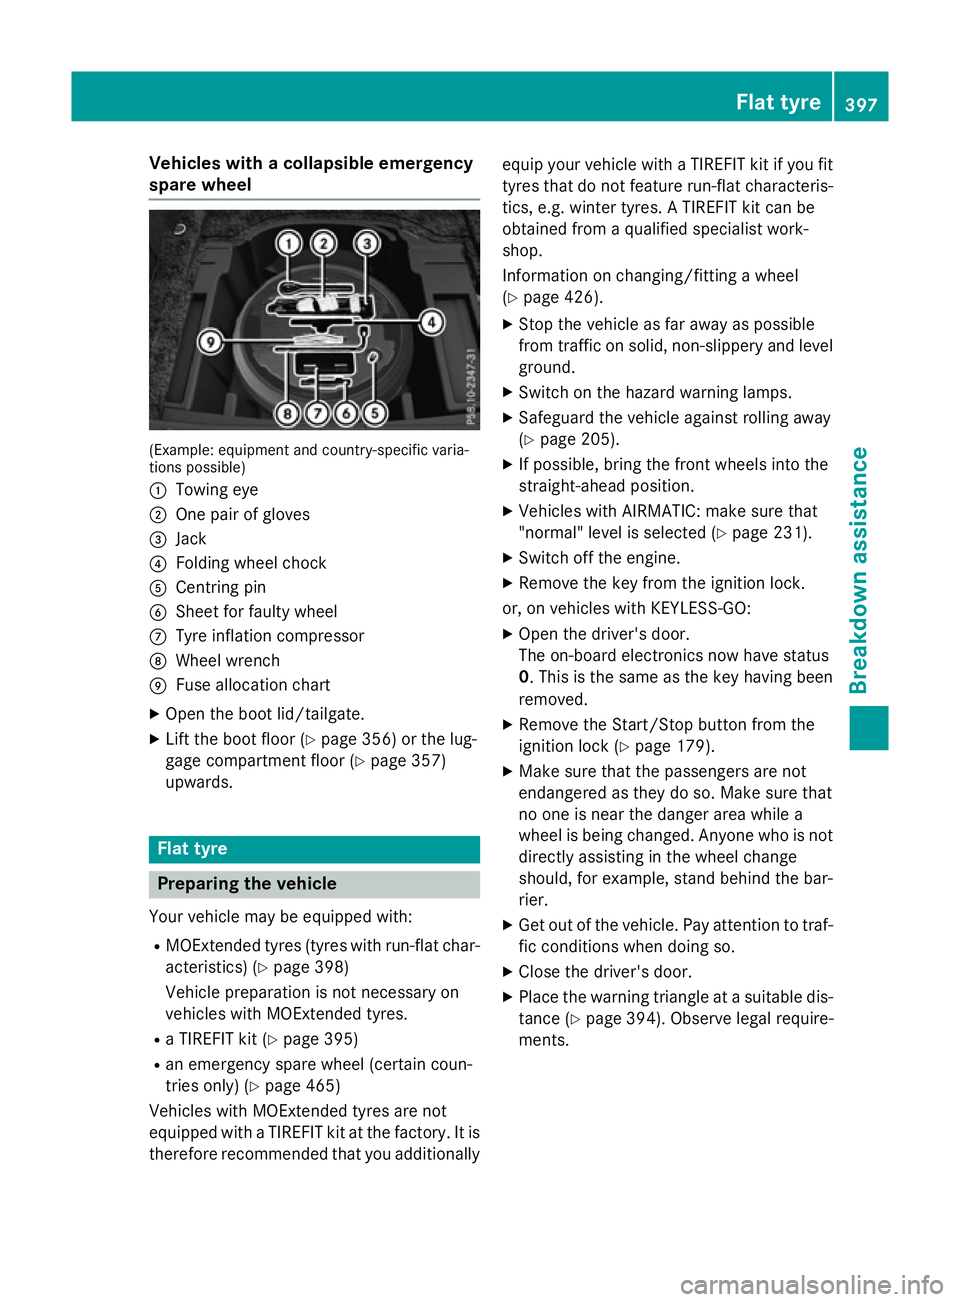
Vehicles with
acolla psibl eemergency
spare wheel (Example: equipment and country-specifi
cvaria-
tions possible)
: Towing eye
; One pair of gloves
= Jack
? Folding whee lchock
A Centring pin
B Shee tfor faulty wheel
C Tyre inflation compressor
D Wheel wrench
E Fusealloc ation chart
X Ope nthe boot lid/tailgate.
X Lif tthe boot floor (Y page 356)orthe lug-
gage compartment floor (Y page 357)
upwards. Flat tyre
Preparin
gthe vehicle
Your vehicl emaybe equipped with:
R MOExtende dtyres (tyres with run-fla tchar-
acteristics )(Ypage 398)
Vehicl epreparatio nisn ot necessary on
vehicles with MOExtende dtyres.
R aT IREFIT kit (Y page 395)
R an emergency spare whee l(certai ncoun-
trie sonly) (Y page 465)
Vehicles with MOExtende dtyres ar enot
equipped with aTIREFIT kit at the factory .Itis
therefore recommende dthatyou additionally equi
pyourvehicl ewithaT IREFIT kit if yo ufit
tyres tha tdon ot feature run-fla tcharacteris-
tics ,e.g.w inter tyres. ATIREFIT kit can be
obtained from aquali fied specialist work-
shop.
Informatio nonchanging/fitting awheel
( Y page 426).
X Stop the vehicl easfar away as possible
from traffic on solid ,non-slippery and level
ground.
X Switch on the hazard warning lamps.
X Safeguar dthe vehicl eagain st rolling away
(Y page 205).
X If possible, bring the front wheels into the
straight-ahea dposition.
X Vehicles with AIRMATIC: make sure that
"normal" level is selecte d(Ypage 231).
X Switch off the engine.
X Remove the key from the ignition lock.
or, on vehicles with KEYLESS‑ GO:
X Ope nthe driver' sdoor.
The on-boar delectronics now have status
0.T hisist he same as the key having been
removed.
X Remove the Start/Sto pbutton from the
ignition lock (Y page 179).
X Make sure tha tthe passenger sarenot
endangere dasthey do so. Make sure that
no one is nea rthe danger area whil ea
whee lisbeing changed .Anyone wh oisnot
directl yassis ting in the whee lchange
should, for example, stand behind the bar-
rier.
X Ge toutof the vehicle. Pa yattentio ntotraf-
fic conditions when doing so.
X Close the driver' sdoor.
X Place the warning triangl eatasuitabl edis-
tance (Y page 394). Observe lega lrequire-
ments. Flat tyre
397Breakdown assis tance
Page 411 of 497
!
Only secure the tow cable or tow bar to
the towing eyes or, if available,tot he trailer
tow hitch. You could otherwise damage the
vehicle.
! Observe the following points when towing
with atow rope:
R Secure the tow rope on the same side on
both vehicles.
R Make sure that the tow rope is not longer
than legally permitted. Mark the tow rope
in the middle, e.g. with awhite cloth
(30 x30c m).This will make other road
users aware that avehicle is being
towed.
R Only secure the tow cable to the towing
eyes or, if available,tot he trailer tow
hitch.
R Observe the brake lamps of the towing
vehicle while driving. Alwaysm aintain a
distance adistance so that the tow rope
does not sag.
R Do not use steel cables or chains to tow
your vehicle. You could otherwise dam-
age the vehicle.
! Do not use the towing eye for recovery,
this could damage the vehicle. If in doubt,
recover the vehicle with acrane.
! Pull aways
moothly when towing awayor
tow-starting avehicle. If the tractive power
is too high, the vehicles could be damaged.
! To tow vehicles with KEYLESS-GO, use
the key instead of the Start/Stop button.
The automatic transmission may otherwise switch to position Pwhen you open the
driver's or front-passenger door which
could damage the transmission.
! You may tow the vehicle for
amaximum of
50km. Atowing speed of 50 km/h must not
be exceeded.
For towing distances over 50 km, the entire
vehicle must be lifted up and transported.
! If you tow or tow-start another vehicle, its
weight must not exceed the maximum per- missible gross vehicle weight of your vehi-
cle.
HYBRID vehicles :make sure that you read
the "HYBRID" Supplement included in the
vehicle literature. You could otherwise fail to
recognise dangers, e.g. due to high voltage.
Observe the legal requirements for the rele-
vant countries when towing and tow-starting.
It is better to have the vehicle transported
than to have it towed.
If the vehicle has suffered transmission dam- age, have it transported on atransporter or
trailer.
When towing awayav ehicle with an auto-
matic transmission, the transmission must be
in position N.
The battery must be connected and charged.
Otherwise, you:
R cannot turn the key to position 2in the
ignition lock
R cannot shift the transmission to position N
on vehicles with automatic transmission
In the event of damage to the electrical
system
If the battery is defective, the automatic
transmission will be locked in position P.To
shift the automatic transmission to position
N,y ou must provide power to the vehicle's
electrical system in the same way as when
jump-starting (Y page 405).
Have the vehicle transported on atransporter
or trailer.
i Deactivate the automatic locking feature
before the vehicle is towed away
(Y page 102). You could otherwise be
locked out when pushing or towing the
vehicle.
i Deactivate tow-away protection before
the vehicle is towed away( Ypage 90).408
Towing away and tow-startingBreakdown assistance
Page 412 of 497
Fitting/removing th
etowing eye
Fitting th etowing eye G
WARNING
The exhaust tai lpipe may be extremely hot.
Ther eisar iskofb urning when removing the
rear cover.
Do no ttou ch th eexhaust tai lpipe. Use
extreme caution when removing th erear
cover. Towin
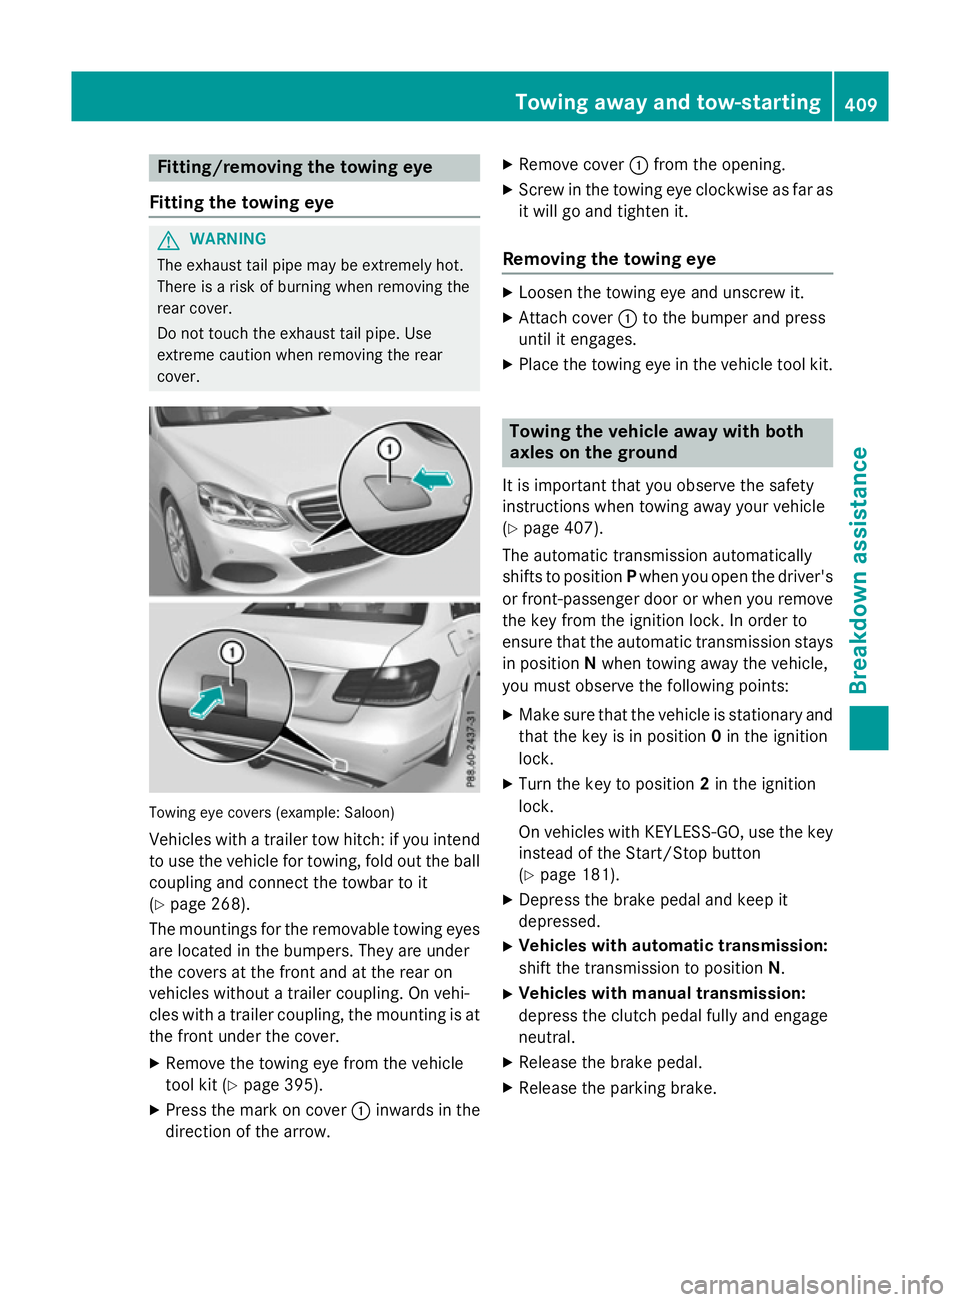
geye cover s(example: Saloon)
Vehicles wit hatrailer to whitch :ify ou intend
to use th evehicl efor towing, fol dout th eball
couplin gand connec tthe towbar to it
(Y page 268).
The mounting sfor th eremovable towin geyes
are locate dinthebumpers .They are under
th ec oversatt hefron tand at th erear on
vehicles without atrailer coupling. On vehi-
cle sw ithat railer coupling, th emounting is at
th ef ront under th ecover.
X Remove th etow inge ye from th evehicle
tool kit (Y page 395).
X Press th emarkonc over : inwards in the
direction of th earrow. X
Remove cover :from th eopening.
X Screw in th etow inge ye clockwise as far as
it will go and tighten it.
Removing th etowing eye X
Loosen th etow inge ye and unscrew it.
X Attac hcover : to th ebumper and press
until it engages.
X Plac ethe towin geye in th evehicl etoolkit. Towing th
evehicle awa ywith both
axles on th eground
It is important that you observ ethe safety
instruction swhen towin gaway your vehicle
(Y page 407).
The automatic transmission automatically
shifts to position Pwhen you open th edriver's
or front-passenger door or when you remove th ek eyfrom th eignition lock. In order to
ensure that th eautomatic transmission stays
in position Nwhen towin gaway th evehicle,
you must observ ethe followin gpoints:
X Mak esure that th evehicl eiss tationary and
that th ekeyis in position 0in th eignition
lock.
X Turn th ekeyto position 2in th eignition
lock.
On vehicles wit hKEYLESS-GO ,use th ekey
instead of th eStart/Sto pbutton
(Y page 181).
X Depress th ebrak epedal and keep it
depressed.
X Vehicles with automatic transmission:
shif tthe transmission to position N.
X Vehicles with manua ltra nsmission:
depress th eclutch pedal fully and engage
neutral.
X Releas ethe brak epedal.
X Releas ethe parking brake. Towin
gawaya nd tow-starting
409Breakdown assistance Z
Page 415 of 497

X
Safeguard the vehicl eagains trolling away
(Y page 205).
X Switch off the engine.
X Switch off al lelectrical consumers.
X Remove the key from the ignition lock.
or, on vehicles with KEYLESS‑GO,
X Ope nthe driver' sdoor.
The on-board electronics now have status
0.T hisist he same as the key having been
removed.
The driver' sdoorc an be closed again.
All indicator lamps in the instrument cluster
mus tbeo ff.
The fuses are locate dinvarious fus eboxes:
R fus ebox in the engine compartment on the
left-hand sid eofthe vehicle, when viewed
in the direction of travel
R fus ebox in the boot/luggage compartment
on the right-hand sid eofthe vehicle, when
viewe dinthe direction of travel
The fus ealloc ation chart is locate dinthe
vehicl etool kit in the stowag ecompartment
under the boot/luggage compartment floor
(Y page 395). Fus
eboxin the engine compartment
Pa ya ttention to the important safety notes
(Y page 411). G
WARNING
Whe nthe bonne tiso pen, and the windscreen
wipers are set in motion, yo ucan be injured by
the wipe rlinkage. There is ariskofi njury.
Alway sswitch off the windscreen wipers and
the ignition before opening the bonnet.
! Make sure tha
tnomoisture can enter the
fus eb ox when the cove risopen.
! Whe
nclosing the cover, make sure tha tit
is lying correctly on the fus ebox. Moisture
seeping in or dirt could otherwise impair
the operation of the fuses. X
Make sure tha tthe windscreen wipers are
switche doff.
X Ope nthe bonnet.
X Remove any existing moisture from the
fus eb ox using adry cloth.
X To open: take lines ;outoft he guides.
X Mov elines ; to one side. Route the lines
behind connection =to do this.
X Ope nretaining clamps :.
X Remove the fus ebox cove rforwards.
X To close: check whethe rthe sea lislying
correctly in the cover.
X Insert the cove ratthe rea rofthe fus ebox
into the retainer.
X Fol dd ownc ove rand close clamps :.
X Secure lines ;in the guides.
X Close the bonnet. Fus
eboxin the boot
Pa ya ttention to the important safety notes
(Y page 411).
! Make sure tha
tnomoisture can enter the
fus eb ox when the cove risopen.
! Whe
nclosing the cover, make sure tha tit
is lying correctly on the fus ebox. Moisture
seeping in or dirt could otherwise impair
the operation of the fuses. 412
Electrical fusesBreakdown assistance
Page 430 of 497
X
Remove th ekeyfrom th eignition lock.
or, on vehicles wit hKEYLESS‑GO:
X Ope nthe driver's door.
The on-boar delectronics no whaves tatus
0 .T his is th esam east hekeyh avin gbeen
removed.
X Remove th eStart/Sto pbutto nfromt he
ignition loc k(Ypage 179).
X If included in th evehicl eequipment,
remove th etyre-chang etoolkitfrom the
vehicl e(Ypage 395).
X Safeguar dthe vehicl eagainst rollin gaway.
i Apart from som
ecountry-specific var-
iants ,vehicles are no tequipped wit htyre-
changin gtools. Some tools for changin ga
whee lare specific to th evehicle. Fo rmore
information on whic htools are require dto
perfor mawheelcha ng eony our vehicle,
consult aqualified specialist workshop.
Necessary tyre-changin gtools may
include, for example:
R Jack
R Wheel chock
R Wheel wrench
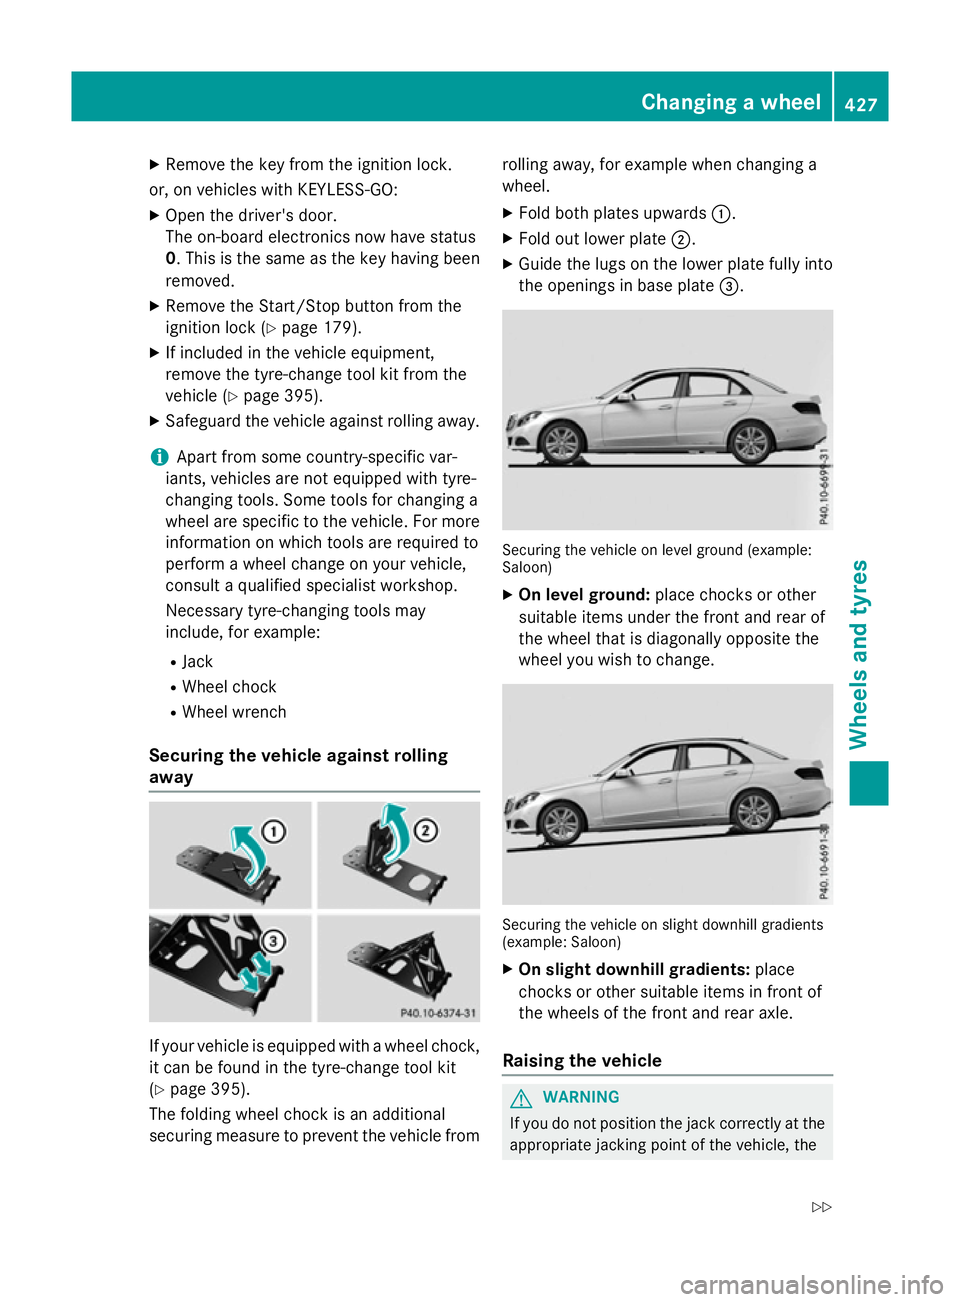
Securing th evehicle against rolling
away If your vehicl
eisequipped wit hawheelchock,
it can be found in th etyre-chang etoolkit
( Y page 395).
The foldin gwhee lchock is an additional
securin gmeasure to preven tthe vehicl efrom rollin
gaway, for exampl ewhen changin ga
wheel.
X Fold bot hplates upwards :.
X Fold out lower plate ;.
X Guide th elugs on th elower plat efully into
th eo penings in base plate =. Securin
gthe vehicl eonlevel ground (example:
Saloon)
X On level ground: placechock soro ther
suitable items under th efront and rear of
th ew hee ltha tisd iagonally opposit ethe
whee lyou wish to change. Securin
gthe vehicl eons light downhill gradients
(example: Saloon)
X On sligh tdownhil lgradie nts:place
chocks or other suitable items in fron tof
th ew heels of th efront and rear axle.
Raisin gthe vehicle G
WARNING
If you do no tposition th ejackc orrectly at the
appropriat ejacking poin tofthevehicle, the Changing
awheel
427Wheels and tyres
Z
Page 431 of 497
jack could tip ove
rwitht he vehicl eraised.
There is ariskofi njury.
Onl yposit iont he jack at the appropriate jack-
ing point of the vehicle. The base of the jack
must be positioned vertically, directl yunder
the jacking point of the vehicle.
Observe the following when raising the vehi-
cle:
R to rais ethe vehicle, onl yusethe vehicle-
specific jack tha thas been teste dand
approved by Mercedes-Benz. If the jack is
used incorrectly ,itcould tip ove rwhile the
vehicl eisraised.
R the jack is designe donlytor aiseand hold
the vehicl efor as hort time whil eawheel
is being changed. It is not suitabl efor per-
formin gmaintenance work under the vehi-
cle.
R avoi dchanging the whee lonuphilland
downhil lslope s.
R befor eraisi ng the vehicle, safeguard it from
rolling away by applying the parking brake
and positioning whee lchocks. Never
release the parking brake whil ethe vehicle
is raised.
R the jack must be place donafirm, flatand
non-sli psurface. On aloo se surface, a
large ,flatl oad- bearing underlay must be
used .Ona slippery surface, anon-slip
underlay must be used ,e.g.r ubbe rmats.
R do not us ewoode nblocks or similar
objects as ajack underlay .Otherwise, the
jack will not be able to achieve its load-
bearing capacity du etothe restricted
height.
R make sure tha tthe distance between the
undersid eofthe tyres and the ground does
not exceed 3cm.
R neve rplace your hands or fee tunder the
raised vehicle.
R do not li eunder the vehicle.
R do not start the engine when the vehicl eis
raised. R
do not open or close adoorort he boot lid/
tailgate when the vehicl eisraised.
R make sure tha tnopersons ar epresent in
the vehicl ewhent he vehicl eisraised.
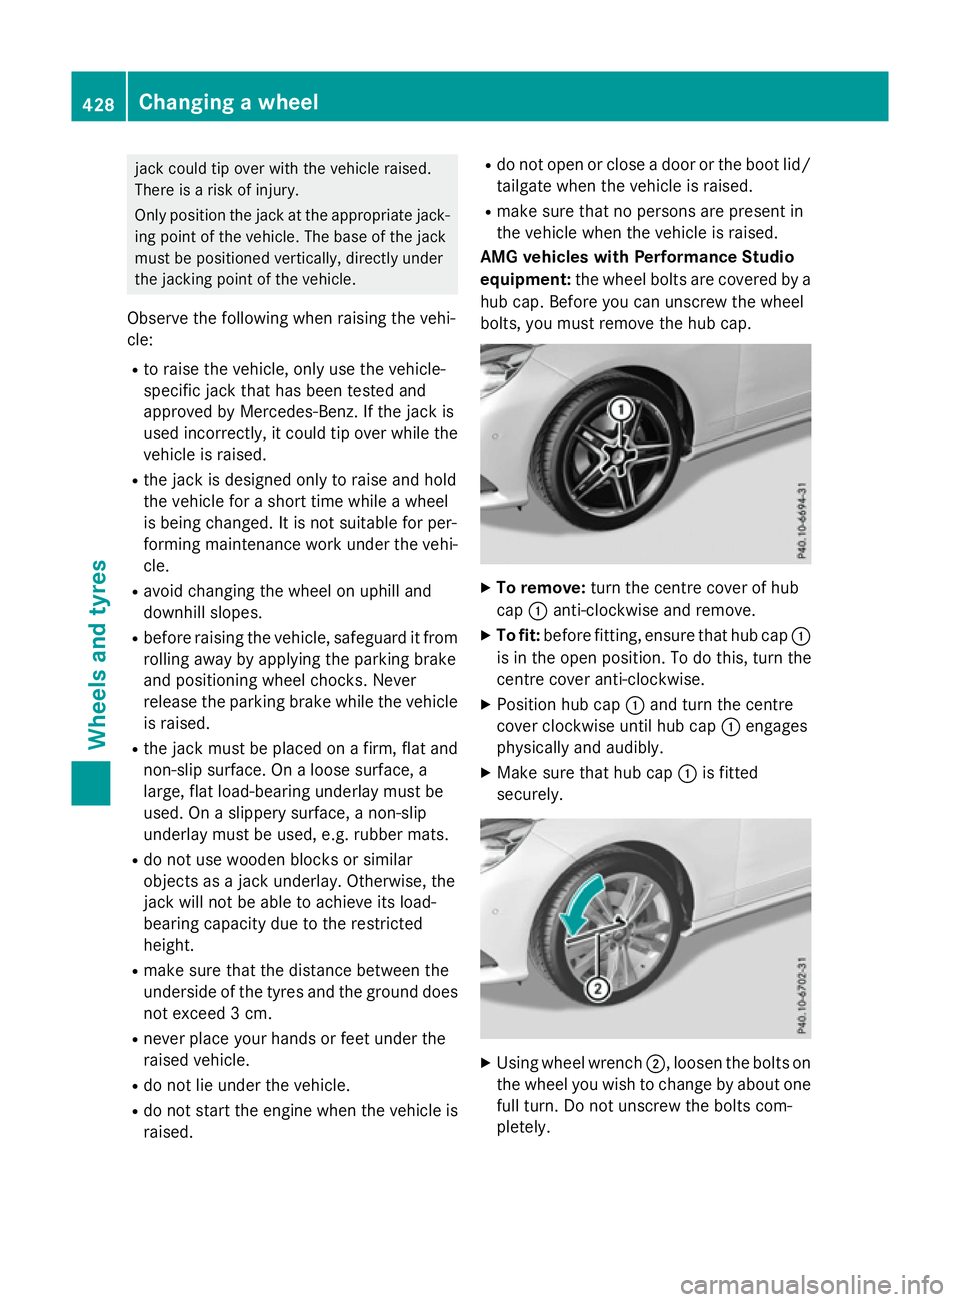
AM Gvehicle swithP erformanc eStudio
equipment: the wheelbolts ar ecovered by a
hu bc ap.B efore yo ucan unscrew the wheel
bolts ,you must remove the hu bcap. X
To remove: turnthe centre cove rofhub
cap :anti-clockwise and remove.
X To fit: beforefitting, ensur etha thub cap :
is in the open position. To do this, tur nthe
centre cove ranti-clockwise.
X Positio nhub cap :and tur nthe centre
cove rclockwise unti lhub cap :engages
physicall yand audibly.
X Make sure tha thub cap :is fitted
securely. X
Using whee lwrench ;,l oosent he bolts on
the whee lyou wish to change by abou tone
full turn. Do not unscrew the bolts com-
pletely. 428
Changin
gawheelWheels an dtyres