2015 MERCEDES-BENZ E-CLASS ESTATE flat tire
[x] Cancel search: flat tirePage 15 of 497
F
Fault message see Display messages
Filler cap
see Fuel fille rflap
Fire extinguisher .............................. .395
First-aid kit ......................................... 394
Fitting awheel
Fitting awheel ............................... 430
Lowering the vehicle ..................... .430
Preparing the vehicle ..................... 426
Raising the vehicle ......................... 427
Removing awheel .......................... 429
Securing the vehicle against roll-
ing away ........................................ 427
Flat tyre
MOExtended tyres ......................... 398
Preparing the vehicle ..................... 397
TIREFIT kit ...................................... 399
see Emergency spare wheel
Floormat ............................................. 374
Foglamps
Extended range .............................. 146
Foldin gbench seat (luggage com-
partment) .......................................... .128
Frequencies
Garage door opene r....................... 371
Mobil ephone ................................. 470
Two-way radio ................................ 470
Fuel
Additives ........................................ 475
Consumption information .............. 476
Consumption statistics .................. 280
Displaying the current consump-
tion ................................................ 281
Displaying the rang e...................... 281
E10 ................................................ 474
Fue lgauge ....................................... 34
Grade (petrol) ................................ 474
Important safety notes .................. 473
Note sfor AMG vehicles ................. 475
Problem (malfunction) ................... 204
Quality (diesel )............................... 476
Refuelling ....................................... 200
Tank content/reserve fue l............. 474
Fue lfille rflap
Emergency release ........................ 202 Opening ......................................... 202
Fue lfilter (white display message) .. 314
Fue llevel
Calling up the rang e(on-board
computer) ...................................... 281
Gaug e.............................................. 34
Fue lreserve
see Fuel
Fue ltank
Capacity ........................................ 474
Problem (malfunction) ................... 204
Fus eallocatio nchart (vehicl etool
kit) ...................................................... 395
Fuses
Allocation chart ............................. 411
Before changing ............................. 411
Fusebox in the boo t...................... 412
Fus ebox in the engine compart-
ment .............................................. 412
Fus ebox in the luggage compart-
ment .............................................. 413
Important safety notes .................. 411 G
Garag edooro pener
Clearing the memory ..................... 371
Frequencie s................................... 371
Genera lnotes ................................ 368
Important safety notes .................. 369
Opening/closing the garag edoor..3 71
Programming (button in the rear-
view mirror) ................................... 369
Synchronising the rolling code ....... 370
Gear indicator (on-board com-
puter, AMG vehicles) ......................... 296
Gearshift program
SETUP (on-board computer) .......... 296
Genuine Mercedes-Benz parts ........... 24
Glove compartment .......................... 343 H
HANDS-FRE EACCESS ....................... 106
Hazard warning lamps ......................145
Head restraints
Adjusting ....................................... 125
Adjusting (electrically). .................. 12612
Index
Page 71 of 497
off, the front-passenger front airbag can
deploy in the event of an accident .The child
could be struck by the airbag. This poses an
increased risk of injury or even fatal injury.
Make sure that the front-passenger front air-
bag has been disabled. The PASSENGER AIR- BAG OFF indicator lamp must be lit.
NEVERu searearward facing child restraint
on aseat protected by an ACTIVE AIRBAGin
front of it; DEATH or SERIOUS INJURY to the
CHILD can occur.
Vehicles without automatic child seat
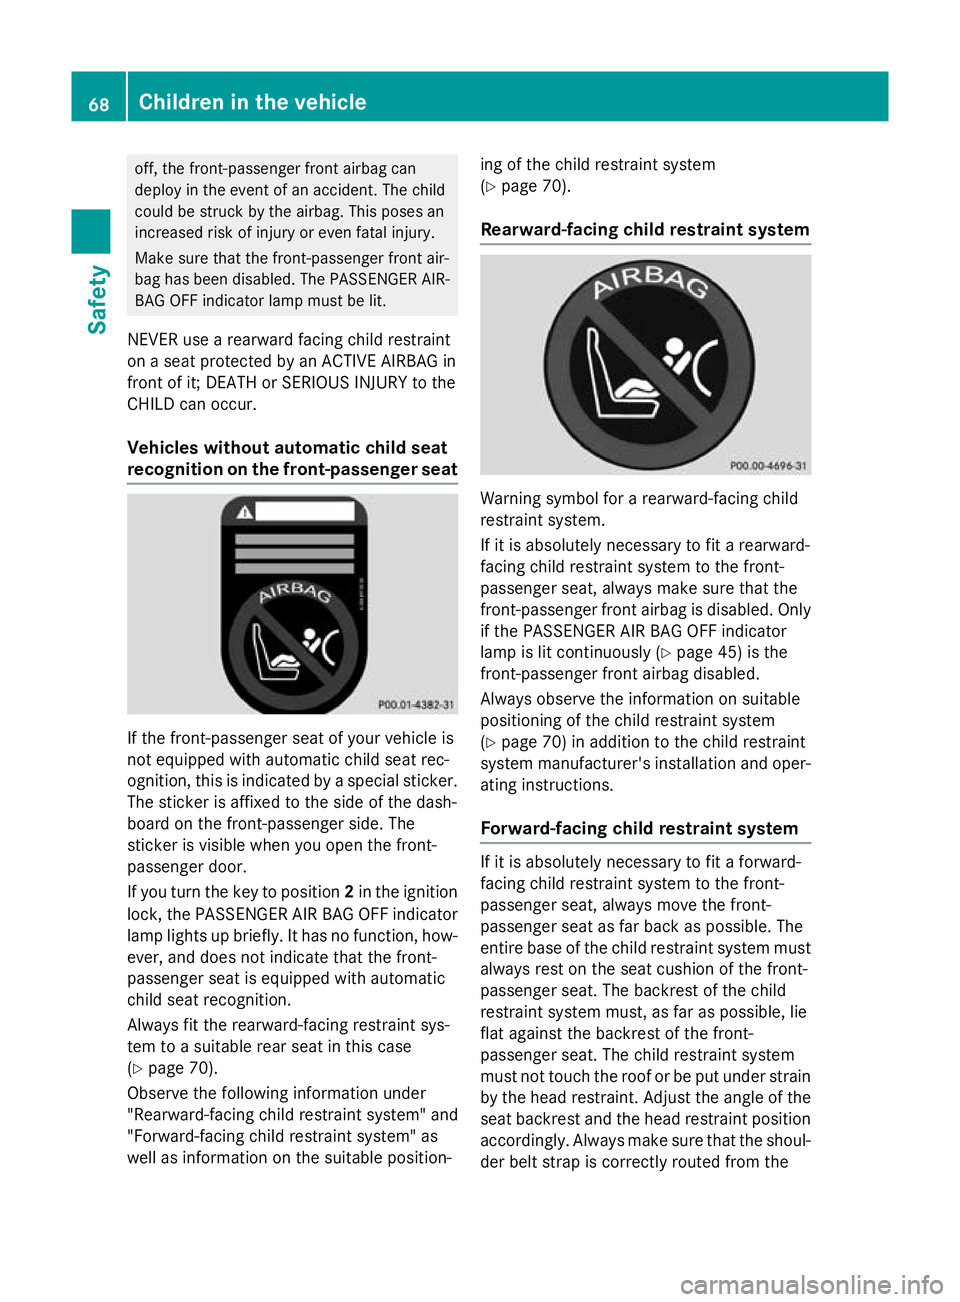
recognition on the front-passenger seat If the front-passenger seat of your vehicle is
not equipped with automatic child seat rec-
ognition
,this is indicated by aspecial sticker.
The sticker is affixed to the side of the dash-
board on the front-passenger side. The
sticker is visible when you open the front-
passenger door.
If you turn the key to position 2in the ignition
lock, the PASSENGER AIR BAG OFF indicator lamp lights up briefly. It has no function, how-ever, and does not indicate that the front-
passenger seat is equipped with automatic
child seat recognition.
Always fit the rearward-facing restraint sys-
tem to asuitable rear seat in this case
(Y page 70).
Observe the following information under
"Rearward-facing child restraint system" and
"Forward-facing child restraint system" as
well as information on the suitable position- ing of the child restraint system
(Y
page 70).
Rearward-facing child restraint system Warning symbol for
arearward-facing child
restraint system.
If it is absolutely necessary to fit arearward-
facing child restraint system to the front-
passenger seat, always make sure that the
front-passenger front airbag is disabled. Only if the PASSENGER AIR BAG OFF indicator
lamp is lit continuously (Y page 45) is the
front-passenger front airbag disabled.
Always observe the information on suitable
positioning of the child restraint system
(Y page 70) in addition to the child restraint
system manufacturer' sinstallation and oper-
ating instructions.
Forward-facing child restraint system If it is absolutely necessary to fit
aforward-
facing child restraint system to the front-
passenger seat, always move the front-
passenger seat as far back as possible. The
entire base of the child restraint system must
always rest on the seat cushion of the front-
passenger seat. The backrest of the child
restraint system must, as far as possible, lie
flat against the backrest of the front-
passenger seat. The child restraint system
must not touch the roof or be put under strain by the head restraint .Adjust the angle of the
seat backrest and the head restraint position accordingly. Always make sure that the shoul-
der belt strap is correctly routed from the 68
Children in the vehicleSafety
Page 399 of 497
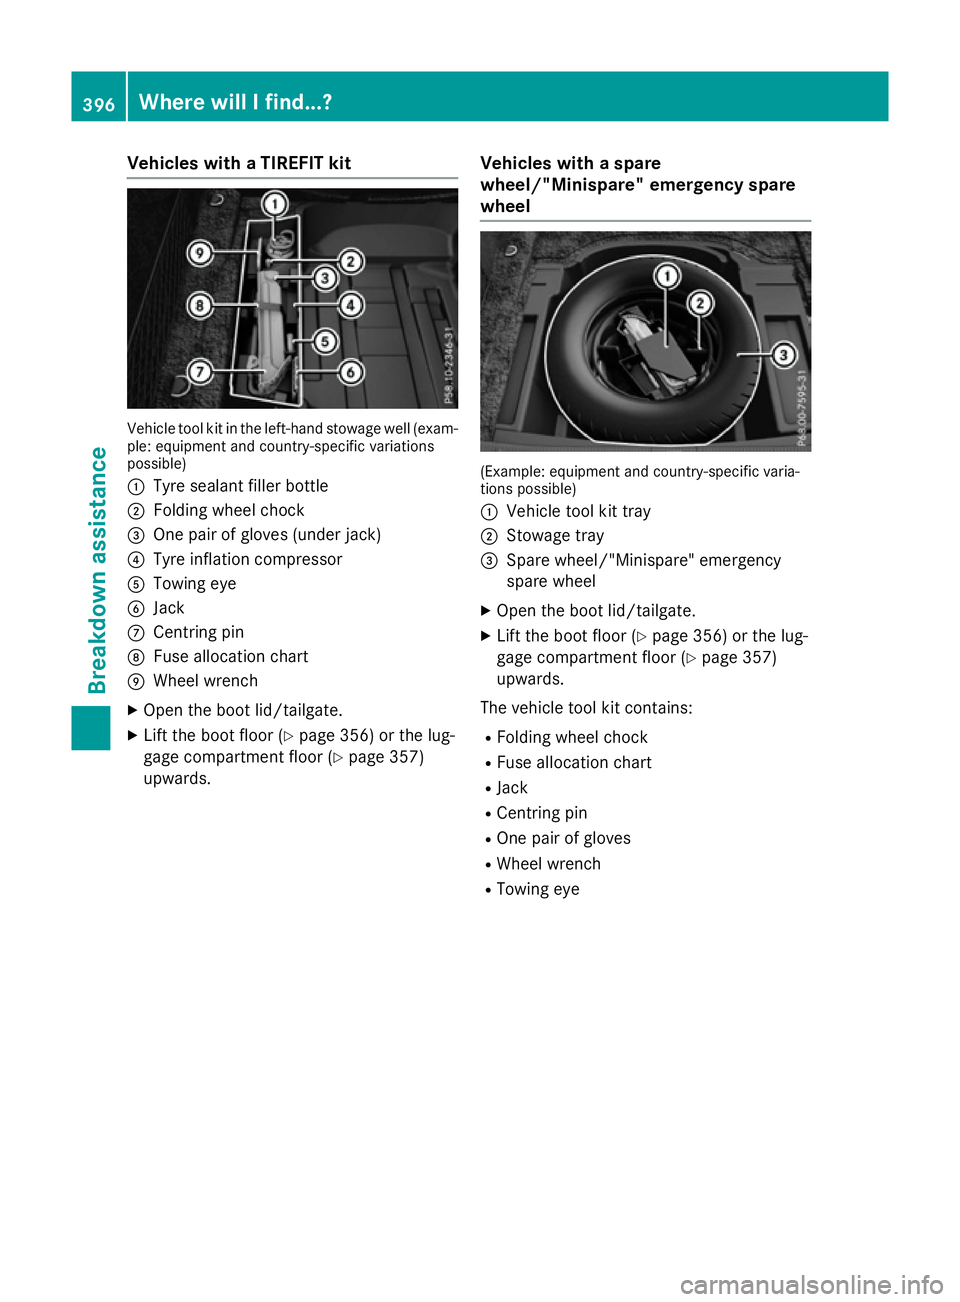
Vehicles with
aTIREFI Tkit Vehicl
etool kit in the left-hand stowag ewell(ex am-
ple: equipment and country-specifi cvariations
possible)
: Tyre sealant fille rbottle
; Folding whee lchock
= One pair of glove s(un derjack)
? Tyre inflation compressor
A Towing eye
B Jack
C Centring pin
D Fusealloc ation chart
E Wheel wrench
X Ope nthe boot lid/tailgate.
X Lif tthe boot floor (Y page 356) or the lug-
gage compartment floor (Y page 357)
upwards. Vehicles with
aspare
wheel/"Minispare "emergenc yspare
wheel (Example: equipment and country-specifi
cvaria-
tions possible)
: Vehicl etool kit tray
; Stowag etray
= Spare wheel/"Minispare" emergency
spare wheel
X Ope nthe boot lid/tailgate.
X Lif tthe boot floor (Y page 356) or the lug-
gage compartment floor (Y page 357)
upwards.
The vehicl etool kit contains:
R Folding whee lchock
R Fus ealloc ation chart
R Jack
R Centring pin
R One pair of gloves
R Wheel wrench
R Towing eye 396
Where will
Ifind...?Breakdo wn assis tance
Page 400 of 497
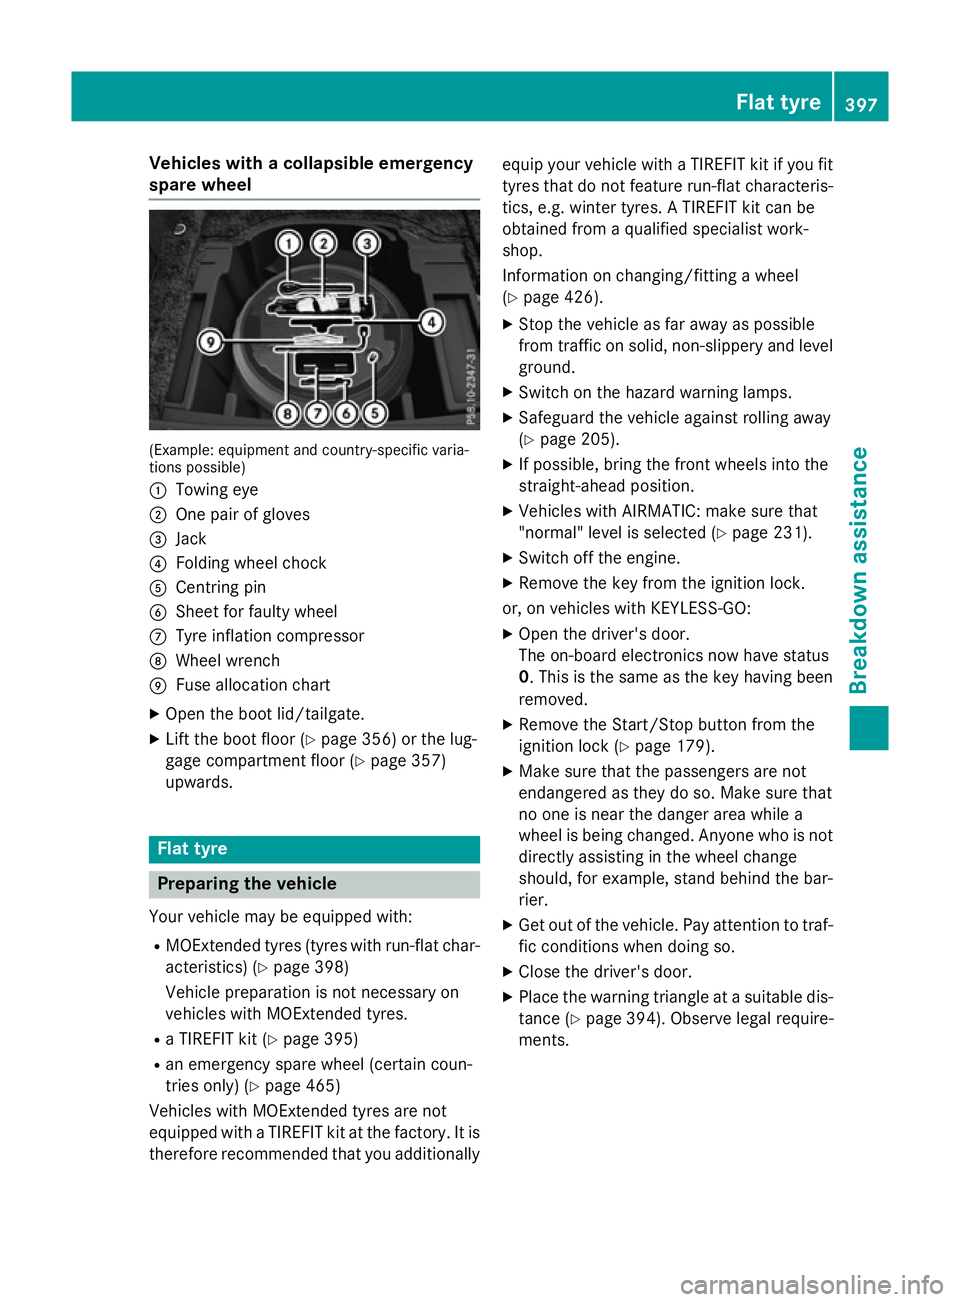
Vehicles with
acolla psibl eemergency
spare wheel (Example: equipment and country-specifi
cvaria-
tions possible)
: Towing eye
; One pair of gloves
= Jack
? Folding whee lchock
A Centring pin
B Shee tfor faulty wheel
C Tyre inflation compressor
D Wheel wrench
E Fusealloc ation chart
X Ope nthe boot lid/tailgate.
X Lif tthe boot floor (Y page 356)orthe lug-
gage compartment floor (Y page 357)
upwards. Flat tyre
Preparin
gthe vehicle
Your vehicl emaybe equipped with:
R MOExtende dtyres (tyres with run-fla tchar-
acteristics )(Ypage 398)
Vehicl epreparatio nisn ot necessary on
vehicles with MOExtende dtyres.
R aT IREFIT kit (Y page 395)
R an emergency spare whee l(certai ncoun-
trie sonly) (Y page 465)
Vehicles with MOExtende dtyres ar enot
equipped with aTIREFIT kit at the factory .Itis
therefore recommende dthatyou additionally equi
pyourvehicl ewithaT IREFIT kit if yo ufit
tyres tha tdon ot feature run-fla tcharacteris-
tics ,e.g.w inter tyres. ATIREFIT kit can be
obtained from aquali fied specialist work-
shop.
Informatio nonchanging/fitting awheel
( Y page 426).
X Stop the vehicl easfar away as possible
from traffic on solid ,non-slippery and level
ground.
X Switch on the hazard warning lamps.
X Safeguar dthe vehicl eagain st rolling away
(Y page 205).
X If possible, bring the front wheels into the
straight-ahea dposition.
X Vehicles with AIRMATIC: make sure that
"normal" level is selecte d(Ypage 231).
X Switch off the engine.
X Remove the key from the ignition lock.
or, on vehicles with KEYLESS‑ GO:
X Ope nthe driver' sdoor.
The on-boar delectronics now have status
0.T hisist he same as the key having been
removed.
X Remove the Start/Sto pbutton from the
ignition lock (Y page 179).
X Make sure tha tthe passenger sarenot
endangere dasthey do so. Make sure that
no one is nea rthe danger area whil ea
whee lisbeing changed .Anyone wh oisnot
directl yassis ting in the whee lchange
should, for example, stand behind the bar-
rier.
X Ge toutof the vehicle. Pa yattentio ntotraf-
fic conditions when doing so.
X Close the driver' sdoor.
X Place the warning triangl eatasuitabl edis-
tance (Y page 394). Observe lega lrequire-
ments. Flat tyre
397Breakdown assis tance
Page 401 of 497
MOExtended tyres (tyres with run-flat
characteristics)
General notes With MOExtended tyres (tyre
swith run-flat
characteristics), you can continue to drive
yourv ehicleeven if there is atotal loss of
pressure in one or more tyres. The affected
tyre must not show any clearly visible dam-
age.
You can recognise MOExtended tyres by the
MOExtended marking which appears on the
tyre wall. You willf ind this marking next to the
tyre size designation, the load-bearing capa-
city and the spee dindex.
MOExtended tyres may only be usedinc on-
junction with an activated tyre pressure loss
warning system or tyre pressure monitor.
If ap ressure lossw arningmessage
appears in the multifunction display:
R observe the instructions in the display mes-
sage s(Ypage3 22)
R check the tyre for damage
R if driving on, observe the following notes
The driving distance possible in run-fla tmode
is approximately 80 km when the vehicl eis
partiallyl aden and approximately 30 km
when the vehicl eisfullyladen.
In addition to the vehicl eload, the driving dis-
tance possible depends upon:
R vehicl espeed
R road condition
R outside temperature
The driving distance possible in run-fla tmode
may be reduced by extreme driving condi-
tions/manoeuvres ,oritcan be increased
through amoderate style of driving.
The driving distance possible in run-fla tmode
is counted from the moment the tyre pressure loss warning appears in the multifunction dis-
play.
You must not exceed amaximu mspee dof
80 km/h. When replacing one or all tyres, observe the
following specifications for yourv
ehicle's
tyres:
R size
R the type and
R the "MOExtended "mark.
If at yre has gone flat and cannot be replaced
with an MOExtended tyre, astandard tyre
may be usedasat emporary measure. Make
sure that you use the prope rsize and type
(summer or winter tyre).
Vehicles with MOExtended tyres are not
equipped with aTIREFIT kit at the factory. It is
therefore recommende dthat you additionally
equip yourv ehiclewithaTIREFIT kit if you fit
tyres that do not feature run-fla tcharacteris-
tics, e.g. winter tyres. ATIREFIT kit can be
obtained from aqualified specialist work-
shop.
Important safety notes G
WARNING
When driving in emergency mode, the driving characteristics deteriorate, e.g. when corner-
ing, accelerating quickly and when braking.
There is arisk of accident.
Do not exceed the stated maximu mspeed.
Avoid abrupt steering and driving manoeu-
vres, and driving over obstacles (kerbs, pot-
holes, off-road). This appliesinp articulartoa
laden vehicle.
Stop driving in emergency mode if:
R you hearb anging noises.
R the vehicl estarts to shake.
R you see smoke and smell rubber.
R ESP ®
is intervening constantly.
R there are tears in the sidewalls of the tyre.
After driving in emergency mode, have the
whee lrims checked at aqualified specialist
worksho pwith regard to their further use .The
faulty tyre must be replaced. 398
Flat tyreBreakdown assistance
Page 402 of 497
TIREFI
Tkit
Important safety notes TIREFIT is
atyres ealan t.
Yo uc an us eTIREFIT to seal punctures of up to
4m m, particularly thos einthe tyr etread. You
can us eTIREFIT at outside temperatures
down to Ò20 †. G
WARNING
In the following situations, the tyr esealant is
unabl etop rovidesufficient breakdow nassis-
tance ,asitisu nabletos ealthe tyr eproperly:
R there ar ecuts or punctures in the tyre
large rtha nt hos em entione dabove.
R the whee lrim is damaged.
R youh aved riven at ver ylow tyrep ressures
or on aflatt yre.
There is ariskofana ccident.
Do not drive any further. Contact aquali fied
specialis tworkshop. G
WARNING
The tyr esealant is harmfu land causes irrita-
tion. It must not come into contact with your
skin, eyes or clothing or be swallowed. Do not inhal eTIREFIT fumes .Keept yres ealant away
fro mc hildren. There is ariskofi njury.
If yo ucome into contact with the tyr esealant,
observe the following:
R Rinse off the tyr esealant fro myours kin
immediatel ywithw ater.
R If the tyr esealant come sinto contact with
your eyes, immediatel yrinse the mthor-
oughl ywithc lean water.
R If tyr esealant is swallowed, immediately
rinse your mouth ou tthoroughl yand drink
plenty of water. Do not induce vomiting,
and see kmedica lattentio nimmediately.
R Immediately change ou tofclothing which
ha sc ome into contact with tyr esealant.
R If an allergi creactio noccurs, see kmedical
attentio nimmediately. !
Do not operate the tyr
einflation com-
presso rfor longe rtha ne ight minute sata
time withou tabreak. It ma yotherwise
overheat.
The tyr einflation compressor can be oper-
ate dagain once it ha scoole ddown.
Compl ywitht he manufacturer's safety
instructions on the sticker on the tyr einfla-
tio nc ompressor.
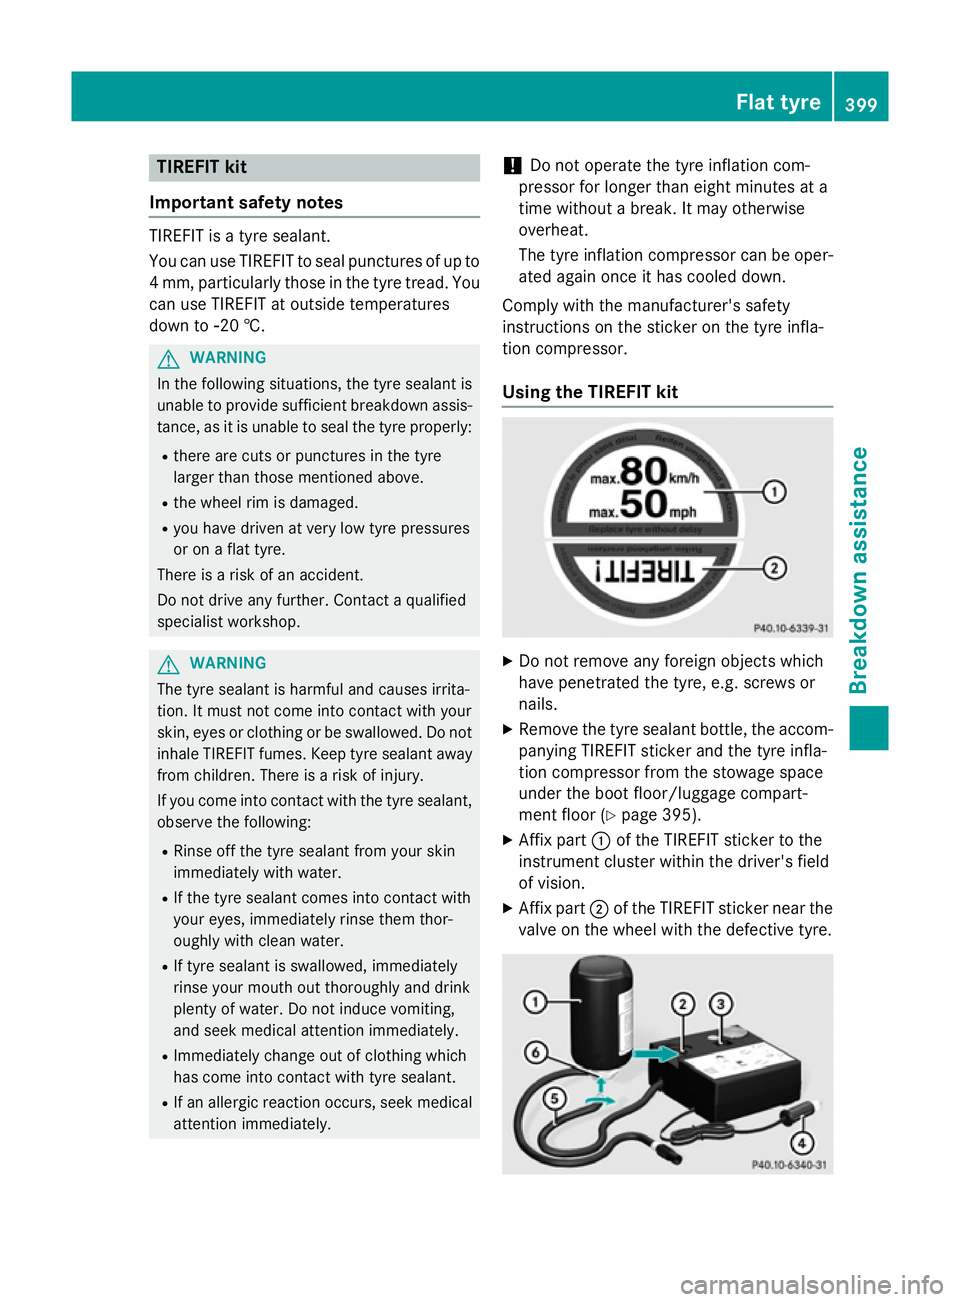
Usin gthe TIREFI Tkit X
Do not remove any foreign objects which
have penetrated the tyre, e.g .screws or
nails.
X Remov ethe tyr esealan tbottle ,the accom-
panying TIREFIT sticker and the tyr einfla-
tio nc ompressor fro mthe stowag espace
under the boot floor/luggage compart-
ment floor (Y page 395).
X Affi xpart :of the TIREFIT sticker to the
instrument cluster withi nthe driver's field
of vision.
X Affi xpart ;of the TIREFIT sticker nea rthe
valve on the whee lwitht he defective tyre. Flat tyre
399Breakdow nassistance Z
Page 403 of 497
X
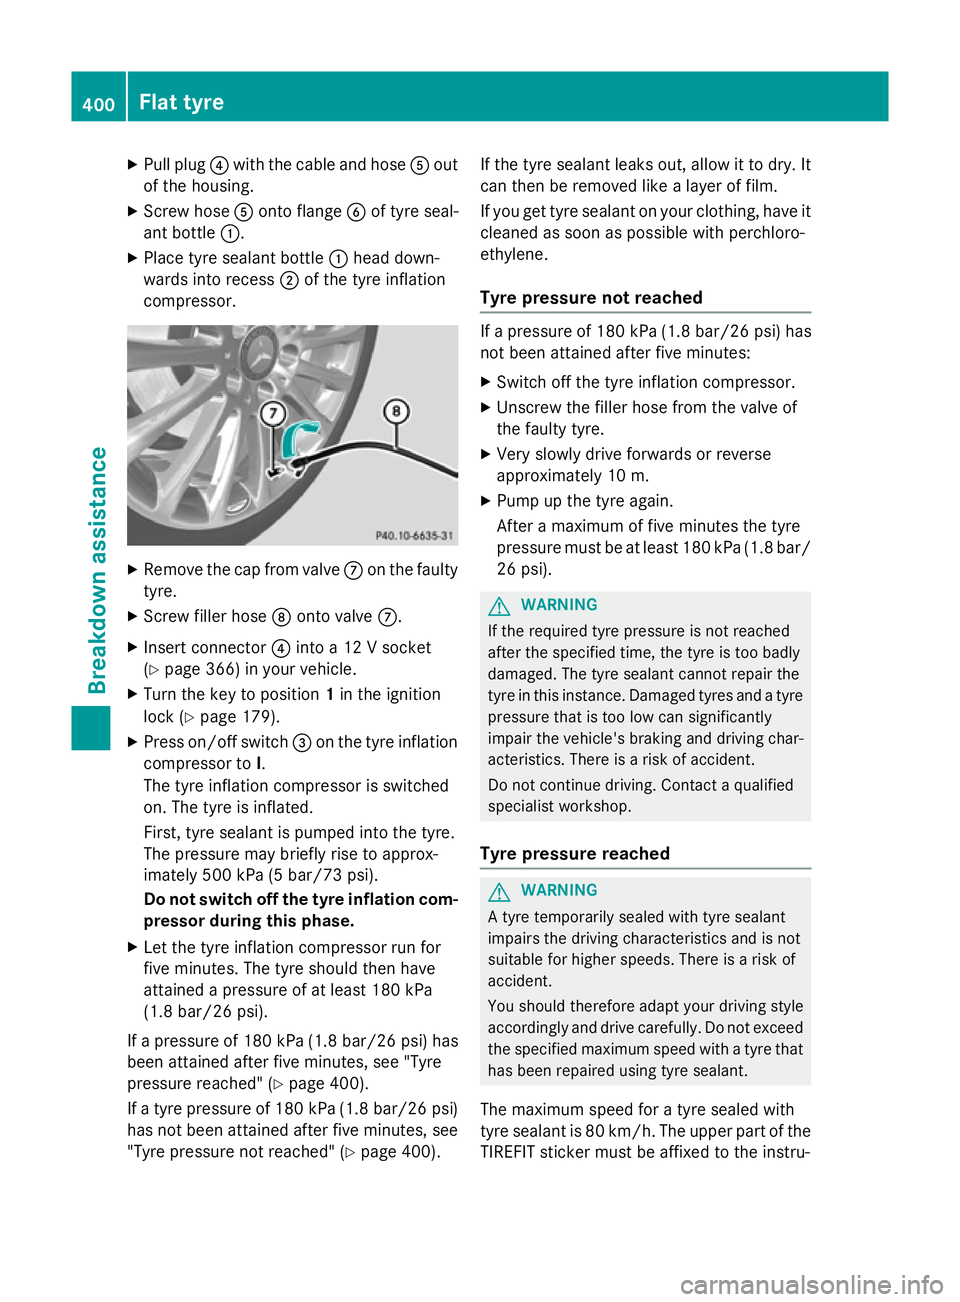
Pull plug ?with the cable and hose Aout
of the housing.
X Screw hose Aontof lange Bof tyre seal-
ant bottle :.
X Place tyre sealant bottle :head down-
wards into recess ;of the tyre inflation
compressor. X
Remove the cap from valve Con the faulty
tyre.
X Screw filler hose Dontov alveC.
X Inser tconnector ?into a12V socket
(Y page 366) in your vehicle.
X Turn the key to position 1in the ignition
lock (Y page 179).
X Press on/of fswitch =on the tyre inflation
compressor to I.
The tyre inflation compressor is switched
on. The tyre is inflated.
First ,tyre sealant is pumped into the tyre.
The pressure may briefly rise to approx-
imately 500 kPa (5 bar/73 psi).
Do not switch off the tyrei nflation com-
pressor during this phase.
X Let the tyre inflation compressor run for
five minutes. The tyre should then have
attained apressure of at least 180 kPa
(1.8 bar/26 psi).
If ap ressure of 180 kPa (1.8 bar/26 psi )has
been attained after five minutes, see "Tyre
pressure reached" (Y page 400).
If at yre pressure of 180 kPa (1.8 bar/26 psi)
has not been attained after five minutes, see "Tyre pressure not reached" (Y page 400).If the tyre sealant leaks out, allow it to dry. It
can then be removed like alayer of film.
If you get tyre sealant on your clothing, have it cleaned as soon as possible with perchloro-
ethylene.
Tyrep ressure not reached If
ap ressure of 180 kPa (1.8 bar/26 psi )has
not been attained after five minutes:
X Switc hoff the tyre inflation compressor.
X Unscrew the filler hose from the valve of
the faulty tyre.
X Very slowly drive forwards or reverse
approximately 10 m.
X Pump up the tyre again.
After amaximum of five minutes the tyre
pressure must be at least 180 kPa (1.8 bar/
26 psi). G
WARNING
If the required tyre pressure is not reached
after the specified time, the tyre is too badly
damaged. The tyre sealant cannot repair the
tyre in this instance. Damaged tyres and atyre
pressure that is too low can significantly
impair the vehicle's braking and driving char-
acteristics. There is arisk of accident.
Do not continue driving. Contact aqualified
specialist workshop.
Tyrep ressure reached G
WARNING
At yre temporarily sealed with tyre sealant
impairs the driving characteristics and is not
suitable for higher speeds. There is arisk of
accident.
You should therefore adapt your driving style
accordingly and drive carefully. Do not exceed the specified maximum speed with atyre that
has been repaired using tyre sealant.
The maximum speed for atyre sealed with
tyre sealant is 80 km/h. The upper part of the
TIREFI Tsticker must be affixed to the instru- 400
Flat tyreBreakdown assistance
Page 404 of 497
ment cluster where it willbee
asily seen by
the driver.
! After use, excess tyre sealant may run out
of the filler hose. This could caus estains.
Therefore, place the filler hose in the plastic
bag which contained the TIREFIT kit. H
Environmental note
Have the used tyre sealant bottle disposed of
professionally, e.g. at aqualified specialist
workshop.
If at yre pressure of 180 kPa (1.8 bar/26 psi)
has been attained after five minutes:
X Switch off the tyre inflation compressor.
X Unscrew the filler hose from the valve of
the faulty tyre.
X Stow the tyre sealant bottle, the tyre infla-
tion compresso rand the warning triangle.
X Pull away immediately.
X Stop after driving for approximatel yten
minutes and check the tyre pressure with
the tyre inflation compressor.
The tyre pressure must now be at least
130 kPa (1.3 bar/19 psi). G
WARNING
If the required tyre pressure is not reached
after driving for ashort period, the tyre is too
badly damaged. The tyre sealant cannot
repair the tyre in this instance. Damage dtyres
and atyre pressure that is too low can signif-
icantly impair the vehicle's braking and driv-
ing characteristics. There is arisk of accident.
Do not continue driving. Contact aqualified
specialist workshop.
i In yourv
ehicle, you willf indasticker with
the Mercedes-Benz Service24h telephone
number, e.g. on the B-pillar on the driver's
side.
X Correct the tyre pressure if it is still at least
130 kPa (1.3 bar/19 psi). See the fuel filler
flap for values.
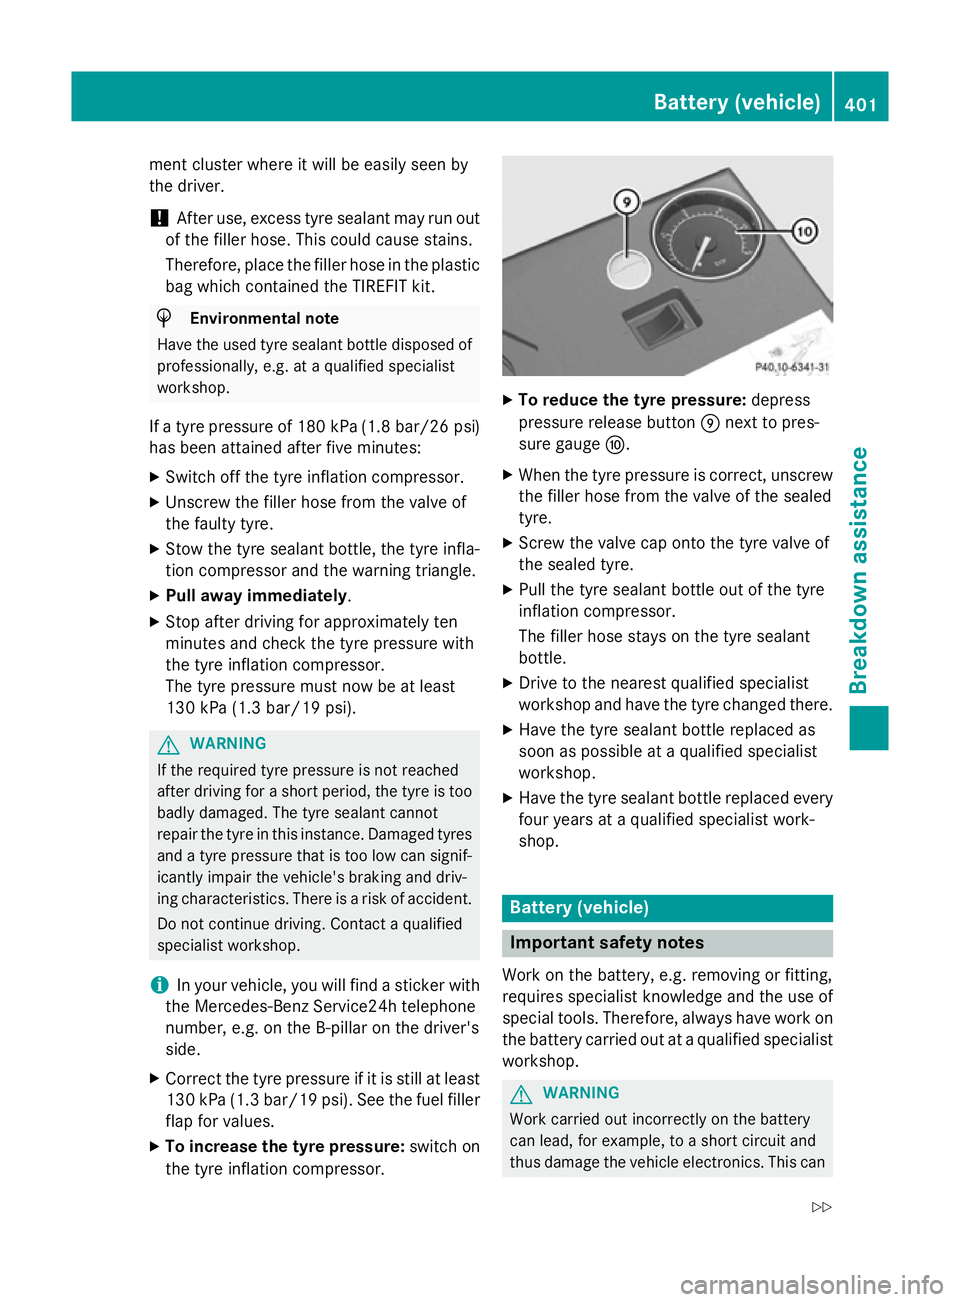
X To increase the tyre pressure: switch on
the tyre inflation compressor. X
To reduce the tyre pressure: depress
pressure release button Enext to pres-
sure gauge F.
X When the tyre pressure is correct, unscrew
the filler hose from the valve of the sealed
tyre.
X Screw the valve cap onto the tyre valve of
the sealed tyre.
X Pullt he tyre sealant bottle out of the tyre
inflation compressor.
The filler hose stays on the tyre sealant
bottle.
X Drive to the nearest qualified specialist
workshop and have the tyre changed there.
X Have the tyre sealant bottle replaced as
soon as possible at aqualified specialist
workshop.
X Have the tyre sealant bottle replaced every
four years at aqualified specialist work-
shop. Battery (vehicle)
Important safety notes
Work on the battery ,e.g. removing or fitting,
requires specialist knowledge and the use of
specia ltools. Therefore, alwaysh ave work on
the battery carrie dout at aqualified specialist
workshop. G
WARNING
Work carried out incorrectly on the battery
can lead, for example, to ashort circuit and
thus damage the vehicl eelectronics. This can Battery (vehicle)
401Breakdown assistance
Z