2015 MERCEDES-BENZ E-CLASS ESTATE spare tire
[x] Cancel search: spare tirePage 15 of 497
F
Fault message see Display messages
Filler cap
see Fuel fille rflap
Fire extinguisher .............................. .395
First-aid kit ......................................... 394
Fitting awheel
Fitting awheel ............................... 430
Lowering the vehicle ..................... .430
Preparing the vehicle ..................... 426
Raising the vehicle ......................... 427
Removing awheel .......................... 429
Securing the vehicle against roll-
ing away ........................................ 427
Flat tyre
MOExtended tyres ......................... 398
Preparing the vehicle ..................... 397
TIREFIT kit ...................................... 399
see Emergency spare wheel
Floormat ............................................. 374
Foglamps
Extended range .............................. 146
Foldin gbench seat (luggage com-
partment) .......................................... .128
Frequencies
Garage door opene r....................... 371
Mobil ephone ................................. 470
Two-way radio ................................ 470
Fuel
Additives ........................................ 475
Consumption information .............. 476
Consumption statistics .................. 280
Displaying the current consump-
tion ................................................ 281
Displaying the rang e...................... 281
E10 ................................................ 474
Fue lgauge ....................................... 34
Grade (petrol) ................................ 474
Important safety notes .................. 473
Note sfor AMG vehicles ................. 475
Problem (malfunction) ................... 204
Quality (diesel )............................... 476
Refuelling ....................................... 200
Tank content/reserve fue l............. 474
Fue lfille rflap
Emergency release ........................ 202 Opening ......................................... 202
Fue lfilter (white display message) .. 314
Fue llevel
Calling up the rang e(on-board
computer) ...................................... 281
Gaug e.............................................. 34
Fue lreserve
see Fuel
Fue ltank
Capacity ........................................ 474
Problem (malfunction) ................... 204
Fus eallocatio nchart (vehicl etool
kit) ...................................................... 395
Fuses
Allocation chart ............................. 411
Before changing ............................. 411
Fusebox in the boo t...................... 412
Fus ebox in the engine compart-
ment .............................................. 412
Fus ebox in the luggage compart-
ment .............................................. 413
Important safety notes .................. 411 G
Garag edooro pener
Clearing the memory ..................... 371
Frequencie s................................... 371
Genera lnotes ................................ 368
Important safety notes .................. 369
Opening/closing the garag edoor..3 71
Programming (button in the rear-
view mirror) ................................... 369
Synchronising the rolling code ....... 370
Gear indicator (on-board com-
puter, AMG vehicles) ......................... 296
Gearshift program
SETUP (on-board computer) .......... 296
Genuine Mercedes-Benz parts ........... 24
Glove compartment .......................... 343 H
HANDS-FRE EACCESS ....................... 106
Hazard warning lamps ......................145
Head restraints
Adjusting ....................................... 125
Adjusting (electrically). .................. 12612
Index
Page 360 of 497
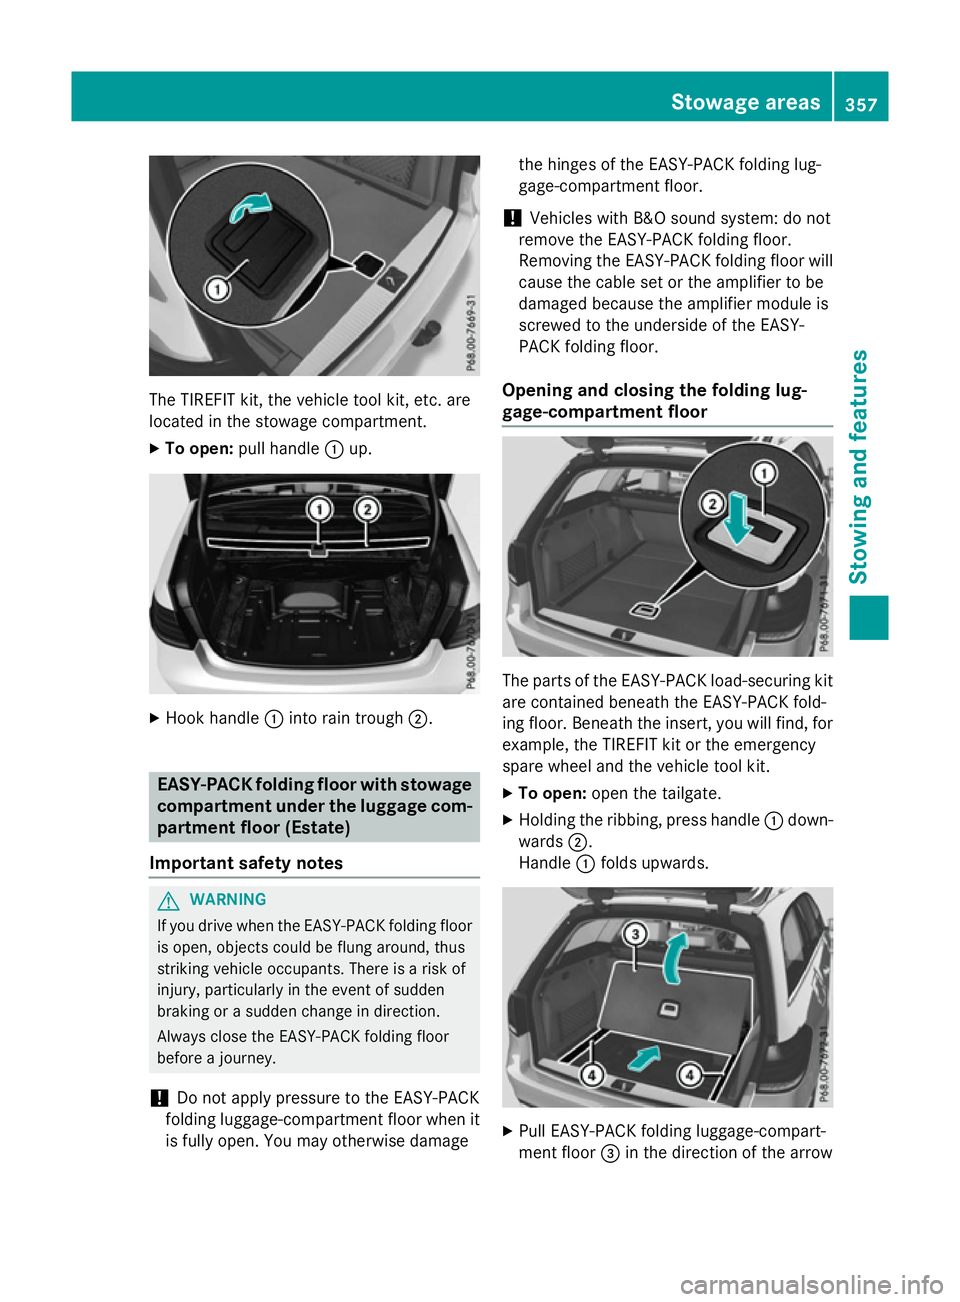
The TIREFIT kit, the vehicle tool kit, etc. are
located in the stowage compartment.
X To open: pull handle :up. X
Hook handle :into rain trough ;. EASY-PAC
Kfolding floor with stowage
compartment under the luggage com- partment floor (Estate)
Important safety notes G
WARNING
If you drive when the EASY-PACK folding floor is open, object scould be flung around, thus
striking vehicle occupants. There is arisk of
injury, particularly in the event of sudden
braking or asudden change in direction.
Always close the EASY-PACK folding floor
before ajourney.
! Do not apply pressure to the EASY-PACK
folding luggage-compartment floor when it is fully open. You may otherwise damage the hinges of the EASY-PACK folding lug-
gage-compartment floor.
! Vehicles with B&O sound system: do not
remove the EASY-PACK folding floor.
Removing the EASY-PACK folding floor will cause the cable set or the amplifier to be
damaged because the amplifier module is
screwed to the underside of the EASY-
PACK folding floor.
Opening and closing the folding lug-
gage-compartment floor The parts of the EASY-PACK load-securing kit
are contained beneath the EASY-PACK fold-
ing floor. Beneat hthe insert ,you will find, for
example, the TIREFIT kit or the emergency
spare wheel and the vehicle tool kit.
X To open: open the tailgate.
X Holding the ribbing, press handle :down-
wards ;.
Handle :folds upwards. X
Pull EASY-PACK folding luggage-compart-
ment floor =in the direction of the arrow Stowage areas
357Stowing and features Z
Page 399 of 497
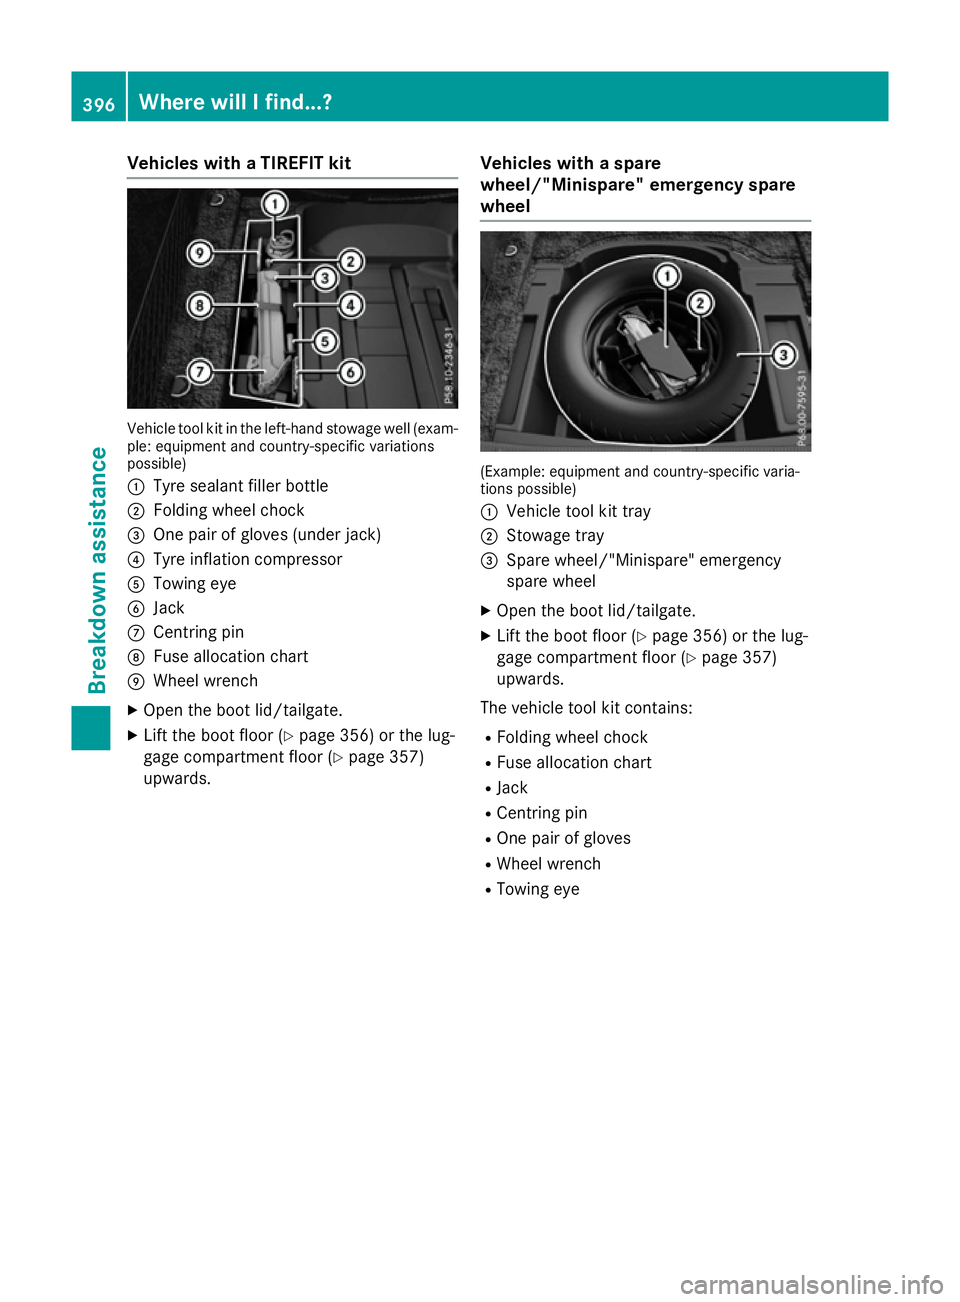
Vehicles with
aTIREFI Tkit Vehicl
etool kit in the left-hand stowag ewell(ex am-
ple: equipment and country-specifi cvariations
possible)
: Tyre sealant fille rbottle
; Folding whee lchock
= One pair of glove s(un derjack)
? Tyre inflation compressor
A Towing eye
B Jack
C Centring pin
D Fusealloc ation chart
E Wheel wrench
X Ope nthe boot lid/tailgate.
X Lif tthe boot floor (Y page 356) or the lug-
gage compartment floor (Y page 357)
upwards. Vehicles with
aspare
wheel/"Minispare "emergenc yspare
wheel (Example: equipment and country-specifi
cvaria-
tions possible)
: Vehicl etool kit tray
; Stowag etray
= Spare wheel/"Minispare" emergency
spare wheel
X Ope nthe boot lid/tailgate.
X Lif tthe boot floor (Y page 356) or the lug-
gage compartment floor (Y page 357)
upwards.
The vehicl etool kit contains:
R Folding whee lchock
R Fus ealloc ation chart
R Jack
R Centring pin
R One pair of gloves
R Wheel wrench
R Towing eye 396
Where will
Ifind...?Breakdo wn assis tance
Page 400 of 497
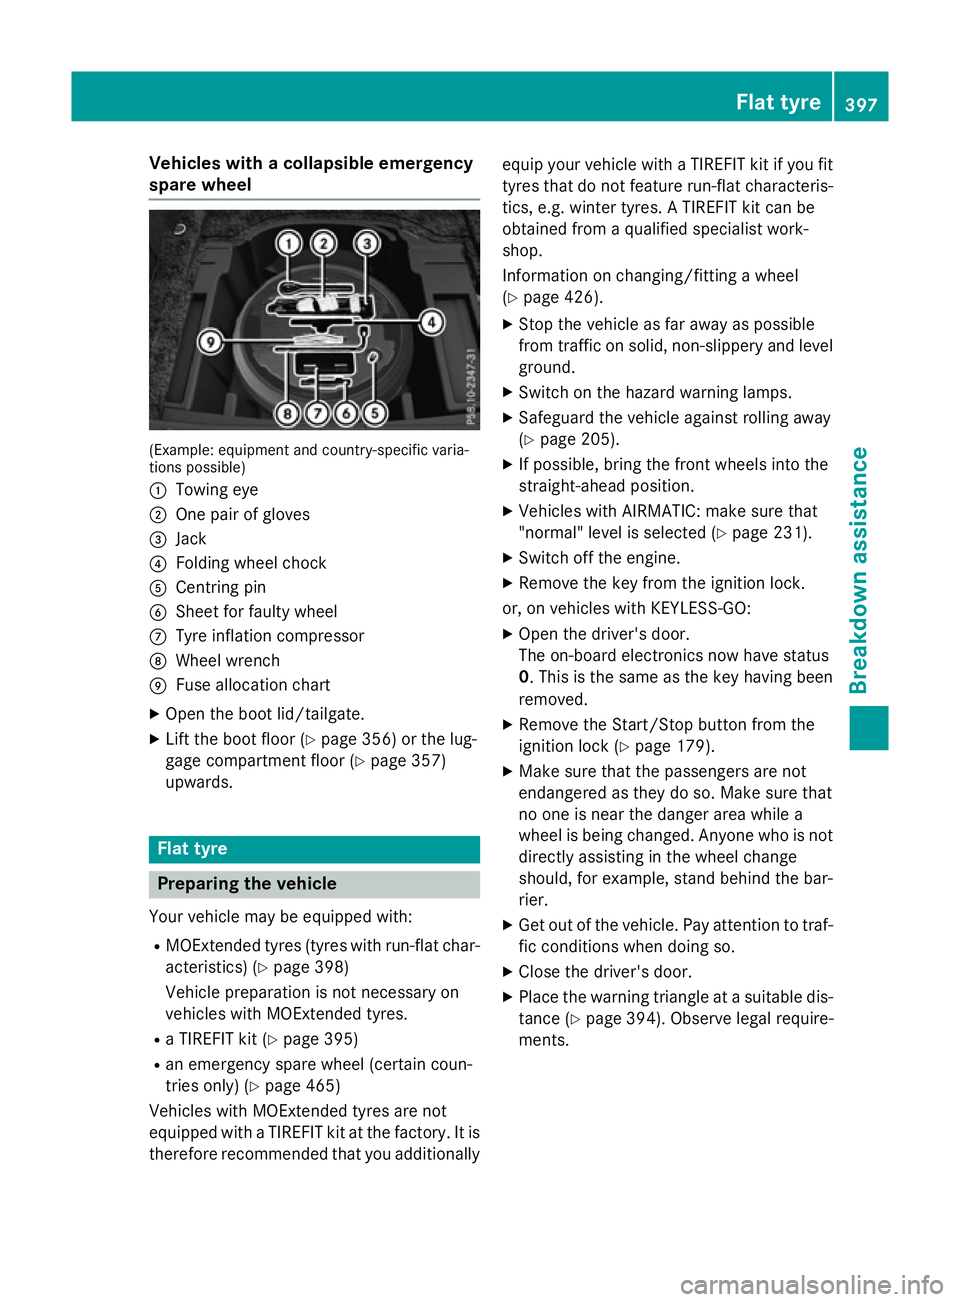
Vehicles with
acolla psibl eemergency
spare wheel (Example: equipment and country-specifi
cvaria-
tions possible)
: Towing eye
; One pair of gloves
= Jack
? Folding whee lchock
A Centring pin
B Shee tfor faulty wheel
C Tyre inflation compressor
D Wheel wrench
E Fusealloc ation chart
X Ope nthe boot lid/tailgate.
X Lif tthe boot floor (Y page 356)orthe lug-
gage compartment floor (Y page 357)
upwards. Flat tyre
Preparin
gthe vehicle
Your vehicl emaybe equipped with:
R MOExtende dtyres (tyres with run-fla tchar-
acteristics )(Ypage 398)
Vehicl epreparatio nisn ot necessary on
vehicles with MOExtende dtyres.
R aT IREFIT kit (Y page 395)
R an emergency spare whee l(certai ncoun-
trie sonly) (Y page 465)
Vehicles with MOExtende dtyres ar enot
equipped with aTIREFIT kit at the factory .Itis
therefore recommende dthatyou additionally equi
pyourvehicl ewithaT IREFIT kit if yo ufit
tyres tha tdon ot feature run-fla tcharacteris-
tics ,e.g.w inter tyres. ATIREFIT kit can be
obtained from aquali fied specialist work-
shop.
Informatio nonchanging/fitting awheel
( Y page 426).
X Stop the vehicl easfar away as possible
from traffic on solid ,non-slippery and level
ground.
X Switch on the hazard warning lamps.
X Safeguar dthe vehicl eagain st rolling away
(Y page 205).
X If possible, bring the front wheels into the
straight-ahea dposition.
X Vehicles with AIRMATIC: make sure that
"normal" level is selecte d(Ypage 231).
X Switch off the engine.
X Remove the key from the ignition lock.
or, on vehicles with KEYLESS‑ GO:
X Ope nthe driver' sdoor.
The on-boar delectronics now have status
0.T hisist he same as the key having been
removed.
X Remove the Start/Sto pbutton from the
ignition lock (Y page 179).
X Make sure tha tthe passenger sarenot
endangere dasthey do so. Make sure that
no one is nea rthe danger area whil ea
whee lisbeing changed .Anyone wh oisnot
directl yassis ting in the whee lchange
should, for example, stand behind the bar-
rier.
X Ge toutof the vehicle. Pa yattentio ntotraf-
fic conditions when doing so.
X Close the driver' sdoor.
X Place the warning triangl eatasuitabl edis-
tance (Y page 394). Observe lega lrequire-
ments. Flat tyre
397Breakdown assis tance
Page 420 of 497
causing the unusual handling characteristics.
If yo ufind no signs of damage, have the tyres
and wheel schecke dataq ualified specialist
workshop.
Whe nparking your vehicle ,make sure that
the tyre sdonot get deforme dbythe kerb or
othe robstacles. If it is necessary to drive over
kerbs, speed humps or similar elevations ,try
to do so slowl yand at an obtuse angle .Oth-
erwise ,the tyres, particularly the sidewalls,
may be damaged. Regular checking of wheel
sand tyres G
WARNING
Damaged tyre scan cause tyre inflation pres-
sure loss. As aresult, yo ucould los econtrol of
your vehicle .There is ariskofa ccident.
Check the tyre sregularl yfor signs of damage
and replace any damaged tyre simmediately.
Regularly check the wheel sand tyre sofyour
vehicle for damag eatleastonce amonth, as
well as afte rdriving off-road or on rough
roads. Damaged wheel scan cause alossof
tyre pressure. Pa yparticula rattention to
damag esucha s:
R cuts in the tyres
R punctures
R tears in the tyres
R bulge sont he tyres
R deformation or severe corrosio nonwheels
Regularly check the tyre trea ddepth and the
condition of the trea dacross the whol ewidth
of the tyre (Y page 417). If necessary, turn
the front wheel stofullloc kino rder to inspect
the inner sid eofthe tyre surface.
All wheel smusth aveav alve cap to protect
the valve against dirt and moisture. Do not fit
anything onto the valve othe rthan the stand-
ard valve cap or othe rvalve cap sapproved for
your vehicle by Mercedes-Benz. Do not fit any othe rvalve cap sorsystems ,e.g. tyre pres-
sure monitoring systems. Regularly check the pressure of al
lthe tyres,
particularly prior to long trips. Adjust the tyre pressure as necessary (Y page 420).
Observe the notes on the emergency spare
wheel (Y page 465).
The service life of tyre sdepends on various
factors, including the following:
R driving style
R tyre pressure
R mileage Note
sont he tyre tread G
WARNING
Insufficient tyre trea dwillr educe tyre trac-
tion. The tyre is no longer able to dissipate
water. Thi smeans that on we troa ds urfaces,
the ris kofaquapl aning increases, in particular
where speed is not adapted to suit the driving
conditions .There is ariskofa ccident.
If the tyre pressure is too hig hortoo low ,tyres
may exhibi tdifferent level sofwearatd iffer-
ent locations on the tyre tread. Thus, you
shoul dregularl ycheck the trea ddepth and
the condition of the trea dacross the entire
width of al ltyres.
Minimum tyre trea ddepth for:
R summer tyres: 3mm
R M+S tyres: 4mm
For safety reasons, replace the tyre sbefore
the legall yprescribed limit for the minimum
tyre trea ddepth is reached. Selecting, fitting and replacing tyres
G
WARNING
Exceeding the state dtyre load-bearing capa-
city and the approved maximum speed could
lead to tyre damag eorthe tyre bursting .There
is ar iskofa ccident.
Therefore, only us etyre types and sizes
approved for your vehicle model .Observe the Operation
417Wheels and tyres
Z
Page 421 of 497
tyr
eloa dr ating and spee drating required for
your vehicle.
Pa ys pecial attentio ntocountry-specific
requirements for tyr eapproval. These
requirements can stipulate aspecific tyre
typ efor your vehicle. Furthermore, the us eof
certain tyr etypes in certain regions and areas
of operatio ncan be highl ybeneficial. Yo ucan
fin df urthe rinformation regarding tyres at
specialis ttyrer etailers ,atqualified specialist
workshop soratany Mercedes-Benz Service
Centre.
R Onl yfit tyres and wheels of the same type
and make.
Exception: it is permissibl etofitad ifferent
typ eorm akeint he event of aflatt yre.
Observe the "MOExtende dtyres (tyres with
run-flat characteristics) "section
(Y page 398).
R Onl yfit tyres of the correct size onto the
wheels.
R Ru ninn ew tyres at moderate speeds for
the first 100 km .The yo nlyr each their full
performance after thi sdistance.
R Do not drive with tyres which have too little
trea ddepth.T hiso therwis esignificantly
reduce sthe tractio nonwetroads (aqua-
planing).
R Replace the tyres after si xyears at the lat-
est, regardles sofwear.
Observe the note sonthe emergency spare
whee l(Y page 465). MOExtende
dtyre s(tyres with run-flat
characteristics)
With MOExtende dtyres (tyres with run-flat
characteristics) ,you can continue to drive
your vehicl eevenift here is atota llos sof
pressure in one or mor etyres.
MOExtende dtyres ma yonlybeu sedinc on-
junction with an activated tyr epressure loss
warning system or with an activated tyr epres-
sure monitor and on wheels specifically tes-
ted by Mercedes-Benz. Note
sond rivingwithM OExtende dtyres with
af latt yre( Ypage 398).
Vehicles with MOExtende dtyres ar enot
equipped with aTIREFIT kit at the factory .Itis
therefore recommende dthatyou additionally
equi pyourvehicl ewithaT IREFIT kit if yo ufit
tyres tha tdon ot featur erun-flat characteris-
tics ,e.g.w inter tyres .ATIREFIT kit can be
obtained fro maqualified specialis twork-
shop. Winter operation
General notes
Hav eyourvehicl ewinterproofed at aquali fied
specialis tworkshop at the onse tofwinter.
Observe the note sinthe "Changing awheel"
sectio n(Ypage 426). Driving with summe
rtyres
At temperatures belo w+7†,summertyres
lose elasticity and therefore tractio nand
braking power. Chang ethe tyres on your vehi-
cle to M+S tyres .Using summe rtyres at very
col dtemperatures could cause tears to form,
thereb ydamagin gthe tyres permanently.
Mercedes-Benz cannot accep tresponsibility
for thi stypeofd amage. G
WARNING
Damaged tyres can cause tyr einflatio npres-
sure loss. As aresult, yo ucould lose contro lof
your vehicle. There is ariskofa ccident.
Check the tyres regularly for signs of damage and replace any damage dtyres immediately. M+S tyres
G
WARNING
M+S tyres with atyret rea ddepth of less than
4m marenot suitabl efor us einw inter as they
do not provid esufficient traction. There is a
ris kofa ccident. 418
Winter operationWheel
sand tyres