2015 MERCEDES-BENZ E-CLASS ESTATE garage door opener
[x] Cancel search: garage door openerPage 21 of 497
Sliding sunroo
f............................... 116
Reading lamp ..................................... 148
Rear benc hseat
Folding the backres tforwards/
back ............................................... 348
Rear compartment
Setting the ai rvents ...................... 174
Setting the airflow ......................... 164
Setting the temperature ................ 163
Rear foglamp
Displa ymessage ............................ 309
Switching on/of f........................... 143
Rear seat
Displa ymessage ............................ 326
Rear windo wblind ............................ 364
Rear windo wheating
Problem (fault) ............................... 166
Switching on/of f........................... 165
Rear windo wwiper
Replacing the wipe rblade .............. 153
Switching on/of f........................... 152
Rear-compartment seat belt sta-
tus indicator ........................................ 49
Rear-vie wmirror
Anti-dazzle mod e(automatic) ........ 137
Dipping (manual) ........................... 136
Refuelling
Fuelgauge ....................................... 34
Important safety notes .................. 200
Note sfor AMG vehicles ................. 475
Refuelling process ......................... 201
see Fuel
Remote control
Auxiliary heating/ventilation .......... 169
Changing the batteries (auxiliary
heating) ......................................... 171
Garag edooro pener ....................... 368
Programming (garage door
opener) .......................................... 369
Replacing bulbs
Important safety notes .................. 149
Overview of bulb types .................. 150
Replacing the battery (auxiliary
heatin gremote control) .................... 171
Rescue card ......................................... 28
Reserve (fuel tank)
see Fuel Reserve fuel
Displa ymessage ............................ 313
Warning lamp ................................. 336
Residual hea t(clim ate control) ........ 167
Restrain tsystem
Displa ymessage ............................ 306
Introduction ..................................... 44
Warning lamp ................................. 335
Warning lamp (function) ................... 45
Rev counter ........................................ 276
Revers egear
Engaging (automati ctransmis-
sion) ............................................... 189
Engaging (manua ltransmission) .... 189
Reversin gcamera
Cleaning instructions ..................... 390
Displays in the Audio display ......... 246
Displays in the COMAND display ... 246
Function/note s............................. 244
Switching on/of f........................... 245
Reversin gfeature
Panorama sliding sunroo f.............. 115
Roller sunblind s............................. 117
Sid ew indow s................................. 110
Sliding sunroo f............................... 115
Reversin gfunction
Boot lid/tailgate ............................ 104
Reversin glamp (display message) .. 309
Rolle rsunblind
Panorama sliding sunroo f.............. 117
Rear window .................................. 364
Roo flinin gand carpets (cleaning
instructions) ...................................... 392
Roo floa d( maximum) ........................ 481 S
Safety Childre ninthe vehicl e..................... 58
Safety net
Attaching ....................................... 353
Important safety information ......... 353
Safety system
see Driving safety systems
Seat
Adjusting the active multicontour
seat............................................... 128
Adjusting the multicontou rseat..... 128 18
Index
Page 44 of 497
Overhea
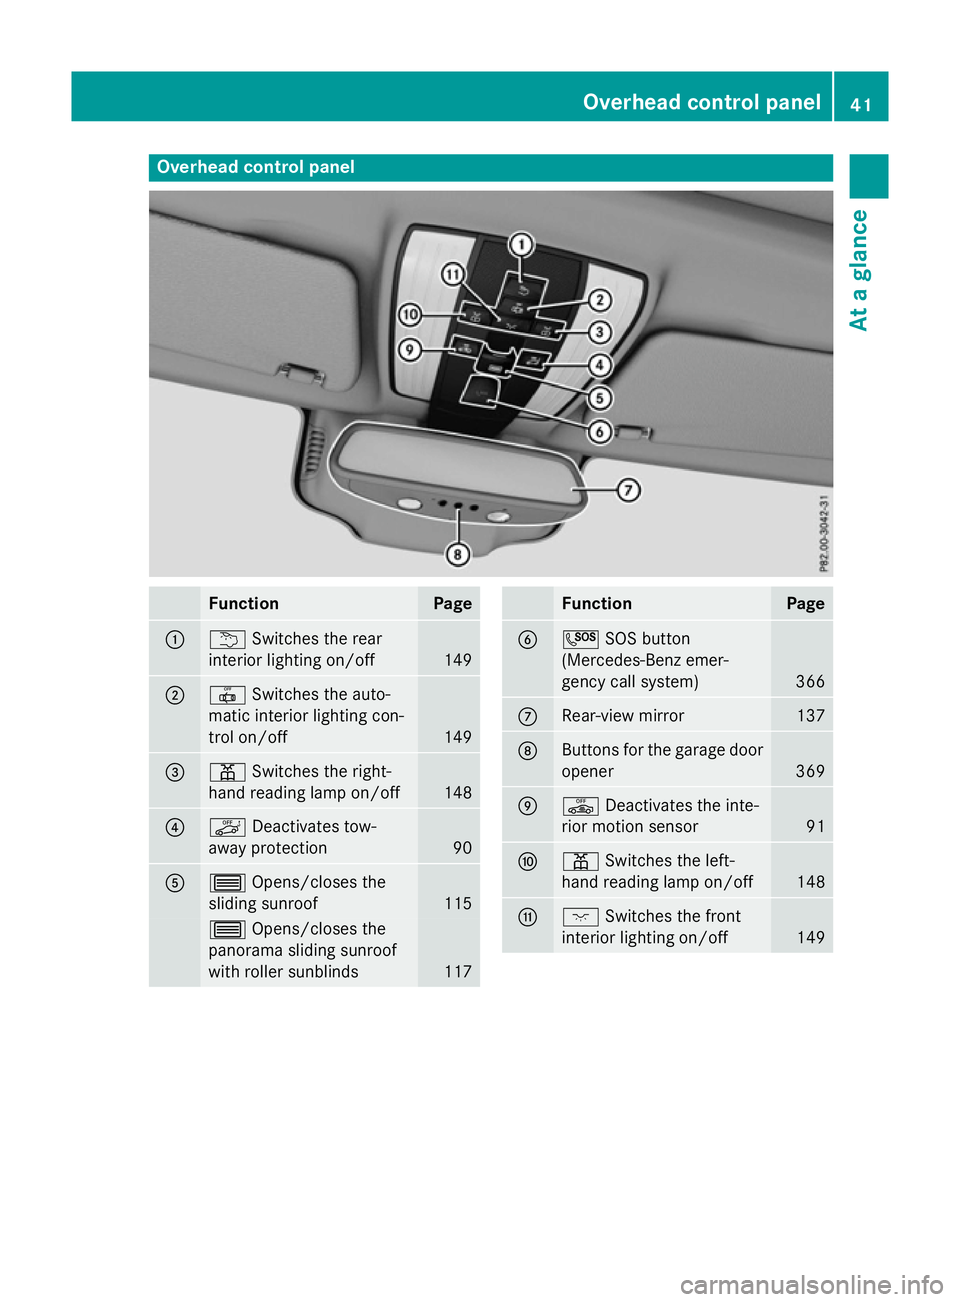
dcontrol panel Function Page
:
u
Switches the rear
interior lighting on/off 149
;
|
Switches the auto-
matic interior lighting con-
trol on/off 149
=
p
Switches the right-
hand reading lamp on/off 148
?
ë
Deactivates tow-
away protection 90
A
3
Opens/closes the
sliding sunroof 115
3
Opens/closes the
panorama sliding sunroof
with roller sunblinds 117 Function Page
B
G
SOS button
(Mercedes-Benz emer-
genc ycall system) 366
C
Rear-view mirror 137
D
Buttons for the garage door
opener 369
E
ê
Deactivates the inte-
rior motion sensor 91
F
p
Switches the left-
hand reading lamp on/off 148
G
c
Switches the front
interior lighting on/off 149Overhea
dcontrol panel
41Atag lance
Page 371 of 497
More information on suitable mobile phones,
mobile phone brackets and on connecting
Bluetooth ®
-capable mobile phones to
COMAND Online/Audio 20 can be obtained:
R at your Mercedes-Ben zService Centre
R on the Internet at http://www.mercedes-
benz.com/connect
The functions and services available when
you use the phone depend on your mobile
phone model and service provider.
Using amobile phone To connect
amobile phone to the exterior
aerial and charge it, insert it into the mobile
phone bracket.
X Open the telephone compartment
(Y page 344).
X Place the mobile phone bracket into the
pre-installed fitting; see the separate instal-
lation instructions for the mobile phone fit-
ting.
X Insert the mobile phone into the mobile
phone bracket; see the separate installa-
tion instructions for the mobile phone fit-
ting.
i The mobile phone can also be operated
without being in the bracket. However, the charging function and aerial function are
not available.
In order to use Bluetooth ®
(SAP profile) on
your telephone module, you must first insert
the telephone module into the pre-installed
fitting. This connects it to the exterior aerial.
If you wish to charge the mobile phone, then
you must connect it to aUSB port.
Further information on the telephone module
with Bluetooth ®
(SAP profile) can be found in
the Digital Owner's Manual.
Operating the mobile phone You can operate the telephone using the
6 and~ buttons on the multifunction
steering wheel. You can operate other mobile phone functions via the on-board computer
(Y page 284).
When you remove the key from the ignition
lock, the mobile phone is disconnected from
the hands-free system. Active calls will first
be transferred to the mobile phone directly.
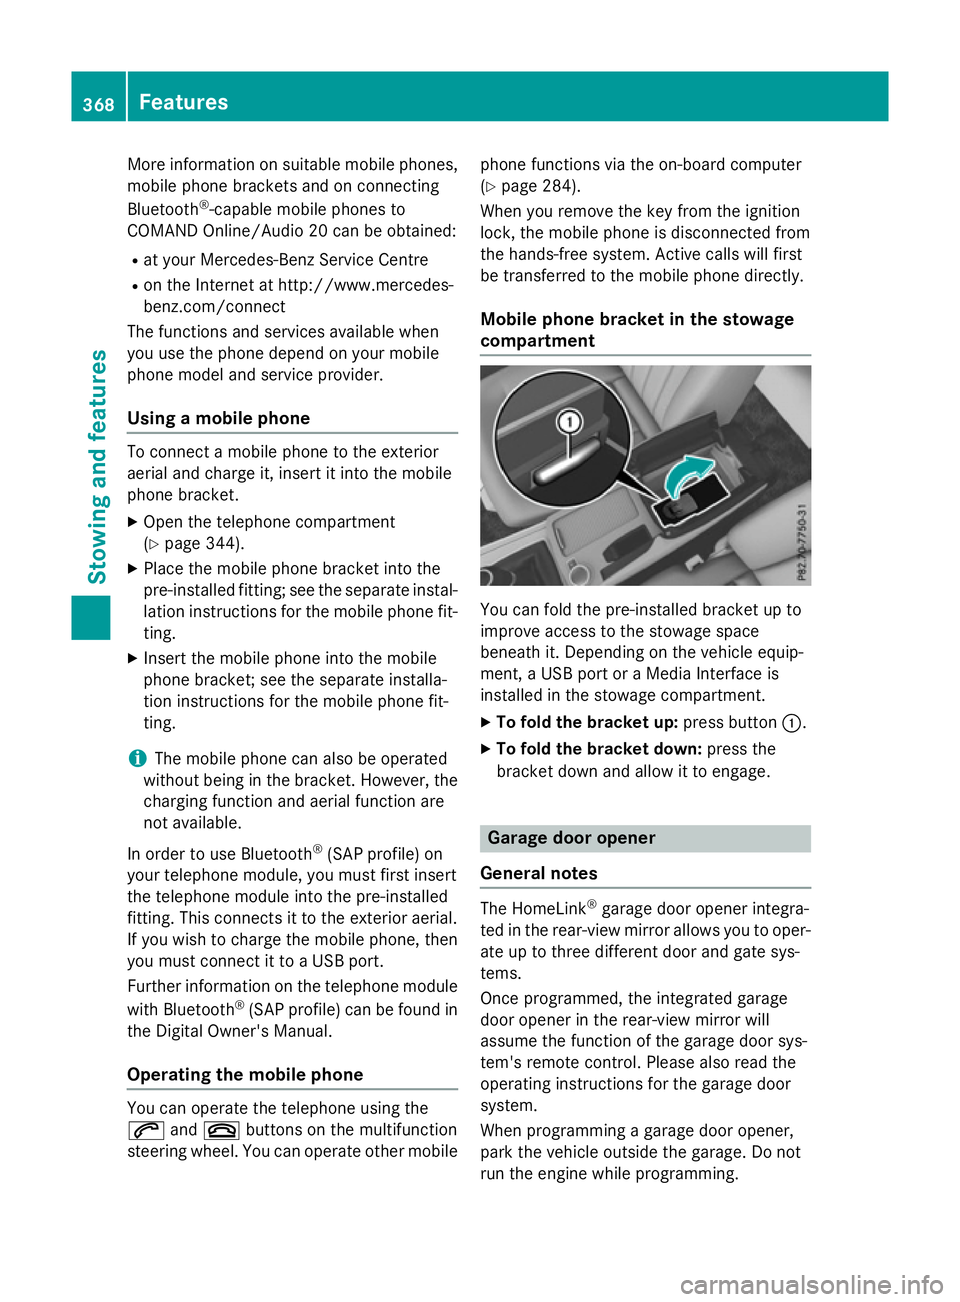
Mobile phone bracket in the stowage
compartment You can fold the pre-installed bracket up to
improve access to the stowage space
beneath it. Depending on the vehicle equip-
ment,aU
SB port or aMedia Interface is
installed in the stowage compartment.
X To fold the bracket up: press button:.
X To fold the bracket down: press the
bracket down and allow it to engage. Garage door opener
General notes The HomeLink
®
garage door opener integra-
ted in the rear-view mirror allowsy ou to oper-
ate up to three different door and gate sys-
tems.
Once programmed, the integrated garage
door opener in the rear-view mirror will
assume the function of the garage door sys-
tem's remote control. Please also read the
operating instructions for the garage door
system.
When programming agarage door opener,
park the vehicle outside the garage. Do not
run the engine while programming. 368
FeaturesStowing and features
Page 372 of 497
The garage door opener is only available for
certain countries. Observe the legal require-
mentsf or each individual country.
The HomeLink ®
garage door opener is com-
patible with most European garage and gate
opener drives. More information on Home-
Link ®
and/or compatible products is availa-
ble:
R at aq ualified specialist workshop
R via the HomeLink ®
Hotline
(0) 080004 66 354 65 or alternatively
+49 (0) 6838 907-277
R on the Internet at http://
www.homelink.com
Important safety notes G
WARNING
When you operate or program the garage door with the integrated garage door opener, per-
sons in the range of movemen tofthe garage
door can become trapped or struck by the
garage door. There is arisk of injury.
When using the integrated garage door
opener, alway smake sure that nobody is
within the range of movemen tofthe garage
door. G
WARNING
Combustion engines emit poisonous exhaust
gases such as carbon monoxide. Inhaling
these exhaust gases leads to poisoning. There is ar isk of fatal injury. Therefore never leave
the engine runnin ginenclosed spaces with-
out sufficient ventilation.
Programming Programming buttons
Pay attention to the "Importan
tsafety notes"
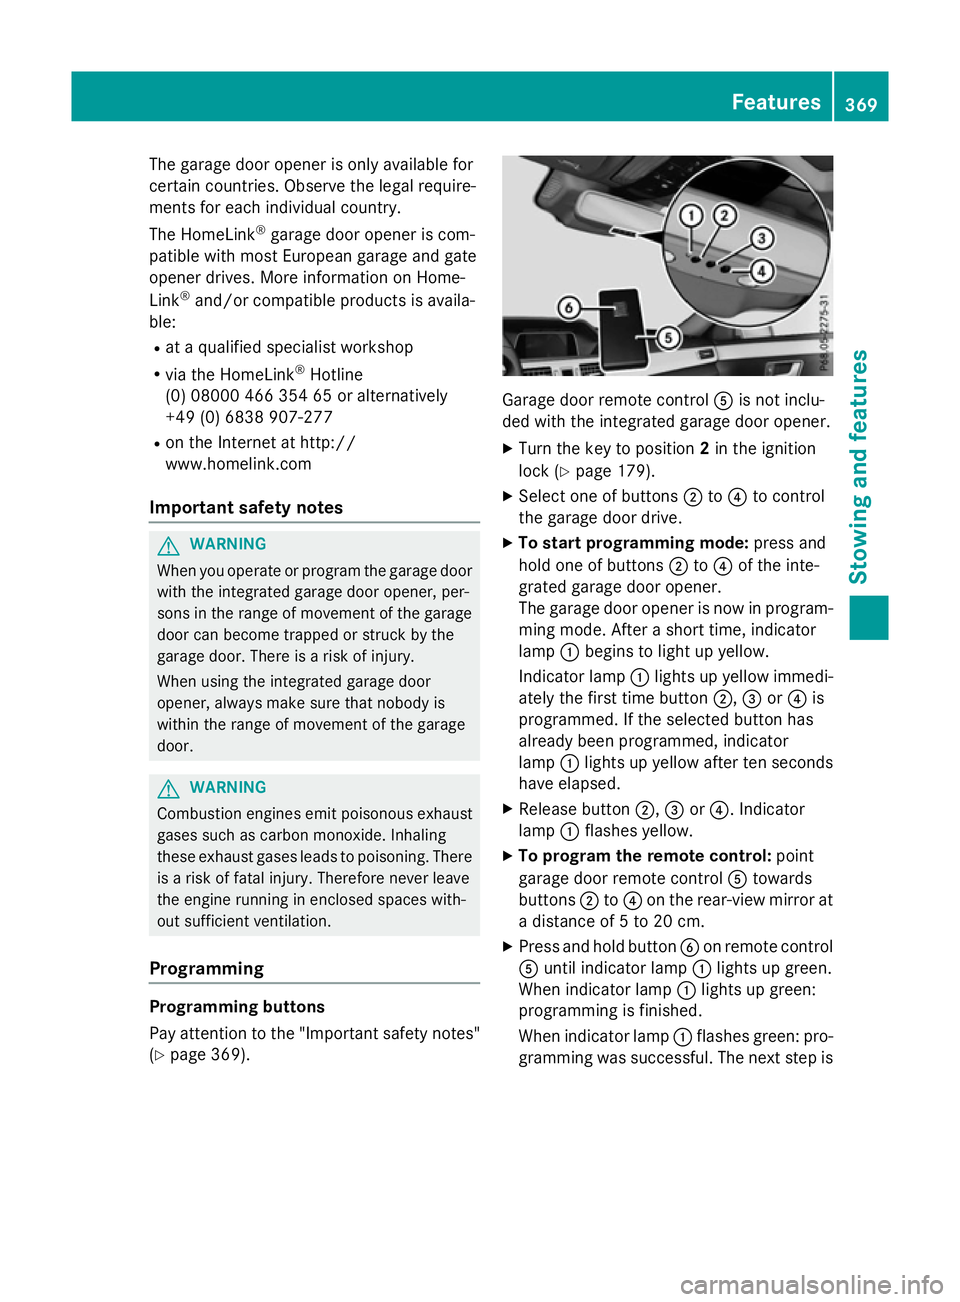
(Y page 369). Garage door remot
econtrol Ais not inclu-
ded with the integrated garage door opener.
X Turn the key to position 2in the ignition
lock (Y page 179).
X Select one of buttons ;to? to control
the garage door drive.
X To startp rogramming mode: press and
hold one of buttons ;to? of the inte-
grated garage door opener.
The garage door opener is now in program- ming mode. After ashort time, indicator
lamp :begins to light up yellow.
Indicator lamp :lights up yellow immedi-
ately the first time button ;,=or? is
programmed. If the selected button has
already been programmed, indicator
lamp :lights up yellow after ten seconds
have elapsed.
X Release button ;,=or?.I ndicator
lamp :flashes yellow.
X To program the remot econtrol: point
garage door remot econtrol Atowards
buttons ;to? on the rear-view mirror at
ad istanc eof5to20c m.
X Press and hold button Bon remot econtrol
A until indicator lamp :lights up green.
When indicator lamp :lights up green:
programming is finished.
When indicator lamp :flashes green: pro-
gramming was successful. The next step is Features
369Stowing and features Z
Page 373 of 497
to synchronise the rolling code
(Y
page 370).
X Releas ebutton Bof remote control Aof
the garage door drive.
If indicator lamp :lights up red :repea tthe
programming proces sfor the correspond-
ing button on the rear-view mirror. When
doing so ,varyt he distance between remote
control Aand the rear-view mirror.
Th er equired distance between remote
control Aand the integrated garage door
opene rdepen ds on the garage door drive
system. Severa lattempts ma yberequired.
Yo us houl dteste very positio nfor at least
25 second sbefore trying another position.
Synchronising the rolling code
Observe the "Important safety notes"
(Y page 369).
If the garage door system uses arolling code,
you will also have to synchronise the garage
door system with the integrated garage door
opener in the rear-view mirror .Todothis you
will need to use the programming button on
the door drive control panel. The program-
ming button may be placed at differen tloca-
tion sdepending on the manufacturer. It is
usually located on the door drive unit on the
garage ceiling.
Familiarise yourself with the garage door
drive operatin ginstructions, e.g. under "Pro-
grammin gofadditional remot econtrols",
before carrying out the following steps.
Your vehicle must be within range of the
garage door or gate opener drive. Make sure
that neither your vehicle nor any persons/
objects are present within the sweep of the
door or gate.
X Turn the key to position 2in the ignition
lock (Y page 179).
X Get out of the vehicle.
X Press the programming button on the door
drive unit.
Usually, you now have 30 seconds to ini-
tiate the nexts tep. X
Get intot he vehicle.
X Press previously programmed button ;,
= or? of the integrated garage door
opener until the door closes.
The rolling code synchronisation is then
complete.
Problems when programming
If you have problems when programming the
integrated garage door opener, please note
the following: R Check the transmitter frequenc yused by
garage door drive remot econtrol Aand
whether it is supported. The transmitter
frequenc ycan usually be found on the back
of the garage door drive remot econtrol.
R Replace the batteries in garage door
remot econtrol A.This increases the like-
lihood that garage door remot econtrol A
will transmit astrong and precise signal to
the integrated garage door opener in the
rear-view mirror.
R When programming, hold remot econtrol
A at varying distances and angles from the
button which you are programming. Try var- ious angles at adistanc ebetween 5and
30 cm or at the same angle but at varying
distances.
R If ther eisanother remot econtrol for the
same garage door drive, perform the pro-
grammin gsteps again using this remote
control. Befor eperforming these steps,
make sure that new batteries have been
fitted in garage door drive remot econtrol
A.
R Note that some remot econtrols transmit
only for alimited period (the indicator lamp
on the remot econtrol goes out). Press but-
ton Bon remot econtrol Aagain before
transmission ends.
R Align the aerial cable of the garage door
opener unit. This can improve signal recep-
tion/transmission. 370
FeaturesStowing and features
Page 374 of 497
Opening or closing the garage door
Oncep
rogrammed, the integrated garage
door opener will assume the function of the
garage door system's remot econtrol. Please
also read the operatin ginstructions for the
garage door system.
X Turn the key to position 2in the ignition
lock (Y page 179).
X Press button ;,=or? which you have
programmed to operate the garage door.
Garage door system with afixed code: indi-
cator lamp :lights up green.
Garage door system with arolling code:
indicator lamp :flashes green.
The transmitter will transmit asignal for as
long as the button is pressed. The trans-
mission is halted after amaximum of ten
seconds and indicator lamp :lights up
yellow.
X Press button ;,=or? again if neces-
sary.
Clearing the memory Make sure that you clear the memory of the
integrated garage door opener before selling
the vehicle.
X Turn the key to position 2in the ignition
lock (Y page 179).
X Press and hold buttons ;and ?.
The indicator lamp initially lights up yellow
and then green.
X Release buttons ;and ?.
The memory of the integrated garage door
opener in the rear-view mirror is cleared. Frequencies Europe
Country Radio typea
pproval num-
ber
Frequency range (MHz) AD (Andorra) 20 July 2005
MHz:2
7, 30, 40, 433,8 68 AT (Austria) Article
6ofDirective
1999/5/ECR &TTE 18 May
05
MHz:2 7, 40, 433,8 68 BE (Belgium) Article
6ofDirective
1999/5/ECR &TTE 18 May
05
MHz:2 7, 40, 433,8 68 BG (Bulga-
ria) Article
6ofDirective
1999/5/ECR &TTE 12 April
07
MHz:2 7, 40, 433,8 68 CH (Switzer-
land) Article
6ofDirective
1999/5/ECR &TTE 14357
27 May 05
MHz:2 7, 40, 433,8 68 CY (Cyprus) Article
6ofDirective
1999/5/ECR &TTE5May
05
MHz:2 7, 40, 433,8 68 CZ (Czech
Republic) General Licence GL-30/R/
2000R
eg No. 844 13 May
05
MHz:2 7, 40, 433 DK (Den-
mark) Article
6ofDirective
1999/5/ECR &TTE 20 April
05
MHz:2 7, 40, 433,8 68 DE (Ger-
many) Article
6ofDirective
1999/5/ECR &TTE
751930129A pril 05
MHz:2 7, 40, 433,8 68 Features
371Stowing and features Z