2015 MERCEDES-BENZ E-CLASS ESTATE driver seat adjustment
[x] Cancel search: driver seat adjustmentPage 22 of 497
Folding the backrest (rear com-
partment) forwards/back .............. 349
Sea tbelt
Centre rear-compartment sea t........ 48
Correct usag e.................................. 47
Switching belt adjustment on/off
(on-board computer) ...................... 295
Seat belts
Adjusting the driver' sand front-
passenger sea tbelt. ........................ 49
Adjusting the height ......................... 48
Cleaning ......................................... 392
Displa ymessage ............................ 305
Fastening ......................................... 48
Important safety guideline s............. 46
Introduction ..................................... 46
Rear sea tbelts tatus indicator ......... 49
Releasing ......................................... 49
Warning lamp ................................. 329
Warning lamp (function) ................... 49
Seats
Adjusting (electrically) ................... 124
Adjusting (manuall yand electri-
cally ).............................................. 124
Adjusting the 4-wa ylum bars up-
por t................................................ 128
Adjusting the hea drestraint .......... 125
Cleaning the cove r......................... 392
Correct driver' sseatp osition ........ 122
Important safety notes .................. 123
Overview ........................................ 123
Sea theating problem .................... 132
Sea tventilation problem ................ 133
Storing settings (memory func-
tion) ............................................... 139
Switching sea theating on/of f....... 130
Switching the sea tventilation on/
off .................................................. 132
Securing luggage ............................... 350
Selecto rlever
Cleaning ......................................... 391
Sensors (cleaning instructions) ....... 389
Service
see ASSYST PLUS
Servic eCentre
see Qualifie dspecialist workshop
Servic emenu( on-board com-
puter) .................................................. 288 Servic
eproducts
AdBlue ®
specia laddit ives.............. 477
Brake fluid ..................................... 479
Coolant (engine) ............................ 479
Engine oi l....................................... 478
Fue l................................................ 473
Important safety notes .................. 473
Washe rfluid ................................... 480
Settin gthe air distribution ............... 163
Setting the airflow ............................ 164
Settings
Factory (on-board computer) ......... 295
On-board compute r....................... 289
SETUP (on-board computer) ............. 296
Shiftin gtoneutral (manual trans-
mission) ............................................. 189
Side hea drestraints
Integrate dchild sea t........................ 65
Side lamps
Switching on/of f........................... 144
Side marker lamp Display mes-
sage .................................................... 309
Side windows
Convenience closing ...................... 112
Convenience opening .................... 111
Important safety notes .................. 110
Opening/closing ............................ 111
Problem (malfunction) ................... 114
Resetting ....................................... 113
Sidebag ................................................ 52
Skibag ................................................ 346
Sliding sunroof
Important safety information ......... 114
Opening/closing ............................ 115
Problem (malfunction) ................... 119
Rain closing feature ....................... 116
Resetting ....................................... 116
see Panorama sliding sunroof
Sno wchains ...................................... 419
Socket
Luggage compartment ................... 366
Sockets
Centre console .............................. 366
Genera lnotes ................................ 366
Rear compartment ......................... 366
Spare wheel
Storing ........................................... 466 Index
19
Page 51 of 497
Infants and childre
nmust never travel sit-
ting on the lap of avehicle occupant. In the
event of an accident, they could be crushed betwee nthe vehicle occupant and seat
belt.
R objects are never secured with aseat belt if
the seat belt is also being used by one of the vehicle's occupants.
Seat belts are only intended to secure and
restrain vehicle occupants. Alwayso bserve
the "Loading guidelines" for securing objects,
luggage or loads (Y page 342).
Fastening and adjusting the seat belts Observe the safety notes on the seat belt
(Y page 46) and the notes on correct use of
seat belts (Y page 47).
If ap assenger is wearing the centre rear seat
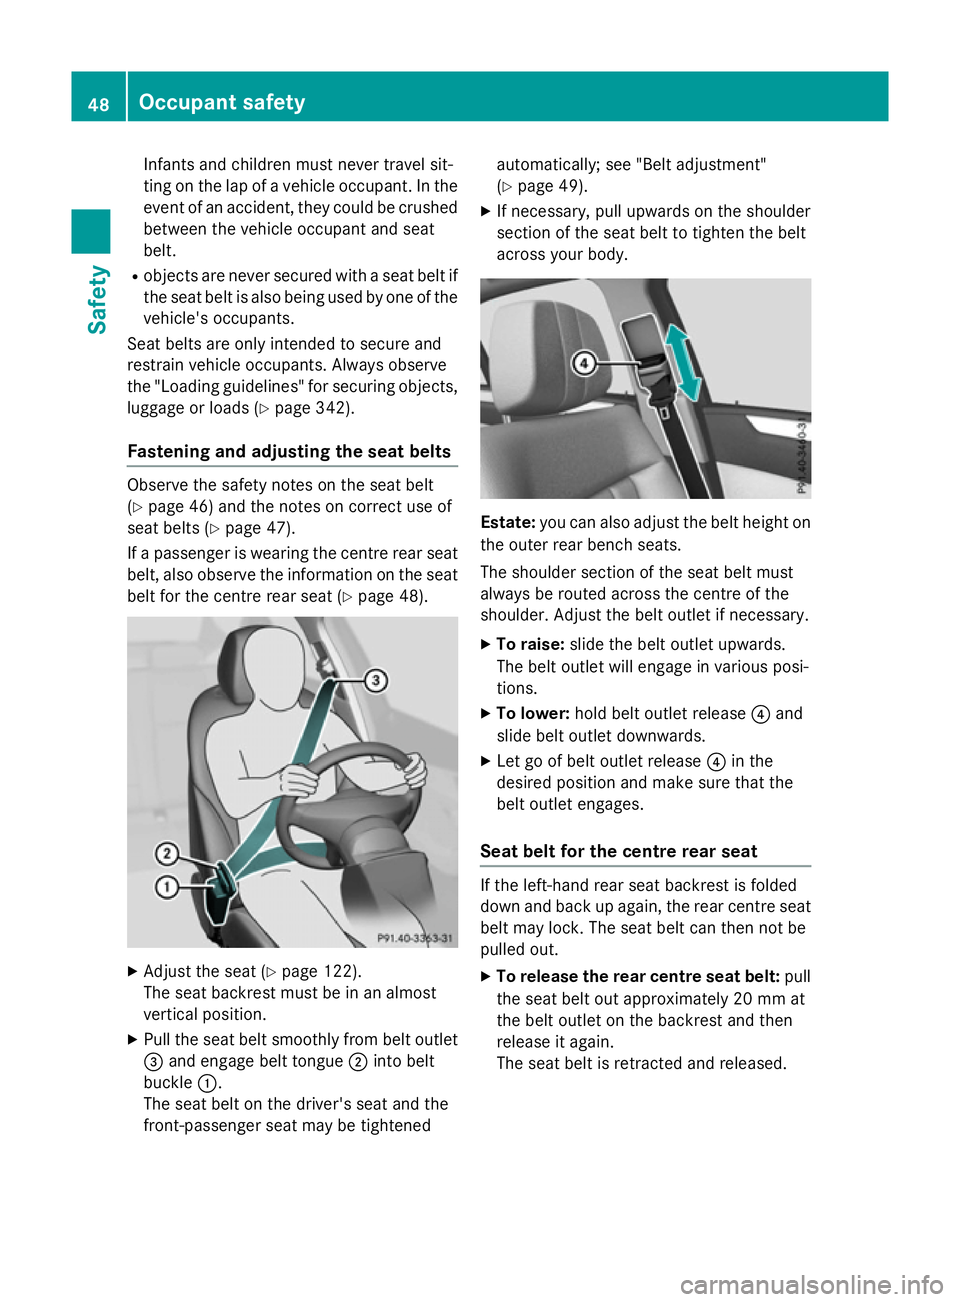
belt, also observe the information on the seat belt for the centre rear seat (Y page 48).X
Adjust the seat (Y page 122).
The seat backrest must be in an almost
vertical position.
X Pullt he seat belt smoothly from belt outlet
= and engage belt tongue ;into belt
buckle :.
The seat belt on the driver's seat and the
front-passenger seat may be tightened automatically; see "Belt adjustment"
(Y
page 49).
X If necessary ,pullu pwards on the shoulder
section of the seat belt to tighten the belt
across yourb ody. Estate:
you can also adjustt he belt heighton
the outer rear bench seats.
The shoulder section of the seat belt must
alwaysber outed across the centre of the
shoulder. Adjust the belt outlet if necessary.
X To raise: slidethe belt outlet upwards.
The belt outlet wille ngage in variousposi-
tions.
X To lower: hold belt outlet release ?and
slideb elt outlet downwards.
X Let go of belt outlet release ?in the
desire dpositio nand make sure that the
belt outlet engages.
Seat beltf or the centre rear seat If the left-hand rear seat backrest is folded
down and back up again, the rear centre seat
belt may lock. The seat belt can then not be
pulled out.
X To release the rear centre seat belt: pull
the seat belt out approximately 20 mm at
the belt outlet on the backrest and then
release it again.
The seat belt is retracted and released. 48
Occupant safetySafety
Page 52 of 497
Releasin
gthe seat belts !
Make sure that the sea
tbelti sf ully rolled
up .O therwise, the sea tbeltorb eltt ongue
will be trapped in the doo rorinthe seat
mechanism. Thi scould damag ethe door,
the doo rtrim panel and the sea tbelt. Dam-
aged sea tbelts can no longer fulfil their
protectiv efunction and mus tbereplaced.
Visit aquali fied specialist workshop. X
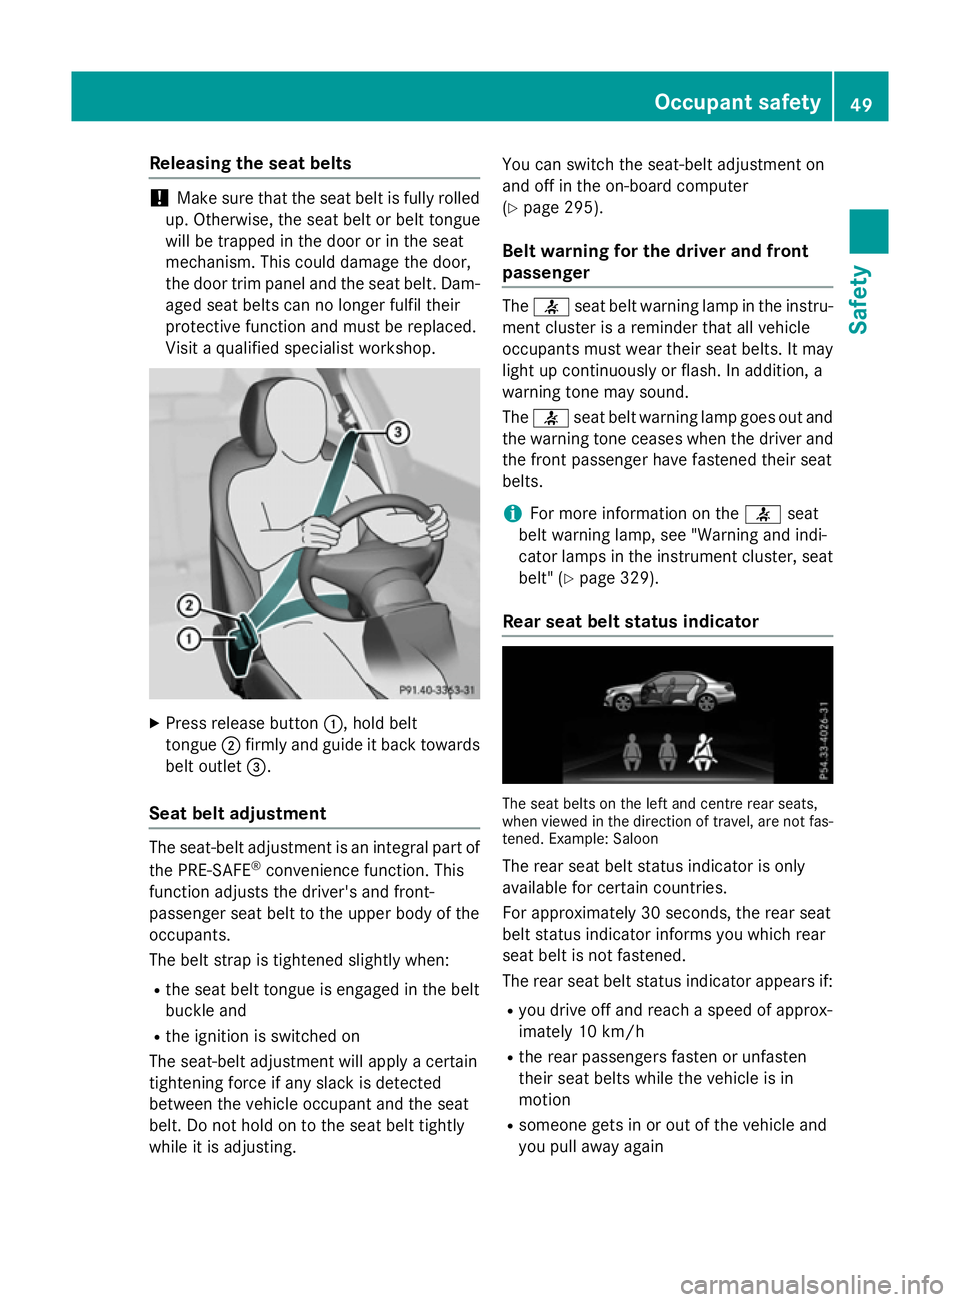
Press release button :,holdb elt
tongue ;firmly and guid eitbackt owards
bel toutlet =.
Seat belt adjustment The seat-bel
tadjustment is an integral part of
the PRE-SAFE ®
convenience function. This
function adjusts the driver' sand front-
passenger sea tbelttot he upper bod yofthe
occupants.
The bel tstra pist ightened slightl ywhen:
R the sea tbeltt ongu eise ngaged in the belt
buckle and
R the ignition is switche don
The seat-bel tadjustment will appl yacertain
tightening force if any slack is detected
between the vehicl eoccupant and the seat
belt. Do not hol dontothe seatbeltt ightly
whil eitisa djusting. Yo
uc an switch the seat-bel tadjustment on
and off in the on-board computer
(Y page 295).
Bel twarnin gfor the drive rand front
passenger The
7 seatbeltw arning lamp in the instru-
ment cluster is areminder that al lvehicle
occupants mus twearthei rseatb elts. It may
light up continuously or flash. In addition, a
warning tone may sound.
The 7 seatbeltw arning lamp goe soutand
the warning tone ceases when the driver and
the front passenger have fastened thei rseat
belts.
i For more information on the
7seat
bel tw arning lamp, see "Warning and indi-
cato rlam ps in the instrument cluster, seat
belt" (Y page 329).
Rear seat belt status indicator The sea
tbelts on the left and centre rea rseats,
when viewe dinthe direction of travel ,are not fas-
tened .Example :Saloon
The rea rseatb elts tatu sindicator is only
available for certain countries.
For approximately 30 seconds ,the rea rseat
bel tstatu sindicator informs yo uwhich rear
sea tbelti sn ot fastened.
The rea rseatb elts tatu sindicator appears if:
R yo ud rive off and reach aspeed of approx-
imately 10 km/h
R the rea rpassenger sfasten or unfasten
thei rseatb elts whil ethe vehicl eisin
motion
R someone gets in or ou tofthe vehicl eand
yo up ulla wa ya gain Occupan
tsafety
49Safety Z
Page 125 of 497
Useful information
i This Owner's Manual describes all mod-
els, series and optional equipment for your
vehicle that were available at the time of
going to press. National variation sare pos-
sible. Not ethat your vehicle may not be
equipped with all of the function sdescri-
bed. This is also the case for system sand
function srelevan ttosafety.
i Read the information on qualified special-
ist workshops: (Y page 27). Correct driver's seat position
G
WARNING
You could lose contro lofthe vehicle while
drivin gifyou:
R adjust the driver' sseat, steering wheel or
mirrors
R faste nthe seat belt
There is arisk of an accident.
Adjust the driver' sseat, head restraint ,steer-
ing wheel and mirrors and faste nyour seat
belt before starting the engine. X
Observ ethe safet yguidelines on seat
adjustment (Y page 123).
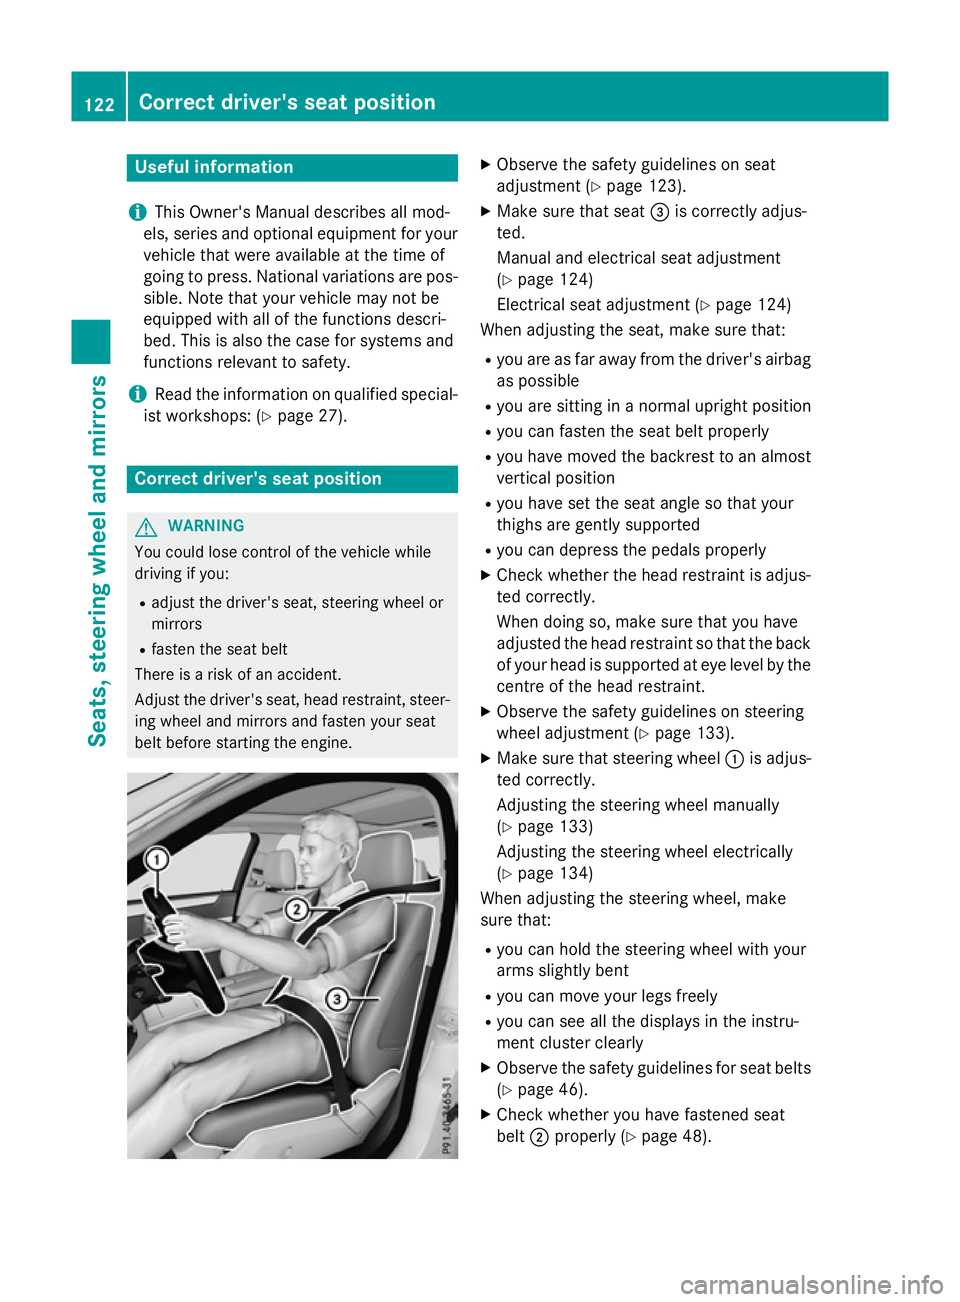
X Make sure that seat =is correctly adjus-
ted.
Manual and electrical seat adjustment
(Y page 124)
Electrical seat adjustment (Y page 124)
When adjusting the seat, make sure that:
R you are as far away from the driver' sairbag
as possible
R you are sitting in anormal upright position
R you can faste nthe seat belt properly
R you have moved the backrest to an almost
vertical position
R you have set the seat angle so that your
thighs are gently supported
R you can depress the pedals properly
X Check whether the head restraint is adjus-
ted correctly.
When doing so, make sure that you have
adjusted the head restraint so that the back
of your head is supported at eye level by the centre of the head restraint.
X Observ ethe safet yguidelines on steering
wheel adjustment (Y page 133).
X Make sure that steering wheel :is adjus-
ted correctly.
Adjustin gthe steering wheel manually
(Y page 133)
Adjustin gthe steering wheel electrically
(Y page 134)
When adjusting the steering wheel, make
sure that:
R you can hold the steering wheel with your
arms slightly bent
R you can move your legs freely
R you can see all the displays in the instru-
ment cluster clearly
X Observ ethe safet yguidelines for seat belts
(Y page 46).
X Check whether you have fastened seat
belt ;properly (Y page 48).122
Correct driver's seat positionSeats, steering wheel and mirrors
Page 128 of 497
?
Sea tfore-and-aft adjustment
A Backrest angle
i Vehicles with memory function: if PRE-
SAFE ®
is activate dand the front-passenger
sea tisinanu nfavourable position, it is
move dtoab etter position.
i Yo
uc an store the sea tsettings using the
memory function (Y page 139).
i Vehicles with the through-loading feature
and memory function: if yo ufoldd owna
rea rseatb ackrest, the respective front
sea tism ovedforward sslightl yifneces-
sary.
i Vehicles with memory function: when the
sea tism ovedforward sorbackwards ,the
headrest is move dupordowna utomati-
cally. Adjustin
gthe hea drestraints
Important safety notes G
WARNING
Yo uc ould lose contro lofthe vehicl ewhile
driving if you:
R adjus tthe driver' sseat, steering wheel or
mirrors
R fasten the sea tbelt
There is ariskofana ccident.
Adjust the driver' sseat, hea drestraint, steer-
ing wheel and mirrors and fasten your seat
belt before starting the engine. G
WARNING
The hea drestraints canno tprovid ethe inten-
de dp rotectio nunless they are fitte dand
adjusted correctly .There is an increased risk
of injury to the hea dand neck in the event of
an accident or sudden braking, for example.
Alway sdrive with the hea drestraints fitted.
Ensur ethatthe centre of the hea drestraints
support the back of each vehicl eoccupant's
hea date yelevel before driving off. Do not interchange the hea
drestraints of the
front and rea rseats. Otherwise, yo uwilln ot
be able to adjus tthe height and angle of the
hea drestraints to the correct position.
Adjust the hea drestraint fore-and-aft posi-
tion so tha titisasc lose as possible to the
back of your head.
Observe the important safety notes regarding the seats (Y page 123).
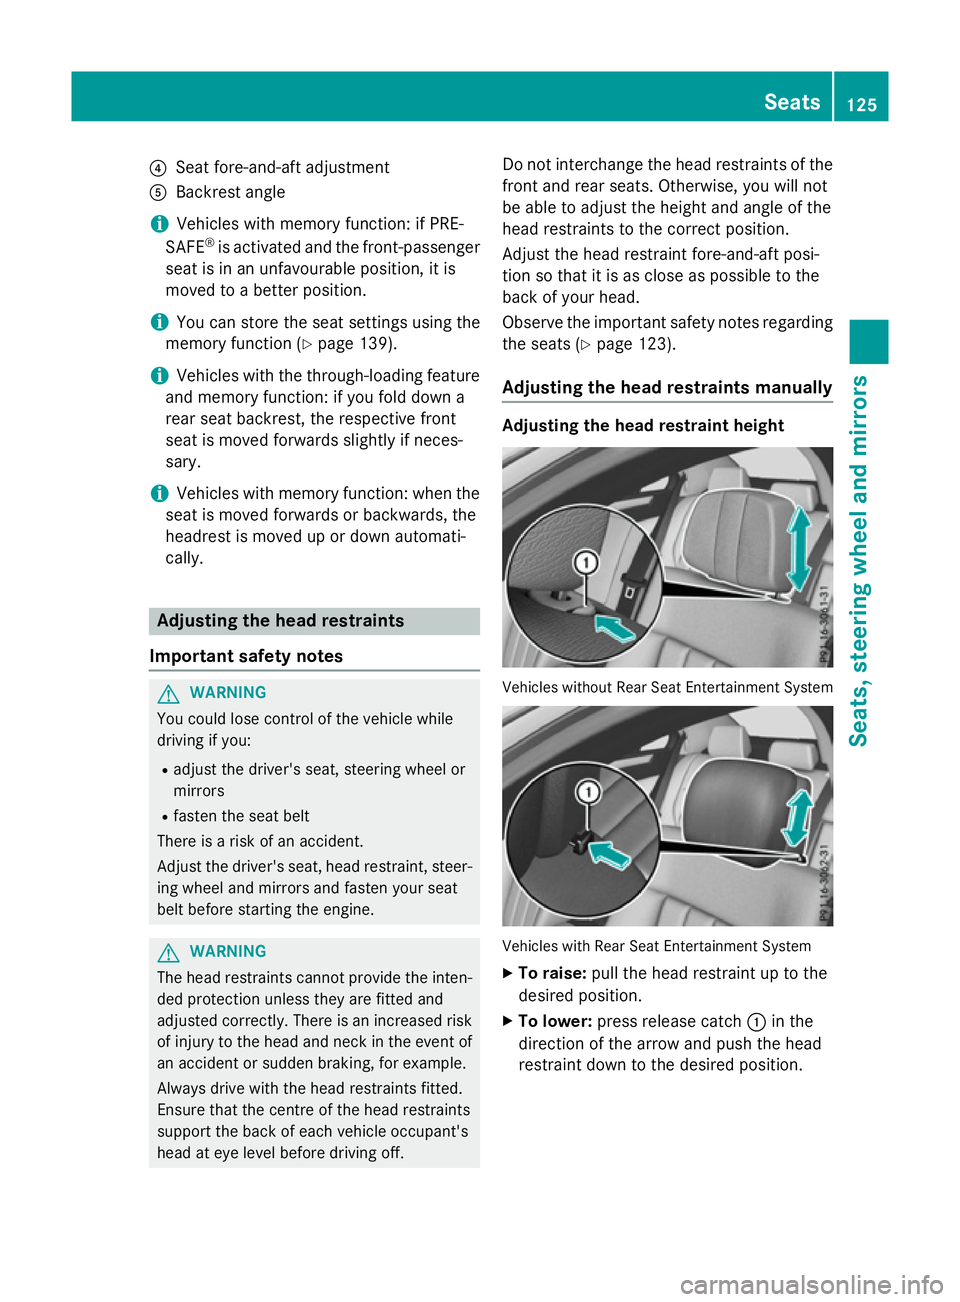
Adjustin gthe hea drestraints manually Adjustin
gthe hea drestrain theight Vehicles withou
tRearS eatE ntertainment System Vehicles with Rear Sea
tEntertainment System
X To raise: pull the hea drestraint up to the
desired position.
X To lower: press release catch :in the
direction of the arrow and push the head
restraint dow ntothe desired position. Seats
125Seats, steering whee land mirrors Z
Page 136 of 497
Problems with the seat ventilation
Problem
Possible causes/consequences and
M
MSolutions The seat ventilation has
switched off prema-
turely or cannot be
switched on. The on-board voltage is too low because too many electrical con-
sumers are switched on.
X Switch off electrical consumers that you do not need, such as
the rear window heating or interior lighting.
Once the battery is sufficiently charged, the seat ventilation will
switch back on automatically. Steering wheel
Important safety notes
G
WARNING
You could lose control of the vehicle while
driving if you:
R adjust the driver's seat, steering wheel or
mirrors
R fasten the seat belt
There is arisk of an accident.
Adjust the driver's seat, head restraint ,steer-
ing wheel and mirrors and fasten your seat
belt before startingt he engine. G
WARNING
Children could become trapped by the steer-
ing wheel if they adjust it. There is arisk of
injury.
When leaving the vehicle, always take the key with you and lock the vehicle. Never leave
children unattended in the vehicle.
The electrically adjustable steering wheel can
still be adjusted when there is no key in the
ignition lock. Adjusting the steering wheel man-
ually
G
WARNING
The steering wheel may move unexpectedly if you adjust it while driving. This could cause you to lose control of the vehicle. There is a
risk of an accident.
Make sure that the steering wheel is locked
before driving off. Never unlock the steering
wheel when the vehicle is in motion.
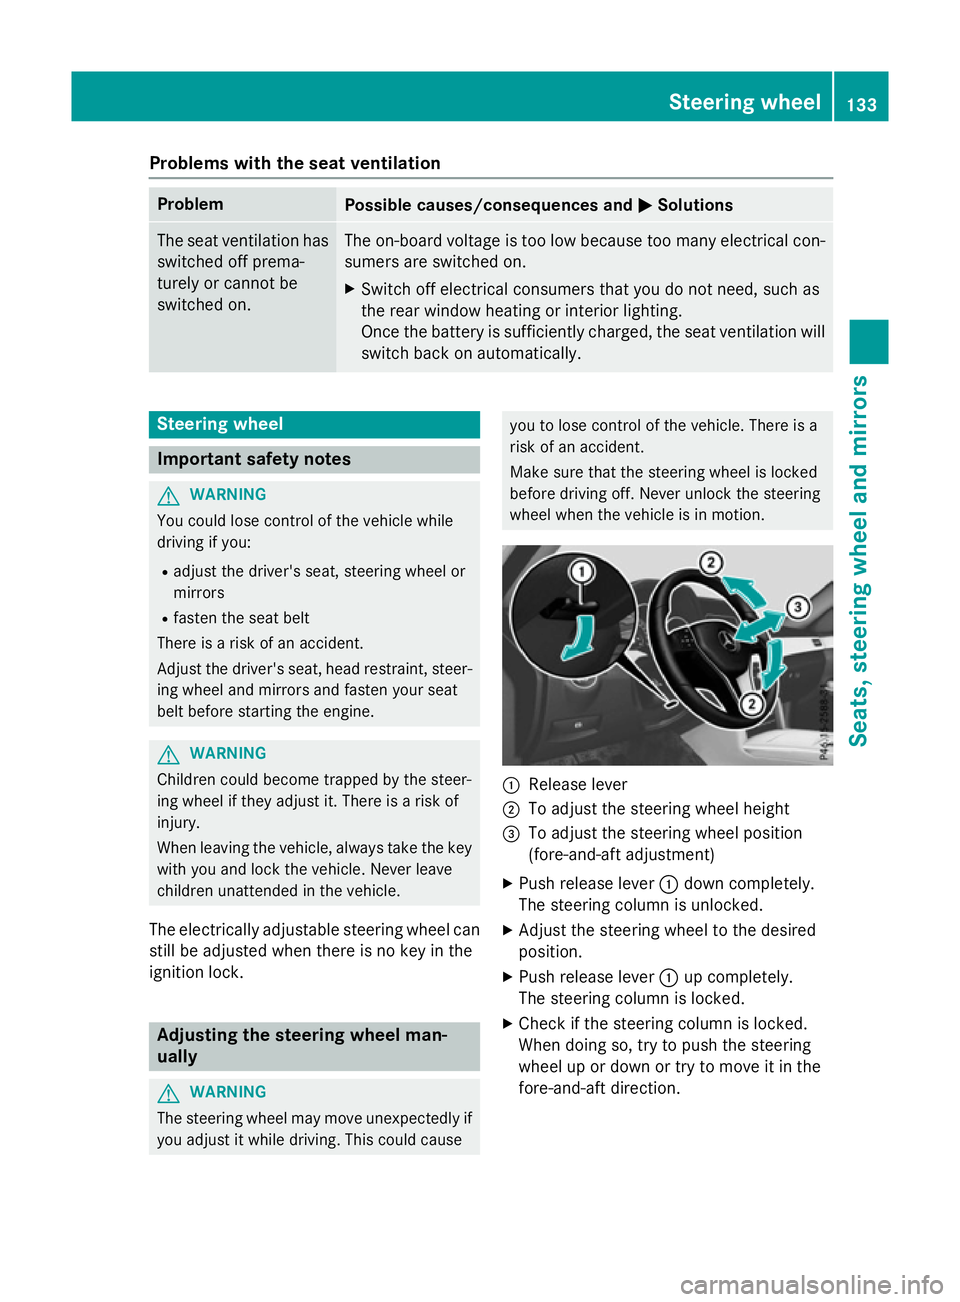
:
Release lever
; To adjust the steering wheel height
= To adjust the steering wheel position
(fore-and-aft adjustment)
X Push release lever :down completely.
The steering column is unlocked.
X Adjust the steering wheel to the desired
position.
X Push release lever :up completely.
The steering column is locked.
X Check if the steering column is locked.
When doing so, try to push the steering
wheel up or down or try to move it in the
fore-and-aft direction. Steering wheel
133Seats, steering wheela nd mirrors Z
Page 137 of 497
Adjusting th
esteering wheel electri-
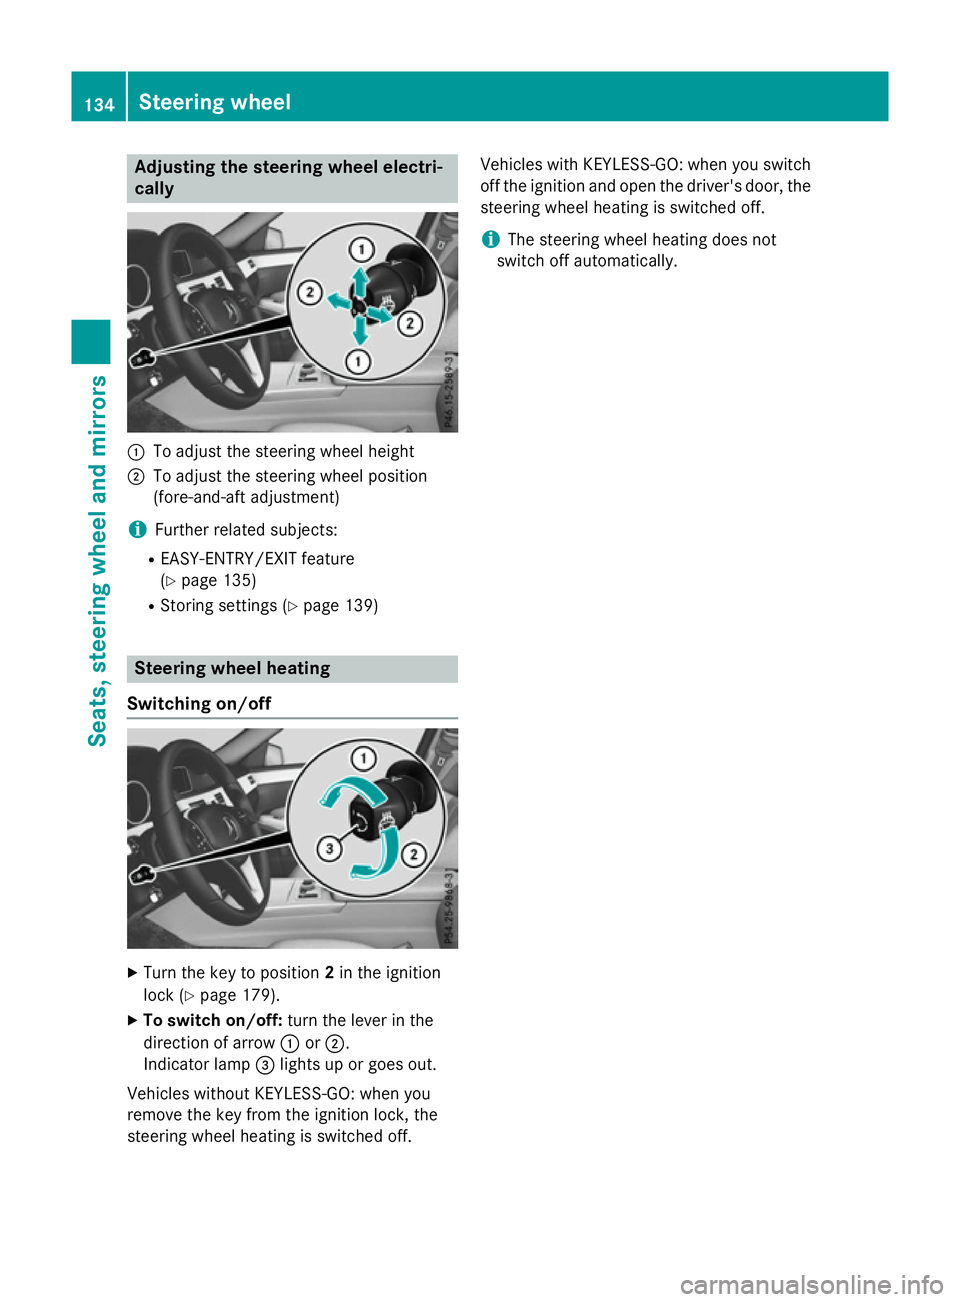
cally :
To adjust th esteering whee lheight
; To adjust th esteering whee lposition
(fore-and-af tadjustment)
i Further relate dsubjects:
R EASY-ENTRY/EXIT feature
(Y page 135)
R Storing setting s(Ypage 139) Steering wheel heating
Switchin gon/off X
Turn th ekeyto position 2in th eignition
loc k(Ypage 179).
X To switch on/off: turnthe lever in the
direction of arrow :or;.
Indicato rlamp =lights up or goes out.
Vehicles without KEYLESS-GO :when you
remove th ekeyfrom th eignition lock, the
steering whee lheating is switched off. Vehicles wit
hKEYLESS-GO :when you switch
off th eignition and open th edriver' sdoor ,the
steering whee lheating is switched off.
i The steering whee
lheating does not
switch off automatically. 134
Steering wheelSeats
,steering wheel and mirrors
Page 138 of 497
Problems with the steering wheel heating
Problem
Possible causes/consequences and
M
MSolutions The steering wheel
heating has switched
itself off prematurely or
cannot be switched on. The on-board voltage is too low because too many electrical con-
sumers are switched on.
X Switch off electrical consumers that you do not need, such as
the rear window heating or interior lighting.
Once the battery is sufficiently charged, the steering wheel
heating will switch back on automatically. EASY-ENTRY/EXIT feature
Important safety notes G
WARNING
When the EASY-ENTRY/EXIT feature adjusts
the steering wheel, you and other vehicle
occupants –particularly children –could
become trapped. There is arisk of injury.
While the EASY-ENTRY/EXIT feature is mak-
ing adjustments, make sure that no one has
any body parts in the sweep of the steering
wheel.
Move the steering wheel adjustment lever if
there is arisk of entrapment by the steering
wheel. The adjustment process is stopped.
Vehicles with amemory function: if there is a
risk of becoming trapped by the steering
wheel, you can also press one of the memory
function position buttons.T he adjustment
process is stopped. G
WARNING
If children activate the EASY-ENTRY/EXIT fea- ture, they can become trapped, particularly
when unattended. There is arisk of injury.
When leaving the vehicle, always take the key with you and lock the vehicle. Never leave
children unattended in the vehicle. G
WARNING
If you drive off while the EASY-ENTRY/EXIT
feature is making adjustments, you could lose
control of the vehicle. There is arisk of an
accident. Always wait until the adjustment process is
complete before driving off.
The EASY-ENTRY/EXIT feature makes getting in and out of your vehicle easier.
You can activate and deactivate the EASY-
ENTRY/EXI Tfeature in the on-board com-
puter (Y page 294).
Position of the steering wheel when the
EASY-ENTRY/EXIT featureisa ctive The steering wheel tilts upwards if you:
R remove the key from the ignition lock
R with KEYLESS-GO: open the driver's door;
KEYLESS-GO must be in position 1
R with the key: open the driver's door; the
key must be in position 0or 1in the ignition
lock (Y page 179)
i The steering wheel only moves upwards if
it has not already reached the upper stop.
Position of the steering wheel for driv-
ing The steering wheel is moved to the previously
set position if:
R the driver's door is closed and
R with KEYLESS-GO: you press the Start/
Stop button once
or
R with the key: you insert the key into the
ignition lock Steering wheel
135Seats, steering wheela nd mirrors Z