2015 MERCEDES-BENZ E-CLASS ESTATE torque
[x] Cancel search: torquePage 26 of 497
Vehicl
eidentificatio nnumber
see VIN
Vehicl eidentificatio nplate .............. 472
Vehicl elevel
AIRMATI C...................................... 231
Vehicl elevel (display message) ....... 315
Vehicl emaintenance
see ASSYST PLUS
Vehicl etoolkit.................................. 395
Vehicl eweigh ts................................. 481
Video
Operating the DVD ......................... 284
VIN
Sea t............................................... 472
Type plate ...................................... 472 W
Warning and indicator lamps ABS ................................................ 332
Brakes ........................................... 330
Distance warning signa l................. 338
ESP ®
.............................................. 333
ESP ®
OFF ....................................... 334
Fue ltank ........................................ 336
Genera lnotes ................................ 329
LIM (cruis econtrol) ........................ 212
LIM (DISTRONIC PLUS) .................. 219
LIM (variabl eSPEEDTRONIC )......... 215
Overview .......................................... 35
PASSENGER AIR BAG OFF ............... 45
Reserve fue l................................... 336
Sea tbelt. ....................................... 329
Tyre pressure monitor ................... 339
Warning triangle ................................ 394
Washer fluid
Displa ymessage ............................ 328
Wheel and tyre combinations
see Tyres
Wheel bolt tightenin gtorque ........... 430
Wheel chock ...................................... 427
Wheels
Changing awheel .......................... 426
Changing/replacing ....................... 426
Checking ........................................ 417
Cleaning ......................................... 388
Emergency spare whee l................. 465
Fitting anew whee l........................ 430 Fitting
awheel ............................... 426
Genera lnotes ................................ 431
Important safety notes .................. 416
Information on driving .................... 416
Removing awheel .......................... 429
Storing ........................................... 426
Tightening torque ........................... 430
Wheel size/tyre size ...................... 431
Windowbag
Operation ......................................... 52
Windows
Cleaning ......................................... 388
see Sid ewindows
Windscreen
Demisting ...................................... 164
Windscree nwasher fluid
see Windscree nwashe rs ystem
Windscree nwasher system
Important safety notes .................. 480
Topping up ..................................... 383
Windscree nwipers
Problem (malfunction) ................... 154
Rear window wipe r........................ 152
Replacing the wipe rblade s............ 152
Switching on/of f........................... 151
Winter operation
Important safety notes .................. 418
Radiato rcove r............................... 380
Slippery roa dsurfaces ................... 211
Snow chains .................................. 419
Winter tyres
Limiting the speed (on-board com-
puter) ............................................. 292
M+S tyre s...................................... 418
Wipe rblades
Cleaning ......................................... 389
Important safety notes .................. 152
Replacing (o nthe rea rwindow )..... 153
Replacing (windscreen) .................. 152
Wooden trim (cleaning instruc-
tions) .................................................. 392
Workshop
see Qualifie dspecialist workshop Z
ZONE function Switching on/of f........................... 164 Index
23
Page 87 of 497
Characteristics of ESP
®General notes
If the
÷ ESPw arning lamp goes out before
beginnin gthe journey, ESP ®
is automatically
active.
If ESP ®
intervenes, the ÷ESP®
warning
lamp flashes in th einstrumen tcluster.
If ESP ®
intervenes:
X Do no tdeactivate ESP ®
unde rany circum-
stances.
X When pullin gaway, only depress th eaccel-
erator pedal as far as is necessary.
X Adapt your driving style to suit th eprevail-
ing road and weather conditions.
ECO start/stop function
The ECO start/sto pfunction switches the
engin eoff automaticall yifthevehicle stops
moving .When pullin gaway again ,the engine
start sautomatically. ESP ®
remains in its pre-
viously selecte dstatus. Example: if ESP®
was deactivate dbefore th eenginew as
switched off ,ESP ®
remains deactivate dwhen
th ee ngineiss witched on again.
Deactivating/activatin gESP®
(except
AMG vehicles) Important safety notes
You can selec
tbetween th efollowin gsta-
tuses of ESP ®
:
R ESP ®
is activated.
R ESP ®
is deactivated. G
WARNING
If you deactivate ESP ®
,E SP ®
no longer sta-
bilise sthe vehicle .Ther eisani ncreased risk
of skiddin gand an accident.
Only deactivate ESP ®
in th esituations descri-
bed in th efollowing. It may be best to deactivate ESP
®
in th efol-
lowin gsituations:
R when usin gsnowc hains
R in deep snow
R on san dorgravel
i Activate ESP ®
as soon as th esituations
describe dabov enol onger apply. ESP ®
will
otherwise no tbeable to stabilise th evehi-
cle if th evehicle start stoskidoraw heel
start stos pin.
Deactivating/activatin gESP®
You can deactivate or activat eESP®
via the
on-board computer (Y page 287).
ESP ®
deactivated:
The å ESP®
OF Fw arning lamp in the
instrumen tcluste rlight sup.
ESP ®
activated:
The å ESP®
OF Fw arning lamp in the
instrumen tcluste rgoes out.
Characteristics when ESP ®
is deactivated
If ESP ®
is deactivate dand on eorm orew heels
start to spin ,the ÷ ESP®
warning lamp in
th ei nstrumen tcluste rflashes. In suc hsitua-
tions ,ESP ®
will no tstabilise th evehicle.
If you deactivate ESP ®
:
R ESP ®
no longer improve sdriving stability
R engin etorque is no longer limited and the
driv ewheels are able to spin
The spinnin gofthewheels results in acut-
tin ga ction for bette rtraction on loos esur-
faces.
R traction control is still activated
R ESP ®
still provide ssupport when you brake 84
Driving safety systemsSafety
Page 89 of 497
R
engin etorque is restricted to alimited
degree and the drive wheels are able to spin
The spinning of the wheels results in acut-
tinga ction for better traction on loose sur-
faces.
R ESP ®
still provides support when you brake
firmly
Characteristics when ESP ®
is deactivated
If ESP ®
is deactivated and one or more wheels
start to spin, the ÷ESP®
warning lamp in
the instrument cluster does not flash. In such
situations, ESP ®
will not stabilise the vehicle.
If you deactivat eESP®
:
R ESP ®
no longer improves driving stability
R engin etorque is restricted to alimited
degree and the drive wheels are able to spin
The spinning of the wheels results in acut-
tinga ction for better traction on loose sur-
faces.
R traction control is still activated
R PRE-SAFE ®
is no longer available; it is also
not activated if you brake firmly with assis-
tanc efrom ESP ®
R PRE-SAFE ®
Brak eisnol onger available; it
is also not activated if you brake firmly with
assistanc efrom ESP ®
R ESP ®
still provides support when you brake
firmly
ESP ®
trailer stabilisation General notes
If your vehicle/trailer combination begins to
lurch, ESP
®
assists you in this situation .ESP ®
slows the vehicle down by brakin gand limit-
ing the engin eoutput until the vehicle/trailer
combination has stabilised.
Important safet ynotes G
WARNING
If road and weather conditions are poor,
trailer stabilisation will not be able to prevent the vehicle/trailer combination from swerv- ing. Trailers with
ahigh centre of gravity can
tip over before ESP ®
can detec tthis. There is
ar isk of an accident.
Always adapt your driving style to the prevail- ing road and weather conditions.
If your vehicle/trailer combination begins to
lurch, you can only stabilise the vehicle/
trailer combination by depressing the brake
firmly.
ESP ®
trailer stabilisation is activ eabove
speeds of about 65 km/h.
ESP ®
trailer stabilisation does not work if
ESP ®
is deactivated or disabled because of a
malfunction. EBD (electronic brak
eforce distribu-
tion)
General notes EBDm
onitors and controls the brake pres-
sure on the rear wheels to improve driving
stability while braking.
Important safet ynotes i
Observe the "Important safety notes" sec-
tion for driving safety systems (Y page 77). G
WARNING
If EBDism alfunctioning, the rear wheels can
lock, e.g. under full braking. This increases the risk of skidding and an accident.
You should therefore adapt your driving style
to the differen thandling characteristics. Have
the brake system checked at aqualified spe-
cialist workshop.
Observe information regarding indicator and
warning lamps (Y page 332) as well as dis-
play messages (Y page 302). ADAPTIVE BRAKE
i Observe the "Important safety notes" sec-
tion (Y page 77). 86
Driving safet
ysystemsSafety
Page 433 of 497
X
Unscrew the remaining wheel bolts fully.
X Remove the wheel.
Fitting anew wheel G
WARNING
Oiled or greased wheel bolts or damaged
wheel bolts/hub threads can cause the wheel bolts to come loose. As aresult, you could
lose awheel while driving. There is arisk of
accident.
Never oil or grease wheel bolts. In the event of damage to the threads, contact aqualified
specialist workshop immediately.H ave the
damagedw heel bolts or hub threads
replaced/renewed. Do not continue driving. G
WARNING
If you tighten the wheel bolts or wheel nuts
when the vehicle is raised, the jack could tip
over. There is arisk of injury.
Only tighten the wheel bolts or wheel nuts
when the vehicle is on the ground.
Observe the instructions and safety notes on "Changing awheel" (Y page 426).
Only use wheel bolts that have been designed
for the wheel and the vehicle. For safety rea-
sons, Mercedes-Benz recommends that you
only use wheel bolts which have been
approved for Mercedes-Benz vehicles and the
respective wheel.
! AMG vehicles:
during removal and repo-
sitioning of the wheel, the wheel rim can
strike the ceramic-brake disc and damage
it. Therefore, take precautions and have a
second person assist you. Alternatively,
you can use asecond centring pin. X
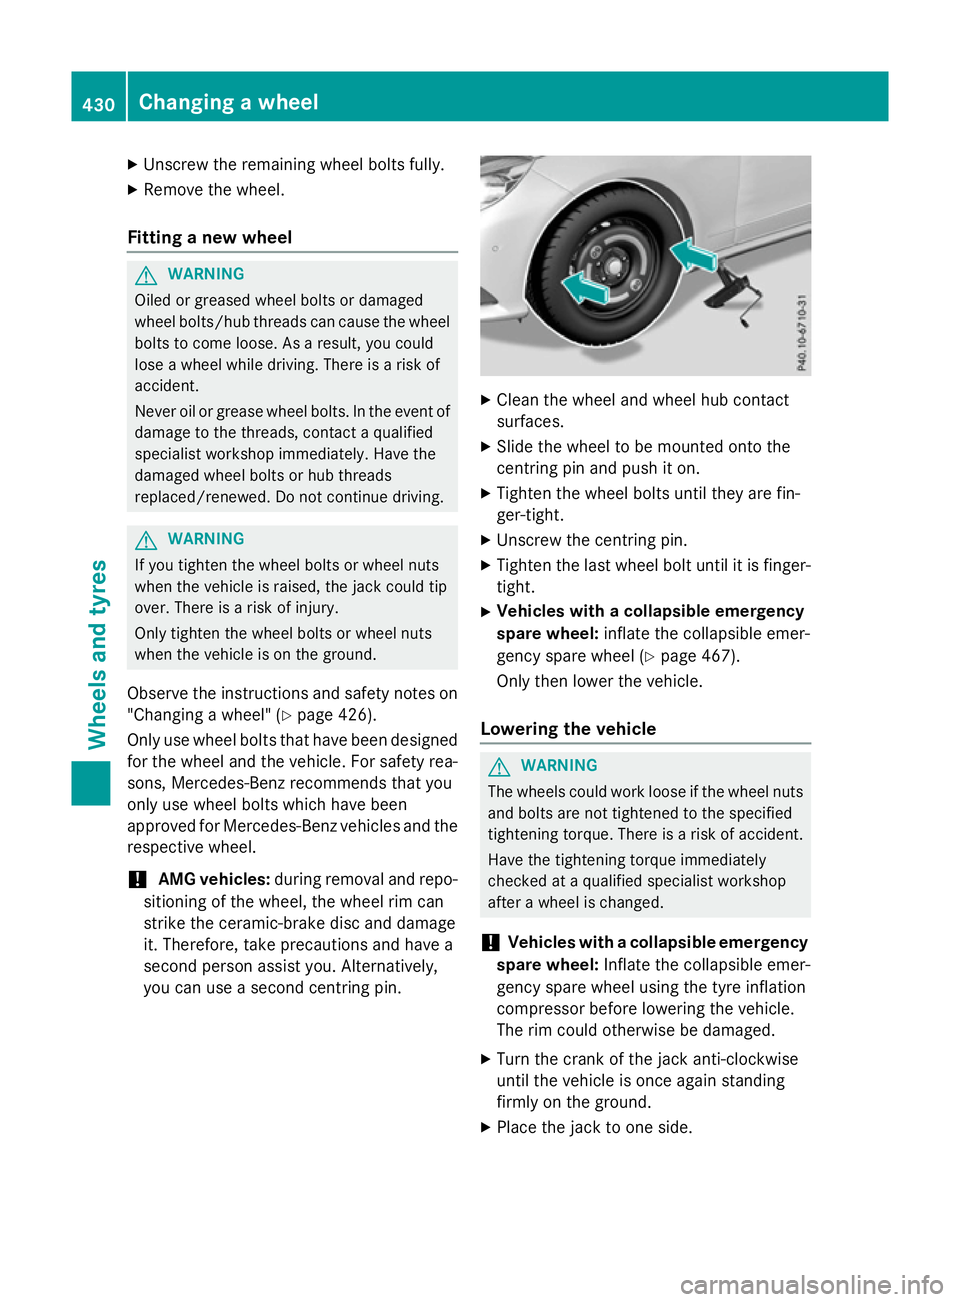
Cleant he wheel and wheel hub contact
surfaces.
X Slide the wheel to be mounted onto the
centring pin and push it on.
X Tighten the wheel bolts until they are fin-
ger-tight.
X Unscrew the centring pin.
X Tighten the last wheel bolt until it is finger-
tight.
X Vehiclesw ithacollapsible emergency
spare wheel: inflate the collapsible emer-
gency spare wheel (Y page 467).
Only then lower the vehicle.
Lowering the vehicle G
WARNING
The wheels could work loose if the wheel nuts and bolts are not tightened to the specified
tightening torque. There is arisk of accident.
Have the tightening torque immediately
checked at aqualified specialist workshop
after awheel is changed.
! Vehiclesw
ithacollapsible emergency
spare wheel: Inflate the collapsible emer-
gency spare wheel using the tyre inflation
compressor before lowering the vehicle.
The rim could otherwise be damaged.
X Turn the crank of the jack anti-clockwise
until the vehicle is once agains tanding
firmly on the ground.
X Place the jack to one side. 430
Changing
awheelWheels and tyres
Page 434 of 497
X
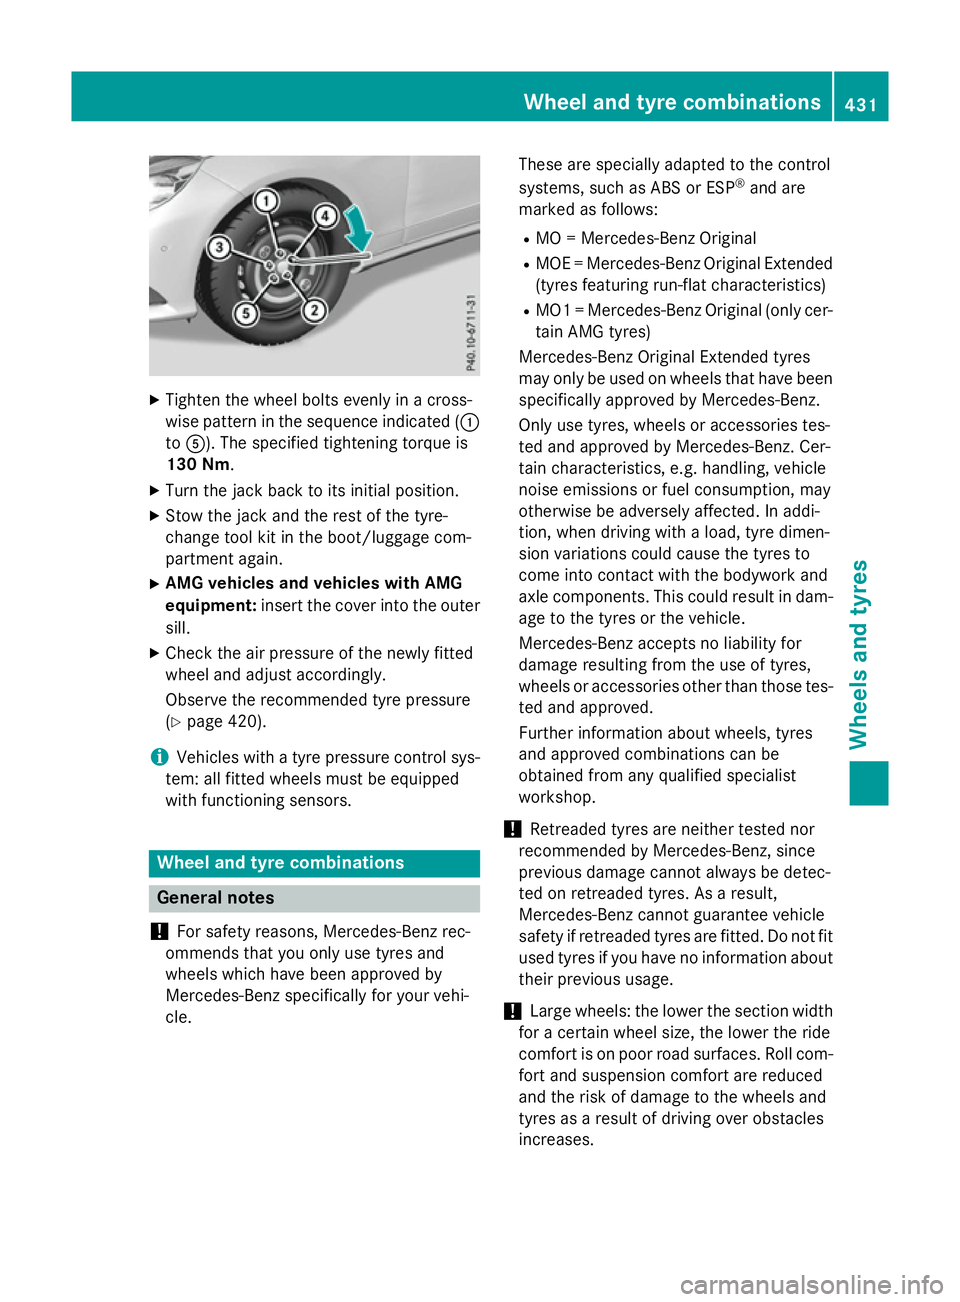
Tighten the wheel bolts evenly in across-
wise pattern in the sequence indicated ( :
to A). The specified tightening torque is
130 Nm.
X Turn the jack back to its initial position.
X Stow the jack and the rest of the tyre-
change tool kit in the boot/luggage com-
partmen tagain.
X AMG vehicles and vehicles with AMG
equipment: insert the cover into the outer
sill.
X Check the air pressure of the newly fitted
wheel and adjust accordingly.
Observe the recommended tyre pressure
(Y page 420).
i Vehicles with
atyre pressure control sys-
tem: all fitted wheels must be equipped
with functioning sensors. Wheel and tyrec
ombinations General notes
! For safety reasons, Mercedes-Benz rec-
ommends that you only use tyres and
wheels which have been approved by
Mercedes-Benz specifically for your vehi-
cle. These are specially adapted to the control
systems, such as ABS or ESP
®
and are
marked as follows:
R MO =Mercedes-Benz Original
R MOE =Mercedes-Benz Original Extended
(tyres featuring run-flat characteristics)
R MO1 =Mercedes-Benz Original (only cer-
tain AMG tyres)
Mercedes-Benz Original Extended tyres
may only be used on wheels that have been
specifically approved by Mercedes-Benz.
Only use tyres, wheels or accessories tes-
ted and approved by Mercedes-Benz.C er-
tain characteristics, e.g. handling, vehicle
noise emissions or fuel consumption, may
otherwise be adversely affected. In addi-
tion, when driving with aload, tyre dimen-
sion variations could cause the tyres to
come into contact with the bodywork and
axle components. This could result in dam- age to the tyres or the vehicle.
Mercedes-Benz accepts no liability for
damage resulting from the use of tyres,
wheels or accessories other than those tes-
ted and approved.
Further information about wheels, tyres
and approved combinations can be
obtained from any qualified specialist
workshop.
! Retreaded tyres are neither tested nor
recommended by Mercedes-Benz,s ince
previous damage cannot alway sbedetec-
ted on retreaded tyres. As aresult,
Mercedes-Benz cannot guarantee vehicle
safety if retreaded tyres are fitted. Do not fit
used tyres if you have no information about their previous usage.
! Large wheels: the lower the section width
for acertain wheel size, the lower the ride
comfor tisonp oor road surfaces. Roll com-
fort and suspension comfor tare reduced
and the risk of damage to the wheels and
tyres as aresult of driving over obstacles
increases. Wheel and tyrec
ombinations
431Wheels and tyres Z