2015 MERCEDES-BENZ E-CLASS ESTATE door lock
[x] Cancel search: door lockPage 296 of 497
ting switches permanent SPEEDTRONIC
off.
X Press the abutton to store the entry.
Observe the additional information on per-
manent SPEEDTRONIC (Y page 217).
Activating/deactivating the automatic
lockin gfeature
X Press the =or; button on the steer-
ing whee ltoselect theSettings Settings menu.
X Press the :or9 button to select the
Vehicle
Vehicle submenu.
X Press ato confirm.
X Press the :or9 button to select the
Auto. doo rlocks
Auto. doo rlocks function.
When the Auto. doo rlocks
Auto. doo rlocks functio nis
switched on, the vehicl edoors ar edis-
played in orange in the multifunctio ndis-
play.
X Press the abutton to save the setting.
If yo uactivate the Auto. doorlocks
Auto. doo rlocks func-
tion, the vehicl eiscentrally locked above a
spee dofa round 15 km/h.
Furthe rinformation on the automatic locking
featur e(Ypage 102).
Activating/deactivating the acoustic
lockin gconfirmation
If yo uswitch on the Acoustic
Acoustic Lock Lockfunction,
an acoustic signa lsou nd sw heny ou lock the
vehicle.
X Press the =or; button on the steer-
ing whee ltoselect theSettings
Settings menu.
X Press the :or9 button to select the
Vehicle
Vehicle submenu.
X Press ato confirm.
X Press the :or9 button to select the
Acoustic Lock
Acoustic Lock function.
If the Acoustic
Acoustic Lock
Lockfunctio nisa ctivated,
the & symbo linthe multifunctio ndis-
play lights up orange.
X Press the abutton to save the setting. Heating Auxiliary heating departure time
G
DANGER
If the exhaust pipe is blocke dorsufficient
ventilation is not possible, toxi cexhaust
fumes can ente rthe vehicle, especiall ycar-
bo nm onoxide. This is the case, e.g .in
enclose dspaces, or if the vehicl eisstuck in
snow. There is ariskoff atal injuries.
Yo us houl dswitch off the auxiliary heating in
enclose dspacesw hich do not have an extrac-
tio ns ystem, e.g .agarage. If the vehicl eis
stuck in sno wand yo umustleave the auxiliary
heating running ,kee pt he exhaust pipe and
the area around the vehicl eclear of snow. To
guarante easufficient supply of fresh air, open
aw indo wont he side of the vehicl eawayfrom
the wind. G
WARNING
When the auxiliary heating is switched on,
parts of the vehicl ecan becom everyh ot.
Flammabl ematerial ssuchasl eaves, grass or
twigs ma yign ite if the ycom einto contact
with:
R ho tp arts of the exhaust system
R the exhaust ga sitself
There is ariskoff ire.
When the auxiliary heating is switched on,
make sure that:
R no flammabl ematerial scom einto contact
with ho tvehicl ecomponents
R the exhaust ga scan escap efromt he
exhaust pipe unhindered
R the exhaust ga sdoesn ot com einto contact
with flammabl ematerials.
! Operating the auxiliary heating/ventila-
tio nd raws on the vehicl ebattery .After you
have heate dorventilated the vehicl ea
maximum of two times ,drive for alon ger
distance.
Onl yvehicles with auxiliary heating have this
function. Menus and submenus
293On-board computer and displays Z
Page 298 of 497
Further information on the EASY-ENTRY/EXIT
feature (Y page 135).
Switchin gbelta djustmen ton/off
X Pres sthe = or; button on the steer-
ing wheel to select the Settings
Settingsmenu.
X Pres sthe : or9 button to select the
Convenience
Convenience submenu.
X Press ato confirm.
X Pres sthe : or9 button to select the
Belt adjustment
Belt adjustment function.
If the Belt adjustment
Belt adjustment function is activa-
ted, the vehicle sea tbeltiss hown in orange
in the multifunction display.
X Pres sthe a button to sav ethe setting.
For further information on bel tadjustment,
see (Y page 49).
Switchin gthe fold-in mirrors whe nlock-
ing functio non/off
Thi sfunction is only available whe nthe vehi-
cle is equipped with the electrica lfold-in func-
tion.
Whe nyou switch on the Auto.fold in
Auto .fold in
function, the exterior mirrors are folded in
whe nthe vehicle is locked. If yo uunlock the
vehicle and then ope nthe driver' sorfront-
passenger door, the exterior mirrors fol dout
again.
X Pres sthe = or; button on the steer-
ing wheel to select the Settings Settingsmenu.
X Pres sthe : or9 button to select the
Convenience
Convenience submenu.
X Press ato confirm.
X Pres sthe : or9 button to select the
Auto .fold in
Auto .fold in function.
If the Auto.
Auto. fold
foldin
infunction is switched
on, the multifunction display shows the
vehicle' sexterior mirror in orange.
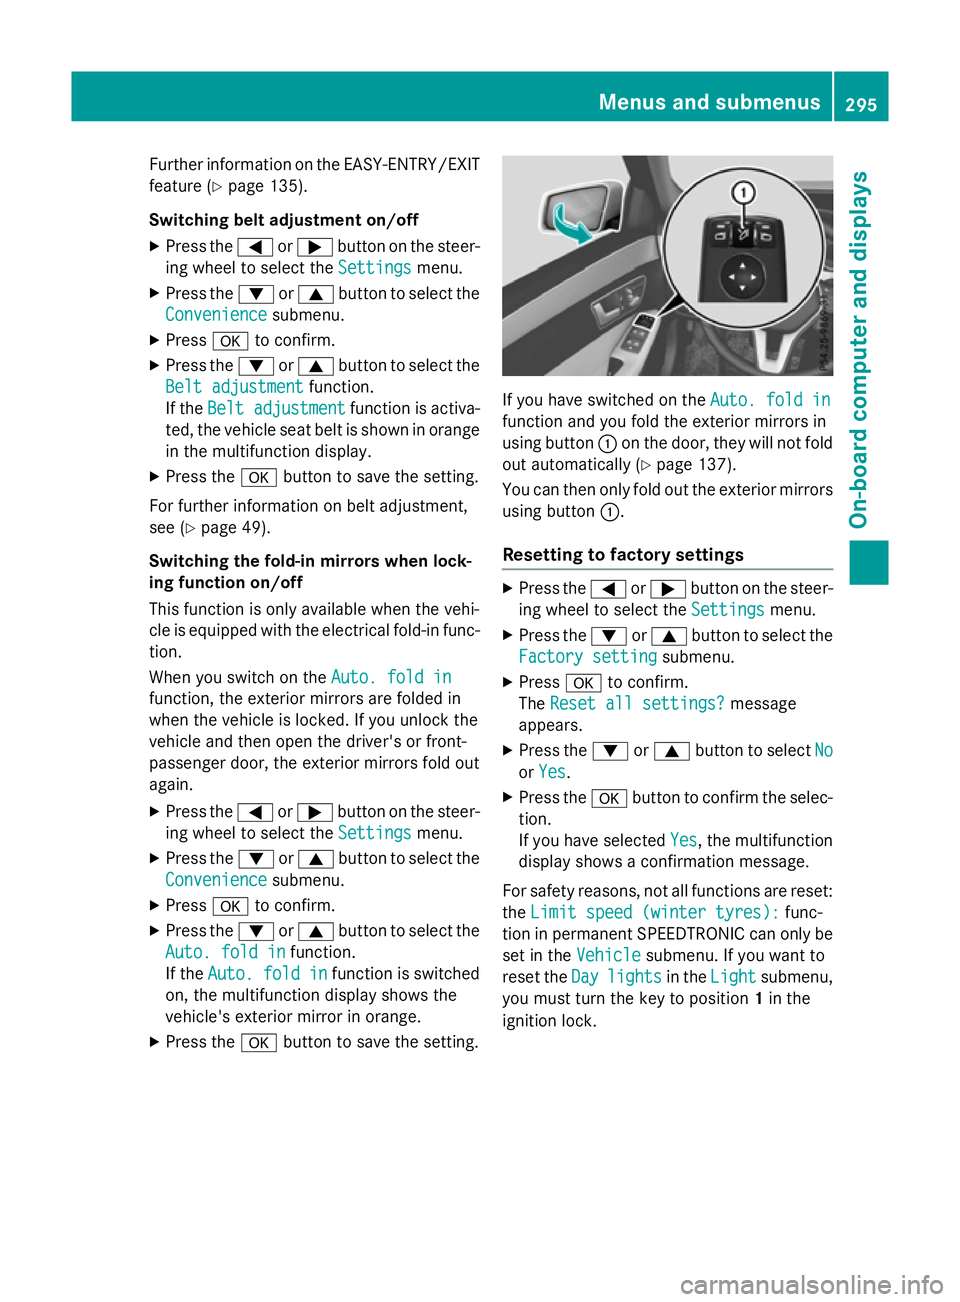
X Pres sthe a button to sav ethe setting. If yo
uhaves witched on the Auto.fold in
Auto .fold in
function and yo ufoldt he exterior mirrors in
using button :on the door, they will not fold
ou ta utomaticall y(Ypage 137).
You can then only fol doutthe exterior mirrors
using button :.
Resettin gtofactory settings X
Pres sthe = or; button on the steer-
ing wheel to select the Settings Settingsmenu.
X Pres sthe : or9 button to select the
Factory setting
Factory setting submenu.
X Press ato confirm.
The Rese tall settings?
Rese tall settings? message
appears.
X Pres sthe : or9 button to select No
No
or Yes
Yes.
X Pres sthe a button to confir mthe selec-
tion.
If yo uhaves elected Yes Yes,the multifunction
display shows aconfirmation message.
For safety reasons, not al lfunctions are reset:
the Limi tspee d(winter tyres):
Limi tspee d(winter tyres): func-
tion in permanent SPEEDTRONIC can only be
set in the Vehicle
Vehiclesubmenu. If yo uwantto
rese tthe Day
Day lights
lights in theLight
Light submenu,
yo um ustturn the key to position 1in the
ignition lock. Menus and submenus
295On-board computer and displays Z
Page 329 of 497
Display messages
Possible causes/consequences and
M
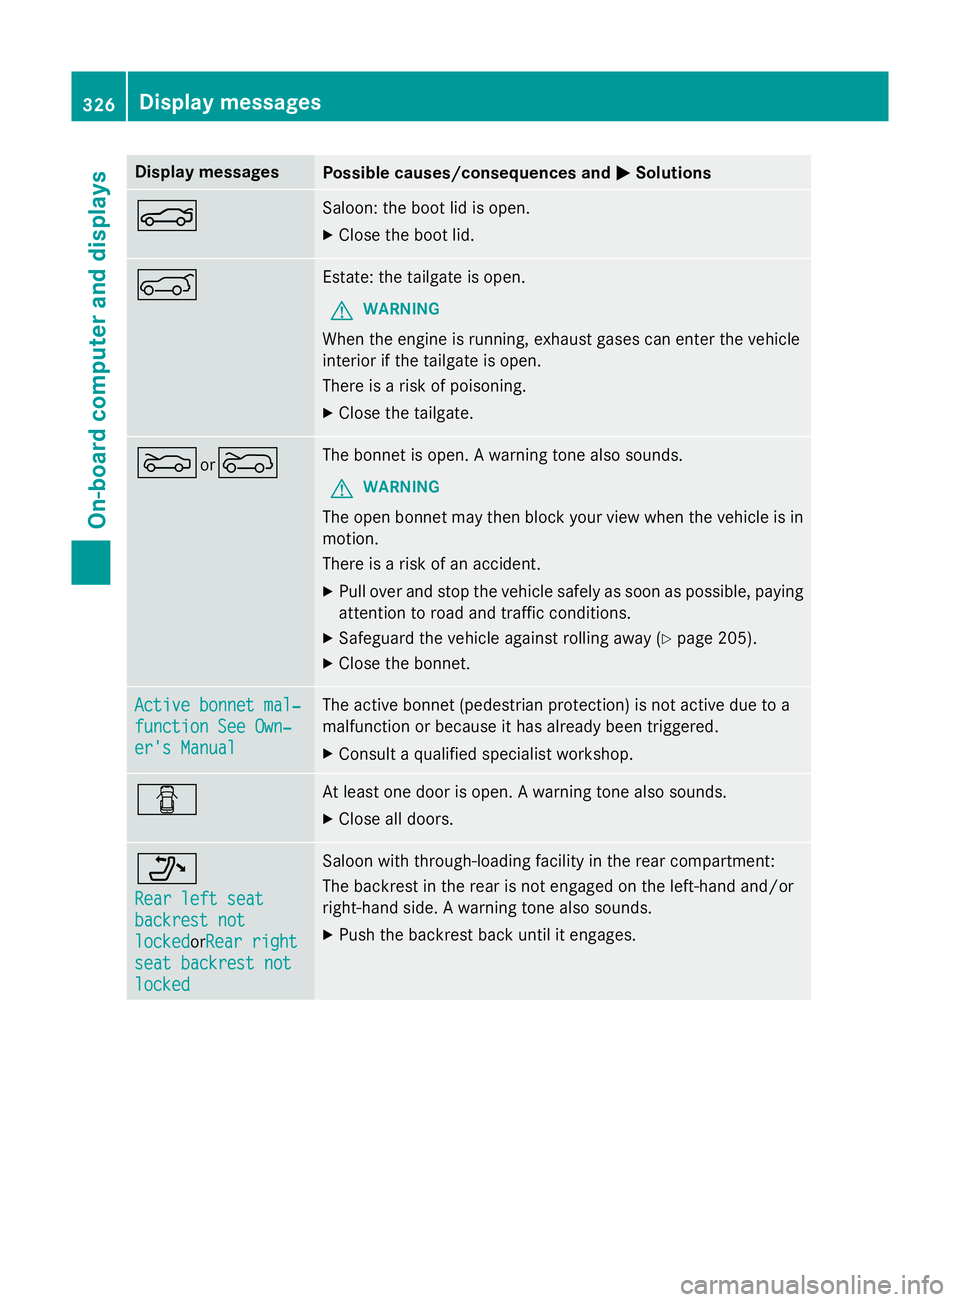
MSolutions N Saloon
:the boo tlid is open.
X Clos ethe boo tlid. A Estate: th
etailgat eisopen.
G WARNING
Whe nthe engin eisrunning ,exhaus tgase scan ente rthe vehicle
interio rifthetailgat eisopen.
There is ariskofp oisoning.
X Clos ethe tailgate. Mor
? The bonne
tisopen.Aw arnin gtonea lso sounds.
G WARNING
The open bonne tmay then bloc kyour vie wwhen th evehicl eisin
motion.
There is ariskofana ccident.
X Pull ove rand stop th evehicl esafely as soo naspossible, paying
attention to roa dand traffic conditions.
X Safeguar dthe vehicl eagainst rollin gaway (Y page 205).
X Clos ethe bonnet. Active bonnet mal‐ Active bonnet mal‐
function See Own‐ function See Own‐
er'
sM anual
er' sM anual The active bonne
t(pedestrian protection )isnotactive due to a
malfunction or because it has already been triggered.
X Consult aqualified specialist workshop. C At leas
tone doo riso pen.Aw arnin gtonea lso sounds.
X Clos eall doors. _
Rea
rl efts eat
Rea rl efts eat
backrest not backrest not
locked locked orRear right
Rea rr ight
sea tb ackrest not
sea tb ackrest not
locked
locked Saloon wit
hthrough-loading facilit yint he rear compartment:
The backrest in th erear is no tengage dont heleft-han dand/or
right-hand side .Awarnin gtonea lso sounds.
X Push th ebackrest bac kuntil it engages. 326
Display
messagesOn-boardcomputer an ddisplays
Page 355 of 497
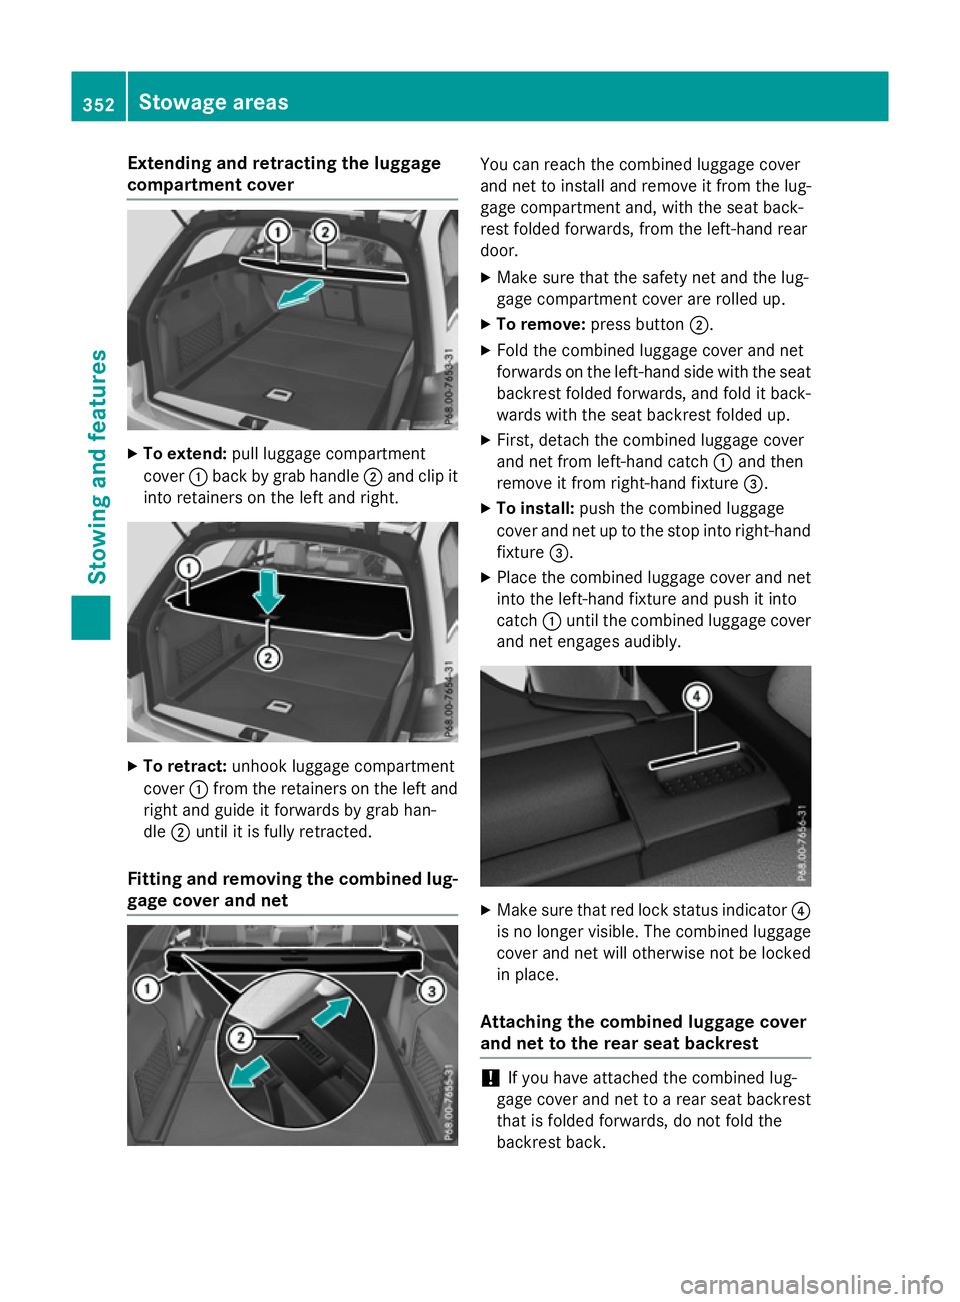
Extending and retractin
gthe luggage
compartment cover X
To extend: pull luggage compartment
cover :back by grab handle ;and clip it
int or etainers on th eleft and right. X
To retract: unhook luggage compartment
cover :from th eretainers on th eleft and
righ tand guide it forwards by grab han-
dle ;until it is fully retracted.
Fitting and removing th ecombined lug-
gage cover and net You can reac
hthe combined luggage cover
and ne ttoinstall and remove it from th elug-
gage compartmen tand, with th eseat back-
res tfolded forwards ,fro mt heleft-hand rear
door.
X Mak esure that th esafety ne tand th elug-
gage compartmen tcover are rolled up.
X To remove: pressbutton ;.
X Fol dthe combined luggage cover and net
forwards on th eleft-hand side with th eseat
backres tfolded forwards ,and fold it back-
wards with th eseat backres tfolded up.
X First ,detach th ecombined luggage cover
and ne tfroml eft-hand catch :and then
remove it from right-han dfixture =.
X To install: push thecombined luggage
cover and ne tuptothestop int oright-hand
fixture =.
X Plac ethe combined luggage cover and net
int ot he left-hand fixtur eand push it into
catch :until th ecombined luggage cover
and ne tengages audibly. X
Mak esure that red loc kstatus indicator ?
is no longer visible. The combined luggage
cover and ne twill otherwise no tbelocked
in place.
Attaching th ecombined luggage cover
and net to th erears eat backrest !
If you have attached th
ecombined lug-
gage cover and ne ttoarear seat backrest
that is folded forwards ,donotfold the
backres tback. 352
Stowage areasStowing and features
Page 371 of 497
More information on suitable mobile phones,
mobile phone brackets and on connecting
Bluetooth ®
-capable mobile phones to
COMAND Online/Audio 20 can be obtained:
R at your Mercedes-Ben zService Centre
R on the Internet at http://www.mercedes-
benz.com/connect
The functions and services available when
you use the phone depend on your mobile
phone model and service provider.
Using amobile phone To connect
amobile phone to the exterior
aerial and charge it, insert it into the mobile
phone bracket.
X Open the telephone compartment
(Y page 344).
X Place the mobile phone bracket into the
pre-installed fitting; see the separate instal-
lation instructions for the mobile phone fit-
ting.
X Insert the mobile phone into the mobile
phone bracket; see the separate installa-
tion instructions for the mobile phone fit-
ting.
i The mobile phone can also be operated
without being in the bracket. However, the charging function and aerial function are
not available.
In order to use Bluetooth ®
(SAP profile) on
your telephone module, you must first insert
the telephone module into the pre-installed
fitting. This connects it to the exterior aerial.
If you wish to charge the mobile phone, then
you must connect it to aUSB port.
Further information on the telephone module
with Bluetooth ®
(SAP profile) can be found in
the Digital Owner's Manual.
Operating the mobile phone You can operate the telephone using the
6 and~ buttons on the multifunction
steering wheel. You can operate other mobile phone functions via the on-board computer
(Y page 284).
When you remove the key from the ignition
lock, the mobile phone is disconnected from
the hands-free system. Active calls will first
be transferred to the mobile phone directly.
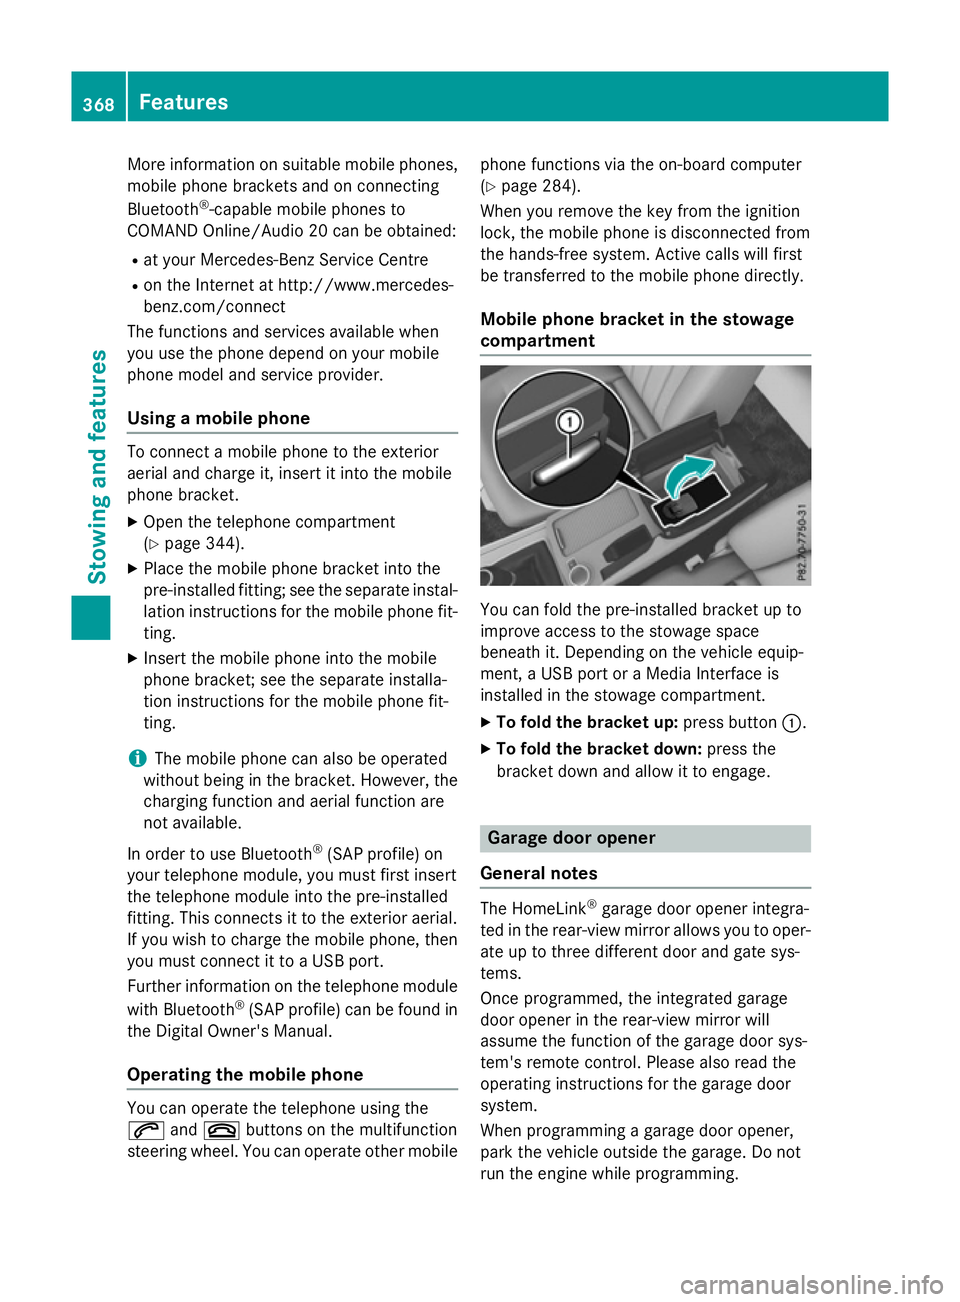
Mobile phone bracket in the stowage
compartment You can fold the pre-installed bracket up to
improve access to the stowage space
beneath it. Depending on the vehicle equip-
ment,aU
SB port or aMedia Interface is
installed in the stowage compartment.
X To fold the bracket up: press button:.
X To fold the bracket down: press the
bracket down and allow it to engage. Garage door opener
General notes The HomeLink
®
garage door opener integra-
ted in the rear-view mirror allowsy ou to oper-
ate up to three different door and gate sys-
tems.
Once programmed, the integrated garage
door opener in the rear-view mirror will
assume the function of the garage door sys-
tem's remote control. Please also read the
operating instructions for the garage door
system.
When programming agarage door opener,
park the vehicle outside the garage. Do not
run the engine while programming. 368
FeaturesStowing and features
Page 372 of 497
The garage door opener is only available for
certain countries. Observe the legal require-
mentsf or each individual country.
The HomeLink ®
garage door opener is com-
patible with most European garage and gate
opener drives. More information on Home-
Link ®
and/or compatible products is availa-
ble:
R at aq ualified specialist workshop
R via the HomeLink ®
Hotline
(0) 080004 66 354 65 or alternatively
+49 (0) 6838 907-277
R on the Internet at http://
www.homelink.com
Important safety notes G
WARNING
When you operate or program the garage door with the integrated garage door opener, per-
sons in the range of movemen tofthe garage
door can become trapped or struck by the
garage door. There is arisk of injury.
When using the integrated garage door
opener, alway smake sure that nobody is
within the range of movemen tofthe garage
door. G
WARNING
Combustion engines emit poisonous exhaust
gases such as carbon monoxide. Inhaling
these exhaust gases leads to poisoning. There is ar isk of fatal injury. Therefore never leave
the engine runnin ginenclosed spaces with-
out sufficient ventilation.
Programming Programming buttons
Pay attention to the "Importan
tsafety notes"
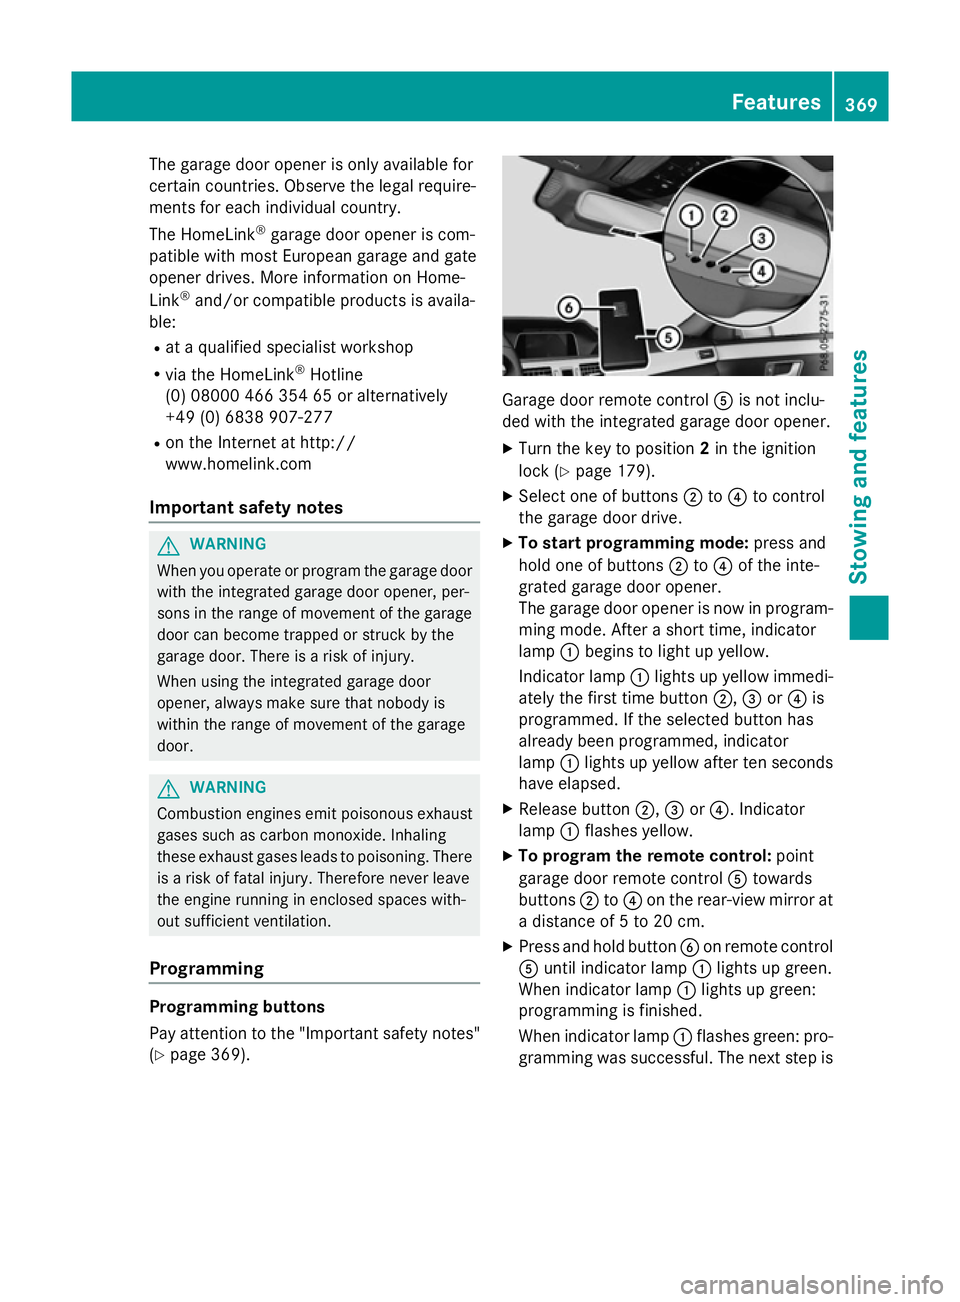
(Y page 369). Garage door remot
econtrol Ais not inclu-
ded with the integrated garage door opener.
X Turn the key to position 2in the ignition
lock (Y page 179).
X Select one of buttons ;to? to control
the garage door drive.
X To startp rogramming mode: press and
hold one of buttons ;to? of the inte-
grated garage door opener.
The garage door opener is now in program- ming mode. After ashort time, indicator
lamp :begins to light up yellow.
Indicator lamp :lights up yellow immedi-
ately the first time button ;,=or? is
programmed. If the selected button has
already been programmed, indicator
lamp :lights up yellow after ten seconds
have elapsed.
X Release button ;,=or?.I ndicator
lamp :flashes yellow.
X To program the remot econtrol: point
garage door remot econtrol Atowards
buttons ;to? on the rear-view mirror at
ad istanc eof5to20c m.
X Press and hold button Bon remot econtrol
A until indicator lamp :lights up green.
When indicator lamp :lights up green:
programming is finished.
When indicator lamp :flashes green: pro-
gramming was successful. The next step is Features
369Stowing and features Z
Page 373 of 497
to synchronise the rolling code
(Y
page 370).
X Releas ebutton Bof remote control Aof
the garage door drive.
If indicator lamp :lights up red :repea tthe
programming proces sfor the correspond-
ing button on the rear-view mirror. When
doing so ,varyt he distance between remote
control Aand the rear-view mirror.
Th er equired distance between remote
control Aand the integrated garage door
opene rdepen ds on the garage door drive
system. Severa lattempts ma yberequired.
Yo us houl dteste very positio nfor at least
25 second sbefore trying another position.
Synchronising the rolling code
Observe the "Important safety notes"
(Y page 369).
If the garage door system uses arolling code,
you will also have to synchronise the garage
door system with the integrated garage door
opener in the rear-view mirror .Todothis you
will need to use the programming button on
the door drive control panel. The program-
ming button may be placed at differen tloca-
tion sdepending on the manufacturer. It is
usually located on the door drive unit on the
garage ceiling.
Familiarise yourself with the garage door
drive operatin ginstructions, e.g. under "Pro-
grammin gofadditional remot econtrols",
before carrying out the following steps.
Your vehicle must be within range of the
garage door or gate opener drive. Make sure
that neither your vehicle nor any persons/
objects are present within the sweep of the
door or gate.
X Turn the key to position 2in the ignition
lock (Y page 179).
X Get out of the vehicle.
X Press the programming button on the door
drive unit.
Usually, you now have 30 seconds to ini-
tiate the nexts tep. X
Get intot he vehicle.
X Press previously programmed button ;,
= or? of the integrated garage door
opener until the door closes.
The rolling code synchronisation is then
complete.
Problems when programming
If you have problems when programming the
integrated garage door opener, please note
the following: R Check the transmitter frequenc yused by
garage door drive remot econtrol Aand
whether it is supported. The transmitter
frequenc ycan usually be found on the back
of the garage door drive remot econtrol.
R Replace the batteries in garage door
remot econtrol A.This increases the like-
lihood that garage door remot econtrol A
will transmit astrong and precise signal to
the integrated garage door opener in the
rear-view mirror.
R When programming, hold remot econtrol
A at varying distances and angles from the
button which you are programming. Try var- ious angles at adistanc ebetween 5and
30 cm or at the same angle but at varying
distances.
R If ther eisanother remot econtrol for the
same garage door drive, perform the pro-
grammin gsteps again using this remote
control. Befor eperforming these steps,
make sure that new batteries have been
fitted in garage door drive remot econtrol
A.
R Note that some remot econtrols transmit
only for alimited period (the indicator lamp
on the remot econtrol goes out). Press but-
ton Bon remot econtrol Aagain before
transmission ends.
R Align the aerial cable of the garage door
opener unit. This can improve signal recep-
tion/transmission. 370
FeaturesStowing and features
Page 374 of 497
Opening or closing the garage door
Oncep
rogrammed, the integrated garage
door opener will assume the function of the
garage door system's remot econtrol. Please
also read the operatin ginstructions for the
garage door system.
X Turn the key to position 2in the ignition
lock (Y page 179).
X Press button ;,=or? which you have
programmed to operate the garage door.
Garage door system with afixed code: indi-
cator lamp :lights up green.
Garage door system with arolling code:
indicator lamp :flashes green.
The transmitter will transmit asignal for as
long as the button is pressed. The trans-
mission is halted after amaximum of ten
seconds and indicator lamp :lights up
yellow.
X Press button ;,=or? again if neces-
sary.
Clearing the memory Make sure that you clear the memory of the
integrated garage door opener before selling
the vehicle.
X Turn the key to position 2in the ignition
lock (Y page 179).
X Press and hold buttons ;and ?.
The indicator lamp initially lights up yellow
and then green.
X Release buttons ;and ?.
The memory of the integrated garage door
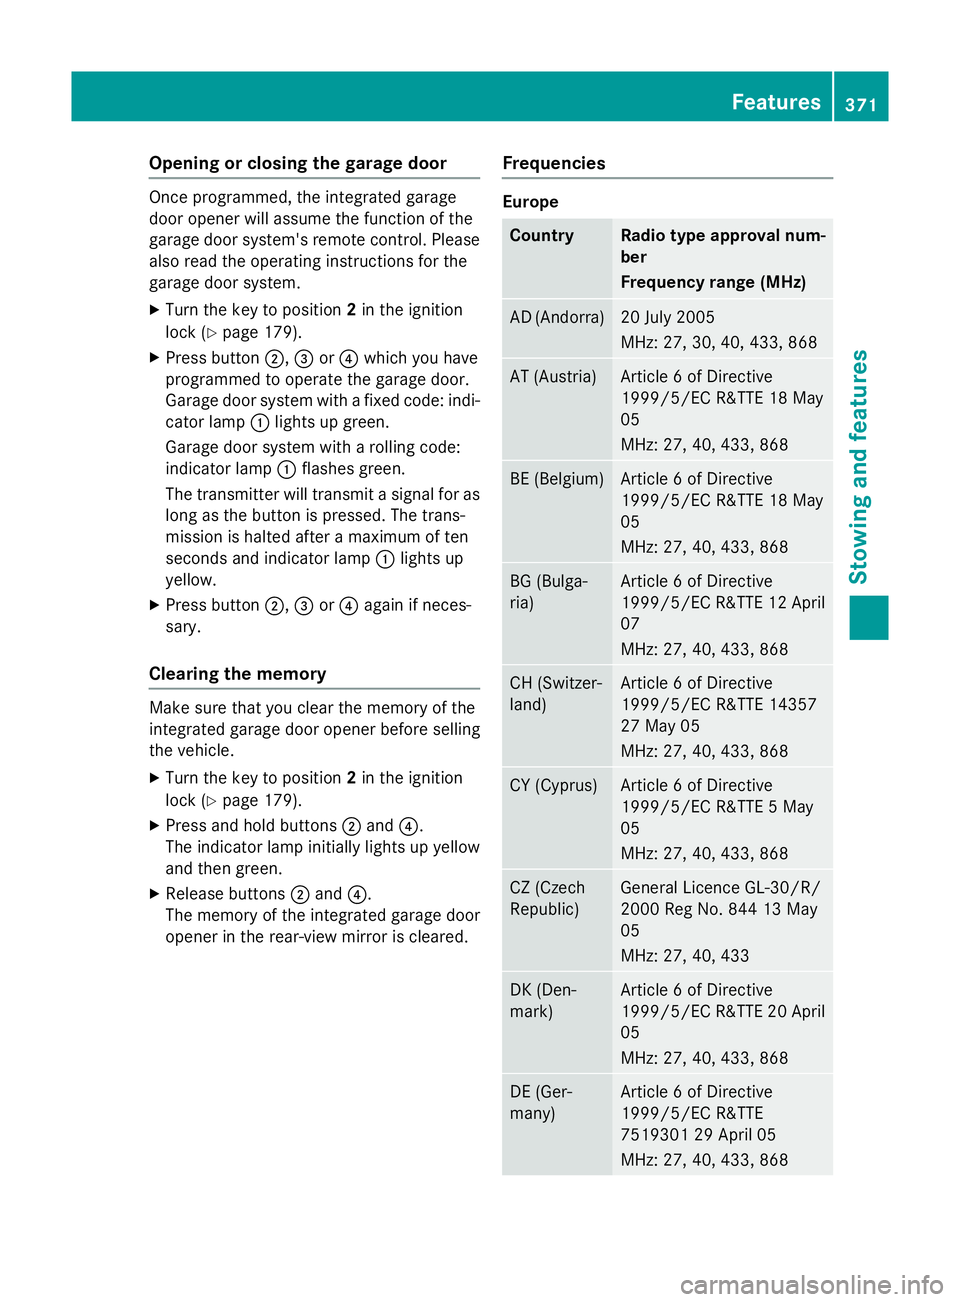
opener in the rear-view mirror is cleared. Frequencies Europe
Country Radio typea
pproval num-
ber
Frequency range (MHz) AD (Andorra) 20 July 2005
MHz:2
7, 30, 40, 433,8 68 AT (Austria) Article
6ofDirective
1999/5/ECR &TTE 18 May
05
MHz:2 7, 40, 433,8 68 BE (Belgium) Article
6ofDirective
1999/5/ECR &TTE 18 May
05
MHz:2 7, 40, 433,8 68 BG (Bulga-
ria) Article
6ofDirective
1999/5/ECR &TTE 12 April
07
MHz:2 7, 40, 433,8 68 CH (Switzer-
land) Article
6ofDirective
1999/5/ECR &TTE 14357
27 May 05
MHz:2 7, 40, 433,8 68 CY (Cyprus) Article
6ofDirective
1999/5/ECR &TTE5May
05
MHz:2 7, 40, 433,8 68 CZ (Czech
Republic) General Licence GL-30/R/
2000R
eg No. 844 13 May
05
MHz:2 7, 40, 433 DK (Den-
mark) Article
6ofDirective
1999/5/ECR &TTE 20 April
05
MHz:2 7, 40, 433,8 68 DE (Ger-
many) Article
6ofDirective
1999/5/ECR &TTE
751930129A pril 05
MHz:2 7, 40, 433,8 68 Features
371Stowing and features Z