2015 MERCEDES-BENZ E-CLASS ESTATE service
[x] Cancel search: servicePage 371 of 497
More information on suitable mobile phones,
mobile phone brackets and on connecting
Bluetooth ®
-capable mobile phones to
COMAND Online/Audio 20 can be obtained:
R at your Mercedes-Ben zService Centre
R on the Internet at http://www.mercedes-
benz.com/connect
The functions and services available when
you use the phone depend on your mobile
phone model and service provider.
Using amobile phone To connect
amobile phone to the exterior
aerial and charge it, insert it into the mobile
phone bracket.
X Open the telephone compartment
(Y page 344).
X Place the mobile phone bracket into the
pre-installed fitting; see the separate instal-
lation instructions for the mobile phone fit-
ting.
X Insert the mobile phone into the mobile
phone bracket; see the separate installa-
tion instructions for the mobile phone fit-
ting.
i The mobile phone can also be operated
without being in the bracket. However, the charging function and aerial function are
not available.
In order to use Bluetooth ®
(SAP profile) on
your telephone module, you must first insert
the telephone module into the pre-installed
fitting. This connects it to the exterior aerial.
If you wish to charge the mobile phone, then
you must connect it to aUSB port.
Further information on the telephone module
with Bluetooth ®
(SAP profile) can be found in
the Digital Owner's Manual.
Operating the mobile phone You can operate the telephone using the
6 and~ buttons on the multifunction
steering wheel. You can operate other mobile phone functions via the on-board computer
(Y page 284).
When you remove the key from the ignition
lock, the mobile phone is disconnected from
the hands-free system. Active calls will first
be transferred to the mobile phone directly.
Mobile phone bracket in the stowage
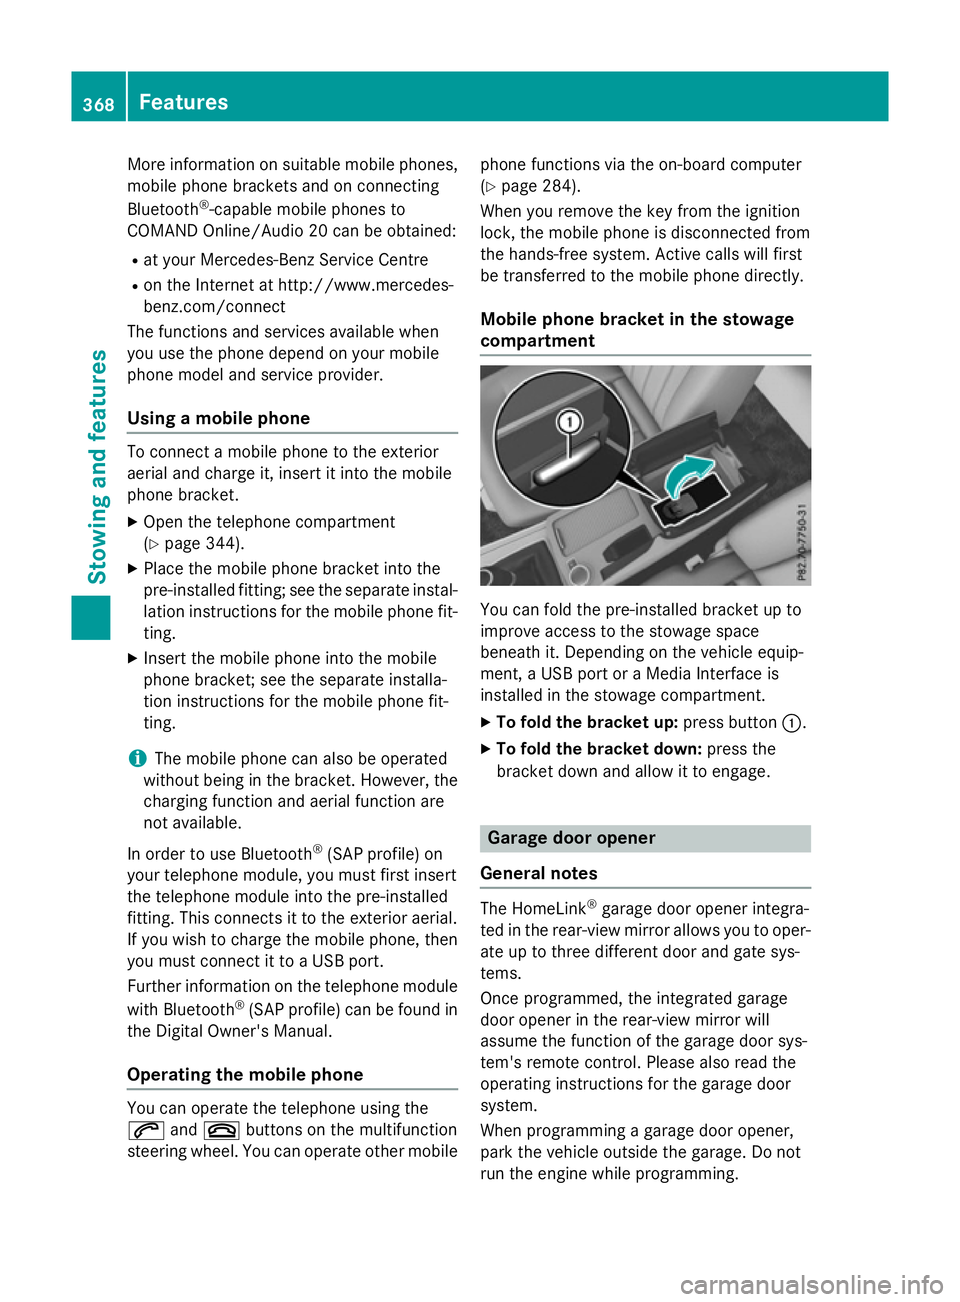
compartment You can fold the pre-installed bracket up to
improve access to the stowage space
beneath it. Depending on the vehicle equip-
ment,aU
SB port or aMedia Interface is
installed in the stowage compartment.
X To fold the bracket up: press button:.
X To fold the bracket down: press the
bracket down and allow it to engage. Garage door opener
General notes The HomeLink
®
garage door opener integra-
ted in the rear-view mirror allowsy ou to oper-
ate up to three different door and gate sys-
tems.
Once programmed, the integrated garage
door opener in the rear-view mirror will
assume the function of the garage door sys-
tem's remote control. Please also read the
operating instructions for the garage door
system.
When programming agarage door opener,
park the vehicle outside the garage. Do not
run the engine while programming. 368
FeaturesStowing and features
Page 380 of 497
Useful information
............................378
Engine compartment ........................378
Service ............................................... 384
Care .................................................... 385 377Maintenance and care
Page 385 of 497
G
WARNING
If engine oil comes into contact with hot com- ponents in the engine compartment, it may
ignite. There is arisk of fire and injury.
Make sure that engine oil does not spil lout
over the filler neck. Allow the engine to cool
downa nd thoroughly clea nthe components
that have come into contact with engine oil
before you start the engine. H
Environmental note
When topping up the oil,t ake care not to spill
any. If oil enters the soil or waterways, it is
harmfu ltothe environment.
! Only use engine oilsa
nd oil filters that
have been approved for vehicles with aser-
vice system. You can obtai nalistoft he
engine oilsa nd oil filters tested and
approved in accordance with the
Mercedes-Benz Specifications for Service
Products at any Mercedes-Benz Service
Centre.
Damag etothe engine or exhaust system is
caused by the following:
R using engine oilsa nd oil filters that have
not been specifically approved for the
service system
R changing the engine oil and oil filter after
missing the change interval required by
the service system
R using engine oil additives
! Do not add too much oil.T
opping up with
too much engine oil can result in damage to
the engine or to the catalytic converter.
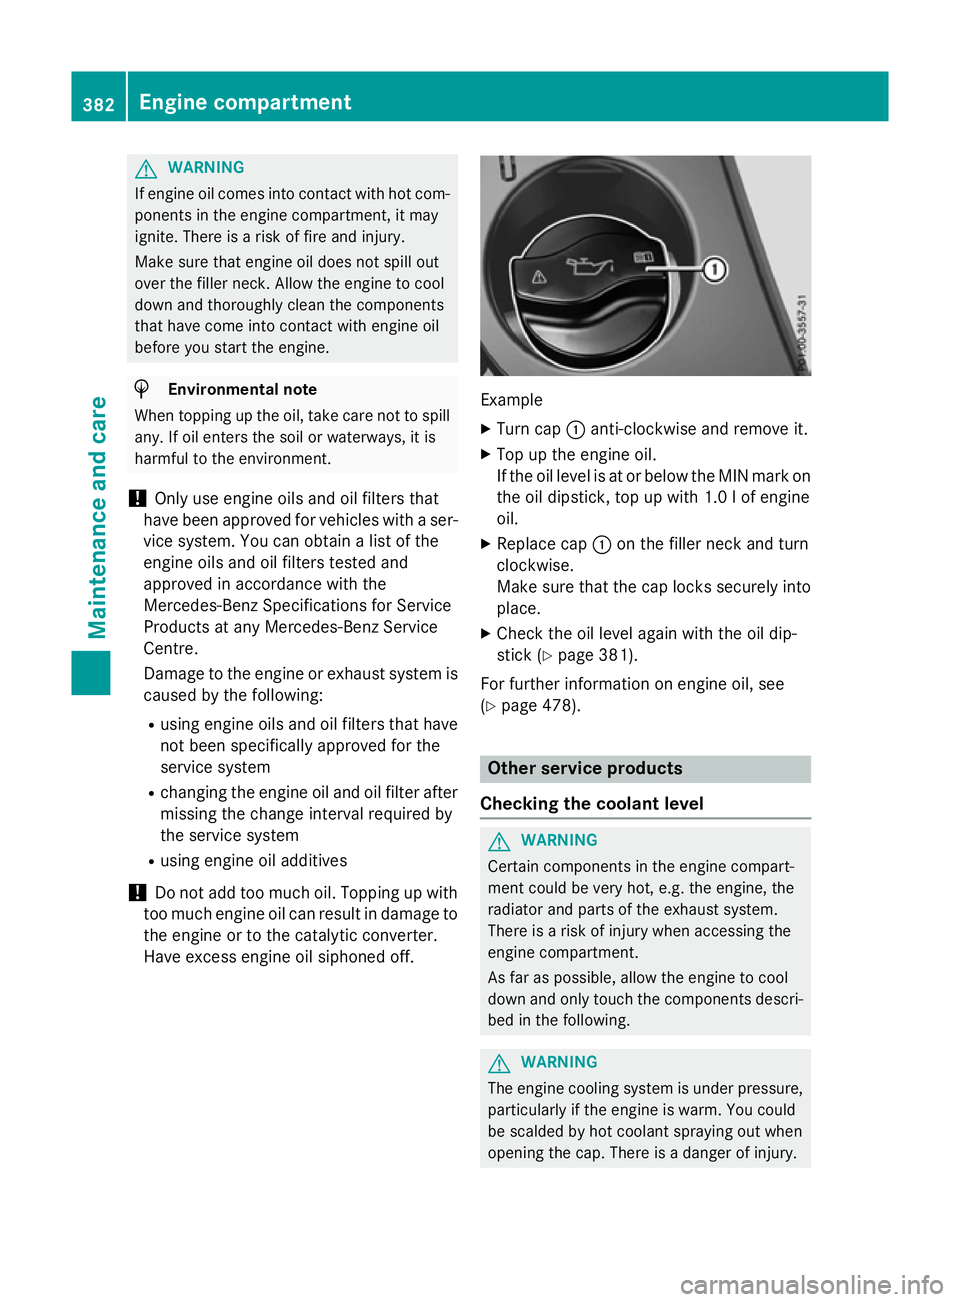
Have excess engine oil siphoned off. Example
X Turn cap :anti-clockwise and remove it.
X Top up the engine oil.
If the oil leve lisatorbelow the MIN mark on
the oil dipstick, top up with 1.0 lofe ngine
oil.
X Replace cap :on the filler neck and turn
clockwise.
Make sure that the cap locks securely into place.
X Check the oil level again with the oil dip-
stick (Y page 381).
For further information on engine oil, see
(Y page 478). Other service products
Checking the coolant level G
WARNING
Certain components in the engine compart-
ment could be very hot, e.g. the engine, the
radiator and parts of the exhaust system.
There is arisk of injury when accessing the
engine compartment.
As far as possible, allow the engine to cool
down and only touch the components descri- bed in the following. G
WARNING
The engine cooling system is under pressure, particularly if the engine is warm. You could
be scalded by hot coolant spraying out when
opening the cap. There is adanger of injury. 382
Engine compartmentMaintenance and care
Page 387 of 497
Further information on windscreen washer
fluid/antifreeze (Y page 480).Service
ASSYST PLUS
Servic emessages The ASSYST PLUS service interval display
informs yo uofthe next service du edate.
Information on the typ eofservice and service
interval s(seet he separate Service Booklet).
You can obtain further information from a
Mercedes-Benz Service Centre.
i The ASSYST PLUS service interval display
doe snot sho wany information on the
engine oil level .Observe the notes on the
engine oil level (Y page 380).
The multifunction display shows aservice
messag efor afew seconds, e.g.:
R Service Ain..d ays
Service Ain..d ays
R Service Aoverdue
Service Aoverdue
R Service Aoverdue by .. days
Service Aoverdue by .. days
Depending on the operating conditions of the vehicle, the remaining time or distance until
the next service du edateisd isplayed.
The letter indicates which service is due. A A
stand sfor am inorservice and B
B for am ajor
service. Anumber or another letter may be
displayed afte rthe letter.
Only for certain countries :the positio nafter
the letter A
A or B
Bindicates any necessar yaddi-
tiona lmaintenance work to be performed. If
yo un otify aquali fied specialist worksho pof
this display ,you will receive astatement on
the associated costs.
The ASSYST PLUS service interval display
doe snot take into account any period sof
time during which the battery is disconnec-
ted. Maintaining the time-dependent service
schedule:
X Note dow nthe service du edated isplayed
in the multifunction display before discon-
necting the battery.
or
X After reconnecting the battery ,sub tract
the battery disconnection period sfrom the
service date shown on the display.
Hiding servic emessages X
Pres sthe a or% button on the steer-
ing wheel.
Displayin gservic em essages X
Switch the ignition on.
X Pres sthe = or; button on the steer-
ing wheel to select the Service Servicemenu.
X Pres sthe 9 or: button to select the
ASSYST PLUS
ASSYST PLUS submenu and confir mby
pressing the abutton.
The service du edatea ppears in the multi-
function display.
Informatio nabout Service Resettin
gthe ASSYST PLU Sservic einter-
val display
! If the ASSYST PLUS service interval dis-
play ha sbeeni nadvertently reset, this set-
ting can be corrected at aquali fied special-
ist workshop.
Have service work carried ou tasd escribed
in the Service Booklet. Thi smay otherwise
lead to increase dweara nd damag etothe
majo rassemblies or the vehicle.
Aq uali fied specialist workshop, e.g. a
Mercedes-Benz Service Centre, will rese tthe
ASSYST PLUS service interval display after
the service work ha sbeenc arried out. You
can also obtain further information on main-
tenance work, for example. 384
ServiceMaintenance and care
Page 388 of 497
Special service requirements
The prescribed service interval is based on
normal operation of the vehicle. Service work
will need to be performed more often if the
vehicle is operated under arduousc onditions
or increased loads, for example:
R regular city driving with frequent intermedi-
ate stops
R if the vehicle is primarily used to travel
short distances
R for frequent operation in mountainous ter-
rain or on poor road surfaces
R if the engine is often left idling for long peri-
ods
In these or similar operating conditions, have,
for example, the air filter, engine oil and oil
filter changed more frequently. The tyres
must be checked more frequently if the vehi-
cle is operated under increased loads. Fur-
ther information can be obtained at aquali-
fied specialist workshop, e.g. aMercedes-
Benz Service Centre.
Driving abroad
An extensive Mercedes-Benz Service network is also available in other countries. You can
obtain further information from any
Mercedes-Benz Service Centre. AdBlue
®
service indicator
i For BlueTEC vehicles only.
To function properly, BlueTEC exhaust gas
aftertreatment must be operated with the
reducing agent AdBlue ®
.A dBlue ®
is topped
up as part of the service. Under normal oper-
ating conditions, afull tank of AdBlue ®
should
last until the next service due date.
Depending on how and where the vehicle is
used, there may be an increase in the
AdBlue ®
consumption, resulting in the next
service due date being brought forward.
Certain display messages show that AdBlue ®
must be topped up, e.g.: Refill AdBlue at workshop See Own‐ Refill AdBlue at workshop See Own‐
er's Manual er's Manual
Refill AdBlue at workshop No start Refill AdBlue at workshop No start
in .. km in .. km
Aw
arning signal also sounds.
You can no longer start the vehicle when the
AdBlue ®
supply has been used up
(Y page 314).
! Have the AdBlue ®
tank topped up at a
qualified specialist workshop only. The
vehicle may otherwise be damaged or
soiled.
Before driving your vehicle outside Europe,
have the AdBlue ®
supply checked at aquali-
fied specialist workshop. If necessary, have
AdBlue ®
topped up. Before aprolonged stay
outside of Europe, consult aqualified special-
ist workshop.
Observe the notes on AdBlue ®
(Y page 477).
Further information about BlueTEC exhaust
gas aftertreatment and AdBlue ®
can be
obtained at aqualified specialist workshop,
e.g. aMercedes-Benz Service Centre. Care
General notes
H
Environmental note
Dispose of empty packaging and cleaning
cloths in an environmentally responsible man- ner.
! For cleaning your vehicle, do not use any
of the following:
R dry, rough or hard cloths
R abrasive cleaning agents
R solvents
R cleaning agents containing solvents
Do not scrub.
Do not touch the surfaces or protective
films with hard objects, e.g. aring or ice
scraper. You could otherwise scratchor
damage the surfaces and protective film. Care
385Maintenance and care Z
Page 404 of 497
ment cluster where it willbee
asily seen by
the driver.
! After use, excess tyre sealant may run out
of the filler hose. This could caus estains.
Therefore, place the filler hose in the plastic
bag which contained the TIREFIT kit. H
Environmental note
Have the used tyre sealant bottle disposed of
professionally, e.g. at aqualified specialist
workshop.
If at yre pressure of 180 kPa (1.8 bar/26 psi)
has been attained after five minutes:
X Switch off the tyre inflation compressor.
X Unscrew the filler hose from the valve of
the faulty tyre.
X Stow the tyre sealant bottle, the tyre infla-
tion compresso rand the warning triangle.
X Pull away immediately.
X Stop after driving for approximatel yten
minutes and check the tyre pressure with
the tyre inflation compressor.
The tyre pressure must now be at least
130 kPa (1.3 bar/19 psi). G
WARNING
If the required tyre pressure is not reached
after driving for ashort period, the tyre is too
badly damaged. The tyre sealant cannot
repair the tyre in this instance. Damage dtyres
and atyre pressure that is too low can signif-
icantly impair the vehicle's braking and driv-
ing characteristics. There is arisk of accident.
Do not continue driving. Contact aqualified
specialist workshop.
i In yourv
ehicle, you willf indasticker with
the Mercedes-Benz Service24h telephone
number, e.g. on the B-pillar on the driver's
side.
X Correct the tyre pressure if it is still at least
130 kPa (1.3 bar/19 psi). See the fuel filler
flap for values.
X To increase the tyre pressure: switch on
the tyre inflation compressor. X
To reduce the tyre pressure: depress
pressure release button Enext to pres-
sure gauge F.
X When the tyre pressure is correct, unscrew
the filler hose from the valve of the sealed
tyre.
X Screw the valve cap onto the tyre valve of
the sealed tyre.
X Pullt he tyre sealant bottle out of the tyre
inflation compressor.
The filler hose stays on the tyre sealant
bottle.
X Drive to the nearest qualified specialist
workshop and have the tyre changed there.
X Have the tyre sealant bottle replaced as
soon as possible at aqualified specialist
workshop.
X Have the tyre sealant bottle replaced every
four years at aqualified specialist work-
shop. Battery (vehicle)
Important safety notes
Work on the battery ,e.g. removing or fitting,
requires specialist knowledge and the use of
specia ltools. Therefore, alwaysh ave work on
the battery carrie dout at aqualified specialist
workshop. G
WARNING
Work carried out incorrectly on the battery
can lead, for example, to ashort circuit and
thus damage the vehicl eelectronics. This can Battery (vehicle)
401Breakdown assistance
Z
Page 406 of 497
Observe the service intervals in the Service
Booklet or contact aqualified specialist
workshop for more information.
! You should have all work involving the
battery carried out at aqualified specialist
workshop. In the exceptional case that it is
necessary for you to disconnect the battery yourself, make sure that:
R you switch off the engine and remove the
key. On vehicles with KEYLESS-GO,
ensure that the ignition is switched off.
Check that all the indicator lamps in the
instrument cluster are off. Otherwise,
electronic components, such as the
alternator, may be damaged.
R you first remove the negative terminal
clamp and then the positive terminal
clamp. Never swap the terminal clamps.
Otherwise, the vehicle's electronic sys-
tem may be damaged.
R in vehicles with automatic transmission,
the transmission is locked in position P
after disconnecting the battery. The vehi-
cle is secured against rolling away. You
can then no longer move the vehicle.
The battery and the cover of the positive
terminal clamp must be fitted securely dur- ing operation.
Comply with safety precautions and take pro-
tective measures when handling batteries. WARNING
Fire, naked flames and smoking
are prohibited when handling the
battery. Avoid creating sparks.
Battery acid is caustic. Avoid con-
tact with the skin, eyes or clothing.
Wear suitablep rotective clothing,
in particularg loves, an apron and a
face mask.
Immediately rinse acid splashes
off with clean water. Consult adoc-
tor if necessary. Wear eye protection.
Keep children away.
Observe this Owner's Manual.
HYBRID vehicles: make sure that you read
the "HYBRID" Supplement included in the
vehicle literature. You could otherwise fail to
recognise dangers, e.g. due to high voltage.
For safety reasons, Mercedes-Benz recom-
mends that you only use batteries which have been tested and approved for your vehicle by
Mercedes-Benz.T hese batteries provide
increased impact protection to prevent vehi-
cle occupants from suffering acid burns
should the battery be damagedint he event of
an accident.
In order for the battery to achieve the maxi-
mum possibles ervice life, it must always be
sufficiently charged.
The vehicle battery, like other batteries, can
discharge over time if you do not use the
vehicle. In such cases, have the battery dis-
connected at aqualified specialist workshop.
You can also charge the battery with a
charger recommended by Mercedes-Benz.
For more information, pleasec ontactaquali-
fied specialist workshop.
Have the battery charge checked more fre-
quently if you use the vehicle mainly for short
trips or if you leave it standing idle for a
lengthy period. Consult aqualified specialist
workshop if you wish to leave your vehicle
parked up for along period of time.
i When you park the vehicle, remove the
key if you do not require any electrical con-
sumers. The vehicle will then use very little energy, thus conserving battery power. Battery (vehicle)
403Breakdown assistance Z
Page 420 of 497
causing the unusual handling characteristics.
If yo ufind no signs of damage, have the tyres
and wheel schecke dataq ualified specialist
workshop.
Whe nparking your vehicle ,make sure that
the tyre sdonot get deforme dbythe kerb or
othe robstacles. If it is necessary to drive over
kerbs, speed humps or similar elevations ,try
to do so slowl yand at an obtuse angle .Oth-
erwise ,the tyres, particularly the sidewalls,
may be damaged. Regular checking of wheel
sand tyres G
WARNING
Damaged tyre scan cause tyre inflation pres-
sure loss. As aresult, yo ucould los econtrol of
your vehicle .There is ariskofa ccident.
Check the tyre sregularl yfor signs of damage
and replace any damaged tyre simmediately.
Regularly check the wheel sand tyre sofyour
vehicle for damag eatleastonce amonth, as
well as afte rdriving off-road or on rough
roads. Damaged wheel scan cause alossof
tyre pressure. Pa yparticula rattention to
damag esucha s:
R cuts in the tyres
R punctures
R tears in the tyres
R bulge sont he tyres
R deformation or severe corrosio nonwheels
Regularly check the tyre trea ddepth and the
condition of the trea dacross the whol ewidth
of the tyre (Y page 417). If necessary, turn
the front wheel stofullloc kino rder to inspect
the inner sid eofthe tyre surface.
All wheel smusth aveav alve cap to protect
the valve against dirt and moisture. Do not fit
anything onto the valve othe rthan the stand-
ard valve cap or othe rvalve cap sapproved for
your vehicle by Mercedes-Benz. Do not fit any othe rvalve cap sorsystems ,e.g. tyre pres-
sure monitoring systems. Regularly check the pressure of al
lthe tyres,
particularly prior to long trips. Adjust the tyre pressure as necessary (Y page 420).
Observe the notes on the emergency spare
wheel (Y page 465).
The service life of tyre sdepends on various
factors, including the following:
R driving style
R tyre pressure
R mileage Note
sont he tyre tread G
WARNING
Insufficient tyre trea dwillr educe tyre trac-
tion. The tyre is no longer able to dissipate
water. Thi smeans that on we troa ds urfaces,
the ris kofaquapl aning increases, in particular
where speed is not adapted to suit the driving
conditions .There is ariskofa ccident.
If the tyre pressure is too hig hortoo low ,tyres
may exhibi tdifferent level sofwearatd iffer-
ent locations on the tyre tread. Thus, you
shoul dregularl ycheck the trea ddepth and
the condition of the trea dacross the entire
width of al ltyres.
Minimum tyre trea ddepth for:
R summer tyres: 3mm
R M+S tyres: 4mm
For safety reasons, replace the tyre sbefore
the legall yprescribed limit for the minimum
tyre trea ddepth is reached. Selecting, fitting and replacing tyres
G
WARNING
Exceeding the state dtyre load-bearing capa-
city and the approved maximum speed could
lead to tyre damag eorthe tyre bursting .There
is ar iskofa ccident.
Therefore, only us etyre types and sizes
approved for your vehicle model .Observe the Operation
417Wheels and tyres
Z