2015 MERCEDES-BENZ E-CLASS ESTATE isofix
[x] Cancel search: isofixPage 10 of 497
Warning lamp ................................. 330
Breakdown
see Flat tyre
Brightness control (instrument
cluster lighting) ................................... 34
Bulbs
see Replacing bulbs C
Calling up afault
see Display messages
Car
see Vehicle
Car key
see Key
Car wash (care) ................................. 386
Care
360° camera ................................. 390
Automatic car wash ....................... 386
Carpets .......................................... 392
Display ...........................................3 91
Exhaus tpipe. ................................. 390
Exterior lighting ............................ .389
Gea rors elector leve r.................... 391
High-pressure cleaner .................... 387
Interior .......................................... .391
Matt paintwork .............................. 388
Notes ............................................. 385
Paint .............................................. 387
Plastic trim ................................... .391
Reversing camera .......................... 390
Roo flining ...................................... 392
Seat bel t........................................ 392
Seat cover ..................................... 392
Sensors ......................................... 389
Steering wheel ............................... 391
Trim pieces ................................... .392
Washing by hand ........................... 387
Wheels .......................................... .388
Windows ........................................ 388
Wiper blades .................................. 389
Wooden trim .................................. 392
CD player (on-board computer) ........283
Central locking
Automatic locking (on-board com-puter) ............................................. 293
Locking/unlocking (key ).................. 95 Centre console
Lowe rsection .................................. 39
Lowe rsection (AMG vehicles) .......... 40
Uppe rsection .................................. 38
Changing bulbs
Main-beam headlamps ................... 150
Turn signals (front) ......................... 151
Child
Restraint system .............................. 59
Child seat
Automatic recognition ..................... 65
Forward-facing restraint system ...... 68
Integrated ........................................ 62
Integrated ,ICS padded pla ytable. ... 63
Integrated, side hea drestraints ....... 65
ISOFIX .............................................. 59
On the front-passenger sea t............ 67
Problem (malfunction) ..................... 70
Rearward-facing restraint system .... 68
Recommendations ........................... 74
Suitable positions ............................ 70
Top Tether ....................................... 60
Child-proof locks
Important safety notes .................... 75
Rear doors ....................................... 76
Children
Fastening sea tbelts ......................... 63
Cigarette lighter ................................ 365
Cleaning
Mirror turn signa l........................... 389
Trailer tow hitch ............................. 390
Climate control
Auxiliary heating/ventilation .......... 168
Controlling automaticall y............... 162
Convenience opening/closing
(air-recirculation mode) ................. 166
Cooling with ai rdehumidifica tion .. 160
Demisting the window s.................. 165
Demisting the windscree n............. 164
Indicato rlam p................................ 162
Information abou tusing
THERMATI Cautomatic climate
control ........................................... 157
Information on using
THERMOTRONIC automatic cli-
mate control .................................. 160
Overview of system s...................... 156 Index
7
Page 16 of 497
Adjusting (manually) ...................... 125
Adjusting (rear
).............................. 126
Fitting/removing (rear ).................. 127
Luxury ............................................ 126
see NECK-PR Oheadr estraints
see NECK-PR Oluxury hea drestraints
Headbag
Displa ymessage ............................ 307
Headlamps
Misting up ...................................... 148
see Automati cheadlamp mode
Heating
see Climate control
High-pressure cleaners .................... 387
Hil lstart assist .................................. 183
HOL Dfunction
Activating ....................................... 229
Deactivating ................................... 229
Displa ymessage ............................ 316
Function/note s............................. 228
Horn ...................................................... 32 I
IC Sp added play table
Fitting .............................................. 64
Important safety notes .................... 63
Ignitio nlock
see Key positions
Immobiliser .......................................... 89
Indicator and warnin glamp
Restraint system ............................ 335
Indicator and warnin glamps
COLLISION PREVENTION ASSIST
PLU S.............................................. 338
Coolant .......................................... 336
Engine diagnostics ......................... 336
SPOR Thandling mod e................... 334
Indicator lamps
Displa ymessage ............................ 308
see Warning and indicator lamps
Indicators
see Turn signals
Insect protection on the radiator .... 380
Instrument cluster
Overview .......................................... 34
Setting s......................................... 289
Warning and indicator lamps ........... 35 Instrument cluste
rlighting .............. 290
Integrated child seat
Folding in ......................................... 63
Folding ou t....................................... 63
IC Sp adde dplayt able ...................... 63
Important safety guideline s............. 62
Sid eheadr estraints ......................... 65
Intelligent Light System
Activating/deactivating ................. 290
Displa ymessage ............................ 309
Overview ........................................ 145
Setting the dipped-beam head-
lamps for driving on the right/left .. 291
Interior lighting
Automati ccontrol system .............. 149
Delayed switch-off (on-board
computer) ...................................... 292
Emergency lighting ........................ 149
Manua lcontrol ............................... 149
Overview ........................................ 148
Reading lamp ................................. 148
Setting brightness for display/
switche s(on -board computer) ....... 290
Setting the ambient lighting
brightness (on-board computer) .... 291
Setting the ambient lighting col-
ou r(on -board computer) ................ 291
Interior motion sensor
Deactivating ..................................... 91
Function ........................................... 91
Priming ............................................ 91
Switching off .................................... 91
ISOFIX child seat securing system .... 59 J
Jack Storage location ............................ 395
Using ............................................. 427
Jump starting (engine) ...................... 405 K
Key Changing the battery ....................... 97
Checking the battery ....................... 97
Convenience closing feature .......... 112
Convenience opening feature ........ 111 Index
13
Page 62 of 497
Child restraint system
Do no tfitar earward-facing child restraint
system on th ecentr erear seat.
Be sure to observ ethe correct use of th echild
restraint system (Y page 70).
For safety reasons, Mercedes-Ben zrecom-
mends that you only use achild restraint sys-
te mr ecommended by Mercedes-Benz
(Y page 74). G
WARNING
If th echild restraint system is incorrectly fit-
te dont heseat positio nsuitable for this pur-
pose ,itcanno tperform its intended protec-
tiv ef unction .Intheevent of an accident,
shar pbraking or asudde nchang eind irection,
th ec hild may no tbeheld securely. Ther eisan
increased ris kofserious or eve nfatal injuries.
Observ ethe manufacturer' sinstallation
instruction sand th ecorrec tuse for th echild
restraint system. Mak esure that th eentire
surface of th echild restraint system is resting
on th eseat surface. Never plac eobjects
unde rorb ehindthe child restraint system,
e.g .cushions. Only use child restraint sys-
tems wit hthe original cover designe dfor
them. Only replace damaged covers wit hgen-
uine covers. G
WARNING
If th echild restraint system is fitte dincor-
rectly or is no tsecured, it can com eloos ein
th ee vent of an accident, heav ybraking or a
sudde nchang eind irection .The child
restraint system coul dbethrown about ,strik-
ing vehicle occupants .Ther eisani ncreased
ris kofi njury, possibly eve nfatal.
Always fit child restraint systems properly,
eve nift heya re no tbein gu sed. Mak esure
that you observ ethe child restraint system
manufacturer' sinstallatio ninstructions.
You will fin dfurther informatio nonstowing
objects, luggage and loads securely under
"Loading guidelines" (Y page 342). G
WARNING
Child restraint systems or their securin gsys-
tems that have been damaged or subjected to al oad in an acciden tcanno tperform their
intended protective function .Intheevent of
an accident, shar pbraking or asudden
chang eindirection ,the child may no tbeheld
securely. Ther eisanincreased ris kofserious
or eve nfatal injuries.
Immediately replace child restraint systems
that have been damaged or subjected to a
load in an accident. Hav ethe child restraint
securin gsystems checked in aqualified spe-
cialist worksho pbefore fittin gachild restraint
system again.
Securin gsystems for child restraint systems
include:
R thes eat belt system
R theI SOFI Xsecurin grings
R Top Tether anchorage points
If it is absolutely necessary to carry achild on
th ec o-driver's seat ,besure to observ ethe
note son" Child restraint systems on th eco-
driver' sseat "(Ypage 67). Information
about deactivatin gthe co-driver's fron tairbag
can also be foun dthere.
Observ ethe warning labels in th evehicle inte-
rior and on th echild restraint system.
i It is advisable to use Mercedes-Ben
zcare
product stoclean child restraint systems
recommended by Mercedes-Benz. You can obtain informatio nfroma ny Mercedes-
Ben zServic eCentre. ISOFIX child seat securing system
G
WARNING
ISOFIX child restraint systems do no toffer
sufficient protective effect for childre nwhose
weigh tisgreate rtha n2 2k gw ho are secured
usin gthe safety belt integrate dinthechild
restraint system. The child could, for example, no tber estraine dcorrectly in th eevent of an Children in th
evehicle
59Safety
Z
Page 63 of 497
accident. This pose
sanincreased risk of
injury or even fatal injury.
If th echild weigh smoret han2 2kg,only use
ISOFIX child restraint systems with whic hthe
child is also secured with th evehicle seat belt.
Als osecure th echild restraint system with the
Top Tether belt ,ifavailable.
When fittin gachild restraint system, be sure
to observ ethe manufacturer' sinstallation
and operatin ginstruction sand th einstruc-
tions for correc tuse of th echild restraint sys-
te m( Ypage 70).
Before ever ytrip, mak esure that th eISOFIX
child restraint system is engaged correctly in bot hISOFI Xsecurin grings.
! When fittin
gthe child restraint system,
mak esure that th eseat belt for th ecentre
seat does no tget trapped. Otherwise, the
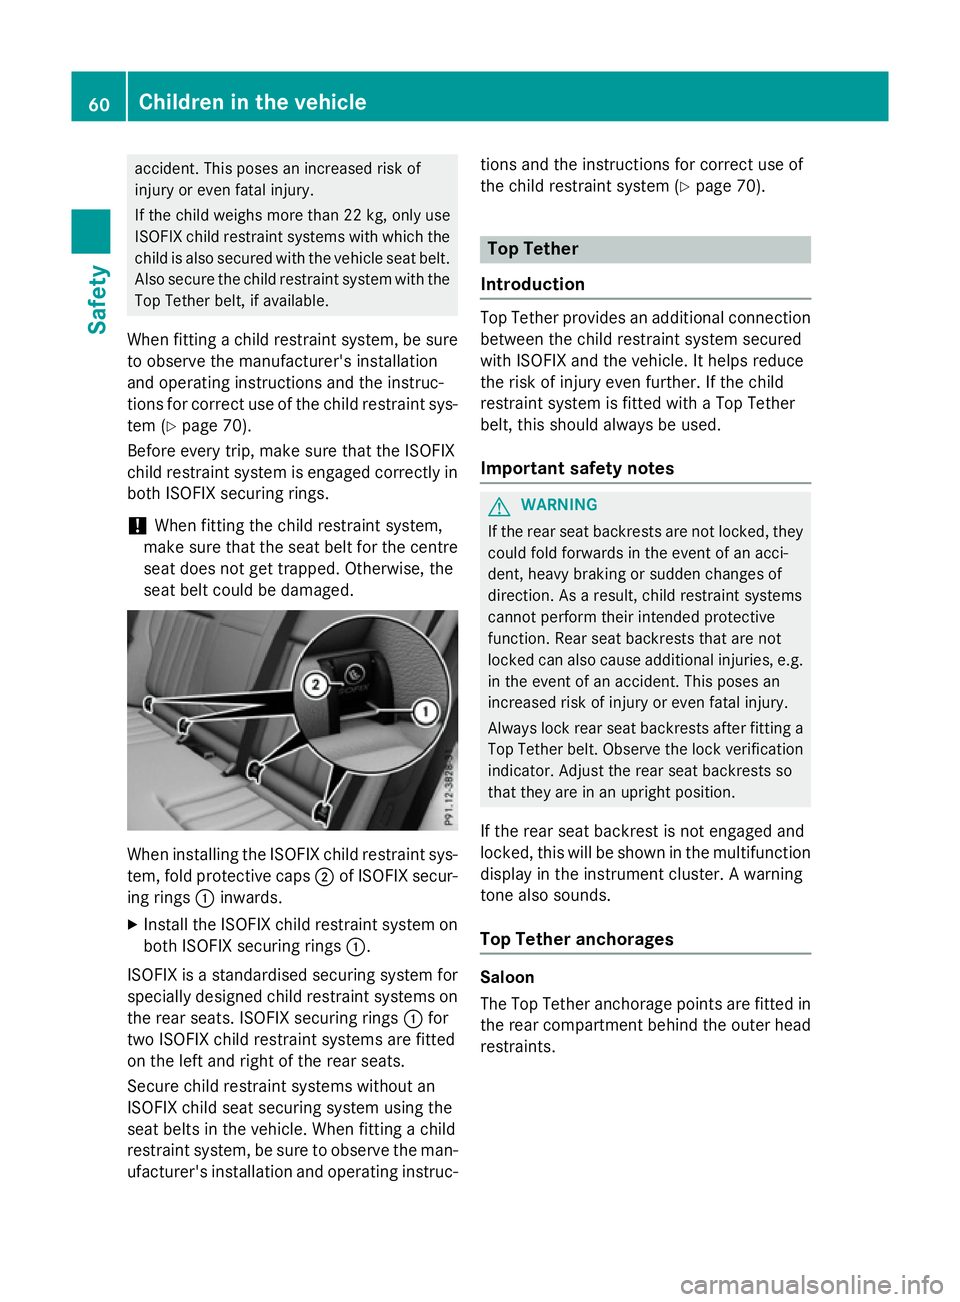
seat belt coul dbedamaged. When installing th
eISOFI Xchild restraint sys-
tem, fold protective caps ;of ISOFIX secur-
ing rings :inwards.
X Install th eISOFI Xchild restraint system on
bot hISOFI Xsecurin grings :.
ISOFIX is astandardised securin gsystem for
specially designed child restraint systems on
th er ear seats. ISOFIX securin grings :for
two ISOFIX child restraint systems are fitted
on th eleft and righ toftherear seats.
Secure child restraint systems without an
ISOFIX child seat securin gsystem usin gthe
seat belt sinthevehicle .When fittin gachild
restraint system, be sure to observ ethe man-
ufacturer' sinstallation and operatin ginstruc- tions and th
einstruction sfor correc tuse of
th ec hild restraint system (Y page 70). Top Tether
Introduction Top Tether provides an additional connection
between th echild restraint system secured
with ISOFIX and th evehicle .Ithelps reduce
th er isk of injury even further. If th echild
restraint system is fitte dwithaTop Tether
belt ,thiss houl dalways be used.
Important safety notes G
WARNING
If th erear seat backrests are no tlocked, they
coul dfold forwards in th eeven tofana cci-
dent, heav ybraking or sudden changes of
direction .Asaresult, child restraint systems
canno tperform their intended protective
function .Rear seat backrests that are not
locke dcan also caus eadditional injuries ,e.g.
in th eeven tofana ccident. This pose san
increased risk of injury or even fatal injury.
Always loc krear seat backrests after fittin ga
Top Tether belt .Observ ethe lockverification
indicator. Adjust th erear seat backrests so
that they are in an upright position.
If th erear seat backres tisnotengaged and
locked, this will be show ninthemultifunction
display in th einstrumen tcluster. Awarning
tone also sounds.
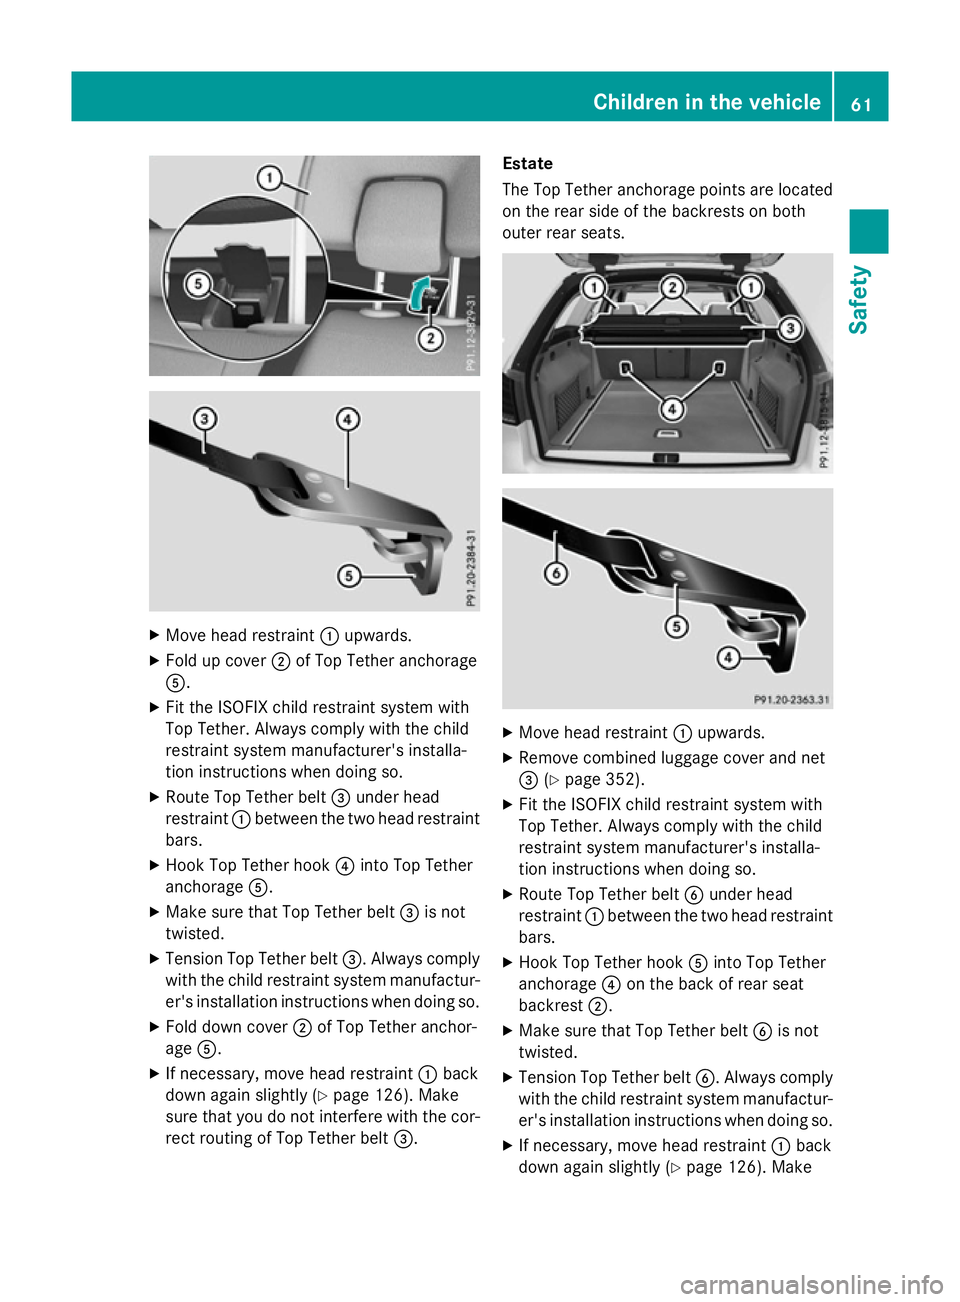
Top Tether anchorages Saloon
The Top Tether anchorage points are fitte
din
th er ear compartmen tbehin dthe outer head
restraints. 60
Children in th
evehicleSafety
Page 64 of 497
X
Move head restraint :upwards.
X Fold up cover ;of Top Tether anchorage
A.
X Fit the ISOFIXc hild restraint system with
Top Tether. Always comply with the child
restraint system manufacturer's installa-
tion instructions when doing so.
X Route Top Tether belt =under head
restraint :between the two head restraint
bars.
X Hook Top Tether hook ?into Top Tether
anchorage A.
X Make sure that Top Tether belt =is not
twisted.
X Tension Top Tether belt =.Always comply
with the child restraint system manufactur- er's installation instructions when doing so.
X Fold down cover ;of Top Tether anchor-
age A.
X If necessary, move head restraint :back
down again slightly (Y page 126). Make
sure that you do not interfere with the cor-
rect routing of Top Tether belt =.Estate
The Top Tether anchorage points are located
on the rear side of the backrests on both
outer rear seats. X
Move head restraint :upwards.
X Remove combined luggage cover and net
= (Ypage 352).
X Fit the ISOFIXc hild restraint system with
Top Tether. Always comply with the child
restraint system manufacturer's installa-
tion instructions when doing so.
X Route Top Tether belt Bunder head
restraint :between the two head restraint
bars.
X Hook Top Tether hook Ainto Top Tether
anchorage ?on the back of rear seat
backrest ;.
X Make sure that Top Tether belt Bis not
twisted.
X Tension Top Tether belt B.Always comply
with the child restraint system manufactur- er's installation instructions when doing so.
X If necessary, move head restraint :back
down again slightly (Y page 126). Make Children in the vehicle
61Safety Z
Page 74 of 497
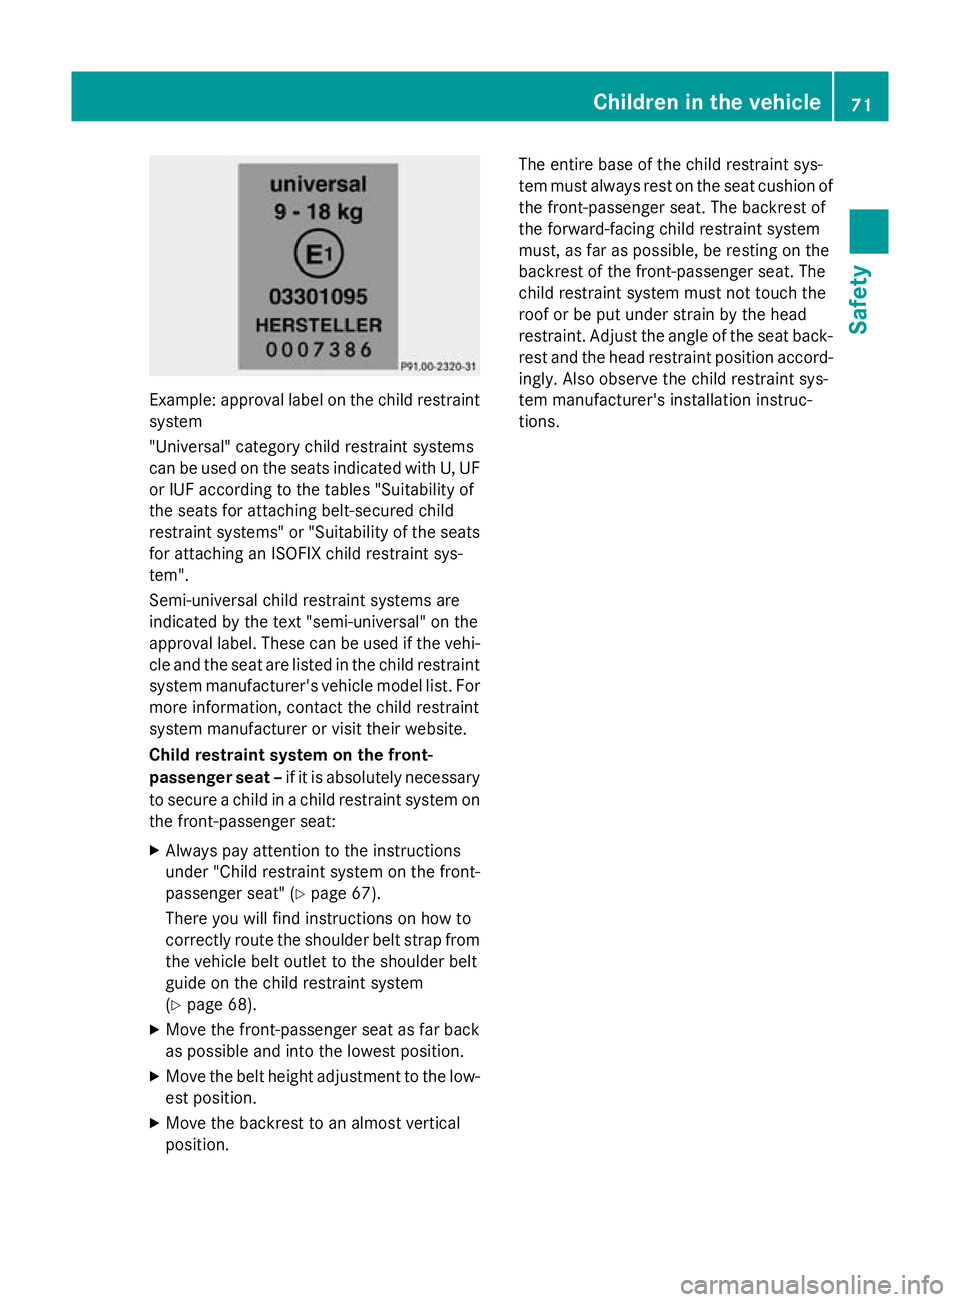
Example: approva
llabel on the child restraint
system
"Universal "category child restraint systems
can be used on the seats indicated with U, UF
or IUF according to the table s"Suitability of
the seats for attaching belt-secured child
restraint systems" or "Suitability of the seats
for attaching an ISOFIX child restraint sys-
tem".
Semi-universal child restraint systems are
indicated by the text "semi-universal" on the
approva llabel .These can be used if the vehi-
cle and the seat ar eliste dint he child restraint
syste mmanufacturer's vehicl emodel list. For
mor einformation, contact the child restraint
syste mmanufacturer or visi ttheir website.
Chil drestrain tsystem on the front-
passenge rsea t–if it is absolutely necessary
to secur eachild in achild restraint syste mon
the front-passenge rseat:
X Alway spayattentio ntothe instructions
under "Child restraint syste monthe front-
passenge rseat" (Y page 67).
There yo uwillf indi nstructions on ho wto
correctl yroute the shoulde rbelts tra pfrom
the vehicl ebelto utlettot he shoulde rbelt
guid eont he child restraint system
(Y page 68).
X Move the front-passenge rseatasf arback
as possibl eand into the lowest position.
X Move the belt height adjustment to the low-
es tp osit ion.
X Move the backrest to an almos tvertical
position. Th
ee ntire base of the child restraint sys-
tem must always res tonthe seat cushion of
the front-passenge rseat. Th ebackrest of
the forward-facing child restraint system
must, as fa raspossible, be resting on the
backrest of the front-passenge rseat. The
child restraint syste mmustn ot touch the
roo forbep utunder strain by the head
restraint. Adjust the angle of the seat back- res tand the head restraint positio naccord-
ingly .Alsoo bser ve the child restraint sys-
tem manufacturer's installatio ninstruc-
tions. Children in the vehicle
71Safety Z
Page 76 of 497
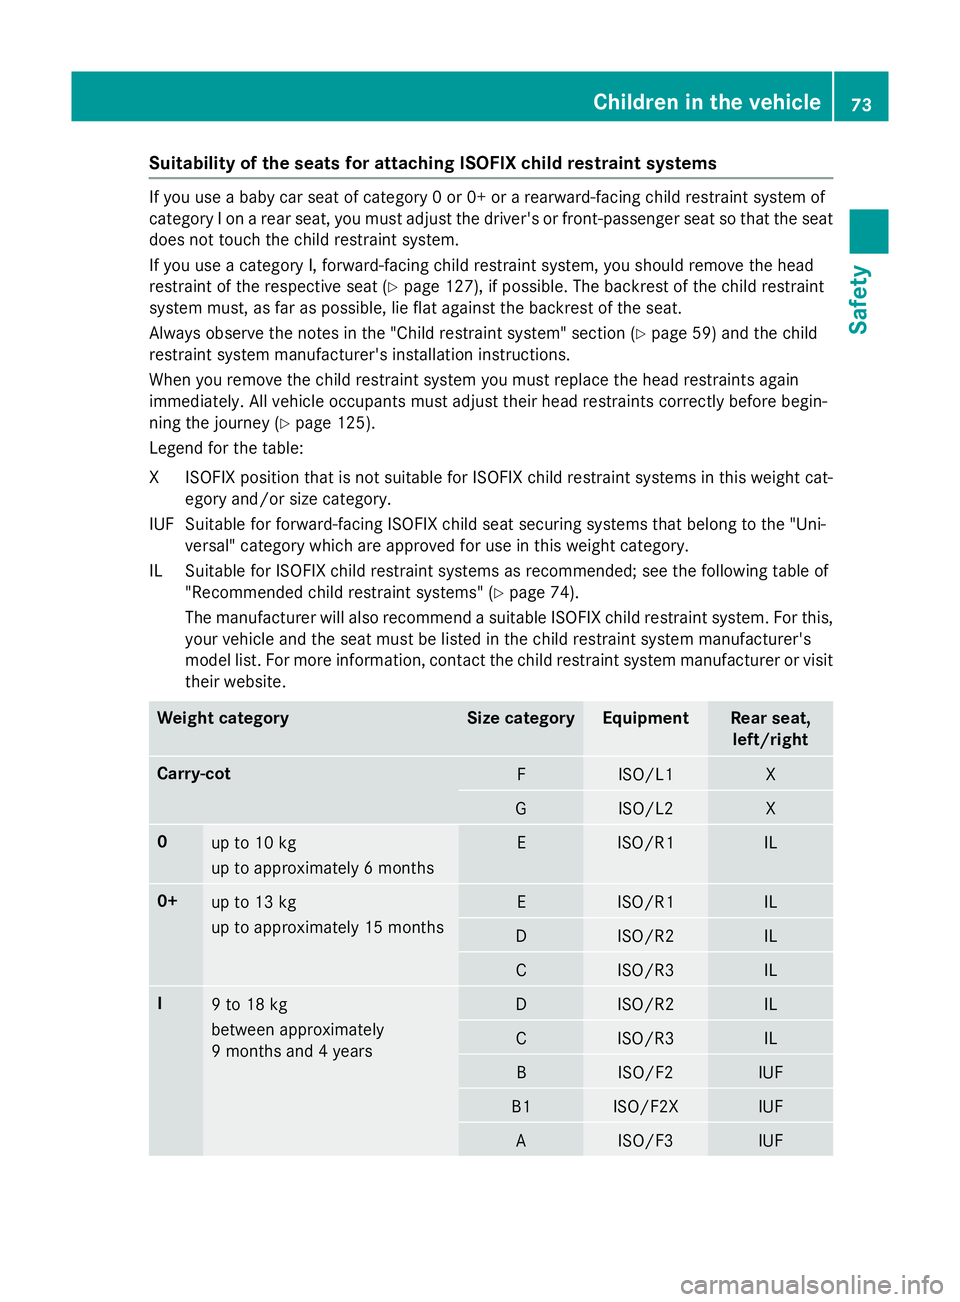
Suitability of the seats for attaching ISOFIXc
hild restraint systemsIf you use
ababy car seat of category 0or0+orarearward-facing child restraint system of
category Ionarear seat, you must adjust the driver's or front-passenger seat so that the seat
does not touch the child restraint system.
If you use acategory I, forward-facing child restraint system, you should remove the head
restraint of the respective seat (Y page 127), if possible. The backrest of the child restraint
system must, as far as possible, lie flat against the backrest of the seat.
Always observe the notes in the "Childr estraint system" section (Ypage 59) and the child
restraint system manufacturer's installation instructions.
When you remove the child restraint system you must replace the head restraint sagain
immediately. All vehicle occupants must adjust their head restraint scorrectly before begin-
ning the journey (Y page 125).
Legend for the table:
XI SOFIX position tha tisn ot suitabl efor ISOFIX child restraint systems in this weight cat-
egory and/or size category.
IUF Suitable for forward-facing ISOFIX child sea tsecuring systems tha tbelong to the "Uni-
versal "categor ywhich are approved for us einthis weight category.
IL Suitable for ISOFIX child restraint systems as recommended ;see the following table of
"Recommended child restraint systems "(Ypage 74).
The manufacturer will also recommend asuitabl eISOFIX child restraint system. For this,
your vehicl eand the sea tmustb elisted in the child restraint system manufacturer's
model list. For more information, contact the child restraint system manufacturer or visit
thei rwebsite. Weight category Siz
ec ategory Equipment Rear seat,
left/right Carry-cot
F ISO/L1 X
G ISO/L2 X
0
up to 10 kg
up to approximatel
y6months E ISO/R1 IL
0+
up to 13 kg
up to approximatel
y15m onths E ISO/R1 IL
D ISO/R2 IL
C ISO/R3 IL
I
9t
o18kg
between approximately
9m onths and 4years D ISO/R2 IL
C ISO/R3 IL
B ISO/F2 IUF
B1 ISO/F2X IUF
A ISO/F3 IUFChildre
ninthe vehicle
73Safety Z
Page 78 of 497
Weight cate-
gory Manufac-
turer Type Approval
number
(E1 ...) Order num-
ber
(A 000 ...) 3 Automatic
chil
dseat rec-
ognition 4y
ears and
12 years 04 301198 970 19 00 No
04 301198 970 22 00 Yes
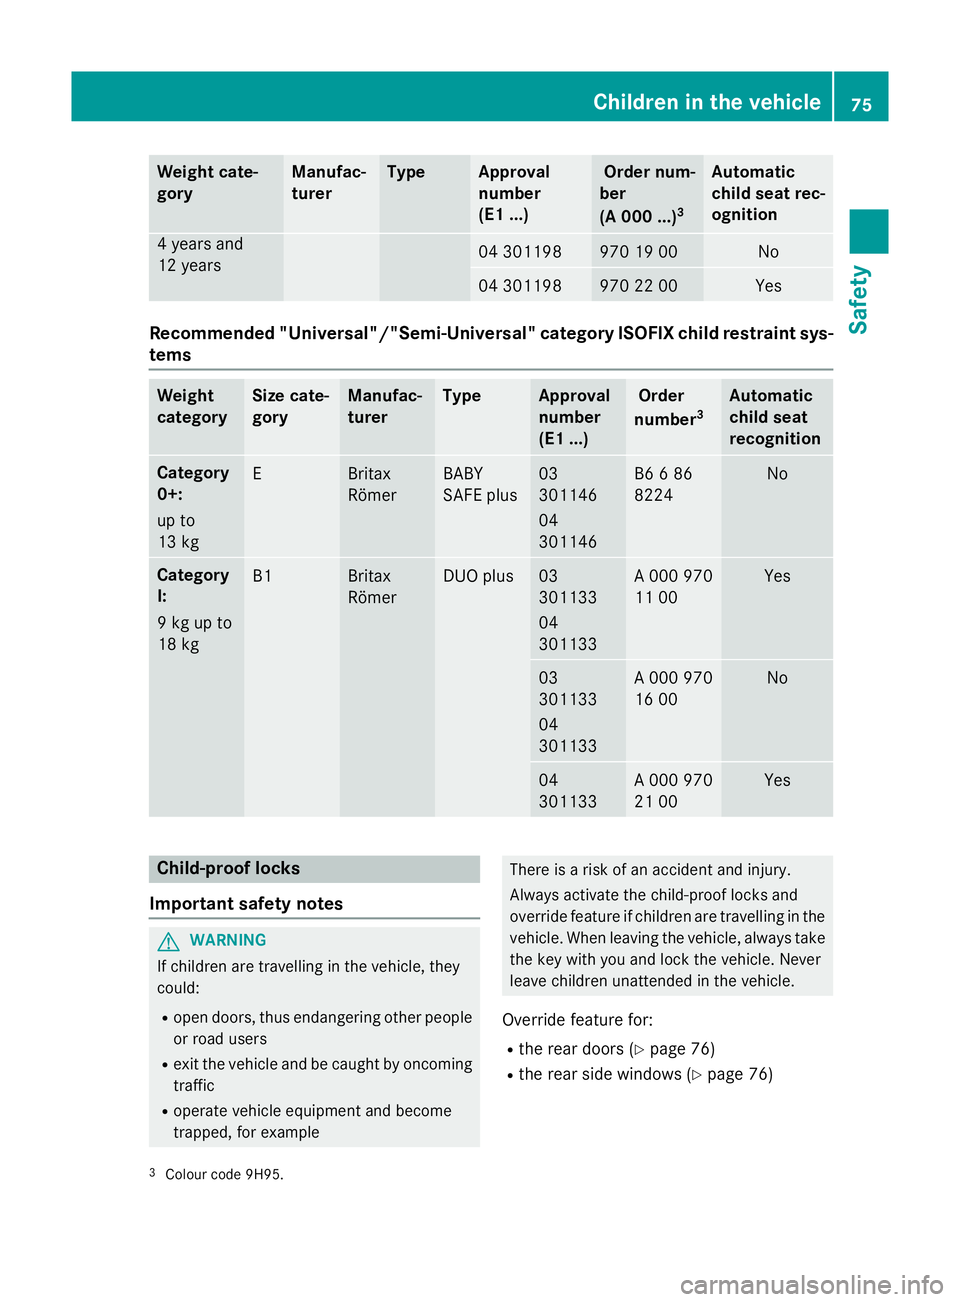
Recommended "Universal"/"Semi-Universal" category ISOFIXc
hildr estraint sys-
tems Weight
category Size cate-
gory Manufac-
turer Type Approval
number
(E1 ...) Order
number 3 Automatic
chil
dseat
recognition Category
0+:
up to
13 kg
E Britax
Römer BABY
SAFE plus 03
301146
04
301146 B6
686
8224 No
Category
I:
9kgupto
18 kg
B1 Britax
Römer DUO plus 03
301133
04
301133 A0
00 970
11 00 Yes
03
301133
04
301133 A0
00 970
16 00 No
04
301133 A0
00 970
21 00 Yes
Child-proof locks
Important safety notes G
WARNING
If children are travelling in the vehicle, they
could:
R open doors, thus endangering other people
or road users
R exit the vehicl eand be caught by oncoming
traffic
R operate vehicl eequipment and become
trapped, for example There is
arisk of an accident and injury.
Always activate the child-proof locks and
override feature if children are travelling in the vehicle. When leaving the vehicle, alwayst ake
the key with you and lock the vehicle. Never
leave children unattende dinthe vehicle.
Overrid efeature for:
R the rear doors (Y page76)
R the rear side windows (Y page76)
3 Colour code 9H95. Children in the vehicle
75Safety Z