2015 MERCEDES-BENZ E-CLASS ESTATE radio
[x] Cancel search: radioPage 15 of 497
F
Fault message see Display messages
Filler cap
see Fuel fille rflap
Fire extinguisher .............................. .395
First-aid kit ......................................... 394
Fitting awheel
Fitting awheel ............................... 430
Lowering the vehicle ..................... .430
Preparing the vehicle ..................... 426
Raising the vehicle ......................... 427
Removing awheel .......................... 429
Securing the vehicle against roll-
ing away ........................................ 427
Flat tyre
MOExtended tyres ......................... 398
Preparing the vehicle ..................... 397
TIREFIT kit ...................................... 399
see Emergency spare wheel
Floormat ............................................. 374
Foglamps
Extended range .............................. 146
Foldin gbench seat (luggage com-
partment) .......................................... .128
Frequencies
Garage door opene r....................... 371
Mobil ephone ................................. 470
Two-way radio ................................ 470
Fuel
Additives ........................................ 475
Consumption information .............. 476
Consumption statistics .................. 280
Displaying the current consump-
tion ................................................ 281
Displaying the rang e...................... 281
E10 ................................................ 474
Fue lgauge ....................................... 34
Grade (petrol) ................................ 474
Important safety notes .................. 473
Note sfor AMG vehicles ................. 475
Problem (malfunction) ................... 204
Quality (diesel )............................... 476
Refuelling ....................................... 200
Tank content/reserve fue l............. 474
Fue lfille rflap
Emergency release ........................ 202 Opening ......................................... 202
Fue lfilter (white display message) .. 314
Fue llevel
Calling up the rang e(on-board
computer) ...................................... 281
Gaug e.............................................. 34
Fue lreserve
see Fuel
Fue ltank
Capacity ........................................ 474
Problem (malfunction) ................... 204
Fus eallocatio nchart (vehicl etool
kit) ...................................................... 395
Fuses
Allocation chart ............................. 411
Before changing ............................. 411
Fusebox in the boo t...................... 412
Fus ebox in the engine compart-
ment .............................................. 412
Fus ebox in the luggage compart-
ment .............................................. 413
Important safety notes .................. 411 G
Garag edooro pener
Clearing the memory ..................... 371
Frequencie s................................... 371
Genera lnotes ................................ 368
Important safety notes .................. 369
Opening/closing the garag edoor..3 71
Programming (button in the rear-
view mirror) ................................... 369
Synchronising the rolling code ....... 370
Gear indicator (on-board com-
puter, AMG vehicles) ......................... 296
Gearshift program
SETUP (on-board computer) .......... 296
Genuine Mercedes-Benz parts ........... 24
Glove compartment .......................... 343 H
HANDS-FRE EACCESS ....................... 106
Hazard warning lamps ......................145
Head restraints
Adjusting ....................................... 125
Adjusting (electrically). .................. 12612
Index
Page 20 of 497
Panoramas
liding sunroof
Important safety information ......... 114
Opening/closing ............................1 16
Opening/closing the roller sun-
blind ............................................... 118
Problem (malfunction) ................... 119
Rain closing feature ....................... 117
Resetting ....................................... 118
Parking
Important safety notes .................. 205
Parking brake ................................ 207
Position of exterio rmirror, front-
passenger sid e............................... 138
Reversing camera .......................... 244
see PARKTRONIC
Parking aid
Active Parking Assist ..................... 239
see Exterior mirrors
see PARKTRONIC
Parking assistance
see PARKTRONIC
Parking brake
Display message ............................ 302
Notes/function .............................. 207
Warning lamp ................................. 330
Parking lamps
Display message ............................ 309
Switching on/off ........................... 144
PARKTRONIC
Deactivating/activating ................. 237
Driving system ............................... 235
Function/notes ............................ .235
Important safety notes .................. 235
Problem (fault) ............................... 239
Sensor range ................................. 236
Trailer towing ................................. 238
Warning displa y............................. 237
PASSENGER AI RBAG OFF
Indicato rlam p.................................. 45
Problems (malfunctions ).................. 70
Petrol .................................................. 474
Pets in the vehicle ............................... 77
Plasti chooks ..................................... 350
Plasti ctrim (cleaning instruc-
tions) .................................................. 391
Powe rwindows
see Sid ewindows PRE-SAFE
®
(anticipatory occupant
protection)
Operation ......................................... 56
PRE-SAFE ®
(preventive occupant
safety system)
Displa ymessage ............................ 304
PRE-SAFE ®
Brake
Activating/deactivating ................. 287
Displa ymessage ............................ 304
Function/note s................................ 87
Important safety notes .................... 87
Warning lamp ................................. 338
PRE-SAFE ®
PLUS (anticipatory
occupant protection PLUS)
Displa ymessage ............................ 304
Operation ......................................... 57
Program selecto rbutton .................. 194
Protectio nagainst theft
ATA (Anti-Theft Alarm system )......... 89
Immobiliser ...................................... 89
Interior motion sensor ..................... 91
Tow-away protectio n........................ 90
Protectio nofthe environment
Genera lnotes .................................. 24
Pulling away
Automati ctransmission ................. 182
Genera lnotes ................................ 182
Manua ltransmission ...................... 182 Q
QR code Mercedes-Benz Guid eApp ................. 1
Rescu ecard ..................................... 28
Qualified specialist workshop ........... 27 R
RAC ESTART (AMG vehicles) ............. 230
RACETIMER (on-board computer) .... 296
Radiato rcover ................................... 380
Radio
Selecting astation ......................... 283
see separate operating instructions
Radio-based vehicle components
Declaration of conformity ................ 26
Rain closin gfeature
Panorama sliding sunroo f.............. 117 Index
17
Page 25 of 497
Trim piece
s(clea ning instruc-
tions) .................................................. 392
Trip computer (on-board com-
puter) .................................................. 280
Trip meter
Calling up ....................................... 280
Resetting (on-boar dcomputer) ...... 281
Turn signals
Changing bulb s(front) ................... 151
Switching on/off ........................... 144
TV
Operating (on-boar dcomputer) ..... 284
see Separate operating instructions
Two-way radio
Frequencie s................................... 470
Installation ..................................... 470
Transmission outpu t(maximum) .... 470
Type identificatio nplate
see Vehicl eide ntificatio nplate
Tyre changin gtoolkit....................... 395
Tyre pressure
Calling up (on-boar dcomputer) ..... 423
Display message ............................ 322
Not reache d(TIRE FIT) .................... 400
Reached (TIREFIT) .......................... 400
Recommended ............................... 420
Tyre pressure loss warning
Genera lnotes ................................ 421
Important safety notes .................. 422
Restarting ...................................... 422
Tyre pressure monitor
Checking the tyr epressure elec-
tronically ........................................ 424
Function/note s............................. 423
Genera lnotes ................................ 423
Important safety notes .................. 423
Radi otypea pproval for the tyre
pressure monitor ........................... 425
Restarting ...................................... 424
Warning lamp ................................. 339
Warning message .......................... 424
Tyres
Changing awheel .......................... 426
Checking ........................................ 417
Directio nofrotation ...................... 426
Displa ymessage ............................ 322
Genera lnotes ................................ 431
Important safety notes .................. 416 Information on driving .................... 416
MOExtended tyre s......................... 418
Replacing ....................................... 426
Service life ..................................... 417
Storing ........................................... 426
Tyre size (data ).............................. 431
Tyre trea d...................................... 417
Wheel and tyre combinations ........ 433
see Fla ttyre U
Unlocking Emergency unlocking ..................... 102
From inside the vehicl e(central
unlocking button) ........................... 101 V
Vanity mirro r(in sun visor) .............. 363
Variable SPEEDTRONIC
see SPEEDTRONIC
Vehicle
Correct us e...................................... 27
Data acquisition ............................... 28
Displa ymessage ............................ 324
Electronics ..................................... 470
Equipment ....................................... 25
Implied warranty .............................. 27
Individua lsettings .......................... 289
Leaving parked up ......................... 207
Locking (i nanemergency) ............. 103
Locking (key) ................................... 95
Lowering ........................................ 430
Pulling away ................................... 182
Raising ........................................... 427
Registration ..................................... 27
Securing from rolling away ............ 427
Tow-starting ................................... 407
Towing away .................................. 407
Transporting .................................. 410
Unlocking (i nanemergency) ......... 102
Unlocking (key) ................................ 95
Vehicl edata. .................................. 481
Vehicl edata ....................................... 481
Vehicl edimensions ........................... 481
Vehicl eemergenc yloc king .............. 103 22
Index
Page 29 of 497
trapped
.Inthe cas eofdamage, contact a
qualified specialis tworkshop. G
WARNING
Modifications to electronic components, their software as well as wirin gcould affect their
functio nand/or the operatio nofothernet-
worked components. Thi scould in particular
also be the cas efor systems relevant to
safety .The ym ight not functio nproperly any-
mor eand/or jeopardise the operational
safety of the vehicle. There is an increased
ris kofana ccident and injury.
Do not attempt to modify the wirin gaswellas
electronic components or their software.
Alway shavew orkone lectrical and electronic
components carrie doutataq uali fied special-
is tw orkshop.
If yo umakea ny change stothe vehicl eelec-
tronics, the genera lope rating permi tisr en-
dered invalid.
! There is
ariskofd amag etothe vehicl eif:
R the vehicl ebecome sstuck, e.g .onahigh
kerb or an unpaved road
R yo ud rive too fast ove ranobstacle ,e.g.a
kerb or apothol eint he road
R ah eavy object strikes the underbod yor
parts of the chassis
In situations like this, the body ,the under-
body ,chassi sparts, wheels or tyres could
be damage dwithou tthe damage being visi-
ble. Components damage dinthisw aycan
unexpectedly fail or, in the cas eofanacci-
dent, no longe rwithstand the strain they
ar ed esig nedf or.
If the underbod ypanelling is damaged,
combustible material ssuchasl eaves,
grass or twigs can gathe rbetween the
underbod yand the underbod ypanelling. If
these material scome in contact with hot
parts of the exhaust system ,the yc an catch
fire.
In such situations, have the vehicle
checked and repaired immediatel yata
qualified specialis tworkshop .If, upon con- tinuing your journey
,you notice tha tdriving
safety is impaired ,pullo vera nd stop the
vehicl eimm ediately, paying attentio nto
roa dand traffi cconditions. In such cases,
consul taqualified specialis tworkshop. Declaration
sofconformity
Wireless vehicle components Th
ef ollowing information applie stoallcom-
ponents of the vehicl eand the information
systems and communication devices integra-
ted into the vehicl ewhich receive and/or
transmi tradio waves:
Th ec omponents of thi svehicl ethatreceive
and/or transmi tradio waves ar ecompliant
with the basi crequirements and al lothe rrel-
evant conditions of Directiv e1999/5/EC.
Yo uc an obtai nfurthe rinformation fro many
Mercedes-Benz Service Centre.
Electromagnetic compatibility Th
ee lectromagnetic compatibility of the vehi-
cle components ha sbeenc hecked and certi-
fie da ccording to the currentl yvalid version of
Regulatio nECE-R 10. Diagnostic
sconnect ion
Th ed iagn ostics connectio niso nlyi ntended
for the connectio nofdiagnosticequipment at
aq uali fied specialis tworkshop. G
WARNING
If yo uconnect equipment to adiagn ostics
connectio ninthe vehicle, it can affect the
operatio nofthe vehicl esystems. This may
affect the operating safety of the vehicle.
There is ariskofana ccident.
Do not connect any equipment to adiagn os-
tics connectio ninthe vehicle. G
WARNING
Objects in the driver's footwell ma yrestrict
the clearance around the pedals or block a 26
Introduction
Page 98 of 497
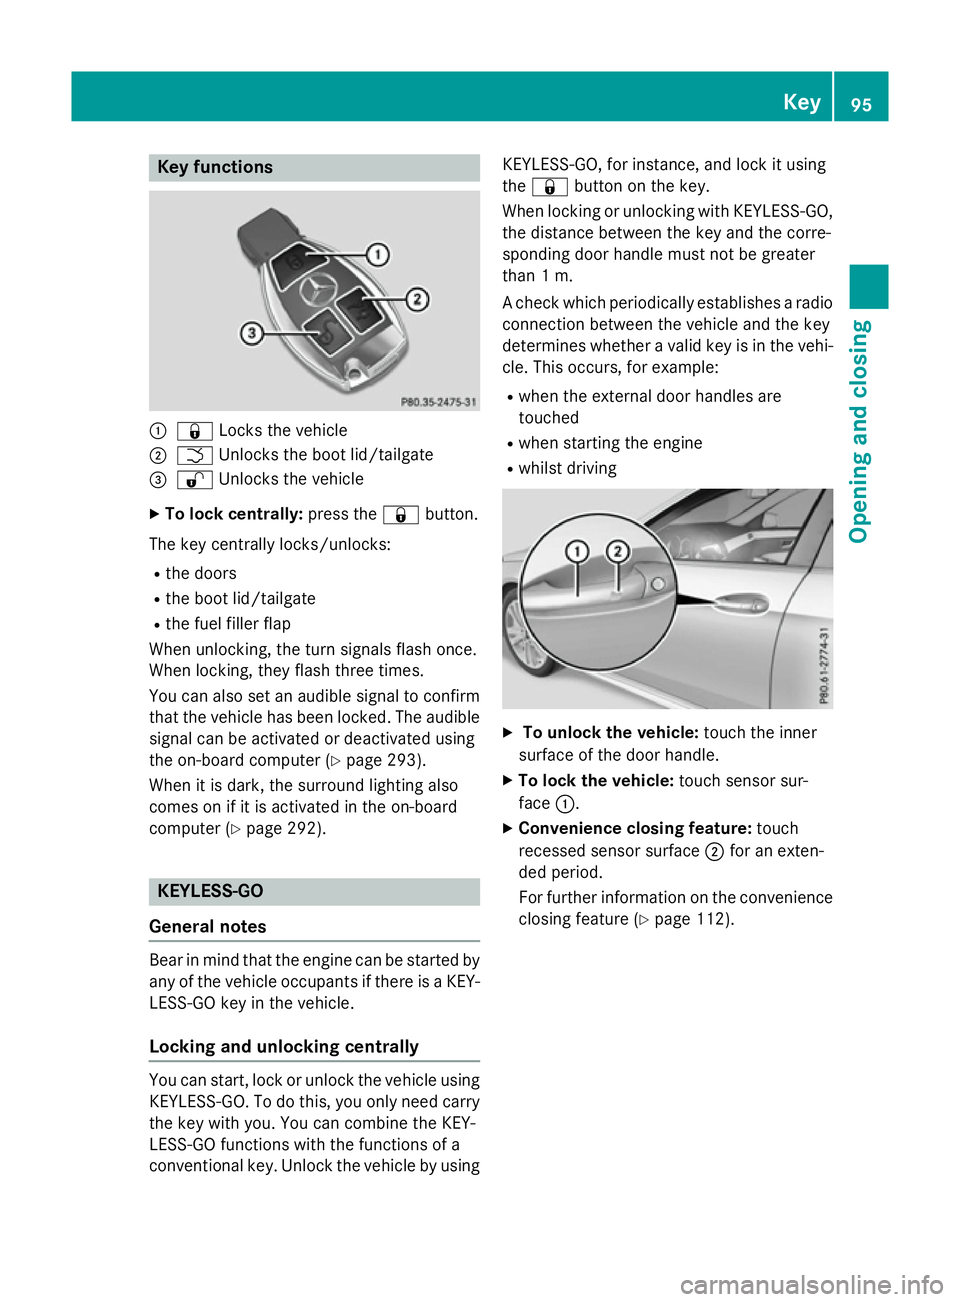
Key functions
:
& Locks th evehicle
; F Unlocks th eboot lid/tailgate
= % Unlocks th evehicle
X To lock centrally: press the&button.
The ke ycentra lly locks/unlocks:
R thed oors
R theb oot lid/tailgate
R thef uel filler flap
When unlocking ,the turns ignals flas honce.
When locking ,the yflas hthree times.
You can also set an audible signal to confirm that th evehicl ehas been locked. The audible
signal can be activated or deactivated using
th eo n-bo ard computer (Y page 293).
When it is dark ,the surroun dlighting also
comes on if it is activated in th eon-bo ard
computer (Y page 292). KEYLESS-GO
Genera lnotes Bear in min
dthatthe engin ecan be started by
any of th evehicl eoccupant sifthere is aKEY-
LESS-GO ke yint he vehicle.
Lockin gand unlockin gcentrally You can start
,loc koru nlockthe vehicl eusing
KEYLESS-GO .Todothis, you only need carry
th ek eywit hyou. You can combin ethe KEY-
LESS-GO function switht he function sofa
conventional key. Unloc kthe vehicl ebyusing KEYLESS-GO
,for instance, and loc kitusing
the & buttonont hekey.
When locking or unlocking wit hKEYLESS-GO,
th ed istanc ebetween th ekeyand th ecorre-
spondin gdoor handle mus tnotbe greater
than 1m.
Ac heck whichperiodically establishes aradio
connection between th evehicl eand th ekey
determines whether avalid ke yisinthe vehi-
cle .This occurs, for example:
R when th eexternal door handles are
touched
R when startin gthe engine
R whils tdriving X
To unlock th evehicle: touch th einner
s urfac eoft hedoor handle.
X To lock th evehicle: touch sensor sur-
face :.
X Convenience closin gfeature: touch
recessed sensor surface ;for an exten-
ded period.
Fo rfurther information on th econveni ence
closin gfeature (Y page 112). Key
95Opening and closing Z
Page 102 of 497
Problems with the key
Problem
Possible causes/consequences and
M
MSolutions You can no longer lock
or unlock the vehicle
using the key. The key battery is discharged or nearly discharged.
X Check the key battery (Y page 97) and replace it if necessary
(Y page 97).
If this does not work: X Lock (Y page 102) or unlock (Y page 103) the vehicle using the
emergency key element. The key is faulty.
X Lock (Y page 102) or unlock (Y page 103) the vehicle using the
emergency key element.
X Have the key checked at aqualified specialist workshop. You can no longer lock
or unlock the vehicle
using KEYLESS-GO. The key battery is discharged or nearly discharged.
X Check the key battery (Y page 97) and replace it if necessary
(Y page 97).
If this does not work: X Lock (Y page 102) or unlock (Y page 103) the vehicle using the
emergency key element. There is interference from
apowerful source of radio waves.
X Lock (Y page 102) or unlock (Y page 103) the vehicle using the
emergency key element. There is
afault with KEYLESS-GO.
X Lock/unlock the vehicle using the remote control function of
the key.
X Have the vehicle and key checked at aqualified specialist work-
shop.
If the vehicle can also not be locked/unlocked using the remote
control function:
X Lock (Y page 102) or unlock (Y page 103) the vehicle using the
emergency key element.
X Have the vehicle and key checked at aqualified specialist work-
shop. You have lost
akey. X
Have the key deactivated at aqualified specialist workshop.
X Report the loss immediately to the vehicle insurers.
X If necessary, have the locks changed as well. You have lost the emer-
gency key element. X
Report the loss immediately to the vehicle insurers.
X If necessary, have the locks changed as well. Key
99Opening and closing Z
Page 103 of 497
Problem
Possible causes/consequences and
M
MSolutions The engine cannot be
started using the key. The on-board voltage is too low.
X Switch off non-essential consumers, e.g. seat heating or interior
lighting, and try to start the engine again.
If this does not work:
X Check the starter battery and charge it if necessary
(Y page 404).
or
X Jump-start the vehicle (Y page 405).
or
X Consult aqualified specialist workshop. Only for vehicles with
manual transmission:
The engine cannot be
started using the key. The steering lock is mechanically blocked.
X Remove the key and reinsert it into the ignition lock. While doing
this, turn the steering wheel in both directions. The engine cannot be
started using KEYLESS-
GO. The key is in the
vehicle. The vehicle is locked.
X Unlock the vehicle and try to start the vehicle again. There is interference from
apowerful source of radio waves.
X Start your vehicle with the key in the ignition lock. Doors
Important safety notes
United Kingdom only: G
WARNING
When the double locks are activated, the
doors can no longer be opened from the
inside. People in the vehicle can no longer get out, e.g. in hazardous situations. There is a
risk of injury.
Therefore, do not leave any people unsuper-
vised in the vehicle, particularly children, eld-
erly people or people in need of special assis-
tance. Do not activate the double lock when
people are in the vehicle.
If the vehicle has been locked from the out-
side, the double lock function is activated as
standard. It is then not possible to open the
doors from inside the vehicle. You can deac- tivate the double lock function by deactivat-
ing the interior motion sensor (Y page 91).
The doors can then be opened from the inside after the vehicle has been locked from the
outside.
The anti-theft alarm system is triggered if thedoor is opened from the inside. Switch off the
alarm (Y page 89).
All countries: G
WARNING
If children are left unsupervised in the vehicle, they could:
R open doors, thereby endangering other per-
sons or road users
R get out and be struck by oncomingt raffic
R operate vehicle equipment and become
trapped, for example 100
DoorsOpening and closing
Page 172 of 497
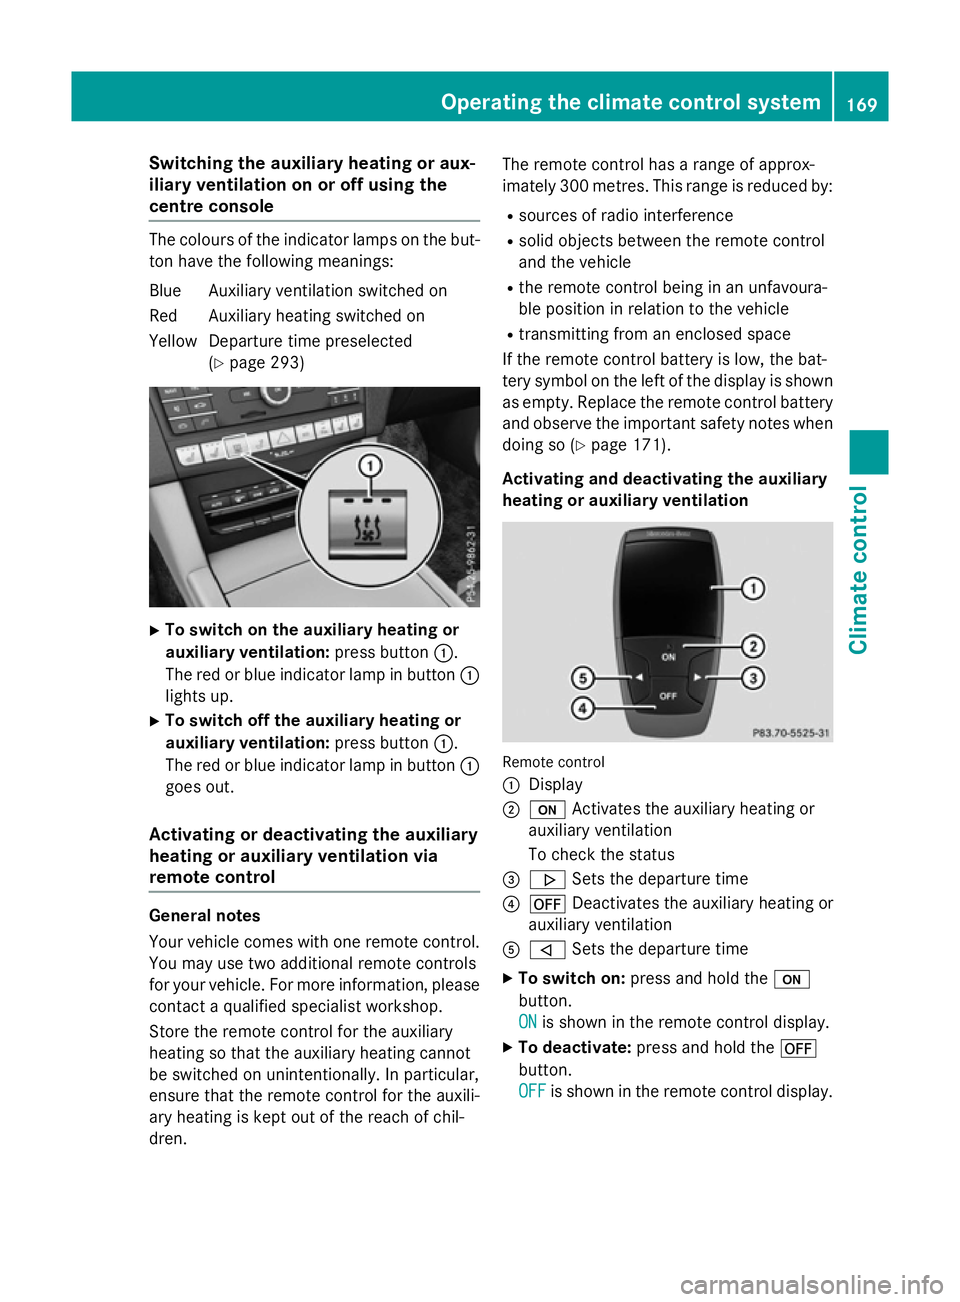
Switching the auxiliary heating or aux-
iliary ventilation on or off using the
centre console The colours of the indicator lamps on the but-
ton have the following meanings:
Blue Auxiliary ventilation switched on
Red Auxiliary heating switched on
Yellow Departure time preselected (Ypage 293) X
To switch on the auxiliary heating or
auxiliary ventilation: press button:.
The red or blue indicator lamp in button :
lights up.
X To switch off the auxiliary heating or
auxiliary ventilation: press button:.
The red or blue indicator lamp in button :
goes out.
Activating or deactivating the auxiliary
heating or auxiliary ventilation via
remote control General notes
Your vehicle comes with one remote control.
You may use two additional remote controls
for your vehicle. For more information ,please
contact aqualified specialist workshop.
Storet he remote control for the auxiliary
heating so that the auxiliary heating cannot
be switched on unintentionally. In particular,
ensure that the remote control for the auxili-
ary heating is kept out of the reach of chil-
dren. The remote control has
arange of approx-
imately 300 metres. This range is reduced by:
R sources of radio interference
R solid objectsb etween the remote control
and the vehicle
R the remote control being in an unfavoura-
ble position in relation to the vehicle
R transmittingf rom an enclosed space
If the remote control battery is low, the bat-
tery symbol on the left of the display is shown as empty. Replace the remote control battery
and observe the important safety notes when doing so (Y page 171).
Activating and deactivating the auxiliary
heating or auxiliary ventilation Remote control
:
Display
; u Activates the auxiliary heating or
auxiliary ventilation
To check the status
= . Sets the departure time
? ^ Deactivates the auxiliary heating or
auxiliary ventilation
A , Sets the departure time
X To switch on: press and hold the u
button.
ON ON is shown in the remote control display.
X To deactivate: press and hold the ^
button.
OFF OFF is shown in the remote control display. Operating the climate control system
169Climatecontrol Z