2015 MERCEDES-BENZ E-CLASS COUPE transmission
[x] Cancel search: transmissionPage 273 of 345
Roof carrier
Important safety notes G
WARNING
When a load is transported on the roof, the
vehicle's centre of gravity rises and the han-
dling changes. If you exceed the maximum
roof load, the handling as well as steering and braking characteristics are severely affected.
There is a risk of an accident.
Always observe the maximum roof load and
adapt your driving style.
! Mercedes-Benz recommends that you only
use roof carriers that have been tested and
approved for Mercedes-Benz vehicles. This
helps to prevent damage to the vehicle.
Position the load on the roof carrier in such a way that the vehicle will not sustain damage
even when it is in motion.
Depending on the vehicle equipment, ensure
that when the roof carrier is fitted you can:
R open the panorama sliding sunroof fully
R open the boot lid fully
! To avoid damaging or scratching the covers,
do not use metallic or hard objects to open
them.
You will find information on the maximum roof
load in the "Technical data" section
(Y page 335).
An incorrectly secured roof carrier or roof load
may become detached from the vehicle. You
must therefore ensure that you observe the roof
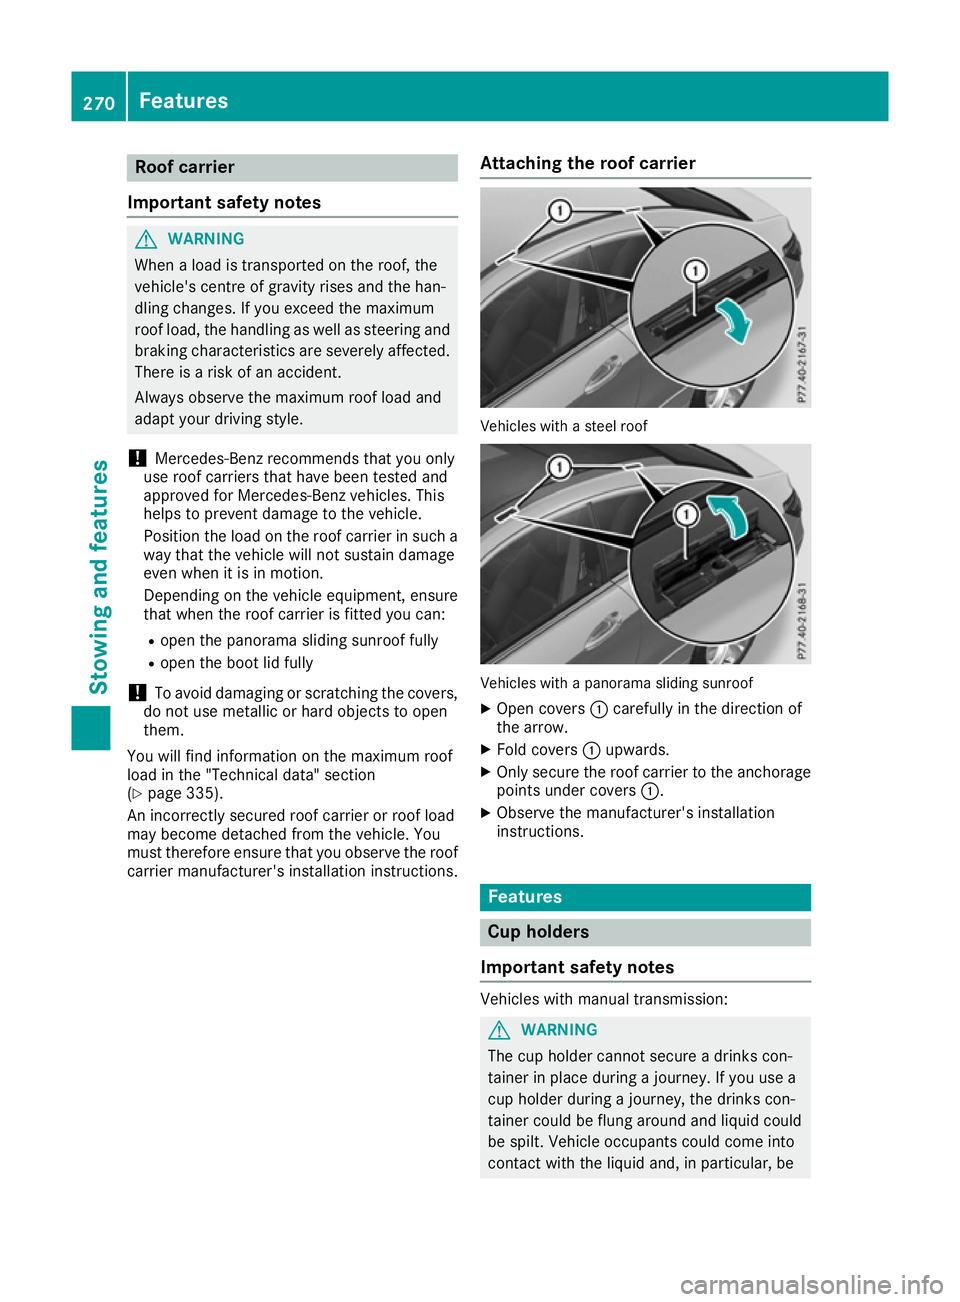
carrier manufacturer's installation instructions. Attaching the roof carrier Vehicles with a steel roof
Vehicles with a panorama sliding sunroof
X Open covers :carefully in the direction of
the arrow.
X Fold covers :upwards.
X Only secure the roof carrier to the anchorage
points under covers :.
X Observe the manufacturer's installation
instructions. Features
Cup holders
Important safety notes Vehicles with manual transmission:
G
WARNING
The cup holder cannot secure a drinks con-
tainer in place during a journey. If you use a
cup holder during a journey, the drinks con-
tainer could be flung around and liquid could
be spilt. Vehicle occupants could come into
contact with the liquid and, in particular, be 270
FeaturesStowing and features
Page 274 of 345
scalded by hot liquid. You could be distracted
from the traffic situation and lose control of
the vehicle. There is a risk of an accident and
injury.
Only use the cup holder when the vehicle is
stationary. Only place containers of a suitable size in the cup holder. Seal the container, in
particular when it contains hot liquid.
! Only use the cup holders for containers of
the right size and which have lids. The drinks
could otherwise spill. G
WARNING
If objects in the passenger compartment are
stowed incorrectly, they can slide or be
thrown around and hit vehicle occupants. In
addition, cupholders, open stowage spaces
and mobile phone brackets cannot always
retain all objects they contain. There is a risk of injury, particularly in the event of sudden
braking or a sudden change in direction.
R Always stow objects so that they cannot be
thrown around in such situations.
R Always make sure that objects do not pro-
trude from stowage spaces, parcel nets or
stowage nets.
R Close the lockable stowage spaces before
starting a journey.
R Always stow and secure heavy, hard, poin-
ted, sharp-edged, fragile or bulky objects in
the boot.
! Do not expose drinks bottles in the cup
holder in the centre console to continuous,
strong and direct sunlight. The passenger
compartment in the area of the centre con-
sole can otherwise be damaged by the con-
centrated and reflected sunlight.
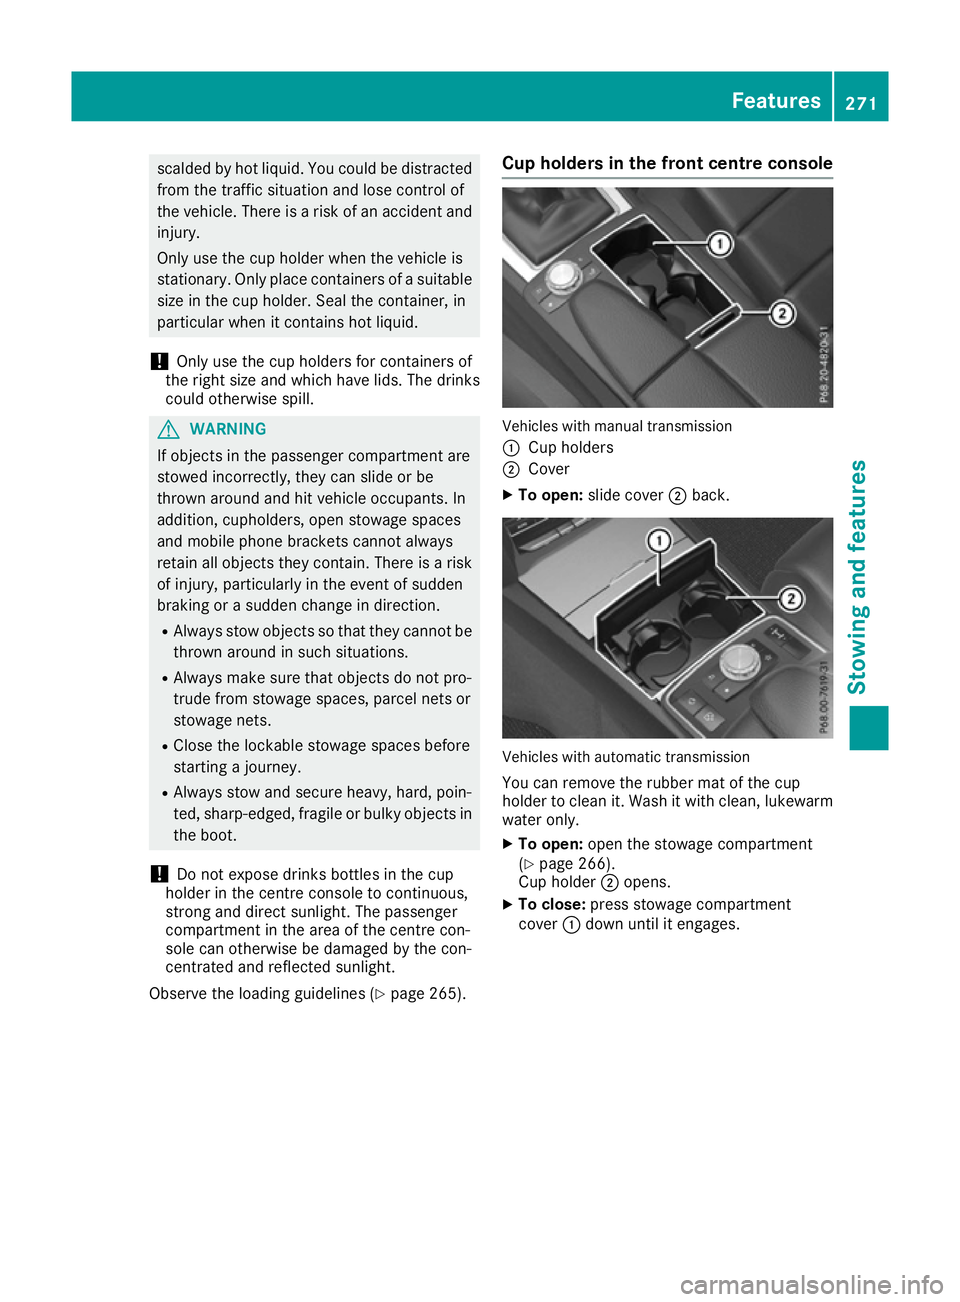
Observe the loading guidelines (Y page 265).Cup holders in the front centre console Vehicles with manual transmission
:
Cup holders
; Cover
X To open: slide cover ;back. Vehicles with automatic transmission
You can remove the rubber mat of the cup
holder to clean it. Wash it with clean, lukewarm
water only.
X To open: open the stowage compartment
(Y page 266).
Cup holder ;opens.
X To close: press stowage compartment
cover :down until it engages. Features
271Stowing and features Z
Page 275 of 345
Removing/fitting the cup holder in the
centre console (vehicles with manual
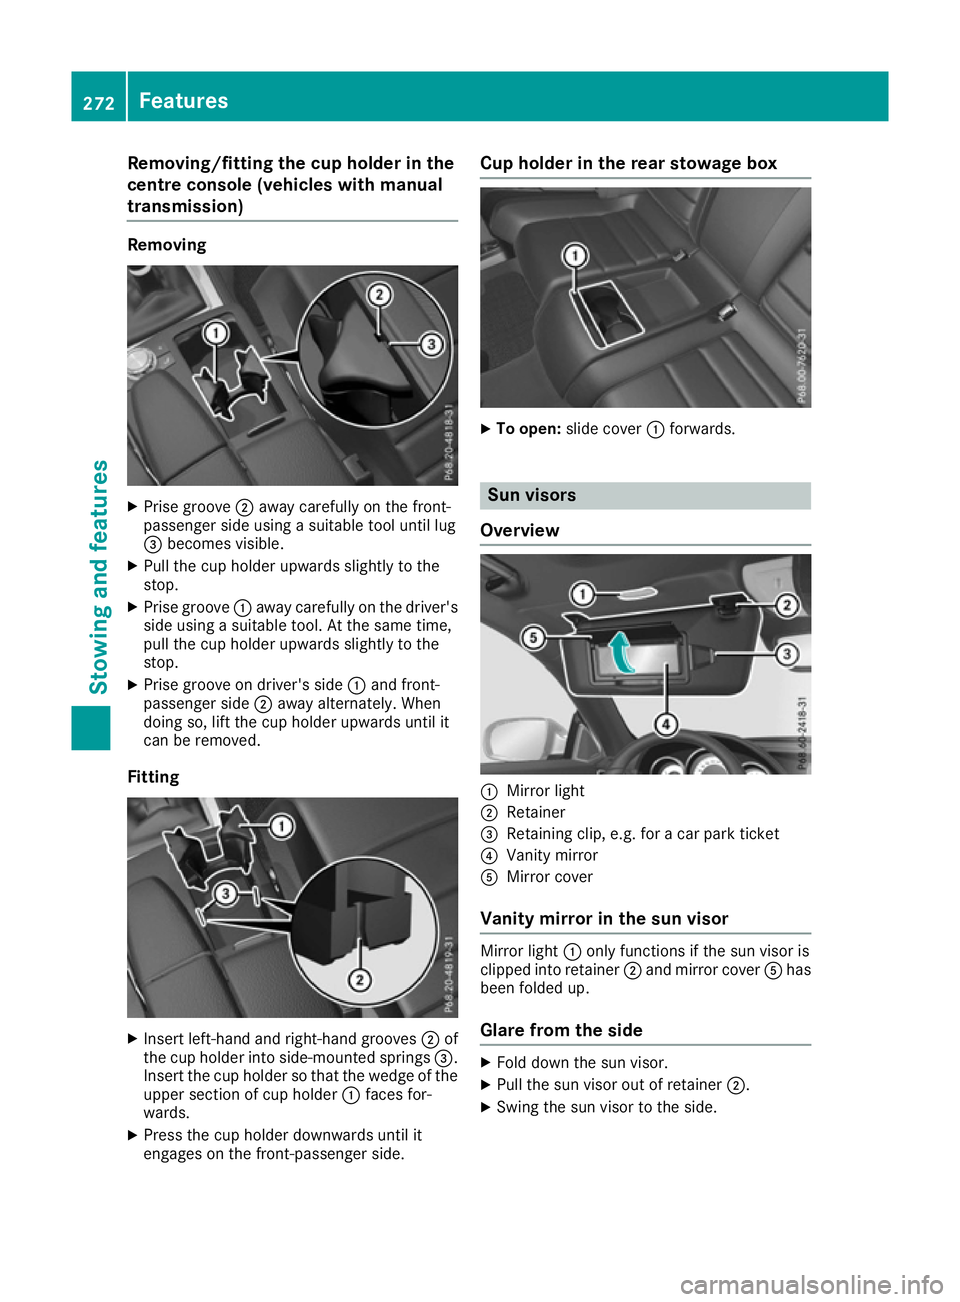
transmission) Removing
X
Prise groove ;away carefully on the front-
passenger side using a suitable tool until lug
= becomes visible.
X Pull the cup holder upwards slightly to the
stop.
X Prise groove :away carefully on the driver's
side using a suitable tool. At the same time,
pull the cup holder upwards slightly to the
stop.
X Prise groove on driver's side :and front-
passenger side ;away alternately. When
doing so, lift the cup holder upwards until it
can be removed.
Fitting X
Insert left-hand and right-hand grooves ;of
the cup holder into side-mounted springs =.
Insert the cup holder so that the wedge of the upper section of cup holder :faces for-
wards.
X Press the cup holder downwards until it
engages on the front-passenger side. Cup holder in the rear stowage box
X
To open: slide cover :forwards. Sun visors
Overview :
Mirror light
; Retainer
= Retaining clip, e.g. for a car park ticket
? Vanity mirror
A Mirror cover
Vanity mirror in the sun visor Mirror light
:only functions if the sun visor is
clipped into retainer ;and mirror cover Ahas
been folded up.
Glare from the side X
Fold down the sun visor.
X Pull the sun visor out of retainer ;.
X Swing the sun visor to the side. 272
FeaturesStowing and features
Page 276 of 345
Rear window roller sunblind
Important safety notes G
WARNING
When extending or retracting, parts of the
body could become trapped within the sweep of the roller sunblind. There is a risk of injury.
When extending or retracting, make sure that
no one has any parts of the body within the
sweep of the roller sunblind. If someone
becomes trapped, briefly press the button
again. The opening or closing process is
briefly stopped. The roller sunblind then
returns to its initial position.
! Make sure that the roller sunblind can move
freely. Otherwise, the roller sunblind or other objects could be damaged.
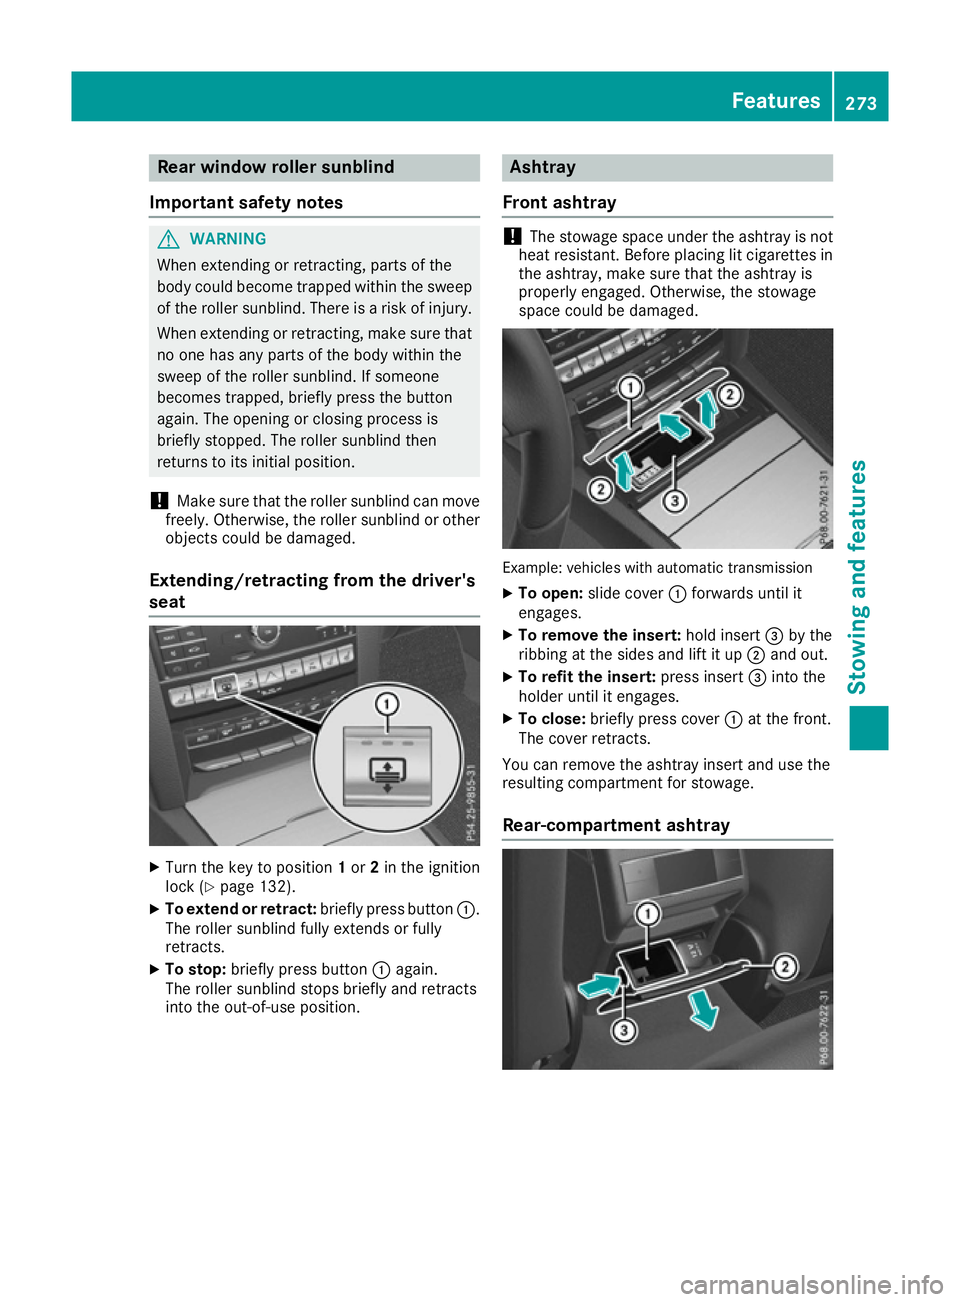
Extending/retracting from the driver's
seat X
Turn the key to position 1or 2in the ignition
lock (Y page 132).
X To extend or retract: briefly press button:.
The roller sunblind fully extends or fully
retracts.
X To stop: briefly press button :again.
The roller sunblind stops briefly and retracts
into the out-of-use position. Ashtray
Front ashtray !
The stowage space under the ashtray is not
heat resistant. Before placing lit cigarettes in the ashtray, make sure that the ashtray is
properly engaged. Otherwise, the stowage
space could be damaged. Example: vehicles with automatic transmission
X To open: slide cover :forwards until it
engages.
X To remove the insert: hold insert=by the
ribbing at the sides and lift it up ;and out.
X To refit the insert: press insert=into the
holder until it engages.
X To close: briefly press cover :at the front.
The cover retracts.
You can remove the ashtray insert and use the
resulting compartment for stowage.
Rear-compartment ashtray Features
273Stowing and features Z
Page 277 of 345
X
To open: pull cover ;out by its top edge.
X To remove the insert: press release button
= and lift the insert up and out.
X To fit the insert: fit insert:into the holder
from above and press down into the holder
until it engages. Cigarette lighter
Important safety notes G
WARNING
You can burn yourself if you touch the hot
heating element or the socket of the cigarette lighter.
In addition, flammable materials can ignite if:
R the hot cigarette lighter falls
R a child holds the hot cigarette lighter to
objects, for example
There is a risk of fire and injury.
Always hold the cigarette lighter by the knob.
Always make sure that the cigarette lighter is
out of reach of children. Never leave children unattended in the vehicle.
Your attention must always be focused on the
traffic conditions. Only use the cigarette lighter when road and traffic conditions permit.
Cigarette lighter in the front compart-
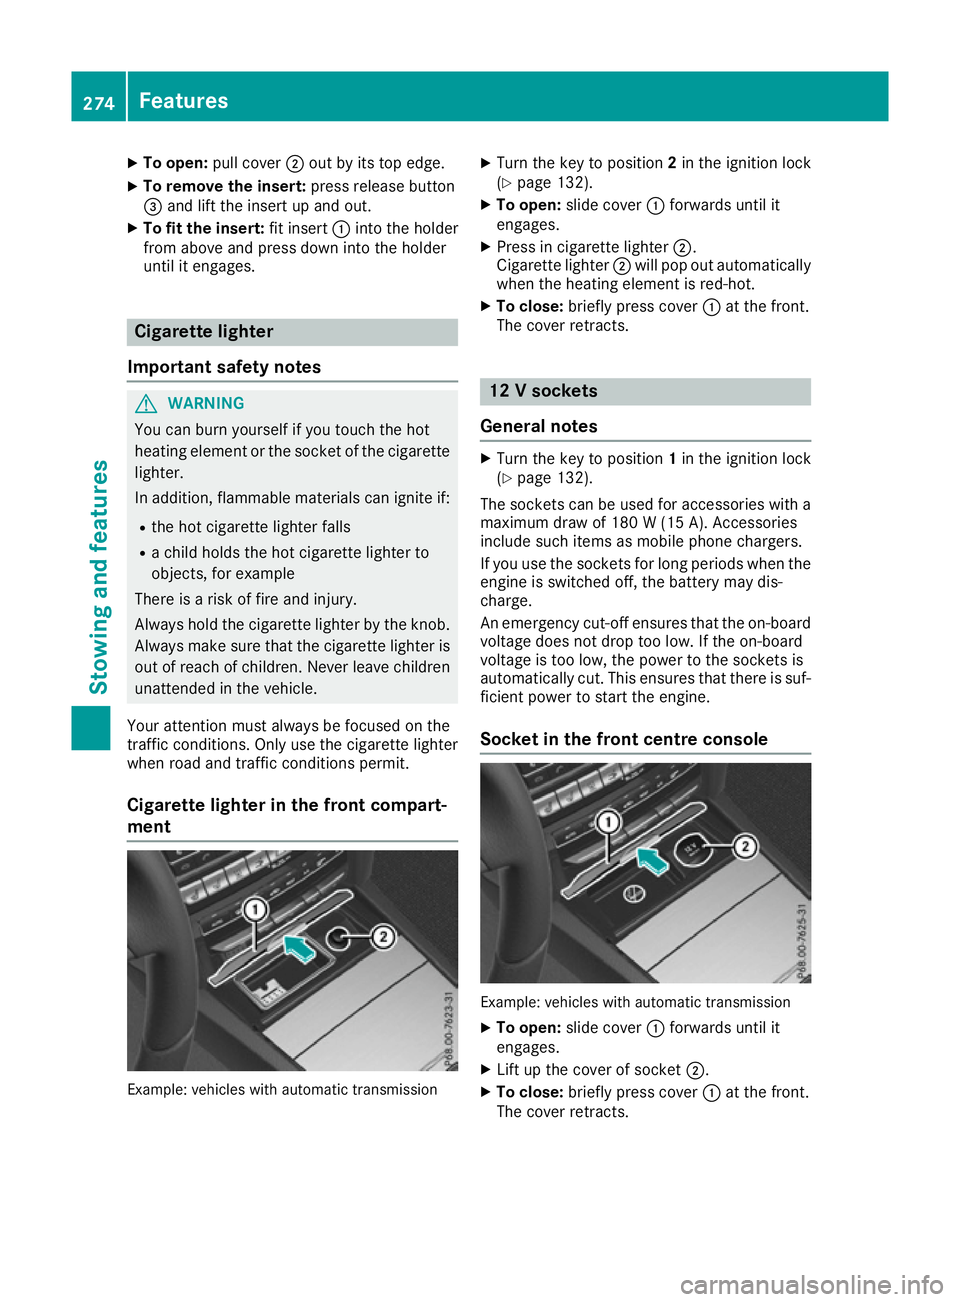
ment Example: vehicles with automatic transmission X
Turn the key to position 2in the ignition lock
(Y page 132).
X To open: slide cover :forwards until it
engages.
X Press in cigarette lighter ;.
Cigarette lighter ;will pop out automatically
when the heating element is red-hot.
X To close: briefly press cover :at the front.
The cover retracts. 12 V sockets
General notes X
Turn the key to position 1in the ignition lock
(Y page 132).
The sockets can be used for accessories with a
maximum draw of 180 W(15 A). Accessories
include such items as mobile phone chargers.
If you use the sockets for long periods when the engine is switched off, the battery may dis-
charge.
An emergency cut-off ensures that the on-boardvoltage does not drop too low. If the on-board
voltage is too low, the power to the sockets is
automatically cut. This ensures that there is suf-
ficient power to start the engine.
Socket in the front centre console Example: vehicles with automatic transmission
X To open: slide cover :forwards until it
engages.
X Lift up the cover of socket ;.
X To close: briefly press cover :at the front.
The cover retracts. 274
FeaturesStowing and fea
tures
Page 281 of 345
Several attempts may be required. You
should test every position for at least
25 seconds before trying another position.
Synchronising the rolling code
Observe the "Important safety notes"
(Y page 277).
If the garage door system uses a rolling code,
you will also have to synchronise the garage
door system with the integrated garage door
opener in the rear-view mirror. To do this, you
will need to use the programming button on the
door drive control panel. The programming but-
ton may be placed at different locations depend- ing on the manufacturer. It is usually located on
the door drive unit on the garage ceiling.
Familiarise yourself with the garage door drive
operating instructions, e.g. under "Program-
ming of additional remote controls", before car-
rying out the following steps.
Your vehicle must be within range of the garage
door or gate opener drive. Make sure that nei-
ther your vehicle nor any persons/objects are
present within the sweep of the door or gate.
X Turn the key to position 2in the ignition lock
(Y page 132).
X Get out of the vehicle.
X Press the programming button on the door
drive unit.
Usually, you now have 30 seconds to initiate
the next step.
X Get into the vehicle.
X Press previously programmed button ;,=
or ? of the integrated garage door opener
until the door closes.
The rolling code synchronisation is then com- plete.
Problems when programming
If you have problems when programming the
integrated garage door opener, please note the following:
R Check the transmitter frequency used by
garage door drive remote control Aand
whether it is supported. The transmitter fre-
quency can usually be found on the back of
the garage door drive remote control.
R Replace the batteries in garage door remote
control A. This increases the likelihood that
garage door remote control Awill transmit a
strong and precise signal to the integrated
garage door opener in the rear-view mirror. R
When programming, hold remote control A
at varying distances and angles from the but-
ton which you are programming. Try various
angles at a distance between 5and 20cm or
at the same angle but at varying distances.
R If there is another remote control for the same
garage door drive, perform the programming
steps again using this remote control. Before
performing these steps, make sure that new
batteries have been fitted in garage door drive remote control A.
R Note that some remote controls transmit only
for a limited period (the indicator lamp on theremote control goes out). Press button Bon
remote control Aagain before transmission
ends.
R Align the aerial cable of the garage door
opener unit. This can improve signal recep-
tion/transmission.
Opening or closing the garage door Once programmed, the integrated garage door
opener will assume the function of the garage
door system's remote control. Please also read
the operating instructions for the garage door
system.
X Turn the key to position 2in the ignition lock
(Y page 132).
X Press button ;,=or? which you have
programmed to operate the garage door.
Garage door system with a fixed code: indi-
cator lamp :lights up green.
Garage door system with a rolling code: indi-
cator lamp :flashes green.
The transmitter will transmit a signal for as
long as the button is pressed. The transmis-
sion is halted after a maximum of ten seconds
and indicator lamp :lights up yellow.
X Press button ;,=or? again if necessary.
Clearing the memory Make sure that you clear the memory of the
integrated garage door opener before selling the
vehicle. 278
FeaturesStowing and features
Page 293 of 345
!
When DISTRONIC PLUS or the HOLD func-
tion is activated, the vehicle brakes automat- ically in certain situations.
To avoid damage to the vehicle, deactivate
DISTRONIC PLUS and the HOLD function in
the following or similar situations:
R when towing away
R in a car wash
! Preferably use car washes with adjustable
high-pressure jets for pre-washing. This cor-
responds with the specifications for cabriolet
programmes. In car washes that use high
water pressures, there is a risk that a small
amount of water may leak into the vehicle.
! Make sure that:
R the side windows and sliding sunroof or
soft top are closed completely.
R the blower for the ventilation/heating is
switched off (OFF button is depressed).
R the windscreen wiper switch is at position
0.
The vehicle could otherwise be damaged.
! In car washes with a towing mechanism,
make sure that the automatic transmission is
in transmission position N; otherwise, the
vehicle could be damaged.
R Vehicles with DIRECT SELECT lever and
key:
do not remove the key from the ignition
lock. Do not open the driver's door or front-
passenger door when the engine is
switched off. Otherwise, the automatic
transmission selects park position Pauto-
matically and locks the wheels. You can
prevent this by shifting the automatic trans-
mission to Nbeforehand.
R Vehicles with DIRECT SELECT lever and
KEYLESS-GO:
do not open the driver's door or front-
passenger door when the engine is
switched off. Otherwise, the automatic
transmission selects park position Pauto-
matically and locks the wheels.
Observe the following to make sure that the
automatic transmission on vehicles with DIRECT
SELECT stays in position N:X
Make sure the vehicle is stationary and the
ignition is switched off.
X Turn the key to position 2in the ignition lock
(Y page 132).
Use the key instead of the Start/Stop button on vehicles with KEYLESS-GO.
X Depress the brake pedal and keep it
depressed.
X Shift the automatic transmission to position
N.
X Release the brake pedal.
X Release the parking brake.
X Switch off the ignition and leave the key in the
ignition lock.
You can wash the vehicle in an automatic car
wash from the very start.
Wash off excess dirt before cleaning the vehicle
in an automatic car wash.
After using an automatic car wash, wipe off wax
from the windscreen and the wiper blades. This
will prevent smears and reduce wiping noises
caused by residue on the windscreen.
Washing by hand In some countries, washing by hand is only
allowed at specially equipped washing bays.
Observe the legal requirements for each indi-
vidual country.
X Do not use hot water and do not wash the
vehicle in direct sunlight.
X Use a soft sponge to clean.
X Use a mild cleaning agent, such as a car
shampoo approved by Mercedes-Benz.
X Thoroughly hose down the vehicle with a gen-
tle jet of water.
X Do not point the water jet directly towards the
air inlet.
X Use plenty of water and rinse out the sponge
frequently.
X Rinse the vehicle with clean water and dry
thoroughly with a chamois.
X Do not let the cleaning agent dry on the paint-
work.
When using the vehicle in winter, remove all
traces of road salt deposits carefully and as
soon as possible. 290
CareMaintenance and care
Page 306 of 345

R
It is important that you observe the descri-
bed order of the battery terminals when
connecting and disconnecting a battery.
R When jump-starting, make sure that the
battery poles with identical polarity are
connected.
R It is particularly important to observe the
described order when connecting and dis-
connecting the jump leads.
R Never connect or disconnect the battery
terminals while the engine is running. G
WARNING
Battery acid is caustic. There is a risk of injury. Avoid contact with the skin, eyes or clothing.
Do not breathe in any battery gases. Do not
lean over the battery. Keep the batteries out
of the reach of children. Immediately rinse off
battery acid thoroughly with plenty of clean
water and seek medical attention at once. H
Environmental note Batteries contain pollutants.
It is illegal to dispose of them with the household rubbish.
They must be collected sep-
arately and disposed of in anenvironmentally responsible
recycling system. Dispose of batteries in an
environmentally responsible
manner. Take discharged
batteries to a qualified spe-
cialist workshop or to a col-
lection point for used batter-
ies.
! Have the battery checked regularly at a
qualified specialist workshop.
Observe the service intervals in the Service
Booklet or contact a qualified specialist work- shop for more information. !
Always have work on the batteries carried
out at a qualified specialist workshop. Should
it, in exceptional circumstances, be abso-
lutely necessary to disconnect the 12-volt
battery yourself, please observe the follow-
ing:
R secure the vehicle to prevent it from rolling
away.
R switch the ignition off.
R first, disconnect the negative terminal, fol-
lowed by the positive terminal.
Vehicles with automatic transmission: the
transmission is locked in position Pafter dis-
connecting the battery.
After the work has been completed, firmly
reinstall the battery and the cover of the pos- itive terminal.
Comply with safety precautions and take pro-
tective measures when handling batteries. Risk of explosion
Fire, naked flames and smoking are
prohibited when handling the bat-
tery. Avoid creating sparks.
Battery acid is caustic. Avoid contact
with the skin, eyes or clothing.
Wear suitable protective clothing, in
particular gloves, an apron and a
face mask.
Immediately rinse acid splashes off
with clean water. Consult a doctor if necessary. Wear eye protection.
Keep children away.
Observe this Owner's Manual.
For safety reasons, Mercedes-Benz recom-
mends that you only use batteries which have
been tested and approved for your vehicle by
Mercedes-Benz. These batteries provide
increased impact protection to prevent vehicle Battery (vehicle)
303Breakdown assistance Z