2015 MERCEDES-BENZ E-CLASS COUPE Fuel flap
[x] Cancel search: Fuel flapPage 152 of 345

X
Press the fuel filler flap in the direction of
arrow :.
The fuel filler flap opens slightly.
X Open the fuel filler flap fully.
X Turn the fuel filler cap anti-clockwise and
remove it.
X Insert the fuel filler cap into the holder on the
inside of fuel filler flap ;.
X Completely insert the filler neck of the fuel
pump nozzle into the tank, hook in place and
refuel.
X Only fill the tank until the pump nozzle
switches off.
Do not add any more fuel after the pump stops
filling for the first time. Otherwise, fuel may leak out.
Vehicles with a diesel engine: the filler neck is
designed for refuelling at diesel filling pumps.
Closing the fuel filler flap X
Replace the cap on the filler neck and turn
clockwise until it engages audibly.
X Close the fuel filler flap.
Close the fuel filler flap before locking the vehi-
cle. Otherwise, the locking pin of the central
locking prevents the fuel filler flap from closing. Refuelling
149Driving and parking Z
Page 153 of 345
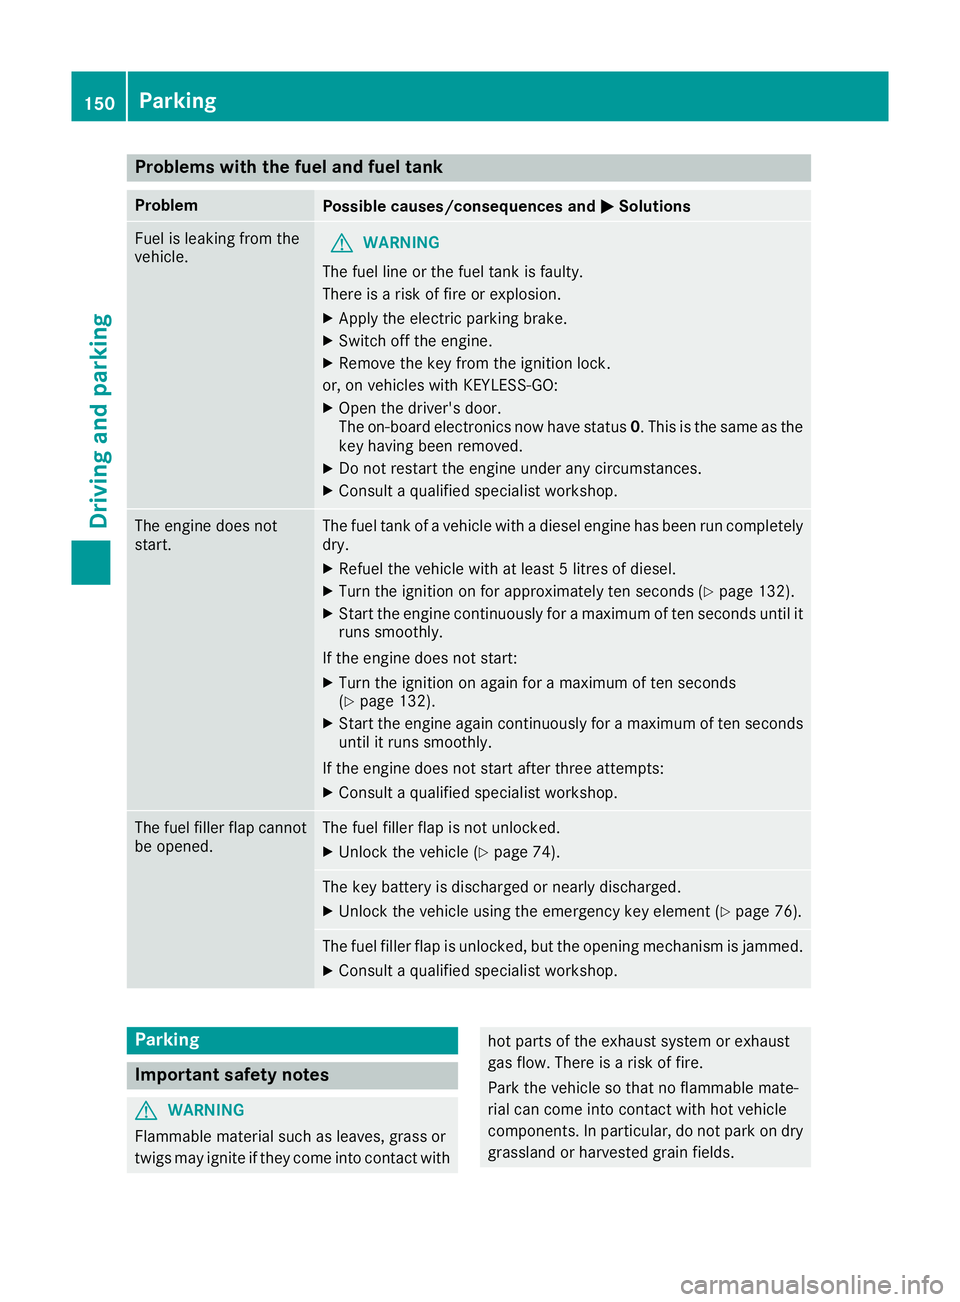
Problems with the fuel and fuel tank
Problem
Possible causes/consequences and
M
MSolutions Fuel is leaking from the
vehicle.
G
WARNING
The fuel line or the fuel tank is faulty.
There is a risk of fire or explosion. X Apply the electric parking brake.
X Switch off the engine.
X Remove the key from the ignition lock.
or, on vehicles with KEYLESS‑GO: X Open the driver's door.
The on-board electronics now have status 0. This is the same as the
key having been removed.
X Do not restart the engine under any circumstances.
X Consult a qualified specialist workshop. The engine does not
start. The fuel tank of a vehicle with a diesel engine has been run completely
dry.
X Refuel the vehicle with at least 5 litres of diesel.
X Turn the ignition on for approximately ten seconds (Y page 132).
X Start the engine continuously for a maximum of ten seconds until it
runs smoothly.
If the engine does not start: X Turn the ignition on again for a maximum of ten seconds
(Y page 132).
X Start the engine again continuously for a maximum of ten seconds
until it runs smoothly.
If the engine does not start after three attempts:
X Consult a qualified specialist workshop. The fuel filler flap cannot
be opened. The fuel filler flap is not unlocked.
X Unlock the vehicle (Y page 74). The key battery is discharged or nearly discharged.
X Unlock the vehicle using the emergency key element (Y page 76).The fuel filler flap is unlocked, but the opening mechanism is jammed.
X Consult a qualified specialist workshop. Parking
Important safety notes
G
WARNING
Flammable material such as leaves, grass or
twigs may ignite if they come into contact with hot parts of the exhaust system or exhaust
gas flow. There is a risk of fire.
Park the vehicle so that no flammable mate-
rial can come into contact with hot vehicle
components. In particular, do not park on dry grassland or harvested grain fields. 150
ParkingDriving and parking
Page 205 of 345
You will find the applicable permissible values,
which must not be exceeded, in the vehicle
documents.
You will find the values approved by the manu-
facturer on the vehicle identification plates and
those for the towing vehicle under "Technical
data" (Y page 336).
When towing a trailer, your vehicle's handling
characteristics will be different in comparison to
when driving without a trailer.
The vehicle/trailer combination:
R is heavier
R is restricted in its acceleration and gradient-
climbing capability
R has an increased braking distance
R is affected more by strong crosswinds
R demands more sensitive steering
R has a larger turning circle
This can impair the vehicle's handling charac-
teristics. Adapt your driving style accordingly.
Maintain a safe distance. Drive carefully.
When towing a trailer, always adjust your speed to the current road and weather conditions. Do
not exceed the maximum permissible speed for
your vehicle/trailer combination. Notes on towing a trailer
General notes The E 500 model cannot be used to tow a trailer.
i When towing a trailer, set the tyre pressure
on the rear axle of the towing vehicle for a
maximum load; see the tyre pressure table in
the fuel filler flap (Y page 316).
Please note that when towing a trailer, the fol-
lowing driving systems have limited availability
or are not available at all.
R PARKTRONIC (Y page 172)
R Active Parking Assist (Y page 176)
R Blind Spot Assist (Y page 193)
i The height of the ball coupling changes with
the load of the vehicle. If necessary, use a
trailer with a height-adjustable drawbar.
You will find fitting dimensions and loads under "Technical data" (Y page 335). Driving tips i
Observe the notes on ESP ®
trailer stabilisa-
tion (Y page 68).
The maximum permissible speed for vehicle/
trailer combinations depends on the type of
trailer. Before beginning the journey, check the
trailer's documents to see what the maximum
permitted speed is. Observe the legally prescri-
bed maximum speed in the relevant country.
For certain Mercedes-Benz vehicles, the maxi-
mum permissible rear axle load is increased
when towing a trailer. See the "Technical data"
section to find out whether this applies to your
vehicle (Y page 336). If you utilise any of the
added maximum rear axle load when towing a
trailer, the vehicle/trailer combination may not
exceed a maximum speed of 100 km/h for rea-
sons concerning the operating permit. This also applies in countries in which the permissible
maximum speed for vehicle/trailer combina-
tions is above 100 km/h.
When towing a trailer, your vehicle's handling
characteristics will be different in comparison to
when driving without a trailer and it will con-
sume more fuel.
Change into a lower gear in good time on long
and steep downhill gradients.
i This also applies if you have activated cruise
control, SPEEDTRONIC or DISTRONIC PLUS.
This will use the braking effect of the engine, so
less braking will be required to maintain vehicle speed. This relieves the load on the brake sys-
tem and prevents the brakes from overheating
and wearing too quickly. If you need additional
braking, depress the brake pedal repeatedly
rather than continuously.
Driving tips If the trailer swings from side to side:
X Do not accelerate.
X Do not countersteer.
X Brake if necessary.
R Maintain a greater distance to the vehicle in
front than when driving without a trailer.
R Avoid braking abruptly. If possible, brake gen-
tly at first to allow the trailer to run on. Then,
increase the braking force rapidly.
R The values given for gradient-climbing capa-
bilities from a standstill refer to sea level.
When driving in mountainous areas, note that 202
Towing a trailerDriving and parking
Page 304 of 345
Tyre pressure not reached
If a pressure of 180 kPa (1.8 bar/26 psi) has not
been attained after five minutes:
X Switch off the tyre inflation compressor.
X Unscrew the filler hose from the valve of the
faulty tyre.
Please note that tyre sealant may leak out
when unscrewing the filler hose.
X Very slowly drive forwards or reverse approx-
imately 10 m.
X Pump up the tyre again.
After a maximum of five minutes the tyre
pressure must be at least 180 kPa (1.8 bar/
26 psi). G
WARNING
If the required tyre pressure is not reached
after the specified time, the tyre is too badly
damaged. The tyre sealant cannot repair the
tyre in this instance. Damaged tyres and a tyre pressure that is too low can significantly
impair the vehicle's braking and driving char-
acteristics. There is a risk of accident.
Do not continue driving. Contact a qualified
specialist workshop.
Tyre pressure reached G
WARNING
A tyre temporarily sealed with tyre sealant
impairs the driving characteristics and is not
suitable for higher speeds. There is a risk of
accident.
You should therefore adapt your driving style
accordingly and drive carefully. Do not exceed the specified maximum speed with a tyre that
has been repaired using tyre sealant.
The maximum speed for a tyre sealed with tyre
sealant is 80 km/h. The upper part of the
TIREFIT sticker must be affixed to the instru-
ment cluster where it will be easily seen by the
driver.
! After use, excess tyre sealant may run out of
the filler hose. This could cause stains.
Therefore, place the tyre sealant bottle with
filler hose in the plastic bag which is con-
tained the TIREFIT kit. H
Environmental note
Have the used tyre sealant bottle disposed of professionally, e.g. at a qualified specialist
workshop.
If a tyre pressure of 180 kPa (1.8 bar/26 psi) has been attained after five minutes:
X Switch off the tyre inflation compressor.
X Unscrew the filler hose from the valve of the
faulty tyre.
X Stow the tyre sealant bottle, the tyre inflation
compressor and the warning triangle.
X Pull away immediately.
X Stop after driving for approximately ten
minutes and check the tyre pressure with the
tyre inflation compressor.
The tyre pressure must now be at least
130 kPa (1.3 bar/19 psi). G
WARNING
If the required tyre pressure is not reached
after driving for a short period, the tyre is too badly damaged. The tyre sealant cannot
repair the tyre in this instance. Damaged tyres and a tyre pressure that is too low can signif-
icantly impair the vehicle's braking and driv-
ing characteristics. There is a risk of accident.
Do not continue driving. Contact a qualified
specialist workshop.
i In your vehicle, you will find a sticker with
the Mercedes-Benz Service24h telephone
number, e.g. on the B-pillar on the driver's
side.
X Correct the tyre pressure if it is still at least
130 kPa (1.3 ba r/19 psi). See the tyre pres-
sure table on the fuel filler flap for values.
X To increase the tyre pressure: switch on
the tyre inflation compressor. Flat tyre
301Breakdown assistance Z
Page 316 of 345
Important safety notes
G
WARNING
If wheels and tyres of the wrong size are used, the wheel brakes or suspension components
may be damaged. There is a risk of an acci-
dent.
Always replace wheels and tyres with those
that fulfil the specifications of the original
part.
When replacing wheels, make sure to fit the
correct:
R designation
R type
When replacing tyres, make sure to fit the
correct:
R designation
R manufacturer
R type G
WARNING
A flat tyre severely impairs the driving, steer-
ing and braking characteristics of the vehicle.
There is a risk of accident.
Tyres without run-flat characteristics:
R do not drive with a flat tyre.
R immediately replace the flat tyre with your
emergency spare wheel or spare wheel, or
consult a qualified specialist workshop.
Tyres with run-flat characteristics:
R pay attention to the information and warn-
ing notices on MOExtended tyres (tyres
with run-flat characteristics).
Accessories that are not approved for your vehi-
cle by Mercedes-Benz or are not being used cor- rectly can impair the operating safety.
Before purchasing and using non-approved
accessories, visit a qualified specialist work-
shop and enquire about:
R suitability
R legal stipulations
R factory recommendations Further information regarding wheels and tyres
can be found under "Wheel/tyre combinations"
(Y page 325).
You can ask for information regarding permitted
wheel-tyre combinations at a Mercedes-Benz
Service Centre.
Information on tyre pressures can be found:
R in the tyre pressure table in the fuel filler flap
(Y page 148)
R under "Tyre pressure" (Y page 316)
Modification work on the brake system and
wheels is not permitted. The use of spacers or
brake dust shields is not permitted. This inva-
lidates the general operating permit for the vehi- cle.
i Further information on wheels and tyres can
be obtained at any qualified specialist work-
shop. Operation
Information on driving
Check the tyre pressures when the vehicle is
heavily laden and adjust prior to a trip.
While driving, pay attention to vibrations, noises
and unusual handling characteristics, e.g. pull-
ing to one side. This may indicate that the
wheels or tyres are damaged. If you suspect that a tyre is defective, reduce your speed immedi-
ately. Stop the vehicle as soon as possible to
check the wheels and tyres for damage. Hidden
tyre damage could also be causing the unusual
handling characteristics. If you find no signs of
damage, have the tyres and wheels checked at a qualified specialist workshop.
When parking your vehicle, make sure not to
squash the tyre sidewalls. If this cannot be avoi-ded, drive slowly over obstacles, e.g. kerbs, and
only at an obtuse angle. You could otherwise
damage the wheel rims and tyres. Regular checking of wheels and tyres
G
WARNING
Damaged tyres can cause tyre inflation pres-
sure loss. As a result, you could lose control of your vehicle. There is a risk of accident. Operation
313Wheels and ty res
Z
Page 320 of 345
pressure that is too low may result in a tyre
blow-out. There is a risk of accident.
R Check the tyre for foreign objects.
R Check whether the wheel is losing air or the
valve is leaking.
If you are unable to rectify the damage, con-
tact a qualified specialist workshop. H
Environmental note
Check the tyre pressure regularly, at least
every 14 days.
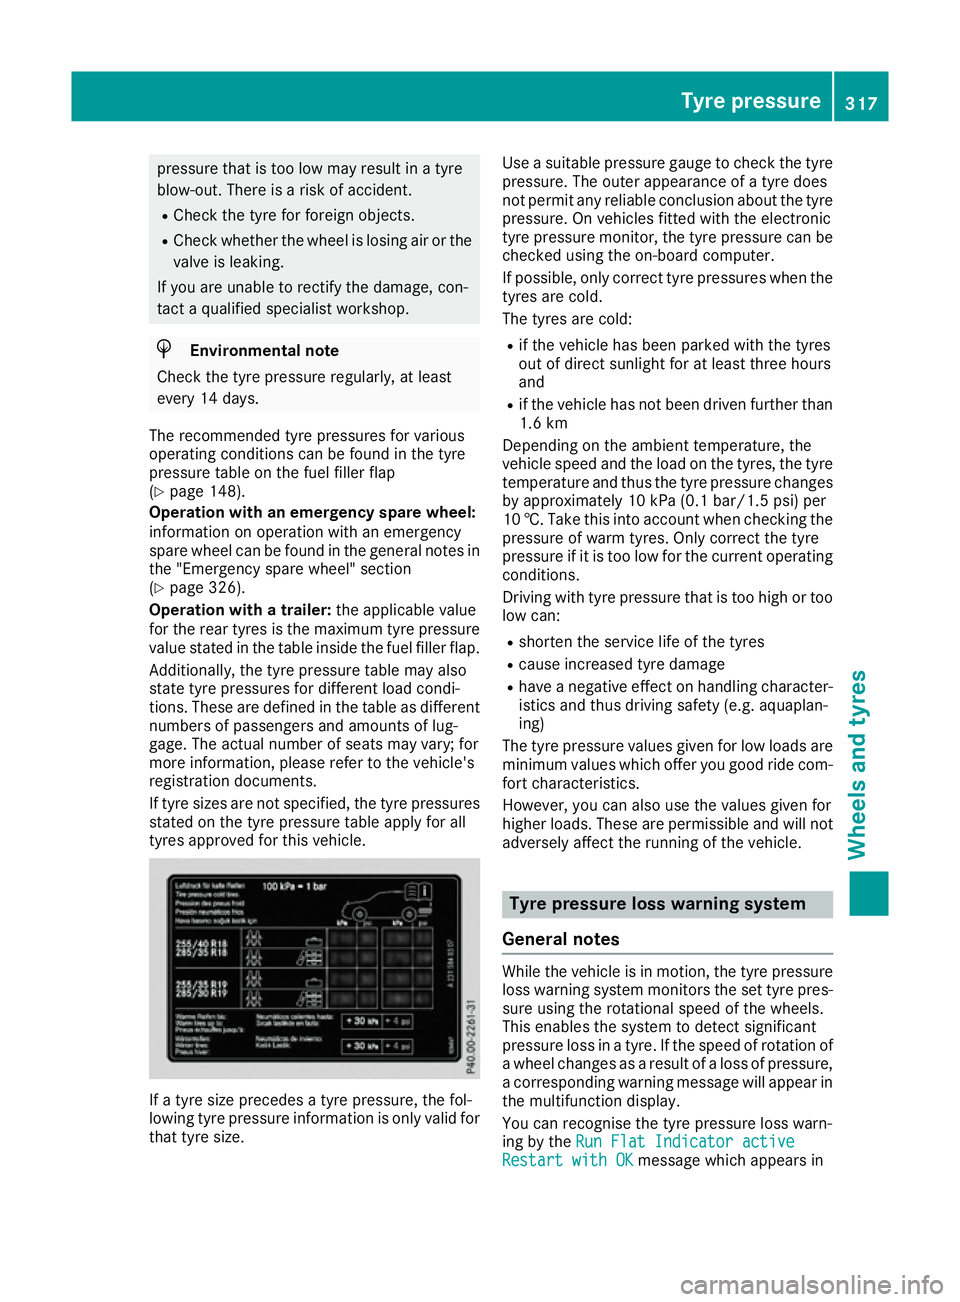
The recommended tyre pressures for various
operating conditions can be found in the tyre
pressure table on the fuel filler flap
(Y page 148).
Operation with an emergency spare wheel:
information on operation with an emergency
spare wheel can be found in the general notes in the "Emergency spare wheel" section
(Y page 326).
Operation with a trailer: the applicable value
for the rear tyres is the maximum tyre pressure
value stated in the table inside the fuel filler flap.
Additionally, the tyre pressure table may also
state tyre pressures for different load condi-
tions. These are defined in the table as different numbers of passengers and amounts of lug-
gage. The actual number of seats may vary; for
more information, please refer to the vehicle's
registration documents.
If tyre sizes are not specified, the tyre pressures stated on the tyre pressure table apply for all
tyres approved for this vehicle. If a tyre size precedes a tyre pressure, the fol-
lowing tyre pressure information is only valid for
that tyre size. Use a suitable pressure gauge to check the tyre
pressure. The outer appearance of a tyre does
not permit any reliable conclusion about the tyre
pressure. On vehicles fitted with the electronic
tyre pressure monitor, the tyre pressure can be checked using the on-board computer.
If possible, only correct tyre pressures when the
tyres are cold.
The tyres are cold:
R if the vehicle has been parked with the tyres
out of direct sunlight for at least three hours
and
R if the vehicle has not been driven further than
1.6 km
Depending on the ambient temperature, the
vehicle speed and the load on the tyres, the tyre temperature and thus the tyre pressure changes
by approximately 10 kPa (0.1 bar/1.5 psi) per
10 †. Take this into account when checking the
pressure of warm tyres. Only correct the tyre
pressure if it is too low for the current operating conditions.
Driving with tyre pressure that is too high or too
low can:
R shorten the service life of the tyres
R cause increased tyre damage
R have a negative effect on handling character-
istics and thus driving safety (e.g. aquaplan-
ing)
The tyre pressure values given for low loads are minimum values which offer you good ride com-
fort characteristics.
However, you can also use the values given for
higher loads. These are permissible and will not adversely affect the running of the vehicle. Tyre pressure loss warning system
General notes While the vehicle is in motion, the tyre pressure
loss warning system monitors the set tyre pres-
sure using the rotational speed of the wheels.
This enables the system to detect significant
pressure loss in a tyre. If the speed of rotation of a wheel changes as a result of a loss of pressure,
a corresponding warning message will appear in
the multifunction display.
You can recognise the tyre pressure loss warn-
ing by the Run Flat Indicator active
Run Flat Indicator active
Restart with OK
Restart with OK message which appears in Tyre pressure
317Wheels and tyres Z
Page 321 of 345

the
Serv.
Serv. menu of the multifunction display.
Information on the message display can be
found in the "Restarting the tyre pressure loss
warning system" section (Y page 318).
Important safety notes The tyre pressure warning system does not warn
you of an incorrectly set tyre pressure. Observe the notes on the recommended tyre pressure
(Y page 316).
The tyre pressure loss warning does not replace the need to regularly check the tyre pressures.
An even loss of pressure on several tyres at the
same time cannot be detected by the tyre pres-
sure loss warning system.
The tyre pressure monitor is not able to warn
you of a sudden loss of pressure, e.g. if the tyre is penetrated by a foreign object. In the event of
a sudden loss of pressure, bring the vehicle to a halt by braking carefully. Avoid abrupt steering
manoeuvres.
The function of the tyre pressure loss warning
system is limited or delayed if:
R snow chains are fitted to your vehicle's tyres.
R road conditions are wintry.
R you are driving on sand or gravel.
R you adopt a very sporty driving style (corner-
ing at high speeds or driving with high rates of
acceleration).
R you are towing a very heavy or large trailer.
R you are driving with a heavy load (in the vehi-
cle or on the roof).
Restarting the tyre pressure loss warn-
ing system Restart the tyre pressure loss warning system if
you have:
R changed the tyre pressure
R changed the wheels or tyres
R fitted new wheels or tyres
X Before restarting, make sure that the tyre
pressures are set properly on all four tyres for the respective operating conditions. The rec-
ommended tyre pressures can be found in the
tyre pressure table on the fuel filler flap.
The tyre pressure loss warning system can
only give reliable warnings if you have set the correct tyre pressure. If an incorrect tyre pressure is set, these incorrect values will be
monitored.
X Observe the notes in the section on tyre pres-
sures (Y page 316).
X Make sure that the key is in position 2in the
ignition lock (Y page 132).
X Press the =or; button on the steering
wheel to select the Serv.
Serv. menu.
X Press the 9or: button on the steering
wheel to select the Tyre pressure
Tyre pressure menu.
X Press the abutton.
The Run Flat Indicator active Run Flat Indicator active
Restart with OK
Restart with OK message appears in the
multifunction display.
If you wish to confirm the restart: X Press the abutton.
The Tyre
Tyre press.
press. now
nowOK?
OK?message appears
in the multifunction display.
X Press the 9or: button to select Yes
Yes .
X Press the abutton.
The Run Flat Indicator restarted
Run Flat Indicator restarted mes-
sage appears in the multifunction display.
After a teach-in period, the tyre pressure loss warning system will monitor the set tyre pres-
sures of all four tyres.
If you wish to cancel the restart: X Press the %button.
or X When the Tyre press. now OK?
Tyre press. now OK? message
appears, press the 9or: button to
select Cancel
Cancel .
X Press the abutton.
The tyre pressure values stored at the last
restart will continue to be monitored. Tyre pressure monitor
General notes If a tyre pressure monitor system is fitted, the
vehicle's wheels have sensors fitted that moni-
tor the tyre pressures in all four tyres. The tyre
pressure monitor warns you if the pressure
drops in one or more of the tyres. The tyre pres- sure monitor only functions if the corresponding
sensors are fitted to all wheels.
Information on tyre pressures is shown in the
multifunction display. After a few minutes of
driving, the current tyre pressure of each tyre is 318
Tyre pressureWheels and tyres
Page 323 of 345
tyre pressure of the wheel that has been
removed. If this occurs, note that the value dis-
played for the position where the spare wheel is fitted is not the same as the current tyre pres-
sure of the emergency spare wheel.
Warning messages of the tyre pressure monitor If the tyre pressure monitor detects a pressure
loss in one or more tyres, a warning message is
shown in the multifunction display. The yellow
tyre pressure warning lamp then lights up.
R If the Please correct tyre pressure
Please correct tyre pressure
message appears in the multifunction display,
the tyre pressure in at least one tyre is too
low. The tyre pressure must be corrected
when the opportunity arises.
R If the Check
Check tyre(s)
tyre(s) message appears in the
multifunction display, the tyre pressure in at
least one tyre has dropped significantly. The
tyres must be checked.
R If the Warning tyre defect Warning tyre defect message
appears in the multifunction display, the tyre
pressure in at least one tyre has dropped sud- denly. The tyres must be checked.
Observe the instructions and safety notes in the display messages in the "Tyres" section
(Y page 239).
If the wheel positions on the vehicle are inter-
changed, the tyre pressures may be displayed
for the wrong positions for a short time. After a few minutes of driving, this is rectified and the
tyre pressures are displayed for the correct
positions.
Restarting the tyre pressure monitor When you restart the tyre pressure monitor, all
existing warning messages are deleted and the
warning lamps go out. The monitor uses the cur-
rently set tyre pressures as the reference values
for monitoring. In most cases, the tyre pressure monitor will automatically detect the new refer-
ence values after you have changed the tyre
pressure. However, you can also set reference
values manually as described here. The tyre
pressure monitor then monitors the new tyre
pressure values.
X Use the table on the inside of the fuel filler flap
to ensure that the tyre pressure is set cor-
rectly in all four tyres for the current operating
conditions. Also observe the notes in the section on tyre
pressures (Y page 316).
X Make sure that the key is in position 2in the
ignition lock.
X Press the =or; button on the steering
wheel to select the Service
Service menu.
X Press the 9or: button to select
Tyre pressure Tyre pressure.
X Press the abutton.
The multifunction display shows the current
tyre pressure for the individual tyres or the
Tyre pressures will be displayed Tyre pressures will be displayed
after a few minutes of driving after a few minutes of driving mes-
sage.
X Press the :button.
The Use
Use current
current pressures
pressures as
asnew
new ref‐
ref‐
erence
erence values
valuesmessage appears in the mul-
tifunction display.
If you wish to confirm the restart: X Press the abutton.
The Tyre
Tyre press.
press. monitor
monitor restarted
restarted mes-
sage appears in the multifunction display.
After you have driven for a few minutes, the
system checks whether the current tyre pres-
sures are within the specified range. The new tyre pressures are then accepted as refer-
ence values and monitored.
If you wish to cancel the restart:
X Press the %button.
The tyre pressure values stored at the last
restart will continue to be monitored. Changing a wheel
Flat tyre
You can find information on what to do in the
event of a flat tyre in the "Breakdown assis-
tance" section (Y page 298). Information on
driving with MOExtended tyres in the event of a flat tyre can be found under "Breakdown assis-
tance" (Y page 298).
Vehicles with an emergency spare wheel: in
the event of a flat tyre, the emergency spare
wheel is fitted according to the description
under "Fitting a wheel" (Y page 321).320
Changing a
wheelWheels and tyres