2015 MERCEDES-BENZ CLA SHOOTING BRAKE fuse
[x] Cancel search: fusePage 14 of 421
Anti-dazzle mode (automatic) ........ 120
Folding in when locking (on-board
computer) ...................................... 261
Folding in/out (automatically) ....... 120
Folding in/out (electrically )........... 120
Out of position (troubleshooting) ... 120
Parking position ............................. 121
Resetting ....................................... 120
Storing settings (memory func-
tion) ............................................... 122 F
Fault message see Display messages
Filler cap
see Fuel filler flap
Fire extinguisher ............................... 351
First-aid kit ......................................... 350
Fitting a wheel
Fitting a wheel ............................... 383
Lowering the vehicle ...................... 383
Preparing the vehicle ..................... 380
Raising the vehicle ......................... 381
Removing a wheel .......................... 383
Securing the vehicle against roll-
ing away ........................................ 381
Flat tyre
Changing a wheel/fitting the
spare wheel ................................... 379
MOExtended tyre s......................... 352
Preparing the vehicle ..................... 352
TIREFIT kit ...................................... 353
see Emergency spare wheel
Floormat ............................................. 331
Foglamps
Switching on/of f........................... 127
Foglamps (extended range) .............. 131
Frequencies
Mobile phone ................................. 400
Two-way radio ................................ 400
Front foglamps
Display message ............................ 281
Front-passenger front airbag deac-
tivation
Display message ............................ 278 Front-passenger front airbag deac-
tivation system
Operation ......................................... 52
Problems ......................................... 56
System self-test ............................... 54
Fuel
Additives ........................................ 405
Consumption information .............. 406
Consumption statistics .................. 250
Displaying the current consump-
tion ................................................ 250
Displaying the range ...................... 250
Driving tip s.................................... 196
E10 ................................................ 404
Fuel gaug e....................................... 32
Grade (petrol) ................................ 404
Important safety notes .................. 403
Low outside temperatures ............. 406
Notes for CLA 250 ......................... 405
Notes for Mercedes‑ AMG vehi-
cles ................................................ 404
Problem (malfunction) ................... 191
Quality (diesel )............................... 405
Refuelling ....................................... 188
Tank content/reserve fue l............. 403
Fuel filler flap
Opening ......................................... 189
Fuel filter (white display message) .. 286
Fuel level
Calling up the range (on-board
computer) ...................................... 250
Gauge .............................................. 32
Fuel reserve
see Fuel
Fuel tank
Capacity ........................................ 403
Problem (malfunction) ................... 191
Fuses
Allocation chart ............................. 368
Before changing ............................. 367
Fuse box in the engine compart-
ment .............................................. 367
Fuse box in the front-passenger
footwell .......................................... 368
Important safety notes .................. 367 Index
11
Page 210 of 421
Selecting the drive program
DISTRONIC PLUS supports a sporty driving
style when you select the S+drive program
(Mercedes-AMG vehicles only), S
(Y page 183) or the manual drive program
(Y page 185). Acceleration behind the vehicle
in front or to the set speed is then noticeably
more dynamic. If you have selected the E(C in
Mercedes-AMG vehicles:) drive program, the
vehicle accelerates more gently. This setting
is recommended in stop-start traffic.
Changing lanes
If you change to the overtaking lane,
DISTRONIC PLUS supports you if:
R you are driving faster than 70 km/h
R DISTRONIC PLUS is maintaining the dis-
tance to a vehicle in front
R you switch on the respective turn signal
R DISTRONIC PLUS does not detect a danger
of collision
If these conditions are met, your vehicle is
accelerated. Acceleration will be interrupted
if changing lanes takes too long or if the dis-
tance between your vehicle and the vehicle in front becomes too small.
Stopping G
WARNING
When leaving the vehicle, even if it is braked
only by DISTRONIC PLUS, it could roll away if:
R there is a malfunction in the system or in
the voltage supply.
R DISTRONIC PLUS has been deactivated
with the cruise control lever, e.g. by a vehi-
cle occupant or from outside the vehicle.
R the electrical system in the engine com-
partment, the battery or the fuses have
been tampered with.
R the battery is disconnected.
R the accelerator pedal has been depressed,
e.g. by a vehicle occupant.
There is a risk of an accident. If you wish to exit the vehicle, always turn off
DISTRONIC PLUS and secure the vehicle
against rolling away.
Further information on deactivating
DISTRONIC PLUS (Y page 209).
If DISTRONIC PLUS detects that the vehicle in front is stopping, it brakes your vehicle until it
is stationary.
Once your vehicle is stationary, it remains
stationary and you do not need to depress the
brake.
i After a short period, the vehicle is secured
by the electric parking brake, thus relieving
the service brake.
i Depending on the specified minimum dis-
tance, your vehicle will come to a standstill
at a sufficient distance behind the vehicle in front. The specified minimum distance is
set using the control on the cruise control
lever.
When DISTRONIC PLUS is activated, the
transmission is shifted automatically to posi-
tion Pif:
R the driver's seat belt is not fastened and the
driver's door is open
R the engine is switched off, unless it is auto-
matically switched off by the ECO start/
stop function
The electric parking brake secures the vehicle automatically if DISTRONIC PLUS is activated
when the vehicle is stationary and:
R a system fault occurs
R the power supply is insufficient
If a malfunction in the electric parking brake
occurs, then the transmission may also be
shifted into position Pautomatically. Driving systems
207Driving and parking Z
Page 215 of 421
Important safety notes
G
WARNING
When leaving the vehicle, it can still roll away despite being braked by the HOLD function if:
R there is a malfunction in the system or in
the voltage supply
R the HOLD function is deactivated by the
accelerator pedal being depressed, e.g. by
a vehicle occupant
R the electrical system in the engine com-
partment, the battery or the fuses are tam-
pered with
R the battery is disconnected
There is a risk of an accident.
Before leaving the vehicle, always deactivate
the HOLD function and secure the vehicle
from rolling away.
! When DISTRONIC PLUS or the HOLD
function is activated, the vehicle brakes
automatically in certain situations.
To avoid damage to the vehicle, deactivate DISTRONIC PLUS and the HOLD function in
the following or similar situations:
R when towing away
R in a car wash
Deactivating the HOLD function
(Y page 212).
Activation conditions You can activate the HOLD function if:
R the vehicle is stationary
R the engine is running or if it has been auto-
matically switched off by the ECO start/
stop function
R the driver's door is closed or if your seat
belt is fastened
R the electric parking brake is released
R DISTRONIC PLUS is deactivated
R the transmission is in position D,Ror Non
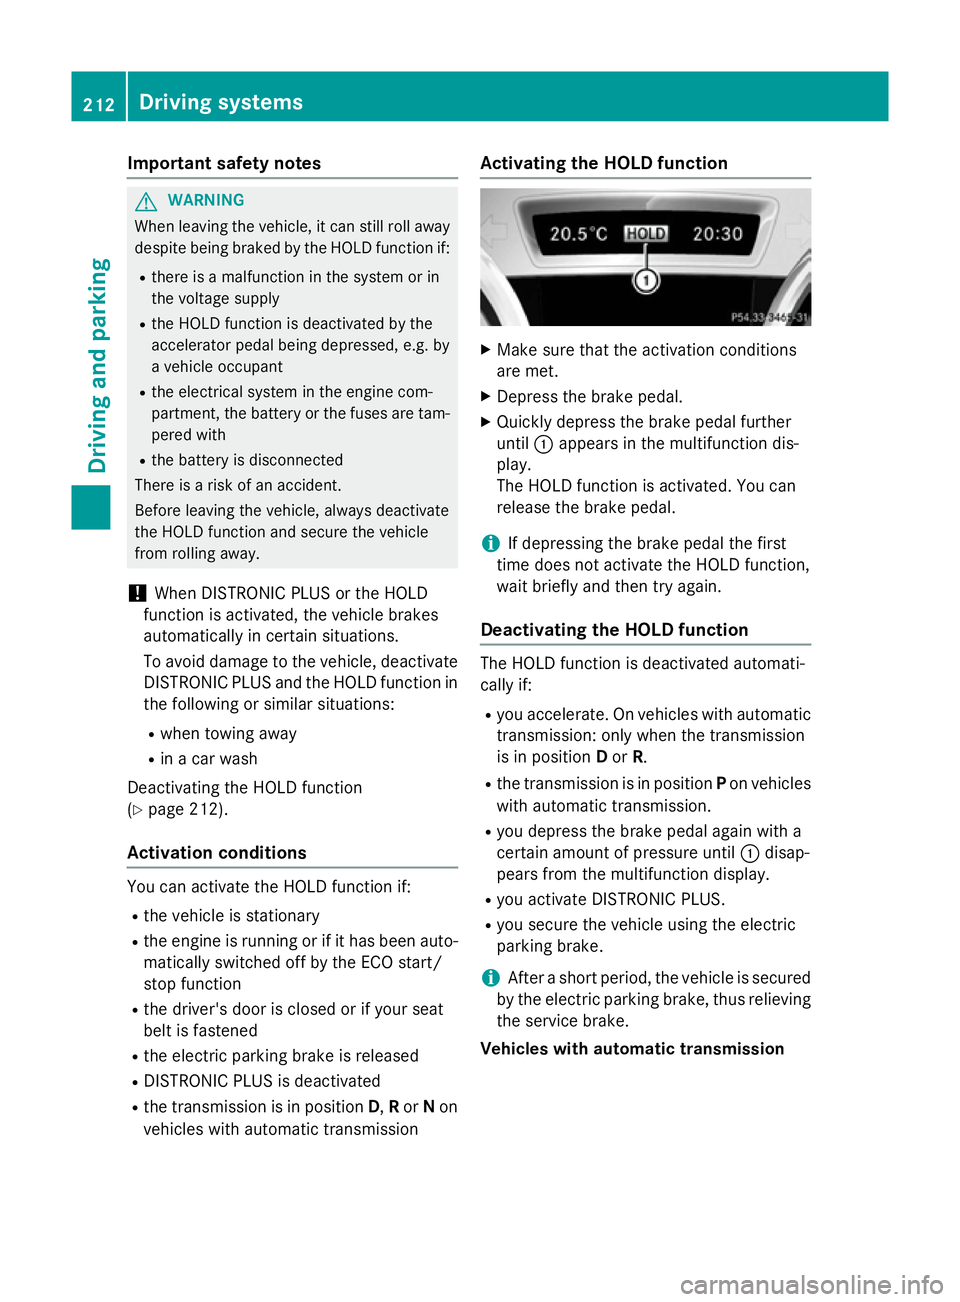
vehicles with automatic transmission Activating the HOLD function
X
Make sure that the activation conditions
are met.
X Depress the brake pedal.
X Quickly depress the brake pedal further
until :appears in the multifunction dis-
play.
The HOLD function is activated. You can
release the brake pedal.
i If depressing the brake pedal the first
time does not activate the HOLD function,
wait briefly and then try again.
Deactivating the HOLD function The HOLD function is deactivated automati-
cally if:
R you accelerate. On vehicles with automatic
transmission: only when the transmission
is in position Dor R.
R the transmission is in position Pon vehicles
with automatic transmission.
R you depress the brake pedal again with a
certain amount of pressure until :disap-
pears from the multifunction display.
R you activate DISTRONIC PLUS.
R you secure the vehicle using the electric
parking brake.
i After a short period, the vehicle is secured
by the electric parking brake, thus relieving the service brake.
Vehicles with automatic transmission 212
Driving systemsDriving and pa
rking
Page 225 of 421

Example: parking symbol
:
Detected parking space on the left
; Parking symbol
= Detected parking space on the right
Active Parking Assist is activated automati-
cally when driving forwards. The system is
operational at speeds of up to approximately
35 km/h. While in operation, the system inde- pendently locates and measures parking
spaces on both sides of the vehicle.
Active Parking Assist will only detect parkingspaces:
R parallel or at right angles to the direction of
travel
R that are parallel to the direction of travel
and are at least 1.5 m wide
R that are parallel to the direction of travel
and at least 1.0 mlonger than your vehicle
R that are at right angles to the direction of
travel and at least 1.0 m wider than your
vehicle
i Note that Active Parking Assist cannot
measure the length of a parking space if it
is at right angles to the direction of travel.
You will need to judge whether your vehicle
will fit in the parking space.
When driving at speeds below 30 km/h, you
will see parking symbol ;as a status indi-
cator in the instrument cluster. When a park-
ing space has been detected, an arrow
towards the right or the left also appears.
Active Parking Assist only displays parking
spaces on the front-passenger side as stand- ard. Parking spaces on the driver's side are
displayed as soon as the turn signal on the
driver's side is activated. When parking on the driver's side, this must remain activated untilyou confirm the use of Active Parking Assist by pressing the
abutton on the multi-
function steering wheel. The system auto-
matically determines whether the parking
space is parallel or at right angles to the direc-
tion of travel.
A parking space is displayed while you are
driving past it, and until you are approx-
imately 15 m away from it.
Parking G
WARNING
If you leave the vehicle when it is only being
braked by Active Parking Assist it could roll
away if:
R there is a malfunction in the system or in
the voltage supply.
R the electrical system in the engine com-
partment, the battery or the fuses are tam-
pered with.
R the battery is disconnected.
R the vehicle is accelerated, e.g. by a vehicle
occupant.
There is a risk of an accident.
Before leaving the vehicle, always secure it
against rolling away.
i Vehicles with automatic transmis-
sion:
When PARKTRONIC detects obstacles,
Active Parking Assist brakes automatically
during the parking process. You are respon-
sible for braking in good time.
X Stop the vehicle when the parking symbol
shows the desired parking space in the
instrument cluster.
X Vehicles with manual transmission:
shift to reverse gear.
Vehicles with automatic transmission:
shift into position R.
The Start Park Assist? Start Park Assist? Yes: OK
Yes: OKNo:
No:
% message appears in the multifunction
display. 222
Driving systemsDriving and parking
Page 285 of 421
Display messages
Possible causes/consequences and
M
MSolutions b
Left daytime driv‐ Left daytime driv‐
ing lamp ing lamp
orRight
Right
daytime driving
daytime driving
lamp lamp The left or right-hand daytime driving lamp is faulty.
X Check whether you are permitted to replace the bulb yourself
(Y page 133).
or
X Consult a qualified specialist workshop. b
Intell. Light Sys‐ Intell. Light Sys‐
tem inoperative tem inoperative The Intelligent Light System is faulty. The lights remain available
without the Intelligent Light System.
X Consult a qualified specialist workshop. b
Malfunction See Malfunction See
Owner's Manual Owner's Manual The exterior lighting is faulty.
X Consult a qualified specialist workshop. Vehicles with trailer tow hitch: a fuse may have blown.
X Pull over and stop the vehicle safely as soon as possible, paying
attention to road and traffic conditions.
X Safeguard the vehicle against rolling away (Y page 192).
X Check the fuses (Y page 367).
X If necessary, replace the blown fuse. Observe the warning notes
as you do so.
If the multifunction display still shows the display message: X Consult a qualified specialist workshop. b
AUTO AUTO
lights
lights inoper‐
inoper‐
ative
ative The light sensor is faulty.
X Consult a qualified specialist workshop. b
Switch off lights Switch off lights The lights are still switched on when you leave the vehicle. A
warning tone also sounds.
X Turn the light switch to the Ãposition. b
Switch Switch
on
onheadlamps
headlamps You are driving without dipped-beam headlamps.
X
Turn the light switch to the Lorà position. 282
Display
messagesOn-board computer and displays
Page 352 of 421
Useful information
............................350
Where will I find...? ...........................350
Flat tyre ............................................. 352
Battery (vehicle) ................................ 356
Jump-starting .................................... 360
Towing away and tow-starting ........362
Electrical fuses ................................. 367 349Breakdown assistance
Page 370 of 421
X
Use the electric parking brake to secure the
vehicle and prevent it from rolling away.
X Remove the rigid towing bar or towing rope.
X Remove the towing eye (Y page 364).
X Switch off the hazard warning lamps. Electrical fuses
Important safety notes
G
WARNING
If you manipulate, bridge or replace a faulty
fuse with a fuse of a higher amperage, the
electric cables could be overloaded. This may result in a fire. There is a risk of an accident
and injury.
Always replace faulty fuses with specified new fuses of the correct amperage.
Blown fuses must be replaced with fuses of
the same rating, which you can recognise by
the colour and fuse rating. The fuse ratings
are listed in the fuse allocation chart.
If the newly inserted fuse also blows, have the
cause traced and rectified at a qualified spe-
cialist workshop, e.g. a Mercedes-Benz Ser-
vice Centre.
! Only use fuses that have been approved
for Mercedes-Benz vehicles and which
have the correct fuse rating for the system concerned. Otherwise, components or sys-
tems could be damaged.
The fuses in your vehicle disconnect faulty
circuits. If a fuse blows, all the components on the circuit and their functions will fail. Before replacing a fuse
X Safeguard the vehicle against rolling away
(Y page 192).
X Switch off all electrical consumers. X
Vehicles without KEYLESS-GO: remove
the key from the ignition lock.
X Vehicles with KEYLESS-GO start-func-
tion or KEYLESS-GO: open the driver's
door.
The on-board electronics now have status
0. This is the same as the key having been
removed.
The fuses are located in various fuse boxes: R fuse box in the engine compartment on the
left-hand side of the vehicle, when viewed
in the direction of travel
R fuse box in the front-passenger footwell
The fuse allocation chart is on the fuse box in
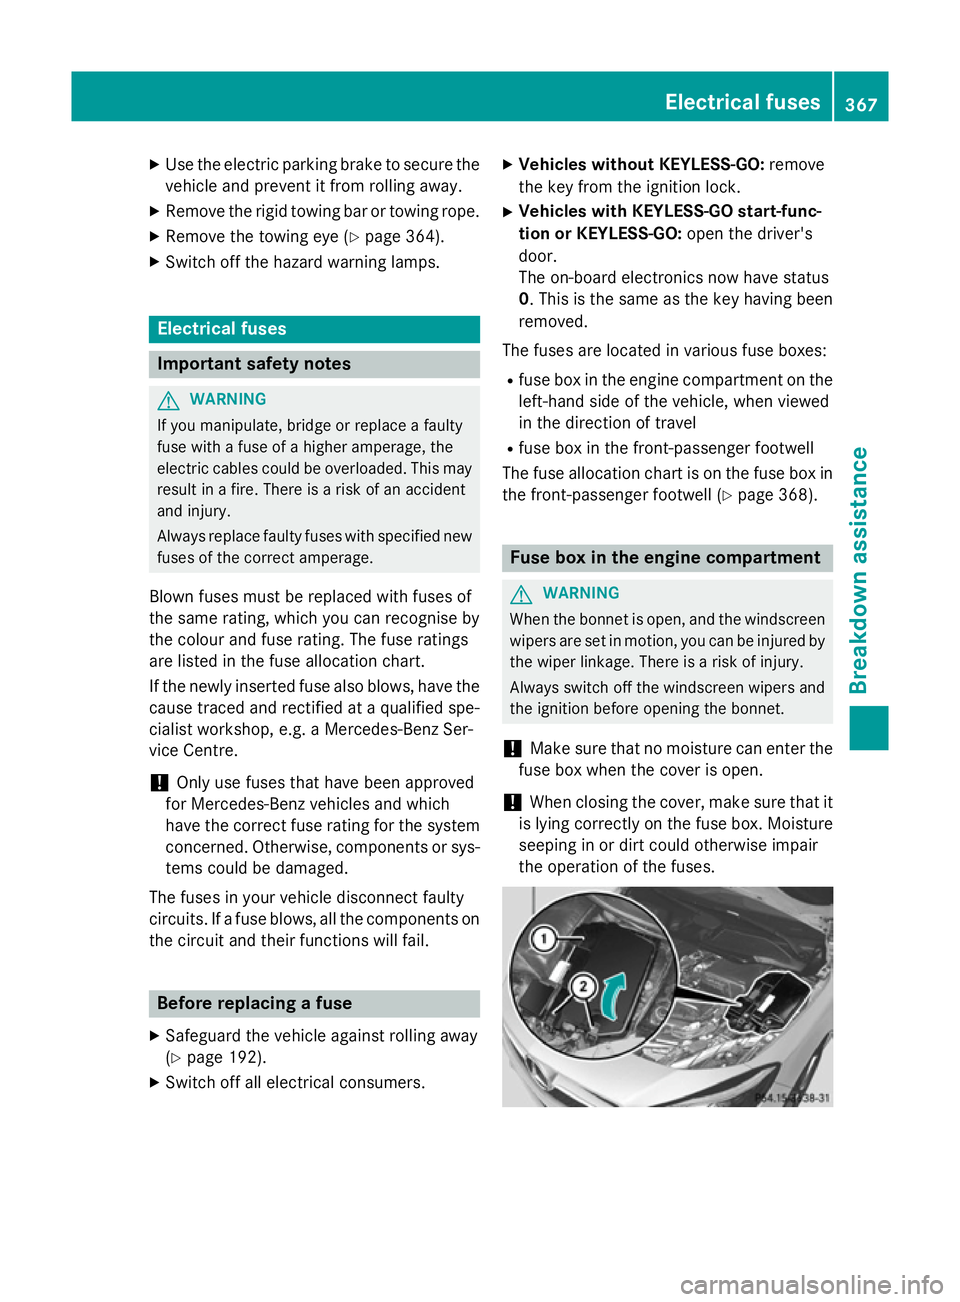
the front-passenger footwell (Y page 368). Fuse box in the engine compartment
G
WARNING
When the bonnet is open, and the windscreen wipers are set in motion, you can be injured by
the wiper linkage. There is a risk of injury.
Always switch off the windscreen wipers and
the ignition before opening the bonnet.
! Make sure that no moisture can enter the
fuse box when the cover is open.
! When closing the cover, make sure that it
is lying correctly on the fuse box. Moisture
seeping in or dirt could otherwise impair
the operation of the fuses. Electrical fuses
367Breakdown assistance Z
Page 371 of 421
X
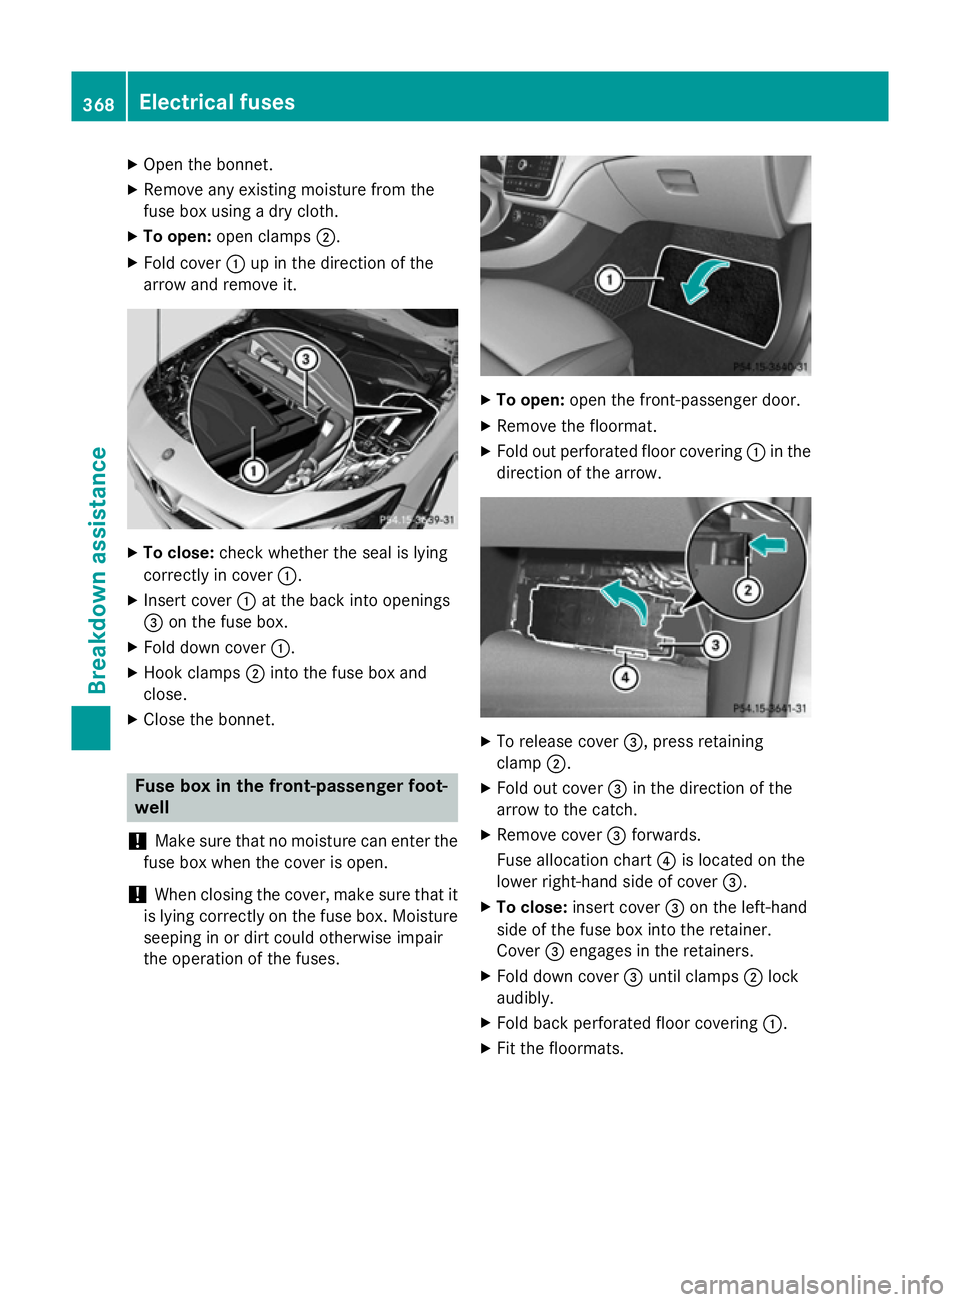
Open the bonnet.
X Remove any existing moisture from the
fuse box using a dry cloth.
X To open: open clamps ;.
X Fold cover :up in the direction of the
arrow and remove it. X
To close: check whether the seal is lying
correctly in cover :.
X Insert cover :at the back into openings
= on the fuse box.
X Fold down cover :.
X Hook clamps ;into the fuse box and
close.
X Close the bonnet. Fuse box in the front-passenger foot-
well
! Make sure that no moisture can enter the
fuse box when the cover is open.
! When closing the cover, make sure that it
is lying correctly on the fuse box. Moisture seeping in or dirt could otherwise impair
the operation of the fuses. X
To open: open the front-passenger door.
X Remove the floormat.
X Fold out perforated floor covering :in the
direction of the arrow. X
To release cover =, press retaining
clamp ;.
X Fold out cover =in the direction of the
arrow to the catch.
X Remove cover =forwards.
Fuse allocation chart ?is located on the
lower right-hand side of cover =.
X To close: insert cover =on the left-hand
side of the fuse box into the retainer.
Cover =engages in the retainers.
X Fold down cover =until clamps ;lock
audibly.
X Fold back perforated floor covering :.
X Fit the floormats. 368
Electrical fusesBreakdown assistance