2015 MERCEDES-BENZ CLA SHOOTING BRAKE low beam
[x] Cancel search: low beamPage 10 of 421
Plastic trim .................................... 346
Reversing camera .......................... 344
Roof lining ...................................... 347
Seat belt ........................................3 47
Seat cover ..................................... 346
Sensors ......................................... 344
Steering wheel ............................... 346
Trim pieces ................................... .346
Washing by hand ........................... 341
Wheels .......................................... .343
Windows ........................................ 343
Wiper blades .................................. 344
Wooden trim .................................. 346
CD player (on-board computer) ........253
Central locking
Automatic locking (on-board com-
puter) ............................................. 260
Locking/unlocking (key ).................. 87
Centre console
Lower section .................................. 37
Upper section .................................. 36
Changing bulbs
Brake lamps ................................... 137
Cornering light function ................. 136
Dipped-beam headlamp s............... 135
Main-beam headlamp s................... 136
Rear foglamp ................................. 137
Turn signals (front) ......................... 136
Turn signals (rear) .......................... 137
Child
Restraint system .............................. 60
Child seat
Forward-facing restraint system ...... 65
ISOFIX .............................................. 61
On the front-passenger sea t............ 63
Rearward-facing restraint system .... 64
Recommendations ........................... 69
Suitable positions ............................ 65
Top Tether ....................................... 62
Child-proof locks
Important safety notes .................... 71
Rear doors ....................................... 71
Cigarette lighter ................................ 328
Cleaning
Mirror turn signal ........................... 344
Trailer tow hitch ............................. 345
Climate control
Air conditioning ............................. 145 Auxiliary heating/ventilation .......... 156
Controlling automaticall
y............... 150
Convenience opening/closing
(air-recirculation mode) ................. 154
Cooling with air dehumidification .. 149
Demisting the windows .................. 152
Demisting the windscreen ............. 152
Indicator lamp ................................ 150
Information on using
THERMOTRONIC automatic cli-
mate control .................................. 147
Notes on using the air-condition-
ing system ..................................... 145
Overview of systems ...................... 144
Problem with the rear window
heating .......................................... 154
Problems with cooling with air
dehumidification ............................ 150
Setting the air distribution ............. 151
Setting the air vents ...................... 161
Setting the airflow ......................... 151
Setting the temperature ................ 150
Switching air-recirculation mode
on/of f............................................ 154
Switching on/of f........................... 148
Switching residual heat on/off ...... 155
Switching the rear window heat-
ing on/of f...................................... 153
Switching the ZONE function on/
off .................................................. 151
THERMOTRONIC (2-zone) auto-
matic climate control ..................... 147
Cockpit
Overview .......................................... 30
COLLISION PREVENTION ASSIST
PLUS
Activating/deactivating ................. 256
Display message ............................ 273
Operation/note s.............................. 73
COMAND display
Cleaning ......................................... 346
Combination switch .......................... 129
Consumption statistics (on-board
computer) .......................................... 250
Convenience closing feature ............ 103
Convenience opening feature .......... 102 Index
7
Page 36 of 421
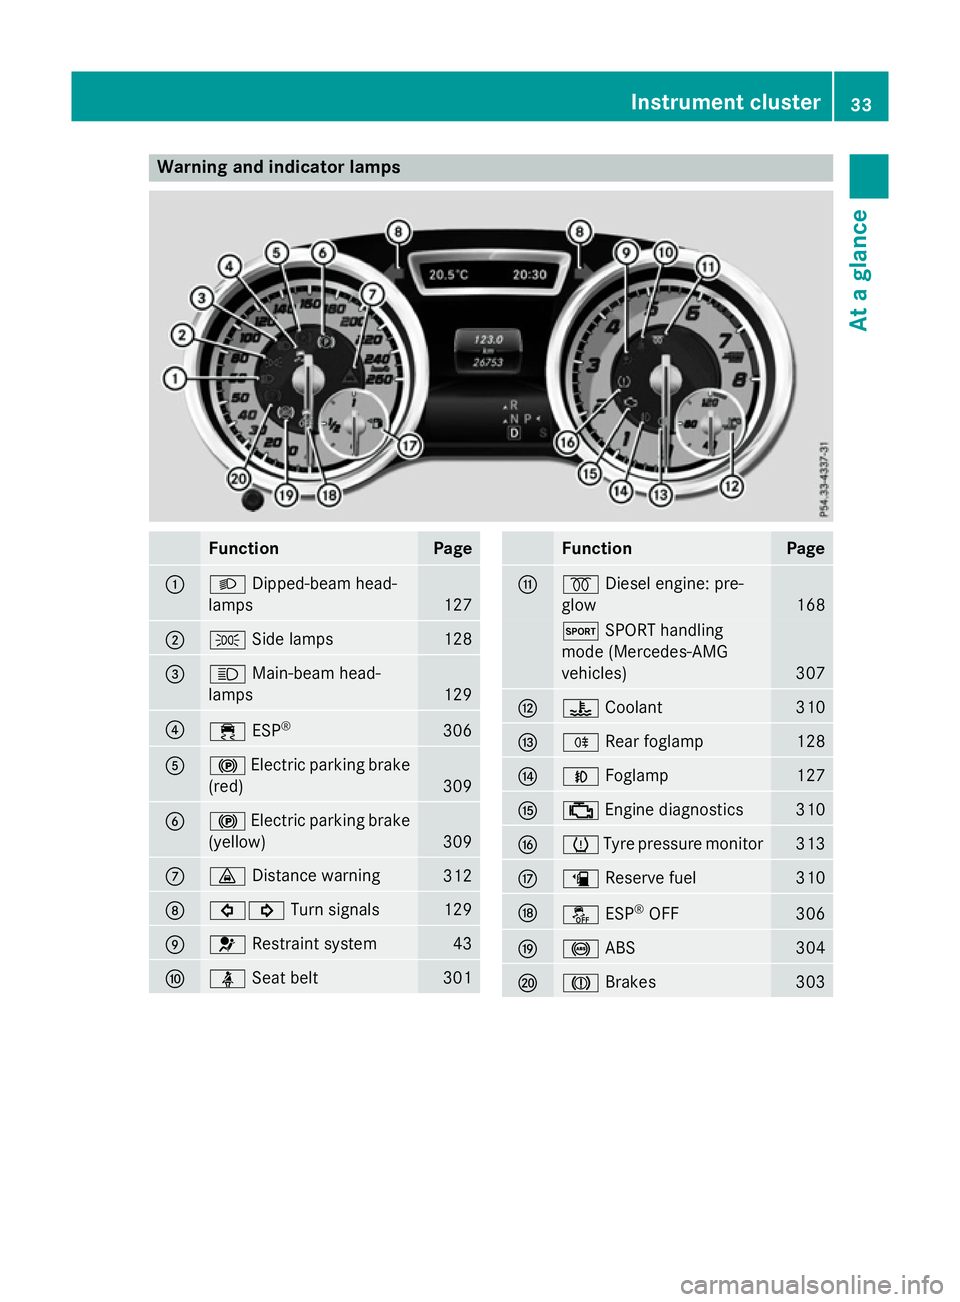
Warning and indicator lamps
Function Page
:
L
Dipped-beam head-
lamps 127
;
T
Side lamps 128
=
K
Main-beam head-
lamps 129
?
÷
ESP® 306
A
!
Electric parking brake
(red) 309
B
!
Electric parking brake
(yellow) 309
C
·
Distance warning 312
D
#!
Turn signals 129
E
6
Restraint system 43
F
ü
Seat belt 301 Function Page
G
%
Diesel engine: pre-
glow 168
M
SPORT handling
mode (Mercedes-AMG
vehicles) 307
H
?
Coolant 310
I
R
Rear foglamp 128
J
N
Foglamp 127
K
;
Engine diagnostics 310
L
h
Tyre pressure monitor 313
M
æ
Reserve fuel 310
N
å
ESP®
OFF 306
O
!
ABS 304
P
J
Brakes 303Instrument cluster
33At a glance
Page 133 of 421
The hazard warning lamps switch on auto-
matically if:
R an airbag is deployed or
R the vehicle decelerates rapidly from a
speed of above 70 km/h and comes to a
standstill
The hazard warning lamps switch off auto-
matically if the vehicle reaches a speed of
above 10 km/ha gain after a full brake appli-
cation.
The hazard warning lamps continue to oper-
ate even if the ignition is switched off. Intelligent Light System
General notes The Intelligent Light System is a system that
adjusts the headlamps automatically to suit
the prevailing driving and weather conditions.
It offers advanced functions for improved illu-
mination of the road surface, e.g. depending
on the vehicle speed or weather conditions.
The system includes the active light function, cornering light function, motorway mode and
extended range foglamps. The system is only active when it is dark.
You can activate or deactivate the "Intelligent
Light System" function using the on-board
computer (Y page 259).
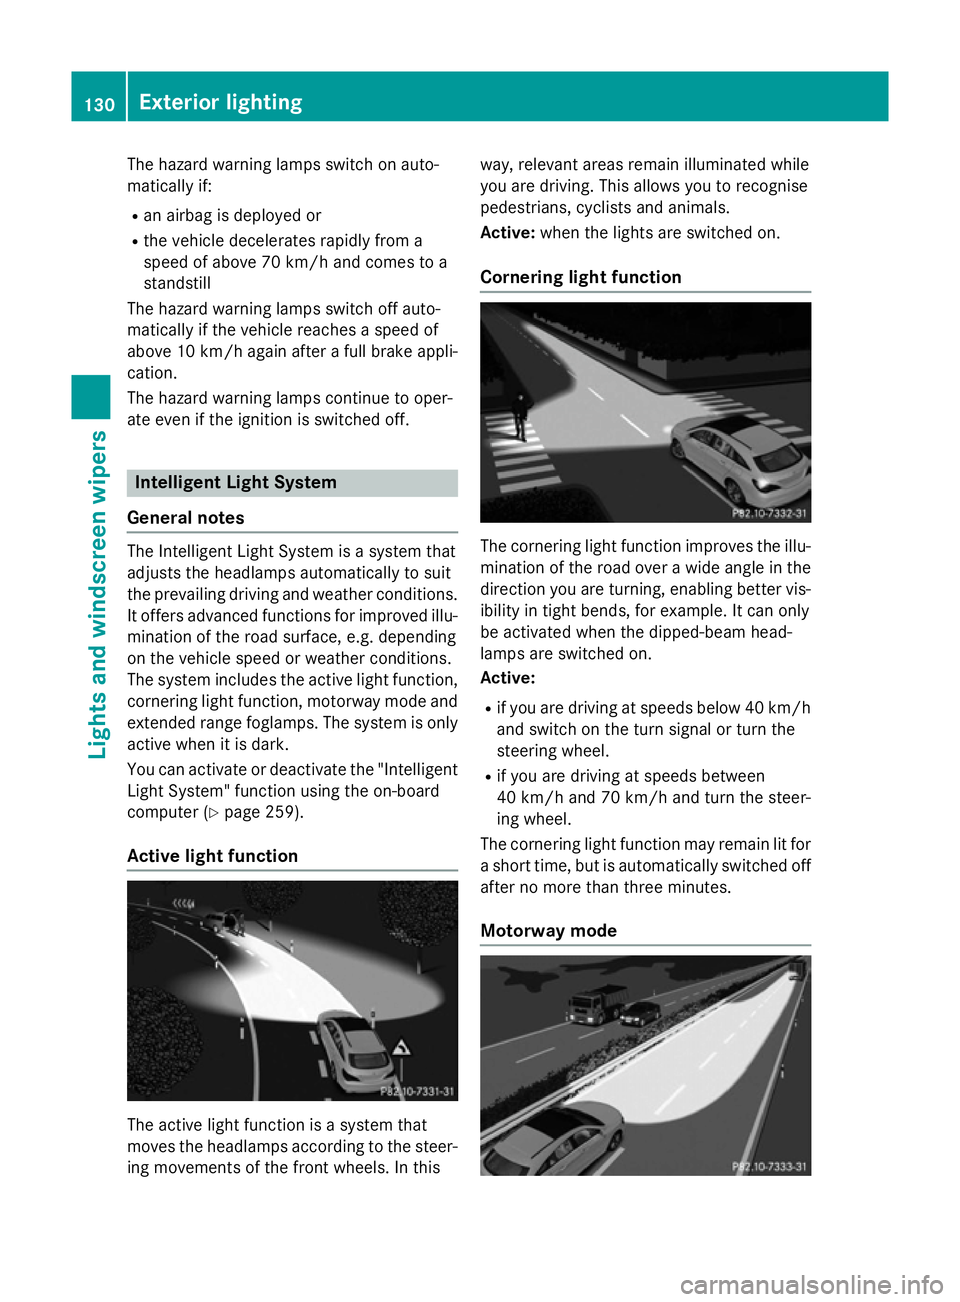
Active light function The active light function is a system that
moves the headlamps according to the steer-
ing movements of the front wheels. In this way, relevant areas remain illuminated while
you are driving. This allows you to recognise
pedestrians, cyclists and animals.
Active:
when the lights are switched on.
Cornering light function The cornering light function improves the illu-
mination of the road over a wide angle in the direction you are turning, enabling better vis-
ibility in tight bends, for example. It can only
be activated when the dipped-beam head-
lamps are switched on.
Active:
R if you are driving at speeds below 40 km/h
and switch on the turn signal or turn the
steering wheel.
R if you are driving at speeds between
40 km/ha nd 70 km/h and turn the steer-
ing wheel.
The cornering light function may remain lit for
a short time, but is automatically switched off after no more than three minutes.
Motorway mode 130
Exterior lightingLights and
windscreen wipers
Page 134 of 421

Active:
if you are driving at a speed above
110 km/h and do not make any large steering movements for at least 1,000 mor if you are
driving at a speed above 130 km/h.
Not active: if you are driving at speeds below
80 km/h following activation.
Extended range foglamps The extended range foglamps reduce the
glare experienced by the driver and improve
the illumination of the edge of the carriage-
way.
Active: if you are driving at speeds below
70 km/h and you switch on the rear foglamp.
Not active: if, following activation, you are
driving at speeds above 100 km/h or if you
switch off the rear foglamp. Adaptive Highbeam Assist
General notes You can use this function to set the head-
lamps to change between dipped beam and
main beam automatically. The system recog-
nises vehicles with their lights on, either
approaching from the opposite direction or
travelling in front of your vehicle, and conse-
quently switches the headlamps from main
beam to dipped beam.
The system automatically adapts the dipped- beam headlamp range depending on the dis-
tance to the other vehicle. Once the system
no longer detects any other vehicles, it
switches on the main-beam headlamps again.
The system's optical sensor is located behind
the windscreen near the overhead control
panel. Exterior lighting
131Lights and windscreen wipers Z
Page 135 of 421

Important safety notes
G
WARNING
Adaptive Highbeam Assist does not recognise road users:
R who have no lights, e.g. pedestrians
R who have poor lighting, e.g. cyclists
R whose lighting is blocked, e.g. by a barrier
In very rare cases, Adaptive Highbeam Assist
recognises road users too late or not at all. In
this, or in similar situations, the automatic
main-beam headlamps will not be deactivated
or activated regardless. There is a risk of an
accident.
Always carefully observe the traffic conditions and switch off the main-beam headlamps in
good time.
Adaptive Highbeam Assist cannot take into
account road, weather or traffic conditions.
Adaptive Highbeam Assist is only an aid. You
are responsible for adjusting the vehicle's
lighting to the prevailing light, visibility and
traffic conditions.
In particular, the detection of obstacles can
be restricted if there is:
R poor visibility, e.g. due to fog, heavy rain or
snow
R dirt on the sensors or if the sensors are
obscured
Switching Adaptive Highbeam Assist
on/off X
To switch on: turn the light switch to Ã.
X Press the combination switch beyond the
pressure point in the direction of arrow :.
The _ indicator lamp in the multifunc-
tion display lights up when it is dark and the
light sensor switches on the dipped-beam
headlamps.
If you are driving at speeds above 25 km/h:
The headlamp range is set automatically
depending on the distance between the
vehicle and other road users. If you are driving at speeds above approx-
imately 30 km/h and no other road users
are recognised:
The main-beam headlamps are switched on
automatically. The Kindicator lamp in
the instrument cluster also lights up.
If you are driving at speeds below 25 km/h
or other road users are recognised or the
roads are adequately lit:
The main-beam headlamps are switched off automatically. The Kindicator lamp in
the instrument cluster goes out. The _
indicator lamp in the multifunction display
remains lit.
X To deactivate: move the combination
switch back to its normal position.
The _ indicator lamp in the multifunc-
tion display goes out. Headlamps misted up on the inside
Certain climatic and physical conditions may
cause moisture to form in the headlamp. This
moisture does not affect the functionality of
the headlamp. Interior lighting
Overview of interior lighting
Front overhead control panel :
p Switches the left-hand front reading
lamp on/off
; c Switches the front interior lighting
on 132
Interior lightingLights and windscreen wipers
Page 137 of 421
Never touch the parts or the electrical con-
tacts of the xenon bulb. Always have work on the xenon bulbs carried out at a qualified spe- cialist workshop.
If your vehicle is equipped with xenon bulbs,
you can recognise this by the following: the
cone of light from the xenon bulbs moves
from the top to the bottom and back again
when you start the engine. For this to be
observed, the lights must be switched on
before the engine is started.
Bulbs and lamps are an important aspect of
vehicle safety. You must therefore make sure
that these function correctly at all times.
Have the headlamp setting checked regularly.
Other bulbs G
WARNING
Bulbs, lamps and plug connectors can
become very hot during use. When replacing a bulb, you could burn yourself on these com-
ponents. There is a risk of injury.
Allow these components to cool down before replacing the bulb.
Do not use a bulb that has been dropped or if
its glass tube has been scratched.
The bulb may explode if:
R you touch it
R it is hot
R you drop it
R you scratch it
Only operate bulbs in enclosed lamps
designed for that purpose. Only fit spare
bulbs of the same type and the specified volt- age.
Marks on the glass tube reduce the service
life of the bulbs. Do not touch the glass tube
with your bare hands. If necessary, clean the
glass tube when cold with alcohol or spirit and
rub it off with a lint-free cloth.
Protect bulbs from moisture during opera-
tion. Do not allow bulbs to come into contact
with liquids. There are bulbs other than the xenon bulbs
that you cannot replace yourself. Only replace the bulbs listed (Y page 134). Have the bulbs
that you cannot replace yourself replaced at a
qualified specialist workshop.
If you require assistance replacing bulbs, con- sult a qualified specialist workshop.
If the new bulb still does not light up, consult
a qualified specialist workshop.
Bulbs and lamps are an important aspect of
vehicle safety. You must therefore make sure that these function correctly at all times.
Have the headlamp setting checked regularly. Overview of bulb replacement – bulbs
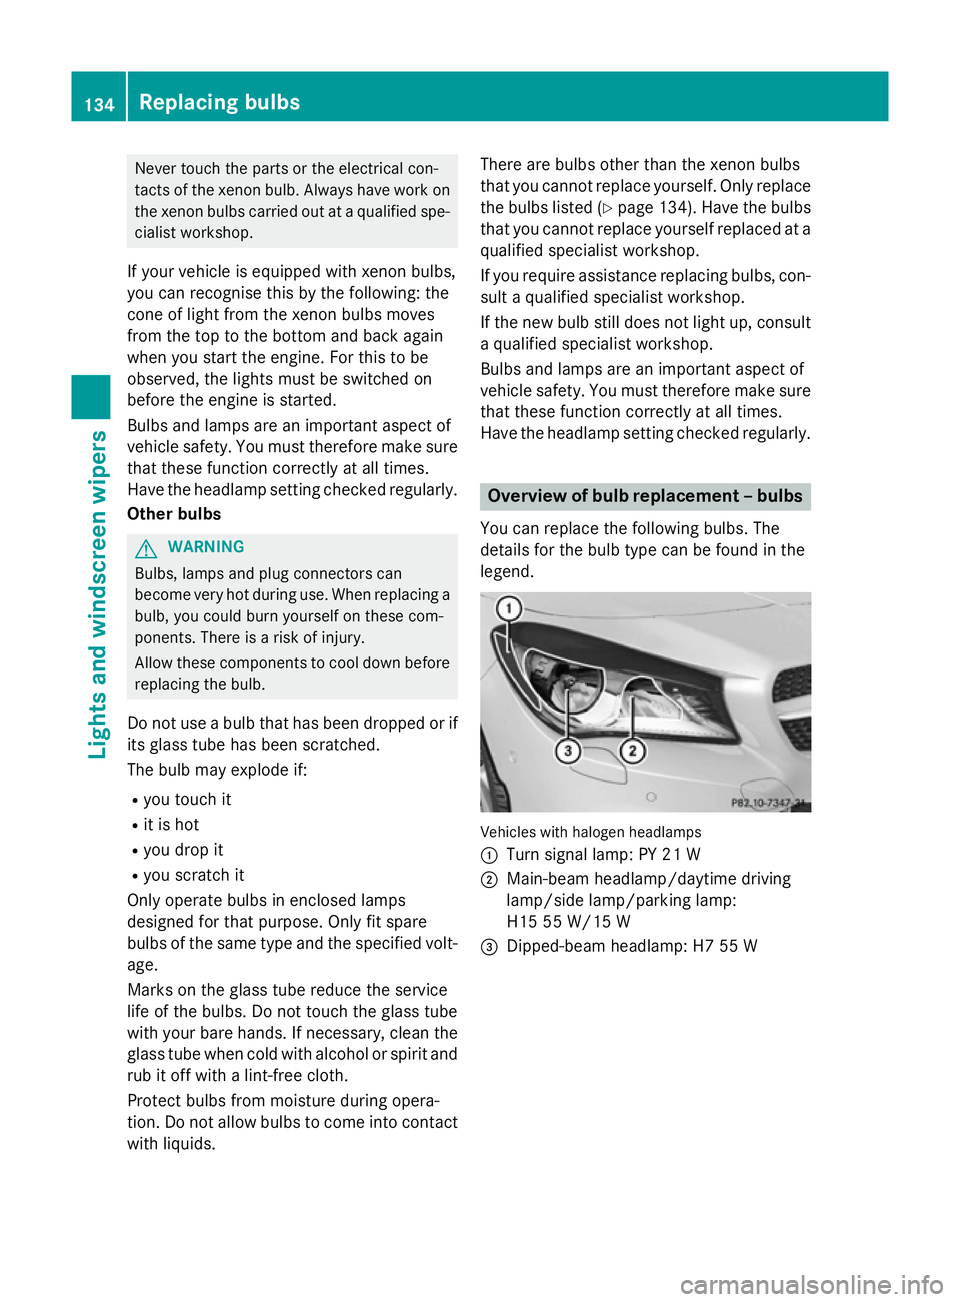
You can replace the following bulbs. The
details for the bulb type can be found in the
legend. Vehicles with halogen headlamps
:
Turn signal lamp: PY 21 W
; Main-beam headlamp/daytime driving
lamp/side lamp/parking lamp:
H15 55 W/15 W
= Dipped-beam headlamp: H7 55 W 134
Replacing bulbsLights and windscreen wipers
Page 252 of 421
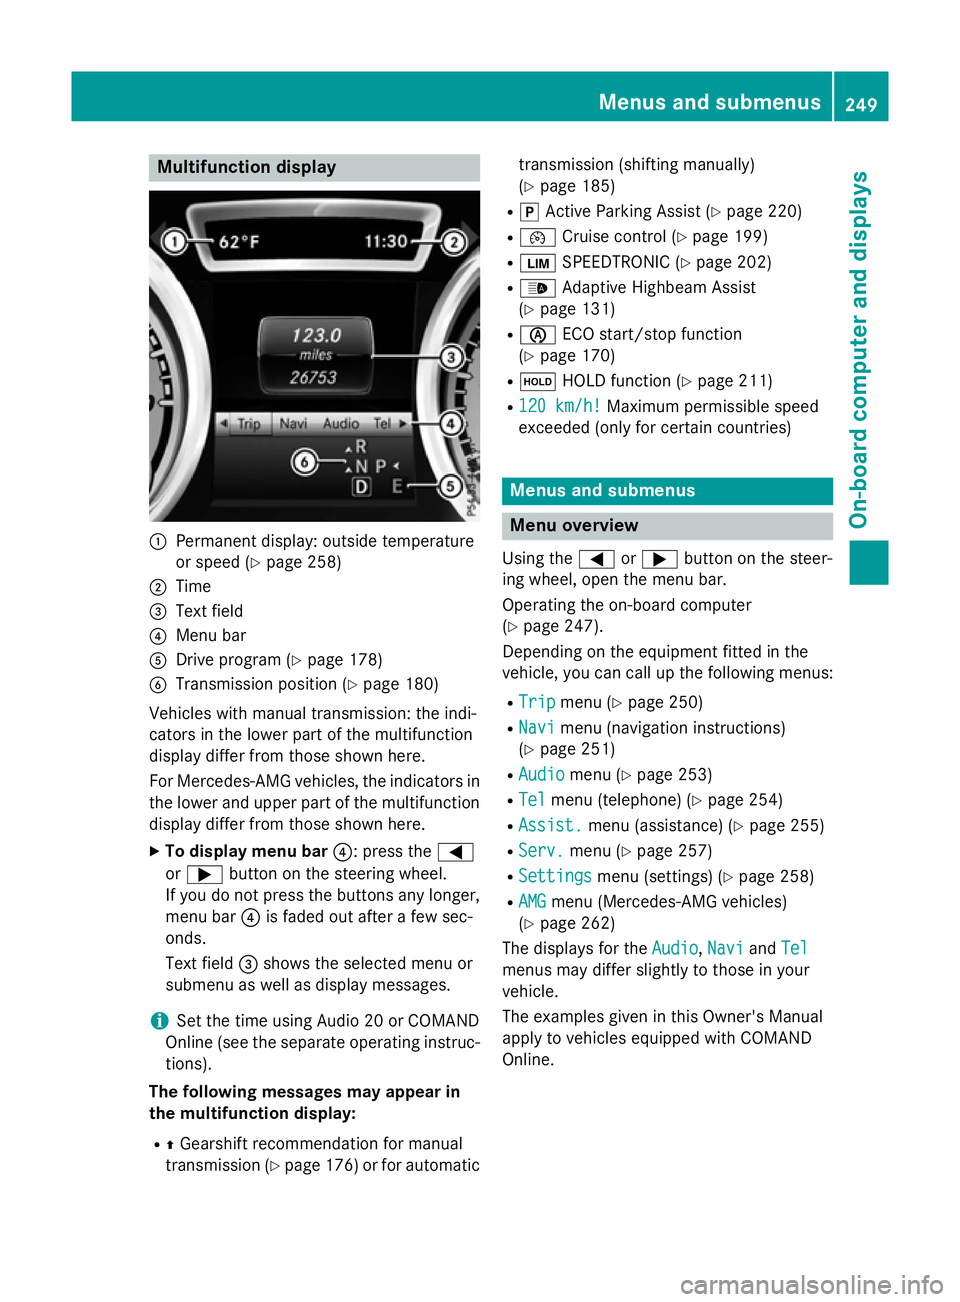
Multifunction display
:
Permanent display: outside temperature
or speed (Y page 258)
; Time
= Text field
? Menu bar
A Drive program (Y page 178)
B Transmission position (Y page 180)
Vehicles with manual transmission: the indi-
cators in the lower part of the multifunction
display differ from those shown here.
For Mercedes-AMG vehicles, the indicators in
the lower and upper part of the multifunction display differ from those shown here.
X To display menu bar ?: press the=
or ; button on the steering wheel.
If you do not press the buttons any longer, menu bar ?is faded out after a few sec-
onds.
Text field =shows the selected menu or
submenu as well as display messages.
i Set the time using Audio 20 or COMAND
Online (see the separate operating instruc-
tions).
The following messages may appear in
the multifunction display:
R ZGearshift recommendation for manual
transmission (Y page 176) or for automatic transmission (shifting manually)
(Y
page 185)
R j Active Parking Assist (Y page 220)
R ¯ Cruise control (Y page 199)
R È SPEEDTRONIC (Y page 202)
R _ Adaptive Highbeam Assist
(Y page 131)
R è ECO start/stop function
(Y page 170)
R ë HOLD function (Y page 211)
R 120 km/h!
120 km/h! Maximum permissible speed
exceeded (only for certain countries) Menus and submenus
Menu overview
Using the =or; button on the steer-
ing wheel, open the menu bar.
Operating the on-board computer
(Y page 247).
Depending on the equipment fitted in the
vehicle, you can call up the following menus:
R Trip Trip menu (Y page 250)
R Navi
Navi menu (navigation instructions)
(Y page 251)
R Audio
Audio menu (Y page 253)
R Tel
Tel menu (telephone) (Y page 254)
R Assist.
Assist. menu (assistance) (Y page 255)
R Serv.
Serv. menu (Y page 257)
R Settings
Settings menu (settings) (Y page 258)
R AMG
AMG menu (Mercedes-AMG vehicles)
(Y page 262)
The displays for the Audio
Audio,Navi
NaviandTel
Tel
menus may differ slightly to those in your
vehicle.
The examples given in this Owner's Manual
apply to vehicles equipped with COMAND
Online. Menus and submenus
249On-board computer and displays Z
Page 262 of 421
![MERCEDES-BENZ CLA SHOOTING BRAKE 2015 Owners Manual X
Press the :or9 button to select the
Permanent display:
Permanent display: function.
The current setting, outside tempera‐
outside tempera‐
ture
ture orDig. speedo [mph]:
Dig. speedo [mph]:, appe MERCEDES-BENZ CLA SHOOTING BRAKE 2015 Owners Manual X
Press the :or9 button to select the
Permanent display:
Permanent display: function.
The current setting, outside tempera‐
outside tempera‐
ture
ture orDig. speedo [mph]:
Dig. speedo [mph]:, appe](/manual-img/4/55475/w960_55475-261.png)
X
Press the :or9 button to select the
Permanent display:
Permanent display: function.
The current setting, outside tempera‐
outside tempera‐
ture
ture orDig. speedo [mph]:
Dig. speedo [mph]:, appears.
X Press the abutton to save the setting.
Lights Switching the Intelligent Light System
on/off
X Press the =or; button on the steer-
ing wheel to select the Settings Settingsmenu.
X Press the :or9 button to select the
Lights
Lights submenu.
X Press ato confirm.
X Press the :or9 button to select the
Intell. Light System
Intell. Light System function.
If the Intell. Light Sys.
Intell. Light Sys. function has
been switched on, the cone of light and the
L symbol in the multifunction display
are shown in orange.
X Press the abutton to save the setting.
When you switch Intell. Light System
Intell. Light System
function on, you activate the following func-
tions:
R Motorway mode
R Active light function
R Cornering light function
R Extended range foglamps
If you set the dipped-beam headlamps for
driving on the right/left, the multifunction
display shows the Intell.
Intell. Light LightSystem:
System:
system inoperative Inactive for
system inoperative Inactive for
left-side traffic
left-side traffic orIntell. Light
Intell. Light
System:
System: System
Systeminoperative
inoperative Inactive
Inactive
for right-side traffic
for right-side traffic display message
instead of the Intell.
Intell.Light
Light System
System func-
tion in the Lights
Lightssubmenu.
Further information on the Intelligent Light
System (Y page 130).
Setting the dipped-beam headlamps for
driving on the left/right
This function is only available in vehicles with the Intelligent Light System. You can use this function to switch between
symmetrical and asymmetrical dipped beam
(Y
page 126).
X Press the =or; button on the steer-
ing wheel to select the Settings
Settings menu.
X Press the :or9 button to select the
Lights Lights submenu.
X Press ato confirm.
X Press the :or9 button to select the
Dipped beams Setting for:
Dipped beams Setting for: function.
The current setting Right-side traffic
Right-side traffic
or Left-side traffic
Left-side traffic appears.
X Press the abutton to save the setting.
If you change the setting, conversion does
not take place until the next time the vehi-
cle is stationary.
If you set the dipped-beam headlamps for
driving on the right/left, then motorway
mode and the extended range foglamps are
unavailable. These are only deactivated if the
setting for driving on the left/right is set
opposite to your vehicle's country version.
A qualified specialist workshop can set the
dipped-beam headlamps for driving on the
left/right.
Vehicle Setting permanent SPEEDTRONIC
You can set permanent SPEEDTRONIC using
the
Limit Limit speed
speed(winter
(winter tyres)
tyres)function.
X Press the =or; button on the steer-
ing wheel to select the Settings
Settingsmenu.
X Press the :or9 button to select the
Vehicle
Vehicle submenu.
X Press ato confirm.
X Press :or9 to select the Limit
Limit
speed (winter tyres):
speed (winter tyres): function.
You will see the current setting.
X Press ato confirm.
X Press the :or9 button to adjust
permanent SPEEDTRONIC in increments of
ten (160 km/h 160 km/h to240 km/h
240 km/h). The Off
Offset- Menus and submenus
259On-board computer and displays Z