2015 MERCEDES-BENZ CLA SHOOTING BRAKE fog light bulb
[x] Cancel search: fog light bulbPage 10 of 421
Plastic trim .................................... 346
Reversing camera .......................... 344
Roof lining ...................................... 347
Seat belt ........................................3 47
Seat cover ..................................... 346
Sensors ......................................... 344
Steering wheel ............................... 346
Trim pieces ................................... .346
Washing by hand ........................... 341
Wheels .......................................... .343
Windows ........................................ 343
Wiper blades .................................. 344
Wooden trim .................................. 346
CD player (on-board computer) ........253
Central locking
Automatic locking (on-board com-
puter) ............................................. 260
Locking/unlocking (key ).................. 87
Centre console
Lower section .................................. 37
Upper section .................................. 36
Changing bulbs
Brake lamps ................................... 137
Cornering light function ................. 136
Dipped-beam headlamp s............... 135
Main-beam headlamp s................... 136
Rear foglamp ................................. 137
Turn signals (front) ......................... 136
Turn signals (rear) .......................... 137
Child
Restraint system .............................. 60
Child seat
Forward-facing restraint system ...... 65
ISOFIX .............................................. 61
On the front-passenger sea t............ 63
Rearward-facing restraint system .... 64
Recommendations ........................... 69
Suitable positions ............................ 65
Top Tether ....................................... 62
Child-proof locks
Important safety notes .................... 71
Rear doors ....................................... 71
Cigarette lighter ................................ 328
Cleaning
Mirror turn signal ........................... 344
Trailer tow hitch ............................. 345
Climate control
Air conditioning ............................. 145 Auxiliary heating/ventilation .......... 156
Controlling automaticall
y............... 150
Convenience opening/closing
(air-recirculation mode) ................. 154
Cooling with air dehumidification .. 149
Demisting the windows .................. 152
Demisting the windscreen ............. 152
Indicator lamp ................................ 150
Information on using
THERMOTRONIC automatic cli-
mate control .................................. 147
Notes on using the air-condition-
ing system ..................................... 145
Overview of systems ...................... 144
Problem with the rear window
heating .......................................... 154
Problems with cooling with air
dehumidification ............................ 150
Setting the air distribution ............. 151
Setting the air vents ...................... 161
Setting the airflow ......................... 151
Setting the temperature ................ 150
Switching air-recirculation mode
on/of f............................................ 154
Switching on/of f........................... 148
Switching residual heat on/off ...... 155
Switching the rear window heat-
ing on/of f...................................... 153
Switching the ZONE function on/
off .................................................. 151
THERMOTRONIC (2-zone) auto-
matic climate control ..................... 147
Cockpit
Overview .......................................... 30
COLLISION PREVENTION ASSIST
PLUS
Activating/deactivating ................. 256
Display message ............................ 273
Operation/note s.............................. 73
COMAND display
Cleaning ......................................... 346
Combination switch .......................... 129
Consumption statistics (on-board
computer) .......................................... 250
Convenience closing feature ............ 103
Convenience opening feature .......... 102 Index
7
Page 19 of 421
Pulling away
Automatic transmission ................. 168
General notes ................................ 168
Hill start assist ...............................1 69
Manual transmission ..................... .168
Trailer ............................................ 169 Q
QR code Mercedes-Benz Guide App ................. 1
Rescue card ..................................... 26
Qualified specialist workshop ........... 25R
RACE START important safety notes ................... 214
RACE START (AMG vehicles) ............. 214
RACETIMER (on-board computer) .... 263
Radio
Selecting a station ......................... 253
see separate operating instructions
Radio-based vehicle components
Declaration of conformity ................ 24
Rain closing feature (panorama
sliding sunroof) ................................. 107
Reading lamp ..................................... 132
Rear bench seat
Folding the backrest forwards/
back ............................................... 320
Rear compartment
Setting the air vents ..................... .162
Rear foglamp
Changing bulbs .............................. 137
Display message ............................ 281
Switching on/off ........................... 128
Rear lamps
see Lights
Rear seat
Adjusting the angle of the backr-
ests ................................................ 320
Rear window heating
Problem (fault) ............................... 154
Switching on/off ........................... 153
Rear window wiper
Replacing the wiper blade .............. 140
Switching on/off ........................... 138 Rear-compartment seat belt sta-
tus indicator
........................................ 48
Rear-view mirror
Anti-dazzle mode (automatic) ....... .120
Dipping (manual) ........................... 119
Refuelling
Fuel gauge ....................................... 32
Important safety notes .................. 188
Notes for Mercedes ‑AMG vehi-
cles ................................................ 404
Refuelling process ......................... 189
see Fuel
Remote control
Auxiliary heating/ventilation .......... 157
Changing the batteries (auxiliary
heating) ......................................... 159
Replacing bulbs
Important safety notes .................. 133
Overview of bulb types .................. 134
Removing/replacing the cover
(front wheel arch) .......................... 135
Replacing the battery (auxiliary
heating remote control) .................... 159
Rescue card ......................................... 26
Reserve (fuel tank)
see Fuel
Reserve fuel
Display message ............................ 286
Warning lamp ................................. 310
Residual heat (climate control) ........155
Restraint system
Display message ............................ 275
Introduction ..................................... 42
Warning lamp ................................. 309
Warning lamp (function) ................... 43
Rev counter ........................................ 247
Reverse gear
Engaging (manual transmission) .... 176
Reverse gear (selector lever) ........... 180
Reversing camera
Cleaning instructions ..................... 344
Displays in the Audio displa y......... 226
Displays in the COMAND display ... 226
Function/note s............................. 225
Switching on/of f........................... 226
Reversing feature
Panorama sliding sunroof .............. 106 16
Index
Page 138 of 421
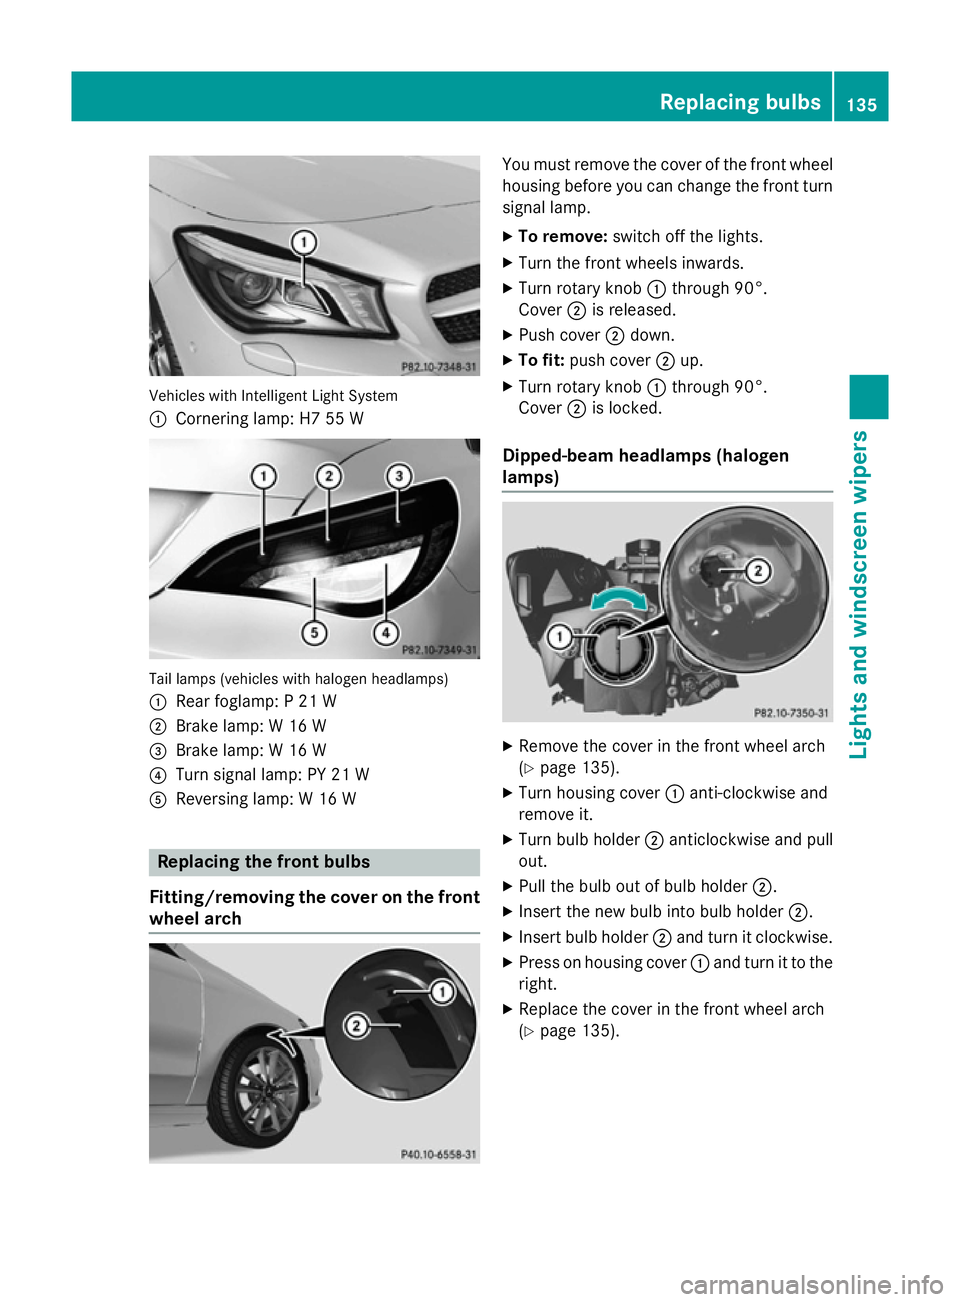
Vehicles with Intelligent Light System
:
Cornering lamp: H7 55 W Tail lamps (vehicles with halogen headlamps)
: Rear foglamp: P 21 W
; Brake lamp: W 16 W
= Brake lamp: W 16 W
? Turn signal lamp: PY 21 W
A Reversing lamp: W 16 W Replacing the front bulbs
Fitting/removing the cover on the front wheel arch You must remove the cover of the front wheel
housing before you can change the front turn signal lamp.
X To remove: switch off the lights.
X Turn the front wheels inwards.
X Turn rotary knob :through 90°.
Cover ;is released.
X Push cover ;down.
X To fit: push cover ;up.
X Turn rotary knob :through 90°.
Cover ;is locked.
Dipped-beam headlamps (halogen
lamps) X
Remove the cover in the front wheel arch
(Y page 135).
X Turn housing cover :anti-clockwise and
remove it.
X Turn bulb holder ;anticlockwise and pull
out.
X Pull the bulb out of bulb holder ;.
X Insert the new bulb into bulb holder ;.
X Insert bulb holder ;and turn it clockwise.
X Press on housing cover :and turn it to the
right.
X Replace the cover in the front wheel arch
(Y page 135). Replacing bulbs
135Lights and windscreen wipers Z
Page 140 of 421
X
To open: release right or left side trim
panel :at the top and fold it down in the
direction of the arrow.
X To close: insert side panel :.
Tail lamps X
Switch off the lights.
X Open the luggage compartment.
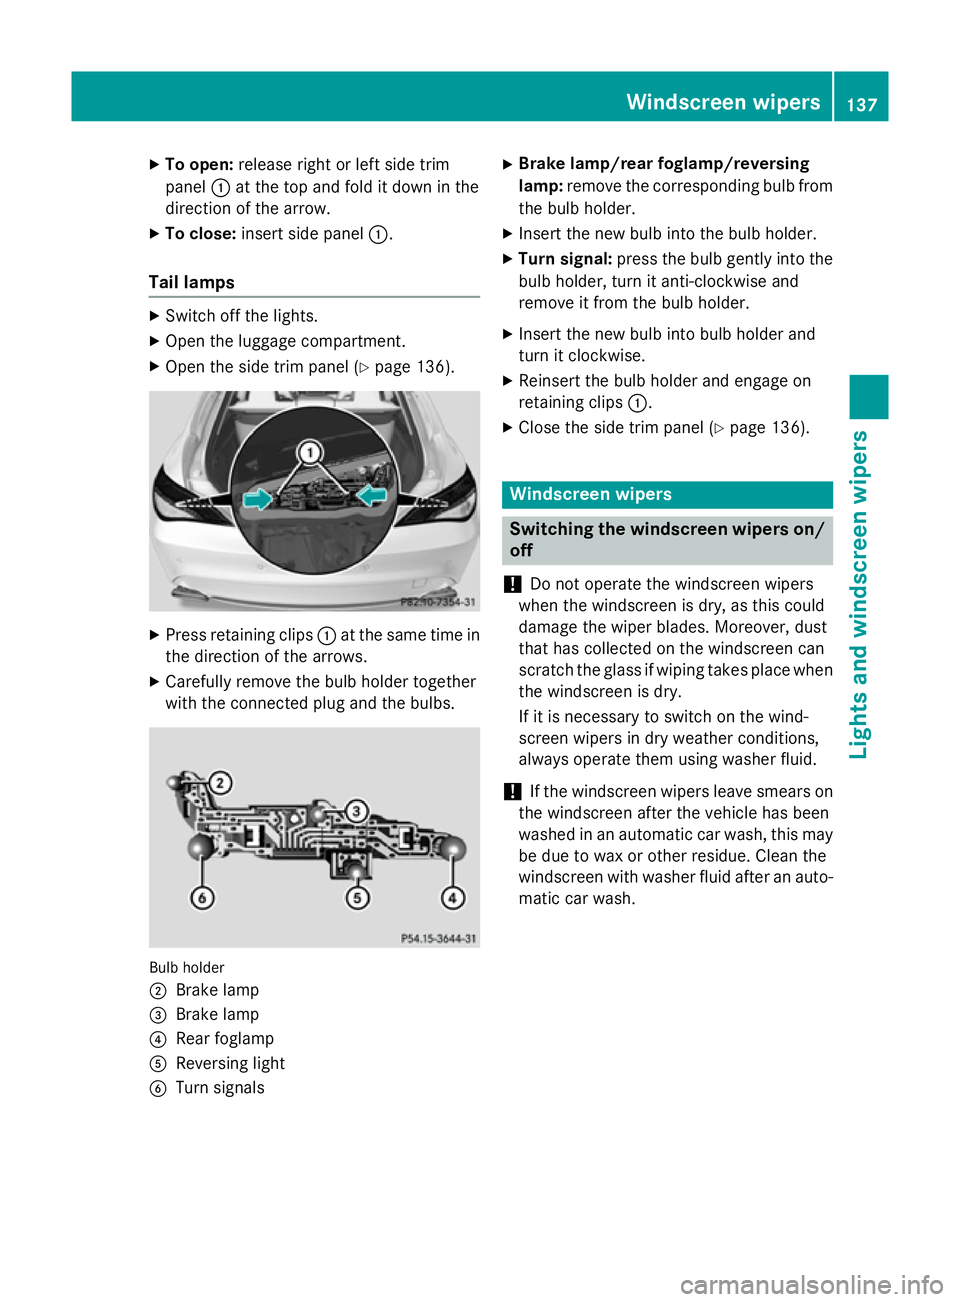
X Open the side trim panel (Y page 136).X
Press retaining clips :at the same time in
the direction of the arrows.
X Carefully remove the bulb holder together
with the connected plug and the bulbs. Bulb holder
;
Brake lamp
= Brake lamp
? Rear foglamp
A Reversing light
B Turn signals X
Brake lamp/rear foglamp/reversing
lamp: remove the corresponding bulb from
the bulb holder.
X Insert the new bulb into the bulb holder.
X Turn signal: press the bulb gently into the
bulb holder, turn it anti-clockwise and
remove it from the bulb holder.
X Insert the new bulb into bulb holder and
turn it clockwise.
X Reinsert the bulb holder and engage on
retaining clips :.
X Close the side trim panel (Y page 136). Windscreen wipers
Switching the windscreen wipers on/
off
! Do not operate the windscreen wipers
when the windscreen is dry, as this could
damage the wiper blades. Moreover, dust
that has collected on the windscreen can
scratch the glass if wiping takes place when the windscreen is dry.
If it is necessary to switch on the wind-
screen wipers in dry weather conditions,
always operate them using washer fluid.
! If the windscreen wipers leave smears on
the windscreen after the vehicle has been
washed in an automatic car wash, this may
be due to wax or other residue. Clean the
windscreen with washer fluid after an auto- matic car wash. Windscreen wipers
137Lights andwindscreen wipers Z
Page 229 of 421
Under the following circumstances, the
reversing camera will not function, or will
function in a limited manner:
R if the tailgate is open
R in heavy rain, snow or fog
R at night or in very dark places
R if the camera is exposed to very bright light
R if the area is lit by fluorescent bulbs or LED
lighting (the display may flicker)
R if there is a sudden change in temperature,
e.g. when driving into a heated garage in
winter
R if the camera lens is dirty or obstructed.
Observe the notes on cleaning
(Y page 344)
R if the rear of your vehicle is damaged. In this
case, have the camera position and setting
checked at a qualified specialist workshop.
The field of vision and other functions of the
reversing camera may be restricted due to
additional accessories on the rear of the vehi-
cle (e.g. licence plate holder, bicycle rack).
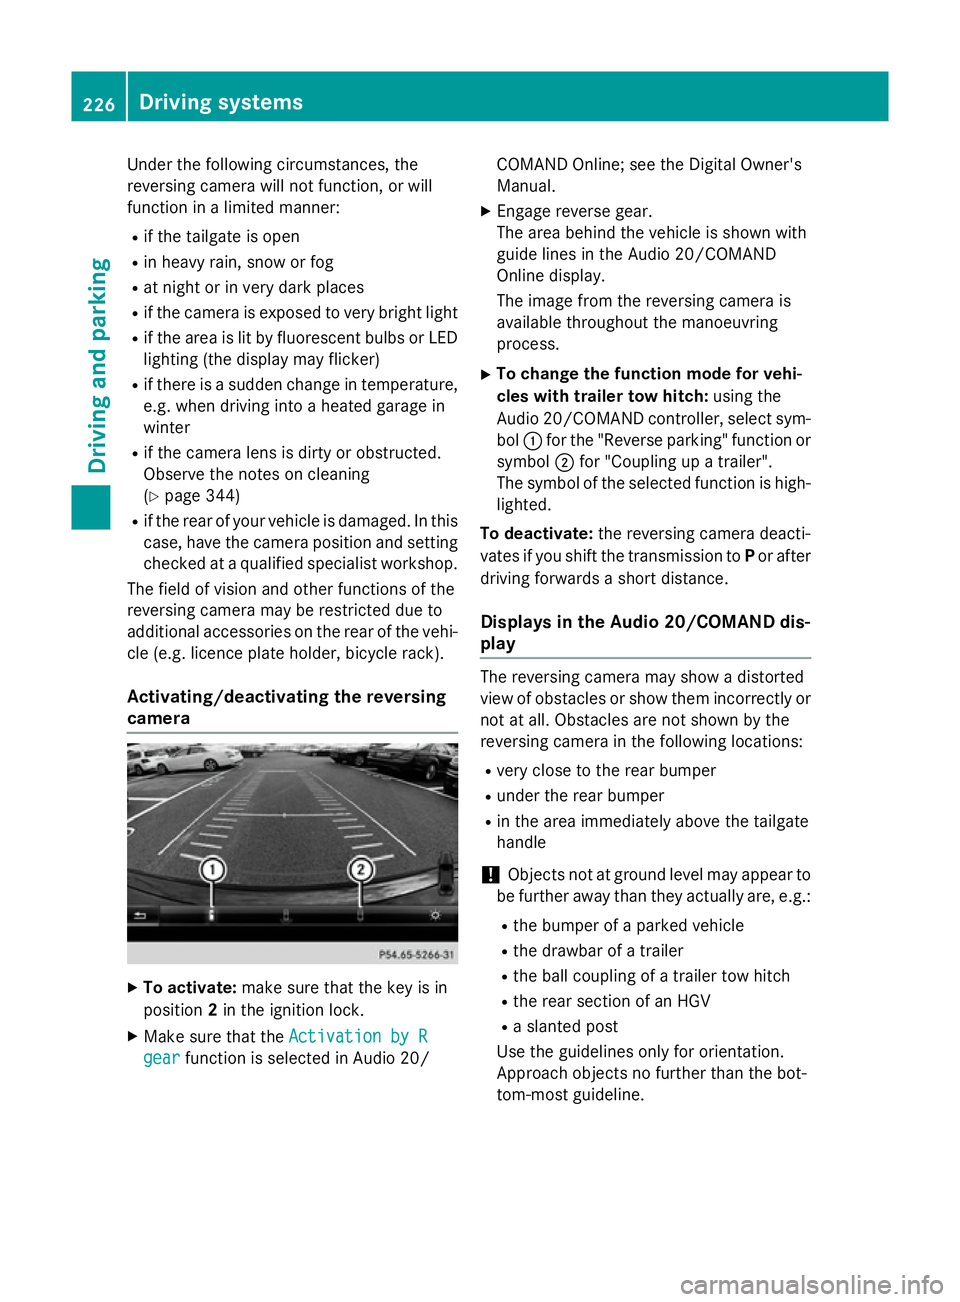
Activating/deactivating the reversing
camera X
To activate: make sure that the key is in
position 2in the ignition lock.
X Make sure that the Activation by R
Activation by R
gear
gear function is selected in Audio 20/ COMAND Online; see the Digital Owner's
Manual.
X Engage reverse gear.
The area behind the vehicle is shown with
guide lines in the Audio 20/COMAND
Online display.
The image from the reversing camera is
available throughout the manoeuvring
process.
X To change the function mode for vehi-
cles with trailer tow hitch: using the
Audio 20/COMAND controller, select sym- bol :for the "Reverse parking" function or
symbol ;for "Coupling up a trailer".
The symbol of the selected function is high- lighted.
To deactivate: the reversing camera deacti-
vates if you shift the transmission to Por after
driving forwards a short distance.
Displays in the Audio 20/COMAND dis-
play The reversing camera may show a distorted
view of obstacles or show them incorrectly or
not at all. Obstacles are not shown by the
reversing camera in the following locations:
R very close to the rear bumper
R under the rear bumper
R in the area immediately above the tailgate
handle
! Objects not at ground level may appear to
be further away than they actually are, e.g.:
R the bumper of a parked vehicle
R the drawbar of a trailer
R the ball coupling of a trailer tow hitch
R the rear section of an HGV
R a slanted post
Use the guidelines only for orientation.
Approach objects no further than the bot-
tom-most guideline. 226
Driving systemsDriving and parking
Page 284 of 421
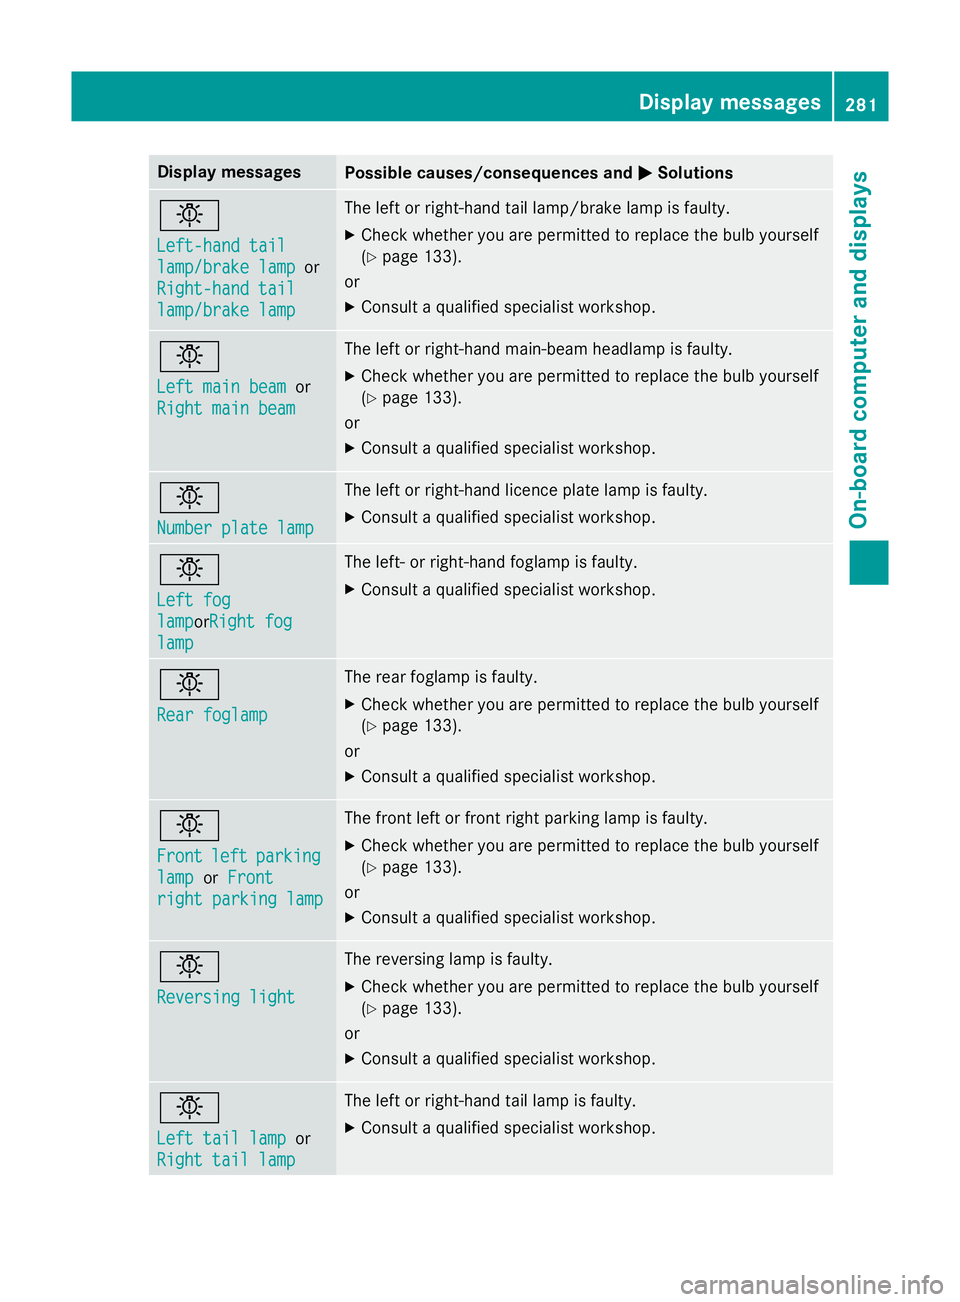
Display messages
Possible causes/consequences and
M
MSolutions b
Left-hand tail Left-hand tail
lamp/brake lamp lamp/brake lamp
or
Right-hand tail
Right-hand tail
lamp/brake lamp lamp/brake lamp The left or right-hand tail lamp/brake lamp is faulty.
X Check whether you are permitted to replace the bulb yourself
(Y page 133).
or
X Consult a qualified specialist workshop. b
Left main beam Left main beam
or
Right main beam
Right main beam The left or right-hand main-beam headlamp is faulty.
X Check whether you are permitted to replace the bulb yourself
(Y page 133).
or
X Consult a qualified specialist workshop. b
Number plate lamp Number plate lamp The left or right-hand licence plate lamp is faulty.
X Consult a qualified specialist workshop. b
Left fog Left fog
lamp lampor
Right fog
Right fog
lamp
lamp The left- or right-hand foglamp is faulty.
X Consult a qualified specialist workshop. b
Rear foglamp Rear foglamp The rear foglamp is faulty.
X Check whether you are permitted to replace the bulb yourself
(Y page 133).
or
X Consult a qualified specialist workshop. b
Front Front
left
leftparking
parking
lamp
lamp orFront
Front
right parking lamp
right parking lamp The front left or front right parking lamp is faulty.
X Check whether you are permitted to replace the bulb yourself
(Y page 133).
or
X Consult a qualified specialist workshop. b
Reversing light Reversing light The reversing lamp is faulty.
X Check whether you are permitted to replace the bulb yourself
(Y page 133).
or
X Consult a qualified specialist workshop. b
Left tail lamp Left tail lamp
or
Right tail lamp
Right tail lamp The left or right-hand tail lamp is faulty.
X Consult a qualified specialist workshop. Display
messages
281On-board computer and displays Z