2015 MERCEDES-BENZ CLA SHOOTING BRAKE service
[x] Cancel search: servicePage 72 of 421
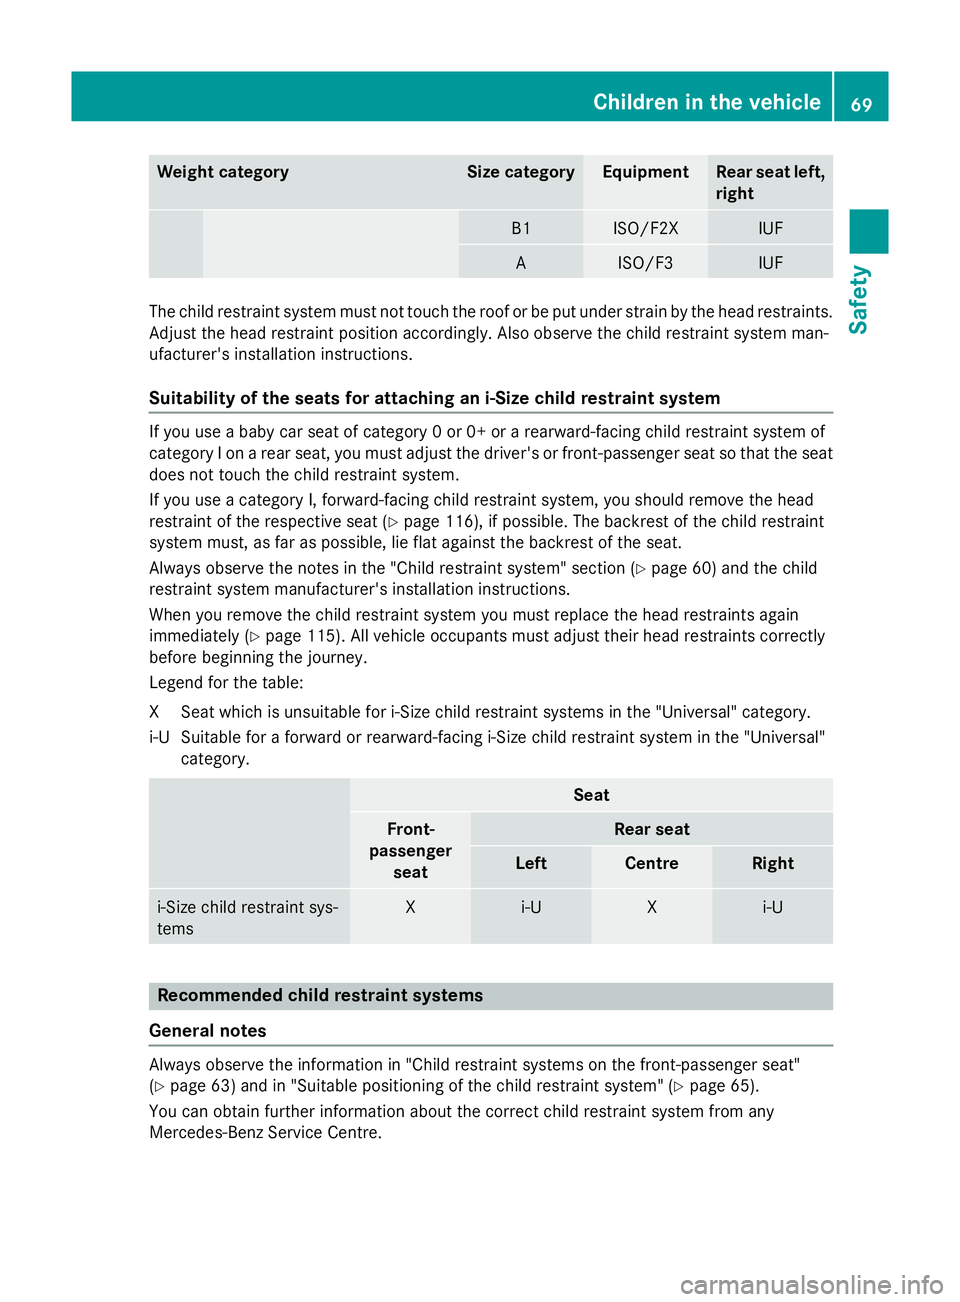
Weight category Size category Equipment Rear seat left,
right B1 ISO/F2X IUF
A ISO/F3 IUF
The child restraint system must not touch the roof or be put under strain by the head restraints.
Adjust the head restraint position accordingly. Also observe the child restraint system man-
ufacturer's installation instructions.
Suitability of the seats for attaching an i-Size child restraint system If you use a baby car seat of category 0 or 0+ or a rearward-facing child restraint system of
category I on a rear seat, you must adjust the driver's or front-passenger seat so that the seat
does not touch the child restraint system.
If you use a category I, forward-facing child restraint system, you should remove the head
restraint of the respective seat (Y page 116), if possible. The backrest of the child restraint
system must, as far as possible, lie flat against the backrest of the seat.
Always observe the notes in the "Child restraint system" section (Y page 60) and the child
restraint system manufacturer's installation instructions.
When you remove the child restraint system you must replace the head restraints again
immediately (Y page 115). All vehicle occupants must adjust their head restraints correctly
before beginning the journey.
Legend for the table:
XS eat which is unsuitable for i-Size child restraint systems in the "Universal" category.
i‑US uitable for a forward or rearward-facing i-Size child restraint system in the "Universal"
category. Seat
Front-
passenger seat Rear seat
Left Centre Right
i‑Size child restraint sys-
tems X i
‑U X i
‑U Recommended child restraint systems
General notes Always observe the information in "Child restraint systems on the front-passenger seat"
(Y page 63) and in "Suitable positioning of the child restraint system" (Y page 65).
You can obtain further information about the correct child restraint system from any
Mercedes-Benz Service Centre. Children in the vehicle
69Safety Z
Page 77 of 421

with the vehicle in front or reduce the effects
of such a collision.
If COLLISION PREVENTION ASSIST PLUS
detects that there is a risk of a collision, you
will be warned visually and acoustically. If you do not react to the visual and audible collision
warning, autonomous braking can be initiated in critical situations. If you apply the brake
yourself in a critical situation, the COLLISION PREVENTION ASSIST PLUS Adaptive Brake
Assist assists you.
Important safety notes Detection of hazardous situations can be par-
ticularly impaired by:
R dirt on the sensors or obscured sensors
R snow or heavy rain
R interference by other radar sources
R strong radar reflections, for example, in
multi-storey car parks
R a narrow vehicle travelling in front, e.g. a
motorcycle
R a vehicle travelling in front on a different
line
R new vehicles or after a service on the COL-
LISION PREVENTION ASSIST PLUS system
Observe the important safety notes in the
"Running-in notes" section (Y page 164).
Following damage to the front end of the vehi-
cle, have the configuration and operation of
the radar sensor checked at a qualified spe-
cialist workshop. This also applies to colli-
sions at slow speeds where there is no visible
damage to the front of the vehicle.
Activating/deactivating The COLLISION PREVENTION ASSIST PLUS is
automatically active after switching on the
ignition.
You can activate or deactivate COLLISION
PREVENTION ASSIST PLUS in the on-board
computer (Y page 256). When deactivated,
the distance warning function and the auton-
omous braking function are also deactivated. If COLLISION PREVENTION ASSIST PLUS is
deactivated, the
æsymbol appears in the
assistance graphics display.
Distance warning function General notes
The distance warning function can help you to
minimise the risk of a collision with the vehi-
cle in front or reduce the effects of such a
collision. If the distance warning function
detects that there is a risk of a collision, you
will be warned visually and acoustically.
Important safety notes
i Observe the "Important safety notes" sec-
tion for driving safety systems (Y page 72). G
WARNING
The distance warning function does not react:
R to people or animals
R to oncoming vehicles
R to crossing traffic
R when cornering
Thus, the distance warning function cannot
provide a warning in all critical situations.
There is a risk of an accident.
Always pay careful attention to the traffic sit-
uation and be ready to brake. G
WARNING
The distance warning function cannot always
clearly identify objects and complex traffic
situations.
In such cases, the distance warning function
may:
R give an unnecessary warning
R not give a warning
There is a risk of an accident.
Always pay careful attention to the traffic sit-
uation; do not rely on the distance warning
function alone. 74
Driving safety systemsSafety
Page 137 of 421
Never touch the parts or the electrical con-
tacts of the xenon bulb. Always have work on the xenon bulbs carried out at a qualified spe- cialist workshop.
If your vehicle is equipped with xenon bulbs,
you can recognise this by the following: the
cone of light from the xenon bulbs moves
from the top to the bottom and back again
when you start the engine. For this to be
observed, the lights must be switched on
before the engine is started.
Bulbs and lamps are an important aspect of
vehicle safety. You must therefore make sure
that these function correctly at all times.
Have the headlamp setting checked regularly.
Other bulbs G
WARNING
Bulbs, lamps and plug connectors can
become very hot during use. When replacing a bulb, you could burn yourself on these com-
ponents. There is a risk of injury.
Allow these components to cool down before replacing the bulb.
Do not use a bulb that has been dropped or if
its glass tube has been scratched.
The bulb may explode if:
R you touch it
R it is hot
R you drop it
R you scratch it
Only operate bulbs in enclosed lamps
designed for that purpose. Only fit spare
bulbs of the same type and the specified volt- age.
Marks on the glass tube reduce the service
life of the bulbs. Do not touch the glass tube
with your bare hands. If necessary, clean the
glass tube when cold with alcohol or spirit and
rub it off with a lint-free cloth.
Protect bulbs from moisture during opera-
tion. Do not allow bulbs to come into contact
with liquids. There are bulbs other than the xenon bulbs
that you cannot replace yourself. Only replace the bulbs listed (Y page 134). Have the bulbs
that you cannot replace yourself replaced at a
qualified specialist workshop.
If you require assistance replacing bulbs, con- sult a qualified specialist workshop.
If the new bulb still does not light up, consult
a qualified specialist workshop.
Bulbs and lamps are an important aspect of
vehicle safety. You must therefore make sure that these function correctly at all times.
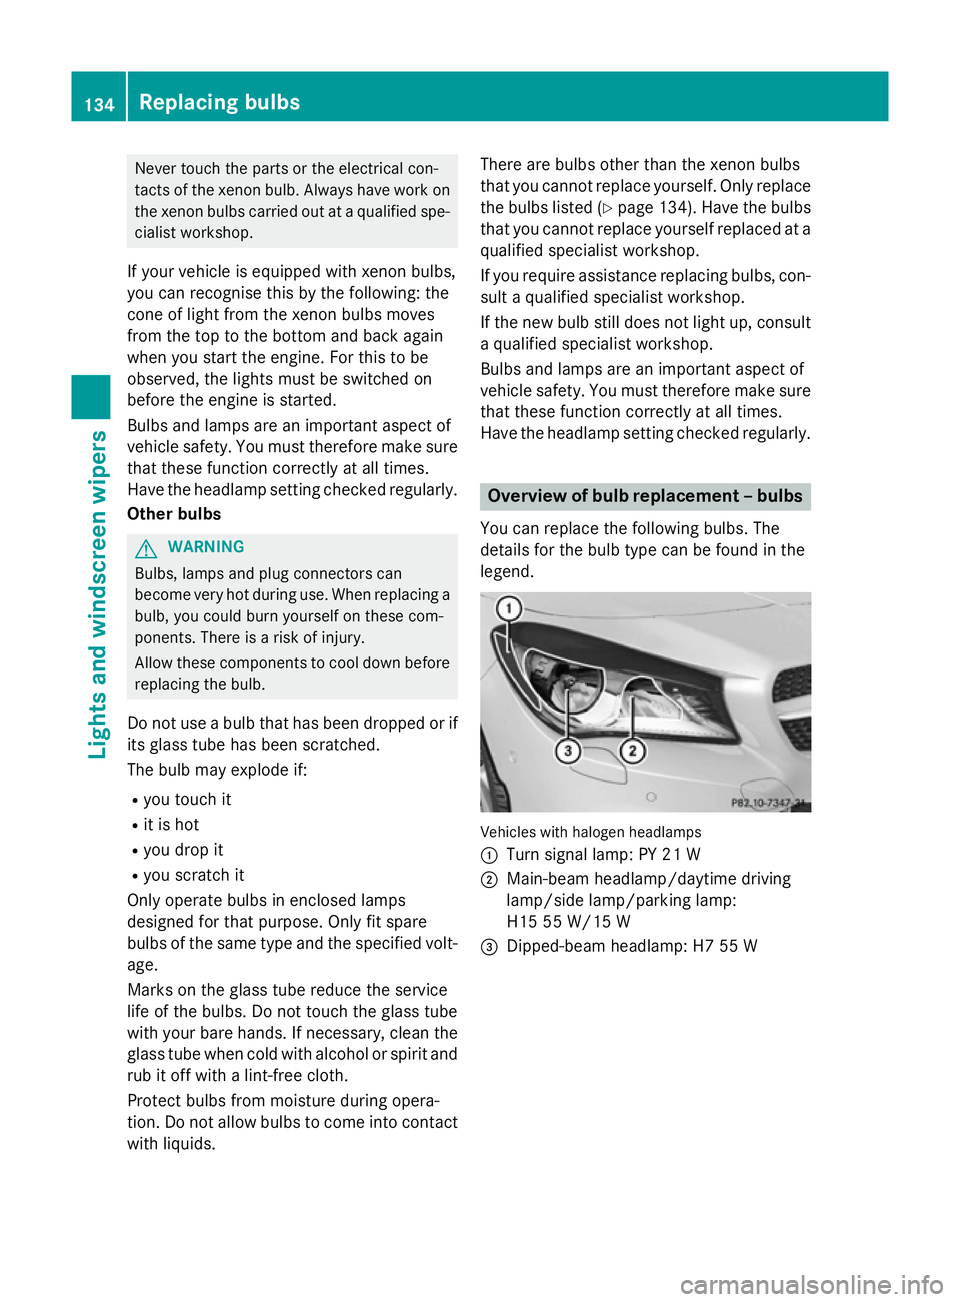
Have the headlamp setting checked regularly. Overview of bulb replacement – bulbs
You can replace the following bulbs. The
details for the bulb type can be found in the
legend. Vehicles with halogen headlamps
:
Turn signal lamp: PY 21 W
; Main-beam headlamp/daytime driving
lamp/side lamp/parking lamp:
H15 55 W/15 W
= Dipped-beam headlamp: H7 55 W 134
Replacing bulbsLights and windscreen wipers
Page 143 of 421
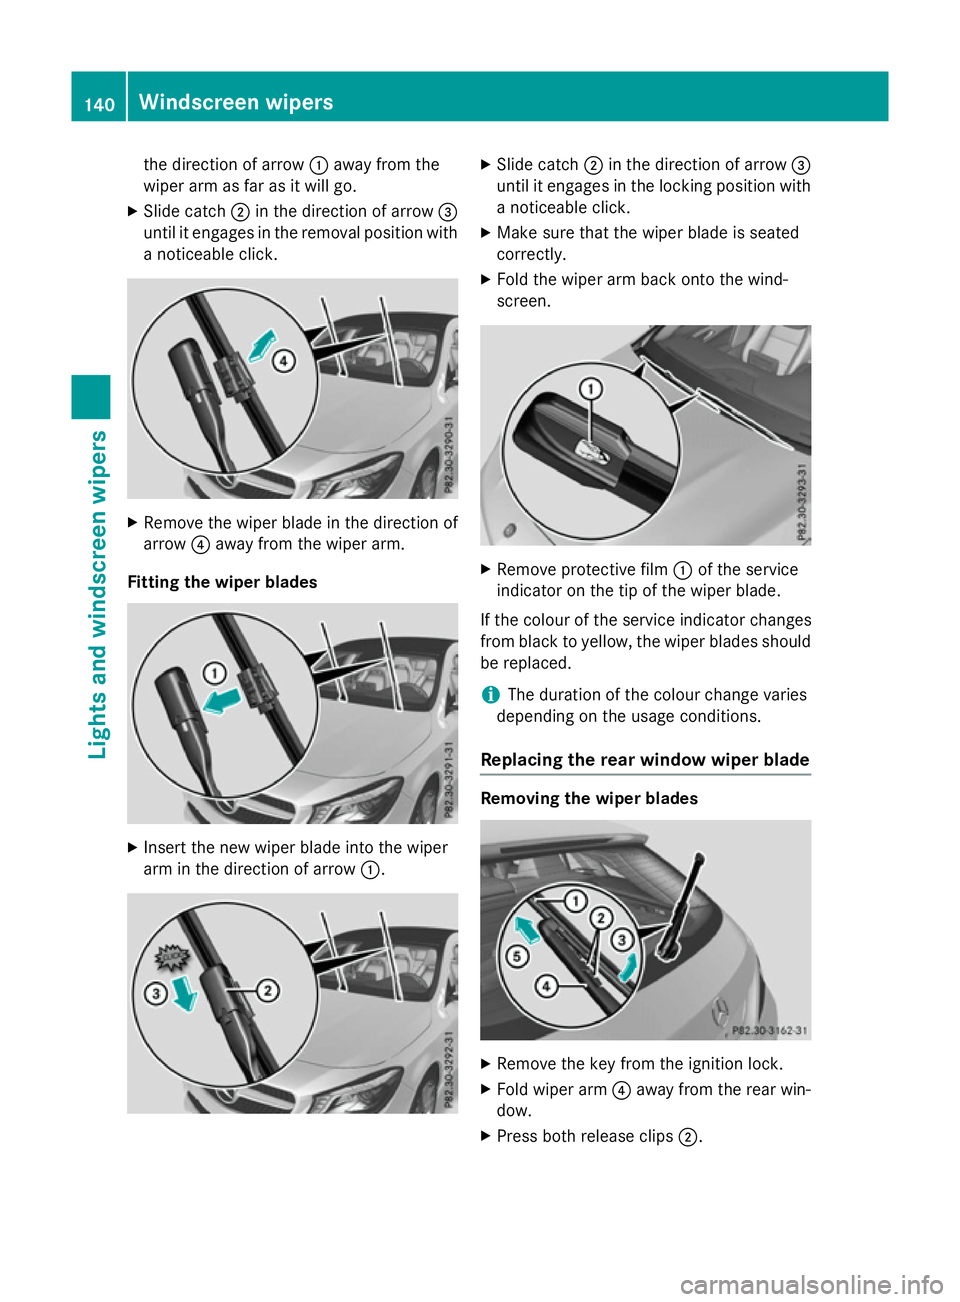
the direction of arrow
:away from the
wiper arm as far as it will go.
X Slide catch ;in the direction of arrow =
until it engages in the removal position with a noticeable click. X
Remove the wiper blade in the direction of
arrow ?away from the wiper arm.
Fitting the wiper blades X
Insert the new wiper blade into the wiper
arm in the direction of arrow :. X
Slide catch ;in the direction of arrow =
until it engages in the locking position with a noticeable click.
X Make sure that the wiper blade is seated
correctly.
X Fold the wiper arm back onto the wind-
screen. X
Remove protective film :of the service
indicator on the tip of the wiper blade.
If the colour of the service indicator changes
from black to yellow, the wiper blades should be replaced.
i The duration of the colour change varies
depending on the usage conditions.
Replacing the rear window wiper blade Removing the wiper blades
X
Remove the key from the ignition lock.
X Fold wiper arm ?away from the rear win-
dow.
X Press both release clips ;.140
Windscreen
wipersLights and windscreen wipers
Page 147 of 421

Useful information
i This Owner's Manual describes all mod-
els, series and optional equipment for your
vehicle that were available at the time of
going to press. National variations are pos- sible. Note that your vehicle may not be
equipped with all of the functions descri-
bed. This is also the case for systems and
functions relevant to safety.
i Read the information on qualified special-
ist workshops: (Y page 25). Overview of climate control systems
General notes
Observe the settings recommended on the
following pages. The windows could other-
wise mist up.
To prevent the windows from misting up:
R switch off climate control only briefly
R activate air-recirculation mode only briefly
R activate the "Cooling with air dehumidifica-
tion" function
R activate the windscreen demisting function
briefly, if required
The air-conditioning system/
THERMOTRONIC automatic climate control
regulates the temperature and the humidity
of the vehicle interior and filters undesirable
substances from the air.
The air-conditioning system/
THERMOTRONIC automatic climate control
can only be operated when the engine is run-
ning. Optimum operation is only achieved
with the side windows and panorama sliding
sunroof closed.
The residual heat function can only be acti-
vated or deactivated with the ignition
switched off (Y page 155).
Always keep the ventilation flaps behind the
side panelling clear (Y page 136). Otherwise
the vehicle will not be ventilated correctly. i
Ventilate the vehicle for a brief period
during warm weather, e.g. using the con-
venience opening feature (Y page 102).
This will speed up the cooling process and
the desired interior temperature will be
reached more quickly.
i The integrated filter filters out most par-
ticles of dust and soot and completely fil-
ters out pollen. With THERMOTRONIC auto-
matic climate control, gaseous pollutants
and odours will also be reduced. A clogged
filter reduces the amount of air supplied to the vehicle interior. For this reason, you
should always observe the interval for
replacing the filter, which is specified in the
Service Booklet. As this depends on envi-
ronmental conditions, e.g. heavy air pollu-
tion, the interval may be shorter than stated in the Service Booklet.
i Vehicles with auxiliary heating:
under
certain environmental conditions, the
residual heat function may be activated
automatically an hour after the key has
been removed in order to dry the automatic climate control. When the automatic cli-
mate control drying function is active, the
blue LED lamp is lit in the rocker switch in
the centre console. The vehicle is then ven-
tilated for 30 minutes.
Vehicles without auxiliary heating:
under certain environmental conditions,
the residual heat function may be activated automatically an hour after the key has
been removed in order to dry the automatic
climate control. The vehicle is then ventila-
ted for 30 minutes. 144
Overview of climate control systemsClimate control
Page 199 of 421
Drive sensibly – save fuel
Observe the following tips to save fuel:
R The tyres should always be inflated to the
recommended tyre pressure.
R Remove unnecessary loads.
R Remove roof racks when they are not nee-
ded.
R Warm up the engine at low engine speeds.
R Avoid frequent acceleration or braking.
R Have all maintenance work carried out as
indicated by the service intervals in the
Service Booklet or by the service interval
display.
Fuel consumption also increases when driv-
ing in cold weather, in stop-start traffic, on
short journeys and in hilly terrain. ECO display
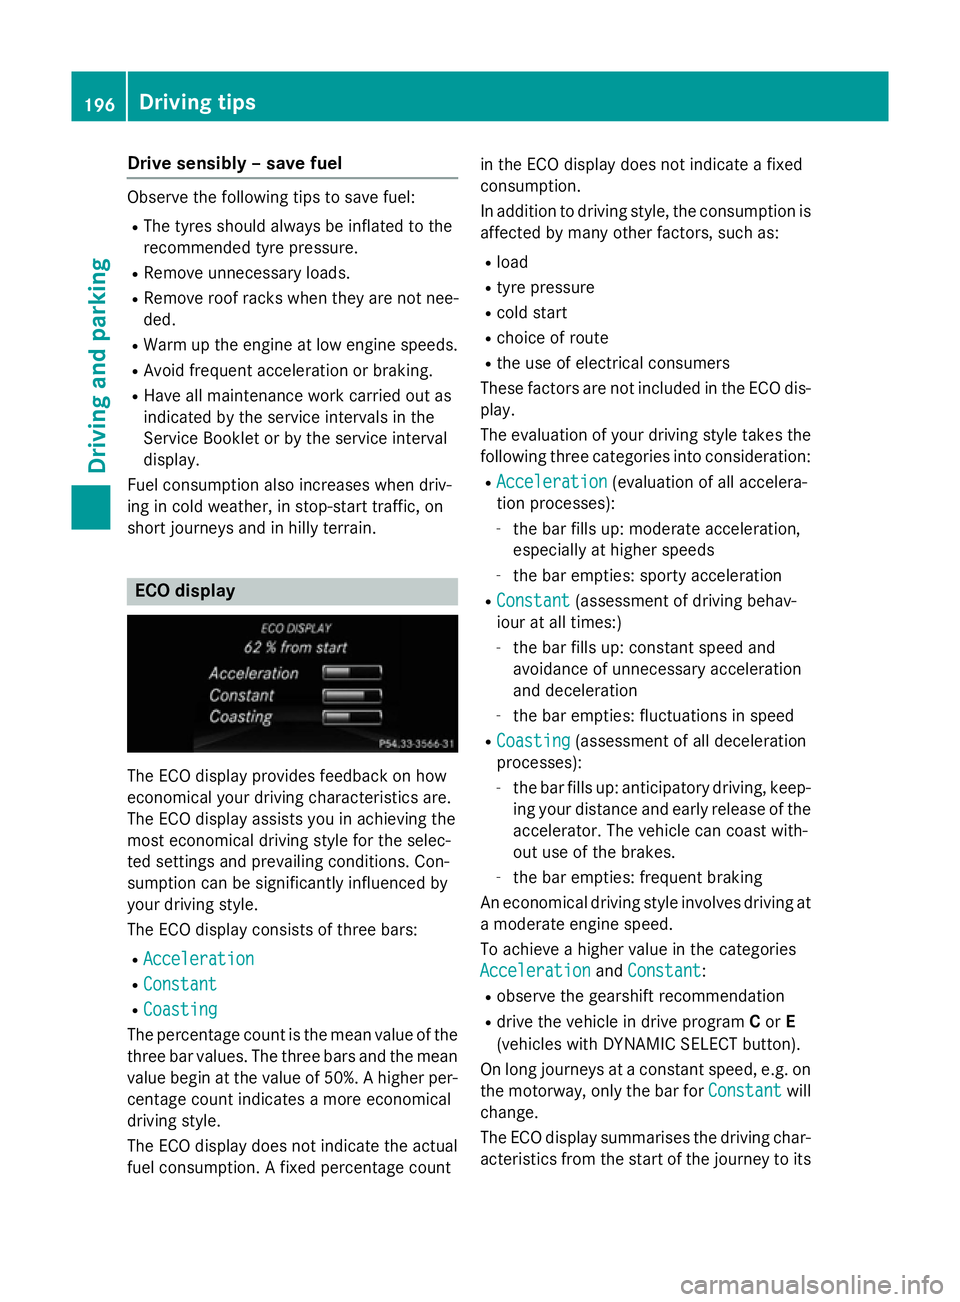
The ECO display provides feedback on how
economical your driving characteristics are.
The ECO display assists you in achieving the
most economical driving style for the selec-
ted settings and prevailing conditions. Con-
sumption can be significantly influenced by
your driving style.
The ECO display consists of three bars:
R Acceleration
Acceleration
R Constant Constant
R Coasting
Coasting
The percentage count is the mean value of the three bar values. The three bars and the mean
value begin at the value of 50%. A higher per- centage count indicates a more economical
driving style.
The ECO display does not indicate the actual
fuel consumption. A fixed percentage count in the ECO display does not indicate a fixed
consumption.
In addition to driving style, the consumption is
affected by many other factors, such as:
R load
R tyre pressure
R cold start
R choice of route
R the use of electrical consumers
These factors are not included in the ECO dis-
play.
The evaluation of your driving style takes the following three categories into consideration:
R Acceleration
Acceleration (evaluation of all accelera-
tion processes):
- the bar fills up: moderate acceleration,
especially at higher speeds
- the bar empties: sporty acceleration
R Constant Constant (assessment of driving behav-
iour at all times:)
- the bar fills up: constant speed and
avoidance of unnecessary acceleration
and deceleration
- the bar empties: fluctuations in speed
R Coasting
Coasting (assessment of all deceleration
processes):
- the bar fills up: anticipatory driving, keep-
ing your distance and early release of the accelerator. The vehicle can coast with-
out use of the brakes.
- the bar empties: frequent braking
An economical driving style involves driving at a moderate engine speed.
To achieve a higher value in the categories
Acceleration Acceleration andConstant
Constant:
R observe the gearshift recommendation
R drive the vehicle in drive program Cor E
(vehicles with DYNAMIC SELECT button).
On long journeys at a constant speed, e.g. on the motorway, only the bar for Constant
Constant will
change.
The ECO display summarises the driving char-
acteristics from the start of the journey to its 196
Driving tipsDriving and pa
rking
Page 210 of 421
Selecting the drive program
DISTRONIC PLUS supports a sporty driving
style when you select the S+drive program
(Mercedes-AMG vehicles only), S
(Y page 183) or the manual drive program
(Y page 185). Acceleration behind the vehicle
in front or to the set speed is then noticeably
more dynamic. If you have selected the E(C in
Mercedes-AMG vehicles:) drive program, the
vehicle accelerates more gently. This setting
is recommended in stop-start traffic.
Changing lanes
If you change to the overtaking lane,
DISTRONIC PLUS supports you if:
R you are driving faster than 70 km/h
R DISTRONIC PLUS is maintaining the dis-
tance to a vehicle in front
R you switch on the respective turn signal
R DISTRONIC PLUS does not detect a danger
of collision
If these conditions are met, your vehicle is
accelerated. Acceleration will be interrupted
if changing lanes takes too long or if the dis-
tance between your vehicle and the vehicle in front becomes too small.
Stopping G
WARNING
When leaving the vehicle, even if it is braked
only by DISTRONIC PLUS, it could roll away if:
R there is a malfunction in the system or in
the voltage supply.
R DISTRONIC PLUS has been deactivated
with the cruise control lever, e.g. by a vehi-
cle occupant or from outside the vehicle.
R the electrical system in the engine com-
partment, the battery or the fuses have
been tampered with.
R the battery is disconnected.
R the accelerator pedal has been depressed,
e.g. by a vehicle occupant.
There is a risk of an accident. If you wish to exit the vehicle, always turn off
DISTRONIC PLUS and secure the vehicle
against rolling away.
Further information on deactivating
DISTRONIC PLUS (Y page 209).
If DISTRONIC PLUS detects that the vehicle in front is stopping, it brakes your vehicle until it
is stationary.
Once your vehicle is stationary, it remains
stationary and you do not need to depress the
brake.
i After a short period, the vehicle is secured
by the electric parking brake, thus relieving
the service brake.
i Depending on the specified minimum dis-
tance, your vehicle will come to a standstill
at a sufficient distance behind the vehicle in front. The specified minimum distance is
set using the control on the cruise control
lever.
When DISTRONIC PLUS is activated, the
transmission is shifted automatically to posi-
tion Pif:
R the driver's seat belt is not fastened and the
driver's door is open
R the engine is switched off, unless it is auto-
matically switched off by the ECO start/
stop function
The electric parking brake secures the vehicle automatically if DISTRONIC PLUS is activated
when the vehicle is stationary and:
R a system fault occurs
R the power supply is insufficient
If a malfunction in the electric parking brake
occurs, then the transmission may also be
shifted into position Pautomatically. Driving systems
207Driving and parking Z
Page 215 of 421
Important safety notes
G
WARNING
When leaving the vehicle, it can still roll away despite being braked by the HOLD function if:
R there is a malfunction in the system or in
the voltage supply
R the HOLD function is deactivated by the
accelerator pedal being depressed, e.g. by
a vehicle occupant
R the electrical system in the engine com-
partment, the battery or the fuses are tam-
pered with
R the battery is disconnected
There is a risk of an accident.
Before leaving the vehicle, always deactivate
the HOLD function and secure the vehicle
from rolling away.
! When DISTRONIC PLUS or the HOLD
function is activated, the vehicle brakes
automatically in certain situations.
To avoid damage to the vehicle, deactivate DISTRONIC PLUS and the HOLD function in
the following or similar situations:
R when towing away
R in a car wash
Deactivating the HOLD function
(Y page 212).
Activation conditions You can activate the HOLD function if:
R the vehicle is stationary
R the engine is running or if it has been auto-
matically switched off by the ECO start/
stop function
R the driver's door is closed or if your seat
belt is fastened
R the electric parking brake is released
R DISTRONIC PLUS is deactivated
R the transmission is in position D,Ror Non
vehicles with automatic transmission Activating the HOLD function
X
Make sure that the activation conditions
are met.
X Depress the brake pedal.
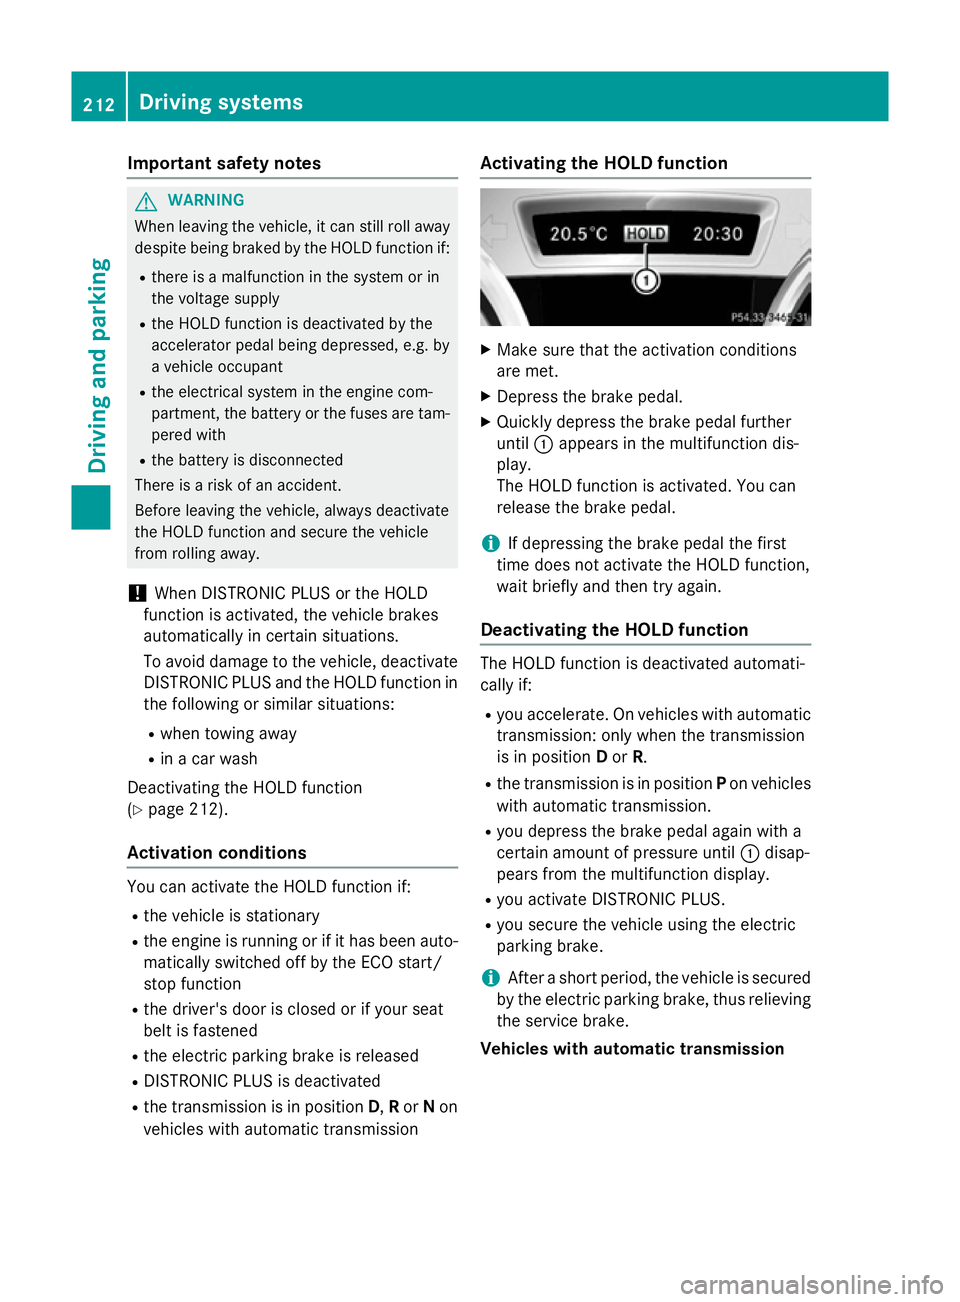
X Quickly depress the brake pedal further
until :appears in the multifunction dis-
play.
The HOLD function is activated. You can
release the brake pedal.
i If depressing the brake pedal the first
time does not activate the HOLD function,
wait briefly and then try again.
Deactivating the HOLD function The HOLD function is deactivated automati-
cally if:
R you accelerate. On vehicles with automatic
transmission: only when the transmission
is in position Dor R.
R the transmission is in position Pon vehicles
with automatic transmission.
R you depress the brake pedal again with a
certain amount of pressure until :disap-
pears from the multifunction display.
R you activate DISTRONIC PLUS.
R you secure the vehicle using the electric
parking brake.
i After a short period, the vehicle is secured
by the electric parking brake, thus relieving the service brake.
Vehicles with automatic transmission 212
Driving systemsDriving and pa
rking