2015 MERCEDES-BENZ CLA SHOOTING BRAKE winter tyres
[x] Cancel search: winter tyresPage 24 of 421
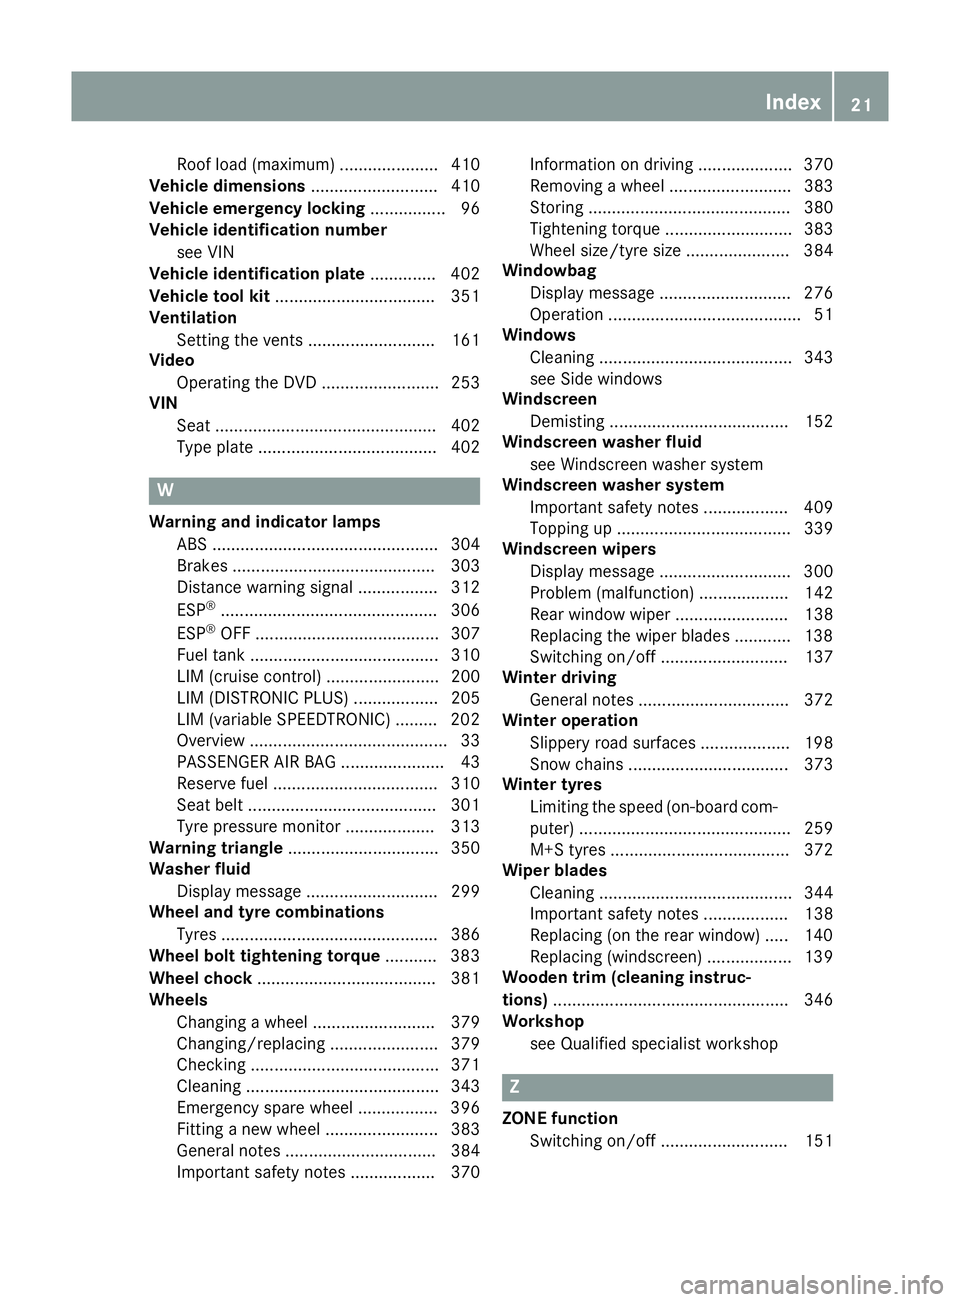
Roof load (maximum
)..................... 410
Vehicle dimensions ........................... 410
Vehicle emergency locking ................ 96
Vehicle identification number
see VIN
Vehicle identification plate .............. 402
Vehicle tool kit .................................. 351
Ventilation
Setting the vents ........................... 161
Video
Operating the DVD ......................... 253
VIN
Seat ............................................... 402
Type plate ...................................... 402 W
Warning and indicator lamps ABS ................................................ 304
Brakes ........................................... 303
Distance warning signal ................. 312
ESP ®
.............................................. 306
ESP ®
OFF ....................................... 307
Fuel tank ........................................ 310
LIM (cruise control) ........................ 200
LIM (DISTRONIC PLUS) .................. 205
LIM (variable SPEEDTRONIC) ......... 202
Overview .......................................... 33
PASSENGER AIR BAG ...................... 43
Reserve fue l................................... 310
Seat belt ........................................ 301
Tyre pressure monitor ................... 313
Warning triangle ................................ 350
Washer fluid
Display message ............................ 299
Wheel and tyre combinations
Tyres .............................................. 386
Wheel bolt tightening torque ........... 383
Wheel chock ...................................... 381
Wheels
Changing a whee l.......................... 379
Changing/replacing ....................... 379
Checking ........................................ 371
Cleaning ......................................... 343
Emergency spare wheel ................. 396
Fitting a new wheel ........................ 383
General notes ................................ 384
Important safety notes .................. 370 Information on driving .................... 370
Removing a whee
l.......................... 383
Storing ........................................... 380
Tightening torque ........................... 383
Wheel size/tyre size ...................... 384
Windowbag
Display message ............................ 276
Operation ......................................... 51
Windows
Cleaning ......................................... 343
see Side windows
Windscreen
Demisting ...................................... 152
Windscreen washer fluid
see Windscreen washer system
Windscreen washer system
Important safety notes .................. 409
Topping up ..................................... 339
Windscreen wipers
Display message ............................ 300
Problem (malfunction) ................... 142
Rear window wipe r........................ 138
Replacing the wiper blades ............ 138
Switching on/of f........................... 137
Winter driving
General notes ................................ 372
Winter operation
Slippery road surfaces ................... 198
Snow chains .................................. 373
Winter tyres
Limiting the speed (on-board com-
puter) ............................................. 259
M+S tyres ...................................... 372
Wiper blades
Cleaning ......................................... 344
Important safety notes .................. 138
Replacing (on the rear window )..... 140
Replacing (windscreen) .................. 139
Wooden trim (cleaning instruc-
tions) .................................................. 346
Workshop
see Qualified specialist workshop Z
ZONE function Switching on/of f........................... 151 Index
21
Page 75 of 421
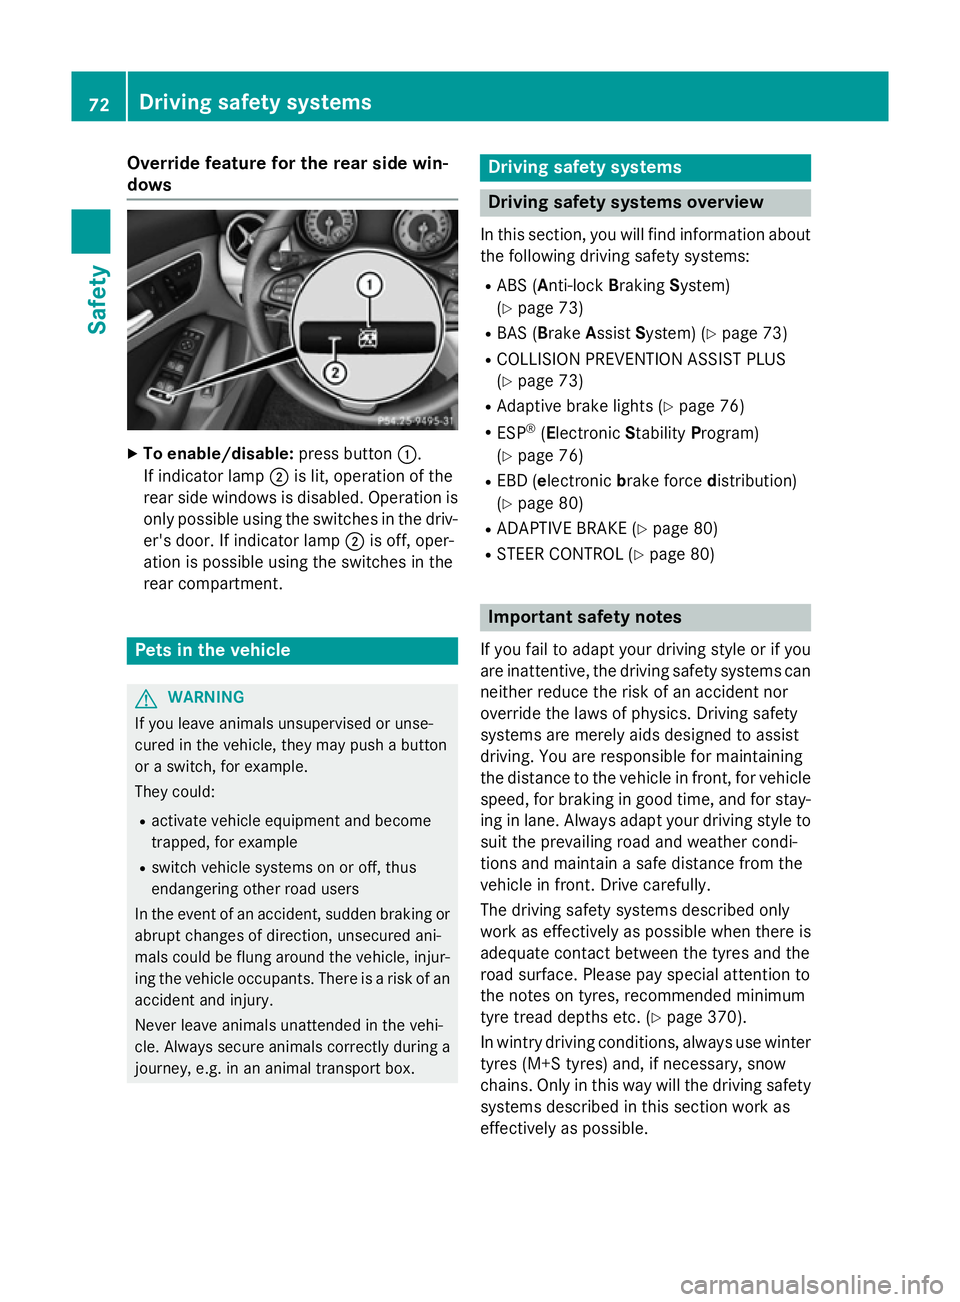
Override feature for the rear side win-
dows X
To enable/disable: press button:.
If indicator lamp ;is lit, operation of the
rear side windows is disabled. Operation is
only possible using the switches in the driv- er's door. If indicator lamp ;is off, oper-
ation is possible using the switches in the
rear compartment. Pets in the vehicle
G
WARNING
If you leave animals unsupervised or unse-
cured in the vehicle, they may push a button
or a switch, for example.
They could:
R activate vehicle equipment and become
trapped, for example
R switch vehicle systems on or off, thus
endangering other road users
In the event of an accident, sudden braking or
abrupt changes of direction, unsecured ani-
mals could be flung around the vehicle, injur-
ing the vehicle occupants. There is a risk of an accident and injury.
Never leave animals unattended in the vehi-
cle. Always secure animals correctly during a
journey, e.g. in an animal transport box. Driving safety systems
Driving safety systems overview
In this section, you will find information about the following driving safety systems:
R ABS ( Anti-lock BrakingSystem)
(Y page 73)
R BAS ( Brake Assist System) (Y page 73)
R COLLISION PREVENTION ASSIST PLUS
(Y page 73)
R Adaptive brake lights (Y page 76)
R ESP ®
(Electronic StabilityProgram)
(Y page 76)
R EBD ( electronic brake force distribution)
(Y page 80)
R ADAPTIVE BRAKE (Y page 80)
R STEER CONTROL (Y page 80) Important safety notes
If you fail to adapt your driving style or if you
are inattentive, the driving safety systems can neither reduce the risk of an accident nor
override the laws of physics. Driving safety
systems are merely aids designed to assist
driving. You are responsible for maintaining
the distance to the vehicle in front, for vehicle
speed, for braking in good time, and for stay- ing in lane. Always adapt your driving style to
suit the prevailing road and weather condi-
tions and maintain a safe distance from the
vehicle in front. Drive carefully.
The driving safety systems described only
work as effectively as possible when there is
adequate contact between the tyres and the
road surface. Please pay special attention to
the notes on tyres, recommended minimum
tyre tread depths etc. (Y page 370).
In wintry driving conditions, always use winter tyres (M+S tyres) and, if necessary, snow
chains. Only in this way will the driving safety
systems described in this section work as
effectively as possible. 72
Driving safety systemsSafety
Page 201 of 421
This can increase the braking distance con-
siderably.
R In order to prevent any salt build-up, apply
the brakes occasionally while paying atten- tion to the traffic conditions.
R Carefully depress the brake pedal at the
end of the journey and when starting the
next journey.
R Maintain a much greater distance to the
vehicle in front.
New brake pads/linings Brake pads/linings and discs that are either
new or have been replaced only achieve opti-
mum braking effect after several hundred kil-
ometres of driving. Compensate for the
reduced braking effect by applying greater
force to the brake pedal.
For safety reasons, Mercedes-Benz recom-
mends that you only have brake pads/linings fitted to your vehicle which have been
approved for Mercedes-Benz vehicles or
which correspond to an equivalent quality
standard. Brake pads/linings which have not
been approved for Mercedes-Benz vehicles or
which are not of an equivalent quality could
affect your vehicle's operating safety. Driving on wet roads
Aquaplaning If water has accumulated to a certain depth
on the road surface, there is a danger of aqua- planing occurring, even if:
R you are driving at low speeds
R the tyres have adequate tread depth
For this reason, drive in the following manner in the event of heavy rain or in conditions in
which aquaplaning can occur:
R lower your speed
R avoid tyre ruts
R avoid sudden steering movements
R brake carefully Driving on flooded roads !
Bear in mind that vehicles travelling in
front or in the opposite direction create
waves. This may cause the maximum per-
missible water depth to be exceeded.
These notes must be observed under all
circumstances. You could otherwise dam-
age the engine, the electronics or the trans- mission.
If you must drive on stretches of road on
which water has collected, please bear in
mind that:
R in the case of standing water, the water
level must be no higher than the lower edge
of the vehicle body
R you should drive no faster than walking
pace Winter driving
G
WARNING
If you shift down on a slippery road surface in an attempt to increase the engine's braking
effect, the drive wheels could lose their grip.
This increases the risk of skidding and having
an accident.
Do not shift down for additional engine brak-
ing on a slippery road surface. G
DANGER
If the exhaust pipe is blocked or adequate
ventilation is not possible, poisonous gases
such as carbon monoxide (CO) may enter the vehicle. This is the case, e.g. if the vehicle
becomes trapped in snow. There is a risk of
fatal injury.
If you leave the engine or the auxiliary heating
running, make sure the exhaust pipe and area
around the vehicle are clear of snow. To
ensure an adequate supply of fresh air, open a window on the side of the vehicle that is not
facing into the wind.
Have your vehicle winterproofed at a qualified specialist workshop at the onset of winter. 198
Driving tipsDriving and parking
Page 202 of 421
You should drive particularly carefully on slip-
pery road surfaces. Avoid sudden accelera-
tion, steering and braking manoeuvres. Do
not use cruise control or DISTRONIC PLUS.
If the vehicle threatens to skid or cannot be
stopped when moving at low speed:
X Vehicles with manual transmission:
shift to neutral.
X Vehicles with automatic transmission:
shift the transmission to position N.
X Try to bring the vehicle under control by
using corrective steering.
The outside temperature indicator is not
designed to serve as an ice-warning device
and is therefore unsuitable for that purpose.
Changes in the outside temperature are dis-
played after a short delay.
Indicated temperatures just above the freez-
ing point do not guarantee that the road sur-
face is free of ice. The road may still be icy,
especially in wooded areas or on bridges.
You should pay special attention to road con-
ditions when temperatures are around freez-
ing point.
Further information on driving with snow
chains (Y page 373).
Further information on driving with summer
tyres (Y page 372).
Observe the notes in the "Winter operation"
section (Y page 372). Driving systems
Cruise control
General notes Cruise control maintains a constant road
speed for you. It brakes automatically in order to avoid exceeding the set speed. You must
select a lower gear in good time on long and
steep downhill gradients, especially if the
vehicle is laden or towing a trailer. For vehi-
cles with automatic transmission, you need to have selected manual shift drive program M
(Y page 185). By doing so, you will make use of the braking effect of the engine. This
relieves the load on the brake system and
prevents the brakes from overheating and
wearing too quickly.
Use cruise control only if road and traffic con-
ditions are appropriate for maintaining a
steady speed for a prolonged period. You canstore any road speed above 30 km/h.
The speed indicated in the speedometer maydiffer slightly from the speed stored.
Important safety notes If you fail to adapt your driving style, cruise
control can neither reduce the risk of an acci-
dent nor override the laws of physics. Cruise
control cannot take into account road,
weather or traffic conditions. Cruise control is
only an aid. You are responsible for the dis-
tance to the vehicle in front, for vehicle speed, for braking in good time, and for staying in
lane.
Do not use cruise control:
R in road and traffic conditions which do not
allow you to maintain a constant speed, e.g.
in heavy traffic or on winding roads
R on smooth or slippery roads. Braking or
accelerating can cause the drive wheels to
lose traction and the vehicle could then
skid
R when there is poor visibility, e.g. due to fog,
heavy rain or snow
If there is a change of drivers, advise the new driver of the speed stored. Driving systems
199Driving and parking Z
Page 205 of 421
SPEEDTRONIC
General notes SPEEDTRONIC brakes automatically so that
you do not exceed the set speed. You must
select a lower gear in good time on long and
steep downhill gradients, especially if the
vehicle is laden or towing a trailer. For vehi-
cles with automatic transmission, you need to have selected manual shift drive program M
(Y page 185). By doing so, you will make use
of the braking effect of the engine. This
relieves the load on the brake system and
prevents the brakes from overheating and
wearing too quickly. If you need additional
braking, depress the brake pedal repeatedly
rather than continuously.
You can set a variable or permanent limit
speed:
R variable for speed limits, e.g. in built-up
areas
R permanent for long-term speed restric-
tions, e.g. when driving with winter tyres
fitted (Y page 204)
i The speed indicated in the speedometer
may differ slightly from the limit speed
stored.
Important safety notes If you fail to adapt your driving style, SPEED-
TRONIC can neither reduce the risk of an
accident nor override the laws of physics.
SPEEDTRONIC cannot take into account
road, weather or traffic conditions. SPEED-
TRONIC is only an aid. You are responsible for
the distance to the vehicle in front, for vehicle speed, for braking in good time, and for stay-
ing in lane.
If there is a change of drivers, advise the new driver of the speed stored. Variable SPEEDTRONIC General notes
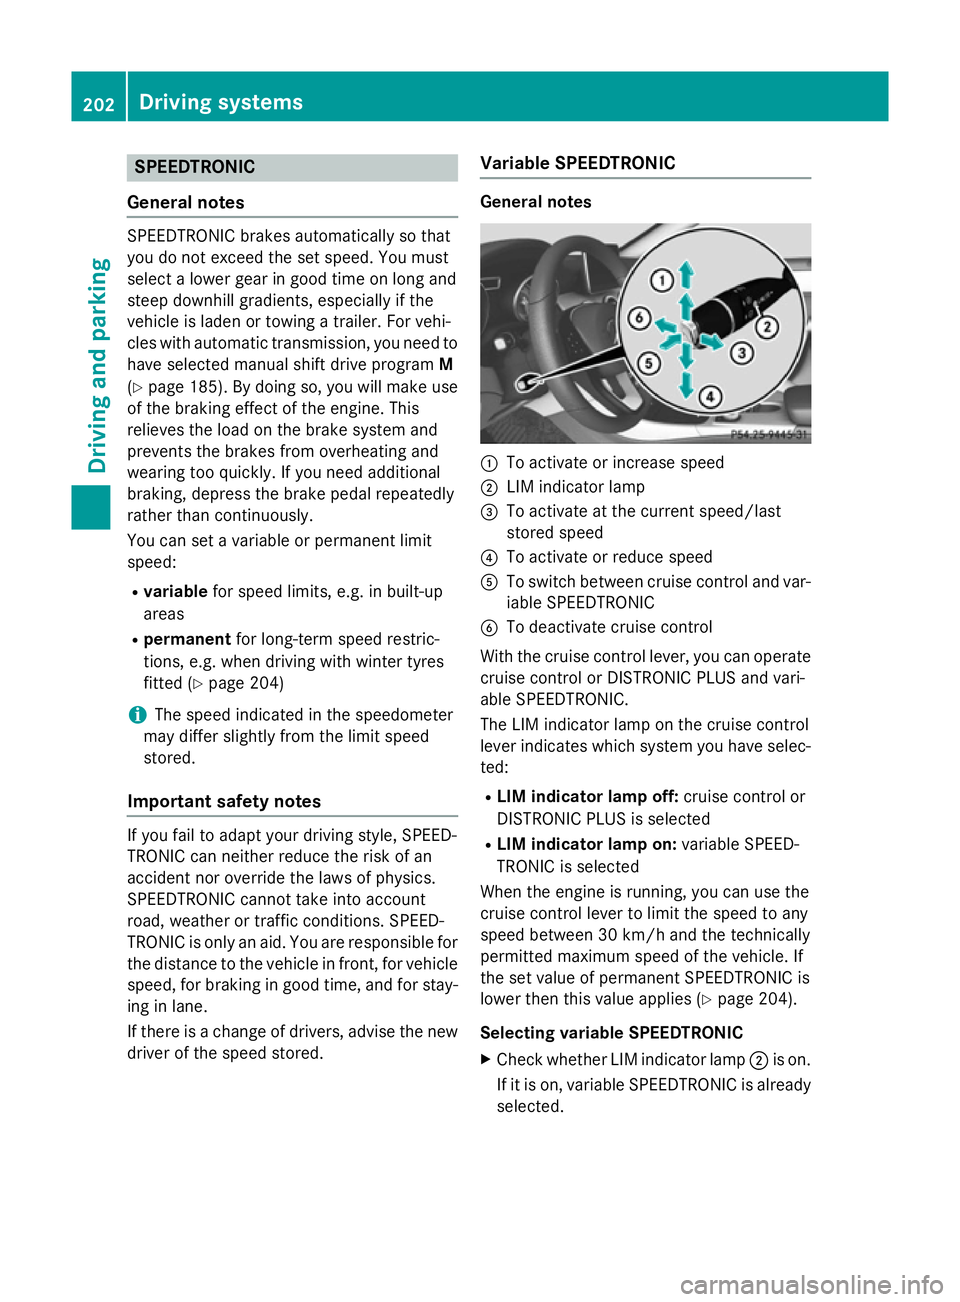
:
To activate or increase speed
; LIM indicator lamp
= To activate at the current speed/last
stored speed
? To activate or reduce speed
A To switch between cruise control and var-
iable SPEEDTRONIC
B To deactivate cruise control
With the cruise control lever, you can operate
cruise control or DISTRONIC PLUS and vari-
able SPEEDTRONIC.
The LIM indicator lamp on the cruise control
lever indicates which system you have selec- ted:
R LIM indicator lamp off: cruise control or
DISTRONIC PLUS is selected
R LIM indicator lamp on: variable SPEED-
TRONIC is selected
When the engine is running, you can use the
cruise control lever to limit the speed to any
speed between 30 km/h and the technically
permitted maximum speed of the vehicle. If
the set value of permanent SPEEDTRONIC is
lower then this value applies (Y page 204).
Selecting variable SPEEDTRONIC X Check whether LIM indicator lamp ;is on.
If it is on, variable SPEEDTRONIC is already selected. 202
Driving systemsDriving and parking
Page 207 of 421
Permanent SPEEDTRONIC
You can use the on-board computer to limit
the speed permanently to a value between
160 km/h(e.g. for driving on winter tyres) and the maximum speed (Y page 259).
Shortly before the stored speed is reached, it
appears in the multifunction display.
Permanent SPEEDTRONIC remains active
even if variable SPEEDTRONIC is deactivated.
You cannot exceed the stored limit speed
even if you depress the accelerator pedal
beyond the pressure point (kickdown). DISTRONIC PLUS
General notes DISTRONIC PLUS regulates the speed and
automatically helps you maintain the dis-
tance to the vehicle detected in front. Vehi-
cles are detected with the aid of the radar
sensor system. DISTRONIC PLUS brakes
automatically to avoid exceeding the set
speed or to maintain the designated distance from the vehicle in front.
Change into a lower gear in good time on long
and steep downhill gradients. Take particular
note of this when driving a laden vehicle. By
doing so, you will make use of the braking
effect of the engine. This relieves the load on
the brake system and prevents the brakes
from overheating and wearing too quickly.
If DISTRONIC PLUS detects that there is a risk of a collision, you will be warned visually and
acoustically. Without your intervention,
DISTRONIC PLUS cannot prevent a collision.
An intermittent warning tone will then sound
and the distance warning lamp will light up in the instrument cluster. Brake immediately to
increase the distance to the vehicle driving in
front, or take evasive action, provided it is
safe to do so.
DISTRONIC PLUS operates in the range
between 0 km/h and 200 km/h.
Do not use DISTRONIC PLUS while driving on roads with steep gradients. Important safety notes G
WARNING
DISTRONIC PLUS does not react to:
R people or animals
R stationary obstacles on the road, e.g. stop-
ped or parked vehicles
R oncoming and crossing traffic
As a result, DISTRONIC PLUS may neither give
warnings nor intervene in such situations.
There is a risk of an accident.
Always pay careful attention to the traffic sit- uation and be ready to brake. G
WARNING
DISTRONIC PLUS cannot always clearly rec-
ognise other road users and complex traffic
conditions.
In such cases, DISTRONIC PLUS may:
R give an unnecessary warning and then
brake the vehicle
R neither give a warning nor intervene
R accelerate or brake unexpectedly
There is a risk of an accident.
Continue to drive carefully and be prepared to
brake, particularly if DISTRONIC PLUS warns
you. G
WARNING
DISTRONIC PLUS brakes your vehicle with up to 50% of the maximum possible deceleration.
If this deceleration is not sufficient,
DISTRONIC PLUS alerts you with a visual and
acoustic warning. There is a risk of an acci-
dent.
Apply the brakes yourself in these situations
and try to take evasive action.
! When DISTRONIC PLUS or the HOLD
function is activated, the vehicle brakes
automatically in certain situations. 204
Driving systemsDriving and parking
Page 219 of 421
4MATIC, together with ESP
®
, improves the
traction of your vehicle whenever a drive
wheel spins due to insufficient grip.
If you fail to adapt your driving style, 4MATIC can neither reduce the risk of an accident noroverride the laws of physics. 4MATIC cannot
take account of road, weather and traffic con-
ditions. 4MATIC is only an aid. You are
responsible for the distance to the vehicle in
front, for vehicle speed, for braking in good
time and for staying in lane.
If a drive wheel spins due to insufficient grip:
R when pulling away, only depress the accel-
erator pedal as far as is necessary.
R accelerate less when driving.
i In wintry driving conditions, the maximum
effect of 4MATIC can only be achieved if
you use winter tyres (M+S tyres), with snow
chains if necessary. Chassis with adaptive adjustable
damping
General notes A suspension with the Adaptive Damping Sys-
tem provides improved driving comfort and
continuously controls the calibration of the
dampers. The damping characteristics adapt
to the current operating and driving situation.
The damping is tuned individually to each
wheel and depends on:
R your driving style, e.g. sporty
R the road surface conditions
R the drive program selected
R the vehicle level setting
The drive program can be set using the
DYNAMIC SELECT button (Y page 174).
Selecting Comfort mode In the
Comfort drive program, the driving
characteristics of your vehicle are more com- fortable. Therefore, select this drive program
if you prefer a more comfortable driving style. Also select the
Comfortdrive program when
driving fast on straight roads, e.g. on straight stretches of motorway.
X Press DYNAMIC SELECT button :
(Y page 174) repeatedly until the Comfort
drive program is selected.
Selecting Sport mode The firmer setting of the suspension tuning in
the Sport drive program ensures even better
contact with the road. Select this drive pro-
gram when employing a sporty driving style,
e.g. on winding country roads.
X Press DYNAMIC SELECT button :
(Y page 174) repeatedly until the Sport
drive program is selected. PARKTRONIC
Important safety notes PARKTRONIC is an electronic parking aid with
ultrasonic sensors. It monitors the area
around your vehicle using six sensors in the
front bumper and six sensors in the rear
bumper. PARKTRONIC indicates visually and
audibly the distance between your vehicle
and an object.
PARKTRONIC is only an aid. It is not a substi- tute for your attention to the immediate sur-
roundings. The responsibility for safe
manoeuvring and parking remains with you.
Make sure that there are no persons, animals
or objects in range while manoeuvring and
parking.
! When parking, pay particular attention to
objects above or below the sensors, such
as flower pots or trailer drawbars.
PARKTRONIC does not detect such objects
when they are in the immediate vicinity of
the vehicle. You could damage the vehicle
or the objects.
The sensors may not detect snow and
objects which absorb ultrasonic sources. 216
Driving systemsDriving and parking
Page 262 of 421
![MERCEDES-BENZ CLA SHOOTING BRAKE 2015 Owners Manual X
Press the :or9 button to select the
Permanent display:
Permanent display: function.
The current setting, outside tempera‐
outside tempera‐
ture
ture orDig. speedo [mph]:
Dig. speedo [mph]:, appe MERCEDES-BENZ CLA SHOOTING BRAKE 2015 Owners Manual X
Press the :or9 button to select the
Permanent display:
Permanent display: function.
The current setting, outside tempera‐
outside tempera‐
ture
ture orDig. speedo [mph]:
Dig. speedo [mph]:, appe](/manual-img/4/55475/w960_55475-261.png)
X
Press the :or9 button to select the
Permanent display:
Permanent display: function.
The current setting, outside tempera‐
outside tempera‐
ture
ture orDig. speedo [mph]:
Dig. speedo [mph]:, appears.
X Press the abutton to save the setting.
Lights Switching the Intelligent Light System
on/off
X Press the =or; button on the steer-
ing wheel to select the Settings Settingsmenu.
X Press the :or9 button to select the
Lights
Lights submenu.
X Press ato confirm.
X Press the :or9 button to select the
Intell. Light System
Intell. Light System function.
If the Intell. Light Sys.
Intell. Light Sys. function has
been switched on, the cone of light and the
L symbol in the multifunction display
are shown in orange.
X Press the abutton to save the setting.
When you switch Intell. Light System
Intell. Light System
function on, you activate the following func-
tions:
R Motorway mode
R Active light function
R Cornering light function
R Extended range foglamps
If you set the dipped-beam headlamps for
driving on the right/left, the multifunction
display shows the Intell.
Intell. Light LightSystem:
System:
system inoperative Inactive for
system inoperative Inactive for
left-side traffic
left-side traffic orIntell. Light
Intell. Light
System:
System: System
Systeminoperative
inoperative Inactive
Inactive
for right-side traffic
for right-side traffic display message
instead of the Intell.
Intell.Light
Light System
System func-
tion in the Lights
Lightssubmenu.
Further information on the Intelligent Light
System (Y page 130).
Setting the dipped-beam headlamps for
driving on the left/right
This function is only available in vehicles with the Intelligent Light System. You can use this function to switch between
symmetrical and asymmetrical dipped beam
(Y
page 126).
X Press the =or; button on the steer-
ing wheel to select the Settings
Settings menu.
X Press the :or9 button to select the
Lights Lights submenu.
X Press ato confirm.
X Press the :or9 button to select the
Dipped beams Setting for:
Dipped beams Setting for: function.
The current setting Right-side traffic
Right-side traffic
or Left-side traffic
Left-side traffic appears.
X Press the abutton to save the setting.
If you change the setting, conversion does
not take place until the next time the vehi-
cle is stationary.
If you set the dipped-beam headlamps for
driving on the right/left, then motorway
mode and the extended range foglamps are
unavailable. These are only deactivated if the
setting for driving on the left/right is set
opposite to your vehicle's country version.
A qualified specialist workshop can set the
dipped-beam headlamps for driving on the
left/right.
Vehicle Setting permanent SPEEDTRONIC
You can set permanent SPEEDTRONIC using
the
Limit Limit speed
speed(winter
(winter tyres)
tyres)function.
X Press the =or; button on the steer-
ing wheel to select the Settings
Settingsmenu.
X Press the :or9 button to select the
Vehicle
Vehicle submenu.
X Press ato confirm.
X Press :or9 to select the Limit
Limit
speed (winter tyres):
speed (winter tyres): function.
You will see the current setting.
X Press ato confirm.
X Press the :or9 button to adjust
permanent SPEEDTRONIC in increments of
ten (160 km/h 160 km/h to240 km/h
240 km/h). The Off
Offset- Menus and submenus
259On-board computer and displays Z