2015 MERCEDES-BENZ CLA SHOOTING BRAKE locking
[x] Cancel search: lockingPage 23 of 421
see Manual transmission
Transmission position display
(DIRECT SELECT lever) ......................178
Transporting the vehicle .................. 365
Trim pieces (cleaning instruc-
tions) ................................................. .346
Trip computer (on-board com-
puter) ................................................. .250
Trip meter
Calling up ....................................... 250
Resetting (on-board computer) ...... 251
Turn signals
Changing bulbs (front) ................... 136
Changing bulbs (rear) .................... 137
Switching on/off ........................... 129
Two-way radio
Frequencies ................................... 400
Installation ..................................... 400
Transmission output (maximum) .... 400
Type identification plate
see Vehicle identification plate
Tyre pressure
Calling up (on-board computer) ..... 376
Display message ............................ 292
Not reached (TIREFIT) .................... 355
Reached (TIREFIT) .......................... 355
Recommended ............................... 374
Tyre pressure loss warning
General notes ................................ 375
Important safety notes .................. 375
Restarting ...................................... 376
Tyre pressure monitor
Checking the tyre pressure elec-
tronically ........................................ 377
Function/notes ............................ .376
General notes ................................ 376
Important safety notes .................. 376
Radio type approval for the tyre
pressure monitor ........................... 379
Restarting ...................................... 378
Warning lamp ................................. 313
Warning message .......................... 378
Tyres
Changing a wheel .......................... 379
Checking ........................................ 371
Direction of rotatio n...................... 380
Display message ............................ 292
General notes ................................ 384 Important safety notes .................. 370
Information on driving .................... 370
M+S tyres ...................................... 372
MOExtended tyre
s......................... 372
Replacing ....................................... 379
Service life ..................................... 371
Storing ........................................... 380
Summer tyres ................................ 372
Tyre size (data ).............................. 384
Tyre tread ...................................... 371
Wheel and tyre combinations ........ 386
see Flat tyre U
Unlocking Emergency unlocking ....................... 95
From inside the vehicle (central
unlocking button) ............................. 94
Upshift indicator (on-board com-
puter, Mercedes-AMG vehicles) ....... 262 V
Vanity mirror (in sun visor) .............. 327
Variable SPEEDTRONIC
see SPEEDTRONIC
Vehicle
Correct use ...................................... 25
Data acquisition ............................... 26
Display message ............................ 294
Electronics ..................................... 400
Equipment ....................................... 23
Implied warranty .............................. 25
Individual settings .......................... 258
Leaving parked up ......................... 195
Locking (in an emergency) ............... 96
Locking (key) ................................... 87
Lowering ........................................ 383
Pulling away ................................... 168
Raising ........................................... 381
Registration ..................................... 25
Securing from rolling away ............ 381
Transporting .................................. 365
Unlocking (in an emergency) ........... 95
Unlocking (key) ................................ 87
Vehicle data ................................... 410
Vehicle data
Boot load (maximum) ..................... 410 20
Index
Page 24 of 421
Roof load (maximum
)..................... 410
Vehicle dimensions ........................... 410
Vehicle emergency locking ................ 96
Vehicle identification number
see VIN
Vehicle identification plate .............. 402
Vehicle tool kit .................................. 351
Ventilation
Setting the vents ........................... 161
Video
Operating the DVD ......................... 253
VIN
Seat ............................................... 402
Type plate ...................................... 402 W
Warning and indicator lamps ABS ................................................ 304
Brakes ........................................... 303
Distance warning signal ................. 312
ESP ®
.............................................. 306
ESP ®
OFF ....................................... 307
Fuel tank ........................................ 310
LIM (cruise control) ........................ 200
LIM (DISTRONIC PLUS) .................. 205
LIM (variable SPEEDTRONIC) ......... 202
Overview .......................................... 33
PASSENGER AIR BAG ...................... 43
Reserve fue l................................... 310
Seat belt ........................................ 301
Tyre pressure monitor ................... 313
Warning triangle ................................ 350
Washer fluid
Display message ............................ 299
Wheel and tyre combinations
Tyres .............................................. 386
Wheel bolt tightening torque ........... 383
Wheel chock ...................................... 381
Wheels
Changing a whee l.......................... 379
Changing/replacing ....................... 379
Checking ........................................ 371
Cleaning ......................................... 343
Emergency spare wheel ................. 396
Fitting a new wheel ........................ 383
General notes ................................ 384
Important safety notes .................. 370 Information on driving .................... 370
Removing a whee
l.......................... 383
Storing ........................................... 380
Tightening torque ........................... 383
Wheel size/tyre size ...................... 384
Windowbag
Display message ............................ 276
Operation ......................................... 51
Windows
Cleaning ......................................... 343
see Side windows
Windscreen
Demisting ...................................... 152
Windscreen washer fluid
see Windscreen washer system
Windscreen washer system
Important safety notes .................. 409
Topping up ..................................... 339
Windscreen wipers
Display message ............................ 300
Problem (malfunction) ................... 142
Rear window wipe r........................ 138
Replacing the wiper blades ............ 138
Switching on/of f........................... 137
Winter driving
General notes ................................ 372
Winter operation
Slippery road surfaces ................... 198
Snow chains .................................. 373
Winter tyres
Limiting the speed (on-board com-
puter) ............................................. 259
M+S tyres ...................................... 372
Wiper blades
Cleaning ......................................... 344
Important safety notes .................. 138
Replacing (on the rear window )..... 140
Replacing (windscreen) .................. 139
Wooden trim (cleaning instruc-
tions) .................................................. 346
Workshop
see Qualified specialist workshop Z
ZONE function Switching on/of f........................... 151 Index
21
Page 62 of 421
safe distance from the vehicle in front. Drive
carefully.
Function PRE-SAFE
®
intervenes:
R in emergency braking situations, e.g. when
BAS is activated
R in critical driving situations, e.g. when phys-
ical limits are exceeded and the vehicle
understeers or oversteers severely
R on vehicles with DISTRONIC PLUS: if adap-
tive Brake Assist intervenes powerfully
PRE-SAFE ®
takes the following measures
depending on the hazardous situation detec-
ted:
R the front seat belts are pre-tensioned.
R if the vehicle skids, the side windows and
the panorama sliding sunroof are closed.
R vehicles with the memory function: the
front-passenger seat is adjusted if it is in an
unfavourable position.
If the hazardous situation passes without
resulting in an accident, PRE-SAFE ®
slackens
the belt pre-tensioning. All settings made by
PRE-SAFE ®
can then be reversed.
If the seat belt pre-tensioning is not reduced:
X Move the seat backrest or seat back
slightly when the vehicle is stationary.
Seat belt pre-tensioning is reduced and the locking mechanism is released.
The seat-belt adjustment is an integral part of
the PRE-SAFE ®
convenience function. Infor-
mation about the convenience function can
be found under "Belt adjustment"
(Y page 47). Automatic measures after an acci-
dent
Immediately after an accident, the following
measures may be implemented, depending
on the type and severity of the impact:
R the hazard warning lamps are activated
R the emergency lighting is activated
R the vehicle doors are unlocked
R the front side windows are lowered
R the engine is switched off and the fuel sup-
ply is cut off
R vehicles with the Mercedes-Benz emer-
gency call system: automatic emergency
call Children in the vehicle
Important safety notes
Accident statistics show that children
secured in the rear seats are safer than chil-
dren secured in the front-passenger seat. For this reason, Mercedes-Benz strongly advises
that you install a child restraint system on a
rear seat. Children are generally better pro-
tected there.
If a child younger than twelve years old and
under 1.50 m in height is travelling in the
vehicle:
R always secure the child in a child restraint
system suitable for Mercedes-Benz vehi-
cles. The child restraint system must be
appropriate to the age, weight and size of
the child.
R be sure to observe the instructions and
safety notes in this section in addition to
the child restraint system manufacturer's
installation instructions.
R always pay attention to the instructions
and safety notes on the automatic front-
passenger front airbag deactivation system (Y page 51). Children in the vehicle
59Safety Z
Page 76 of 421

ABS (Anti-lock Braking System)
General notes ABS regulates brake pressure in such a way
that the wheels do not lock when you brake.
This allows you to continue steering the vehi- cle when braking.
The ! ABS warning lamp in the instrument
cluster lights up when the ignition is switched on. It goes out when the engine is running.
ABS works from a speed of about 8 km/h,
regardless of road-surface conditions. ABS
works on slippery surfaces, even when you
only brake gently.
Important safety notes i
Observe the "Important safety notes" sec-
tion (Y page 72). G
WARNING
If ABS is faulty, the wheels could lock when
braking. The steerability and braking charac-
teristics may be severely impaired. Addition-
ally, further driving safety systems are deac-
tivated. There is an increased danger of skid- ding and accidents.
Drive on carefully. Have ABS checked imme-
diately at a qualified specialist workshop.
If ABS is malfunctioning, other systems,
including driving safety systems, will also
become inoperative. Observe the information on the ABS warning lamp (Y page 304) and
display messages which may be shown in the
instrument cluster (Y page 266).
Brakes X
If ABS intervenes: continue to depress the
brake pedal with force until the braking sit- uation is over.
X To make a full brake application:
depress the brake pedal with full force.
If ABS intervenes when braking, you will feel a
pulsing in the brake pedal. The pulsating brake pedal can be an indica-
tion of hazardous road conditions; this serves
as a reminder to take extra care while driving. BAS (Brake Assist)
General notes BAS operates in emergency braking situa-
tions. If you depress the brake pedal quickly,
BAS automatically boosts the braking force,
thus shortening the stopping distance.
Important safety notes i
Observe the "Important safety notes" sec-
tion (Y page 72). G
WARNING
If BAS is malfunctioning, the braking distance
in an emergency braking situation is
increased. There is a risk of accident.
In an emergency braking situation, depress
the brake pedal with full force. ABS prevents
the wheels from locking.
Braking X
Keep the brake pedal depressed firmly until
the emergency braking situation is over.
ABS prevents the wheels from locking.
The brakes will function as usual once you
release the brake pedal. BAS is deactivated. COLLISION PREVENTION ASSIST
PLUS
General notes i
Observe the "Important safety notes" sec-
tion (Y page 72).
COLLISION PREVENTION ASSIST PLUS con-
sists of a distance warning function with an
autonomous braking function and Adaptive
Brake Assist.
COLLISION PREVENTION ASSIST PLUS can
help you to minimise the risk of a collision Driving safety systems
73Safety Z
Page 79 of 421
Up to a speed of approximately 70 km/h,
Adaptive Brake Assist reacts to stationary
obstacles.
If Adaptive Brake Assist demands particularly high braking force, preventative passenger
protection measures (PRE-SAFE ®
) are activa-
ted simultaneously (Y page 58).
X Keep the brake pedal depressed until the
emergency braking situation is over.
ABS prevents the wheels from locking.
The brakes will work normally again if:
R you release the brake pedal
R there is no longer any danger of a collision
R no obstacle is detected in front of your
vehicle
Adaptive Brake Assist is then deactivated.
Important safety notes
i Observe the "Important safety notes" sec-
tion for driving safety systems (Y page 72).G
WARNING
Adaptive Brake Assist cannot always clearly
identify objects and complex traffic situa-
tions.
In such cases, Adaptive Brake Assist can:
R intervene unnecessarily
R not intervene
There is a risk of an accident.
Always pay careful attention to the traffic sit- uation and be ready to brake. Terminate the
intervention in a non-critical driving situation. G
WARNING
Adaptive Brake Assist does not react:
R to people or animals
R to oncoming vehicles
R to crossing traffic
R when cornering
As a result, the Adaptive Brake Assist may not intervene in all critical conditions. There is a
risk of an accident.
Always pay careful attention to the traffic sit- uation and be ready to brake. Due to the nature of the system, particularly
complicated but non-critical driving condi-
tions may also cause Brake Assist to inter-
vene.
If Adaptive Brake Assist is not available due to a malfunction in the radar sensor system, thebrake system remains available with full
brake boosting effect and BAS. Adaptive brake lights
The adaptive brake lights warn following traf- fic in an emergency braking situation:
R by flashing brake lamps
R the hazard warning lamps are activated
If you brake sharply from a speed of more
than 50 km/h or if braking is assisted by BAS
or BAS PLUS, the brake lamps flash rapidly. In
this way, traffic travelling behind you is
warned in an even more noticeable manner.
If you brake sharply from a speed of more
than 70 km/h to a standstill, the hazard warn- ing lamps are activated automatically. If the
brakes are applied again, the brake lamps
light up continuously. The hazard warning
lamps switch off automatically if you travel
faster than 10 km/h. You can also switch off
the hazard warning lamps using the hazard
warning button (Y page 129). ESP
®
(Electronic Stability Program)
General notes i
Observe the "Important safety notes" sec-
tion (Y page 72).
ESP ®
monitors driving stability and traction,
i.e. power transmission between the tyres
and the road surface.
If ESP ®
detects that the vehicle is deviating
from the direction desired by the driver, one
or more wheels are braked to stabilise the
vehicle. The engine output is also modified to keep the vehicle on the desired course within
physical limits. ESP ®
assists the driver when 76
Driving safety systemsSafety
Page 90 of 421
opened from the inside. Switch off the alarm
(Y page 81). G
WARNING
If persons (particularly children) are exposed
to heat or cold for a prolonged period, there is a risk of serious or even fatal injuries. Never
leave persons (particularly children) unatten-
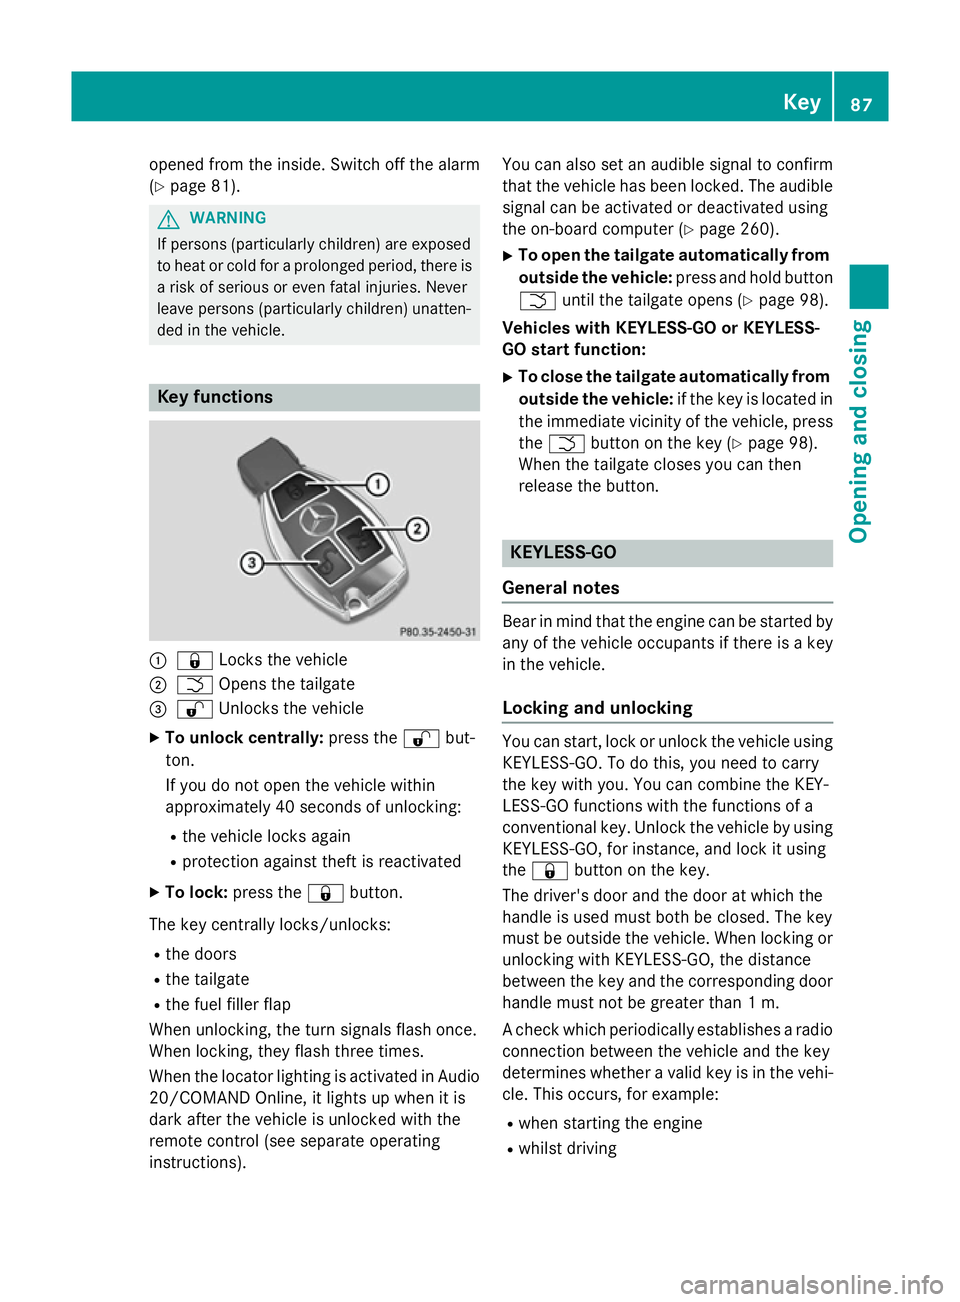
ded in the vehicle. Key functions
:
& Locks the vehicle
; F Opens the tailgate
= % Unlocks the vehicle
X To unlock centrally: press the%but-
ton.
If you do not open the vehicle within
approximately 40 seconds of unlocking:
R the vehicle locks again
R protection against theft is reactivated
X To lock: press the &button.
The key centrally locks/unlocks:
R the doors
R the tailgate
R the fuel filler flap
When unlocking, the turn signals flash once.
When locking, they flash three times.
When the locator lighting is activated in Audio
20/COMAND Online, it lights up when it is
dark after the vehicle is unlocked with the
remote control (see separate operating
instructions). You can also set an audible signal to confirm
that the vehicle has been locked. The audiblesignal can be activated or deactivated using
the on-board computer (Y page 260).
X To open the tailgate automatically from
outside the vehicle: press and hold button
F until the tailgate opens (Y page 98).
Vehicles with KEYLESS-GO or KEYLESS-
GO start function: X To close the tailgate automatically from
outside the vehicle: if the key is located in
the immediate vicinity of the vehicle, press
the F button on the key (Y page 98).
When the tailgate closes you can then
release the button. KEYLESS-GO
General notes Bear in mind that the engine can be started by
any of the vehicle occupants if there is a key
in the vehicle.
Locking and unlocking You can start, lock or unlock the vehicle using
KEYLESS-GO. To do this, you need to carry
the key with you. You can combine the KEY-
LESS-GO functions with the functions of a
conventional key. Unlock the vehicle by using KEYLESS-GO, for instance, and lock it using
the & button on the key.
The driver's door and the door at which the
handle is used must both be closed. The key
must be outside the vehicle. When locking or unlocking with KEYLESS-GO, the distance
between the key and the corresponding door
handle must not be greater than 1 m.
A check which periodically establishes a radio
connection between the vehicle and the key
determines whether a valid key is in the vehi- cle. This occurs, for example:
R when starting the engine
R whilst driving Key
87Opening and closing Z
Page 91 of 421
R
when the external door handles are
touched
R during convenience closing X
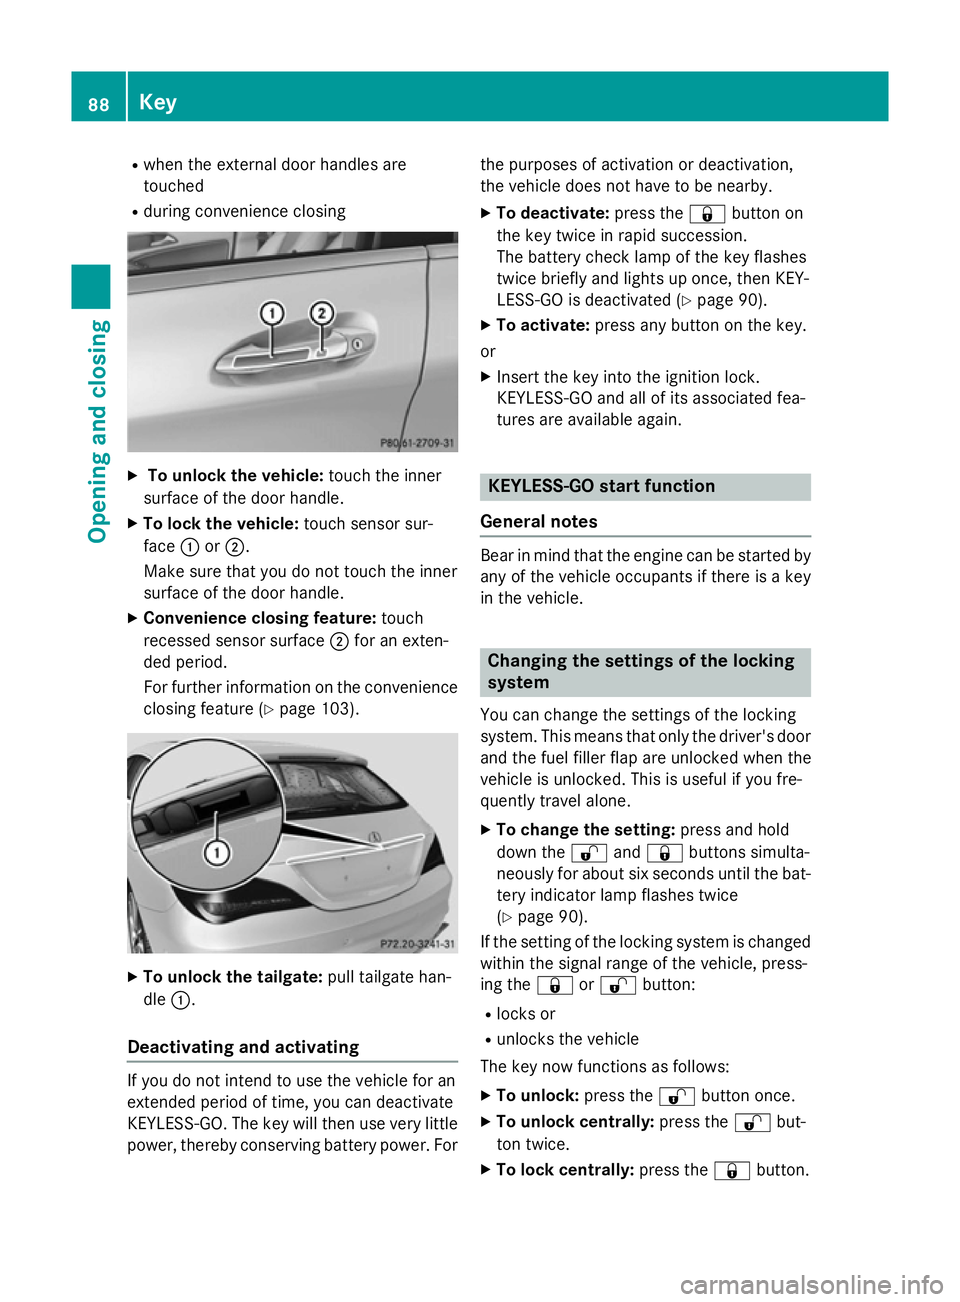
To unlock the vehicle: touch the inner
surface of the door handle.
X To lock the vehicle: touch sensor sur-
face :or;.
Make sure that you do not touch the inner
surface of the door handle.
X Convenience closing feature: touch
recessed sensor surface ;for an exten-
ded period.
For further information on the convenience closing feature (Y page 103).X
To unlock the tailgate: pull tailgate han-
dle :.
Deactivating and activating If you do not intend to use the vehicle for an
extended period of time, you can deactivate
KEYLESS-GO. The key will then use very little power, thereby conserving battery power. For the purposes of activation or deactivation,
the vehicle does not have to be nearby.
X To deactivate: press the&button on
the key twice in rapid succession.
The battery check lamp of the key flashes
twice briefly and lights up once, then KEY-
LESS-GO is deactivated (Y page 90).
X To activate: press any button on the key.
or
X Insert the key into the ignition lock.
KEYLESS-GO and all of its associated fea-
tures are available again. KEYLESS-GO start function
General notes Bear in mind that the engine can be started by
any of the vehicle occupants if there is a key
in the vehicle. Changing the settings of the locking
system
You can change the settings of the locking
system. This means that only the driver's door and the fuel filler flap are unlocked when the
vehicle is unlocked. This is useful if you fre-
quently travel alone.
X To change the setting: press and hold
down the %and& buttons simulta-
neously for about six seconds until the bat-
tery indicator lamp flashes twice
(Y page 90).
If the setting of the locking system is changed
within the signal range of the vehicle, press-
ing the &or% button:
R locks or
R unlocks the vehicle
The key now functions as follows:
X To unlock: press the%button once.
X To unlock centrally: press the%but-
ton twice.
X To lock centrally: press the&button. 88
KeyOpening and closing
Page 92 of 421
The KEYLESS-GO function is changed as fol-
lows:
X To unlock the driver's door: touch the
inner surface of the door handle on the
driver's door.
X To unlock centrally: touch the inner sur-
face of the door handle on the front-
passenger door or the rear door.
X To lock centrally: touch the outer sensor
surface on one of the door handles.
X To restore the factory settings: press
and hold down the %and& buttons
simultaneously for approximately six sec-
onds until the battery check lamp flashes
twice (Y page 90). Emergency key element
General notes If the vehicle can no longer be unlocked with
the key or KEYLESS-GO, use the emergency
key element.
If you use the emergency key element to
unlock and open the driver's door or the tail-
gate, the anti-theft alarm system will be trig-
gered (Y page 81).
There are several ways to deactivate the
alarm:
X To deactivate the alarm with the key:
press the %or& button on the key.
or X Insert the key into the ignition lock.
or
X To deactivate the alarm with KEYLESS-
GO: press the Start/Stop button in the igni-
tion lock. The key must be in the vehicle.
or X Lock or unlock the vehicle using KEYLESS-
GO. The key must be outside the vehicle.
If you unlock the vehicle using the emergency
key element, the fuel filler flap will not be
unlocked automatically. X
To unlock the fuel filler flap: insert the
key into the ignition lock.
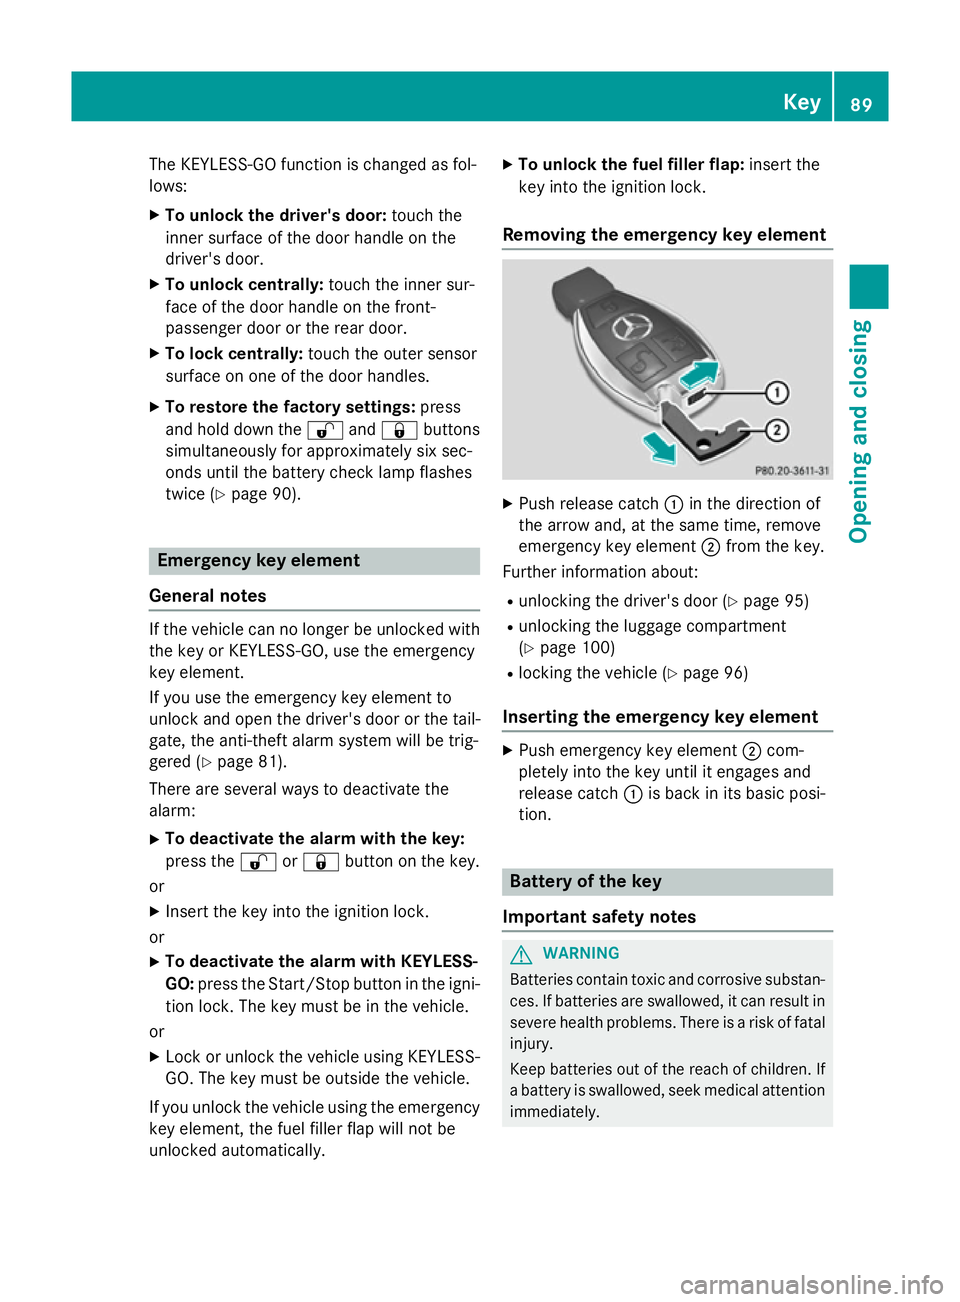
Removing the emergency key element X
Push release catch :in the direction of
the arrow and, at the same time, remove
emergency key element ;from the key.
Further information about:
R unlocking the driver's door (Y page 95)
R unlocking the luggage compartment
(Y page 100)
R locking the vehicle (Y page 96)
Inserting the emergency key element X
Push emergency key element ;com-
pletely into the key until it engages and
release catch :is back in its basic posi-
tion. Battery of the key
Important safety notes G
WARNING
Batteries contain toxic and corrosive substan- ces. If batteries are swallowed, it can result in
severe health problems. There is a risk of fatal injury.
Keep batteries out of the reach of children. If
a battery is swallowed, seek medical attention immediately. Key
89Opening and closing Z