2015 MERCEDES-BENZ C-Class key
[x] Cancel search: keyPage 7 of 214

Burmester
®
surround sound sys-
tem Balance/fader ............................... 202
Calling up the sound menu ............201
Equalizer ........................................ 202
Equipment ..................................... 201
Buttons and controller ........................19 C
Call Connecting .................................... 109
Call lists
Displaying details ........................... 124
Opening and selecting an entry .....124
Saving an entry in the address
book .............................................. 125
Car pool lanes ...................................... 66
Category list (music search) ............174
CD Inserting ........................................ 166
Inserting/loading (DVD changer) ...166
Notes on discs ............................... 173
Selecting a track ............................ 170
Sound settings (balance, bass,
fader, treble ).................................. 200
Characters
Entering (navigation) ........................29
Climate control
COMAND ......................................... 54
Cooling with air dehumidification
(COMAND) ....................................... 56
Ionization (COMAND) .......................57
Perfume atomizer (COMAND) ..........57
Setting the air distribution
(COMAND) ....................................... 55
Setting the airflow (COMAND) .........55
Setting the climate mode
(COMAND) ....................................... 56
Setting the departure time
(COMAND) ....................................... 58
Setting the temperature
(COMAND) ....................................... 55
Switching on/off (COMAND) ...........56
Switching the synchronizing func-
tion on/off (COMAND) ..................... 56 COMAND
Basic functions ................................ 26
Controller ......................................... 19
Display ............................................. 17
Settings ......................................... 150
Switching on/off .............................. 26
COMAND display
Cleaning instructions .......................18
Setting ............................................. 36
Contacts
Deleting ......................................... 122
Importing ....................................... 122
Controller ............................................. 19
Country-specific information (nav-
igation) ................................................. 94 D
Date format, setting ............................37
Day design, setting .............................36
Delayed switch-off time Setting (COMAND) ...........................51
Deleting
Call lists ......................................... 126
Destination
Storing in the address book .............89
Destination (navigation)
Entering a destination using the
map ................................................. 75
Entering a point of interest ..............72
Entering using geo-coordinates .......79
Entering using Mercedes-Benz
Apps ................................................ 78
Keyword search ............................... 70
Saving .............................................. 89
Selecting an address book con-
tact as a destination ........................72
Selecting from the list of last des-
tinations .......................................... .72
Dialing a number (telephone) ...........109
Display Selecting the design ........................36
Switching on/off .............................. 36
DVD
Notes on discs ............................... 173
Removing/ejecting (DVD
changer) ........................................ 167 Index
5
Page 9 of 214

M
Map (navigation) Adjusting the scale ..........................91
Building images ................................ 94
Elevation modeling ........................... 94
Heading ........................................... 91
Map settings .................................... 91
Moving ............................................. 64
North orientation ............................. 91
Notes ............................................... 91
Rotating the 3D map ........................93
Updating .......................................... 96
Map functions ...................................... 91
Media Interface Mode ............................................. 186
Playback options ........................... 188
Search ........................................... 187
Selecting music files ......................187
Switching to Media Interface .........187
Video function ............................... 188
Media Register
Basic displa y.................................. 176
Calling up memory space informa-
tion ................................................ 179
Copying file s.................................. 176
Deleting all file s............................. 179
Renaming/deleting file s................ 178
Selecting a playback mode ............180
Switching on .................................. 176
Media search
Category lis t.................................. 174
Current tracklis t............................ 174
Keyword search ............................. 175
Music genres ................................. 175
Selecting by cover .........................174
Starting the media search .............. 173
Menu overview
CD/DVD audio and MP3 mode ...... 166
Mercedes-Benz Apps .........................144
Microphone, switching on/off .........111
Mobile phone Authorizing .................................... 106
Connecting (Bluetooth ®
inter-
face) .............................................. 104
Connecting another mobile
phone ............................................ 107De-authorizing
............................... 108
Displaying Bluetooth ®
connection
details ............................................ 108
MP3
Copyright ....................................... 173
Notes ............................................. 171
Safety notes .................................. 165
MP3 mode
Stop and playback function ...........170 N
Navigation Adjusting the volume of the navi-
gation announcements ....................26
Alternative route .............................. 83
Avoiding an area .............................. 94
Basic settings .................................. 64
Blocking a route section affected
by a traffic jam ................................ .84
Calling up the compass display ........ 97
Calling up the men u......................... 97
Drive Information ............................. 98
Entering a destination ......................67
Entering a destination using the
map ................................................. 75
Entering a point of interest ..............72
Entering characters (character
bar) .................................................. 29
GPS reception .................................. 62
Important safety notes ....................62
Info on navigation ............................ 98
Lane recommendation .....................81
Off-road/off-map (off-road desti-
nation) ............................................. 85
Online map displa y.......................... 97
Reading out traffic reports ...............88
Repeating announcements ..............82
Selecting a destination from the
list of last destinations ..................... 72
Setting options for destination/
route downloa d.............................. 142
Setting route options (avoiding:
highways, toll roads, tunnels, fer-
ries) ................................................. 64
Setting the route type (short
route, fast route, dynamic route or
economic route) ............................... 64 Index
7
Page 11 of 214

Setting the route type (short
route, fast route, dynamic route or
economic route) ............................... 64
Starting calculation ..........................69
Route guidance
Continue .......................................... 83
Freeway information ........................81
General notes .................................. 79
Lane recommendations ...................81
Off-road ........................................... 85
Traffic reports .................................. 85S
Safety notes Audio CD/DVD and MP3 mode .....165
Using the telephone ....................... 102
Video DVD mode ........................... 191
SatRadio
Channel list updates ......................162
Displaying information ...................161
Memory functions ..........................160
Music and sports alerts .................160
Notes ............................................. 157
Registering .................................... 158
Selecting a category ......................159
Selecting a channel .......................159
Switching to ................................... 158
Tagging music tracks .....................161
SD memory card
Ejecting .......................................... 168
Inserting ........................................ 168
Inserting/removing ........................ 167
Seat-belt adjustment function
Activating/deactivating
(COMAND) ....................................... 50
Selecting stations
Radio ............................................. 155
Selecting the country .......................... 68
Sending DTMF tones .........................111
Settings Sound settings ............................... 200
Setting the language
COMAND ......................................... 42
Setting the night design .....................36
Setting the text reader speed ............38
Setting the volume Telephone call s................................ 26SIRIUS weather display
5-day forecast ................................ 204
Daily forecast ................................. 204
Detail information ..........................205
Information chart ........................... 204
Selecting the area for the weather
forecast ......................................... 205
Switching on/off ........................... 204
Weather map ................................. 207
SIRIUS weather map
Storm Guide .................................. 212
Storm Watch Box ........................... 211
Sound
Switching on/off .............................. 27
Sound settings
Balance/fader ............................... 201
Calling up the sound menu ............200
Equalizer ........................................ 200
Speed dial
Deleting ......................................... 126
Setting up ...................................... 126
Station list ......................................... 156
Stop function Video DVD ..................................... 196
Storing stations
Radio ............................................. 156
Switching on media mode
Using the Media button .................164
Via the device list .......................... 165
Via the main function bar .............. .165
Via the number keypad ..................165
System settings
Bluetooth ®
....................................... 41
Date ................................................. 37
Importing/exporting data ................43
Language ......................................... 42
Text reader speed ............................ 38
Time ................................................ .37
Time zone ........................................ 38
Voice Control System ......................39 T
Telephone Accepting a call (COMAND) ...........109
Adding a call .................................. 110
Adjusting the volume for calls .......... 26 Index
9
Page 19 of 214

R
Navigation system
-Navigation via the hard drive
- Destination entry using keyword search
- Realistic 3D map with textured city mod-
els
- Navigation functions such as Drive Infor-
mation and Google™ Maps
- Dynamic route guidance with traffic
reports via SIRIUS satellite radio
R Communication
-Messaging functions (text messages,
email)
- Address book
- Internet browser
- Mercedes-Benz Apps with Google™
Local Search, Destination/Route Down-
load, Weather, Facebook, Google™
Street View, Internet radio, stock prices,
news and much more
- Mercedes-Benz Mobile Website
- WLAN interface for the connection of a
smartphone to COMAND
- WLAN hotspot functionality to connect a
tablet PC or laptop in order to enable
access to the Internet using the custom-
er's mobile phone
R SIRIUS Weather
-Weather data as an information chart
(current forecast, 5-day preview,
detailed information)
- Weather data on the weather map, for
example as rain radars, storm character-
istics, and tracking of tropical cyclones
(hurricanes, typhoons) R
Vehicle functions
-Vehicle settings, such as ambient light-
ing, belt adjustment and tow-away alarm
- 360° camera
- Rear view camera
- Climate control functions, such as cli-
mate mode, perfume atomizer and aux-
iliary heating
- AGILITY SELECT (individual drive pro-
gram)
R Favorites button
Fast access to favorites functions using the
favorites button on the controller or on the
touchpad Display
General notes !
Do not use the space in front of the dis-
play for storage. Objects placed here could
damage the display or impair its function.
Avoid any direct contact with the display
surface. Pressure on the display surface
may result in impairments to the display,
which could be irreversible.
Wearing polarized sunglasses may impair
your ability to read the display.
The display has an automatic temperature-
controlled switch-off feature. The brightness
is automatically reduced if the temperature is
too high. The display may temporarily switch
off completely. Overview
17Overview and operation
Page 32 of 214

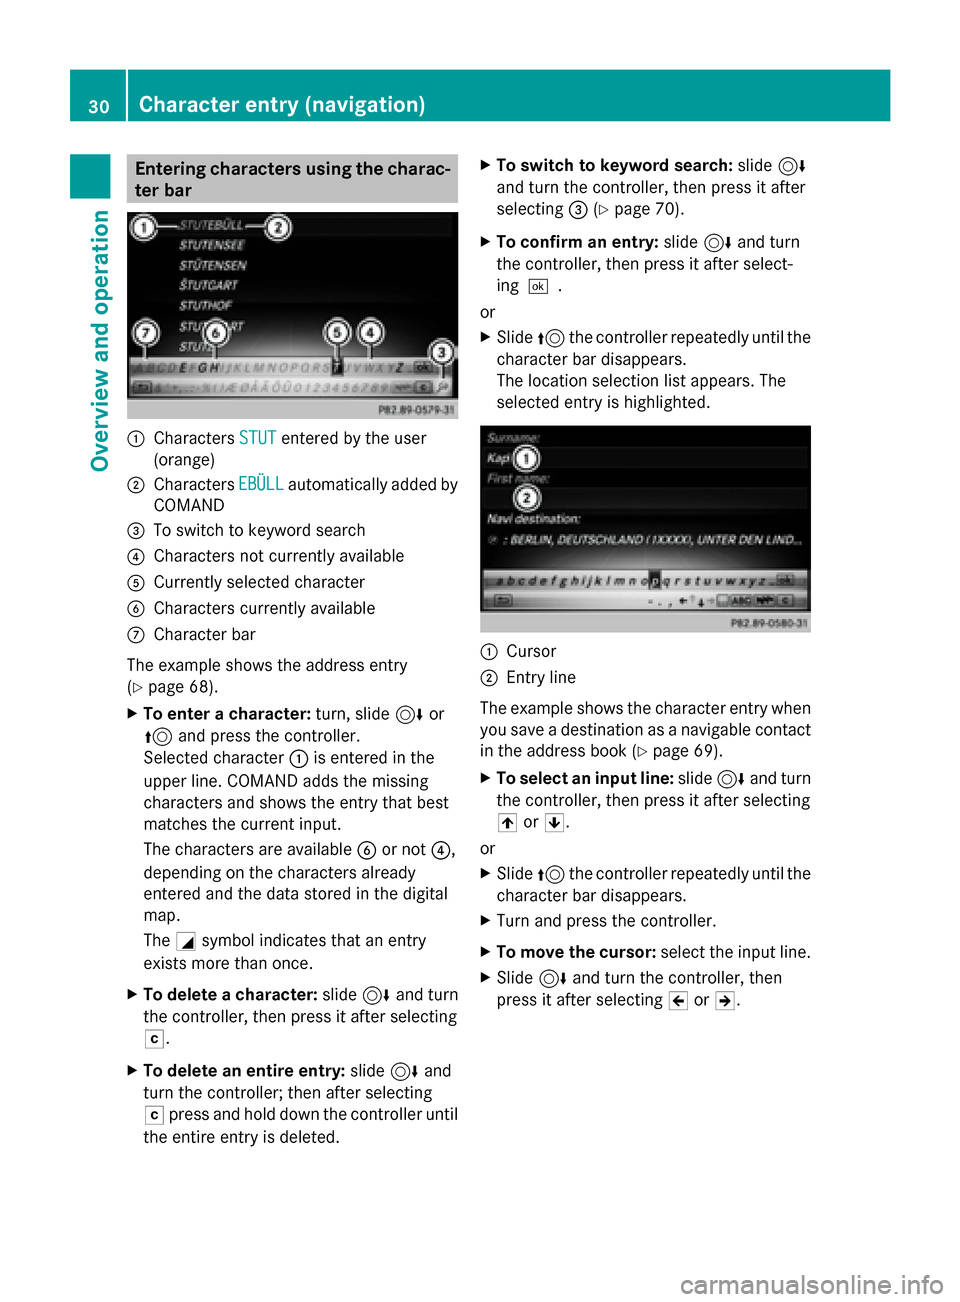
Entering characters using the charac-
ter bar 0043
Characters STUT
STUTentered by the user
(orange)
0044 Characters EBÜLL
EBÜLLautomatically added by
COMAND
0087 To switch to keyword search
0085 Characters not currently available
0083 Currently selected character
0084 Characters currently available
006B Character bar
The example shows the address entry
(Y page 68).
X To enter a character: turn, slide6or
5 and press the controller.
Selected character 0043is entered in the
upper line. COMAND adds the missing
characters and shows the entry that best
matches the current input.
The characters are available 0084or not 0085,
depending on the characters already
entered and the data stored in the digital
map.
The 0043symbol indicates that an entry
exists more than once.
X To delete a character: slide6and turn
the controller, then press it after selecting
0042.
X To delete an entire entry: slide6and
turn the controller; then after selecting
0042 press and hold down the controller until
the entire entry is deleted. X
To switch to keyword search: slide6
and turn the controller, then press it after
selecting 0087(Ypage 70).
X To confirm an entry: slide6and turn
the controller, then press it after select-
ing 0054.
or
X Slide 5the controller repeatedly until the
character bar disappears.
The location selection list appears. The
selected entry is highlighted. 0043
Cursor
0044 Entry line
The example shows the character entry when
you save a destination as a navigable contact
in the address book (Y page 69).
X To select an input line: slide6and turn
the controller, then press it after selecting
005F or0060.
or
X Slide 5the controller repeatedly until the
character bar disappears.
X Turn and press the controller.
X To move the cursor: select the input line.
X Slide 6and turn the controller, then
press it after selecting 005Dor005E. 30
Character entry (navigation)Overview and operation
Page 33 of 214

X
To change the character bar language:
slide 6and turn the controller, then
press it after selecting 0054.
A menu appears.
X To select the language: turn and press the
controller.
The character set for the selected language
is set.
The character bar entry functions are listed in
the table. Symbol Function
0062
Switches between digits and
symbols
0069
Switches the character bar to
uppercase/lowercase letters
0054
Changes the character bar lan-
guage
0042
Deletes a character/an entry
00D3
Switches to keyword search
(Y
page 70) 005F,
0060 Selects the input line
005D,
005E Moves the cursor within the
input line
0054
Confirms an entry
0039
Cancels input Entering characters using the touch-
pad
Alternatively, you can enter characters using
the touchpad (Y
page 21). Character entry is
supported by a handwriting recognition func-
tion.
An example is the address entry
(Y page 68).
X With one finger, draw the desired charac-
ter, e.g. the letter B
B, on the touch-sensitive
surface. In the list (e.g. City), the first entry that starts
with the letter entered is highlighted. You can
draw the next character on the touch-sensi-
tive surface.
If the character that you have entered can be
interpreted in different ways, these options
are displayed.
X
To select a character suggestion: turn the
controller.
The selected character is used for the list
display instead of the automatically recog-
nized character. Character entry can be
continued. Character entry (navigation)
31Overview and operation
Page 42 of 214

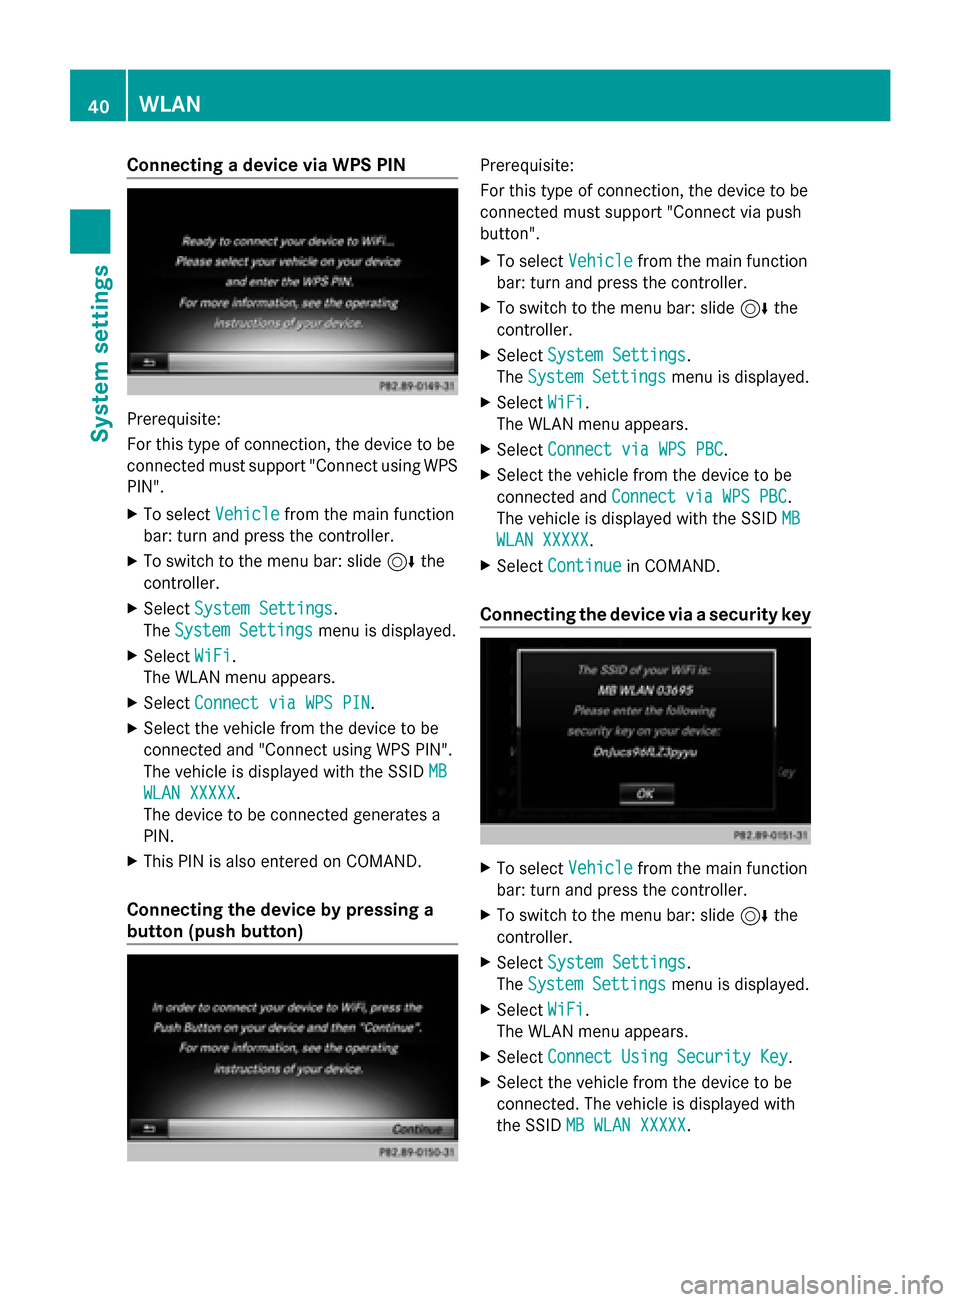
Connecting a device via WPS PIN
Prerequisite:
For this type of connection, the device to be
connected must support "Connect using WPS
PIN".
X To select Vehicle
Vehicle from the main function
bar: turn and press the controller.
X To switch to the menu bar: slide 6the
controller.
X Select System Settings
System Settings.
The System Settings
System Settings menu is displayed.
X Select WiFi
WiFi.
The WLAN menu appears.
X Select Connect via WPS PIN Connect via WPS PIN .
X Select the vehicle from the device to be
connected and "Connect using WPS PIN".
The vehicle is displayed with the SSID MB
MB
WLAN XXXXX
WLAN XXXXX.
The device to be connected generates a
PIN.
X This PIN is also entered on COMAND.
Connecting the device by pressing a
button (push button) Prerequisite:
For this type of connection, the device to be
connected must support "Connect via push
button".
X To select Vehicle Vehiclefrom the main function
bar: turn and press the controller.
X To switch to the menu bar: slide 6the
controller.
X Select System Settings
System Settings.
The System Settings
System Settings menu is displayed.
X Select WiFi
WiFi.
The WLAN menu appears.
X Select Connect via WPS PBC
Connect via WPS PBC .
X Select the vehicle from the device to be
connected and Connect via WPS PBC Connect via WPS PBC .
The vehicle is displayed with the SSID MB
MB
WLAN XXXXX
WLAN XXXXX.
X Select Continue
Continue in COMAND.
Connecting the device via a security key X
To select Vehicle
Vehiclefrom the main function
bar: turn and press the controller.
X To switch to the menu bar: slide 6the
controller.
X Select System Settings
System Settings.
The System Settings
System Settings menu is displayed.
X Select WiFi
WiFi.
The WLAN menu appears.
X Select Connect Using Security Key
Connect Using Security Key .
X Select the vehicle from the device to be
connected. The vehicle is displayed with
the SSID MB WLAN XXXXX MB WLAN XXXXX. 40
WLANSystem settings
Page 43 of 214

X
Enter the security key that appears on the
COMAND display for the device to be con-
nected.
X Confirm the entry. Generating a new security key
X
To select Vehicle Vehiclefrom the main function
bar: turn and press the controller.
X To switch to the menu bar: slide 6the
controller.
X Select System Settings
System Settings.
The System Settings
System Settings menu appears.
X Select WiFi
WiFi.
The WLAN menu appears.
X Select Generate Security Key
Generate Security Key .
X Select Regenerate
Regenerate.
A new security key is generated.
X To save the security key: turn the controller
and select Save Save.
The WLAN menu appears. The new security
key will now be displayed and verified when
a connection is established via the security
key. The connection must be re-estab-
lished with the newly created security key.
i Device connections established using the
previous security key will no longer work
after the security key is changed. You have
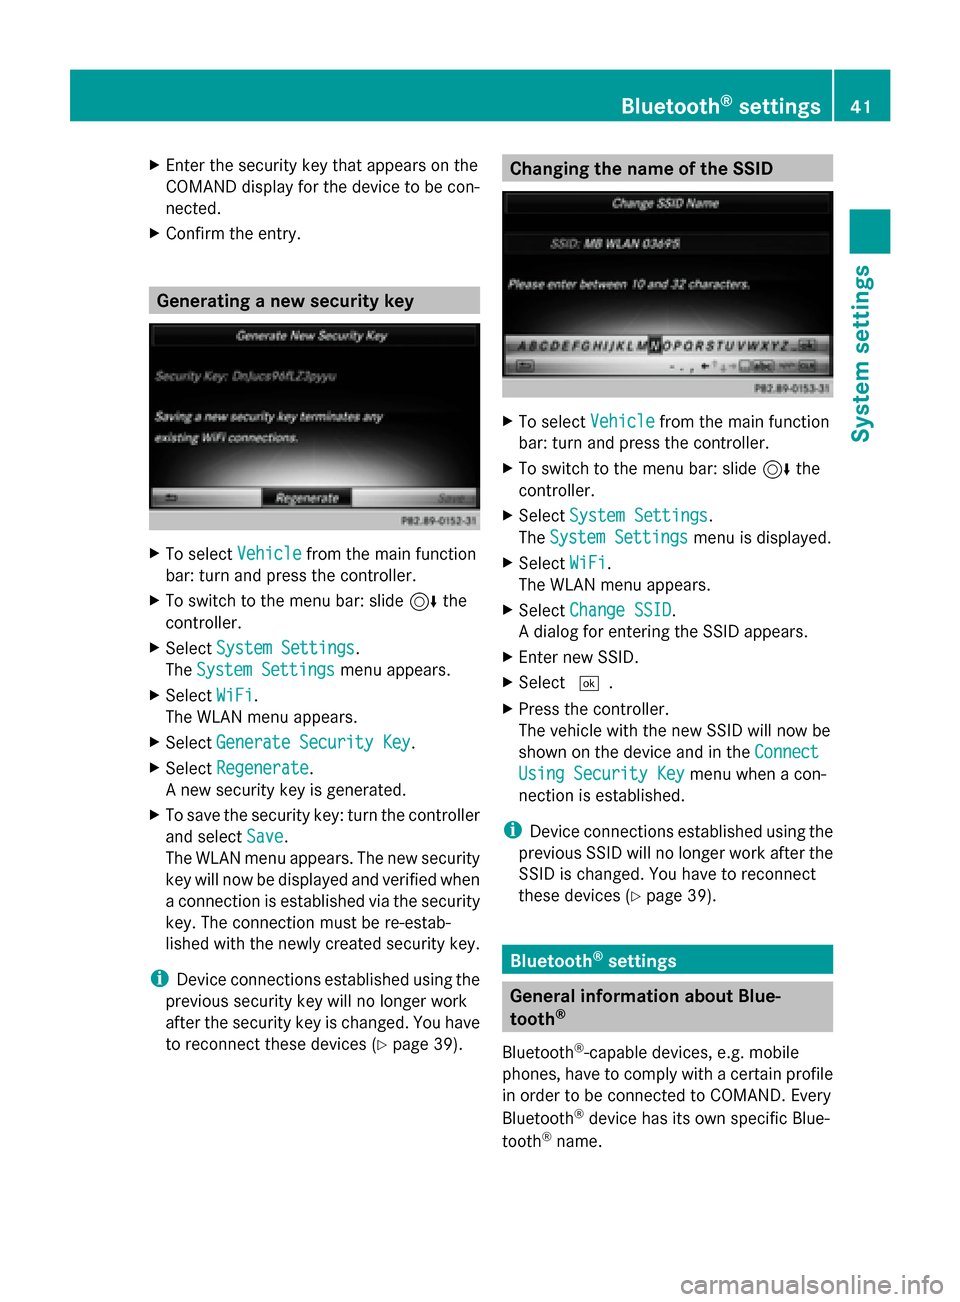
to reconnect these devices ( Ypage 39). Changing the name of the SSID
X
To select Vehicle Vehiclefrom the main function
bar: turn and press the controller.
X To switch to the menu bar: slide 6the
controller.
X Select System Settings
System Settings.
The System Settings
System Settings menu is displayed.
X Select WiFi
WiFi.
The WLAN menu appears.
X Select Change SSID
Change SSID.
A dialog for entering the SSID appears.
X Enter new SSID.
X Select 0054.
X Press the controller.
The vehicle with the new SSID will now be
shown on the device and in the Connect Connect
Using Security Key
Using Security Key menu when a con-
nection is established.
i Device connections established using the
previous SSID will no longer work after the
SSID is changed. You have to reconnect
these devices (Y page 39). Bluetooth
®
settings General information about Blue-
tooth
®
Bluetooth ®
-capable devices, e.g. mobile
phones, have to comply with a certain profile
in order to be connected to COMAND. Every
Bluetooth ®
device has its own specific Blue-
tooth ®
name. Bluetooth
®
settings 41System settings