2015 MERCEDES-BENZ B-CLASS SPORTS warning
[x] Cancel search: warningPage 258 of 346
Cargo compartment cover
Important safety notes
GWARNING
On its own, the cargo compartment cover
cannot secure or restrain heavy objects,
items of luggage and heavy loads. You could
be hit by an unsecured load during sudden
changes in direction, braking or in the event of an accident. There is an increased risk of
injury or even fatal injury.
Always store objects so that they cannot be
flung around. Secure objects, luggage or
loads against slipping or tipping over, e.g. by
using tie downs, even if you are using the
cargo compartment cover.
!When loading the vehicle, make sure that
you do not stack the load in the cargo com-
partment higher than the lower edge of the side windows. Do not place heavy objects
on top of the cargo compartment cover.
!When removing and installing the cargo
compartment cover, ensure that its end
caps do not scrape the light-colored parts
of the vehicle.
The cargo compartment cover is located
behind the rear bench seat backrest.
Extending/retracting the cargo com-
partment cover
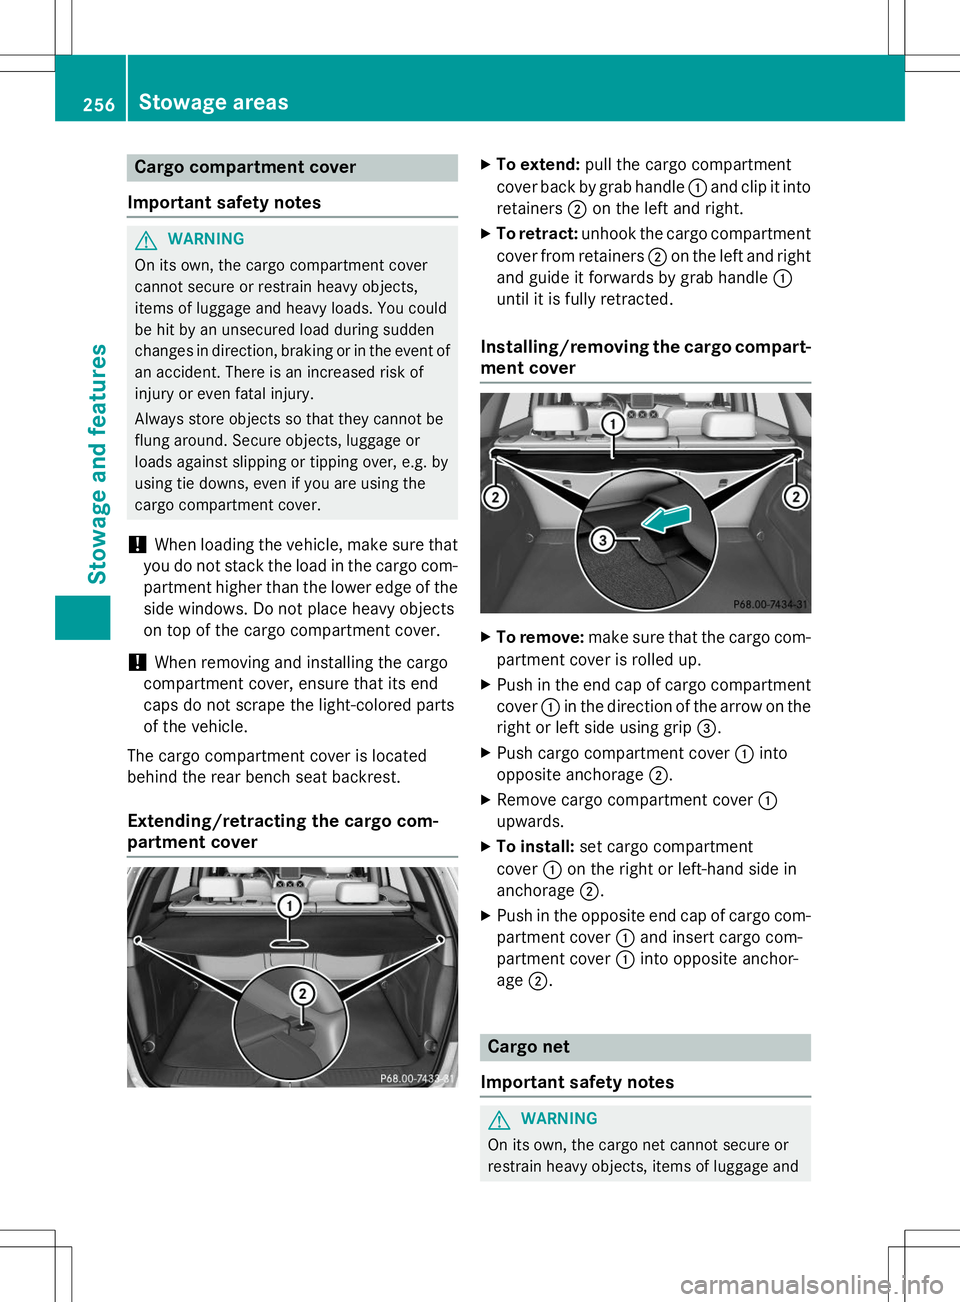
X To extend: pull the cargo compartment
cover back by grab handle :and clip it into
retainers ;on the left and right.
X To retract: unhook the cargo compartment
cover from retainers ;on the left and right
and guide it forwards by grab handle :
until it is fully retracted.
Installing/removing the cargo compart-
ment cover
X To remove: make sure that the cargo com-
partment cover is rolled up.
X Push in the end cap of cargo compartment
cover :in the direction of the arrow on the
right or left side using grip =.
X Push cargo compartment cover :into
opposite anchorage ;.
X Remove cargo compartment cover :
upwards.
X To install: set cargo compartment
cover :on the right or left-hand side in
anchorage ;.
X Push in the opposite end cap of cargo com-
partment cover :and insert cargo com-
partment cover :into opposite anchor-
age ;.
Cargo net
Important safety notes
GWARNING
On its own, the cargo net cannot secure or
restrain heavy objects, items of luggage and
256Stowage areas
Stowage and features
Page 261 of 346
floor away so that it engages in the guide onthe upper level.
Cargo compartment floor ;engages in
the upper position.
iCarry out this step using both hands.
X To lower: raise cargo compartment
floor ;slightly using handle :and pull it
towards you.
X Lower cargo compartment floor ;again
slowly. Whilst doing so, press the cargo
compartment floor into the lower level.
Cargo compartment floor ;engages in
the lower position.
Roof carrier
Important safety notes
GWARNING
When you load the roof, the center of gravity
of the vehicle rises and the driving character- istics change. If you exceed the maximum roof
load, the driving characteristics, as well as
steering and braking, will be greatly impaired.There is a risk of an accident.
Never exceed the maximum roof load and
adjust your driving style.
!Mercedes-Benz recommends that you
only use roof carriers that have been tested
and approved for Mercedes-Benz vehicles.
This helps to prevent damage to the vehi-cle.
Position the load on the roof rack in such a
way that the vehicle will not sustain dam-
age even when it is in motion.
Ensure that, depending on the vehicle's
equipment, you can raise the panorama
roof with power tilt/sliding panel fully and
open the tailgate fully when the roof carrier is installed.
You will find information on the maximum roof
load in the "Technical data" section( Y page 341). An incorrectly secured roof carrier or roof
load may become detached from the vehicle.
You must therefore ensure that you observe
the roof carrier manufacturer's installation
instructions.
Attaching the roof carrier
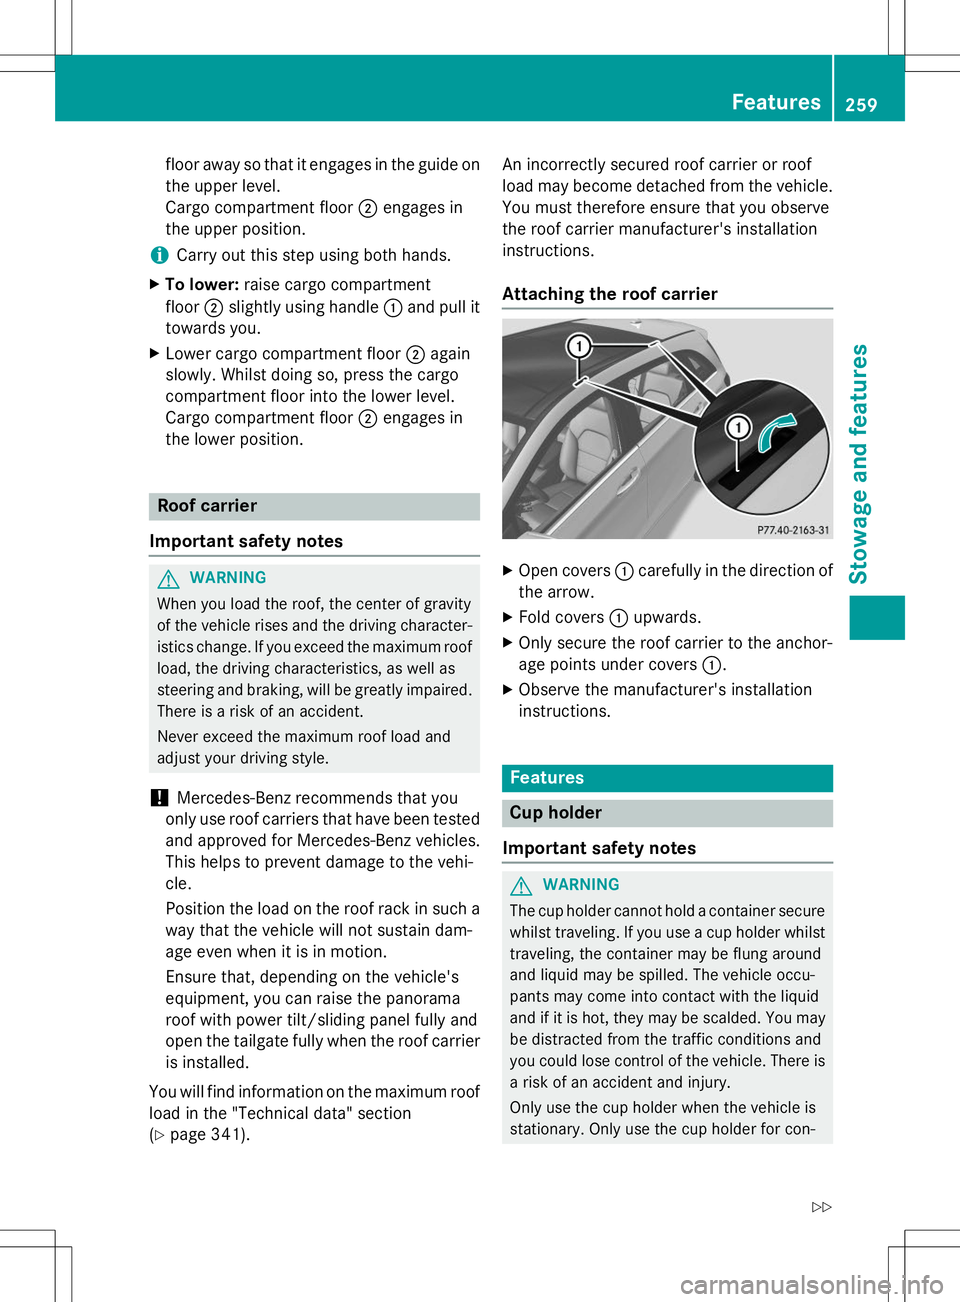
X Open covers :carefully in the direction of
the arrow.
X Fold covers :upwards.
X Only secure the roof carrier to the anchor-
age points under covers :.
X Observe the manufacturer's installation
instructions.
Features
Cup holder
Important safety notes
GWARNING
The cup holder cannot hold a container secure whilst traveling. If you use a cup holder whilsttraveling, the container may be flung around
and liquid may be spilled. The vehicle occu-
pants may come into contact with the liquid
and if it is hot, they may be scalded. You may
be distracted from the traffic conditions and
you could lose control of the vehicle. There is a risk of an accident and injury.
Only use the cup holder when the vehicle is
stationary. Only use the cup holder for con-
Features259
Stowage and features
Z
Page 262 of 346
tainers of the right size. Always close the con-tainer, particularly if the liquid is hot.
GWARNING
If objects in the passenger compartment are
stowed incorrectly, they can slide or be
thrown around and hit vehicle occupants.
There is a risk of injury, particularly in the
event of sudden braking or a sudden change
in direction.
R Always stow objects so that they cannot be
thrown around in such situations.
R Always make sure that objects do not pro-
trude from stowage spaces, parcel nets or
stowage nets.
R Close the lockable stowage spaces while
driving.
R Stow and secure objects that are heavy,
hard, pointy, sharp-edged, fragile or too
large in the cargo compartment.
!Only use the cup holders for containers of
the right size and which have lids. The
drinks could otherwise spill.
Observe the loading guidelines ( Ypage 248).
The stowage compartments in the doors pro-
vide space for bottles:
R front: capacity up to 51 fl. oz. (1.5 l)
R rear: capacity up to 17 fl. oz. (0.5 l)
Cup holder in the front-compartment
center console
The cup holder and the rubber mat under-
neath can be removed for cleaning. Clean
them with clean, lukewarm water only.
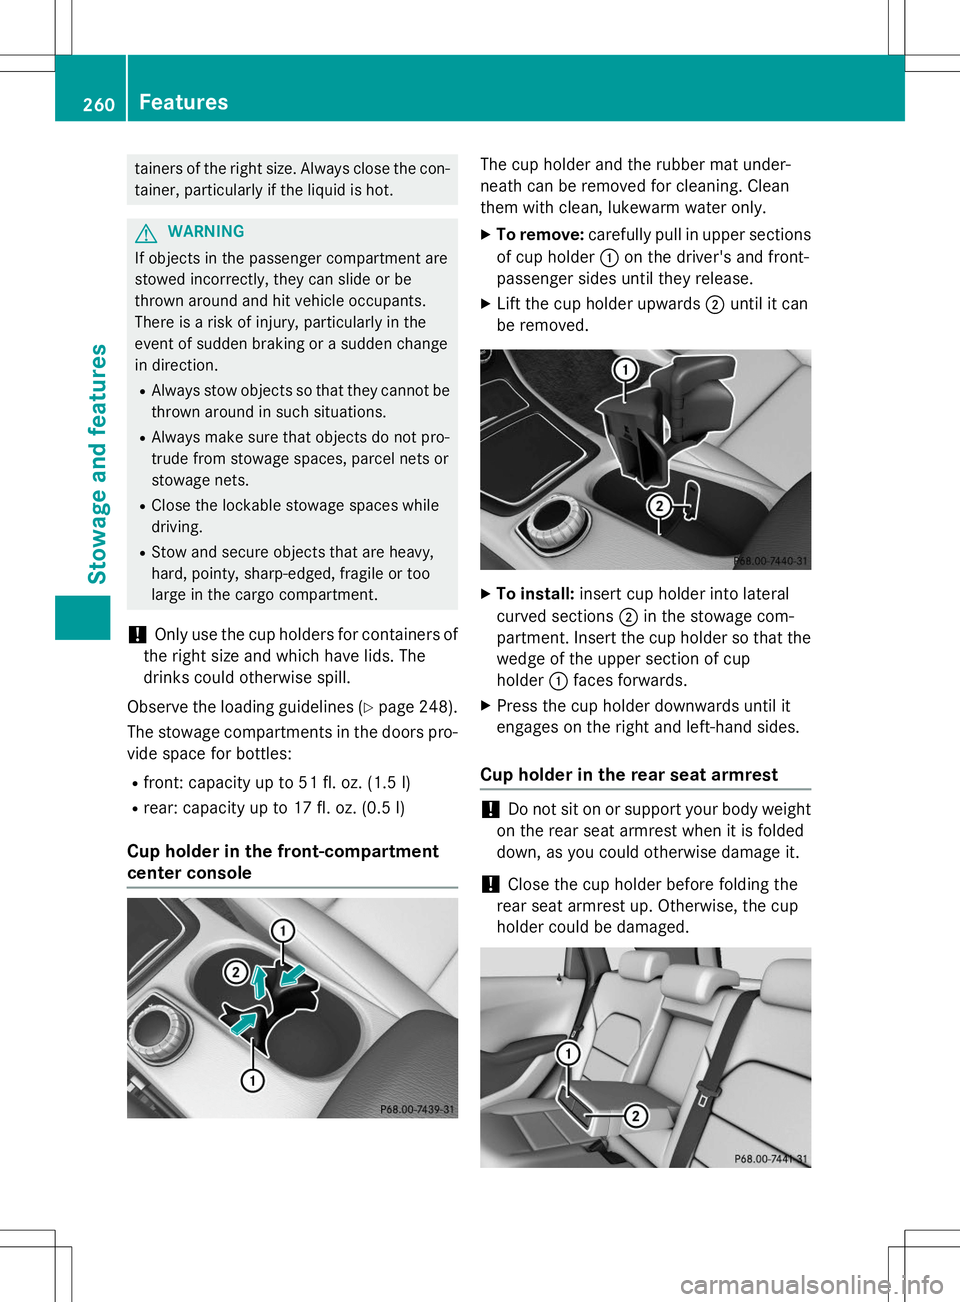
X To remove: carefully pull in upper sections
of cup holder :on the driver's and front-
passenger sides until they release.
X Lift the cup holder upwards ;until it can
be removed.
X To install: insert cup holder into lateral
curved sections ;in the stowage com-
partment. Insert the cup holder so that the wedge of the upper section of cup
holder :faces forwards.
X Press the cup holder downwards until it
engages on the right and left-hand sides.
Cup holder in the rear seat armrest
!Do not sit on or support your body weight
on the rear seat armrest when it is folded
down, as you could otherwise damage it.
!Close the cup holder before folding the
rear seat armrest up. Otherwise, the cup
holder could be damaged.
260Features
Stowage and features
Page 263 of 346
XFold down the rear seat armrest.
X To open: press the front of cup holder :
or ; .
Cup holder :or; extends automatically.
X To close: slide cup holder :or; back
until it engages.
Sun visors
Overview
GWARNING
If the mirror cover of the vanity mirror is folded up when the vehicle is in motion, you could be
blinded by incident light. There is a risk of an
accident.
Always keep the mirror cover folded down
while driving.
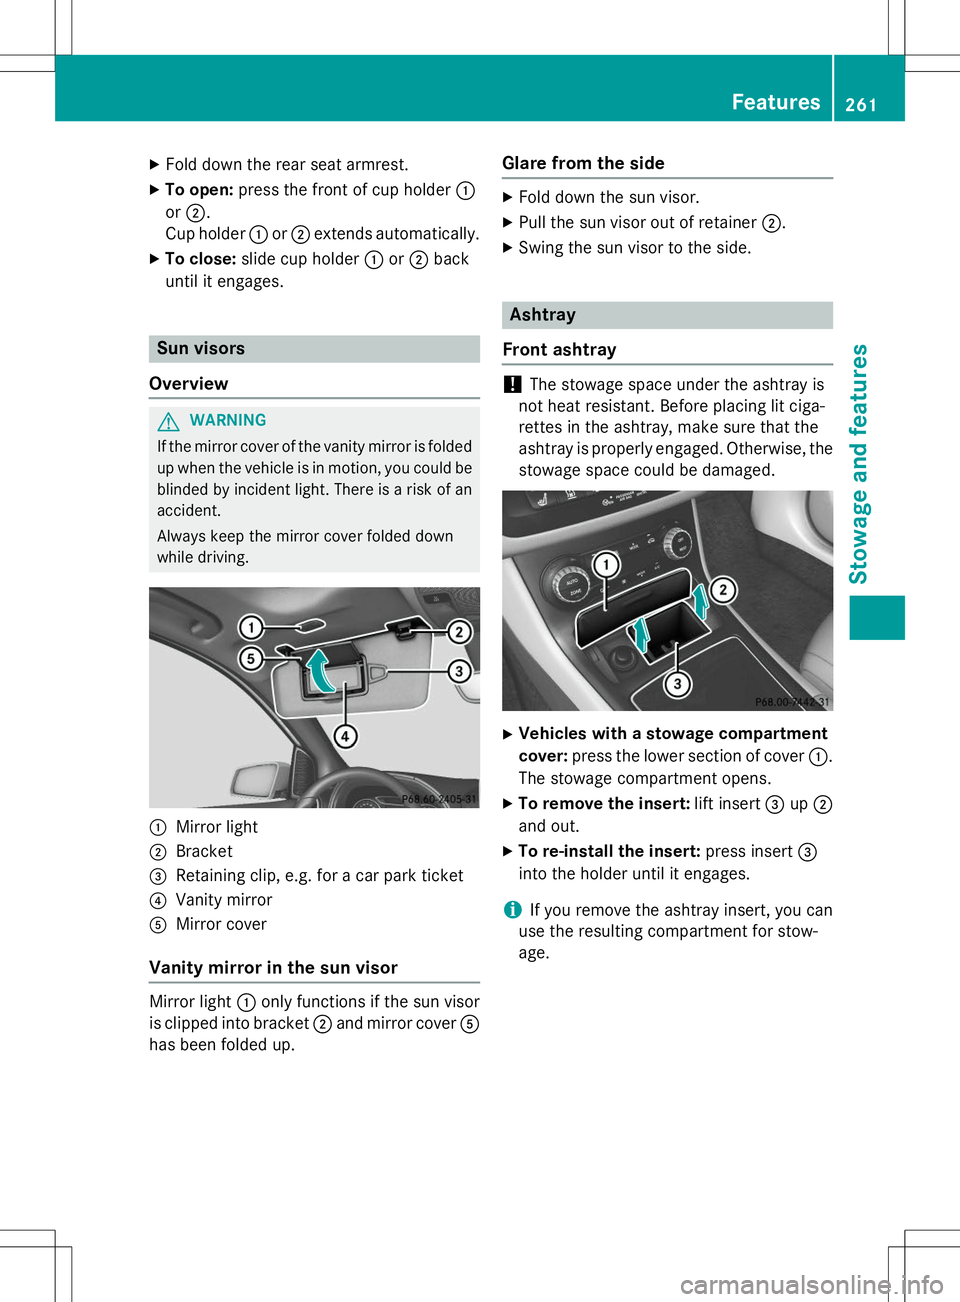
:Mirror light
;Bracket
=Retaining clip, e.g. for a car park ticket
?Vanity mirror
AMirror cover
Vanity mirror in the sun visor
Mirror light :only functions if the sun visor
is clipped into bracket ;and mirror cover A
has been folded up.
Glare from the side
X Fold down the sun visor.
X Pull the sun visor out of retainer ;.
X Swing the sun visor to the side.
Ashtray
Front ashtray
!The stowage space under the ashtray is
not heat resistant. Before placing lit ciga-
rettes in the ashtray, make sure that the
ashtray is properly engaged. Otherwise, the
stowage space could be damaged.
X Vehicles with a stowage compartment
cover: press the lower section of cover :.
The stowage compartment opens.
X To remove the insert: lift insert=up;
and out.
X To re-install the insert: press insert=
into the holder until it engages.
iIf you remove the ashtray insert, you can
use the resulting compartment for stow-
age.
Features261
Stowage and features
Z
Page 264 of 346
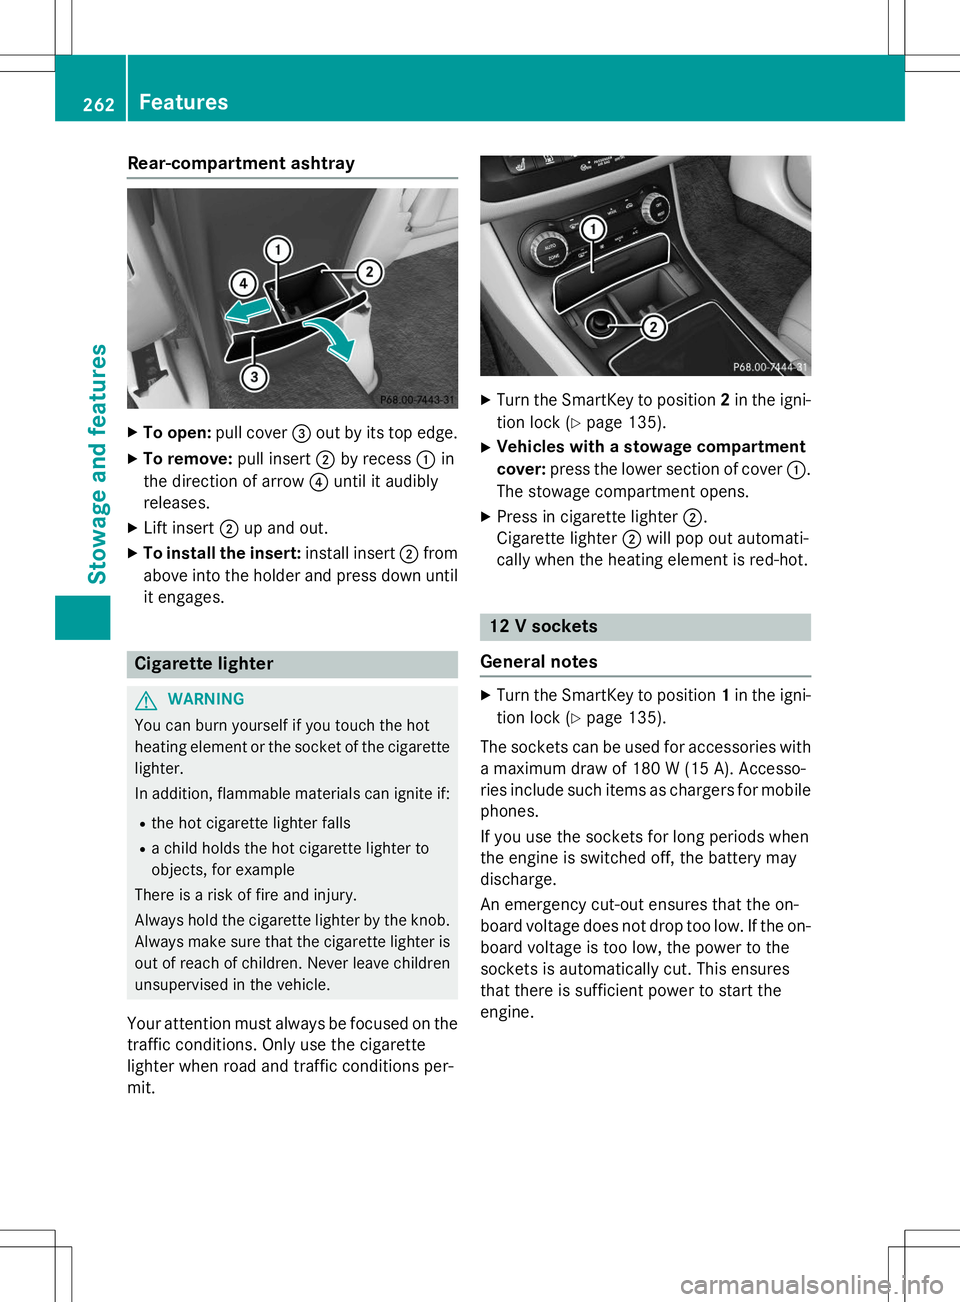
Rear-compartment ashtray
XTo open: pull cover =out by its top edge.
X To remove: pull insert;by recess :in
the direction of arrow ?until it audibly
releases.
X Lift insert ;up and out.
X To install the insert: install insert;from
above into the holder and press down until it engages.
Cigarette lighter
GWARNING
You can burn yourself if you touch the hot
heating element or the socket of the cigarette lighter.
In addition, flammable materials can ignite if:
R the hot cigarette lighter falls
R a child holds the hot cigarette lighter to
objects, for example
There is a risk of fire and injury.
Always hold the cigarette lighter by the knob.
Always make sure that the cigarette lighter is
out of reach of children. Never leave children unsupervised in the vehicle.
Your attention must always be focused on the traffic conditions. Only use the cigarette
lighter when road and traffic conditions per-mit.
X Turn the SmartKey to position 2in the igni-
tion lock ( Ypage 135).
X Vehicles with a stowage compartment
cover: press the lower section of cover :.
The stowage compartment opens.
X Press in cigarette lighter ;.
Cigarette lighter ;will pop out automati-
cally when the heating element is red-hot.
12 V sockets
General notes
X Turn the SmartKey to position 1in the igni-
tion lock ( Ypage 135).
The sockets can be used for accessories with a maximum draw of 180 W(15 A). Accesso-
ries include such items as chargers for mobile
phones.
If you use the sockets for long periods when
the engine is switched off, the battery may
discharge.
An emergency cut-out ensures that the on-
board voltage does not drop too low. If the on-
board voltage is too low, the power to the
sockets is automatically cut. This ensures
that there is sufficient power to start the
engine.
262Features
Stowage and fea tures
Page 266 of 346
Important safety notes
GWARNING
When you operate or program the garage doorwith the integrated garage door opener, per-
sons in the range of movement of the garage
door can become trapped or struck by the
garage door. There is a risk of injury.
When using the integrated garage door
opener, always make sure that nobody is
within the range of movement of the garage
door.
GWARNING
Combustion engines emit poisonous exhaust
gases such as carbon monoxide. Inhaling
these exhaust gases leads to poisoning. There is a risk of fatal injury. Therefore never leave
the engine running in enclosed spaces with-
out sufficient ventilation.
Programming
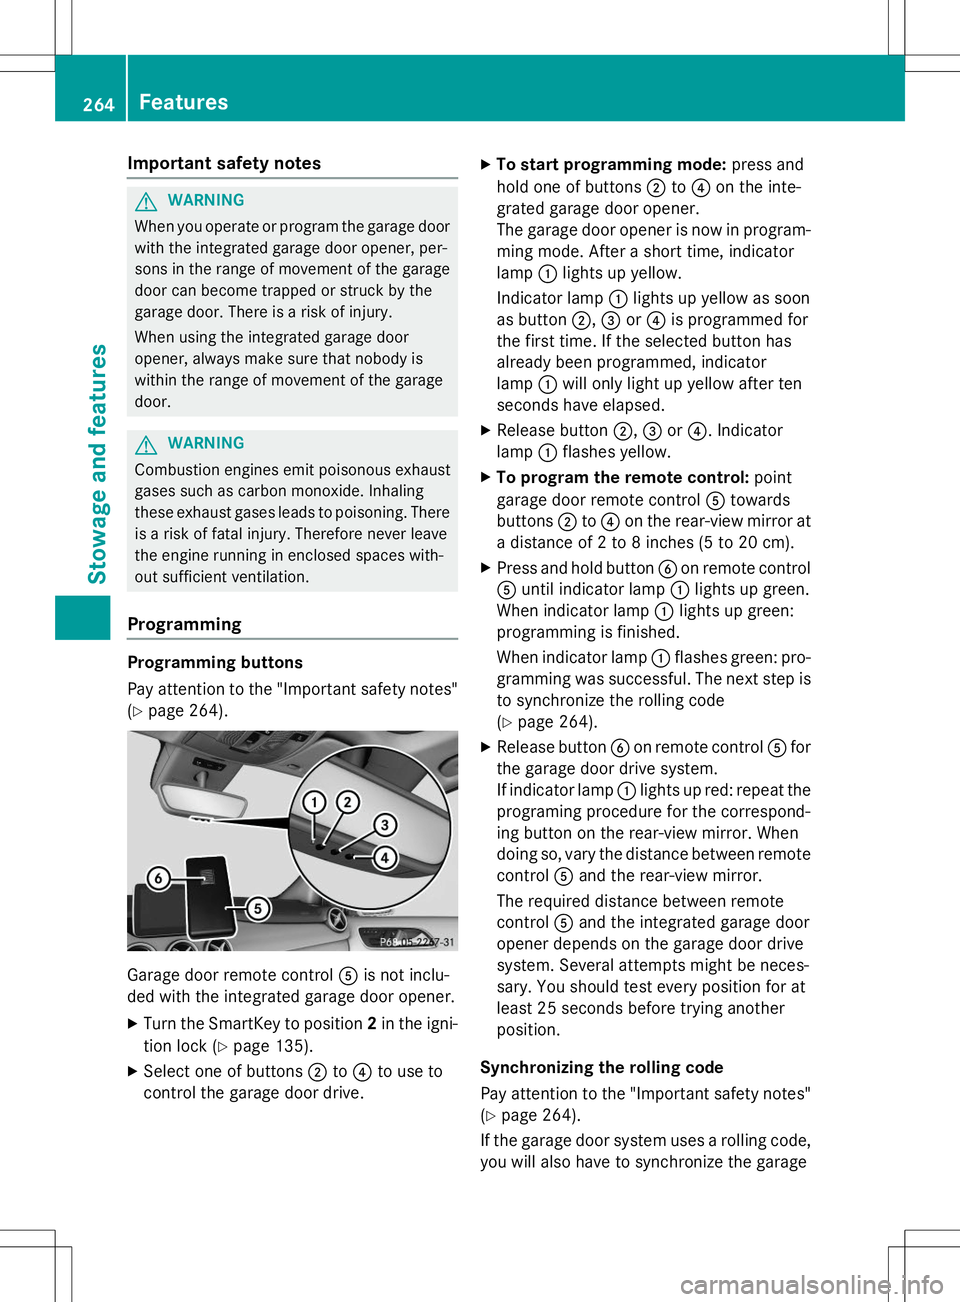
Programming buttons
Pay attention to the "Important safety notes"
( Y page 264).
Garage door remote control Ais not inclu-
ded with the integrated garage door opener.
X Turn the SmartKey to position 2in the igni-
tion lock ( Ypage 135).
X Select one of buttons ;to? to use to
control the garage door drive. X
To start programming mode: press and
hold one of buttons ;to? on the inte-
grated garage door opener.
The garage door opener is now in program-
ming mode. After a short time, indicatorlamp :lights up yellow.
Indicator lamp :lights up yellow as soon
as button ;,= or? is programmed for
the first time. If the selected button has
already been programmed, indicatorlamp :will only light up yellow after ten
seconds have elapsed.
X Release button ;,= or? . Indicator
lamp :flashes yellow.
X To program the remote control: point
garage door remote control Atowards
buttons ;to? on the rear-view mirror at
a distance of 2 to 8 inches (5 to 20 cm).
X Press and hold button Bon remote control
A until indicator lamp :lights up green.
When indicator lamp :lights up green:
programming is finished.
When indicator lamp :flashes green: pro-
gramming was successful. The next step is to synchronize the rolling code ( Y page 264).
X Release button Bon remote control Afor
the garage door drive system.
If indicator lamp :lights up red: repeat the
programing procedure for the correspond-
ing button on the rear-view mirror. When
doing so, vary the distance between remote control Aand the rear-view mirror.
The required distance between remote
control Aand the integrated garage door
opener depends on the garage door drive
system. Several attempts might be neces-
sary. You should test every position for at
least 25 seconds before trying another
position.
Synchronizing the rolling code
Pay attention to the "Important safety notes"
( Y page 264).
If the garage door system uses a rolling code,
you will also have to synchronize the garage
264Features
Stowage and featu res
Page 270 of 346
Magnetic field zone maps
North America
South America
Floormats
GWARNING
Objects in the driver's footwell can restrict thepedal travel or obstruct a depressed pedal.
The operating and road safety of the vehicle is
jeopardized. There is a risk of an accident.
Make sure that all objects in the vehicle are
stowed correctly, and that they cannot enter
the driver's footwell. Install the floormats
securely and as specified in order to ensure
sufficient clearance for the pedals. Do not use loose floormats and do not place floormats ontop of one another.
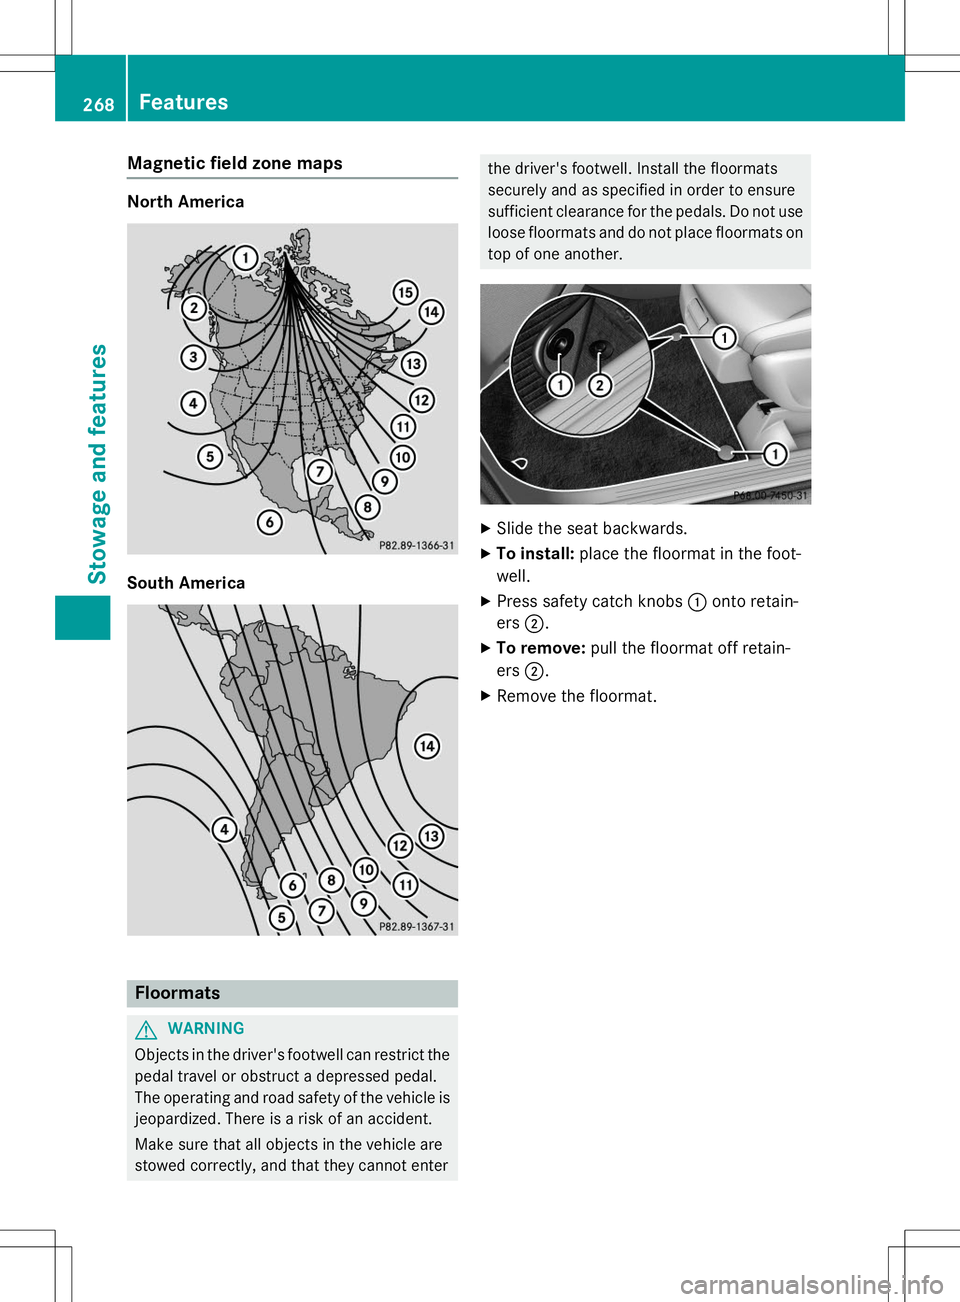
X Slide the seat backwards.
X To install: place the floormat in the foot-
well.
X Press safety catch knobs :onto retain-
ers ;.
X To remove: pull the floormat off retain-
ers ;.
X Remove the floormat.
268Features
Stowage and features
Page 272 of 346
Useful information
iThis Operator's Manual describes all
models and all standard and optional equip- ment of your vehicle available at the time of
publication of the Operator's Manual.
Country-specific differences are possible.
Please note that your vehicle may not be
equipped with all features described. This
also applies to safety-related systems and
functions.
iRead the information on qualified special-
ist workshops ( Ypage 24).
Engine compartment
Hood
Important safety notes
GWARNING
If the hood is unlatched, it may open up when the vehicle is in motion and block your view.
There is a risk of an accident.
Never unlatch the hood while driving. Before
every trip, ensure that the hood is locked.
GWARNING
When opening and closing the hood, it may
suddenly fall into the closed position. There is a risk of injury to persons within range of
movement of the hood.
Open and close the hood only when no one is
within its range of movement.
GWARNING
Opening the hood when the engine is over-
heated or when there is a fire in the engine
compartment could expose you to hot gases
or other service products. There is a risk of
injury.
Let an overheated engine cool down before
opening the hood. If there is a fire in the
engine compartment, keep the hood closed
and contact the fire department.
GWARNING
The engine compartment contains moving
components. Certain components, such as
the radiator fan, may continue to run or start
again suddenly when the ignition is off. There is a risk of injury.
If you need to do any work inside the engine
compartment:
R switch off the ignition
R never reach into the area where there is a
risk of danger from moving components,
such as the fan rotation area
R remove jewelry and watches
R keep items of clothing and hair, for exam-
ple, away from moving parts
GWARNING
The ignition system and the fuel injection sys-
tem work under high voltage. If you touch
components which are under voltage, you
could get an electric shock. There is a risk of
injury.
Never touch components of the ignition sys-
tem or fuel injection system when the ignition is switched on.
Opening the hood
GWARNING
Certain components in the engine compart-
ment, such as the engine, radiator and parts
of the exhaust system, can become very hot.
Working in the engine compartment poses a
risk of injury.
Where possible, let the engine cool down and touch only the components described in the following.
GWARNING
When the hood is open and the windshield
wipers are set in motion, you can be injured bythe wiper linkage. There is a risk of injury.
Always switch off the windshield wipers and
the ignition before opening the hood.
270Engine compartment
Maintenance and care