2015 MERCEDES-BENZ B-CLASS SPORTS reset
[x] Cancel search: resetPage 6 of 346
1, 2, 3 ...
4ETS (Electronic Traction System)see ETS/4ETS (Electronic Trac-
tion System)
4MATIC
Display message ............................ 232
4MATIC (permanent four-wheel
drive) .................................................. 172
12 V socket
see Sockets
A
ABS (Anti-lock Braking System)Display message ............................ 208
Function/notes ................................ 61
Important safety notes .................... 61
Warning lamp ................................ .238
Accident
Automatic measures after an acci-
dent ................................................. 54
Activating/deactivating cooling
with air dehumidification ................. 124
Active Parking Assist
Detecting parking spaces .............. 176
Display message ............................ 227
Exiting a parking space .................. 178
Function/notes ............................ .175
Important safety notes .................. 175
Parking .......................................... 177
ADAPTIVE BRAKE ................................. 66
Adaptive Brake Assist
Function/notes ................................ 63
Adaptive Highbeam Assist
Function/notes ............................ .107
Switching on/off ........................... 108
Additional speedometer ................... 204
Additives (engine oil) ........................ 338
Air bag
Occupant Classification System
(OCS) ............................................... 47
Air bags
Deployment ..................................... 52
Display message ............................ 218
Front air bag (driver, front
passenger) ....................................... 45
Important safety notes .................... 44 Introduction ..................................... 44
Knee bag .......................................... 46
PASSENGER AIR BAG indicator
lamps ............................................... 39
Side impact air bag .......................... 46
Window curtain air bag .................... 46
Air vents
Important safety notes .................. 131
Rear ............................................... 132
Setting the center air vents ........... 131
Setting the side air vents .............. .131
Air-conditioning system
see Climate control
Alarm
ATA (Anti-Theft Alarm system) ......... 67
Switching off (ATA) .......................... 67
Switching the function on/off
(ATA) ................................................ 67
Animals in the vehicle ......................... 60
Ashtray ............................................... 261
Assistance display (on-board com- puter) ................................................. .202
Assistance menu (on-board com-puter) ................................................. .201
ASSYST PLUS
Displaying a service message ....... .275
Driving abroad ............................... 275
Hiding a service message .............. 274
Information about Service ............. 275
Resetting the service interval dis-pla y................................................ 275
Service message ............................ 274
Special service requirements ......... 275
ATA (Anti-Theft Alarm system)
Activating/deactivating ................... 67
Function ........................................... 67
Switching off the alarm .................... 67
ATTENTION ASSIST
Activating/deactivating ................. 203
Display message ............................ 225
Function/note s............................. 183
Audio menu (on-board computer) .... 199
Audio system
see separate operating instructions
Authorized Mercedes-Benz Center
see Qualified specialist workshop
4Index
Page 17 of 346
SeatsAdjusting (electrically) ..................... 94
Adjusting (manually) ........................ 94
Adjusting the 4-way lumbar sup-
port .................................................. 95
Adjusting the head restraint ............ 94
Cleaning the cover ........................ .281
Correct driver's seat position ........... 92
Folding the backrest (rear com-
partment) forwards/back (vehi-
cles with the EASY-VARIO-PLUS
system) .......................................... 253
Folding the backrest (rear com-
partment) forwards/back (vehi-
cles without the EASY-VARIO-
PLUS system) ................................ 252
Important safety notes .................... 93
Seat heating problem ..................... .97
Storing settings (memory func-
tion) ............................................... 101
Switching seat heating on/of f......... 96
Securing cargo .................................. 255
Selector lever
Cleaning ......................................... 280
Sensors (cleaning instructions) ....... 279
Service menu (on-board com- puter) .................................................. 204
Service message
see ASSYST PLUS
Service products
Brake fluid ..................................... 338
Coolant (engine) ............................ 339
Engine oil ....................................... 337
Fuel ................................................ 335
Important safety notes .................. 335
Refrigerant (air-conditioning sys-
tem) ............................................... 340
Washer fluid ................................... 339
Setting the air distribution ............... 127
Setting the airflow ............................ 127
Settings
Factory (on-board computer) ......... 206
On-board computer ....................... 204
Side impact air bag ............................. 46
Side marker lamp (display mes-
sage) ................................................... 221 Side windows
Cleaning ......................................... 278
Convenience closing feature ............ 83
Convenience opening feature .......... 82
Important safety information ........... 81
Opening/closing .............................. 82
Problem (malfunction) ..................... 85
Resetting ......................................... 84
Reversing feature ............................. 81
Sliding sunroof
see Panorama roof with power
tilt/sliding panel
SmartKey
Changing the battery ....................... 74
Changing the programming ............. 72
Checking the battery ....................... 73
Convenience closing feature ............ 83
Convenience opening feature .......... 82
Display message ............................ 234
Door central locking/unlocking ....... 70
Important safety notes .................... 70
KEYLESS-GO start function .............. 72
Loss ................................................. 75
Mechanical key ................................ 72
Positions (ignition lock) ................. 135
Problem (malfunction) ..................... 75
Starting the engine ........................ 137
SmartKey positions (ignition lock) .. 135
Snow chains ...................................... 305
Sockets
Center console .............................. 263
General notes ................................ 262
Luggage compartment ................... 263
Rear compartment ......................... 263
Special seat belt retractor .................. 55
Specialist workshop ............................ 24
Speed, controlling
see Cruise control
Speedometer
Activating/deactivating the addi-
tional speedometer ........................ 204
Digital ............................................ 197
In the Instrument cluster ................. 29
Segments ...................................... 193
Selecting the unit of measure-
ment .............................................. 204
Standing lamps
Display message ............................ 221
Index15
Page 20 of 346
Trim pieces (cleaning instruc-
tions).................................................. 281
Trip computer (on-board com-
puter) .................................................. 196
Trip odometer
Calling up ....................................... 196
Resetting (on-board computer) ...... 197
Trunk load (maximum) ...................... 341
Turn signals
Changing bulbs (front) ................... 112
Display message ............................ 219
Switching on/off ........................... 106
Type identification plate
see Vehicle identification plate
U
UnlockingEmergency unlocking ....................... 78
From inside the vehicle (central
unlocking button) ............................. 78
V
Vanity mirror (in the sun visor) ........ 261
Vehicle
Correct use ...................................... 24
Data acquisition ............................... 25
Display message ............................ 230
Equipment ....................................... 21
Individual settings .......................... 204
Limited Warranty ............................. 25
Loading .......................................... 310
Locking (in an emergency) ............... 79
Locking (SmartKey) .......................... 70
Lowering ........................................ 325
Maintenance .................................... 21
Parking for a long period ................ 155
Pulling away ................................... 138
Raising ........................................... 323
Reporting problems ......................... 24
Securing from rolling away ............ 323
Transporting .................................. 298
Unlocking (in an emergency) ........... 78
Unlocking (SmartKey) ...................... 70
Vehicle data ................................... 341
Vehicle data
Roof load (maximum) ..................... 341 Trunk load (maximum) ................... 341
Vehicle dimensions ........................... 341
Vehicle emergency locking ................ 79
Vehicle identification number
see VIN
Vehicle identification plate .............. 334
Vehicle tool kit .................................. 284
Ventilation
Setting the vents ........................... 131
Video
Operating the DVD ........................ .200
VIN ...................................................... 334
W
Warning and indicator lamps
ABS ................................................ 238
Brakes .......................................... .237
Check Engine ................................. 244
Coolant .......................................... 244
Distance warning ........................... 246 ESP ®
.............................................. 240
ESP ®
OFF ....................................... 241
LIM (DISTRONIC PLUS) .................. 164
Overview .......................................... 30
PASSENGER AIR BAG ..................... .39
Reserve fuel .................................. .244
Restraint system ............................ 243
Seat belt ........................................ 235
Warranty .............................................. 21
Washer fluid
Display message ............................ 233
Wheel and tire combination
see Tires
Wheel bolt tightening torque ........... 325
Wheel chock ...................................... 323
Wheels
Changing a wheel .......................... 322
Checking ........................................ 303
Cleaning ......................................... 278
Emergency spare wheel ................. 329
General notes ................................ 326
Important safety notes .................. 302
Information on driving .................... 302
Interchanging/changing ................ 322
Mounting a new wheel ................... 325
Removing a wheel .......................... 325
Storing .......................................... .322
18Index
Page 26 of 346
GWARNING
If you connect equipment to the diagnostics
connection in the vehicle, it may affect the
operation of the vehicle systems. As a result,the operating safety of the vehicle could be
affected. There is a risk of an accident.
Do not connect any equipment to a diagnos-
tics connection in the vehicle.
GWARNING
Objects in the driver's footwell can restrict the pedal travel or obstruct a depressed pedal.
The operating and road safety of the vehicle is
jeopardized. There is a risk of an accident.
Make sure that all objects in the vehicle are
stowed correctly, and that they cannot enter
the driver's footwell. Install the floormats
securely and as specified in order to ensure
sufficient clearance for the pedals. Do not use loose floormats and do not place floormats on
top of one another.
!If the engine is switched off and equip-
ment on the diagnostics connection is
used, the starter battery may discharge.
Connecting equipment to the diagnostics
connection can lead to emissions monitoring information being reset, for example. This
may lead to the vehicle failing to meet the
requirements of the next emissions test dur-
ing the main inspection.
Qualified specialist workshop
An authorized Mercedes-Benz Center is a
qualified specialist workshop. It has the nec-
essary specialist knowledge, tools and quali-
fications to correctly carry out the work
required on your vehicle. This is especially the case for work relevant to safety.
Observe the notes in the Maintenance Book- let. Always have the following work carried out at
an authorized Mercedes-Benz Center:
R work relevant to safety
R service and maintenance work
R repair work
R alterations, installation work and modifica-
tions
R work on electronic components
Correct use
If you remove any warning stickers, you or
others could fail to recognize certain dangers.
Leave warning stickers in position.
Observe the following information when driv- ing your vehicle: R the safety notes in this manual
R the vehicle technical data
R traffic rules and regulations
R laws and safety standards pertaining to
motor vehicles
Problems with your vehicle
If you should experience a problem with your
vehicle, particularly one that you believe may affect its safe operation, we urge you to con-
tact an authorized Mercedes-Benz Center
immediately to have the problem diagnosed
and rectified. If the problem is not resolved to
your satisfaction, please discuss the problem
again with a Mercedes-Benz Center or con-
tact us at one of the following addresses.
In the USA
Customer Assistance Center
Mercedes-Benz USA, LLC
One Mercedes Drive
Montvale, NJ 07645-0350
In Canada
Customer Relations Department
Mercedes-Benz Canada, Inc.
98 Vanderhoof Avenue
Toronto, Ontario M4G 4C9
24Introduction
Page 83 of 346
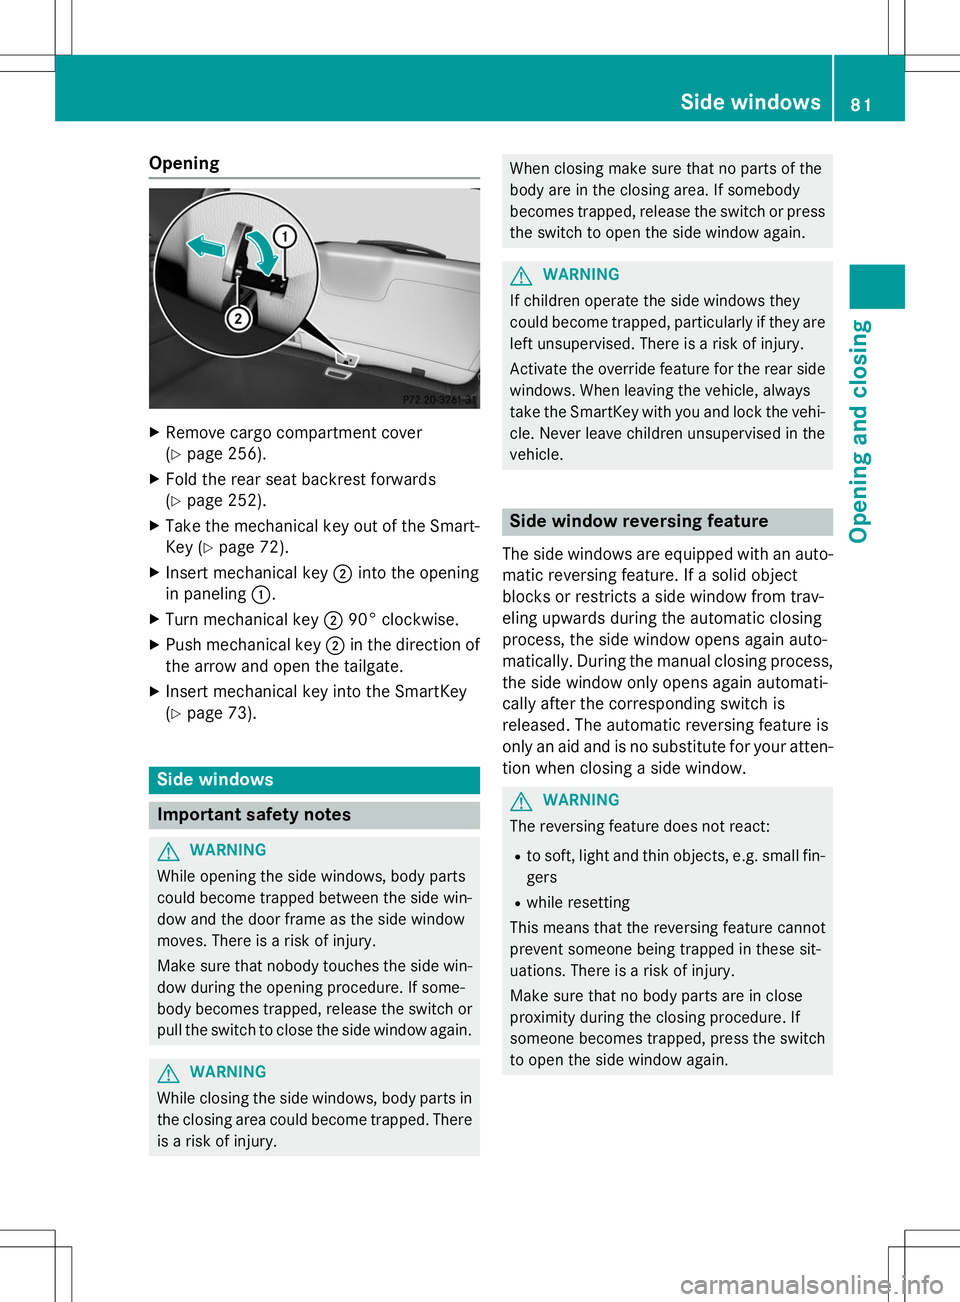
Opening
XRemove cargo compartment cover (Y page 256).
X Fold the rear seat backrest forwards(Y page 252).
X Take the mechanical key out of the Smart-
Key ( Ypage 72).
X Insert mechanical key ;into the opening
in paneling :.
X Turn mechanical key ;90° clockwise.
X Push mechanical key ;in the direction of
the arrow and open the tailgate.
X Insert mechanical key into the SmartKey(Y page 73).
Side windows
Important safety notes
GWARNING
While opening the side windows, body parts
could become trapped between the side win-
dow and the door frame as the side window
moves. There is a risk of injury.
Make sure that nobody touches the side win-
dow during the opening procedure. If some-
body becomes trapped, release the switch or pull the switch to close the side window again.
GWARNING
While closing the side windows, body parts inthe closing area could become trapped. There is a risk of injury.
When closing make sure that no parts of the
body are in the closing area. If somebody
becomes trapped, release the switch or pressthe switch to open the side window again.
GWARNING
If children operate the side windows they
could become trapped, particularly if they are left unsupervised. There is a risk of injury.
Activate the override feature for the rear side
windows. When leaving the vehicle, always
take the SmartKey with you and lock the vehi-
cle. Never leave children unsupervised in thevehicle.
Side window reversing feature
The side windows are equipped with an auto- matic reversing feature. If a solid object
blocks or restricts a side window from trav-
eling upwards during the automatic closing
process, the side window opens again auto-
matically. During the manual closing process,
the side window only opens again automati-
cally after the corresponding switch is
released. The automatic reversing feature is
only an aid and is no substitute for your atten- tion when closing a side window.
GWARNING
The reversing feature does not react:
R to soft, light and thin objects, e.g. small fin-
gers
R while resetting
This means that the reversing feature cannot
prevent someone being trapped in these sit-
uations. There is a risk of injury.
Make sure that no body parts are in close
proximity during the closing procedure. If
someone becomes trapped, press the switch
to open the side window again.
Side windows81
Opening and closing
Z
Page 86 of 346
On vehicles with a panorama roof with powertilt/sliding panel:
X Touch recessed sensor surface :on the
door handle again until the roller sunblind
of the panorama sliding sunroof closes.
X To interrupt convenience closing:
release recessed sensor surface :on the
door handle.
Resetting the side windows
If a side window can no longer be closed fully, you must reset it.
X Close all the doors.
X Turn the SmartKey to position 1or 2in the
ignition lock ( Ypage 135).
X Pull the corresponding switch on the door
control panel until the side window is com-
pletely closed ( Ypage 82).
X Hold the switch for an additional second.
If the side window opens again slightly: X Immediately pull the corresponding switch
on the door control panel until the side win-
dow is completely closed ( Ypage 82).
X Hold the switch for an additional second.
X If the respective side window remains
closed after the button is released, then it
has been set correctly. If this is not the
case, repeat the steps above again.
84Side windows
Opening and closing
Page 87 of 346
Problems with the side windows
GWARNING
If you close a side window again immediately after it has been blocked or reset, the side window
closes with increased or maximum force. The reversing feature is then not active. Parts of the
body could be trapped in the closing area in the process. This poses an increased risk of injury oreven fatal injury.
Make sure that no parts of the body are in the closing area. To stop the closing process, releasethe switch or push the switch again to reopen the side window.
ProblemPossible causes/consequences and MSolutions
A side window cannot
be closed because it is
blocked by objects, e.g.
leaves in the windowguide.X Remove the objects.
X Close the side window.
A side window cannot
be closed and you can-
not see the cause.If a side window is obstructed during closing and reopens again slightly:
X Immediately after the window blocks, pull the corresponding
switch again until the side window has closed.
The side window is closed with increased force.
If a side window is obstructed again during closing and reopens
again slightly: X Immediately after the window blocks, pull the corresponding
switch again until the side window has closed.
The side window is closed without the anti-entrapment feature.
Panorama roof with power tilt/sliding
panel
Important safety notes
In the following section, the term "sliding sun- roof" refers to the panorama roof with power
tilt/sliding panel.
GWARNING
While opening and closing the sliding sunroof,body parts in close proximity could become
trapped. There is a risk of injury.
Make sure that no body parts are in close
proximity during the opening and closing pro-cedures.
If somebody becomes trapped:
R release the switch immediately, or
R during automatic operation, push the
switch briefly in any direction
The opening or closing procedure will be stop-
ped.
GWARNING
If children operate the sliding sunroof they
could become trapped, particularly if they are left unsupervised. There is a risk of injury.
When leaving the vehicle, always take the
SmartKey with you and lock the vehicle. Never
leave children unsupervised in the vehicle.
Panorama roof with power tilt/sliding panel85
Opening and closing
Z
Page 88 of 346
!Only open the sliding sunroof if it is free of
snow and ice. Otherwise, malfunctions may
occur.
Do not allow anything to protrude from the sliding sunroof. Otherwise, the seals could
be damaged.
!The weather can change abruptly. It could
start to rain or snow. Make sure that the
sliding sunroof is closed when you leave the
vehicle. The vehicle electronics can be
damaged if water enters the vehicle inte-rior.
iResonance noises can occur in addition to
the usual airflow noises when the sliding
sunroof is open. They are caused by minor
pressure fluctuations in the vehicle interior.
Change the position of the sliding sunroof
or open a side window slightly to reduce or
eliminate these noises.
Sliding sunroof reversing feature
The sliding sunroof is equipped with an auto-
matic reversing feature. If a solid object
blocks or restricts the sliding sunroof during
the closing process, the sliding sunroof opens again automatically. However, the automatic
reversing feature is only an aid and does not
relieve you of the responsibility of paying
attention when closing the sliding sunroof.
GWARNING
The reversing feature does not react:
R to soft, light and thin objects, e.g. small fin-
gers
R over the last 1/6 in(4 mm) of the closing movement
R during resetting
R when closing the sliding sunroof again man-
ually immediately after automatic reversing
This means that the reversing feature cannot
prevent someone being trapped in these sit-
uations. There is a risk of injury.
Make sure that no body parts are in close
proximity during the closing procedure.
If somebody becomes trapped:
R release the switch immediately, or
R during automatic operation, push the
switch briefly in any direction
The closing process is stopped.
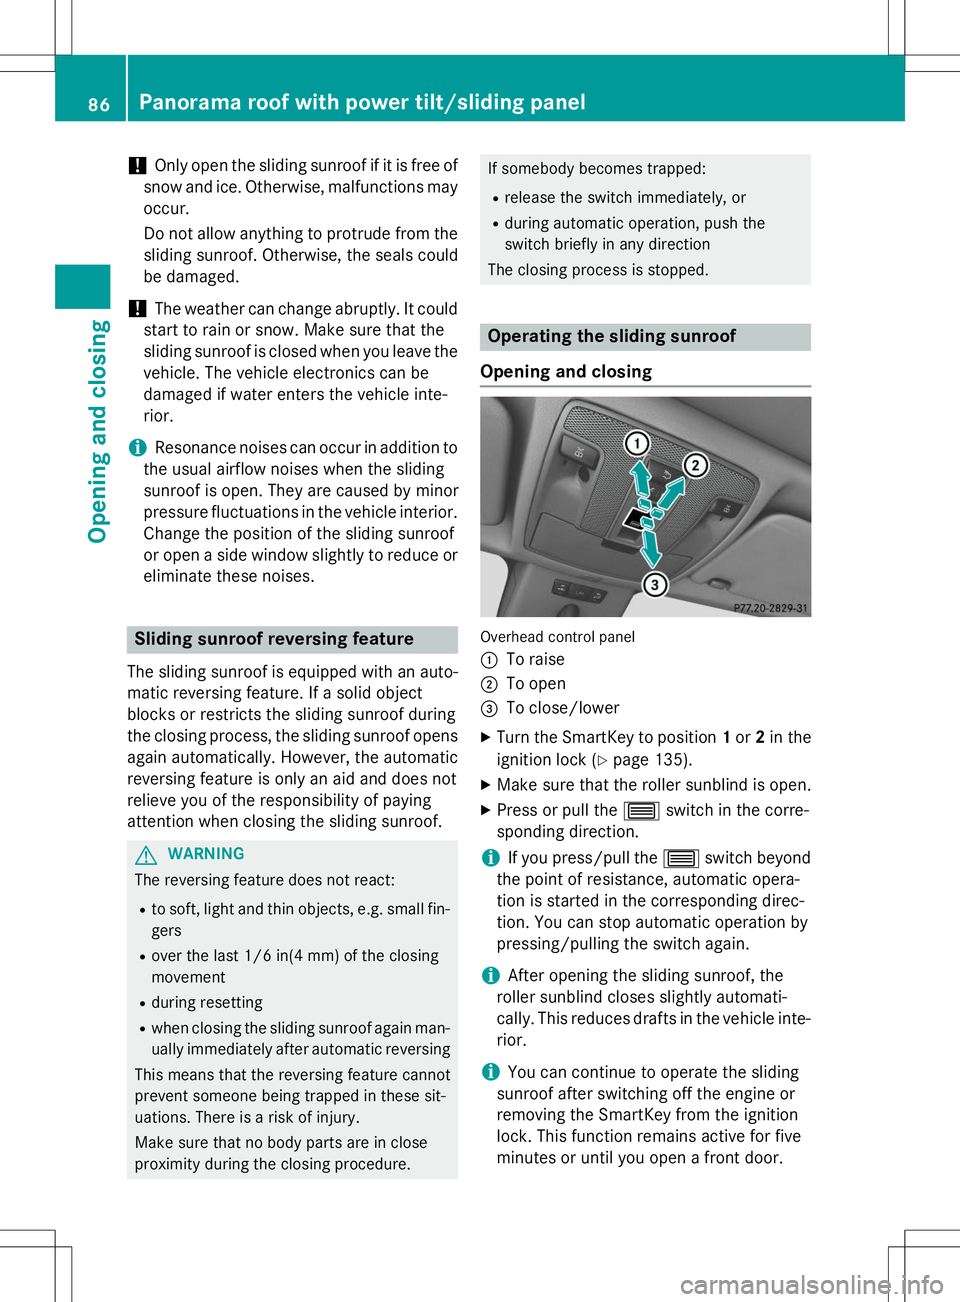
Operating the sliding sunroof
Opening and closing
Overhead control panel :
To raise
;To open
=To close/lower
X Turn the SmartKey to position 1or 2in the
ignition lock ( Ypage 135).
X Make sure that the roller sunblind is open.
X Press or pull the 3switch in the corre-
sponding direction.
iIf you press/pull the 3switch beyond
the point of resistance, automatic opera-
tion is started in the corresponding direc-
tion. You can stop automatic operation by
pressing/pulling the switch again.
iAfter opening the sliding sunroof, the
roller sunblind closes slightly automati-
cally. This reduces drafts in the vehicle inte- rior.
iYou can continue to operate the sliding
sunroof after switching off the engine or
removing the SmartKey from the ignition
lock. This function remains active for five
minutes or until you open a front door.
86Panorama roof with power tilt/sliding panel
Opening and closing