2015 MERCEDES-BENZ B-CLASS SPORTS low beam
[x] Cancel search: low beamPage 8 of 346
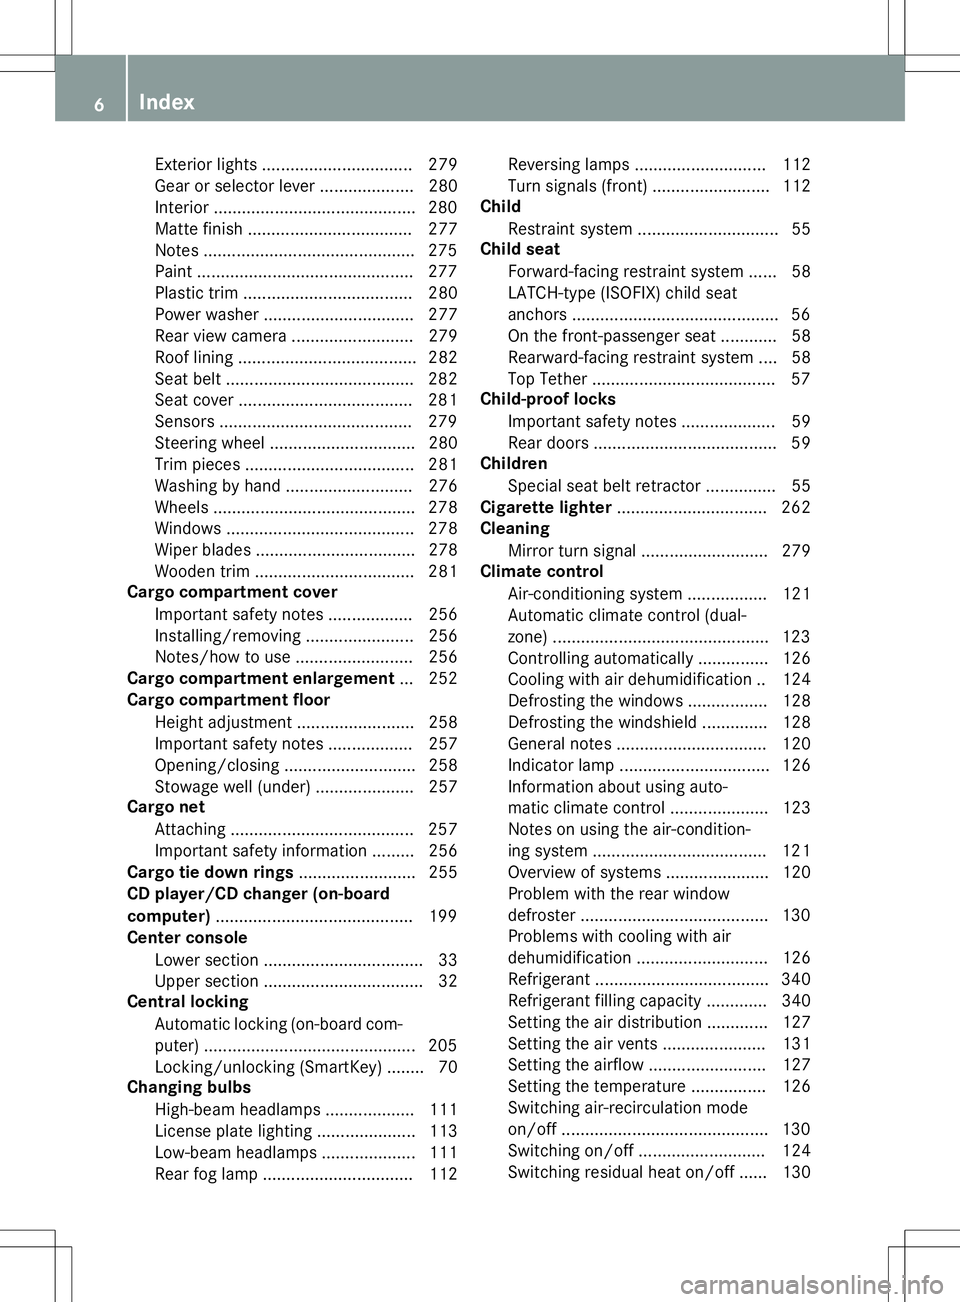
Exterior lights ................................ 279
Gear or selector lever .................... 280
Interior........................................... 280
Matte finish ................................... 277
Notes ............................................. 275
Paint .............................................. 277
Plastic trim .................................... 280
Power washe r................................ 277
Rear view camera .......................... 279
Roof lining ...................................... 282
Seat belt ........................................ 282
Seat cove r..................................... 281
Sensors ......................................... 279
Steering wheel ............................... 280
Trim pieces .................................... 281
Washing by hand ........................... 276
Wheels ........................................... 278
Windows ........................................ 278
Wiper blades .................................. 278
Wooden trim .................................. 281
Cargo compartment cover
Important safety notes .................. 256
Installing/removing ....................... 256
Notes/how to use ......................... 256
Cargo compartment enlargement ... 252
Cargo compartment floor
Height adjustment ......................... 258
Important safety notes .................. 257
Opening/closing ............................ 258
Stowage well (under )..................... 257
Cargo net
Attaching ....................................... 257
Important safety information ......... 256
Cargo tie down rings ......................... 255
CD player/CD changer (on-board
computer) .......................................... 199
Center console
Lower section .................................. 33
Upper section .................................. 32
Central locking
Automatic locking (on-board com-
puter) ............................................. 205
Locking/unlocking (SmartKey )........ 70
Changing bulbs
High-beam headlamp s................... 111
License plate lighting ..................... 113
Low-beam headlamp s.................... 111
Rear fog lamp ................................ 112 Reversing lamps ............................ 112
Turn signals (front) ......................... 112
Child
Restraint system .............................. 55
Child seat
Forward-facing restraint system ...... 58
LATCH-type (ISOFIX) child seat
anchors ............................................ 56
On the front-passenger sea t............ 58
Rearward-facing restraint system .... 58
Top Tether ....................................... 57
Child-proof locks
Important safety notes .................... 59
Rear doors ....................................... 59
Children
Special seat belt retractor ............... 55
Cigarette lighter ................................ 262
Cleaning
Mirror turn signal ........................... 279
Climate control
Air-conditioning system ................. 121
Automatic climate control (dual-
zone) .............................................. 123
Controlling automaticall y............... 126
Cooling with air dehumidification .. 124
Defrosting the window s................. 128
Defrosting the windshield .............. 128
General notes ................................ 120
Indicator lamp ................................ 126
Information about using auto-
matic climate control ..................... 123
Notes on using the air-condition-
ing system ..................................... 121
Overview of systems ...................... 120
Problem with the rear window
defroster ........................................ 130
Problems with cooling with air
dehumidification ............................ 126
Refrigerant ..................................... 340
Refrigerant filling capacity ............. 340
Setting the air distribution ............. 127
Setting the air vents ...................... 131
Setting the airflow ......................... 127
Setting the temperature ................ 126
Switching air-recirculation modeon/of f............................................ 130
Switching on/of f........................... 124
Switching residual heat on/off ...... 130
6Index
Page 13 of 346
Indicator and warning lampsCOLLISION PREVENTION ASSIST
PLUS .............................................. 246
Indicator lamps
see Warning and indicator lamps
Instrument cluster
Overview .......................................... 29
Settings ........................................ .204
Warning and indicator lamps ........... 30
Instrument cluster lighting .............. 192
Interior lighting
Control .......................................... .109
Emergency lighting ........................ 109
Overview ........................................ 108
Reading lamp ................................. 108
J
Jack
Storage location ............................ 284
Using ............................................. 323
Jump starting (engine) ......................293
K
Key positions
Start/Stop button .......................... 135
KEYLESS-GO
Convenience closing feature ............ 83
Deactivation ..................................... 71
Locking ............................................ 71
Unlocking ......................................... 71
Kickdown
Driving tips ................................... .146
Manual drive program .................... 149
Knee bag .............................................. 46
L
Lamps
see Warning and indicator lamps
Lane Keeping Assist
Activating/deactivating (on-
board computer) ............................ 203
Display message ............................ 226
Function/informatio n.................... 187
Lane Tracking package ..................... 185
LATCH-type (ISOFIX) child seat
anchors ................................................ 56 License plate lamp
Changing bulb s.............................. 113
License plate lamp (display mes-
sage) ................................................... 220
Light function, active
Display message ............................ 221
Light sensor (display message) ....... 222
Lights
Adaptive Highbeam Assist ............. 107
Automatic headlamp mod e............ 104
Fog lamps ...................................... 105
Fogged up headlamp s.................... 108
Hazard warning lamps ................... 107
High beam flashe r.......................... 107
High-beam headlamp s................... 106
Light switch ................................... 104
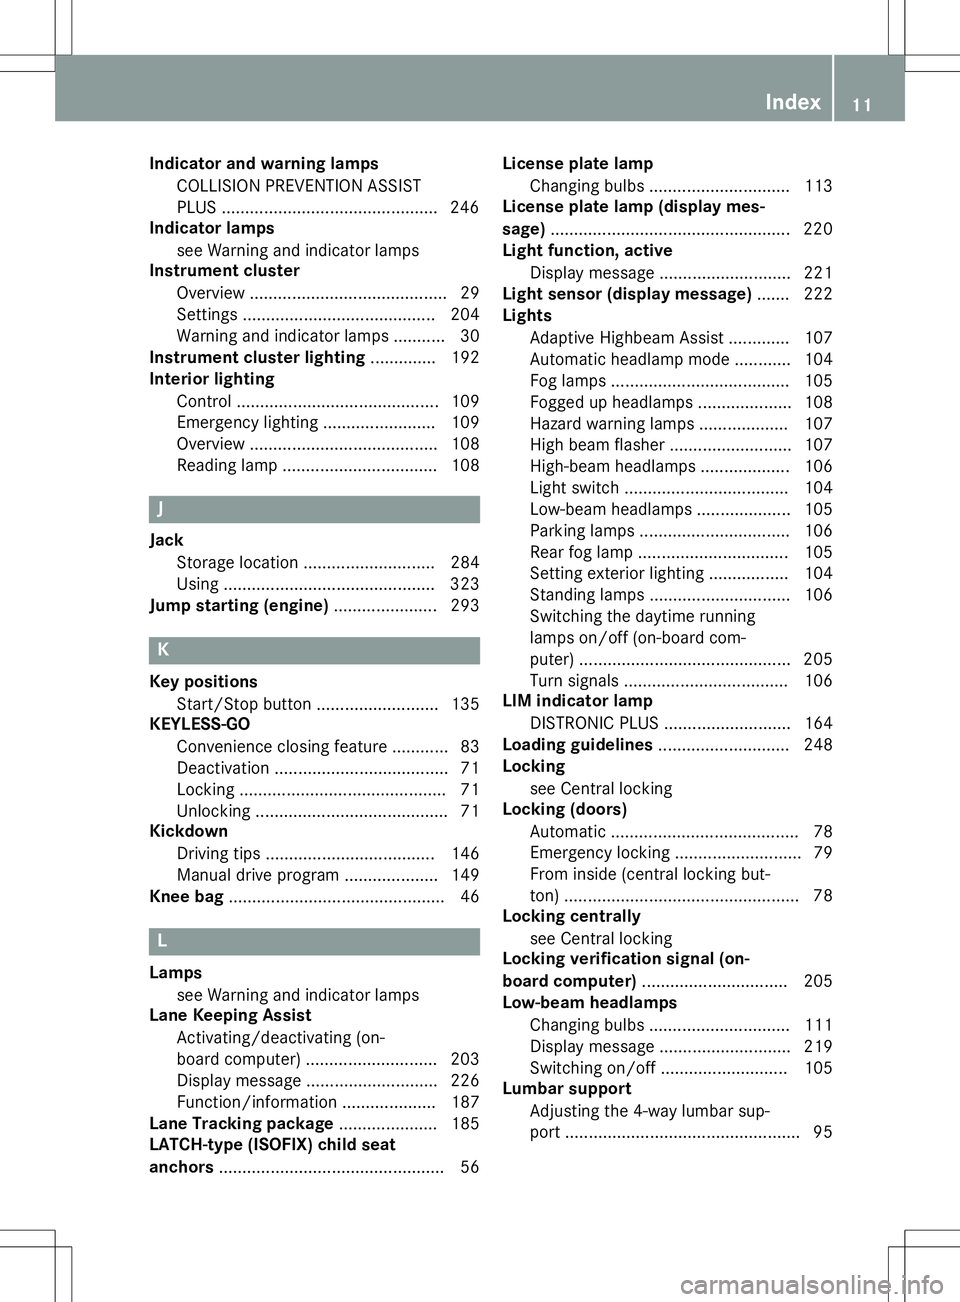
Low-beam headlamp s.................... 105
Parking lamps ................................ 106
Rear fog lamp ................................ 105
Setting exterior lighting ................. 104
Standing lamps .............................. 106
Switching the daytime running
lamps on/off (on-board com-
puter) ............................................. 205
Turn signals ................................... 106
LIM indicator lamp
DISTRONIC PLUS ........................... 164
Loading guidelines ............................ 248
Locking
see Central locking
Locking (doors)
Automatic ........................................ 78
Emergency locking ........................... 79
From inside (central locking but-
ton) .................................................. 78
Locking centrally
see Central locking
Locking verification signal (on-
board computer) ............................... 205
Low-beam headlamps
Changing bulb s.............................. 111
Display message ............................ 219
Switching on/of f........................... 105
Lumbar support
Adjusting the 4-way lumbar sup-
port .................................................. 95
Index11
Page 32 of 346
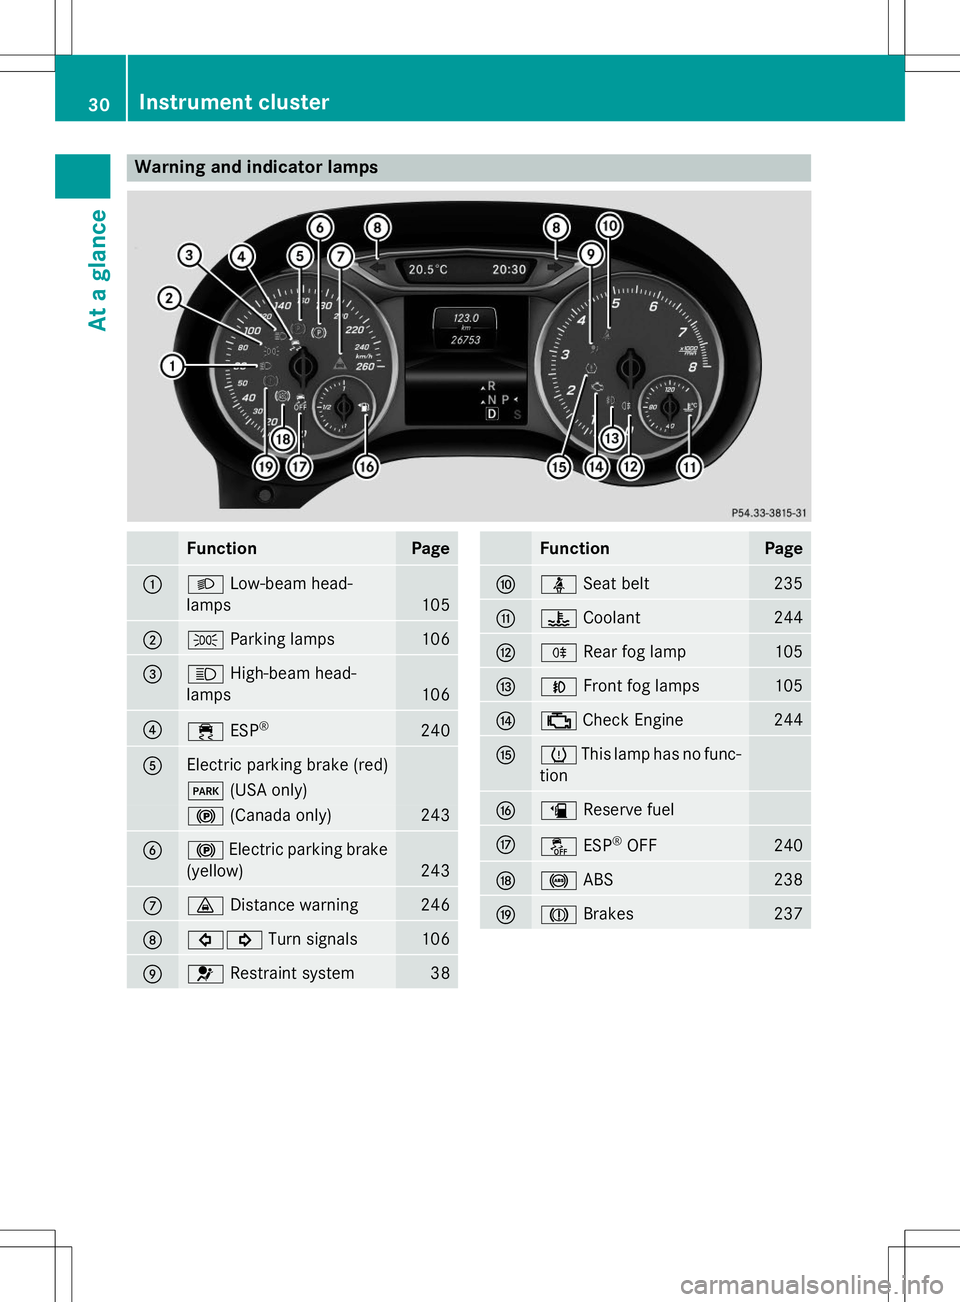
Warning and indicator lamps
FunctionPage
:LLow-beam head-
lamps
105
;T Parking lamps106
=KHigh-beam head-
lamps
106
?÷ ESP®240
AElectric parking brake (red)
F
(USA only)
!(Canada only)243
B!Electric parking brake
(yellow)
243
C· Distance warning246
D#! Turn signals106
E6Restraint system38
FunctionPage
FüSeat belt235
G?Coolant244
HRRear fog lamp105
INFront fog lamps105
J;Check Engine244
KhThis lamp has no func-
tion
Læ Reserve fuel
MåESP®
OFF240
N! ABS238
OJBrakes237
30Instrument cluster
At a glance
Page 106 of 346
Useful information
iThis Operator's Manual describes all
models and all standard and optional equip- ment of your vehicle available at the time of
publication of the Operator's Manual.
Country-specific differences are possible.
Please note that your vehicle may not be
equipped with all features described. This
also applies to safety-related systems and
functions.
iRead the information on qualified special-
ist workshops ( Ypage 24).
Exterior lighting
General notes
For reasons of safety, Mercedes-Benz recom-
mends that you drive with the lights switchedon even during the daytime. In some coun-
tries, operation of the headlamps varies due
to legal requirements and self-imposed obli-
gations.
Setting the exterior lighting
Setting options
Exterior lighting can be set using: R the light switch
R the combination switch ( Ypage 106)
Light switch
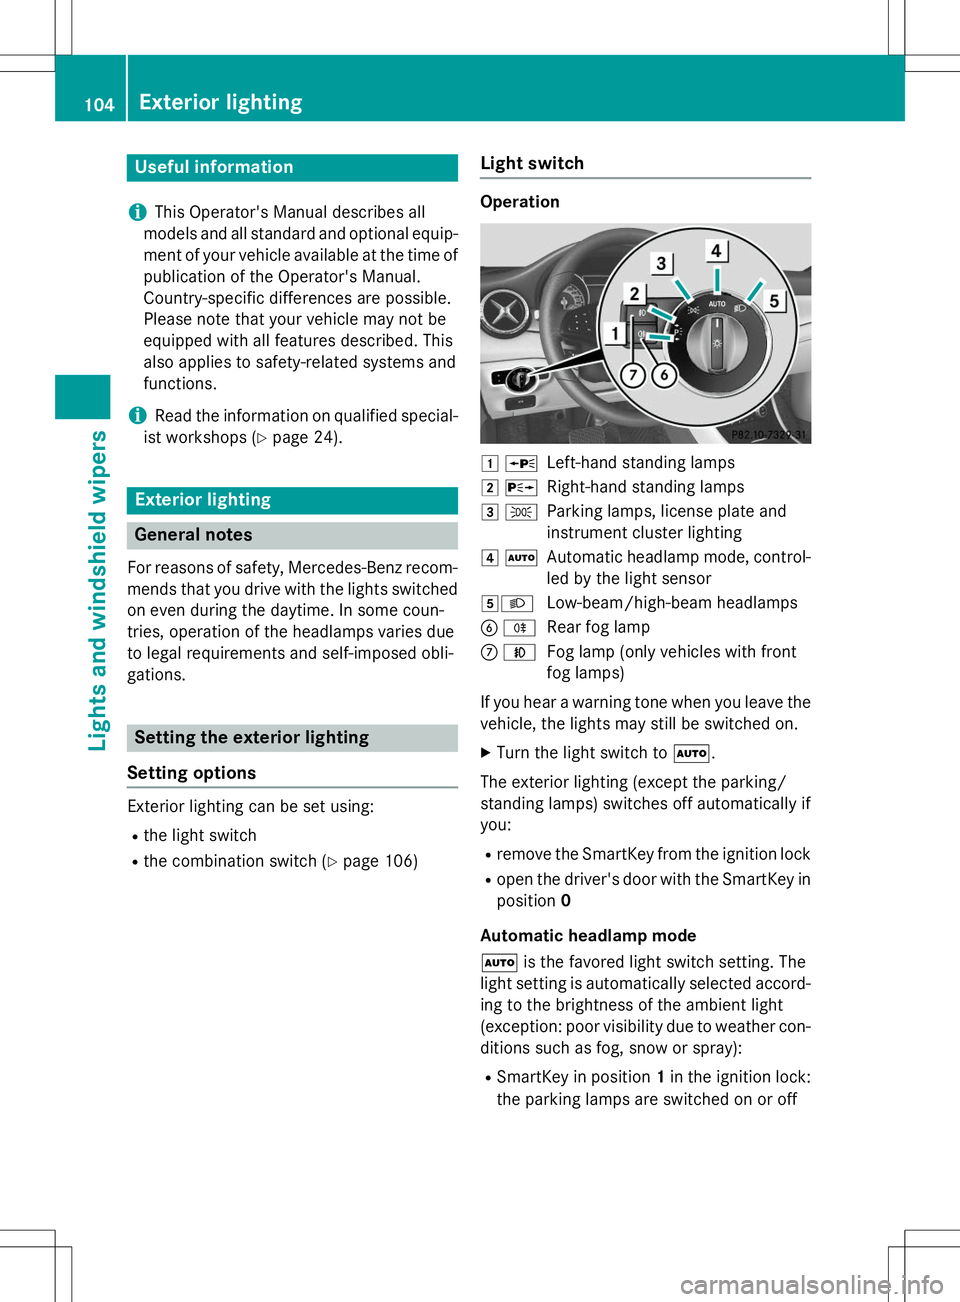
Operation
1 WLeft-hand standing lamps
2XRight-hand standing lamps
3 TParking lamps, license plate and
instrument cluster lighting
4ÃAutomatic headlamp mode, control-
led by the light sensor
5 LLow-beam/high-beam headlamps
B RRear fog lamp
CNFog lamp (only vehicles with front
fog lamps)
If you hear a warning tone when you leave the
vehicle, the lights may still be switched on. X Turn the light switch to Ã.
The exterior lighting (except the parking/
standing lamps) switches off automatically ifyou: R remove the SmartKey from the ignition lock
R open the driver's door with the SmartKey in
position 0
Automatic headlamp mode à is the favored light switch setting. The
light setting is automatically selected accord- ing to the brightness of the ambient light
(exception: poor visibility due to weather con-
ditions such as fog, snow or spray):
R SmartKey in position 1in the ignition lock:
the parking lamps are switched on or off
104Exterior lighting
Lights and windshield wipers
Page 107 of 346
automatically depending on the brightnessof the ambient light.
R With the engine running: if you have acti-
vated the "Daytime running lamps" func-
tion via the on-board computer, the day-
time running lamps or the parking lamps
and the low-beam headlamps are switched
on or off automatically depending on the
brightness of the ambient light.
X To switch on automatic headlamp
mode: turn the light switch to Ã.
GWARNING
When the light switch is set to Ã, the low-
beam headlamps may not be switched on
automatically if there is fog, snow or other
causes of poor visibility due to the weather
conditions such as spray. There is a risk of an
accident.
In such situations, turn the light switch to L .
The automatic headlamp feature is only an
aid. The driver is responsible for the vehicle's lighting at all times.
The daytime running lamps improve the visi-
bility of your vehicle during the day. The day- time running lamps function is required by lawin Canada. It cannot therefore be deactivated.
When the engine is running and the vehicle is
stationary: if you move the selector lever from a drive position to P, the daytime running
lamps/low-beam headlamps go out after
three minutes.
When the engine is running, the vehicle is
stationary and in bright ambient light: if you
turn the light switch to T, you turn on the
daytime running lamps and parking lamps.
If the engine is running and you turn the light
switch to L, the manual settings take
precedence over the daytime running lamps.
Low-beam headlamps
Even if the light sensor does not detect that it is dark, the parking lamps and low-beam
headlamps switch on when the ignition is
switched on and the light switch is set to the L
position. This is a particularly useful
function in the event of rain and fog. X To switch on the low-beam headlamps:
turn the SmartKey in the ignition lock to
position 2or start the engine.
X Turn the light switch to L.
The green Lindicator lamp in the instru-
ment cluster lights up.
Front fog lamps
In conditions where visibility is poor due to
fog, snow or rain, the fog lamps improve vis-
ibility as well as making it easier for other road
users to see you. They can be operated
together with the parking lamps or together
with the parking lamps and low-beam head-
lamps. X To switch on the front fog lamps: turn
the SmartKey in the ignition lock to position 2 or start the engine.
X Turn the light switch to Lorà .
X Press the Nbutton.
The green Nindicator lamp in the instru-
ment cluster lights up.
X To switch off the front fog lamps: press
the N button.
The green Nindicator lamp in the instru-
ment cluster goes out.
Rear fog lamp
The rear fog lamp improves visibility of your
vehicle for the traffic behind in the event of
thick fog. Please take note of the country-
specific regulations for the use of rear fog
lamps. X To switch on the rear fog lamps: turn the
SmartKey to position 2in the ignition lock
or start the engine.
X Turn the light switch to Lorà .
Exterior lighting105
Lights and windshield wipers
Z
Page 108 of 346
XPress the Rbutton.
The yellow Rindicator lamp in the
instrument cluster lights up.
X To switch off the rear fog lamp: press the
R button.
The yellow Rindicator lamp in the
instrument cluster goes out.
Parking lamps
!If the battery has been excessively dis-
charged, the parking lamps or standing
lamps are automatically switched off to
enable the next engine start. Always park
your vehicle safely and sufficiently lit
according to legal standards. Avoid the
continuous use of the Tparking lamps
for several hours. If possible, switch on theX right or the Wleft standing lamp.
X To switch on: turn the light switch to T.
The green Tindicator lamp in the instru-
ment cluster lights up.
Standing lamps
Switching on the standing lamps ensures the
corresponding side of the vehicle is illumina- ted.
X To switch on the standing lamps: the
SmartKey is not in the ignition lock or it is in position 0.
X Turn the light switch to W(left-hand side
of the vehicle) or X(right-hand side of
the vehicle).
Combination switch
Turn signal
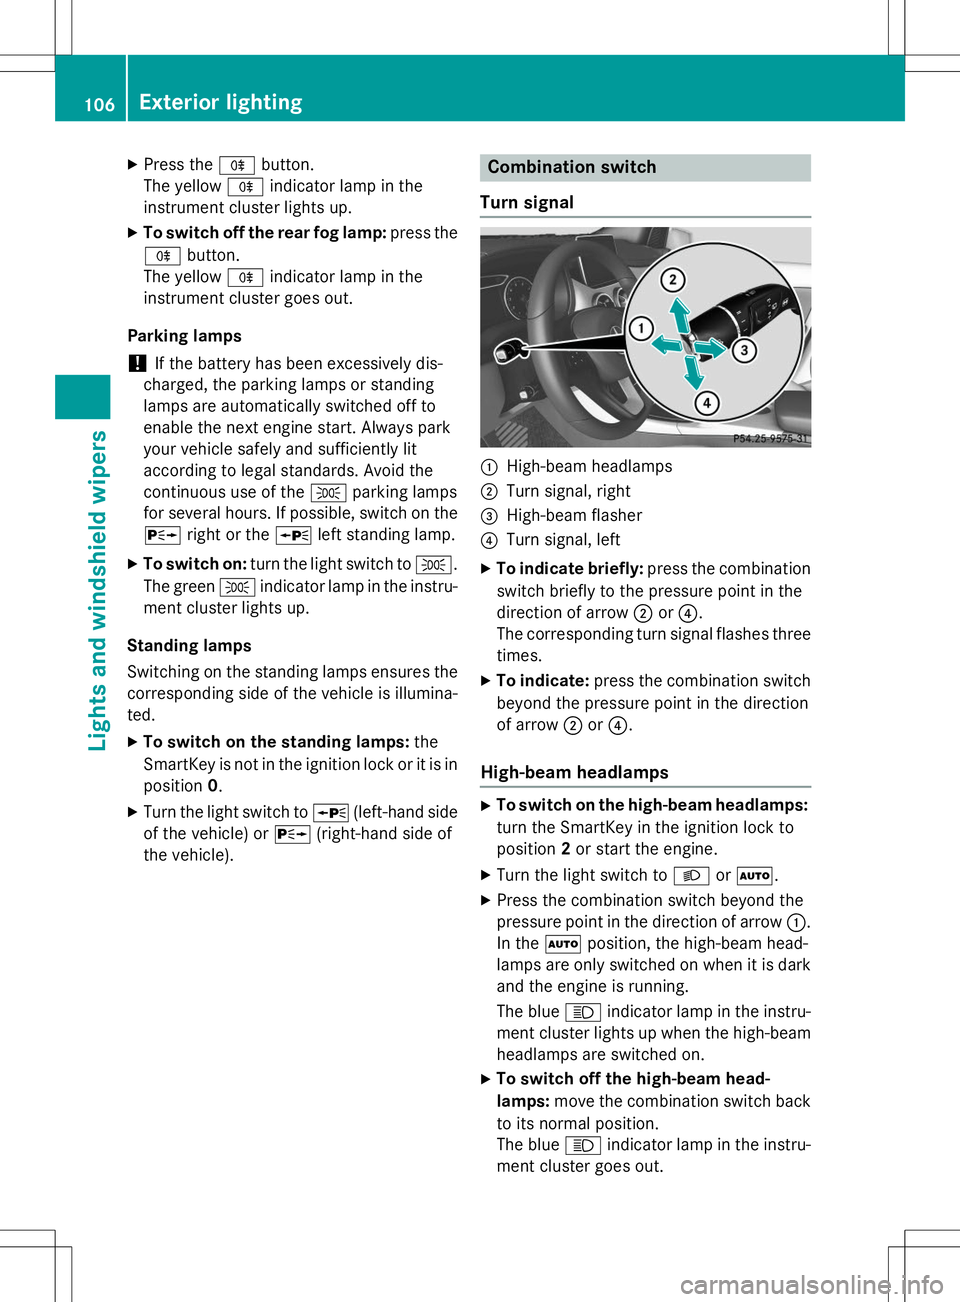
:High-beam headlamps
;Turn signal, right
=High-beam flasher
?Turn signal, left
X To indicate briefly: press the combination
switch briefly to the pressure point in the
direction of arrow ;or? .
The corresponding turn signal flashes three
times.
X To indicate: press the combination switch
beyond the pressure point in the direction
of arrow ;or? .
High-beam headlamps
X
To switch on the high-beam headlamps:
turn the SmartKey in the ignition lock to position 2or start the engine.
X Turn the light switch to Lorà .
X Press the combination switch beyond the
pressure point in the direction of arrow :.
In the Ãposition, the high-beam head-
lamps are only switched on when it is dark
and the engine is running.
The blue Kindicator lamp in the instru-
ment cluster lights up when the high-beam headlamps are switched on.
X To switch off the high-beam head-
lamps: move the combination switch back
to its normal position.
The blue Kindicator lamp in the instru-
ment cluster goes out.
106Exterior lighting
Lights and windshield wipers
Page 109 of 346
Vehicles with Adaptive Highbeam Assist:
when Adaptive Highbeam Assist is active, it
controls activation of the high-beam head-
lamps (Ypage 107).
High-beam flasher
X
To switch on: turn the SmartKey in the
ignition lock to position 1or 2, or start the
engine.
X Pull the combination switch in the direction
of arrow =.
Hazard warning lamps
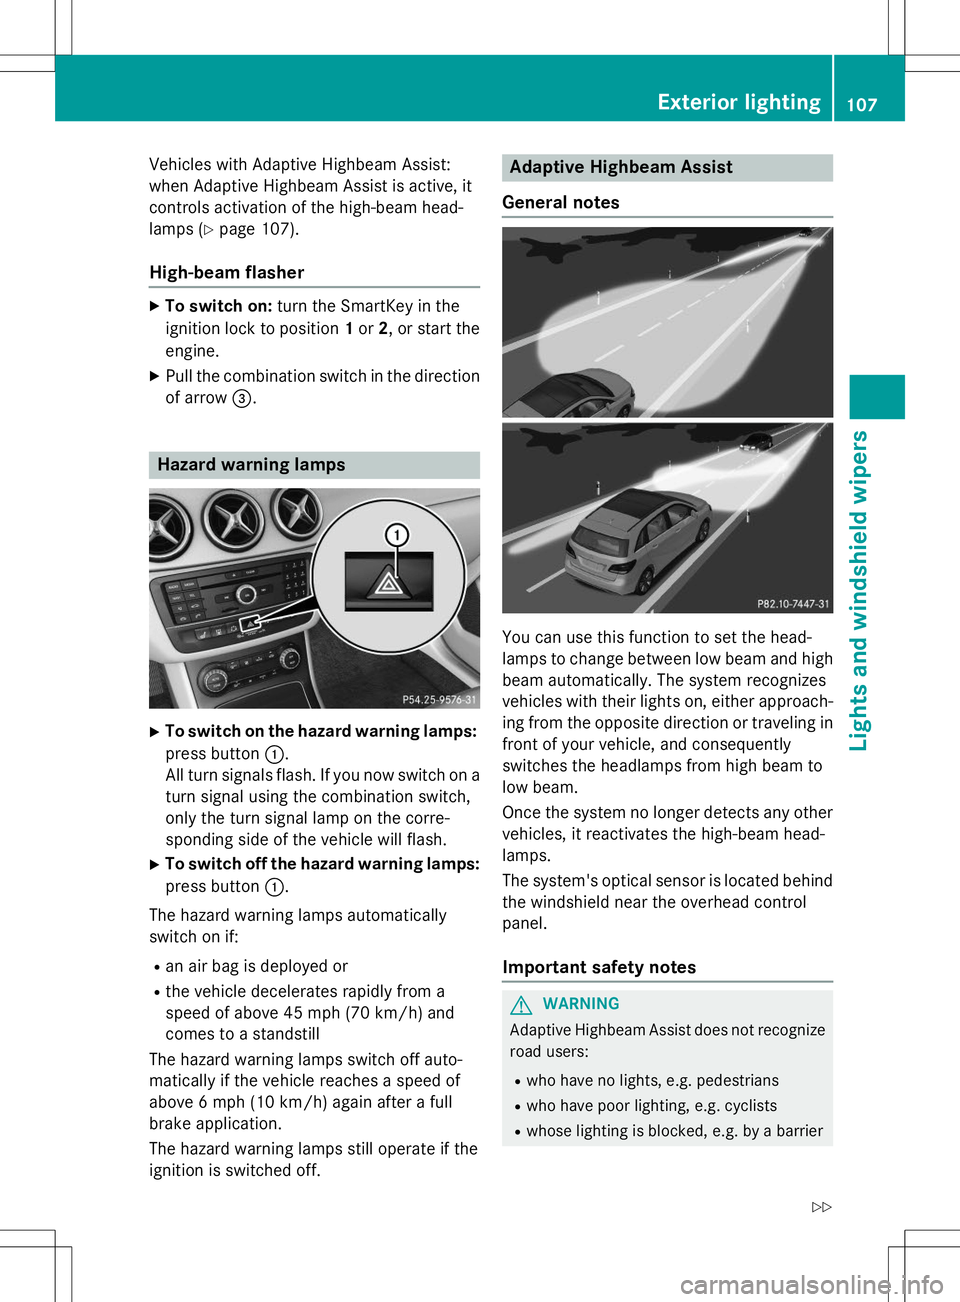
X
To switch on the hazard warning lamps:
press button :.
All turn signals flash. If you now switch on a turn signal using the combination switch,
only the turn signal lamp on the corre-
sponding side of the vehicle will flash.
X To switch off the hazard warning lamps:
press button :.
The hazard warning lamps automatically
switch on if:
R an air bag is deployed or
R the vehicle decelerates rapidly from a
speed of above 45 mph (70 km/h) and
comes to a standstill
The hazard warning lamps switch off auto-
matically if the vehicle reaches a speed of
above 6 mph (10 km/h) again after a full
brake application.
The hazard warning lamps still operate if the
ignition is switched off.
Adaptive Highbeam Assist
General notes
You can use this function to set the head-
lamps to change between low beam and high beam automatically. The system recognizes
vehicles with their lights on, either approach-
ing from the opposite direction or traveling in front of your vehicle, and consequently
switches the headlamps from high beam to
low beam.
Once the system no longer detects any other
vehicles, it reactivates the high-beam head- lamps.
The system's optical sensor is located behind the windshield near the overhead control panel.
Important safety notes
GWARNING
Adaptive Highbeam Assist does not recognizeroad users:
R who have no lights, e.g. pedestrians
R who have poor lighting, e.g. cyclists
R whose lighting is blocked, e.g. by a barrier
Exterior lighting107
Lights and windshield wipers
Z
Page 110 of 346
In very rare cases, Adaptive Highbeam Assistmay fail to recognize other road users that
have lights, or may recognize them too late. In
this or similar situations, the automatic high-
beam headlamps will not be deactivated or
activated regardless. There is a risk of an acci-
dent.
Always carefully observe the traffic conditions and switch off the high-beam headlamps in
good time.
Adaptive Highbeam Assist cannot take into
account road, weather or traffic conditions.
Adaptive Highbeam Assist is only an aid. You
are responsible for adjusting the vehicle's
lighting to the prevailing light, visibility and
traffic conditions.
In particular, the detection of obstacles can
be restricted if there is: R poor visibility, e.g. due to fog, heavy rain or
snow
R dirt on the sensors or the sensors are obscured
Switching Adaptive Highbeam Assist
on/off
X To switch on: turn the light switch to Ã.
X Press the combination switch beyond the
pressure point in the direction of arrow :.
The _ indicator lamp in the multifunc-
tion display lights up when it is dark and the
light sensor activates the low-beam head-
lamps.
If you are driving at speeds above approx-
imately 19 mph (30 km/h) and no other
road users are recognized:
The high-beam headlamps are switched on
automatically. The Kindicator lamp in
the instrument cluster also lights up.
If you are driving at speeds below approx-
imately 16 mph (25 km/h) or other road
users have been detected or the roads are adequately lit:
The high-beam headlamps are switched off
automatically. The Kindicator lamp in the instrument cluster goes out. The
_
indicator lamp in the multifunction display
remains lit.
X To deactivate: move the combination
switch back to its normal position.The _ indicator lamp in the multifunc-
tion display goes out.
Headlamps fogged up on the inside
Certain climatic and physical conditions may
cause moisture to form in the headlamp. This moisture does not affect the functionality of
the headlamp.
Interior lighting
Overview of interior lighting
Front overhead control panel
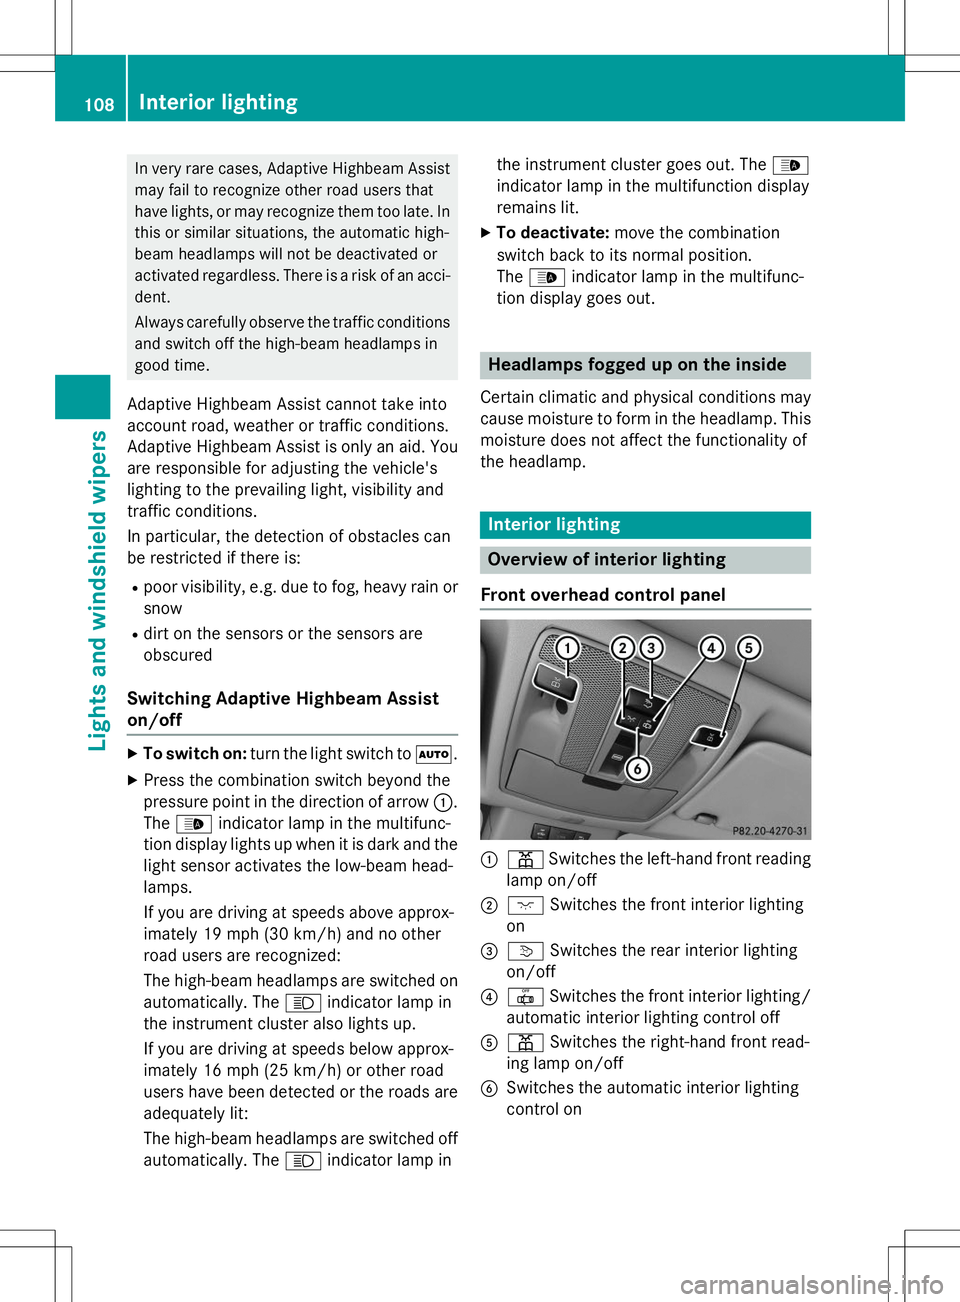
:p Switches the left-hand front reading
lamp on/off
;c Switches the front interior lighting
on
=v Switches the rear interior lighting
on/off
?| Switches the front interior lighting/
automatic interior lighting control off
Ap Switches the right-hand front read-
ing lamp on/off
BSwitches the automatic interior lighting
control on
108Interior lighting
Lights and windshield wipers