2015 MERCEDES-BENZ B-CLASS SPORTS turn signal
[x] Cancel search: turn signalPage 109 of 346
Vehicles with Adaptive Highbeam Assist:
when Adaptive Highbeam Assist is active, it
controls activation of the high-beam head-
lamps (Ypage 107).
High-beam flasher
X
To switch on: turn the SmartKey in the
ignition lock to position 1or 2, or start the
engine.
X Pull the combination switch in the direction
of arrow =.
Hazard warning lamps
X
To switch on the hazard warning lamps:
press button :.
All turn signals flash. If you now switch on a turn signal using the combination switch,
only the turn signal lamp on the corre-
sponding side of the vehicle will flash.
X To switch off the hazard warning lamps:
press button :.
The hazard warning lamps automatically
switch on if:
R an air bag is deployed or
R the vehicle decelerates rapidly from a
speed of above 45 mph (70 km/h) and
comes to a standstill
The hazard warning lamps switch off auto-
matically if the vehicle reaches a speed of
above 6 mph (10 km/h) again after a full
brake application.
The hazard warning lamps still operate if the
ignition is switched off.
Adaptive Highbeam Assist
General notes
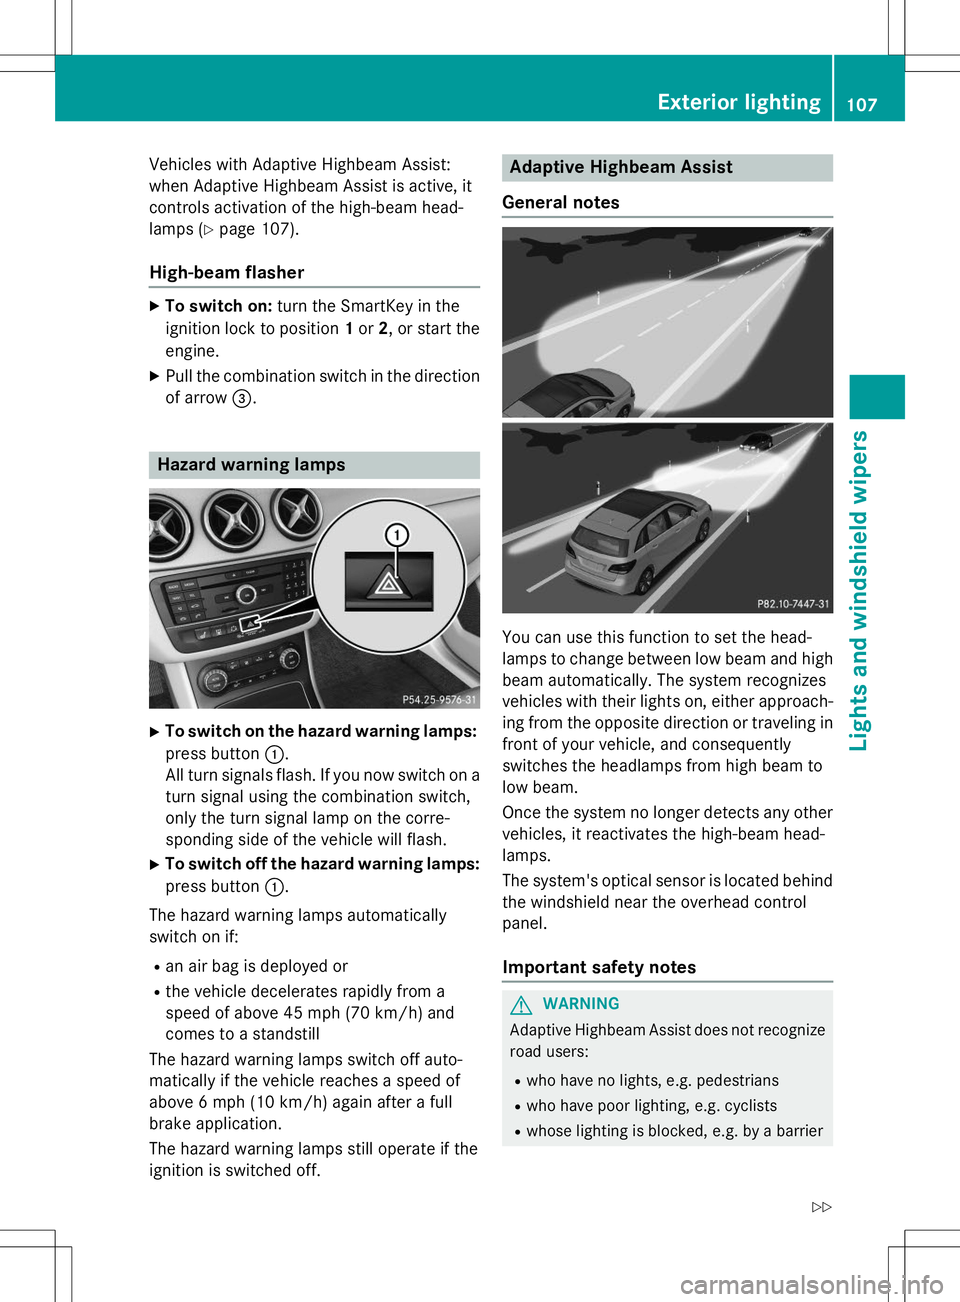
You can use this function to set the head-
lamps to change between low beam and high beam automatically. The system recognizes
vehicles with their lights on, either approach-
ing from the opposite direction or traveling in front of your vehicle, and consequently
switches the headlamps from high beam to
low beam.
Once the system no longer detects any other
vehicles, it reactivates the high-beam head- lamps.
The system's optical sensor is located behind the windshield near the overhead control panel.
Important safety notes
GWARNING
Adaptive Highbeam Assist does not recognizeroad users:
R who have no lights, e.g. pedestrians
R who have poor lighting, e.g. cyclists
R whose lighting is blocked, e.g. by a barrier
Exterior lighting107
Lights and windshield wipers
Z
Page 112 of 346
bulbs of the same type and the specified volt-
age.
Marks on the glass tube reduce the service
life of the bulbs. Do not touch the glass tube
with your bare hands. If necessary, clean the glass tube when cold with alcohol or spirit and
rub it off with a lint-free cloth.
Protect bulbs from moisture during opera-
tion. Do not allow bulbs to come into contact
with liquids.
Replace only the bulbs listed ( Ypage 110).
Have the bulbs that you cannot replace your-
self changed at a qualified specialist work- shop.
If you require assistance changing bulbs, con- sult a qualified specialist workshop.
If the new bulb still does not light up, consult
a qualified specialist workshop.
Bulbs and lamps are an important aspect of
vehicle safety. You must therefore make sure that these function correctly at all times.
Have the headlamp setting checked regularly.
Vehicles with LED headlamps: the light
clusters of your vehicle are equipped with
LED light bulbs. Do not replace the bulbs
yourself. Contact a qualified specialist work-
shop which has the necessary specialist
knowledge and tools to carry out the workrequired.
Overview: changing bulbs/bulb types
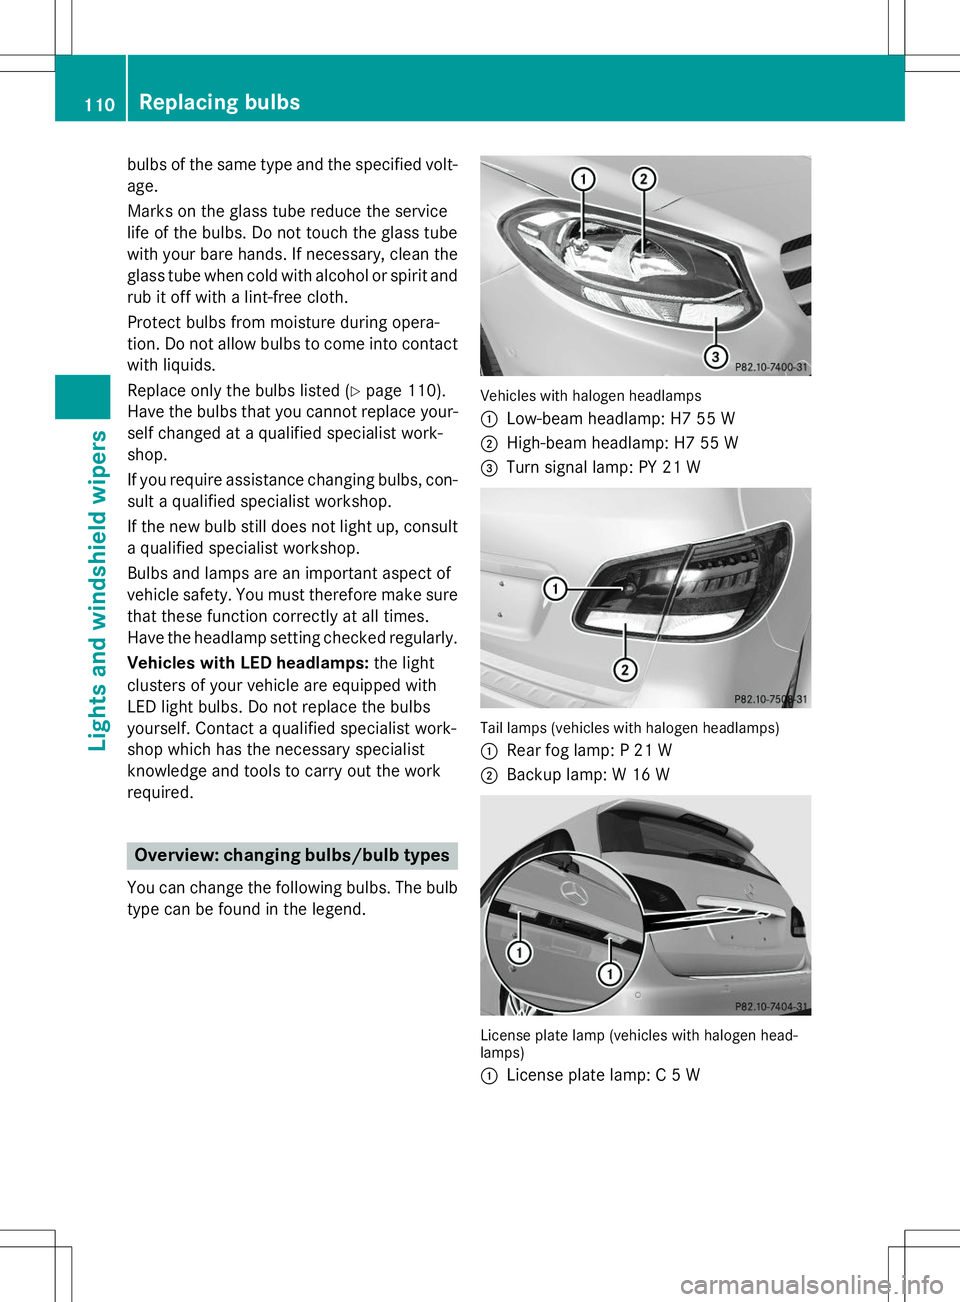
You can change the following bulbs. The bulb type can be found in the legend.
Vehicles with halogen headlamps :
Low-beam headlamp: H7 55 W
;High-beam headlamp: H7 55 W
=Turn signal lamp: PY 21 W
Tail lamps (vehicles with halogen headlamps) :
Rear fog lamp: P 21 W
;Backup lamp: W 16 W
License plate lamp (vehicles with halogen head- lamps) :
License plate lamp: C 5 W
110Replacing bulbs
Lights and windshield wipers
Page 113 of 346
Changing the front bulbs
Removing and installing the cover in the
front wheel housing
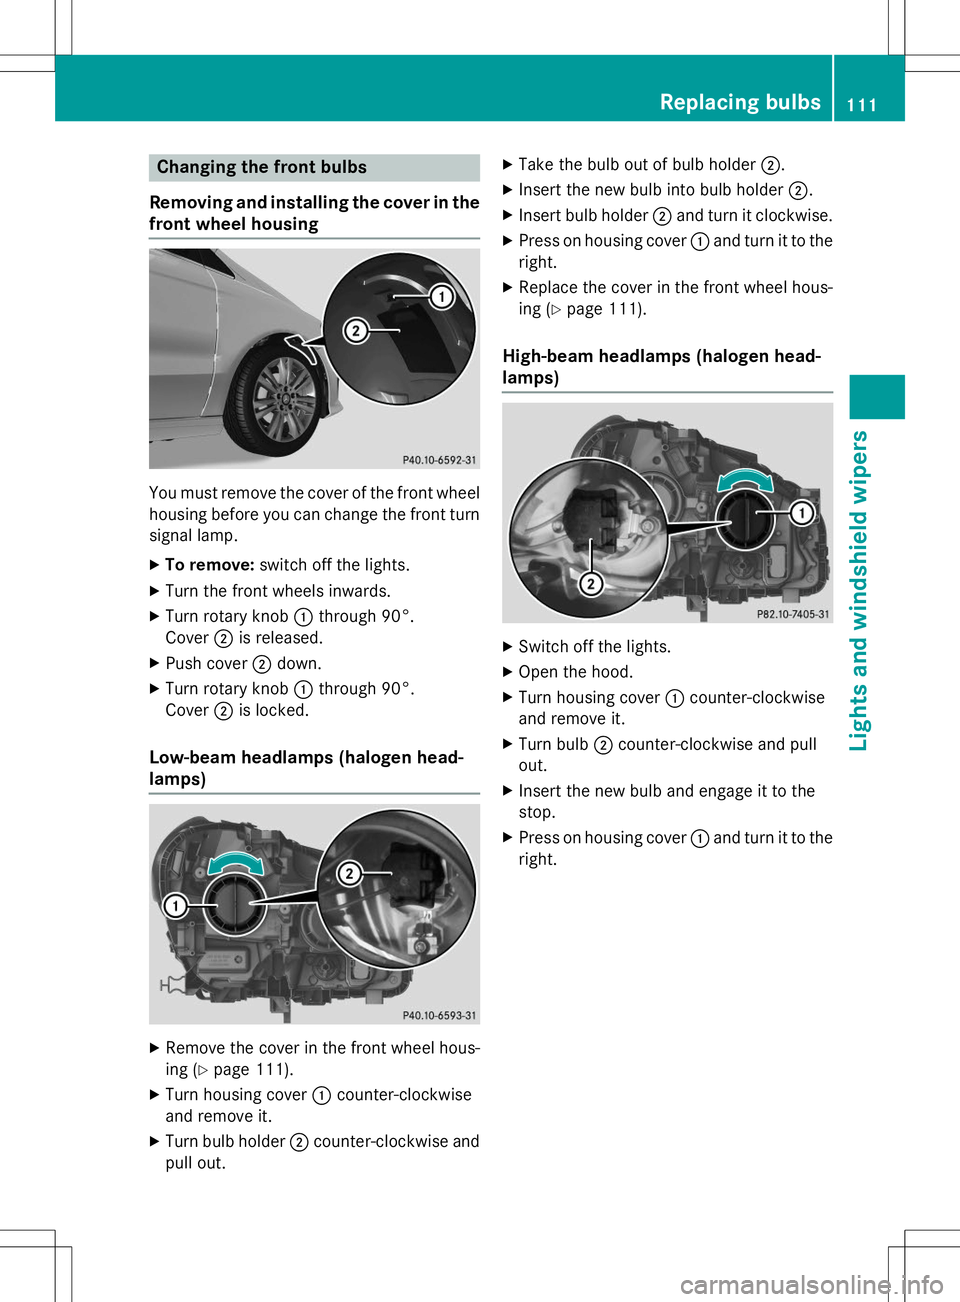
You must remove the cover of the front wheel
housing before you can change the front turn signal lamp.
X To remove: switch off the lights.
X Turn the front wheels inwards.
X Turn rotary knob :through 90°.
Cover ;is released.
X Push cover ;down.
X Turn rotary knob :through 90°.
Cover ;is locked.
Low-beam headlamps (halogen head-
lamps)
X
Remove the cover in the front wheel hous-
ing ( Ypage 111).
X Turn housing cover :counter-clockwise
and remove it.
X Turn bulb holder ;counter-clockwise and
pull out. X
Take the bulb out of bulb holder ;.
X Insert the new bulb into bulb holder ;.
X Insert bulb holder ;and turn it clockwise.
X Press on housing cover :and turn it to the
right.
X Replace the cover in the front wheel hous-
ing ( Ypage 111).
High-beam headlamps (halogen head-
lamps)
X
Switch off the lights.
X Open the hood.
X Turn housing cover :counter-clockwise
and remove it.
X Turn bulb ;counter-clockwise and pull
out.
X Insert the new bulb and engage it to the
stop.
X Press on housing cover :and turn it to the
right.
Replacing bulbs111
Lights and windshield wipers
Z
Page 114 of 346
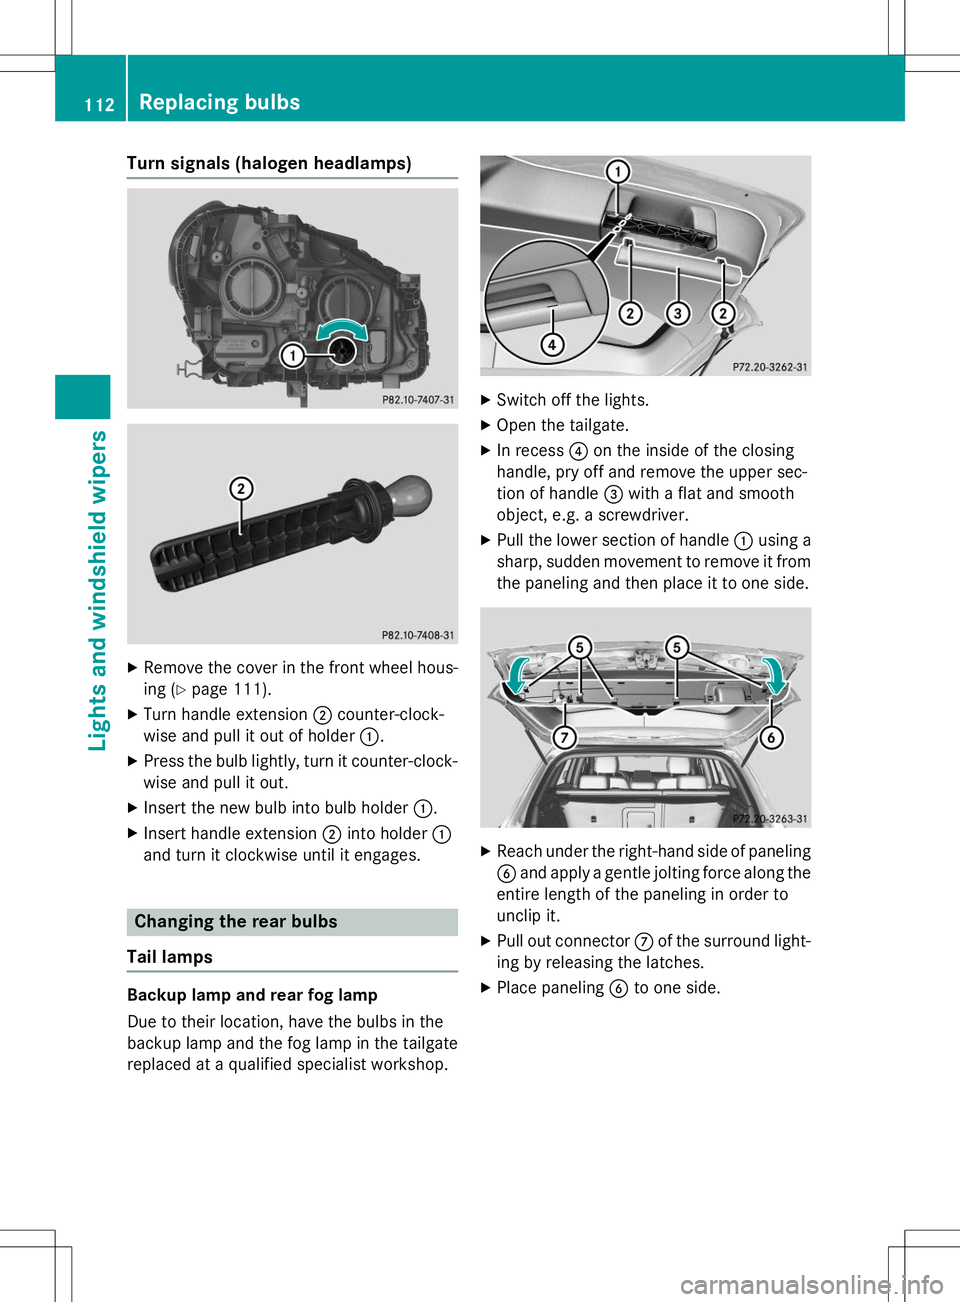
Turn signals (halogen headlamps)
XRemove the cover in the front wheel hous-
ing ( Ypage 111).
X Turn handle extension ;counter-clock-
wise and pull it out of holder :.
X Press the bulb lightly, turn it counter-clock-
wise and pull it out.
X Insert the new bulb into bulb holder :.
X Insert handle extension ;into holder :
and turn it clockwise until it engages.
Changing the rear bulbs
Tail lamps
Backup lamp and rear fog lamp
Due to their location, have the bulbs in the
backup lamp and the fog lamp in the tailgate replaced at a qualified specialist workshop.
X Switch off the lights.
X Open the tailgate.
X In recess ?on the inside of the closing
handle, pry off and remove the upper sec-
tion of handle =with a flat and smooth
object, e.g. a screwdriver.
X Pull the lower section of handle :using a
sharp, sudden movement to remove it from the paneling and then place it to one side.
X Reach under the right-hand side of paneling
B and apply a gentle jolting force along the
entire length of the paneling in order to
unclip it.
X Pull out connector Cof the surround light-
ing by releasing the latches.
X Place paneling Bto one side.
112Replacing bulbs
Lights and windshield wipers
Page 155 of 346
Switching off the engine
Important safety notes
GWARNING
The automatic transmission switches to neu-
tral position Nwhen you switch off the engine.
The vehicle may roll away. There is a risk of an
accident.
After switching off the engine, always switch
to parking position P. Prevent the parked vehi-
cle from rolling away by applying the parkingbrake.
Vehicles with automatic transmission
X Apply the electric parking brake.
X Shift the transmission to position P.
X With the SmartKey: turn the SmartKey to
position 0in the ignition lock and remove it.
The immobilizer is activated.
X With the Start/Stop button: press the
Start/Stop button ( Ypage 135).
The engine stops and all the indicator
lamps in the instrument cluster go out.
When the driver's door is closed, this cor-
responds to key position 1. When the driv-
er's door is open, this corresponds to keyposition 0: "Key removed".
If you switch the engine off with the trans-
mission in position Ror D, the automatic
transmission shifts to Nautomatically.
With the SmartKey: if you then open the
driver's door or the front-passenger door or
remove the SmartKey from the ignition, the
automatic transmission shifts to Pautomati-
cally.
With the Start/Stop button: if you then
open the driver's door or the front-passenger
door, the automatic transmission shifts to P
automatically.
If you want the automatic transmission to
remain in neutral N, e.g. when having the
vehicle cleaned in an automatic car wash with
a towing system: Using the SmartKey:
X Switch on the ignition.
X Depress the brake pedal and keep itdepressed.
X Shift to neutral N.
X Release the brake pedal.
X Release the electric parking brake.
X Switch off the ignition and leave the Smart-
Key in the ignition lock.
With the Start/Stop button: X Remove the Start/Stop button from the
ignition lock.
X Insert the SmartKey into the ignition lock.
X Switch on the ignition.
X Depress the brake pedal and keep itdepressed.
X Shift to neutral N.
X Release the brake pedal.
X Release the electric parking brake.
X Switch off the ignition and leave the Smart-
Key in the ignition lock.
If you attempt to turn off the engine when the
selector lever is not in position P:
R a message appears in the multifunction dis-
play
R a warning signal sounds
Electric parking brake
General notes
GWARNING
If you leave children unsupervised in the vehi- cle, they could set it in motion by, for example:
R release the parking brake.
R shift the automatic transmission out of the
parking position P.
R start the engine.
In addition, they may operate vehicle equip-
ment and become trapped. There is a risk of
an accident and injury.
Parking153
Driving and parking
Z
Page 167 of 346
Rthe driver's door must be closed when you
shift from Pto Dor your seat belt must be
fastened.
R the front-passenger door and rear doors
must be closed.
Arming X Briefly pull the cruise control lever towards
you ?, up :or down A.
DISTRONIC PLUS is selected.
X Keep the cruise control lever pressed up :
or down Auntil the desired speed is set.
X Remove your foot from the accelerator
pedal.
Your vehicle adapts its speed to that of the
vehicle in front, but only up to the desired
stored speed.
iIf you do not fully release the accelerator
pedal, the
DISTRONICPLUSPassivemes-
sage appears in the multifunction display.
The set distance to a slower-moving vehicle in front will then not be maintained. You will
be driving at the speed you determine by
the position of the accelerator pedal.
You can also activate DISTRONIC PLUS when
stationary. The lowest speed that can be set is
30 km/h.
Driving with DISTRONIC PLUS
Pulling away and driving
The vehicle can also pull away when it is
facing an unidentified obstacle or is driving on
a different line from another vehicle. The vehi- cle then brakes automatically. Be ready to
brake at all times.
If you depress the brake, DISTRONIC PLUS is
deactivated unless your vehicle is stationary. X
If you want to pull away with
DISTRONIC PLUS: remove your foot from
the brake pedal.
X Briefly pull the cruise control lever (Y page 164) towards you ?.
or
X Accelerate briefly.
Your vehicle pulls away and adapts its
speed to that of the vehicle in front.
If no vehicle is detected in front, your vehi-
cle accelerates to the set speed.
If there is no vehicle in front, DISTRONIC
PLUS operates in the same way as cruise
control.
If DISTRONIC PLUS detects that the vehicle in front has slowed down, it brakes your vehicle.
In this way, the distance you have selected is
maintained.
If DISTRONIC PLUS detects a faster-moving
vehicle in front, it increases the driving speed. The vehicle is only accelerated up to the
speed you have stored.
Selecting the drive program
DISTRONIC Plus supports a sporty driving
style when you have selected the Sor Mdriv-
ing program ( Ypage 147). Acceleration
behind the vehicle in front or to the set speed is then noticeably more dynamic. If you have
selected the E(AMG vehicles: C) drive pro-
gram, the vehicle accelerates more gently.
This setting is recommended in stop-and-
start traffic.
Changing lanes
If you change to the passing lane, DISTRONIC PLUS supports you when: R you are driving faster than 70 km/h
R DISTRONIC PLUS is maintaining the dis-
tance to a vehicle in front
R you switch on the appropriate turn signal
R DISTRONIC PLUS does not detect a danger
of collision
If these conditions are fulfilled, your vehicle is
accelerated. Acceleration will be interrupted
Driving systems165
Driving an d parking
Z
Page 179 of 346
22 mph (35 km/h). While in operation, the
system independently locates and measures
parking spaces on both sides of the vehicle.
Active Parking Assist will only detect parkingspaces: R that are parallel or at right-angles to the
direction of travel
R that are parallel to the direction of travel
and at least 59 in (1.5 m) wide
R that are parallel to the direction of travel
and at least 39.5 in (1.0 m) longer than your
vehicle
R that are at right angles to the direction of
travel and at least 39.5 in (1.0 m) wider
than your vehicle
iNote that Active Parking Assist cannot
measure the length of a parking space if it
is at right angles to the direction of travel.
You will need to judge whether your vehicle will fit into the parking space.
When driving at speeds below 19 mph
(30 km/h), you will see parking symbol ;as
a status indicator in the instrument cluster.
When a parking space has been detected, an arrow towards the right or the left also
appears. By default, Active Parking Assist
only displays parking spaces on the front-
passenger side. Parking spaces on the driv-
er's side are displayed as soon as the turn
signal on the driver's side is activated. When
parking on the driver's side, this must remain
activated until you confirm the use of Active
Parking Assist by pressing the abutton on
the multifunction steering wheel. The system
automatically determines whether the park-
ing space is parallel or at right-angles to the
direction of travel.
A parking space is displayed while you are
driving past it, and until you are approx-
imately 50 ft (15 m) away from it.
Parking
GWARNING
If you leave the vehicle when it is only being
braked by Active Parking Assist it could roll
away if:
R there is a malfunction in the system or in
the voltage supply.
R the electrical system in the engine com-
partment, the battery or the fuses have
been tampered with.
R the battery is disconnected.
R the accelerator pedal has been depressed,
e.g. by a vehicle occupant.
There is a risk of an accident.
Before leaving the vehicle, always secure it
against rolling away.
iWhen PARKTRONIC detects obstacles,
Active Parking Assist brakes automatically
during the parking process. You are respon- sible for braking in good time.
X Stop the vehicle when the parking space
symbol shows the desired parking space in
the instrument cluster.
X Shift the transmission to position R.
The
Start Park Assist?Yes: OKNo:
% message appears in the multifunction
display.
X To cancel the procedure: press the%
button on the multifunction steering wheel or pull away.
or
X To park using Active Parking Assist:
press the abutton on the multifunction
steering wheel.
The
Park Assist Active Accelerate
and BrakeObserve Surroundingsmes-
sage appears in the multifunction display.
X Let go of the multifunction steering wheel.
X Back up the vehicle, being ready to brake at
all times. When backing up, drive at a speed below approximately 6 mph (10 km/h).
Driving systems177
Driving an d parking
Z
Page 181 of 346
XStart the engine.
X Release the electric parking brake.
X Switch on the turn signal in the direction
you are pulling away.
X Shift the transmission to position Dor R.
The
Start Park Assist? Yes: OK No:
message appears in the multifunction dis-
play % .
X To cancel the procedure: press the%
button on the multifunction steering wheel or pull away.
or
X To exit a parking space using Active
Parking Assist: press theabutton on
the multifunction steering wheel. The
Park Assist Active Accelerate
andBrakeObserveSurroundingsmes-
sage appears in the multifunction display.
X Let go of the multifunction steering wheel.
X Pull away, being ready to brake at all times.
Do not exceed a maximum speed of
approximately 6 mph (10 km/h) when exit-
ing a parking space. Otherwise Active Park- ing Assist will be canceled.
X Depending on the message or as required,
shift the transmission to position Dor R.
Active Parking Assist immediately steers in the other direction. The
Park Assist
Active Accelerate and Brake
ObserveSurroundingsmessage appears
in the multifunction display.
iYou will achieve the best results by wait-
ing for the steering procedure to complete before pulling away.
If you back up after activation, the steeringwheel is moved to the straight-ahead posi-
tion.
X Drive forwards and back up as prompted by
the PARKTRONIC warning displays, several
times if necessary.
Once you have exited the parking space com- pletely, the steering wheel is moved to the
straight-ahead position. You hear a tone and the
Park Assist Finishedmessage
appears in the multifunction display. You will then have to steer and merge into traffic on
your own. PARKTRONIC is still available. You
can take over the steering, before the vehicle
has exited the parking space completely. This
is useful, for example when you recognize
that it is already possible to pull out of the
parking space.
Canceling Active Parking Assist
X Stop the movement of the multifunction
steering wheel or steer yourself.
Active Parking Assist will be canceled at
once. The
Park Assist Canceledmes-
sage appears in the multifunction display.
or X Press the PARKTRONIC button (Y page 174).
PARKTRONIC is switched off and Active
Parking Assist is immediately canceled. The
Park Assist Canceledmessage
appears in the multifunction display.
Active Parking Assist is canceled automati-
cally if: R the electric parking brake is engaged
R transmission position Pis selected
R parking using Active Parking Assist is no
longer possible
R you are driving faster than 6 mph (10 km/h)
R a wheel spins, ESP ®
intervenes or fails. The
÷ warning lamp lights up in the instru-
ment cluster
A warning tone sounds. The parking symbol
disappears and the multifunction display
shows the
Park Assist Canceledmes-
sage.
When Active Parking Assist is canceled, you
must steer and brake again yourself.
If a system malfunction occurs, the vehicle is
braked to a standstill. To drive on, depress the accelerator again.
Driving systems179
Driving and parking
Z