2015 MERCEDES-BENZ B-CLASS SPORTS load capacity
[x] Cancel search: load capacityPage 19 of 346
Checking ........................................ 303
Curb weight (definition)................. 321
Definition of terms ......................... 319
Direction of rotation ...................... 322
Display message ............................ 229
Distribution of the vehicle occu-
pants (definition) ............................ 322
DOT (Department of Transporta-
tion) (definition) ............................. 320
DOT, Tire Identification Number
(TIN) ............................................... 319
GAWR (Gross Axle Weight Rating)
(definition) ..................................... 320
General notes ................................ 326
GVW (Gross Vehicle Weight) (def-
inition) ........................................... 320
GVWR (Gross Vehicle Weight Rat-
ing) (definition) .............................. 320
Important safety notes .................. 302
Increased vehicle weight due to
optional equipment (definition) ...... 320
Information on driving .................... 302
Kilopascal (kPa) (definition) ........... 320
Labeling (overview) ........................ 316
Load bearing index (definition) ...... 321
Load index ..................................... 318
Load index (definition) ................... 320
M+S tire s....................................... 304
Maximum load on a tire (defini-
tion) ............................................... 321
Maximum loaded vehicle weight
(definition) ..................................... 320
Maximum permissible tire pres-
sure (definition) ............................. 321
Maximum tire load ......................... 318
Maximum tire load (definition) ....... 321
MOExtended tire s.......................... 304
Optional equipment weight (defi-
nition) ............................................ 321
PSI (pounds per square inch) (def-
inition) ........................................... 321
Replacing ....................................... 322
Service life ..................................... 304
Sidewall (definition) ....................... 321
Speed rating (definition) ................ 320
Storing ........................................... 322
Structure and characteristics
(definition) ..................................... 319 Summer tire
s................................. 304
Temperature .................................. 315
TIN (Tire Identification Number)
(definition) ..................................... 321
Tire bead (definition) ...................... 321
Tire pressure (definition) ................ 321
Tire pressures (recommended) ...... 320
Tire size (data) ............................... 326
Tire size designation, load-bearing capacity, speed rating .................... 316
Tire tread ....................................... 303
Tire tread (definition) ..................... 321
Total load limit (definition) ............. 322
Traction ......................................... 315
Traction (definition) ....................... 321
Tread wear ..................................... 315
Uniform Tire Quality Grading
Standards ...................................... 314
Uniform Tire Quality Grading
Standards (definition) .................... 320
Wear indicator (definition) ............. 321
Wheel and tire combination ........... 328
Wheel rim (definition) .................... 320
see Flat tire
Top Tether ............................................ 57
Tow-starting
Emergency engine starting ............ 298
Important safety notes .................. 295
Installing the towing eye ................ 296
Removing the towing eye ............... 297
Towing a trailer
ESP ®
(Electronic Stability Pro-
gram) ............................................... 66
Towing away
Important safety guidelines ........... 295
Installing the towing eye ................ 296
Notes for 4MATIC vehicles ............ 298
Removing the towing eye ............... 297
Transporting the vehicl e................ 298
With both axles on the ground ....... 297
With front axle raised ..................... 297
Towing eye ......................................... 284
Transmission
see Automatic transmission
Transmission position display
(DIRECT SELECT lever) ...................... 143
Transporting the vehicle .................. 298
Index17
Page 250 of 346
Useful information
iThis Operator's Manual describes all
models and all standard and optional equip- ment of your vehicle available at the time of
publication of the Operator's Manual.
Country-specific differences are possible.
Please note that your vehicle may not be
equipped with all features described. This
also applies to safety-related systems and
functions.
iRead the information on qualified special-
ist workshops ( Ypage 24).
Loading guidelines
GWARNING
If objects, luggage or loads are not secured or
not secured sufficiently, they could slip, tip
over or be flung around and thereby hit vehicle
occupants. There is a risk of injury, particu-
larly in the event of sudden braking or a sud-
den change in direction.
Always store objects so that they cannot be
flung around. Secure objects, luggage or
loads against slipping or tipping before the
journey.
GWARNING
Combustion engines emit poisonous exhaust
gases such as carbon monoxide. If the tailgate is open when the engine is running, particu-
larly if the vehicle is moving, exhaust fumes
could enter the passenger compartment.
There is a risk of poisoning.
Turn off the engine before opening the tail-
gate. Never drive with the tailgate open.
GWARNING
The exhaust tail pipe and tail pipe trim can
become very hot. If you come into contact
with these parts of the vehicle, you could burn
yourself. There is a risk of injury.
Always be particularly careful around the
exhaust tail pipe and the tail pipe trim. Allow
these components to cool down before touch-
ing them.
The handling characteristics of a laden vehi-
cle are dependent on the distribution of the
load within the vehicle. For this reason, you
should observe the following notes when
transporting a load: R Never exceed the maximum permissible
gross vehicle mass or the gross axle weight
rating for the vehicle (including occupants).
The values are specified on the vehicle
identification plate on the B-pillar of the
driver's door.
R The cargo compartment is the preferred
place to carry objects.
R Position heavy loads as far forwards as pos-
sible and as low down in the cargo com-
partment as possible.
R The load must not protrude above the
upper edge of the seat backrests.
R Always place the load against the rear or
front seat backrests. Make sure that the
seat backrests are securely locked intoplace.
R Always place the load behind unoccupied
seats if possible.
R Use the cargo tie-down rings and the parcel
nets to transport loads and luggage.
R Use cargo tie-down rings and fastening
materials appropriate for the weight and
size of the load.
R Hook in the cargo net when loading.
R The maximum load capacity of the stowage
well under the cargo compartment floor is
55 lbs (25 kg).
R Secure the load with sufficiently strong and
wear-resistant tie-downs. Pad sharp edges
for protection.
!Do not position the load on one part of the
folding cargo compartment floor only. The
maximum load capacity of the folding cargo
compartment floor is 220 lbs (100 kg). Dis- tribute the weight evenly to avoid damaging
the cargo compartment floor. Place a solid
248Loading guidelines
Stowage and features
Page 253 of 346
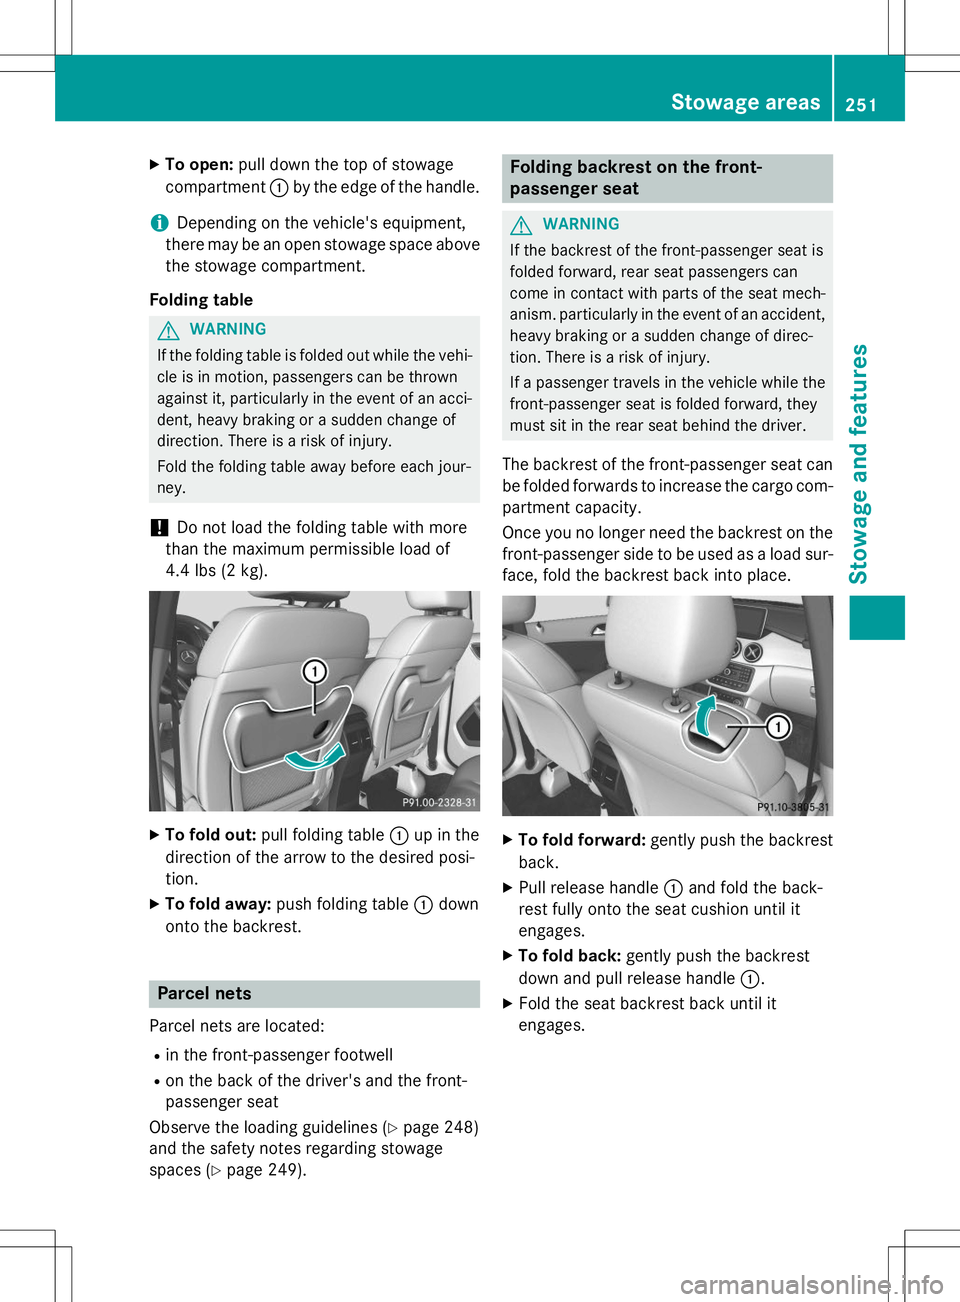
XTo open: pull down the top of stowage
compartment :by the edge of the handle.
iDepending on the vehicle's equipment,
there may be an open stowage space above the stowage compartment.
Folding table
GWARNING
If the folding table is folded out while the vehi- cle is in motion, passengers can be thrown
against it, particularly in the event of an acci- dent, heavy braking or a sudden change of
direction. There is a risk of injury.
Fold the folding table away before each jour-
ney.
!Do not load the folding table with more
than the maximum permissible load of
4.4 lbs (2 kg).
X To fold out: pull folding table :up in the
direction of the arrow to the desired posi-
tion.
X To fold away: push folding table :down
onto the backrest.
Parcel nets
Parcel nets are located:
R in the front-passenger footwell
R on the back of the driver's and the front-
passenger seat
Observe the loading guidelines ( Ypage 248)
and the safety notes regarding stowage
spaces ( Ypage 249).
Folding backrest on the front-
passenger seat
GWARNING
If the backrest of the front-passenger seat is
folded forward, rear seat passengers can
come in contact with parts of the seat mech-
anism. particularly in the event of an accident,
heavy braking or a sudden change of direc-
tion. There is a risk of injury.
If a passenger travels in the vehicle while the
front-passenger seat is folded forward, they
must sit in the rear seat behind the driver.
The backrest of the front-passenger seat can
be folded forwards to increase the cargo com-
partment capacity.
Once you no longer need the backrest on the
front-passenger side to be used as a load sur- face, fold the backrest back into place.
X To fold forward: gently push the backrest
back.
X Pull release handle :and fold the back-
rest fully onto the seat cushion until it
engages.
X To fold back: gently push the backrest
down and pull release handle :.
X Fold the seat backrest back until it
engages.
Stowage areas251
Sto wage an d features
Z
Page 254 of 346
Through-loading facility in the rear
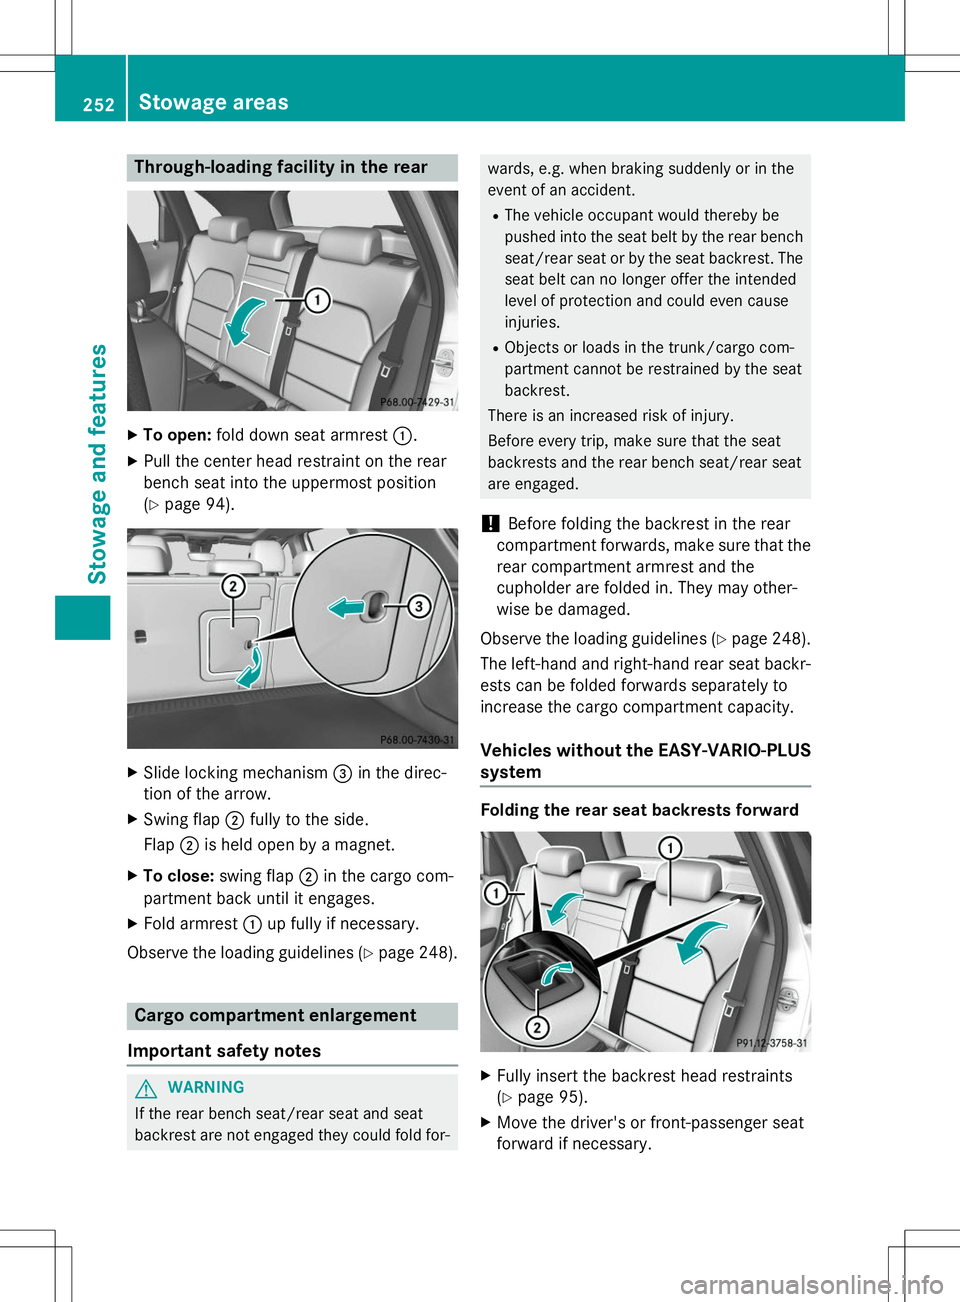
XTo open: fold down seat armrest :.
X Pull the center head restraint on the rear
bench seat into the uppermost position(Y page 94).
X
Slide locking mechanism =in the direc-
tion of the arrow.
X Swing flap ;fully to the side.
Flap ;is held open by a magnet.
X To close: swing flap ;in the cargo com-
partment back until it engages.
X Fold armrest :up fully if necessary.
Observe the loading guidelines ( Ypage 248).
Cargo compartment enlargement
Important safety notes
GWARNING
If the rear bench seat/rear seat and seat
backrest are not engaged they could fold for-
wards, e.g. when braking suddenly or in the
event of an accident. R The vehicle occupant would thereby be
pushed into the seat belt by the rear bench
seat/rear seat or by the seat backrest. The
seat belt can no longer offer the intended
level of protection and could even cause
injuries.
R Objects or loads in the trunk/cargo com-
partment cannot be restrained by the seat
backrest.
There is an increased risk of injury.
Before every trip, make sure that the seat
backrests and the rear bench seat/rear seat
are engaged.
!Before folding the backrest in the rear
compartment forwards, make sure that the rear compartment armrest and the
cupholder are folded in. They may other-
wise be damaged.
Observe the loading guidelines ( Ypage 248).
The left-hand and right-hand rear seat backr-
ests can be folded forwards separately to
increase the cargo compartment capacity.
Vehicles without the EASY-VARIO-PLUS system
Folding the rear seat backrests forward
X Fully insert the backrest head restraints (Y page 95).
X Move the driver's or front-passenger seat
forward if necessary.
252Sto wage areas
Stowage an d features
Page 256 of 346
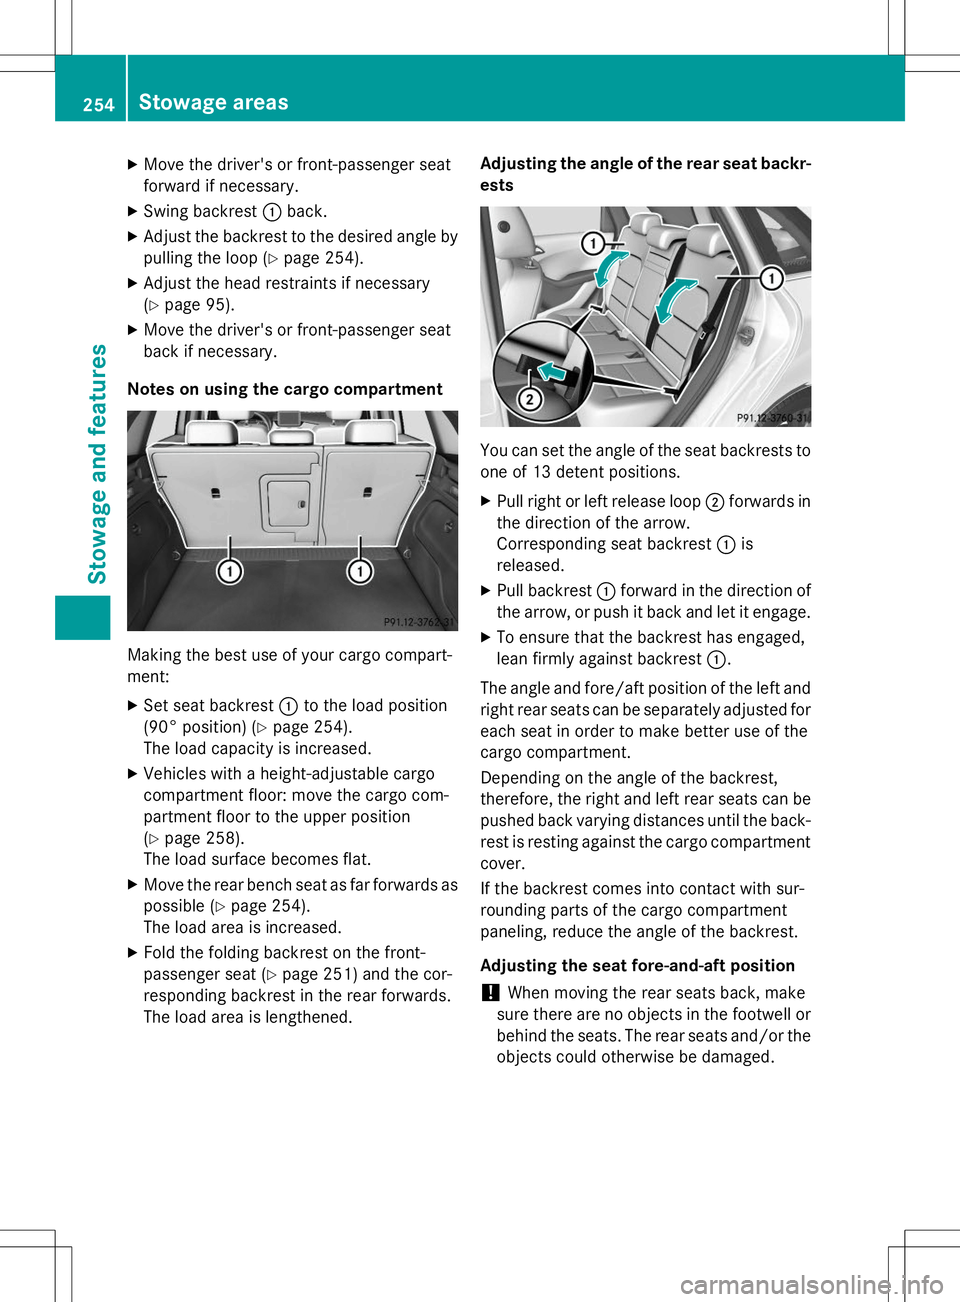
XMove the driver's or front-passenger seat
forward if necessary.
X Swing backrest :back.
X Adjust the backrest to the desired angle by
pulling the loop ( Ypage 254).
X Adjust the head restraints if necessary(Y page 95).
X Move the driver's or front-passenger seat
back if necessary.
Notes on using the cargo compartment
Making the best use of your cargo compart-
ment: X Set seat backrest :to the load position
(90° position) ( Ypage 254).
The load capacity is increased.
X Vehicles with a height-adjustable cargo
compartment floor: move the cargo com-
partment floor to the upper position(Y page 258).
The load surface becomes flat.
X Move the rear bench seat as far forwards as
possible ( Ypage 254).
The load area is increased.
X Fold the folding backrest on the front-
passenger seat ( Ypage 251) and the cor-
responding backrest in the rear forwards.
The load area is lengthened. Adjusting the angle of the rear seat backr-ests
You can set the angle of the seat backrests to
one of 13 detent positions. X Pull right or left release loop ;forwards in
the direction of the arrow.
Corresponding seat backrest :is
released.
X Pull backrest :forward in the direction of
the arrow, or push it back and let it engage.
X To ensure that the backrest has engaged,
lean firmly against backrest :.
The angle and fore/aft position of the left and
right rear seats can be separately adjusted for
each seat in order to make better use of the
cargo compartment.
Depending on the angle of the backrest,
therefore, the right and left rear seats can be pushed back varying distances until the back-
rest is resting against the cargo compartment cover.
If the backrest comes into contact with sur-
rounding parts of the cargo compartment
paneling, reduce the angle of the backrest.
Adjusting the seat fore-and-aft position
!When moving the rear seats back, make
sure there are no objects in the footwell or behind the seats. The rear seats and/or the
objects could otherwise be damaged.
254Stowage areas
Stowage and features
Page 260 of 346
Always close the cargo compartment floor
before a journey.
!The maximum load capacity of the stow-
age well under the cargo compartment
floor is 55 lbs (25 kg).
There is a stowage area for TIREFIT, the vehi-
cle tool kit, a folding box, etc. underneath the
cargo compartment floor.
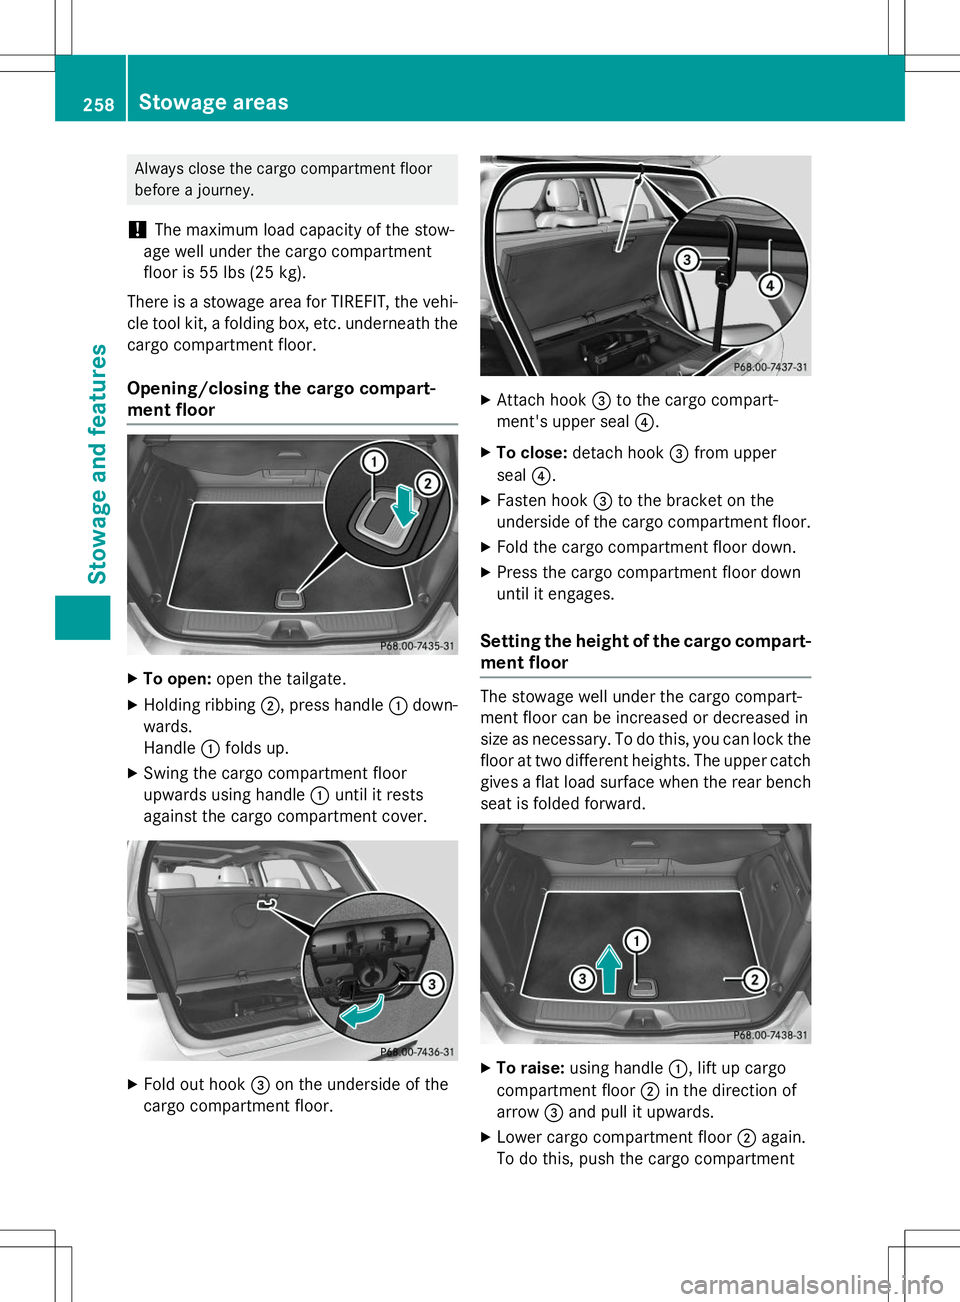
Opening/closing the cargo compart-
ment floor
X To open: open the tailgate.
X Holding ribbing ;, press handle :down-
wards.
Handle :folds up.
X Swing the cargo compartment floor
upwards using handle :until it rests
against the cargo compartment cover.
X Fold out hook =on the underside of the
cargo compartment floor.
X Attach hook =to the cargo compart-
ment's upper seal ?.
X To close: detach hook =from upper
seal ?.
X Fasten hook =to the bracket on the
underside of the cargo compartment floor.
X Fold the cargo compartment floor down.
X Press the cargo compartment floor down
until it engages.
Setting the height of the cargo compart-
ment floor
The stowage well under the cargo compart-
ment floor can be increased or decreased in
size as necessary. To do this, you can lock thefloor at two different heights. The upper catch gives a flat load surface when the rear bench
seat is folded forward.
X To raise: using handle :, lift up cargo
compartment floor ;in the direction of
arrow =and pull it upwards.
X Lower cargo compartment floor ;again.
To do this, push the cargo compartment
258Stowage areas
Sto wage an d features
Page 262 of 346
tainers of the right size. Always close the con-tainer, particularly if the liquid is hot.
GWARNING
If objects in the passenger compartment are
stowed incorrectly, they can slide or be
thrown around and hit vehicle occupants.
There is a risk of injury, particularly in the
event of sudden braking or a sudden change
in direction.
R Always stow objects so that they cannot be
thrown around in such situations.
R Always make sure that objects do not pro-
trude from stowage spaces, parcel nets or
stowage nets.
R Close the lockable stowage spaces while
driving.
R Stow and secure objects that are heavy,
hard, pointy, sharp-edged, fragile or too
large in the cargo compartment.
!Only use the cup holders for containers of
the right size and which have lids. The
drinks could otherwise spill.
Observe the loading guidelines ( Ypage 248).
The stowage compartments in the doors pro-
vide space for bottles:
R front: capacity up to 51 fl. oz. (1.5 l)
R rear: capacity up to 17 fl. oz. (0.5 l)
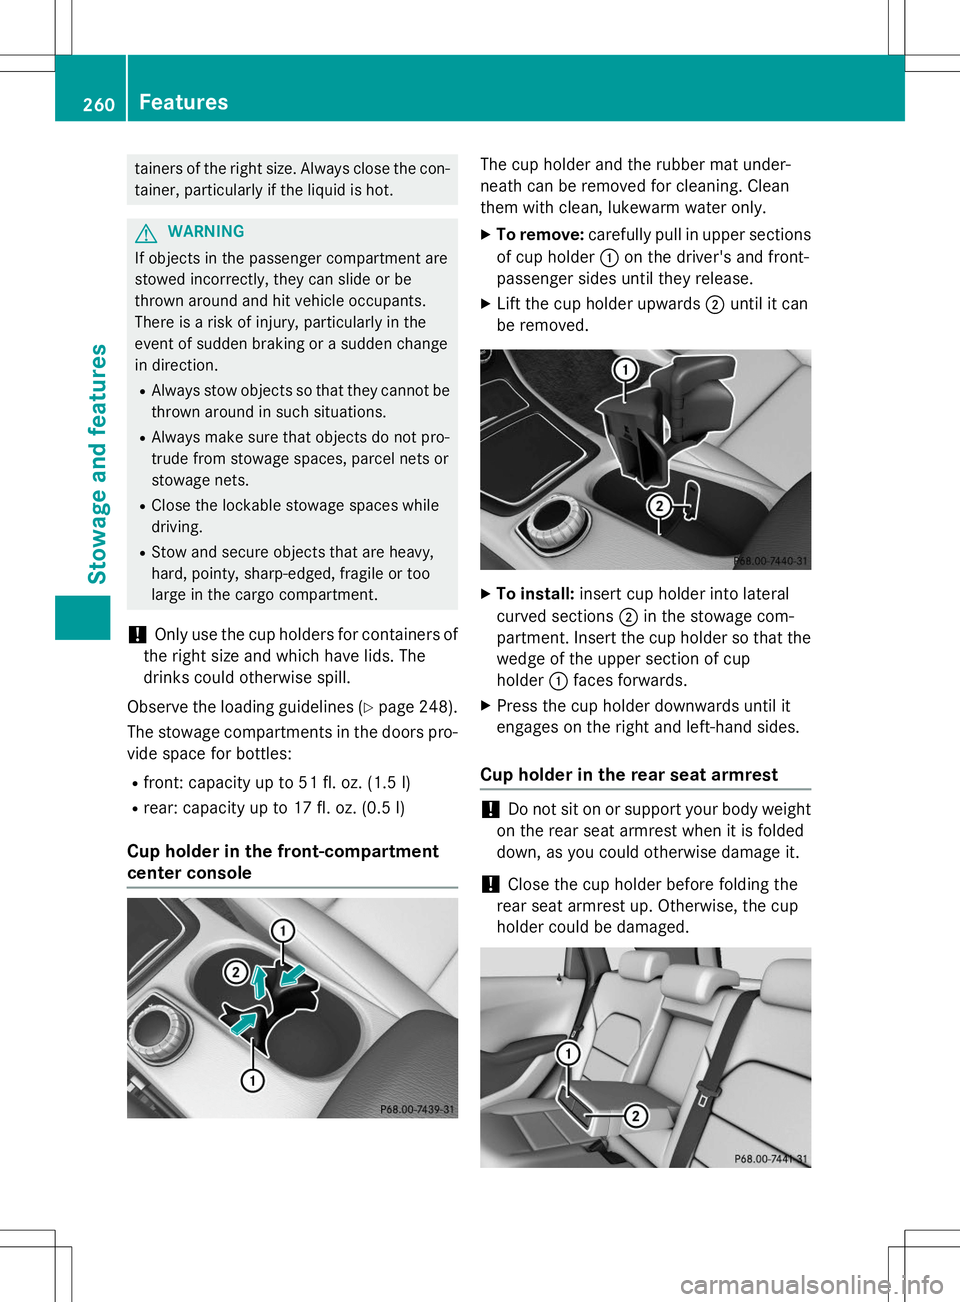
Cup holder in the front-compartment
center console
The cup holder and the rubber mat under-
neath can be removed for cleaning. Clean
them with clean, lukewarm water only.
X To remove: carefully pull in upper sections
of cup holder :on the driver's and front-
passenger sides until they release.
X Lift the cup holder upwards ;until it can
be removed.
X To install: insert cup holder into lateral
curved sections ;in the stowage com-
partment. Insert the cup holder so that the wedge of the upper section of cup
holder :faces forwards.
X Press the cup holder downwards until it
engages on the right and left-hand sides.
Cup holder in the rear seat armrest
!Do not sit on or support your body weight
on the rear seat armrest when it is folded
down, as you could otherwise damage it.
!Close the cup holder before folding the
rear seat armrest up. Otherwise, the cup
holder could be damaged.
260Features
Stowage and features
Page 287 of 346
Information on changing/mounting a wheel (Y page 322).
X Stop the vehicle on solid, non-slippery and
level ground, as far away as possible fromtraffic.
X Switch on the hazard warning lamps.
X Secure the vehicle against rolling away(Y page 152).
X If possible, bring the front wheels into the
straight-ahead position.
X Switch off the engine.
X Vehicles without KEYLESS-GO: remove
the SmartKey from the ignition lock.
X Vehicles with KEYLESS-GO start-func-
tion or KEYLESS-GO: open the driver's
door.
The on-board electronics now have status0 . This is the same as the SmartKey having
been removed.
X Vehicles with KEYLESS-GO start-func-
tion or KEYLESS-GO: remove the Start/
Stop button from the ignition lock ( Y page 135).
X All occupants must get out of the vehicle.
Make sure that they are not endangered as
they do so.
X Make sure that no one is near the danger
area while a wheel is being changed. Any-
one who is not directly assisting in the
wheel change should, for example, stand
behind the barrier.
X Get out of the vehicle. Pay attention to traf-
fic conditions when doing so.
X Close the driver's door.
iVehicles equipped with MOExtended tires
are not equipped with a TIREFIT kit at the
factory. It is therefore recommended that
you additionally equip your vehicle with a
TIREFIT kit if you mount tires that do not
feature run-flat properties, e.g. winter tires.
A TIREFIT kit can be obtained from a quali-
fied specialist workshop.
MOExtended tires (tires with run-flat properties)
General notes
With MOExtended tires (tires with run flat
characteristics), you can continue to drive
your vehicle even if there is a total loss of
pressure in one or more tires. The affected
tire must not show any clearly visible damage.
You can recognize MOExtended tires by the
MOExtended marking which appears on the
sidewall of the tire. You will find this marking next to the tire size designation, the load-
bearing capacity and the speed index( Y page 316).
MOExtended tires may only be used in con-
junction with an active tire pressure loss
warning system.
If a pressure loss warning message
appears in the multifunction display:
R observe the instructions in the display mes-
sages ( Ypage 229).
R check the tire for damage.
R if driving on, observe the following notes.
The driving distance possible in run-flat mode is approximately 50 miles (80 km) when the
vehicle is partially laden and approximately
18 miles (30 km) when the vehicle is fully
laden.
In addition to the vehicle load, the driving dis-
tance possible depends upon:
R vehicle speed
R road condition
R outside temperature
The driving distance possible in run-flat mode may be reduced by extreme driving condi-
tions/maneuvers, or it can be increased
through a moderate style of driving.
The driving distance possible in run-flat modeis counted from the moment the tire pressure
loss warning appears in the multifunction dis-
play.
You must not exceed a maximum speed of
50 mph (80 km/h).
Flat tire285
Roadside Assistance