2015 MERCEDES-BENZ B-CLASS SPORTS tailgate
[x] Cancel search: tailgatePage 114 of 346
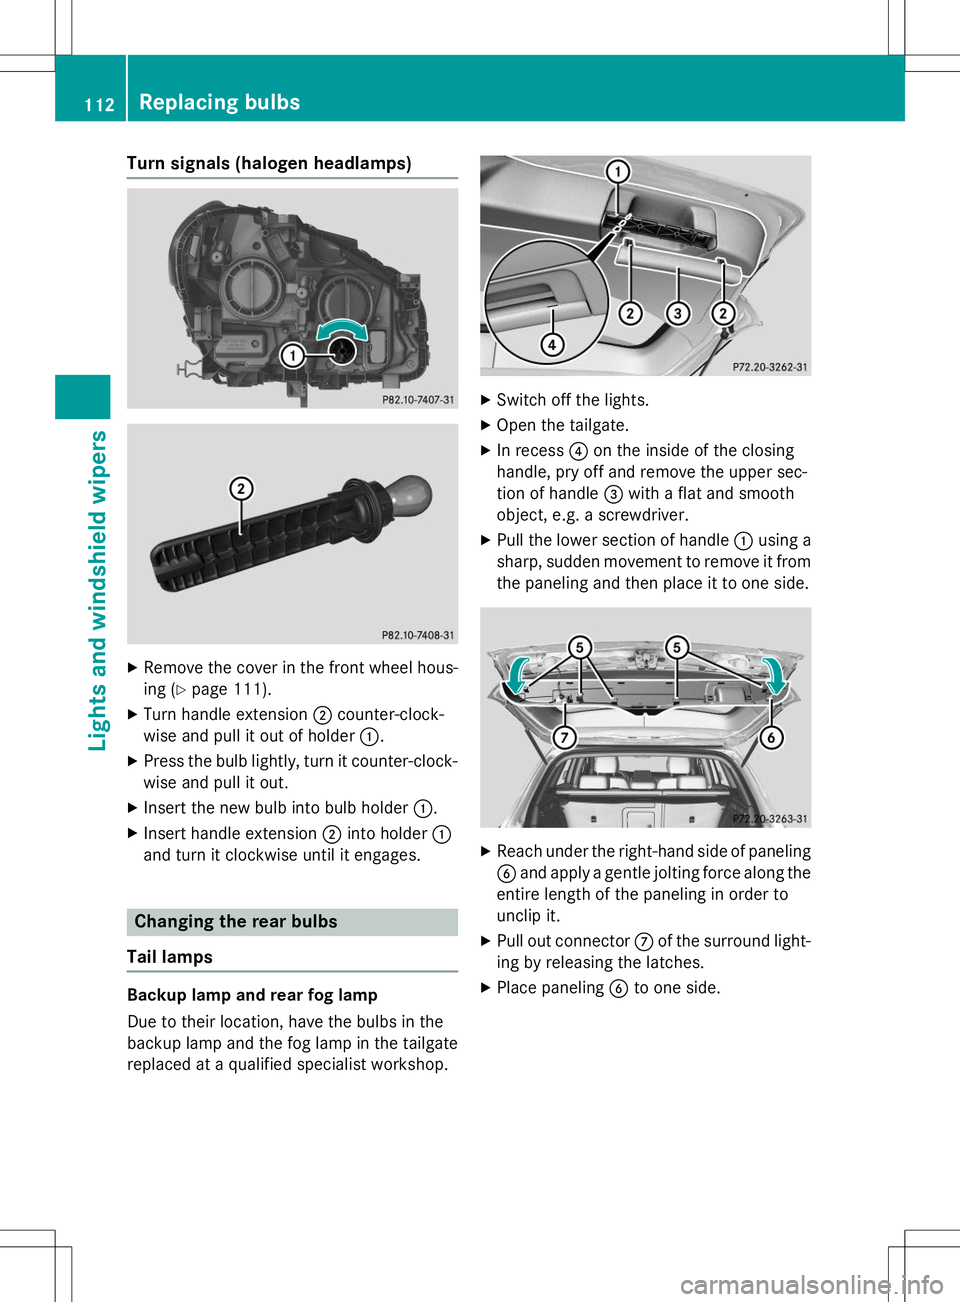
Turn signals (halogen headlamps)
XRemove the cover in the front wheel hous-
ing ( Ypage 111).
X Turn handle extension ;counter-clock-
wise and pull it out of holder :.
X Press the bulb lightly, turn it counter-clock-
wise and pull it out.
X Insert the new bulb into bulb holder :.
X Insert handle extension ;into holder :
and turn it clockwise until it engages.
Changing the rear bulbs
Tail lamps
Backup lamp and rear fog lamp
Due to their location, have the bulbs in the
backup lamp and the fog lamp in the tailgate replaced at a qualified specialist workshop.
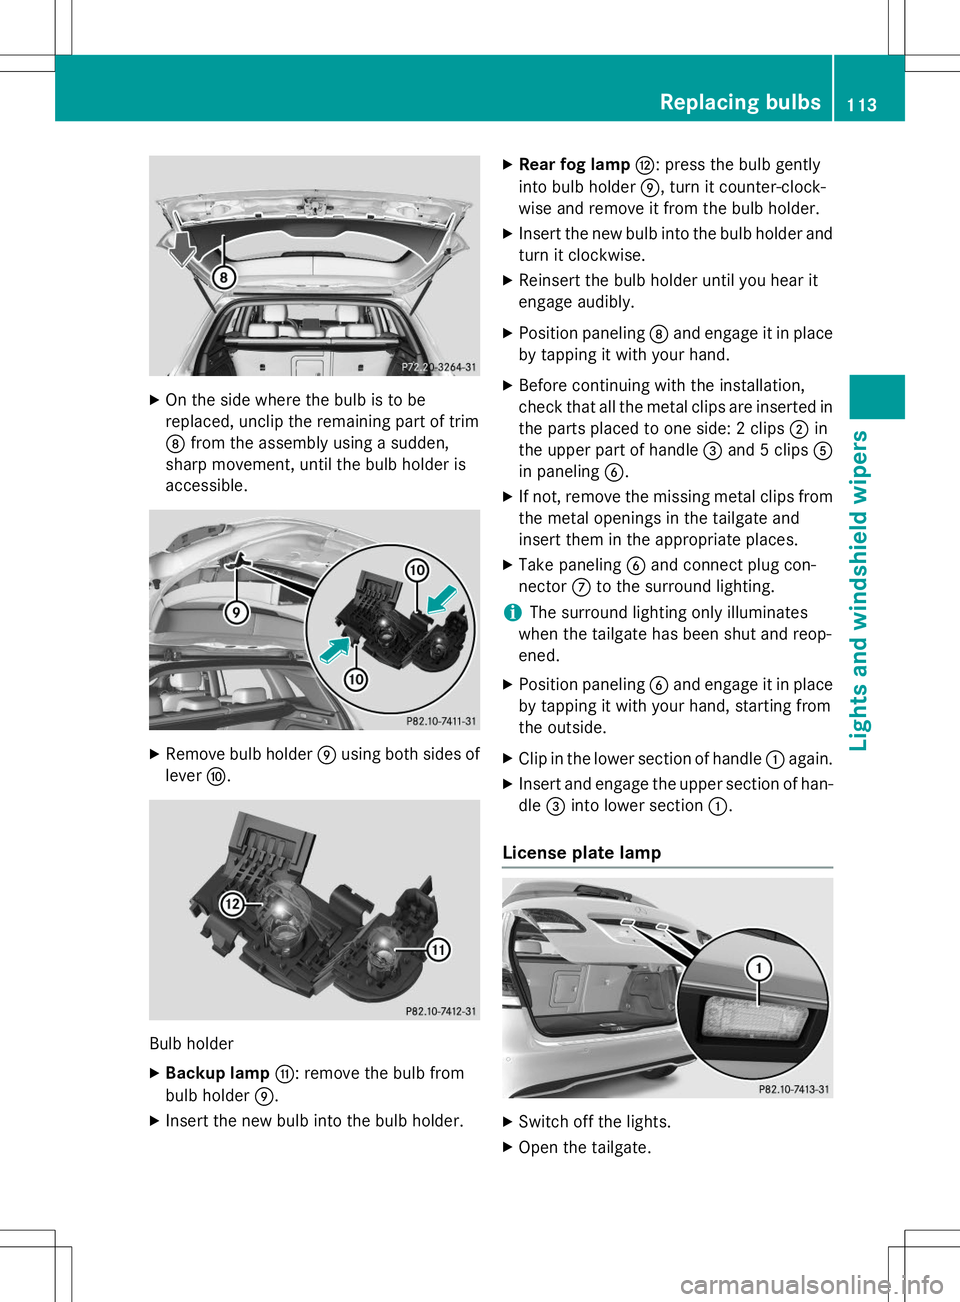
X Switch off the lights.
X Open the tailgate.
X In recess ?on the inside of the closing
handle, pry off and remove the upper sec-
tion of handle =with a flat and smooth
object, e.g. a screwdriver.
X Pull the lower section of handle :using a
sharp, sudden movement to remove it from the paneling and then place it to one side.
X Reach under the right-hand side of paneling
B and apply a gentle jolting force along the
entire length of the paneling in order to
unclip it.
X Pull out connector Cof the surround light-
ing by releasing the latches.
X Place paneling Bto one side.
112Replacing bulbs
Lights and windshield wipers
Page 115 of 346
XOn the side where the bulb is to be
replaced, unclip the remaining part of trimD from the assembly using a sudden,
sharp movement, until the bulb holder isaccessible.
X Remove bulb holder Eusing both sides of
lever F.
Bulb holder
X Backup lamp G: remove the bulb from
bulb holder E.
X Insert the new bulb into the bulb holder. X
Rear fog lamp H: press the bulb gently
into bulb holder E, turn it counter-clock-
wise and remove it from the bulb holder.
X Insert the new bulb into the bulb holder and
turn it clockwise.
X Reinsert the bulb holder until you hear it
engage audibly.
X Position paneling Dand engage it in place
by tapping it with your hand.
X Before continuing with the installation,
check that all the metal clips are inserted in
the parts placed to one side: 2 clips ;in
the upper part of handle =and 5 clips A
in paneling B.
X If not, remove the missing metal clips from
the metal openings in the tailgate and
insert them in the appropriate places.
X Take paneling Band connect plug con-
nector Cto the surround lighting.
iThe surround lighting only illuminates
when the tailgate has been shut and reop- ened.
X Position paneling Band engage it in place
by tapping it with your hand, starting from
the outside.
X Clip in the lower section of handle :again.
X Insert and engage the upper section of han-dle =into lower section :.
License plate lamp
X
Switch off the lights.
X Open the tailgate.
Replacing bulbs113
Lights and windshield wipers
Z
Page 117 of 346
40Switches off intermittent wiping
5ô Wipes with washer fluid
X Switch on the ignition.
X Turn switch :on the combination switch
to the corresponding position.
Vehicles with a black and white multi-
function display: when the rear window
wiper is switched on, the èsymbol
appears in the status overview in the instru- ment cluster. Further information on the
status overview ( Ypage 201).
Vehicles with a color multifunction dis-
play: when the rear window wiper is
switched on, the èsymbol appears in
the assistance graphic in the instrument
cluster. Further information on the assis-
tance graphic ( Ypage 202).
Replacing the wiper blades
Important safety notes
GWARNING
If the windshield wipers begin to move while
you are changing the wiper blades, you could be trapped by the wiper arm. There is a risk of
injury.
Always switch off the windshield wipers and
ignition before changing the wiper blades.
!To avoid damaging the wiper blades,
make sure that you touch only the wiper
arm of the wiper.
!Never open the hood/tailgate if a wiper
arm has been folded away from the wind-
shield/rear window.
Never fold a windshield wiper arm without a
wiper blade back onto the windshield/rear window.
Hold the windshield wiper arm firmly whenyou change the wiper blade. If you release
the wiper arm without a wiper blade and it
falls onto the windshield/rear window, the
windshield/rear window may be damaged
by the force of the impact. Mercedes-Benz recommends that you have
the wiper blades changed at a qualified
specialist workshop.
Changing the windshield wiper blades
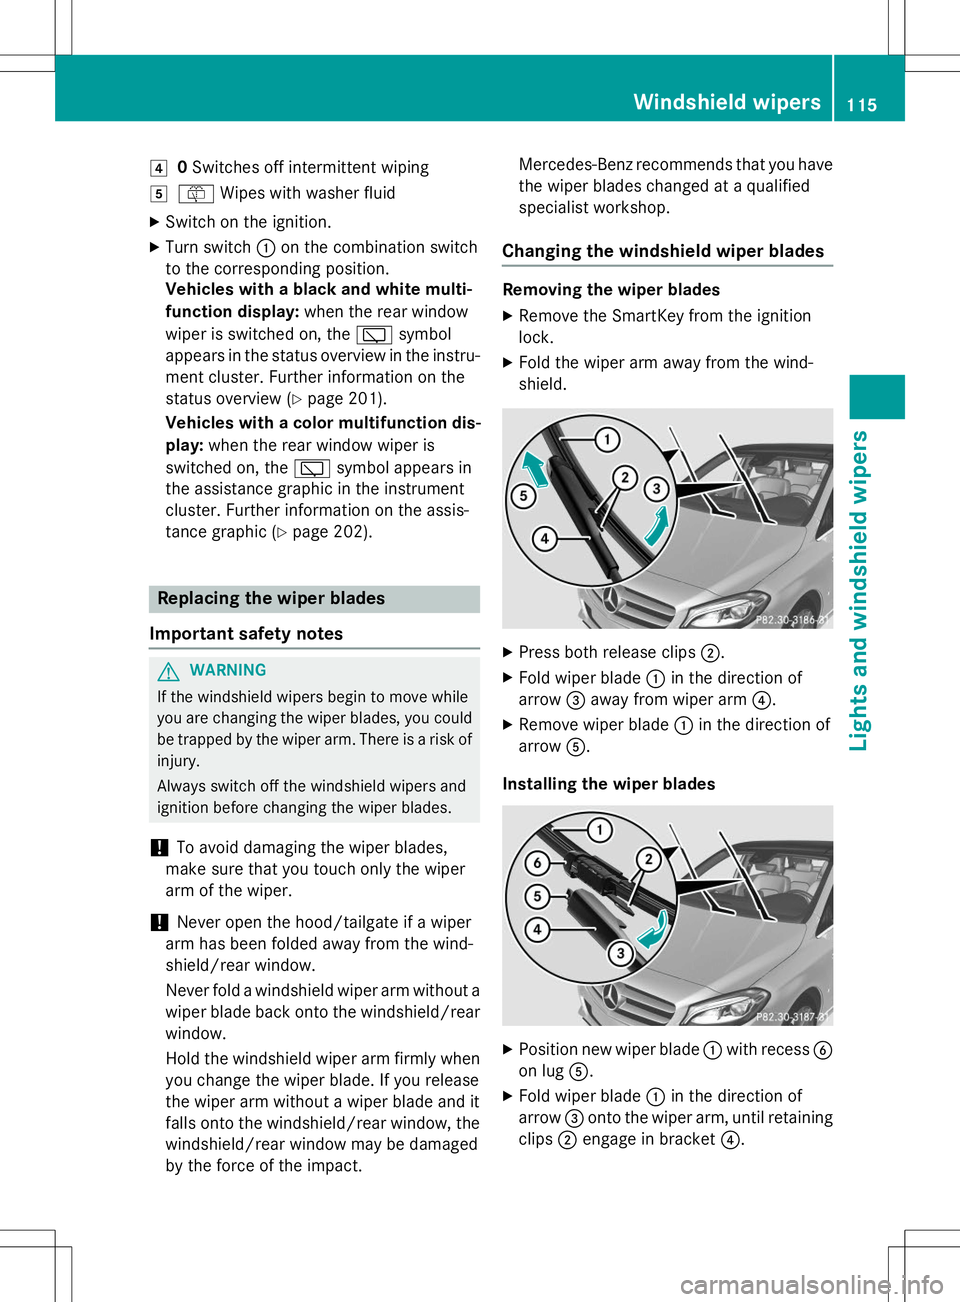
Removing the wiper blades
X Remove the SmartKey from the ignition
lock.
X Fold the wiper arm away from the wind-
shield.
XPress both release clips ;.
X Fold wiper blade :in the direction of
arrow =away from wiper arm ?.
X Remove wiper blade :in the direction of
arrow A.
Installing the wiper blades
X Position new wiper blade :with recess B
on lug A.
X Fold wiper blade :in the direction of
arrow =onto the wiper arm, until retaining
clips ;engage in bracket ?.
Windshield wipers115
Lights and windshield wipers
Z
Page 157 of 346
Rthe seat belt has been fastened.
R you depress the accelerator pedal.
If the transmission is in position R, the tailgate
must be closed.
If your seat belt is not fastened, the following
conditions must be fulfilled to automatically
release the electric parking brake:
R the driver's door is closed.
R you have shifted out of transmission posi-
tion Por you have previously driven faster
than 2 mph (3 km/h).
Ensure that you do not depress the acceler-
ator pedal unintentionally. Otherwise the
parking brake will be released and the vehicle will start to move.
Emergency braking
The vehicle can also be braked during an
emergency by using the electric parking
brake.
X While driving, push handle :of the electric
parking brake ( Ypage 153).
The vehicle is braked as long as you keep
handle :of the electric parking brake
pressed. The longer the electric parking
brake handle :is depressed, the greater
the braking force.
During braking:
R a warning tone sounds
R the
Release park. brakemessage
appears
R the red !indicator lamp in the instru-
ment cluster flashes
When the vehicle has been braked to a stand- still, the electric parking brake is engaged.
Parking the vehicle for a long period
If you leave the vehicle parked for longer than four weeks, the battery may be damaged by
exhaustive discharging. If you leave the vehicle parked for longer than
six weeks, the vehicle may suffer damage as a result of lack of use.
X Visit a qualified specialist workshop and
seek advice.
iYou can obtain information about trickle
chargers from a qualified specialist work-
shop.
Driving tips
General notes
Important safety notes
GWARNING
If you switch off the ignition while driving,
safety-relevant functions are only available
with limitations, or not at all. This could affect, for example, the power steering and the brake
boosting effect. You will require considerably
more effort to steer and brake. There is a risk
of an accident.
Do not switch off the ignition while driving.
GWARNING
If you operate mobile communication equip-
ment while driving, you will be distracted from traffic conditions. You could also lose controlof the vehicle. There is a risk of an accident.
Only operate this equipment when the vehicleis stationary.
Observe the legal requirements for the coun- try in which you are driving. Some jurisdic-
tions prohibit the driver from using a mobile
phone while driving a vehicle.
If you make a call while driving, always use
hands-free mode. Only operate the telephone
when the traffic situation permits. If you are
unsure, pull over to a safe location and stop
before operating the telephone.
Bear in mind that at a speed of only 30 mph
(approximately 50 km/h), the vehicle covers
a distance of 44 ft (approximately 14 m) per
se cond.
Driving tips155
Driving and parking
Z
Page 182 of 346
Rear view camera
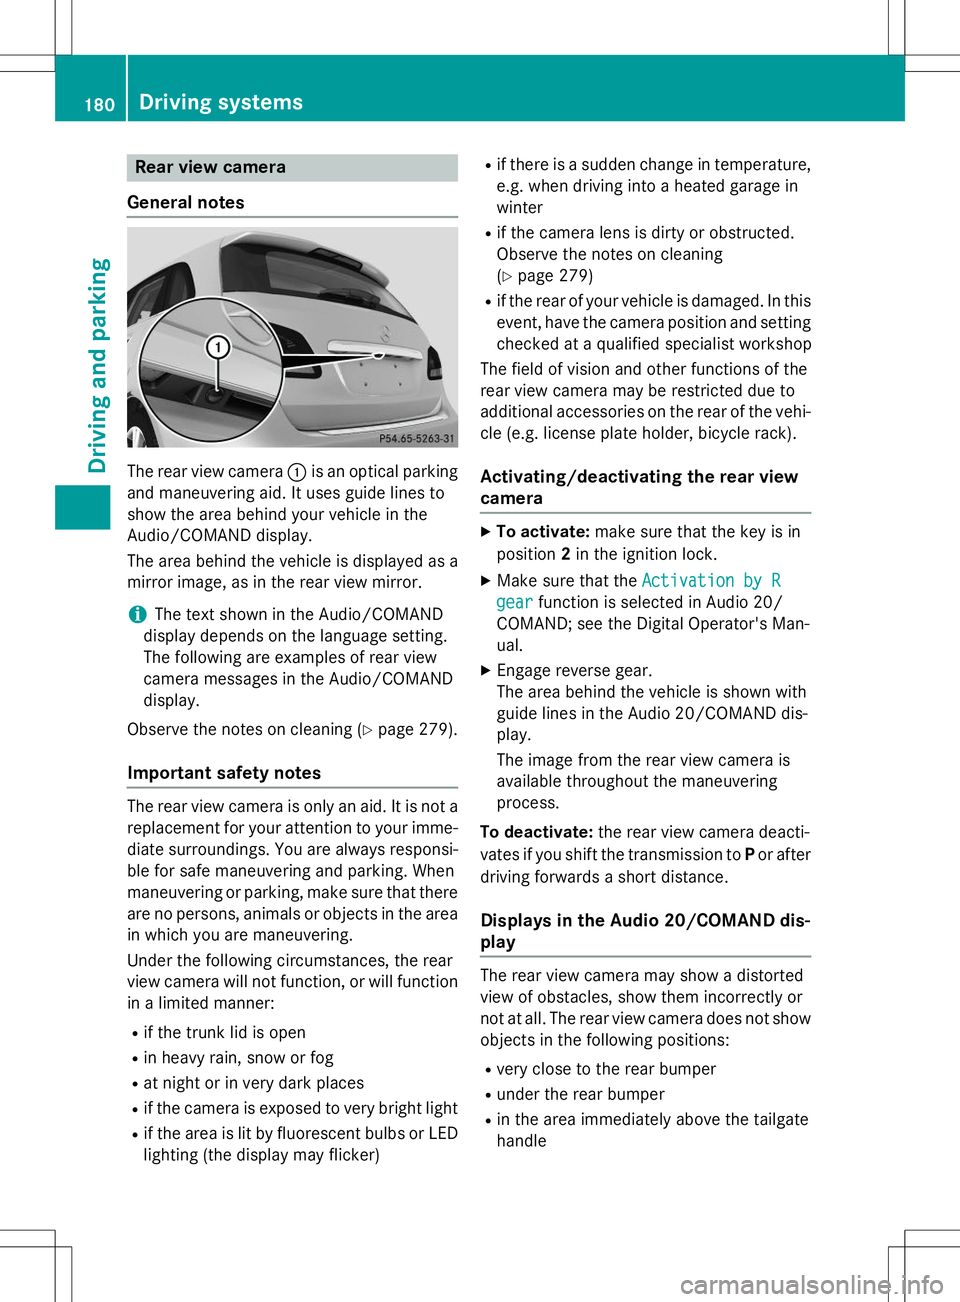
General notes
The rear view camera :is an optical parking
and maneuvering aid. It uses guide lines to
show the area behind your vehicle in the
Audio/COMAND display.
The area behind the vehicle is displayed as a
mirror image, as in the rear view mirror.
iThe text shown in the Audio/COMAND
display depends on the language setting.
The following are examples of rear view
camera messages in the Audio/COMAND
display.
Observe the notes on cleaning ( Ypage 279).
Important safety notes
The rear view camera is only an aid. It is not a
replacement for your attention to your imme-
diate surroundings. You are always responsi- ble for safe maneuvering and parking. When
maneuvering or parking, make sure that there
are no persons, animals or objects in the area in which you are maneuvering.
Under the following circumstances, the rear
view camera will not function, or will function
in a limited manner:
R if the trunk lid is open
R in heavy rain, snow or fog
R at night or in very dark places
R if the camera is exposed to very bright light
R if the area is lit by fluorescent bulbs or LED
lighting (the display may flicker) R
if there is a sudden change in temperature,
e.g. when driving into a heated garage in
winter
R if the camera lens is dirty or obstructed.
Observe the notes on cleaning(Y page 279)
R if the rear of your vehicle is damaged. In this
event, have the camera position and setting
checked at a qualified specialist workshop
The field of vision and other functions of the
rear view camera may be restricted due to
additional accessories on the rear of the vehi-
cle (e.g. license plate holder, bicycle rack).
Activating/deactivating the rear view
camera
X To activate: make sure that the key is in
position 2in the ignition lock.
X Make sure that the
Activation by R
gearfunction is selected in Audio 20/
COMAND; see the Digital Operator's Man-
ual.
X Engage reverse gear.
The area behind the vehicle is shown with
guide lines in the Audio 20/COMAND dis-
play.
The image from the rear view camera is
available throughout the maneuvering
process.
To deactivate: the rear view camera deacti-
vates if you shift the transmission to Por after
driving forwards a short distance.
Displays in the Audio 20/COMAND dis-play
The rear view camera may show a distorted
view of obstacles, show them incorrectly or
not at all. The rear view camera does not show
objects in the following positions:
R very close to the rear bumper
R under the rear bumper
R in the area immediately above the tailgate
handle
180Driving systems
Driving and parking
Page 234 of 346
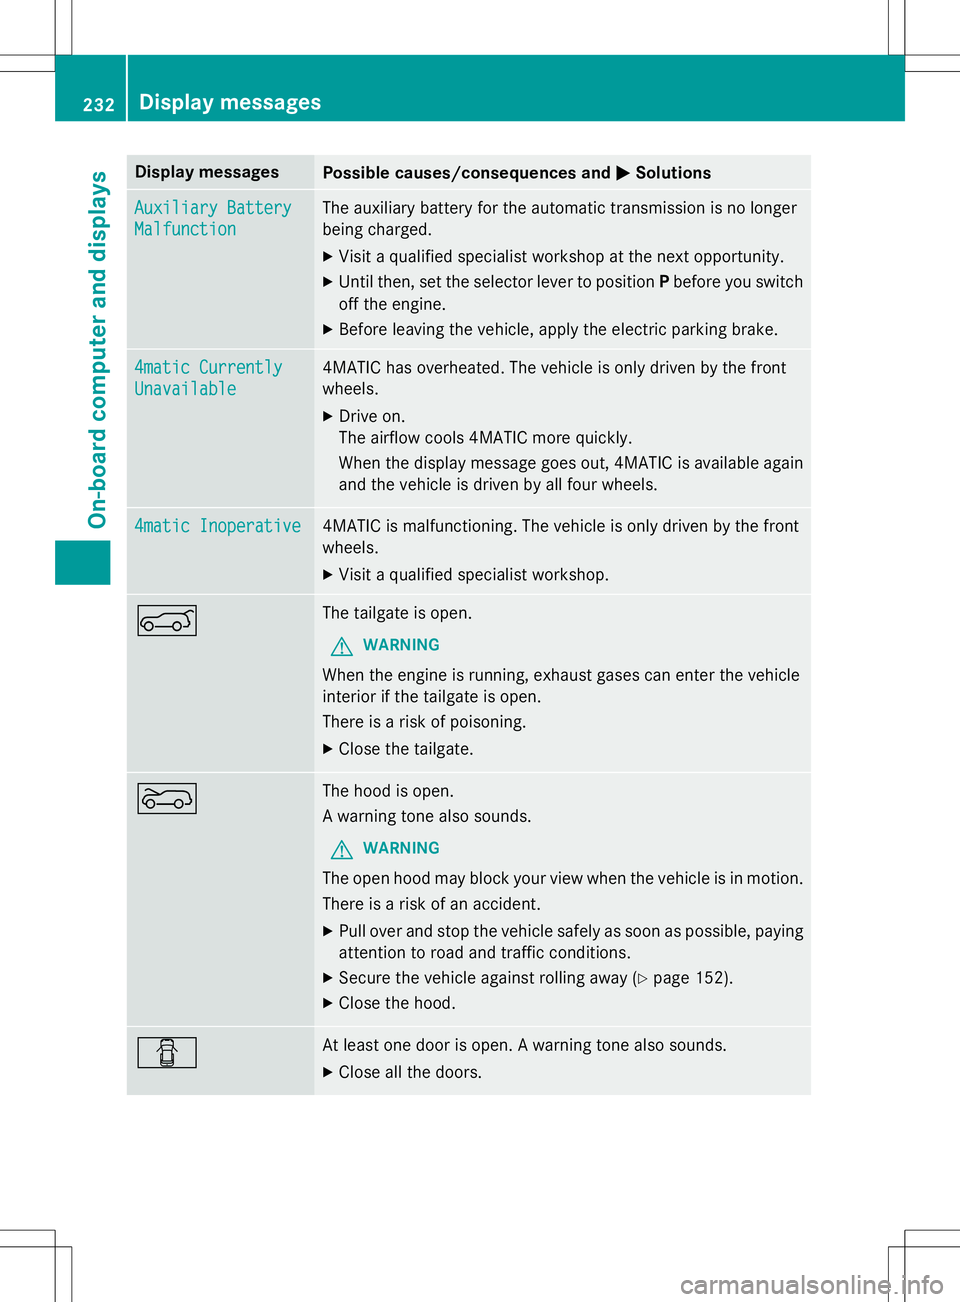
Display messagesPossible causes/consequences andMSolutions
Auxiliary Battery
Malfunction
The auxiliary battery for the automatic transmission is no longer
being charged. X
Visit a qualified specialist workshop at the next opportunity.
X Until then, set the selector lever to position Pbefore you switch
off the engine.
X Before leaving the vehicle, apply the electric parking brake.
4matic Currently
Unavailable
4MATIC has overheated. The vehicle is only driven by the front
wheels. X Drive on.
The airflow cools 4MATIC more quickly.
When the display message goes out, 4MATIC is available again
and the vehicle is driven by all four wheels.
4matic Inoperative4MATIC is malfunctioning. The vehicle is only driven by the front
wheels. X Visit a qualified specialist workshop.
AThe tailgate is open.
GWARNING
When the engine is running, exhaust gases can enter the vehicle
interior if the tailgate is open.
There is a risk of poisoning.
X Close the tailgate.
?The hood is open.
A warning tone also sounds.
GWARNING
The open hood may block your view when the vehicle is in motion.
There is a risk of an accident.
X Pull over and stop the vehicle safely as soon as possible, paying
attention to road and traffic conditions.
X Secure the vehicle against rolling away ( Ypage 152).
X Close the hood.
CAt least one door is open. A warning tone also sounds.
X Close all the doors.
232Display messages
On-board computer and displays
Page 250 of 346
Useful information
iThis Operator's Manual describes all
models and all standard and optional equip- ment of your vehicle available at the time of
publication of the Operator's Manual.
Country-specific differences are possible.
Please note that your vehicle may not be
equipped with all features described. This
also applies to safety-related systems and
functions.
iRead the information on qualified special-
ist workshops ( Ypage 24).
Loading guidelines
GWARNING
If objects, luggage or loads are not secured or
not secured sufficiently, they could slip, tip
over or be flung around and thereby hit vehicle
occupants. There is a risk of injury, particu-
larly in the event of sudden braking or a sud-
den change in direction.
Always store objects so that they cannot be
flung around. Secure objects, luggage or
loads against slipping or tipping before the
journey.
GWARNING
Combustion engines emit poisonous exhaust
gases such as carbon monoxide. If the tailgate is open when the engine is running, particu-
larly if the vehicle is moving, exhaust fumes
could enter the passenger compartment.
There is a risk of poisoning.
Turn off the engine before opening the tail-
gate. Never drive with the tailgate open.
GWARNING
The exhaust tail pipe and tail pipe trim can
become very hot. If you come into contact
with these parts of the vehicle, you could burn
yourself. There is a risk of injury.
Always be particularly careful around the
exhaust tail pipe and the tail pipe trim. Allow
these components to cool down before touch-
ing them.
The handling characteristics of a laden vehi-
cle are dependent on the distribution of the
load within the vehicle. For this reason, you
should observe the following notes when
transporting a load: R Never exceed the maximum permissible
gross vehicle mass or the gross axle weight
rating for the vehicle (including occupants).
The values are specified on the vehicle
identification plate on the B-pillar of the
driver's door.
R The cargo compartment is the preferred
place to carry objects.
R Position heavy loads as far forwards as pos-
sible and as low down in the cargo com-
partment as possible.
R The load must not protrude above the
upper edge of the seat backrests.
R Always place the load against the rear or
front seat backrests. Make sure that the
seat backrests are securely locked intoplace.
R Always place the load behind unoccupied
seats if possible.
R Use the cargo tie-down rings and the parcel
nets to transport loads and luggage.
R Use cargo tie-down rings and fastening
materials appropriate for the weight and
size of the load.
R Hook in the cargo net when loading.
R The maximum load capacity of the stowage
well under the cargo compartment floor is
55 lbs (25 kg).
R Secure the load with sufficiently strong and
wear-resistant tie-downs. Pad sharp edges
for protection.
!Do not position the load on one part of the
folding cargo compartment floor only. The
maximum load capacity of the folding cargo
compartment floor is 220 lbs (100 kg). Dis- tribute the weight evenly to avoid damaging
the cargo compartment floor. Place a solid
248Loading guidelines
Stowage and features
Page 260 of 346
Always close the cargo compartment floor
before a journey.
!The maximum load capacity of the stow-
age well under the cargo compartment
floor is 55 lbs (25 kg).
There is a stowage area for TIREFIT, the vehi-
cle tool kit, a folding box, etc. underneath the
cargo compartment floor.
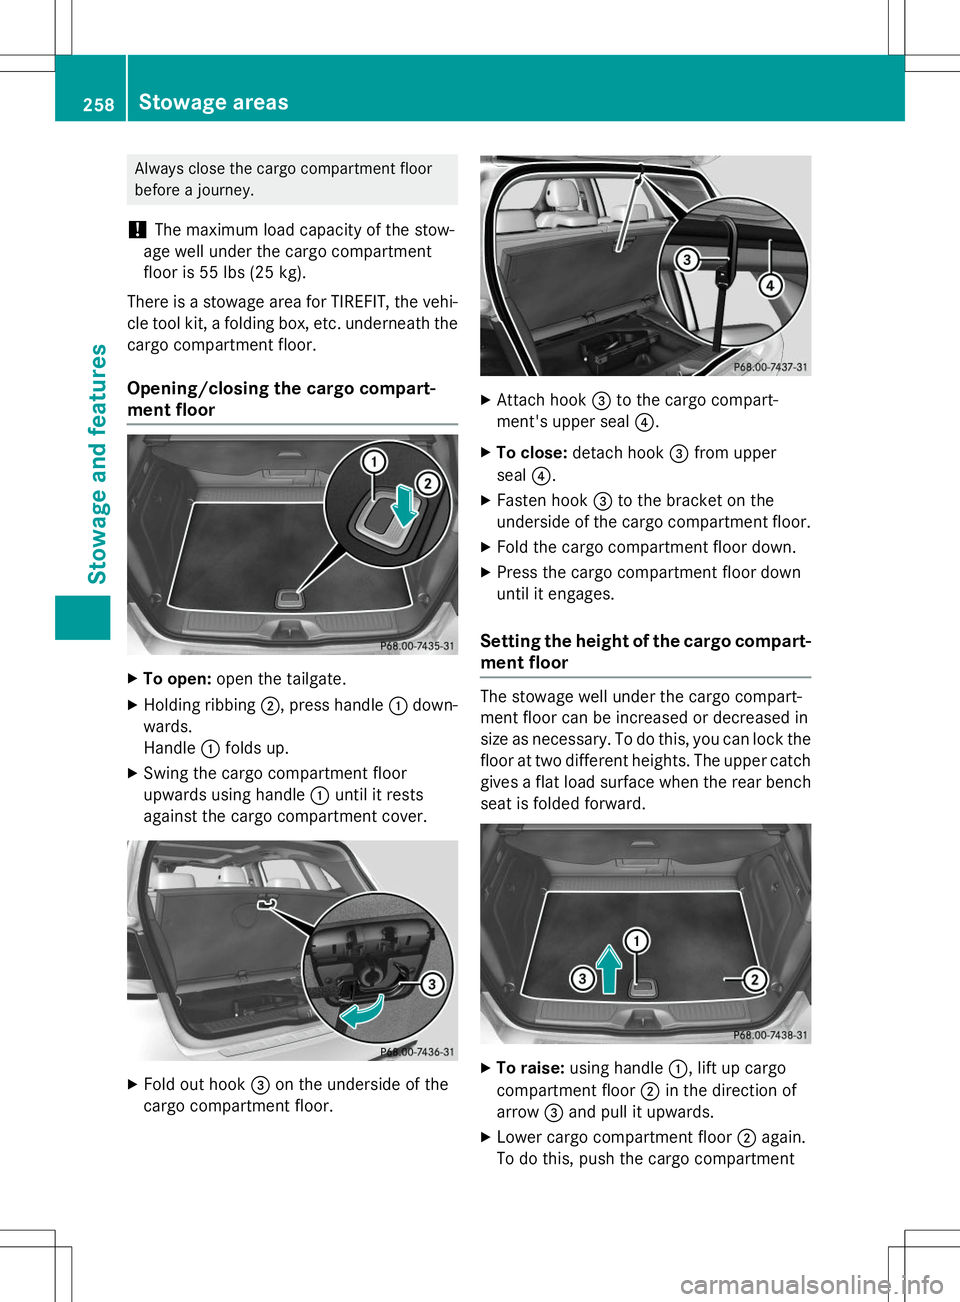
Opening/closing the cargo compart-
ment floor
X To open: open the tailgate.
X Holding ribbing ;, press handle :down-
wards.
Handle :folds up.
X Swing the cargo compartment floor
upwards using handle :until it rests
against the cargo compartment cover.
X Fold out hook =on the underside of the
cargo compartment floor.
X Attach hook =to the cargo compart-
ment's upper seal ?.
X To close: detach hook =from upper
seal ?.
X Fasten hook =to the bracket on the
underside of the cargo compartment floor.
X Fold the cargo compartment floor down.
X Press the cargo compartment floor down
until it engages.
Setting the height of the cargo compart-
ment floor
The stowage well under the cargo compart-
ment floor can be increased or decreased in
size as necessary. To do this, you can lock thefloor at two different heights. The upper catch gives a flat load surface when the rear bench
seat is folded forward.
X To raise: using handle :, lift up cargo
compartment floor ;in the direction of
arrow =and pull it upwards.
X Lower cargo compartment floor ;again.
To do this, push the cargo compartment
258Stowage areas
Sto wage an d features