2015 MERCEDES-BENZ B-Class ELECTRIC turn signal
[x] Cancel search: turn signalPage 109 of 338
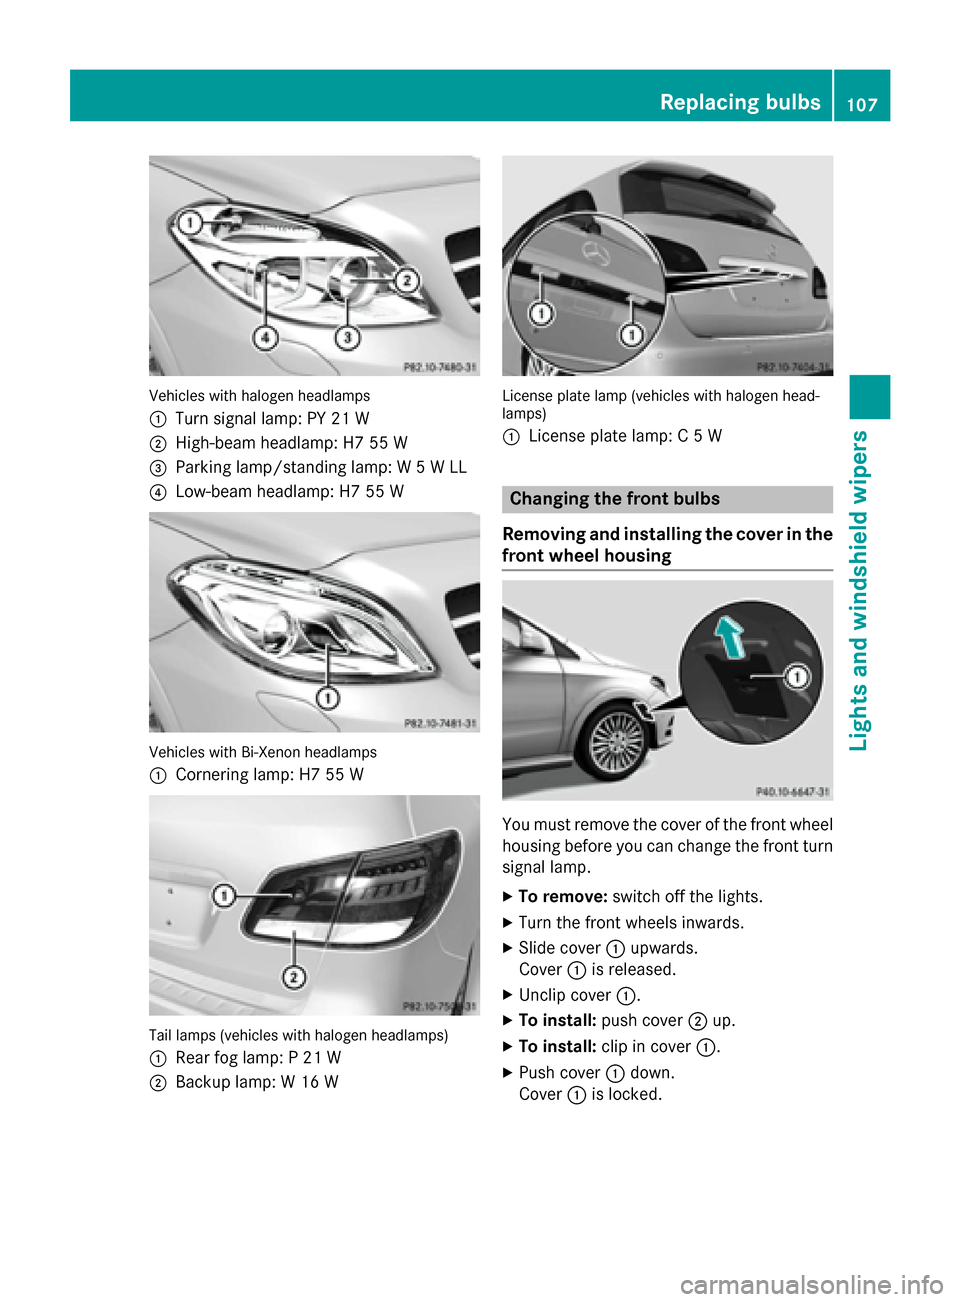
Vehicles with halogen headlamps
:
Turn signal lamp: PY 21 W
; High-beam headlamp: H7 55 W
= Parking lamp/standing lamp: W 5 W LL
? Low-beam headlamp: H7 55 W Vehicles with Bi-Xenon headlamps
:
Cornering lamp: H7 55 W Tail lamps (vehicles with halogen headlamps)
: Rear fog lamp: P 21 W
; Backup lamp: W 16 W License plate lamp (vehicles with halogen head-
lamps)
:
License plate lamp: C 5 W Changing the front bulbs
Removing and installing the cover in the
front wheel housing You must remove the cover of the front wheel
housing before you can change the front turn signal lamp.
X To remove: switch off the lights.
X Turn the front wheels inwards.
X Slide cover :upwards.
Cover :is released.
X Unclip cover :.
X To install: push cover ;up.
X To install: clip in cover :.
X Push cover :down.
Cover :is locked. Replacing bulbs
107Lights and windshield wipers Z
Page 110 of 338
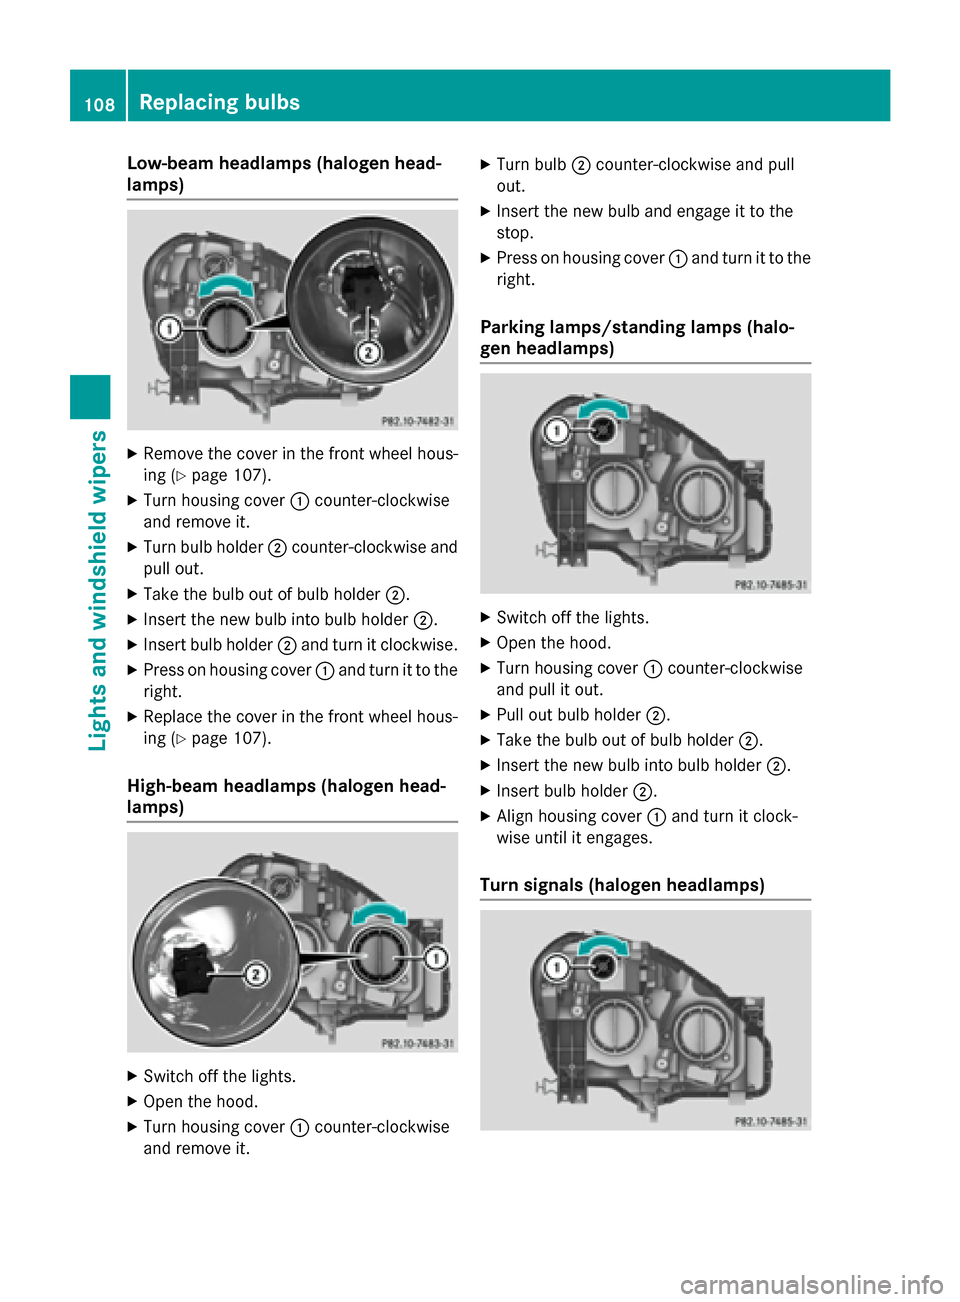
Low-beam headlamps (halogen head-
lamps) X
Remove the cover in the front wheel hous-
ing (Y page 107).
X Turn housing cover :counter-clockwise
and remove it.
X Turn bulb holder ;counter-clockwise and
pull out.
X Take the bulb out of bulb holder ;.
X Insert the new bulb into bulb holder ;.
X Insert bulb holder ;and turn it clockwise.
X Press on housing cover :and turn it to the
right.
X Replace the cover in the front wheel hous-
ing (Y page 107).
High-beam headlamps (halogen head-
lamps) X
Switch off the lights.
X Open the hood.
X Turn housing cover :counter-clockwise
and remove it. X
Turn bulb ;counter-clockwise and pull
out.
X Insert the new bulb and engage it to the
stop.
X Press on housing cover :and turn it to the
right.
Parking lamps/standing lamps (halo-
gen headlamps) X
Switch off the lights.
X Open the hood.
X Turn housing cover :counter-clockwise
and pull it out.
X Pull out bulb holder ;.
X Take the bulb out of bulb holder ;.
X Insert the new bulb into bulb holder ;.
X Insert bulb holder ;.
X Align housing cover :and turn it clock-
wise until it engages.
Turn signals (halogen headlamps) 108
Replacing bulbsLights and windshield wipers
Page 172 of 338
Active Parking Assist will only detect parking
spaces:
R that are parallel to the direction of travel
R that are at least 59 in (1.5 m) wide
R that are at least 51 in (1.3 m) longer than
your vehicle
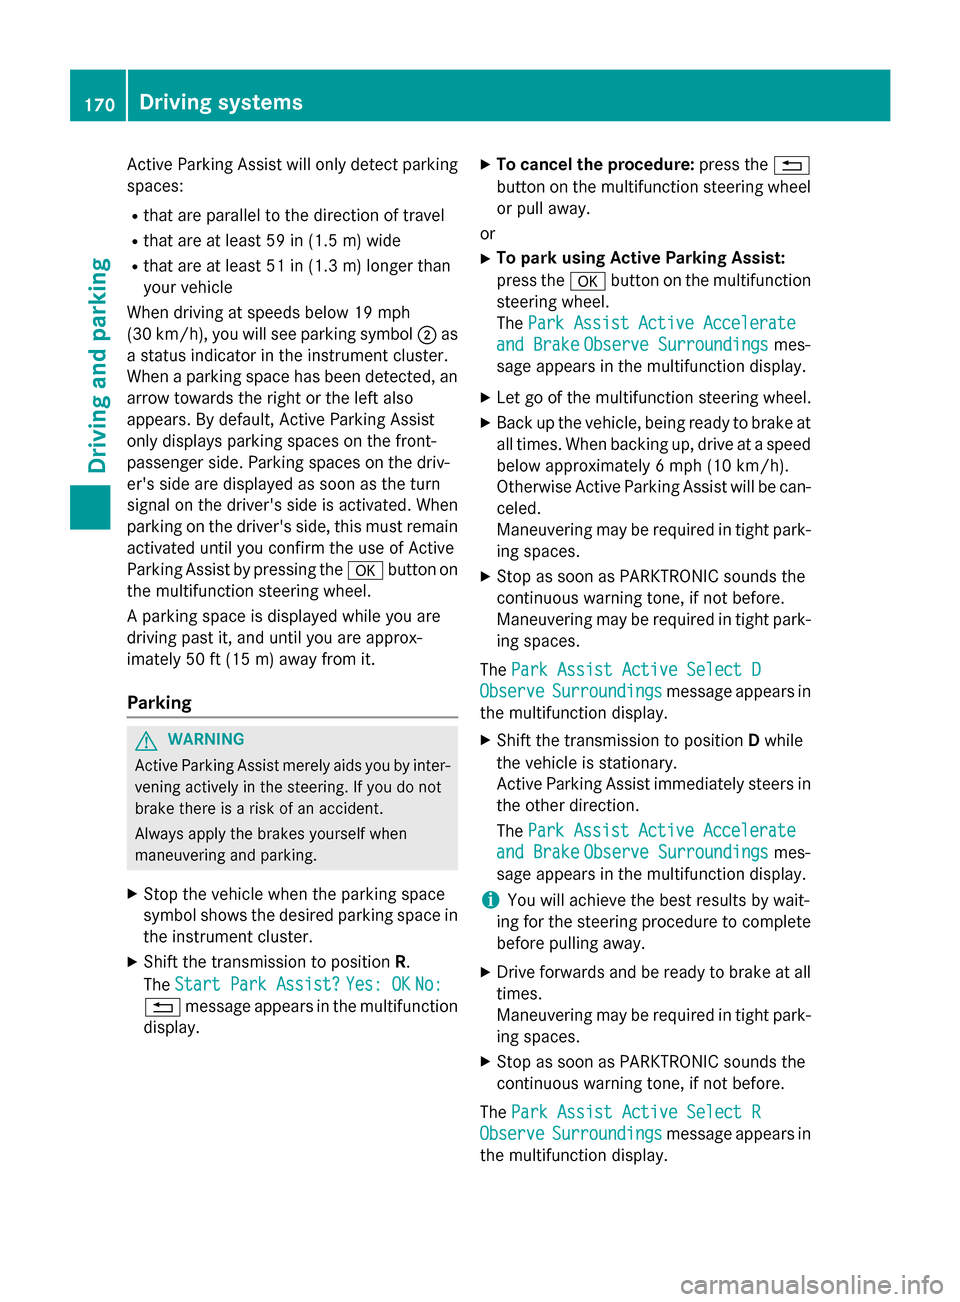
When driving at speeds below 19 mph
(30 km/h), you will see parking symbol ;as
a status indicator in the instrument cluster.
When a parking space has been detected, an arrow towards the right or the left also
appears. By default, Active Parking Assist
only displays parking spaces on the front-
passenger side. Parking spaces on the driv-
er's side are displayed as soon as the turn
signal on the driver's side is activated. When
parking on the driver's side, this must remain activated until you confirm the use of Active
Parking Assist by pressing the abutton on
the multifunction steering wheel.
A parking space is displayed while you are
driving past it, and until you are approx-
imately 50 ft (15 m) away from it.
Parking G
WARNING
Active Parking Assist merely aids you by inter- vening actively in the steering. If you do not
brake there is a risk of an accident.
Always apply the brakes yourself when
maneuvering and parking.
X Stop the vehicle when the parking space
symbol shows the desired parking space in
the instrument cluster.
X Shift the transmission to position R.
The Start Park Assist? Start Park Assist? Yes: OK
Yes: OKNo:
No:
% message appears in the multifunction
display. X
To cancel the procedure: press the%
button on the multifunction steering wheel or pull away.
or
X To park using Active Parking Assist:
press the abutton on the multifunction
steering wheel.
The Park Assist Active Accelerate Park Assist Active Accelerate
and Brake and Brake Observe Surroundings
Observe Surroundings mes-
sage appears in the multifunction display.
X Let go of the multifunction steering wheel.
X Back up the vehicle, being ready to brake at
all times. When backing up, drive at a speed below approximately 6 mph (10 km/h).
Otherwise Active Parking Assist will be can-
celed.
Maneuvering may be required in tight park- ing spaces.
X Stop as soon as PARKTRONIC sounds the
continuous warning tone, if not before.
Maneuvering may be required in tight park- ing spaces.
The Park Assist Active Select D Park Assist Active Select D
Observe Observe Surroundings Surroundings message appears in
the multifunction display.
X Shift the transmission to position Dwhile
the vehicle is stationary.
Active Parking Assist immediately steers in
the other direction.
The Park Assist Active Accelerate Park Assist Active Accelerate
and Brake
and Brake Observe Surroundings
Observe Surroundings mes-
sage appears in the multifunction display.
i You will achieve the best results by wait-
ing for the steering procedure to complete before pulling away.
X Drive forwards and be ready to brake at all
times.
Maneuvering may be required in tight park-
ing spaces.
X Stop as soon as PARKTRONIC sounds the
continuous warning tone, if not before.
The Park Assist Active Select R Park Assist Active Select R
Observe
Observe Surroundings
Surroundings message appears in
the multifunction display. 170
Driving systemsDriving an
d parking
Page 173 of 338
As soon as the parking procedure is com-
plete, the Park
ParkAssist
Assist Switched
Switched Off
Offmes-
sage appears and a warning tone sounds. The vehicle is now parked.
Active Parking Assist no longer supports you
with steering interventions and brake appli-
cations. When Active Parking Assist is fin-
ished, you must steer and brake again your-
self. PARKTRONIC is still available.
Parking tips:
R The way your vehicle is positioned in the
parking space after parking is dependent
on various factors. These include the posi-
tion and shape of the vehicles parked in
front and behind it and the conditions of the location. It may be the case that Active
Parking Assist guides you too far into a
parking space, or not far enough into it. In
some cases, it may also lead you across or
onto the curb. If necessary, you should can- cel the parking procedure with Active Park-ing Assist.
R You can also select preselect transmission
position D. The vehicle redirects and does
not drive as far into the parking space.
Should the transmission change take place
too early, the parking procedure will be
canceled. A sensible parking position can
no longer be achieved from this position.
Exiting a parking space In order that Active Parking Assist can sup-
port you when you exit the parking space:
R you need to have parked using Active Park-
ing Assist.
R the border of the parking space must be
high enough at the front and the rear. A
curb is too small, for example.
R the border of the parking space must not be
too wide, as the position of the vehicle must
not exceed an angle of 45° to the starting
position as it is maneuvering into the park-
ing space.
R a maneuvering distance of at least 3.3 ft
(1.0 m) must be available. Active Parking Assist can only assist you with
exiting a parking space if you have parked thevehicle parallel to the direction of travel using
Active Parking Assist.
X Start the engine.
X Release the electric parking brake.
X Switch on the turn signal in the direction
you are pulling away.
X Shift the transmission to position Dor R.
The Start Park Assist? Yes: OK No: Start Park Assist? Yes: OK No:
message appears in the multifunction dis-
play %.
X To cancel the procedure: press the%
button on the multifunction steering wheel
or pull away.
or X To exit a parking space using Active
Parking Assist: press theabutton on
the multifunction steering wheel.
The Park Assist Active Accelerate Park Assist Active Accelerate
and
and Brake
Brake Observe
Observe Surroundings
Surroundings mes-
sage appears in the multifunction display.
X Let go of the multifunction steering wheel.
X Pull away, being ready to brake at all times.
Do not exceed a maximum speed of
approximately 6 mph (10 km/h) when exit-
ing a parking space. Otherwise Active Park- ing Assist will be canceled.
X Stop when PARKTRONIC sounds the con-
tinuous warning tone, if not before.
X Depending on the message or as required,
shift the transmission to position Dor R.
Active Parking Assist immediately steers in the other direction. The Park Assist Park Assist
Active Accelerate and Brake
Active Accelerate and Brake
Observe Observe Surroundings
Surroundings message appears
in the multifunction display.
i You will achieve the best results by wait-
ing for the steering procedure to complete before pulling away.
If you back up after activation, the steeringwheel is moved to the straight-ahead posi-
tion. Driving systems
171Driving and parking Z
Page 179 of 338

The following information is displayed:
R length of the journey since the last break.
R the attention level determined by ATTEN-
TION ASSIST ( Attention Level
Attention Level), dis-
played in a bar display in five levels from
high to low
R If ATTENTION ASSIST is unable to calculate
the attention level and cannot issue a warn-
ing, the System Suspended System Suspended message
appears. The bar display then changes the
display, e.g. if you are driving at a speed
below 37 mph (60 km/h) or above 124 mph
(200 km/h).
Activating ATTENTION ASSIST X
Activate ATTENTION ASSIST using the on-
board computer (Y page 194).
The system determines the attention level
of the driver depending on the setting
selected:
Selection Standard
Standard: the sensitivity with
which the system determines the attention
level is set to normal.
Selection Sensitive Sensitive: the sensitivity is set
higher. The attention level detected by Atten- tion Assist is adapted accordingly and the
driver is warned earlier.
When ATTENTION ASSIST is deactivated, the é symbol appears in the multifunction
display in the assistance graphic display.
When ATTENTION ASSIST has been deactiva-
ted, it is automatically reactivated after the
engine has been stopped. The sensitivity
selected corresponds to the last selection
activated (standard/sensitive).
Warning in the multifunction display If fatigue or increasing lapses in concentra-
tion are detected, a warning appears in the
multifunction display:
ATTENTION ASSIST ATTENTION ASSIST
Take a Break! Take a Break!.
In addition to the message shown in the mul-
tifunction display, you will then hear a warn-
ing tone. X
If necessary, take a break.
X Confirm the message by pressing the a
button on the steering wheel.
On long journeys, take regular breaks in good
time to allow yourself to rest properly. If you
do not take a break and ATTENTION ASSIST
still detects increasing lapses in concentra-
tion, you will be warned again after
15 minutes at the earliest. This will only hap-
pen if ATTENTION ASSIST still detects typical indicators of fatigue or increasing lapses in
concentration.
If a warning is output in the multifunction dis-
play, a service station search is performed in
COMAND. You can select a service station
and navigation to this service station will then
begin. This function can be activated and
deactivated in COMAND. Blind Spot Assist
General notes Blind Spot Assist monitors the areas on either
side of the vehicle that are not visible to the
driver with two lateral, rear-facing radar sen-
sors. A warning display in the exterior mirrors draws your attention to vehicles detected in
the monitored area. If you then switch on thecorresponding turn signal to change lanes,
you will also receive a visual and audible col-
lision warning.
Blind Spot Assist supports you from a speed
of approximately 20 mph (30 km/h).
Important safety notes G
WARNING
Blind Spot Assist does not react to:
R vehicles overtaken too closely on the side,
placing them in the blind spot area
R vehicles which approach with a large speed
differential and overtake your vehicle
As a result, Blind Spot Assist may not give
warnings in such situations. There is a risk of an accident. Driving systems
177Driving and parking
Z
Page 181 of 338
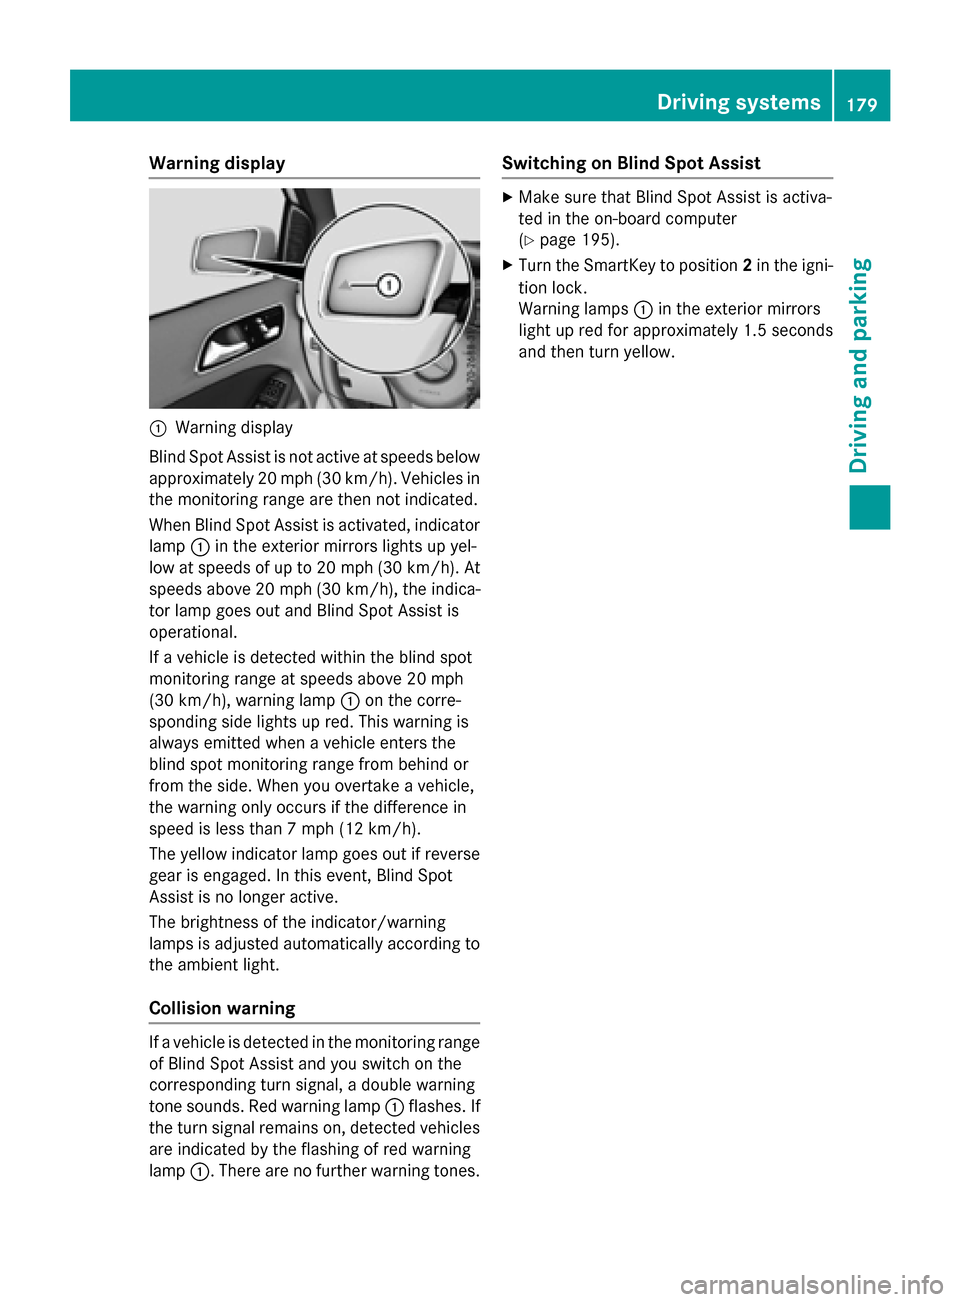
Warning display
:
Warning display
Blind Spot Assist is not active at speeds below approximately 20 mph (30 km/h). Vehicles in the monitoring range are then not indicated.
When Blind Spot Assist is activated, indicator
lamp :in the exterior mirrors lights up yel-
low at speeds of up to 20 mph (30 km/h). At speeds above 20 mph (30 km/h), the indica-
tor lamp goes out and Blind Spot Assist is
operational.
If a vehicle is detected within the blind spot
monitoring range at speeds above 20 mph
(30 km/h), warning lamp :on the corre-
sponding side lights up red. This warning is
always emitted when a vehicle enters the
blind spot monitoring range from behind or
from the side. When you overtake a vehicle,
the warning only occurs if the difference in
speed is less than 7 mph (12 km/h).
The yellow indicator lamp goes out if reverse gear is engaged. In this event, Blind Spot
Assist is no longer active.
The brightness of the indicator/warning
lamps is adjusted automatically according to
the ambient light.
Collision warning If a vehicle is detected in the monitoring range
of Blind Spot Assist and you switch on the
corresponding turn signal, a double warning
tone sounds. Red warning lamp :flashes. If
the turn signal remains on, detected vehicles
are indicated by the flashing of red warning
lamp :. There are no further warning tones. Switching on Blind Spot Assist X
Make sure that Blind Spot Assist is activa-
ted in the on-board computer
(Y page 195).
X Turn the SmartKey to position 2in the igni-
tion lock.
Warning lamps :in the exterior mirrors
light up red for approximately 1.5 seconds
and then turn yellow. Driving systems
179Driving and parking Z
Page 216 of 338
Display messages
Possible causes/consequences and
M
MSolutions ator's Manual
ator's Manual
display messages must not be shown in the
multifunction display.
X Wait for a period of at least 60 seconds until the necessary sys-
tem checks have been completed.
X Make sure that the display messages do not appear in the mul-
tifunction display.
If these conditions are fulfilled, the front-passenger seat can be
occupied again. Whether the PASSENGER AIR BAG OFF or ON
indicator lamp remains lit or goes out depends on how OCS clas-
sifies the occupant.
If the conditions are not fulfilled, the system is not operating cor- rectly.
X Visit a qualified specialist workshop immediately.
For further information about the Occupant Classification System, see (Y page 49). Lights
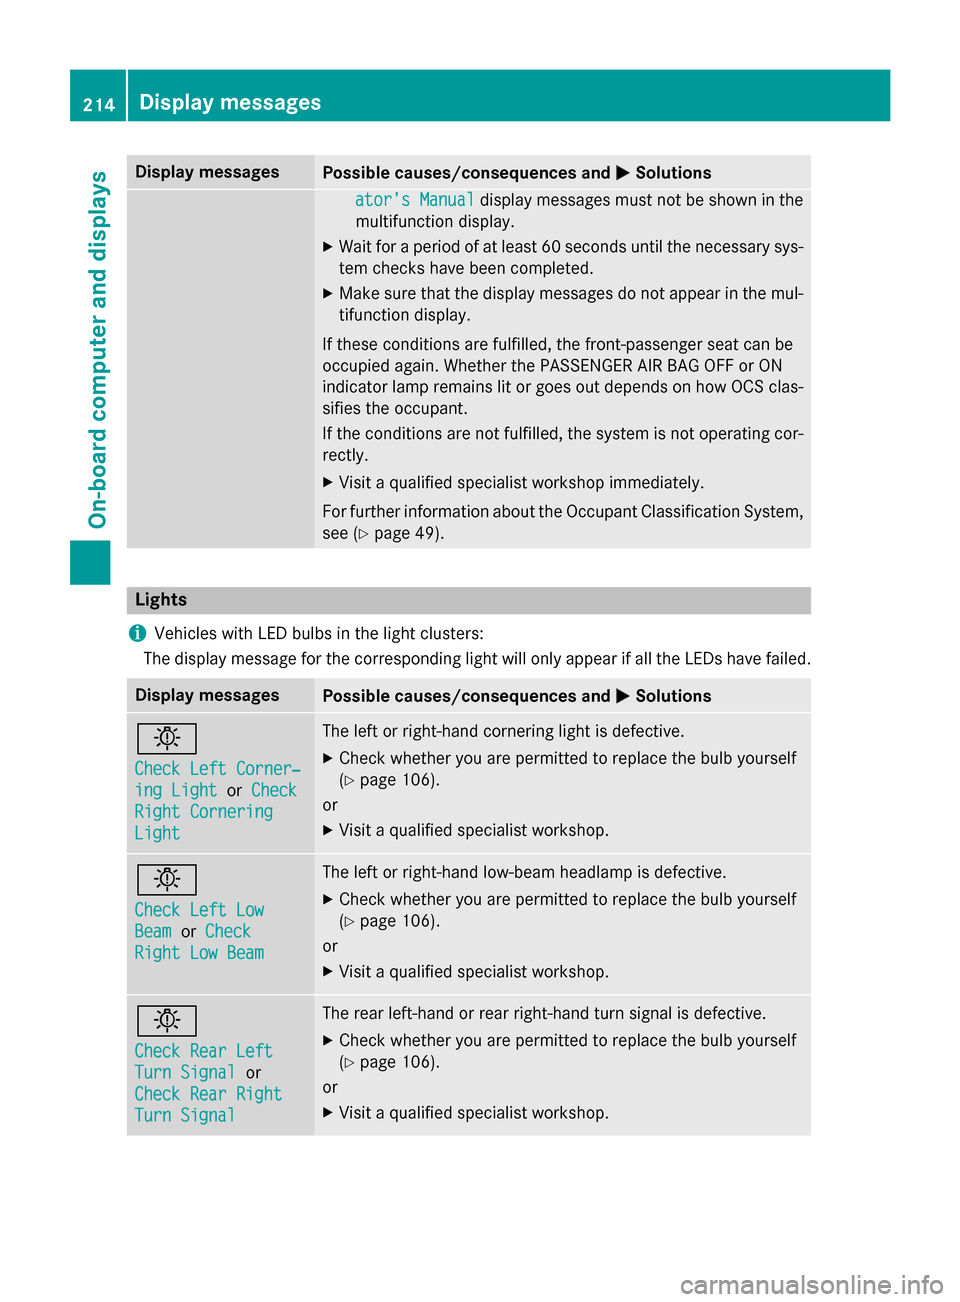
i Vehicles with LED bulbs in the light clusters:
The display message for the corresponding light will only appear if all the LEDs have failed. Display messages
Possible causes/consequences and
M MSolutions b
Check Left Corner‐ Check Left Corner‐
ing Light ing Light
orCheck
Check
Right Cornering
Right Cornering
Light Light The left or right-hand cornering light is defective.
X Check whether you are permitted to replace the bulb yourself
(Y page 106).
or
X Visit a qualified specialist workshop. b
Check Left Low Check Left Low
Beam Beam
orCheck
Check
Right Low Beam
Right Low Beam The left or right-hand low-beam headlamp is defective.
X Check whether you are permitted to replace the bulb yourself
(Y page 106).
or
X Visit a qualified specialist workshop. b
Check Rear Left Check Rear Left
Turn Signal Turn Signal
or
Check Rear Right
Check Rear Right
Turn Signal Turn Signal The rear left-hand or rear right-hand turn signal is defective.
X Check whether you are permitted to replace the bulb yourself
(Y page 106).
or
X Visit a qualified specialist workshop. 214
Display
messagesOn-board computer and displays
Page 217 of 338
Display messages
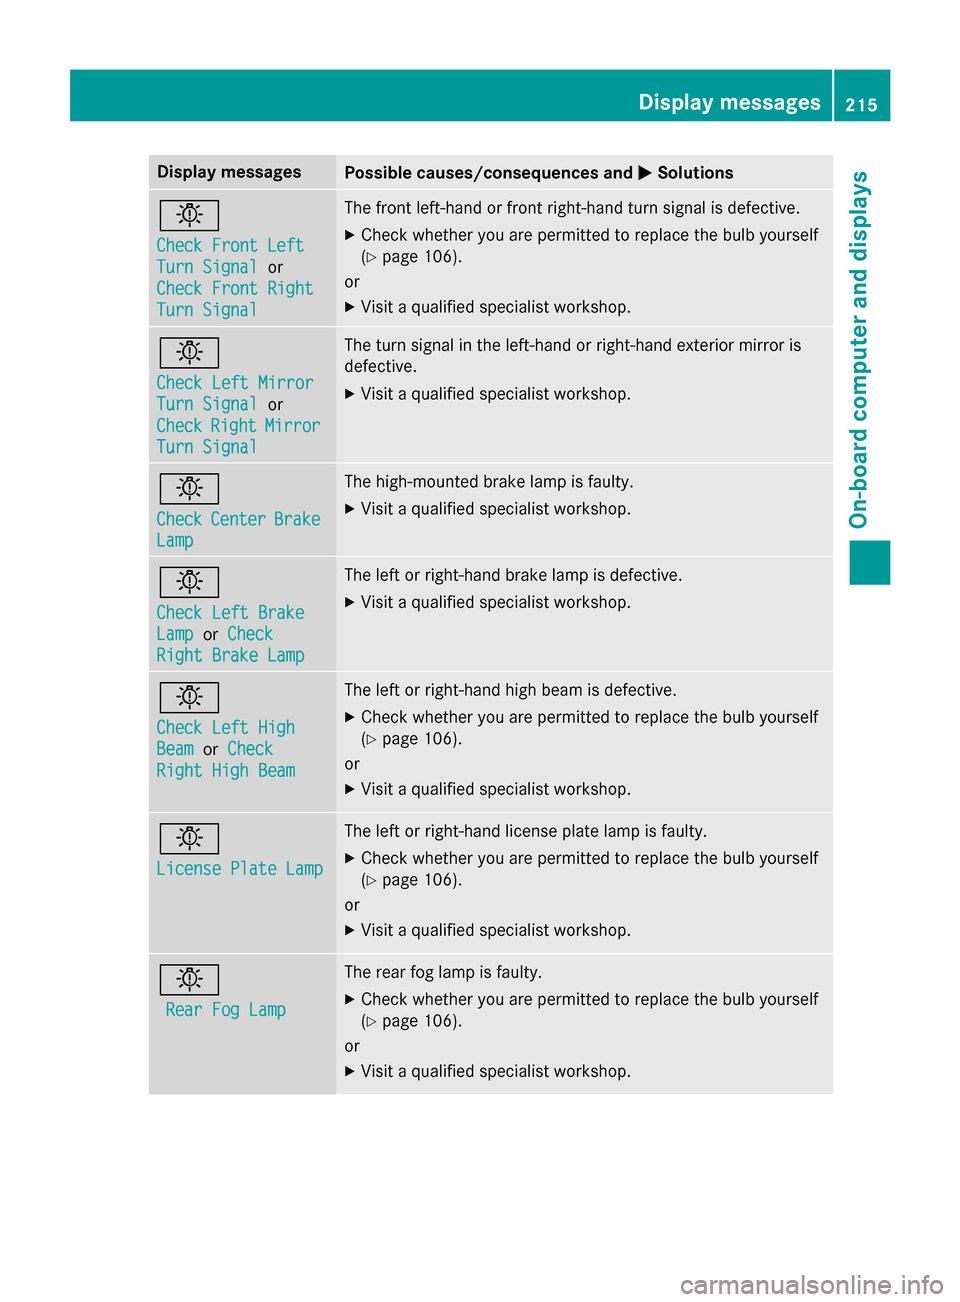
Possible causes/consequences and
M
MSolutions b
Check Front Left Check Front Left
Turn Signal Turn Signal
or
Check Front Right
Check Front Right
Turn Signal Turn Signal The front left-hand or front right-hand turn signal is defective.
X Check whether you are permitted to replace the bulb yourself
(Y page 106).
or
X Visit a qualified specialist workshop. b
Check Left Mirror Check Left Mirror
Turn Signal Turn Signal
or
Check
Check Right
RightMirror
Mirror
Turn Signal
Turn Signal The turn signal in the left-hand or right-hand exterior mirror is
defective.
X Visit a qualified specialist workshop. b
Check Check
Center
Center Brake
Brake
Lamp
Lamp The high-mounted brake lamp is faulty.
X
Visit a qualified specialist workshop. b
Check Left Brake Check Left Brake
Lamp Lamp
orCheck
Check
Right Brake Lamp
Right Brake Lamp The left or right-hand brake lamp is defective.
X Visit a qualified specialist workshop. b
Check Left High Check Left High
Beam Beam
orCheck
Check
Right High Beam
Right High Beam The left or right-hand high beam is defective.
X Check whether you are permitted to replace the bulb yourself
(Y page 106).
or
X Visit a qualified specialist workshop. b
License Plate Lamp License Plate Lamp The left or right-hand license plate lamp is faulty.
X Check whether you are permitted to replace the bulb yourself
(Y page 106).
or
X Visit a qualified specialist workshop. b
Rear Fog Lamp Rear Fog Lamp The rear fog lamp is faulty.
X Check whether you are permitted to replace the bulb yourself
(Y page 106).
or
X Visit a qualified specialist workshop. Display
messages
215On-board computer and displays Z