2015 MERCEDES-BENZ B-Class ELECTRIC fold seats
[x] Cancel search: fold seatsPage 15 of 338
Driving system ............................... 165
Function/note
s............................. 165
Important safety notes .................. 165
Problem (malfunction) ................... 168
Range of the sensors ..................... 165
Warning display ............................. 166
PASSENGER AIR BAG
Display message ............................ 213
Indicator lamps ................................ 41
PASSENGER AIRBAG
Problems (malfunction) .................. 213
Pets in the vehicle ............................... 62
Plastic trim (cleaning instruc-
tions) .................................................. 276
Power display .................................... 183
Power washers .................................. 273
Power windows
see Side windows
Program selector button .................. 137
Protection against theft
ATA (Anti-Theft Alarm system) ......... 69
Immobilizer ...................................... 69
Protection of the environment
General notes .................................. 19
Pulling away
Hill start assist ............................... 134 Q
QR code Mercedes-Benz Guide App ................. 1
Rescue card ..................................... 26
Qualified specialist workshop ........... 25R
Radio Selecting a station ......................... 191
see separate operating instructions
Radio-wave reception/transmis-
sion in the vehicle
Declaration of conformity ................ 24
Range
RANGE PLUS ................................. 144
RANGE PLUS
charge ........................................... 196
Range ............................................ 144 RBS
see Recuperative Brake System ...... 68
Reading lamp ..................................... 105
READY indicator ................................ 182
Rear compartment
Setting the air vents ...................... 127
Rear fog lamp
Changing bulbs .............................. 109
Display message ............................ 215
Switching on/of f........................... 101
Rear lamps
see Lights
Rear seats
Folding the backrest forwards/
back ............................................... 244
Rear view camera
Cleaning instructions ..................... 276
Displays in the Audio display ......... 173
Displays in the COMAND display ... 173
Function/note s............................. 172
Switching on/of f........................... 173
Rear window defroster
Problem (malfunction) ................... 123
Switching on/of f........................... 122
Rear window wiper
Replacing the wiper blad e.............. 113
Switching on/of f........................... 111
Rear-view mirror
Anti-glare (manual) .......................... 94
Dipping (automatic) ......................... 95
Recharging statistics (COMAND)
see Electrical energy generated
Recuperative Brake System
Driving safety systems ..................... 68
Refrigerant (air-conditioning sys-
tem)
Important safety notes .................. 333
Remote control
Garage door opener ....................... 261
Programming (garage door
opener) .......................................... 262
Replacing bulbs
Important safety notes .................. 106
Overview of bulb types .................. 106
Removing/replacing the cover
(front wheel arch) .......................... 107
Reporting safety defects .................... 25
Rescue card ......................................... 26 Index
13
Page 16 of 338
Reserve
High-voltage battery ...................... 236
Restraint system
Display messag e............................ 210
Introduction ..................................... 40
Warning lamp ................................. 236
Warning lamp (function) ................... 41
Reverse gear
Engaging ........................................ 135
Reversing feature
Side windows ................................... 83
Roadside Assistance (breakdown) .... 21
Roof carrier ........................................ 249
Roof lining and carpets (cleaning
guidelines) ......................................... 278
Roof load (maximum) ........................ 334S
Safety Children in the vehicle ..................... 56
Seat belts
Adjusting the height ......................... 44
center rear-compartment sea t......... 45
Cleaning ......................................... 278
Correct usage .................................. 44
Fastening ......................................... 44
Important safety guidelines ............. 42
Introduction ..................................... 42
Releasing ......................................... 45
Warning lamp ................................. 228
Warning lamp (function) ................... 45
Seats
Adjusting (electrically) ..................... 90
Adjusting (manually) ........................ 90
Adjusting the 4-way lumbar sup-
port .................................................. 91
Adjusting the head restraint ............ 90
Cleaning the cover ......................... 277
Correct driver's seat position ........... 88
Folding the backrest (rear com-
partment) forwards/back .............. 244
Important safety notes .................... 89
Seat heating problem ...................... 93
Storing settings (memory func-
tion) ................................................. 97
Switching seat heating on/of f......... 92
Securing cargo .................................. 245 Selector lever
Cleaning ......................................... 277
see DIRECT SELECT lever
Sensors (cleaning instructions) ....... 275
Service menu (on-board com-
puter) .................................................. 195
Service message
see ASSYST PLUS
Service products
Brake fluid ..................................... 332
Coolant (engine) ............................ 332
Important safety notes .................. 331
Refrigerant (air-conditioning sys-
tem) ............................................... 333
Washer fluid ................................... 333
Setting the air distribution ............... 120
Setting the airflow ............................ 121
Setting the maximum charge cur-
rent (Control system) ........................ 197
Settings
Factory (on-board computer) ......... 199
On-board compute r....................... 195
Side impact air bag ............................. 48
Side marker lamp (display mes-
sage) ................................................... 216
Side windows
Cleaning ......................................... 274
Convenience closing feature ............ 84
Convenience opening feature .......... 84
Important safety information ........... 83
Opening/closing .............................. 84
Problem (malfunction) ..................... 86
Resetting ......................................... 85
Reversing feature ............................. 83
SmartKey
Changing the battery ....................... 75
Changing the programming ............. 74
Checking the battery ....................... 75
Convenience closing feature ............ 84
Convenience opening feature .......... 84
Display message ............................ 226
Door central locking/unlocking ....... 72
Important safety notes .................... 72
KEYLESS-GO start function .............. 74
Loss ................................................. 77
Mechanical key ................................ 74
Positions (ignition lock) ................. 131 14
Index
Page 38 of 338
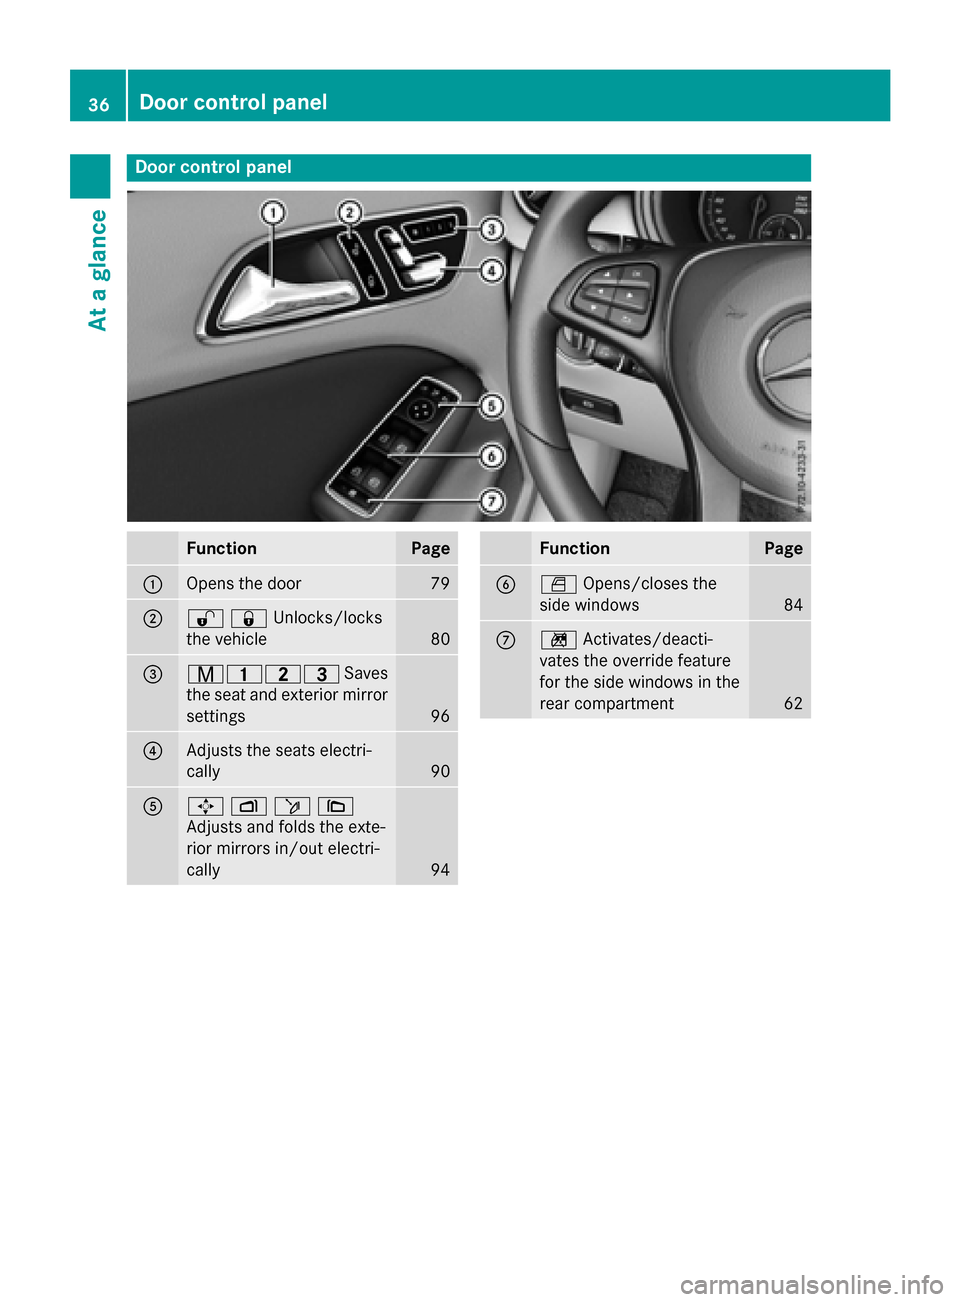
Door control panel
Function Page
:
Opens the door 79
;
%&Unlocks/locks
the vehicle 80
=
r45=
Saves
the seat and exterior mirror settings 96
?
Adjusts the seats electri-
cally
90
A
7
Zö\
Adjusts and folds the exte-
rior mirrors in/out electri-
cally 94 Function Page
B
W
Opens/closes the
side windows 84
C
n
Activates/deacti-
vates the override feature
for the side windows in the
rear compartment 6236
Door control panelAt a glance
Page 61 of 338
Always comply with the manufacturer's
installation and operating instructions for the child restraint system used.
Before every trip, make sure that the LATCH-
type (ISOFIX) child restraint system is
engaged correctly in both LATCH-type (ISO-
FIX) securing rings
! When installing the child restraint system,
make sure that the seat belt for the middle seat does not get trapped. The seat belt
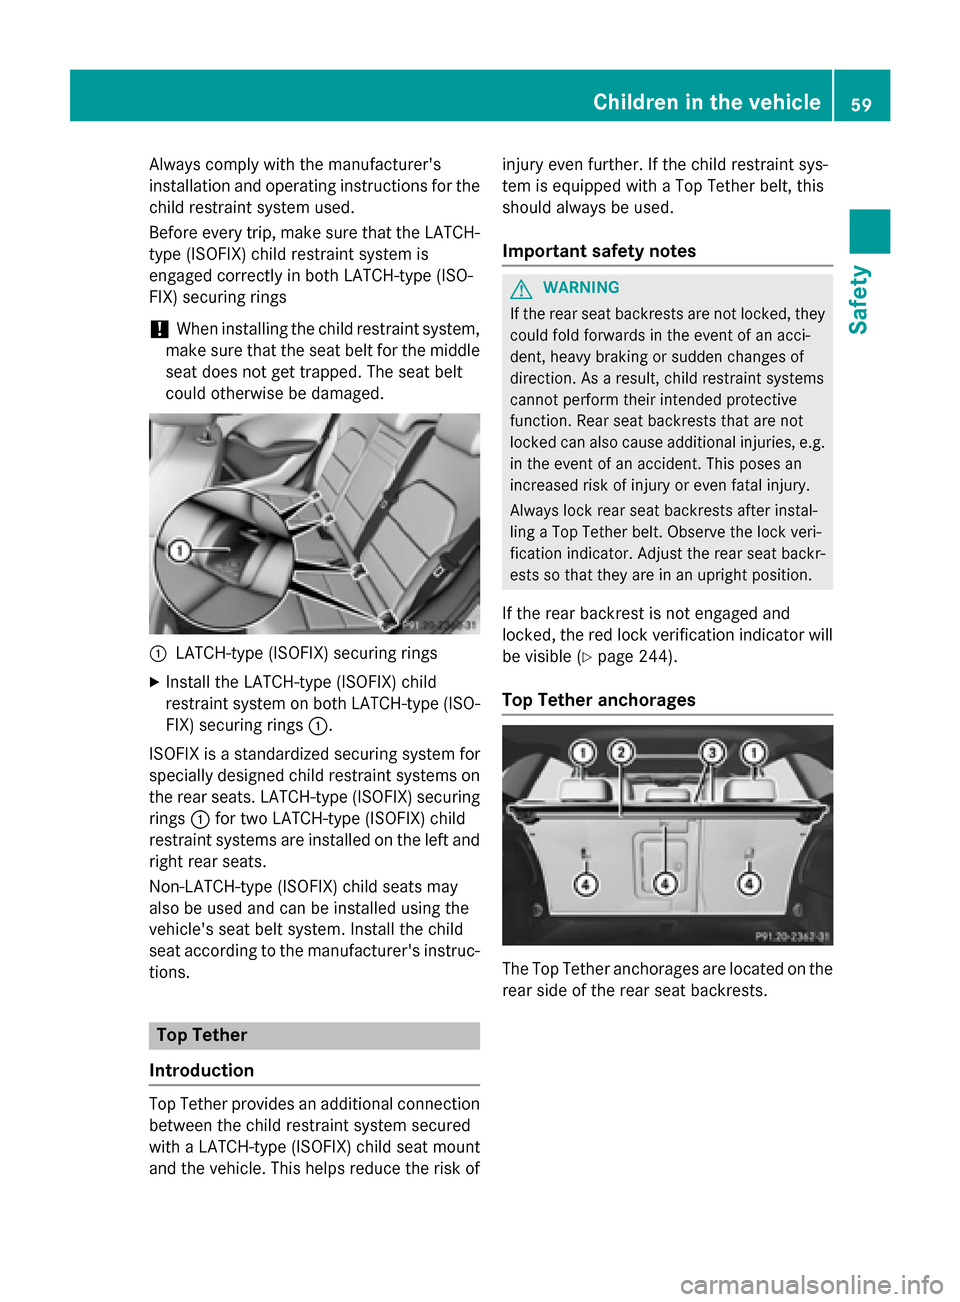
could otherwise be damaged. :
LATCH-type (ISOFIX) securing rings
X Install the LATCH-type (ISOFIX) child
restraint system on both LATCH-type (ISO-
FIX) securing rings :.
ISOFIX is a standardized securing system for
specially designed child restraint systems on
the rear seats. LATCH-type (ISOFIX) securing rings :for two LATCH-type (ISOFIX) child
restraint systems are installed on the left and
right rear seats.
Non-LATCH-type (ISOFIX) child seats may
also be used and can be installed using the
vehicle's seat belt system. Install the child
seat according to the manufacturer's instruc-
tions. Top Tether
Introduction Top Tether provides an additional connection
between the child restraint system secured
with a LATCH-type (ISOFIX) child seat mount
and the vehicle. This helps reduce the risk of injury even further. If the child restraint sys-
tem is equipped with a Top Tether belt, this
should always be used.
Important safety notes G
WARNING
If the rear seat backrests are not locked, they
could fold forwards in the event of an acci-
dent, heavy braking or sudden changes of
direction. As a result, child restraint systems
cannot perform their intended protective
function. Rear seat backrests that are not
locked can also cause additional injuries, e.g. in the event of an accident. This poses an
increased risk of injury or even fatal injury.
Always lock rear seat backrests after instal-
ling a Top Tether belt. Observe the lock veri-
fication indicator. Adjust the rear seat backr-
ests so that they are in an upright position.
If the rear backrest is not engaged and
locked, the red lock verification indicator will
be visible (Y page 244).
Top Tether anchorages The Top Tether anchorages are located on the
rear side of the rear seat backrests. Children in the vehicle
59Safety Z
Page 62 of 338
X
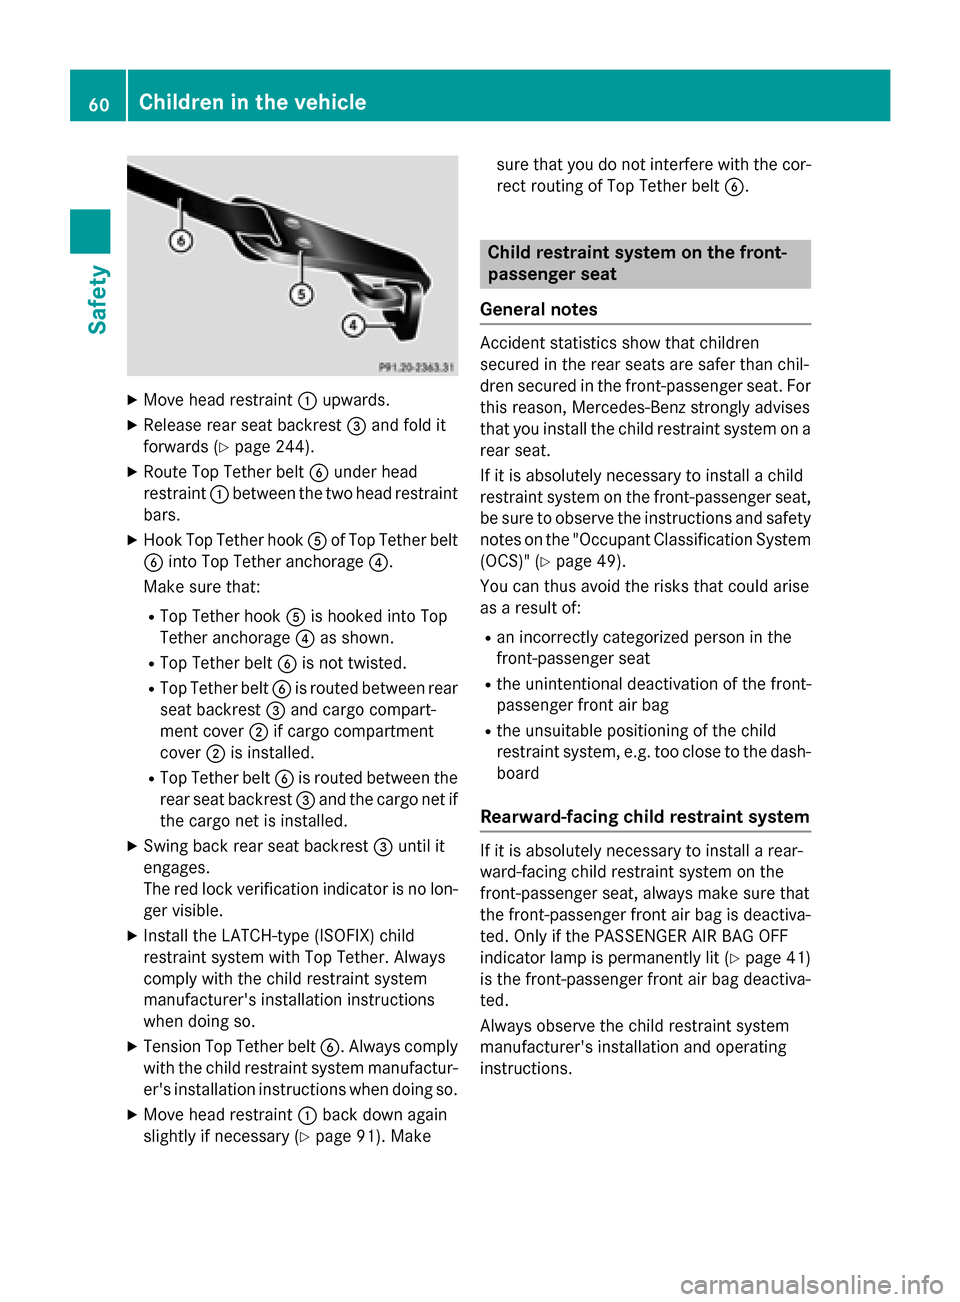
Move head restraint :upwards.
X Release rear seat backrest =and fold it
forwards (Y page 244).
X Route Top Tether belt Bunder head
restraint :between the two head restraint
bars.
X Hook Top Tether hook Aof Top Tether belt
B into Top Tether anchorage ?.
Make sure that:
R Top Tether hook Ais hooked into Top
Tether anchorage ?as shown.
R Top Tether belt Bis not twisted.
R Top Tether belt Bis routed between rear
seat backrest =and cargo compart-
ment cover ;if cargo compartment
cover ;is installed.
R Top Tether belt Bis routed between the
rear seat backrest =and the cargo net if
the cargo net is installed.
X Swing back rear seat backrest =until it
engages.
The red lock verification indicator is no lon- ger visible.
X Install the LATCH-type (ISOFIX) child
restraint system with Top Tether. Always
comply with the child restraint system
manufacturer's installation instructions
when doing so.
X Tension Top Tether belt B. Always comply
with the child restraint system manufactur- er's installation instructions when doing so.
X Move head restraint :back down again
slightly if necessary (Y page 91). Make sure that you do not interfere with the cor-
rect routing of Top Tether belt B. Child restraint system on the front-
passenger seat
General notes Accident statistics show that children
secured in the rear seats are safer than chil-
dren secured in the front-passenger seat. For
this reason, Mercedes-Benz strongly advises
that you install the child restraint system on a
rear seat.
If it is absolutely necessary to install a child
restraint system on the front-passenger seat,
be sure to observe the instructions and safety
notes on the "Occupant Classification System (OCS)" (Y page 49).
You can thus avoid the risks that could arise
as a result of:
R an incorrectly categorized person in the
front-passenger seat
R the unintentional deactivation of the front-
passenger front air bag
R the unsuitable positioning of the child
restraint system, e.g. too close to the dash- board
Rearward-facing child restraint system If it is absolutely necessary to install a rear-
ward-facing child restraint system on the
front-passenger seat, always make sure that
the front-passenger front air bag is deactiva-
ted. Only if the PASSENGER AIR BAG OFF
indicator lamp is permanently lit (Y page 41)
is the front-passenger front air bag deactiva-
ted.
Always observe the child restraint system
manufacturer's installation and operating
instructions. 60
Children in the vehicleSafety
Page 92 of 338
rials, e.g. blankets, coats, bags, seat cov-
ers, child seats or booster seats.
! Make sure that there are no objects in the
footwell under or behind the seats when
moving the seats back. There is a risk that
the seats and/or the objects could be dam-
aged.
i Further related subjects:
R cargo compartment enlargement (fold-
ing down the rear seats) (Y page 244)Adjusting the seats manually
Seat fore-and-aft adjustment X
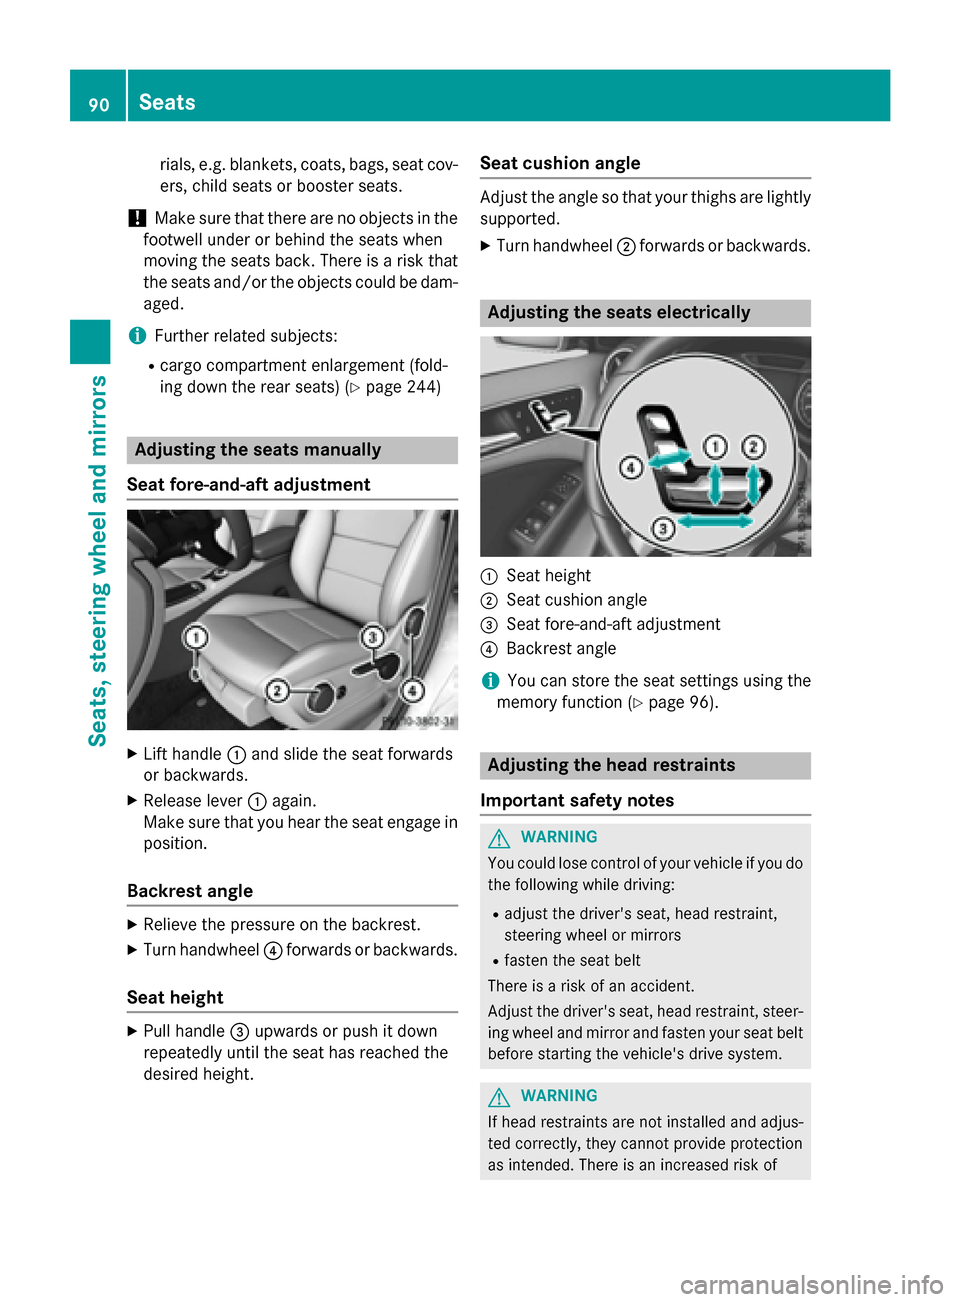
Lift handle :and slide the seat forwards
or backwards.
X Release lever :again.
Make sure that you hear the seat engage in
position.
Backrest angle X
Relieve the pressure on the backrest.
X Turn handwheel ?forwards or backwards.
Seat height X
Pull handle =upwards or push it down
repeatedly until the seat has reached the
desired height. Seat cushion angle Adjust the angle so that your thighs are lightly
supported.
X Turn handwheel ;forwards or backwards. Adjusting the seats electrically
:
Seat height
; Seat cushion angle
= Seat fore-and-aft adjustment
? Backrest angle
i You can store the seat settings using the
memory function (Y page 96). Adjusting the head restraints
Important safety notes G
WARNING
You could lose control of your vehicle if you do the following while driving:
R adjust the driver's seat, head restraint,
steering wheel or mirrors
R fasten the seat belt
There is a risk of an accident.
Adjust the driver's seat, head restraint, steer-
ing wheel and mirror and fasten your seat belt before starting the vehicle's drive system. G
WARNING
If head restraints are not installed and adjus-
ted correctly, they cannot provide protection
as intended. There is an increased risk of 90
SeatsSeats, steering wheel and mirrors
Page 242 of 338
Useful information
i This Operator's Manual describes all
models and all standard and optional equip- ment of your vehicle available at the time of
publication of the Operator's Manual.
Country-specific differences are possible.
Please note that your vehicle may not be
equipped with all features described. This
also applies to safety-related systems and
functions.
i Read the information on qualified special-
ist workshops (Y page 25). Loading guidelines
G
WARNING
If objects, luggage or loads are not secured or not secured sufficiently, they could slip, tip
over or be flung around and thereby hit vehicle
occupants. There is a risk of injury, particu-
larly in the event of sudden braking or a sud-
den change in direction.
Always store objects so that they cannot be
flung around. Secure objects, luggage or
loads against slipping or tipping before the
journey.
The handling characteristics of a laden vehi-
cle are dependent on the distribution of the
load within the vehicle. For this reason, you
should observe the following notes when
transporting a load:
R Never exceed the maximum permissible
gross vehicle mass or the gross axle weight rating for the vehicle (including occupants).
The values are specified on the vehicle
identification plate on the B-pillar of the
driver's door.
R The cargo compartment is the preferred
place to carry objects.
R Position heavy loads as far forwards as pos-
sible and as low down in the cargo com-
partment as possible. R
The load must not protrude above the
upper edge of the seat backrests.
R Always place the load against the rear or
front seat backrests. Make sure that the
seat backrests are securely locked into
place.
R Always place the load behind unoccupied
seats if possible.
R Use the cargo tie-down rings and the parcel
nets to transport loads and luggage.
R Use cargo tie-down rings and fastening
materials appropriate for the weight and
size of the load.
R Hook in the cargo net when loading.
R The maximum load capacity of the stowage
well under the cargo compartment floor is
55 lbs (25 kg).
R Secure the load with sufficiently strong and
wear-resistant tie-downs. Pad sharp edges
for protection.
! Do not position the load on one part of the
folding cargo compartment floor only. The
maximum load capacity of the folding cargo
compartment floor is 220 lbs (100 kg). Dis-
tribute the weight evenly to avoid damaging
the cargo compartment floor. Place a solid board under the load if necessary. Please
note that the load on the cargo compart-
ment floor will be increased when the load
is lashed down. Stowage areas
Stowage spaces
Important safety notes G
WARNING
If objects in the passenger compartment are
stowed incorrectly, they can slide or be
thrown around and hit vehicle occupants.
There is a risk of injury, particularly in the
event of sudden braking or a sudden change
in direction. 240
Stowage areasStowage and features