2015 MERCEDES-BENZ B-Class ELECTRIC turn signal
[x] Cancel search: turn signalPage 8 of 338

Cargo tie down rings
.........................245
CD player/CD changer (on-board
computer) .......................................... 191
Center console
Lower section .................................. 35
Upper section .................................. 34
Central locking
Automatic locking (on-board com-
puter) ............................................. 198
Locking/unlocking (SmartKey) ....... .72
Changing bulbs
Cornering light function ................ .109
High-beam headlamps ................... 108
License plate lighting ..................... 110
Low-beam headlamps .................... 108
Parking lamps ................................ 108
Rear fog lamp ................................ 109
Reversing lamps ............................ 109
Standing lamps (front) ................... 108
Turn signals (front) ......................... 108
Charge level display .......................... 184
Charging
with RANGE PLUS .......................... 196
see Charging the high-voltage battery
Charging cable
Connecting ................................... .148
Controls ......................................... 146
Important safety notes .................. 146
Removing ....................................... 148
Storing .......................................... .146
Warming up ................................... 145
Charging the high-voltage battery
(important safety notes) ................... 140
Child
Restraint system .............................. 57
Child seat
Forward-facing restraint system ...... 61
LATCH-type (ISOFIX) child seat
anchors ............................................ 58
On the front-passenger sea t............ 60
Rearward-facing restraint system .... 60
Top Tether ....................................... 59
Child-proof locks
Important safety notes .................... 61
Rear doors ....................................... 62
Children
Special seat belt retractor ............... 57 Cigarette lighter
................................ 252
Cleaning
Mirror turn signal ........................... 275
Climate control
Automatic climate control (dual-
zone) .............................................. 117
Auxiliary climate control (on-
board computer) ............................ 196
Controlling automaticall y............... 120
Convenience opening/closing
(air-recirculation mode) ................. 123
Cooling with air dehumidification .. 118
Defrosting the window s................. 122
Defrosting the windshield .............. 121
General notes ................................ 116
Immediate pre-entry climate con-
trol ................................................. 125
Indicator lamp ................................ 120
Information about using auto-
matic climate control ..................... 117
Maximum cooling .......................... 122
Overview of systems ...................... 116
Pre-entry climate control at
departure time ............................... 125
Pre-entry climate control at time
of departure (on-board computer) .. 196 Pre-entry climate control via key ... 124
Pre-entry climate control via key
(on-board computer) ...................... 196
Problem with the rear window
defroster ........................................ 123
Problems with cooling with air
dehumidification ............................ 120
Refrigerant ..................................... 333
Refrigerant filling capacity ............. 334
Setting the air distribution ............. 120
Setting the air vents ...................... 126
Setting the airflow ......................... 121
Setting the temperature ................ 120
Switching air-recirculation mode
on/of f............................................ 123
Switching on/of f........................... 118
Switching the rear window
defroster on/of f............................ 122
Switching the ZONE function on/
off .................................................. 121
Cockpit
Overview .......................................... 30 6
Index
Page 13 of 338
Switching the daytime running
lamps on/off (on-board com-
puter) ............................................. 198
Turn signals ................................... 102
Loading guidelines ............................ 240
Locking
see Central locking
Locking (doors)
Automatic ........................................ 80
Emergency locking ........................... 81
From inside (central locking but-
ton) .................................................. 80
Locking centrally
see Central locking
Locking verification signal (on-
board computer) ............................... 198
Low-beam headlamps
Changing bulb s.............................. 108
Display message ............................ 214
Switching on/of f........................... 101
Lumbar support
Adjusting the 4-way lumbar sup-
port .................................................. 91 M
M+S tires ............................................ 302
Malfunction message
see Display messages
Map (navigation)
Switching the range on the map
on/off ............................................ 143
Matte finish (cleaning instruc-
tions) .................................................. 274
Maximum charge current
Setting (charging cable) ................. 147
mbrace
Call priority .................................... 257
Display message ............................ 209
Downloading destinations
(COMAND) ..................................... 257
Downloading routes ....................... 260
Emergency call .............................. 254
General notes ................................ 253
Geo fencing ................................... 261
Locating a stolen vehicle ............... 259
MB info call button ........................ 256
Remote fault diagnosi s.................. 259 Remote vehicle locking .................. 259
Roadside Assistance button .......... 255
Search & Send ............................... 258
Self-test ......................................... 253
Speed alert .................................... 260
System .......................................... 253
Triggering the vehicle alarm ........... 261
Vehicle remote unlocking .............. 258
Mechanical key
Function/note s................................ 74
Inserting .......................................... 75
Locking vehicle ................................ 81
Removing ......................................... 75
Unlocking the driver's door .............. 80
Memory card (audio) ......................... 191
Memory function ................................. 96
Message memory (on-board com-
puter) .................................................. 200
Messages
see Display messages
Mirror turn signal
Cleaning ......................................... 275
Mirrors
see Exterior mirrors
see Rear-view mirror
see Vanity mirror (in the sun visor)
Mobile phone
Menu (on-board computer) ............ 192
Modifying the programming
(SmartKey) ........................................... 74
MOExtended tires .............................. 281
Mounting wheels
Lowering the vehicle ...................... 325
Mounting a new whee l................... 324
Preparing the vehicle ..................... 321
Raising the vehicl e......................... 322
Removing a whee l.......................... 324
Securing the vehicle against roll-
ing away ........................................ 322
MP3
Operation ....................................... 191
Multifunction display
Function/note s............................. 186
Permanent display ......................... 198
Multifunction steering wheel
Operating the on-board compute r..1 84
Overview .......................................... 33 Index
11
Page 19 of 338

Installing the towing eye ................ 294
Removing the towing eye ............... 294
Transporting the vehicle ................ 295
With both axles on the ground ....... 294
With front axle raised .....................2 95
With the rear axle raised ................ 295
Towing eye ......................................... 280
Trailer hitch ......................................... 24
Trailer tow hitch .................................. 24
Transmission
DIRECT SELECT lever ..................... 134
Drive program ................................ 137
Driving tips ................................... .137
Engaging the drive position ............ 136
Engaging the park position ............ 135
Holding the vehicle stationary on
uphill gradients .............................. 137
Kickdown ....................................... 137
Overview ........................................ 134
Program selector button ................ 137
Shifting to neutra l.......................... 135
Transmission position display ......... 134
Transmission position display
(DIRECT SELECT lever) ...................... 134
Transmission positions .................... 136
Transporting the vehicle .................. 295
Trim pieces (cleaning instruc-
tions) .................................................. 277
Trip computer (on-board com-
puter) .................................................. 187
Trip odometer
Calling up ....................................... 186
Resetting (on-board computer) ...... 189
Trunk load (maximum) ...................... 334
Turn signals
Changing bulbs (front) ................... 108
Display message ............................ 214
Switching on/of f........................... 102
Type identification plate
see Vehicle identification plate U
Unlocking Emergency unlocking ....................... 80
From inside the vehicle (central
unlocking button) ............................. 80 V
Vanity mirror (in the sun visor) ........ 251
Vehicle
Correct use ...................................... 25
Data acquisition ............................... 26
Display message ............................ 223
Equipment ....................................... 20
Individual settings .......................... 195
Limited Warranty ............................. 26
Loading .......................................... 310
Locking (in an emergency) ............... 81
Locking (SmartKey) .......................... 72
Lowering ........................................ 325
Maintenance .................................... 21
Parking for a long period ................ 156
Raising ........................................... 322
Reporting problems ......................... 25
Securing from rolling away ............ 322
Starting .......................................... 132
Transporting .................................. 295
Unlocking (in an emergency) ........... 80
Unlocking (SmartKey) ...................... 72
Vehicle data ................................... 334
Vehicle data
Roof load (maximum) ..................... 334
Trunk load (maximum) ................... 334
Vehicle dimensions ........................... 334
Vehicle emergency locking ................ 81
Vehicle Homepage
Data protection .............................. 152
Functions ....................................... 153
General information ....................... 152
Internet connection ....................... 153
Vehicle identification number
see VIN
Vehicle identification plate .............. 330
Vehicle tool kit .................................. 280
Ventilation
Setting the vents ........................... 126
Video
Operating the DVD ......................... 191
VIN ...................................................... 330 W
Warning and indicator lamps ABS ................................................ 230 Index
17
Page 34 of 338
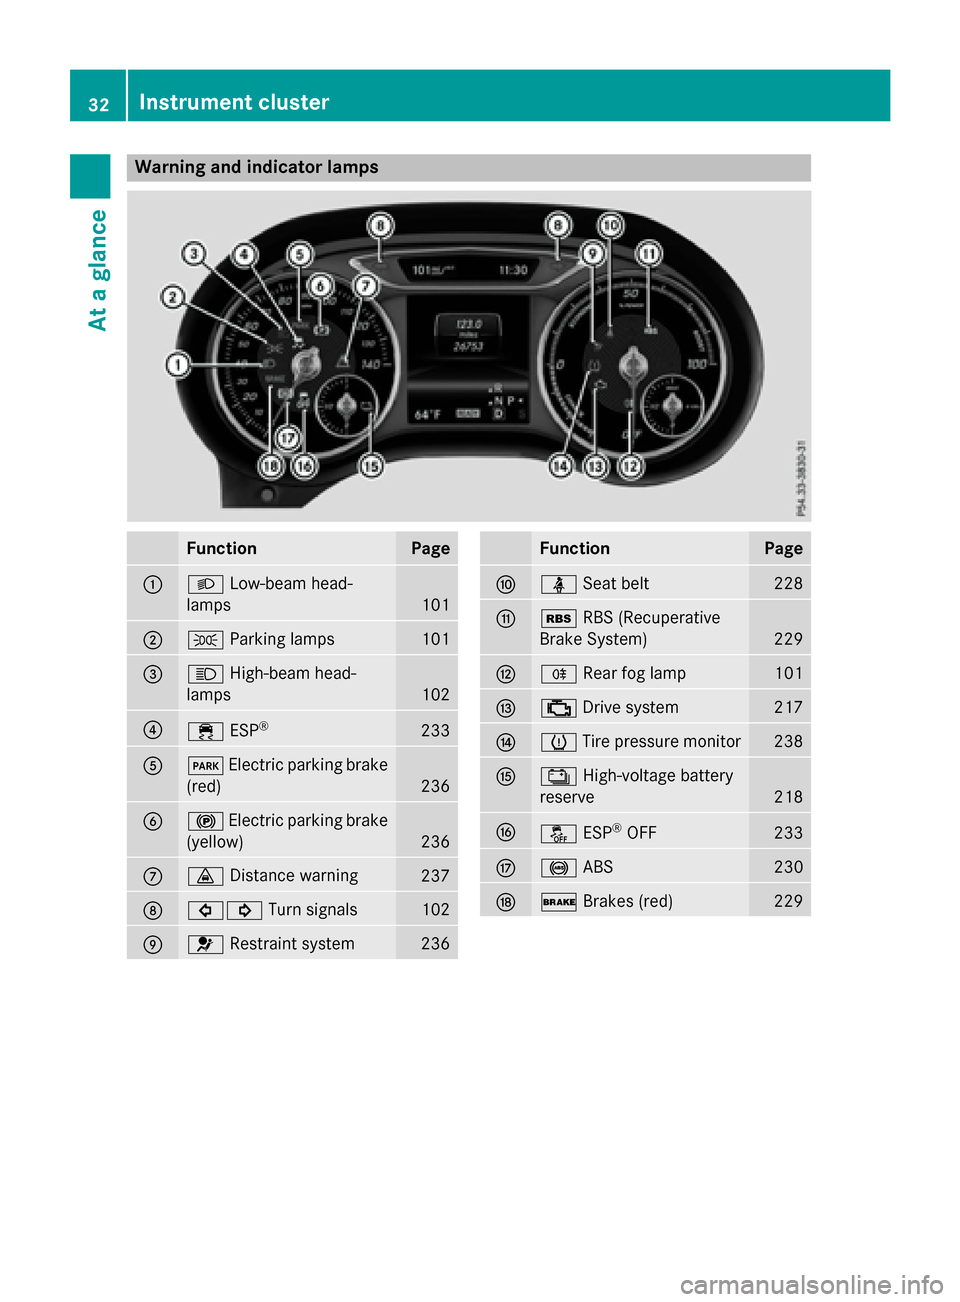
Warning and indicator lamps
Function Page
:
L
Low-beam head-
lamps 101
;
T
Parking lamps 101
=
K
High-beam head-
lamps 102
?
÷
ESP® 233
A
F
Electric parking brake
(red) 236
B
!
Electric parking brake
(yellow) 236
C
·
Distance warning 237
D
#!
Turn signals 102
E
6
Restraint system 236 Function Page
F
ü
Seat belt 228
G
é
RBS (Recuperative
Brake System) 229
H
R
Rear fog lamp 101
I
;
Drive system 217
J
h
Tire pressure monitor 238
K
Ý
High-voltage battery
reserve 218
L
å
ESP®
OFF 233
M
!
ABS 230
N
$
Brakes (red) 22932
Instrument clusterAt a glance
Page 75 of 338
The SmartKey centrally locks/unlocks:
R the doors
R the tailgate
R the charge socket flap
The turn signals flash once when unlocking
and three times when locking.
i You can also set an audible signal to con-
firm that the vehicle has been locked. The
audible signal can be activated and deacti- vated using the on-board computer
(Y page 198). KEYLESS-GO
General notes Bear in mind that the engine can be started by
any of the vehicle occupants if there is a
SmartKey in the vehicle.
Locking/unlocking centrally You can start, lock or unlock the vehicle using
KEYLESS-GO. To do this, you only need carry the SmartKey with you. You can combine the
functions of KEYLESS-GO with those of a con- ventional SmartKey. Unlock the vehicle by
using KEYLESS-GO, for instance, and lock it
using the &button on the SmartKey.
The driver's door and the door at which the
handle is used, must both be closed. The
SmartKey must be outside the vehicle. When
locking or unlocking with KEYLESS-GO, the
distance between the SmartKey and the cor-
responding door handle must not be greater
than 3 ft (1 m).
A check which periodically establishes a radio
connection between the vehicle and the
SmartKey determines whether a valid Smart- Key is in the vehicle. This occurs, for example:
R when starting the engine
R whilst driving
R when the external door handles are
touched
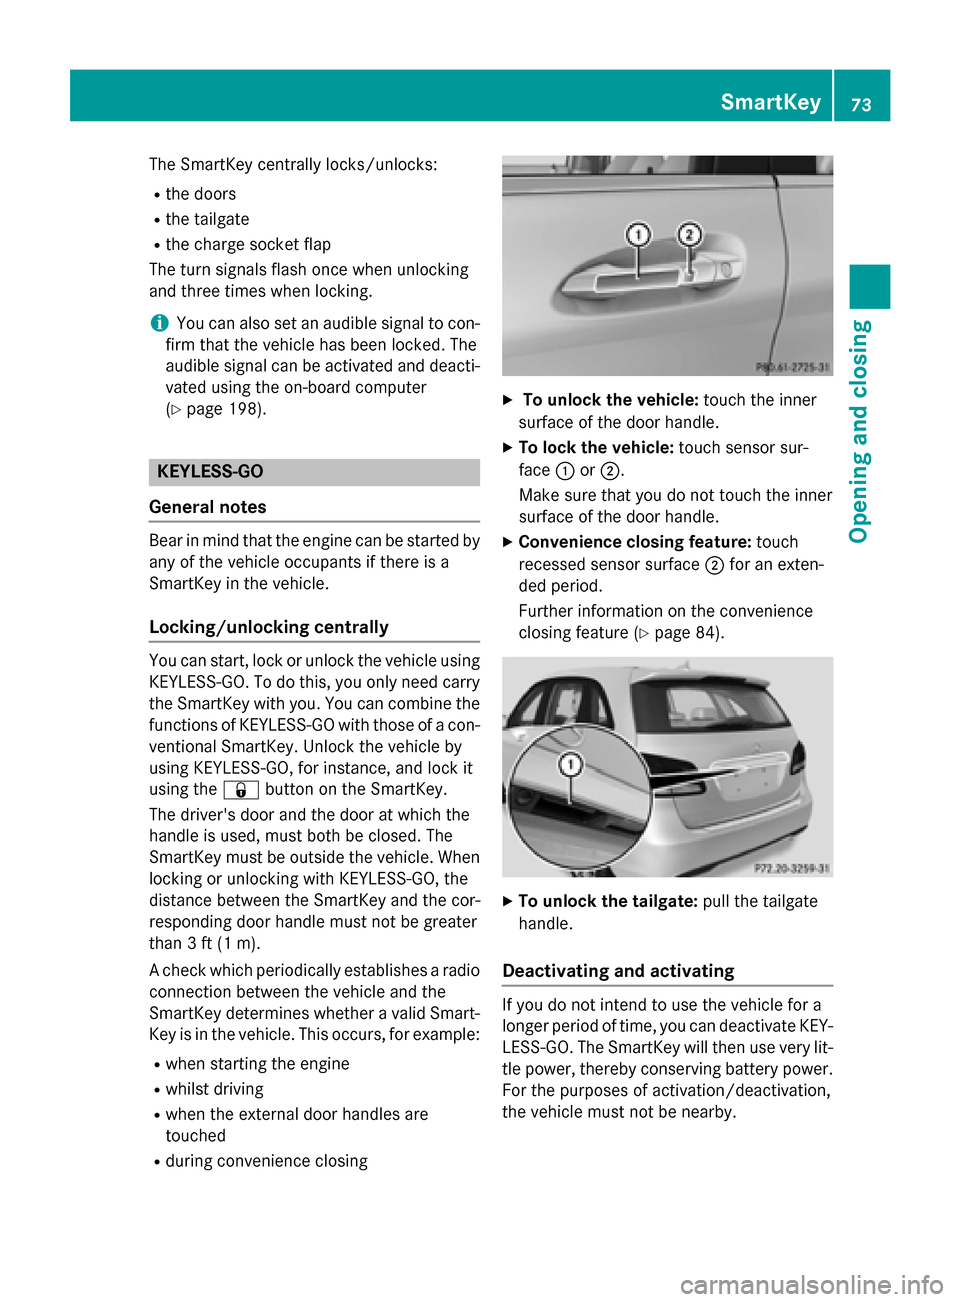
R during convenience closing X
To unlock the vehicle: touch the inner
surface of the door handle.
X To lock the vehicle: touch sensor sur-
face :or;.
Make sure that you do not touch the inner
surface of the door handle.
X Convenience closing feature: touch
recessed sensor surface ;for an exten-
ded period.
Further information on the convenience
closing feature (Y page 84). X
To unlock the tailgate: pull the tailgate
handle.
Deactivating and activating If you do not intend to use the vehicle for a
longer period of time, you can deactivate KEY-
LESS-GO. The SmartKey will then use very lit-
tle power, thereby conserving battery power.
For the purposes of activation/deactivation,
the vehicle must not be nearby. SmartKey
73Opening and closing Z
Page 76 of 338
X
To deactivate: press the&button on
the SmartKey twice in rapid succession.
The battery check lamp of the SmartKey
(Y page 75) lights up twice briefly and
KEYLESS-GO is deactivated.
X To activate: press any button on the
SmartKey or insert the SmartKey into the
ignition lock.
KEYLESS-GO and all of its associated fea-
tures are available again. KEYLESS-GO start function
Bear in mind that the engine can be started by any of the vehicle occupants if there is a
SmartKey in the vehicle. Changing the settings of the locking
system
You can change the settings of the locking
system. This means that only the driver's door and the charge socket flap are unlocked when the vehicle is unlocked. This is useful if you
frequently travel on your own.
X To change the setting: simultaneously
press the %and& buttons for
approximately 6 seconds until the battery
check lamp (Y page 75) flashes twice.
i If the setting of the locking system is
changed within the signal range of the vehi- cle, pressing the &or% button:
R locks or
R unlocks the vehicle
The SmartKey now functions as follows:
X To unlock the driver's door: press the
% button once.
X To unlock centrally: press the%but-
ton twice.
X To lock centrally: press the&button. The KEYLESS-GO function is changed as fol-
lows:
X To unlock the driver's door: touch the
inner surface of the door handle on the
driver's door.
X To unlock centrally: touch the inner sur-
face of the door handle on the front-
passenger door or the rear door.
X To lock centrally: touch the outer sensor
surface on one of the door handles.
X To restore the factory settings: simulta-
neously press the %and& buttons
for approximately 6 seconds until the bat-
tery check lamp flashes twice
(Y page 75). Mechanical key
General notes If the vehicle can no longer be locked or
unlocked with the SmartKey or KEYLESS-GO, use the mechanical key.
If you use the mechanical key to unlock and
open the driver's door or the trunk lid, the
anti-theft alarm system will be triggered
(Y page 69).
There are several ways to turn off the alarm:
X To turn the alarm off with the SmartKey:
press the %or& button on the
SmartKey.
or X Insert the SmartKey into the ignition lock.
or
X To deactivate the alarm with KEYLESS-
GO: press the Start/Stop button in the igni-
tion lock. The SmartKey must be in the
vehicle.
or X Lock or unlock the vehicle using KEYLESS-
GO. The SmartKey must be outside the
vehicle. 74
SmartKeyOpening and closing
Page 104 of 338
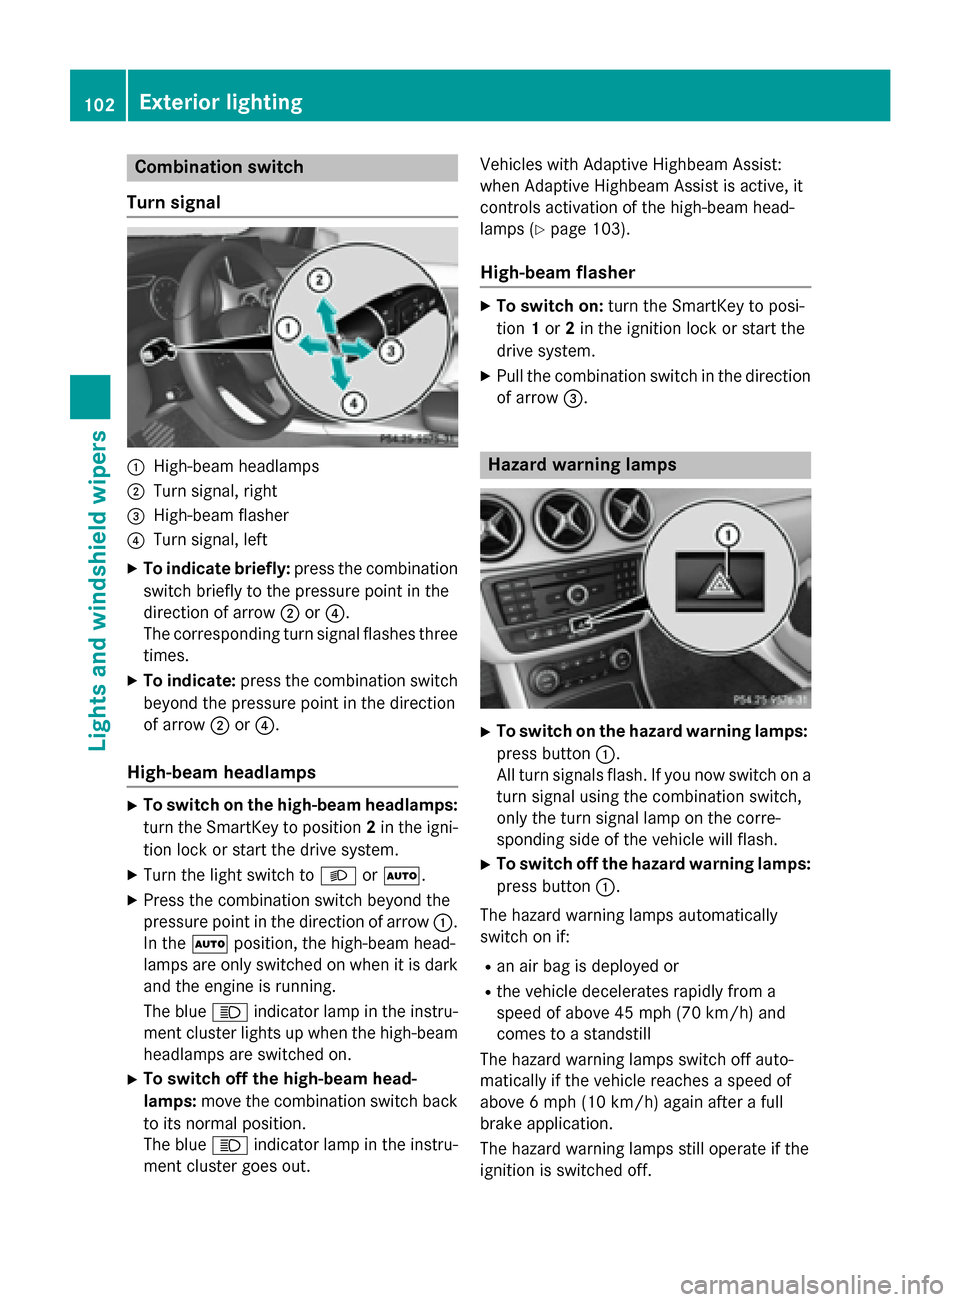
Combination switch
Turn signal :
High-beam headlamps
; Turn signal, right
= High-beam flasher
? Turn signal, left
X To indicate briefly: press the combination
switch briefly to the pressure point in the
direction of arrow ;or?.
The corresponding turn signal flashes three
times.
X To indicate: press the combination switch
beyond the pressure point in the direction
of arrow ;or?.
High-beam headlamps X
To switch on the high-beam headlamps:
turn the SmartKey to position 2in the igni-
tion lock or start the drive system.
X Turn the light switch to LorÃ.
X Press the combination switch beyond the
pressure point in the direction of arrow :.
In the Ãposition, the high-beam head-
lamps are only switched on when it is dark
and the engine is running.
The blue Kindicator lamp in the instru-
ment cluster lights up when the high-beam headlamps are switched on.
X To switch off the high-beam head-
lamps: move the combination switch back
to its normal position.
The blue Kindicator lamp in the instru-
ment cluster goes out. Vehicles with Adaptive Highbeam Assist:
when Adaptive Highbeam Assist is active, it
controls activation of the high-beam head-
lamps (Y page 103).
High-beam flasher X
To switch on: turn the SmartKey to posi-
tion 1or 2in the ignition lock or start the
drive system.
X Pull the combination switch in the direction
of arrow =. Hazard warning lamps
X
To switch on the hazard warning lamps:
press button :.
All turn signals flash. If you now switch on a turn signal using the combination switch,
only the turn signal lamp on the corre-
sponding side of the vehicle will flash.
X To switch off the hazard warning lamps:
press button :.
The hazard warning lamps automatically
switch on if:
R an air bag is deployed or
R the vehicle decelerates rapidly from a
speed of above 45 mph (70 km/h) and
comes to a standstill
The hazard warning lamps switch off auto-
matically if the vehicle reaches a speed of
above 6 mph (10 km/h)again after a full
brake application.
The hazard warning lamps still operate if the
ignition is switched off. 102
Exterior lightingLights and windshield wipers
Page 105 of 338
Cornering light function
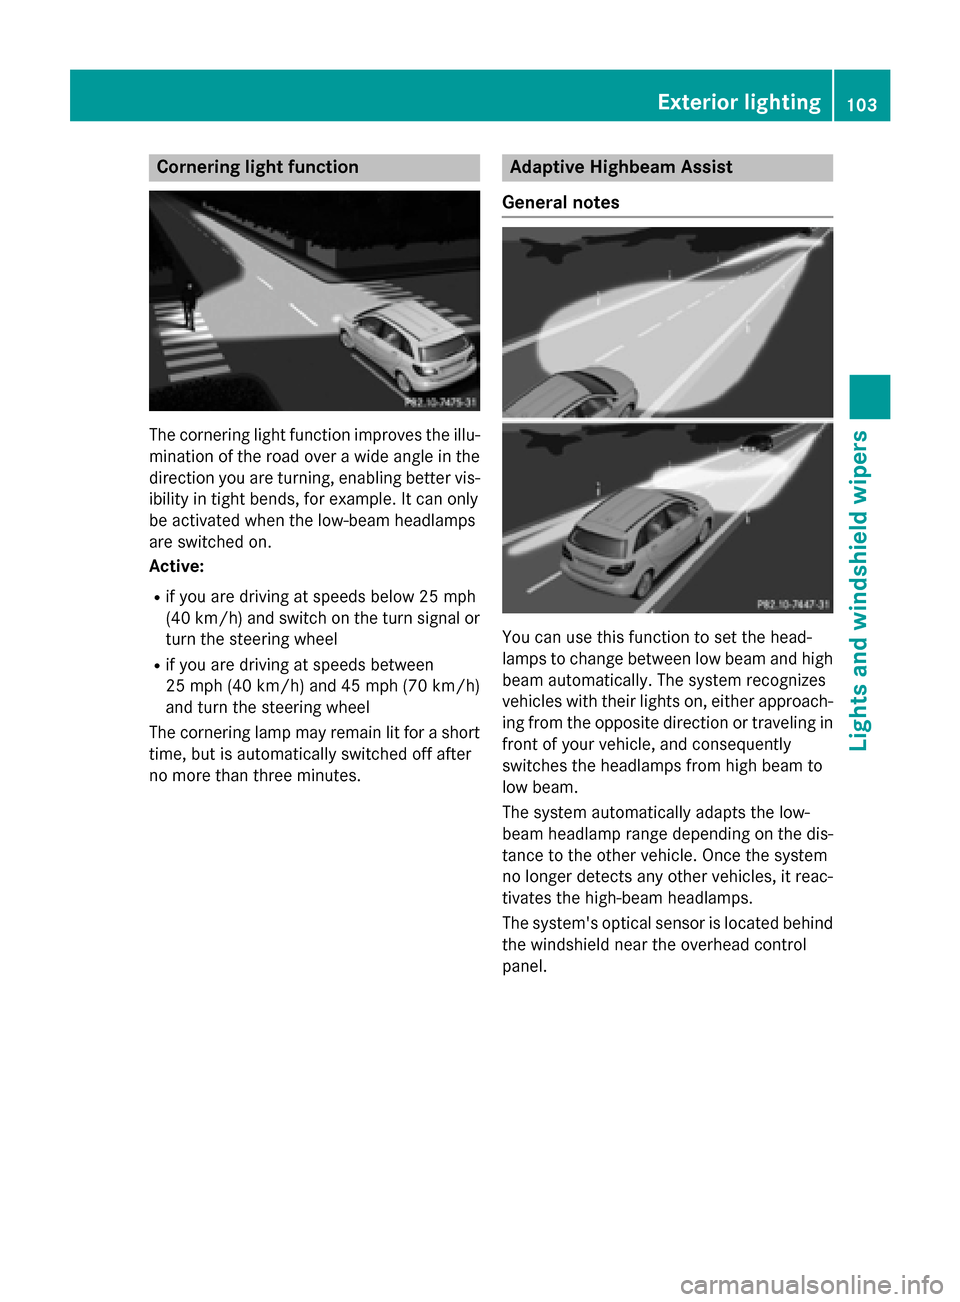
The cornering light function improves the illu-
mination of the road over a wide angle in the direction you are turning, enabling better vis-
ibility in tight bends, for example. It can only
be activated when the low-beam headlamps
are switched on.
Active:
R if you are driving at speeds below 25 mph
(40 km/h) and switch on the turn signal or
turn the steering wheel
R if you are driving at speeds between
25 mph (40 km/ h)and 45 mph (70 km/h)
and turn the steering wheel
The cornering lamp may remain lit for a short
time, but is automatically switched off after
no more than three minutes. Adaptive Highbeam Assist
General notes You can use this function to set the head-
lamps to change between low beam and high beam automatically. The system recognizes
vehicles with their lights on, either approach-
ing from the opposite direction or traveling in front of your vehicle, and consequently
switches the headlamps from high beam to
low beam.
The system automatically adapts the low-
beam headlamp range depending on the dis-
tance to the other vehicle. Once the system
no longer detects any other vehicles, it reac-
tivates the high-beam headlamps.
The system's optical sensor is located behind
the windshield near the overhead control
panel. Exterior lighting
103Lights and windshield wipers Z