2015 MERCEDES-BENZ B-Class ELECTRIC bulb
[x] Cancel search: bulbPage 17 of 338

Problem (malfunction) ..................... 77
SmartKey positions (ignition lock) .. 131
Snow chains ...................................... 303
Sockets
Center console .............................. 252
General notes ................................ 252
Luggage compartment ...................2 53
Rear compartment ......................... 253
Special seat belt retractor .................. 57
Specialist workshop ............................ 25
Speed, controlling
see Cruise control
Speedometer
Activating/deactivating the addi-
tional speedometer ........................ 198
Digital ............................................ 189
In the Instrument cluster ................. 31
Selecting the unit of measure-
ment .............................................. 197
Standing lamps
Changing bulbs .............................. 108
Display message ............................ 216
Switching on/off ........................... 101
Start/Stop button
Removing ....................................... 132
Starting the drive system .............. .133
Starting (vehicle) ............................... 132
STEER CONTROL .................................. 68
Steering (display message) .............. 225
Steering assistant STEER CON-
TROL
see STEER CONTROL
Steering wheel
Adjusting (manually) ........................ 93
Button overview ............................... 33
Buttons (on-board computer) ......... 184
Cleaning ......................................... 277
Important safety notes .................... 93
Paddle shifters ............................... 138
Steering wheel paddle shifters ........ 138
Stowage compartments
Armrest (front) ............................... 241
Armrest (under) ............................. 242
Center console .............................. 241
Center console (rear) ..................... 242
Cup holders ................................... 249
Eyeglasses compartment ............... 241 Glove box ....................................... 241
Important safety information ......... 240
Map pockets .................................. 243
Stowage net ................................... 243
Under driver's seat/front-
passenger sea
t.............................. 242
Stowage net ....................................... 243
Summer tires ..................................... 302
Sun visor ............................................ 251
Switching air-recirculation mode
on/off ................................................. 123 T
Tail lamps see Lights
Tailgate
Display message ............................ 224
Emergency unlocking ....................... 82
Important safety notes .................... 81
Opening dimensions ...................... 334
Opening/closing (from outside) ....... 82
Technical data
Capacities ...................................... 331
Information .................................... 330
Tires/wheels ................................. 325
Vehicle data ................................... 334
Telephone
Accepting a call (multifunction
steering wheel) .............................. 192
Display message ............................ 225
Introduction ................................... 192
Menu (on-board computer) ............ 192
Number from the phone book ........ 192
Redialing ........................................ 193
Rejecting/ending a call ................. 192
Temperature
Outside temperature ...................... 183
Setting (climate control )................ 120
Through-loading feature ................... 243
Tire pressure
Calling up (on-board computer) ..... 307
Checking manually ........................ 307
Display message ............................ 221
Important safety notes .................. 307
Maximum ....................................... 306
Not reached (TIREFIT) .................... 284
Note s............................................. 305 Index
15
Page 19 of 338

Installing the towing eye ................ 294
Removing the towing eye ............... 294
Transporting the vehicle ................ 295
With both axles on the ground ....... 294
With front axle raised .....................2 95
With the rear axle raised ................ 295
Towing eye ......................................... 280
Trailer hitch ......................................... 24
Trailer tow hitch .................................. 24
Transmission
DIRECT SELECT lever ..................... 134
Drive program ................................ 137
Driving tips ................................... .137
Engaging the drive position ............ 136
Engaging the park position ............ 135
Holding the vehicle stationary on
uphill gradients .............................. 137
Kickdown ....................................... 137
Overview ........................................ 134
Program selector button ................ 137
Shifting to neutra l.......................... 135
Transmission position display ......... 134
Transmission position display
(DIRECT SELECT lever) ...................... 134
Transmission positions .................... 136
Transporting the vehicle .................. 295
Trim pieces (cleaning instruc-
tions) .................................................. 277
Trip computer (on-board com-
puter) .................................................. 187
Trip odometer
Calling up ....................................... 186
Resetting (on-board computer) ...... 189
Trunk load (maximum) ...................... 334
Turn signals
Changing bulbs (front) ................... 108
Display message ............................ 214
Switching on/of f........................... 102
Type identification plate
see Vehicle identification plate U
Unlocking Emergency unlocking ....................... 80
From inside the vehicle (central
unlocking button) ............................. 80 V
Vanity mirror (in the sun visor) ........ 251
Vehicle
Correct use ...................................... 25
Data acquisition ............................... 26
Display message ............................ 223
Equipment ....................................... 20
Individual settings .......................... 195
Limited Warranty ............................. 26
Loading .......................................... 310
Locking (in an emergency) ............... 81
Locking (SmartKey) .......................... 72
Lowering ........................................ 325
Maintenance .................................... 21
Parking for a long period ................ 156
Raising ........................................... 322
Reporting problems ......................... 25
Securing from rolling away ............ 322
Starting .......................................... 132
Transporting .................................. 295
Unlocking (in an emergency) ........... 80
Unlocking (SmartKey) ...................... 72
Vehicle data ................................... 334
Vehicle data
Roof load (maximum) ..................... 334
Trunk load (maximum) ................... 334
Vehicle dimensions ........................... 334
Vehicle emergency locking ................ 81
Vehicle Homepage
Data protection .............................. 152
Functions ....................................... 153
General information ....................... 152
Internet connection ....................... 153
Vehicle identification number
see VIN
Vehicle identification plate .............. 330
Vehicle tool kit .................................. 280
Ventilation
Setting the vents ........................... 126
Video
Operating the DVD ......................... 191
VIN ...................................................... 330 W
Warning and indicator lamps ABS ................................................ 230 Index
17
Page 25 of 338
Danger of electric shock
G
DANGER
The vehicle's high voltage electrical system is under high voltage. If you modify components
in the vehicle's high-voltage electrical system or touch damaged components, you may be
electrocuted. The components in the vehi-
cle's high-voltage electrical system may be
damaged in an accident, although the damage
is not visible. There is a risk of fatal injury.
Following an accident, do not touch any high- voltage components and never modify the
vehicle's high-voltage electrical system. Have
the vehicle towed away after an accident and the vehicle's high-voltage electrical system
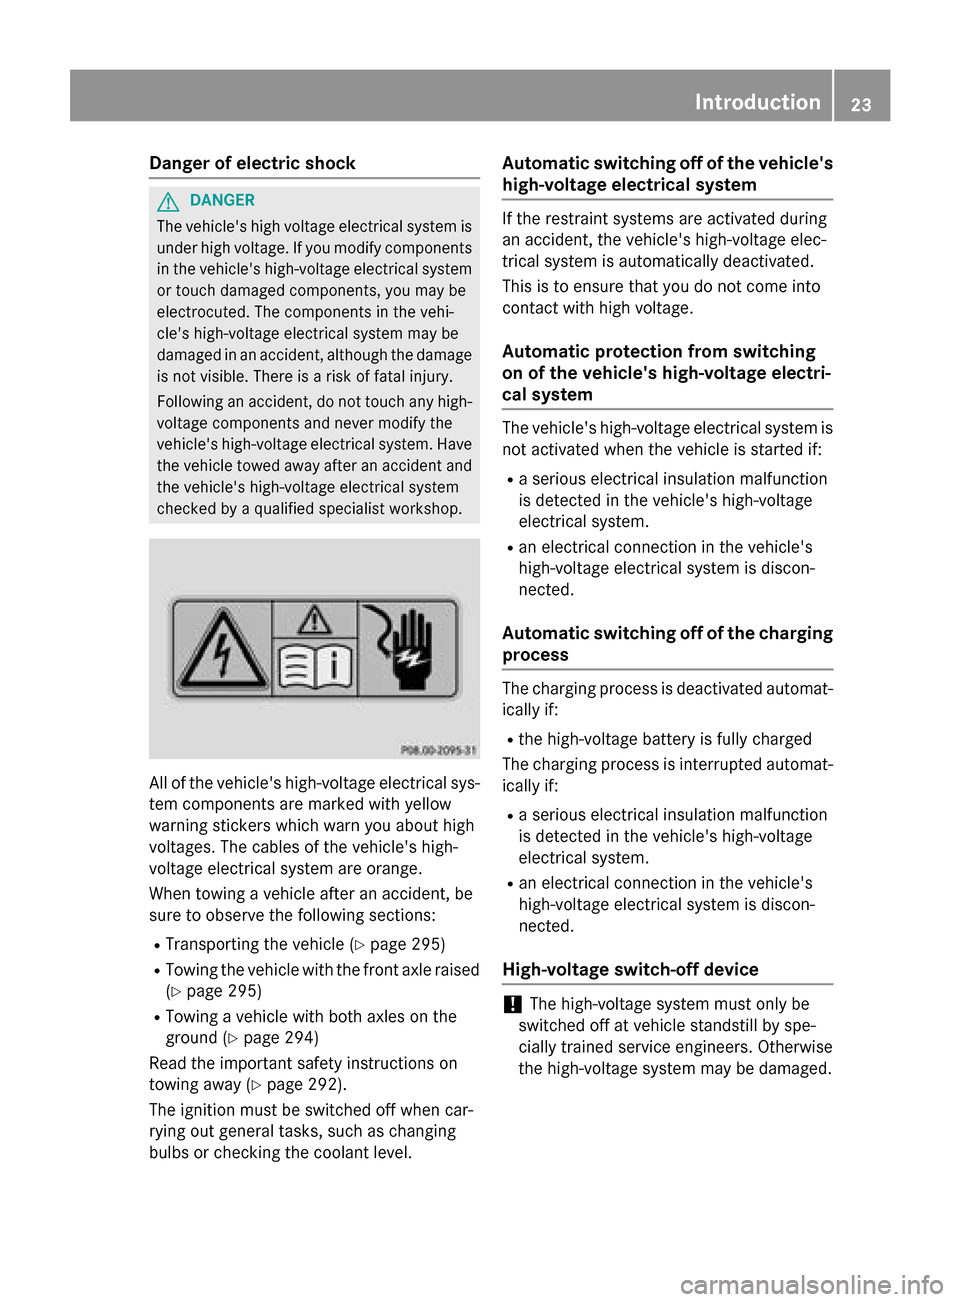
checked by a qualified specialist workshop. All of the vehicle's high-voltage electrical sys-
tem components are marked with yellow
warning stickers which warn you about high
voltages. The cables of the vehicle's high-
voltage electrical system are orange.
When towing a vehicle after an accident, be
sure to observe the following sections:
R Transporting the vehicle (Y page 295)
R Towing the vehicle with the front axle raised
(Y page 295)
R Towing a vehicle with both axles on the
ground (Y page 294)
Read the important safety instructions on
towing away (Y page 292).
The ignition must be switched off when car-
rying out general tasks, such as changing
bulbs or checking the coolant level. Automatic switching off of the vehicle's
high-voltage electrical system If the restraint systems are activated during
an accident, the vehicle's high-voltage elec-
trical system is automatically deactivated.
This is to ensure that you do not come into
contact with high voltage.
Automatic protection from switching
on of the vehicle's high-voltage electri-
cal system The vehicle's high-voltage electrical system is
not activated when the vehicle is started if:
R a serious electrical insulation malfunction
is detected in the vehicle's high-voltage
electrical system.
R an electrical connection in the vehicle's
high-voltage electrical system is discon-
nected.
Automatic switching off of the charging process The charging process is deactivated automat-
ically if:
R the high-voltage battery is fully charged
The charging process is interrupted automat- ically if:
R a serious electrical insulation malfunction
is detected in the vehicle's high-voltage
electrical system.
R an electrical connection in the vehicle's
high-voltage electrical system is discon-
nected.
High-voltage switch-off device !
The high-voltage system must only be
switched off at vehicle standstill by spe-
cially trained service engineers. Otherwise
the high-voltage system may be damaged. Int
roduction
23 Z
Page 101 of 338
Useful information
............................100
Exterior lighting ................................ 100
Interior lighting ................................. 105
Replacing bulbs ................................. 106
Windshield wipers ............................111 99Lights and windshield wipers
Page 108 of 338
Crash-responsive emergency lighting
The interior lighting is activated automatically
if the vehicle is involved in an accident.
X To switch off the crash-responsive
emergency lighting: press the hazard
warning lamp button.
or X Lock and then unlock the vehicle using the
SmartKey. Replacing bulbs
Important safety notes
Xenon bulbs G
DANGER
Xenon bulbs carry a high voltage. You can get an electric shock if you remove the cover of
the Xenon bulb and touch the electrical con-
tacts. There is a risk of fatal injury.
Never touch the parts or the electrical con-
tacts of the Xenon bulb. Always have work on
the Xenon bulbs carried out at a qualified spe-
cialist workshop.
If your vehicle is equipped with Xenon bulbs,
you can recognize this by the following: the
cone of light from the Xenon bulbs moves
from the top to the bottom and back again
when you start the drive system. For this to be
observed, the lights must be switched on
before the drive system is started.
Bulbs and lamps are an important aspect of
vehicle safety. You must therefore make sure that these function correctly at all times.
Have the headlamp setting checked regularly.
Other bulbs G
WARNING
Bulbs, lamps and connectors can get very hot when operating. If you change a bulb, you
could burn yourself on these components.
There is a risk of injury.
Allow these components to cool down before changing a bulb. Do not use a bulb that has been dropped or if
its glass tube has been scratched.
The bulb may explode if:
R you touch it
R it is hot
R you drop it
R you scratch it
Only operate bulbs in enclosed lamps
designed for that purpose. Only install spare
bulbs of the same type and the specified volt- age.
Marks on the glass tube reduce the service
life of the bulbs. Do not touch the glass tube
with your bare hands. If necessary, clean the
glass tube when cold with alcohol or spirit and
rub it off with a lint-free cloth.
Protect bulbs from moisture during opera-
tion. Do not allow bulbs to come into contact
with liquids.
There are bulbs other than the Xenon bulbs
that you cannot replace. Replace only the
bulbs listed (Y page 106). Have the bulbs that
you cannot replace yourself changed at a
qualified specialist workshop.
If you require assistance changing bulbs, con- sult a qualified specialist workshop.
If the new bulb still does not light up, consult
a qualified specialist workshop.
Bulbs and lamps are an important aspect of
vehicle safety. You must therefore make sure that these function correctly at all times.
Have the headlamp setting checked regularly. Overview: changing bulbs/bulb types
You can change the following bulbs. The bulb type can be found in the legend. 106
Replacing bulbsLights and windshield wipers
Page 109 of 338
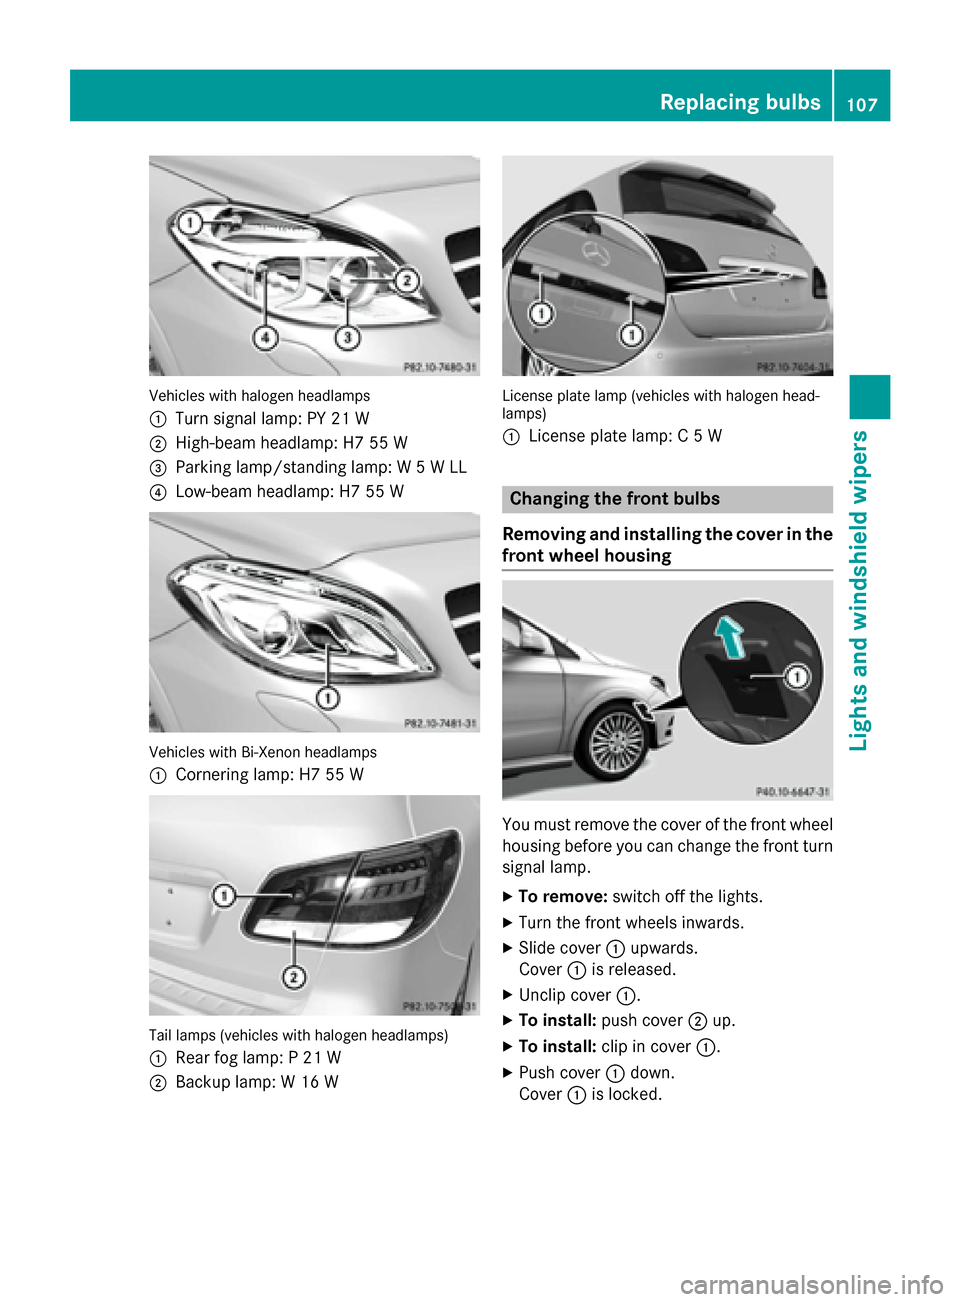
Vehicles with halogen headlamps
:
Turn signal lamp: PY 21 W
; High-beam headlamp: H7 55 W
= Parking lamp/standing lamp: W 5 W LL
? Low-beam headlamp: H7 55 W Vehicles with Bi-Xenon headlamps
:
Cornering lamp: H7 55 W Tail lamps (vehicles with halogen headlamps)
: Rear fog lamp: P 21 W
; Backup lamp: W 16 W License plate lamp (vehicles with halogen head-
lamps)
:
License plate lamp: C 5 W Changing the front bulbs
Removing and installing the cover in the
front wheel housing You must remove the cover of the front wheel
housing before you can change the front turn signal lamp.
X To remove: switch off the lights.
X Turn the front wheels inwards.
X Slide cover :upwards.
Cover :is released.
X Unclip cover :.
X To install: push cover ;up.
X To install: clip in cover :.
X Push cover :down.
Cover :is locked. Replacing bulbs
107Lights and windshield wipers Z
Page 110 of 338
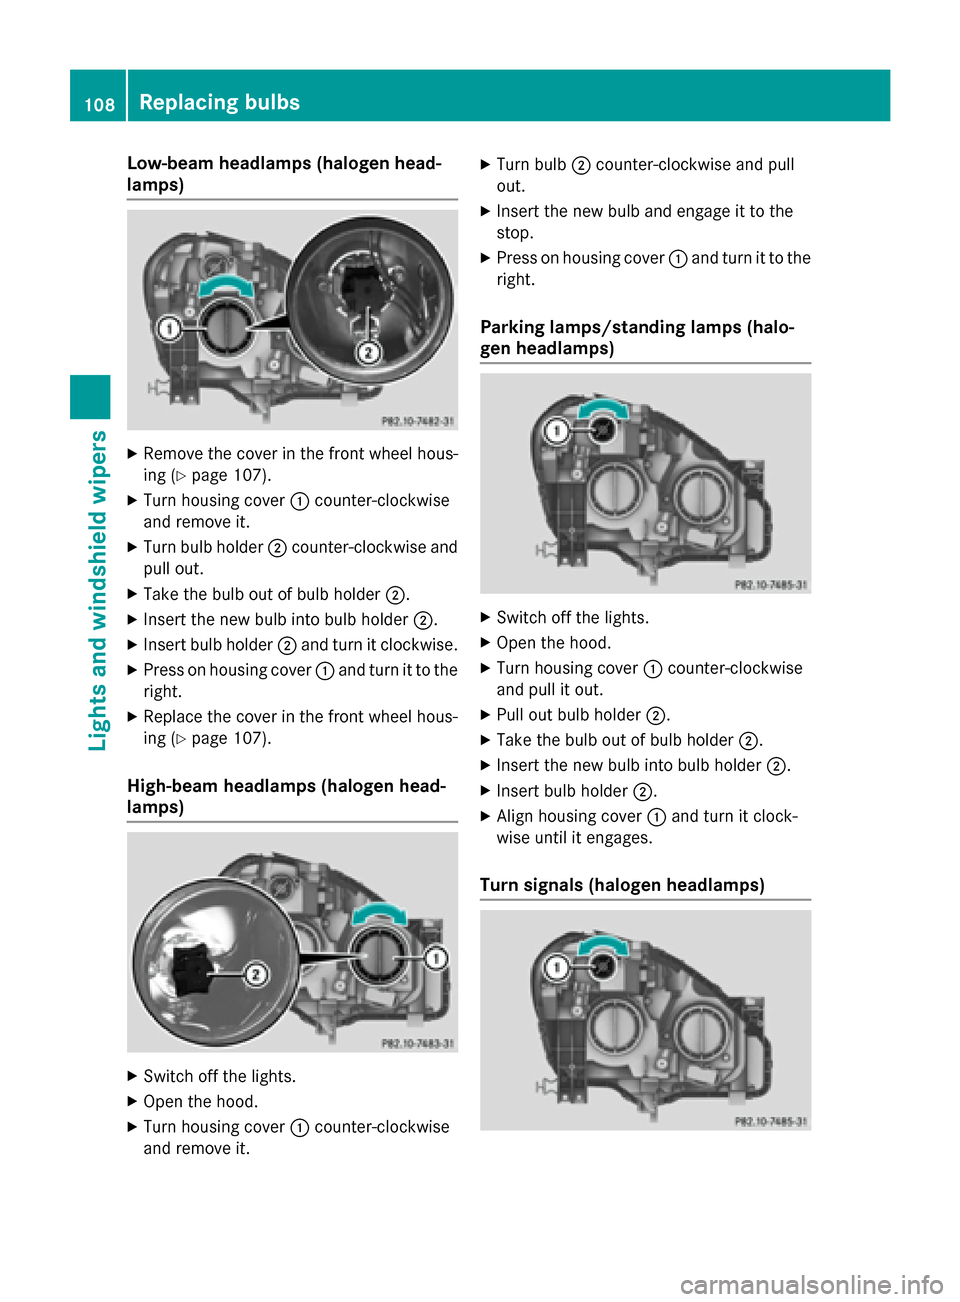
Low-beam headlamps (halogen head-
lamps) X
Remove the cover in the front wheel hous-
ing (Y page 107).
X Turn housing cover :counter-clockwise
and remove it.
X Turn bulb holder ;counter-clockwise and
pull out.
X Take the bulb out of bulb holder ;.
X Insert the new bulb into bulb holder ;.
X Insert bulb holder ;and turn it clockwise.
X Press on housing cover :and turn it to the
right.
X Replace the cover in the front wheel hous-
ing (Y page 107).
High-beam headlamps (halogen head-
lamps) X
Switch off the lights.
X Open the hood.
X Turn housing cover :counter-clockwise
and remove it. X
Turn bulb ;counter-clockwise and pull
out.
X Insert the new bulb and engage it to the
stop.
X Press on housing cover :and turn it to the
right.
Parking lamps/standing lamps (halo-
gen headlamps) X
Switch off the lights.
X Open the hood.
X Turn housing cover :counter-clockwise
and pull it out.
X Pull out bulb holder ;.
X Take the bulb out of bulb holder ;.
X Insert the new bulb into bulb holder ;.
X Insert bulb holder ;.
X Align housing cover :and turn it clock-
wise until it engages.
Turn signals (halogen headlamps) 108
Replacing bulbsLights and windshield wipers
Page 111 of 338
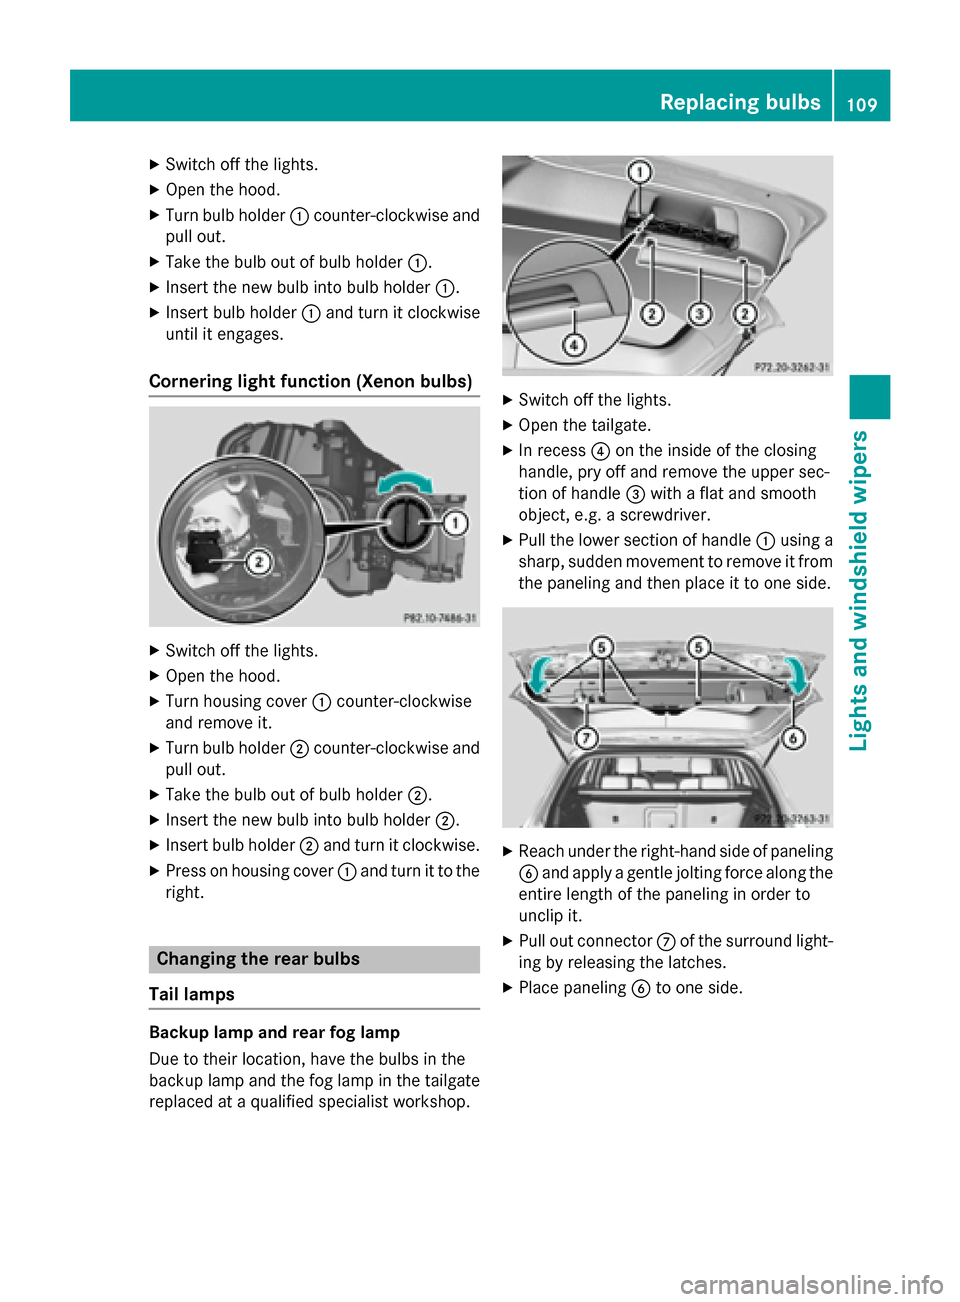
X
Switch off the lights.
X Open the hood.
X Turn bulb holder :counter-clockwise and
pull out.
X Take the bulb out of bulb holder :.
X Insert the new bulb into bulb holder :.
X Insert bulb holder :and turn it clockwise
until it engages.
Cornering light function (Xenon bulbs) X
Switch off the lights.
X Open the hood.
X Turn housing cover :counter-clockwise
and remove it.
X Turn bulb holder ;counter-clockwise and
pull out.
X Take the bulb out of bulb holder ;.
X Insert the new bulb into bulb holder ;.
X Insert bulb holder ;and turn it clockwise.
X Press on housing cover :and turn it to the
right. Changing the rear bulbs
Tail lamps Backup lamp and rear fog lamp
Due to their location, have the bulbs in the
backup lamp and the fog lamp in the tailgate replaced at a qualified specialist workshop. X
Switch off the lights.
X Open the tailgate.
X In recess ?on the inside of the closing
handle, pry off and remove the upper sec-
tion of handle =with a flat and smooth
object, e.g. a screwdriver.
X Pull the lower section of handle :using a
sharp, sudden movement to remove it from the paneling and then place it to one side. X
Reach under the right-hand side of paneling
B and apply a gentle jolting force along the
entire length of the paneling in order to
unclip it.
X Pull out connector Cof the surround light-
ing by releasing the latches.
X Place paneling Bto one side. Replacing bulbs
109Lights and windshield wipers Z