2015 MERCEDES-BENZ B-Class ELECTRIC light
[x] Cancel search: lightPage 233 of 338
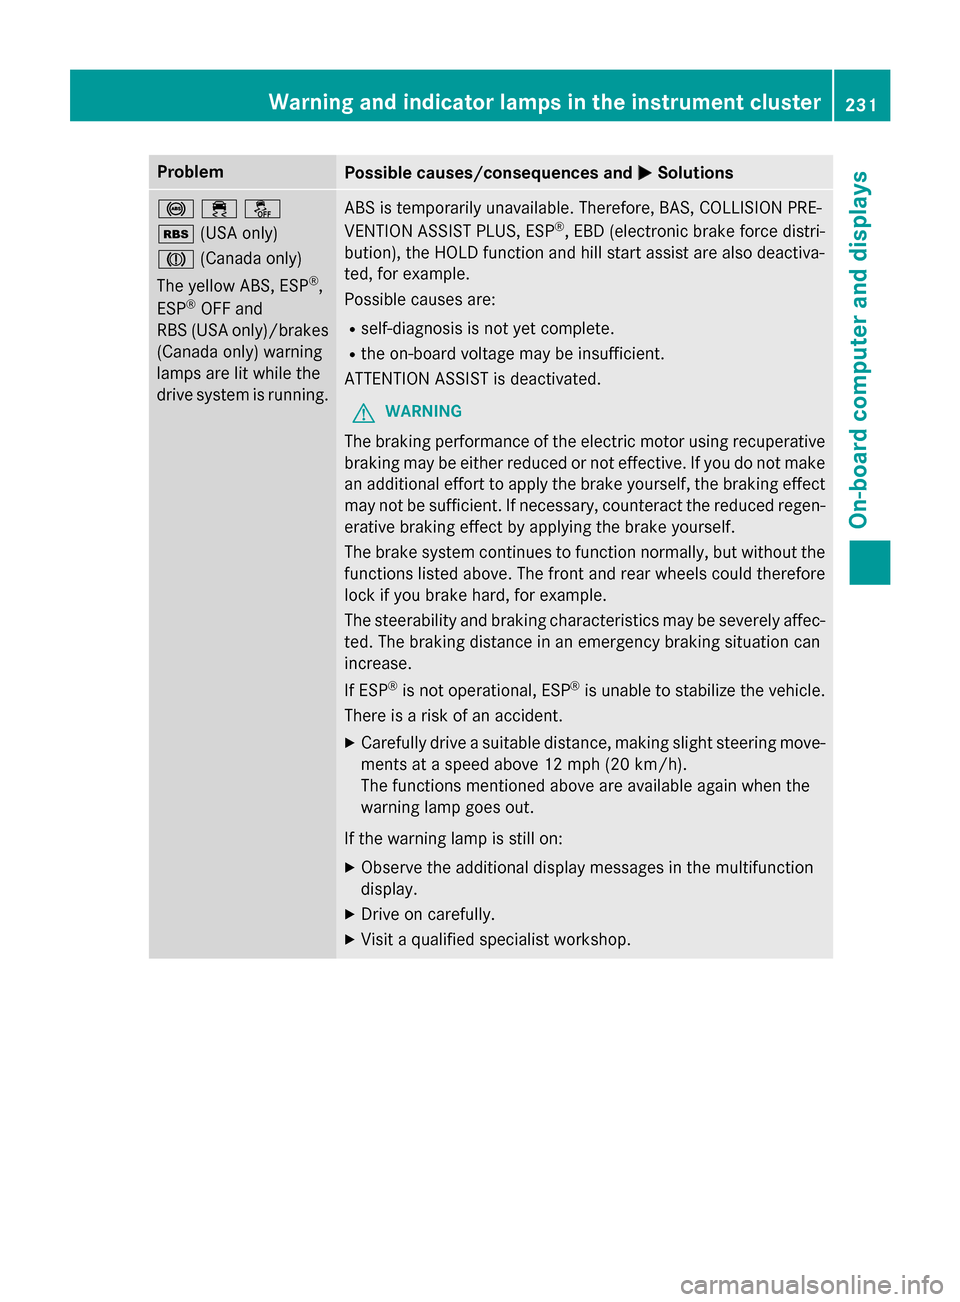
Problem
Possible causes/consequences and
M
MSolutions !֌
é(USA only)
J
(Canada only)
The yellow ABS, ESP ®
,
ESP ®
OFF and
RBS (USA only)/brakes
(Canada only) warning
lamps are lit while the
drive system is running. ABS is temporarily unavailable. Therefore, BAS, COLLISION PRE-
VENTION ASSIST PLUS, ESP
®
, EBD (electronic brake force distri-
bution), the HOLD function and hill start assist are also deactiva-
ted, for example.
Possible causes are:
R self-diagnosis is not yet complete.
R the on-board voltage may be insufficient.
ATTENTION ASSIST is deactivated.
G WARNING
The braking performance of the electric motor using recuperative braking may be either reduced or not effective. If you do not make
an additional effort to apply the brake yourself, the braking effect may not be sufficient. If necessary, counteract the reduced regen-erative braking effect by applying the brake yourself.
The brake system continues to function normally, but without the functions listed above. The front and rear wheels could therefore
lock if you brake hard, for example.
The steerability and braking characteristics may be severely affec-
ted. The braking distance in an emergency braking situation can
increase.
If ESP ®
is not operational, ESP ®
is unable to stabilize the vehicle.
There is a risk of an accident.
X Carefully drive a suitable distance, making slight steering move-
ments at a speed above 12 mph (20 km/h).
The functions mentioned above are available again when the
warning lamp goes out.
If the warning lamp is still on:
X Observe the additional display messages in the multifunction
display.
X Drive on carefully.
X Visit a qualified specialist workshop. Warning and indicator lamps in the instrument cluster
231On-board computer and displays Z
Page 237 of 338
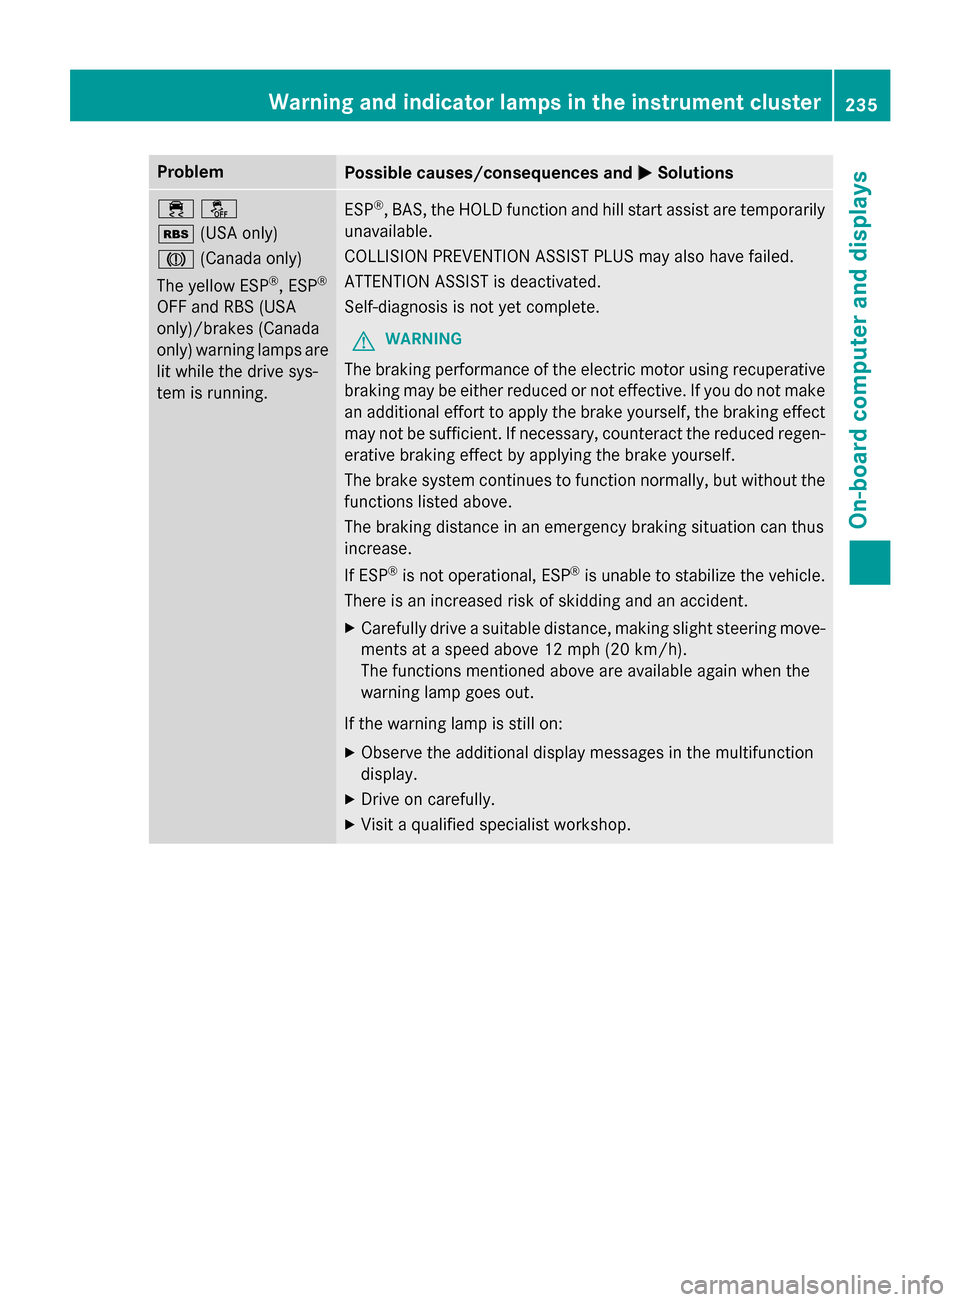
Problem
Possible causes/consequences and
M
MSolutions ֌
é(USA only)
J
(Canada only)
The yellow ESP ®
, ESP ®
OFF and RBS (USA
only)/brakes (Canada
only) warning lamps are
lit while the drive sys-
tem is running. ESP
®
, BAS, the HOLD function and hill start assist are temporarily
unavailable.
COLLISION PREVENTION ASSIST PLUS may also have failed.
ATTENTION ASSIST is deactivated.
Self-diagnosis is not yet complete.
G WARNING
The braking performance of the electric motor using recuperative braking may be either reduced or not effective. If you do not make
an additional effort to apply the brake yourself, the braking effect may not be sufficient. If necessary, counteract the reduced regen-erative braking effect by applying the brake yourself.
The brake system continues to function normally, but without the functions listed above.
The braking distance in an emergency braking situation can thus
increase.
If ESP ®
is not operational, ESP ®
is unable to stabilize the vehicle.
There is an increased risk of skidding and an accident.
X Carefully drive a suitable distance, making slight steering move-
ments at a speed above 12 mph (20 km/h).
The functions mentioned above are available again when the
warning lamp goes out.
If the warning lamp is still on: X Observe the additional display messages in the multifunction
display.
X Drive on carefully.
X Visit a qualified specialist workshop. Warning and indicator lamps in the instrument cluster
235On-board computer and displays Z
Page 238 of 338
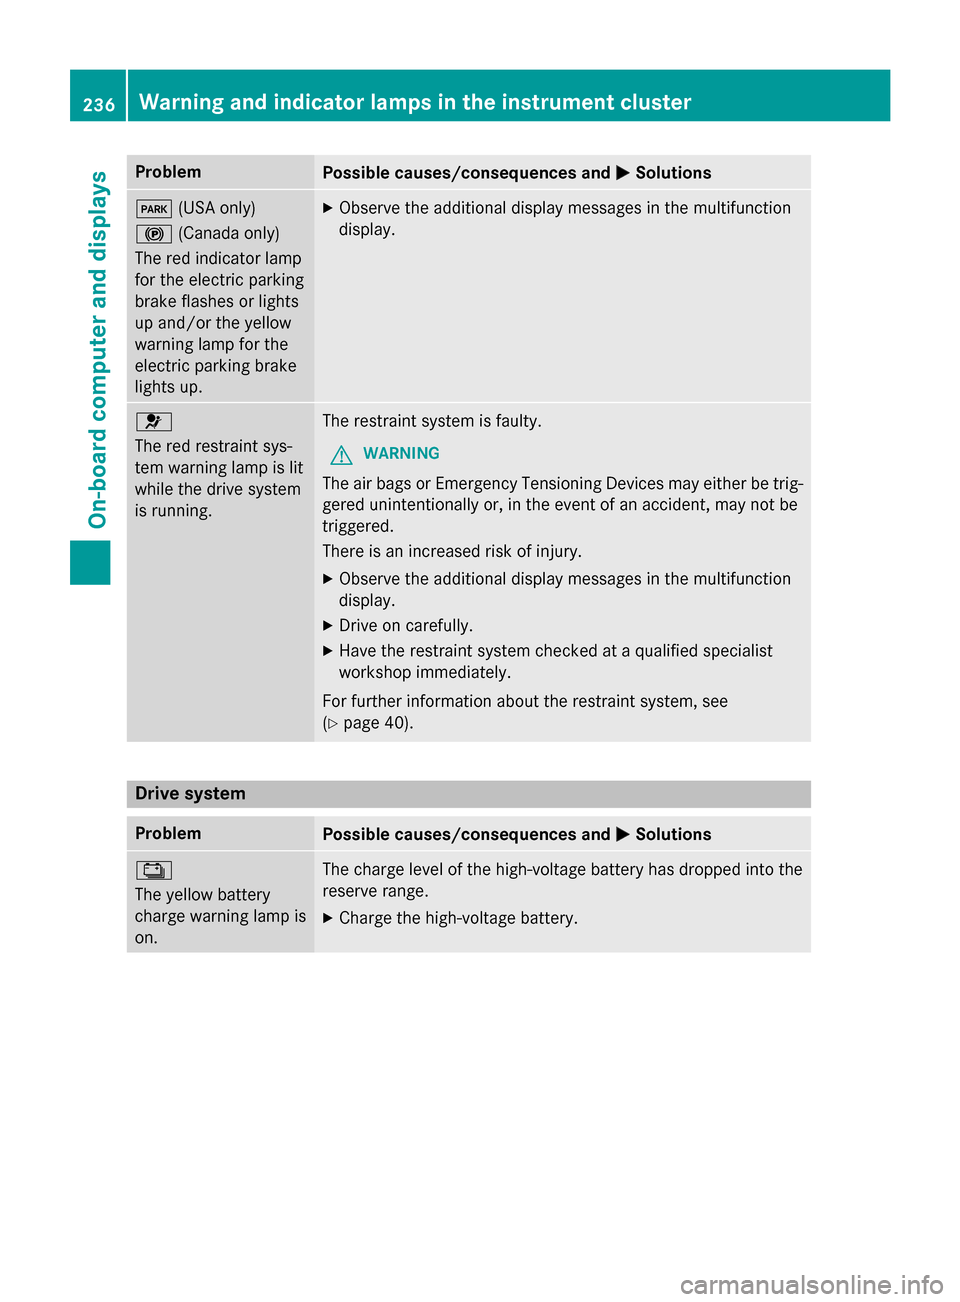
Problem
Possible causes/consequences and
M
MSolutions F
(USA only)
! (Canada only)
The red indicator lamp
for the electric parking
brake flashes or lights
up and/or the yellow
warning lamp for the
electric parking brake
lights up. X
Observe the additional display messages in the multifunction
display. 6
The red restraint sys-
tem warning lamp is lit
while the drive system
is running.
The restraint system is faulty.
G WARNING
The air bags or Emergency Tensioning Devices may either be trig- gered unintentionally or, in the event of an accident, may not be
triggered.
There is an increased risk of injury.
X Observe the additional display messages in the multifunction
display.
X Drive on carefully.
X Have the restraint system checked at a qualified specialist
workshop immediately.
For further information about the restraint system, see
(Y page 40). Drive system
Problem
Possible causes/consequences and
M MSolutions Ý
The yellow battery
charge warning lamp is
on. The charge level of the high-voltage battery has dropped into the
reserve range.
X Charge the high-voltage battery. 236
Warning and indicator lamps in the instrument clusterOn-board computer and displays
Page 239 of 338
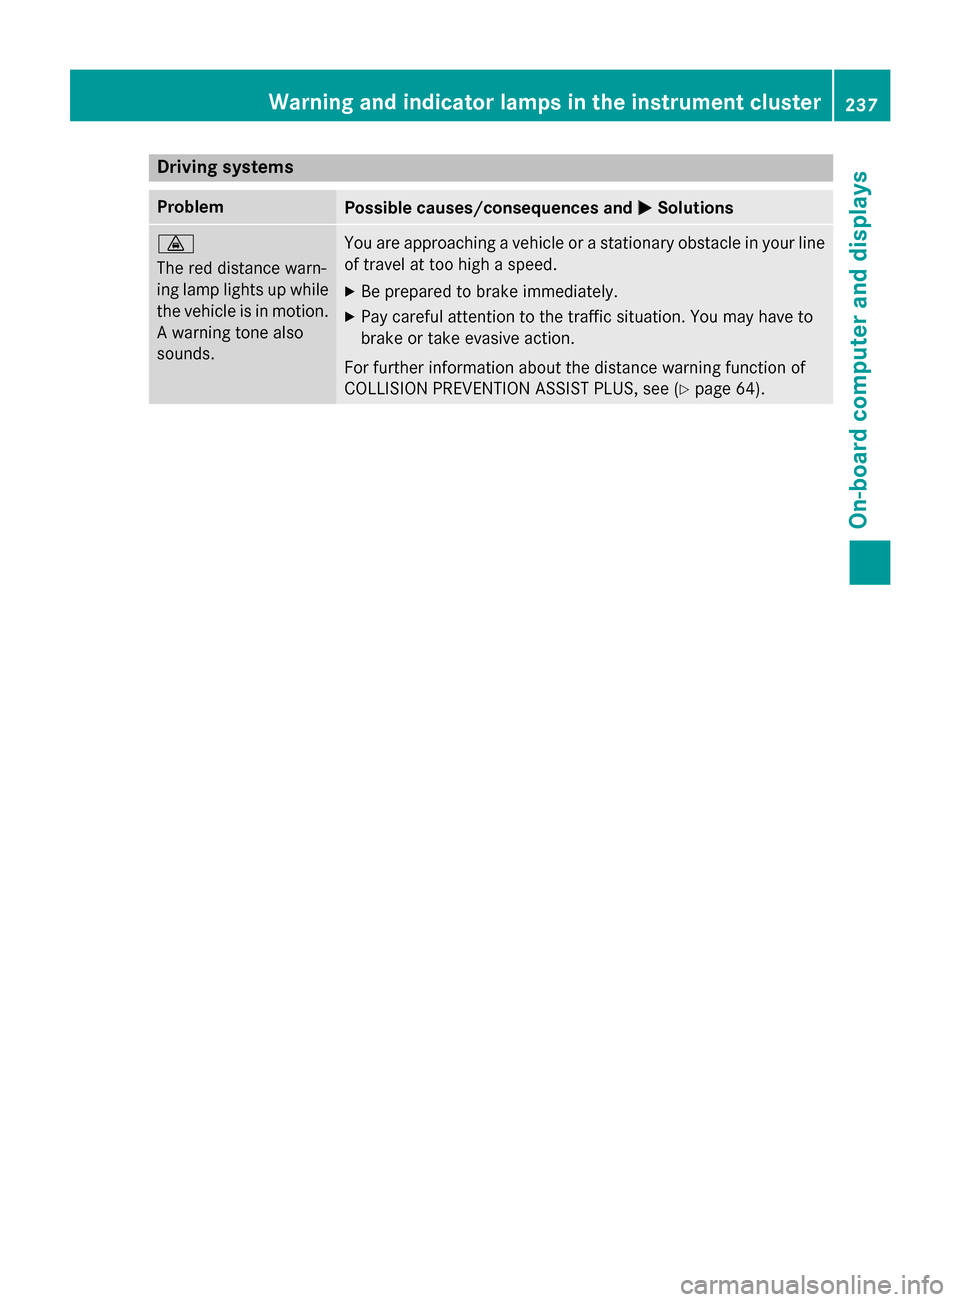
Driving systems
Problem
Possible causes/consequences and
M
MSolutions ·
The red distance warn-
ing lamp lights up while
the vehicle is in motion. A warning tone also
sounds. You are approaching a vehicle or a stationary obstacle in your line
of travel at too high a speed.
X Be prepared to brake immediately.
X Pay careful attention to the traffic situation. You may have to
brake or take evasive action.
For further information about the distance warning function of
COLLISION PREVENTION ASSIST PLUS, see (Y page 64).Wa
rning and indi cator lamps in the instrument cluster
237On-board computer and displays Z
Page 243 of 338
R
Always stow objects so that they cannot be
thrown around in such situations.
R Always make sure that objects do not pro-
trude from stowage spaces, parcel nets or
stowage nets.
R Close the lockable stowage spaces while
driving.
R Stow and secure objects that are heavy,
hard, pointy, sharp-edged, fragile or too
large in the cargo compartment.
Observe the loading guidelines (Y page 240).
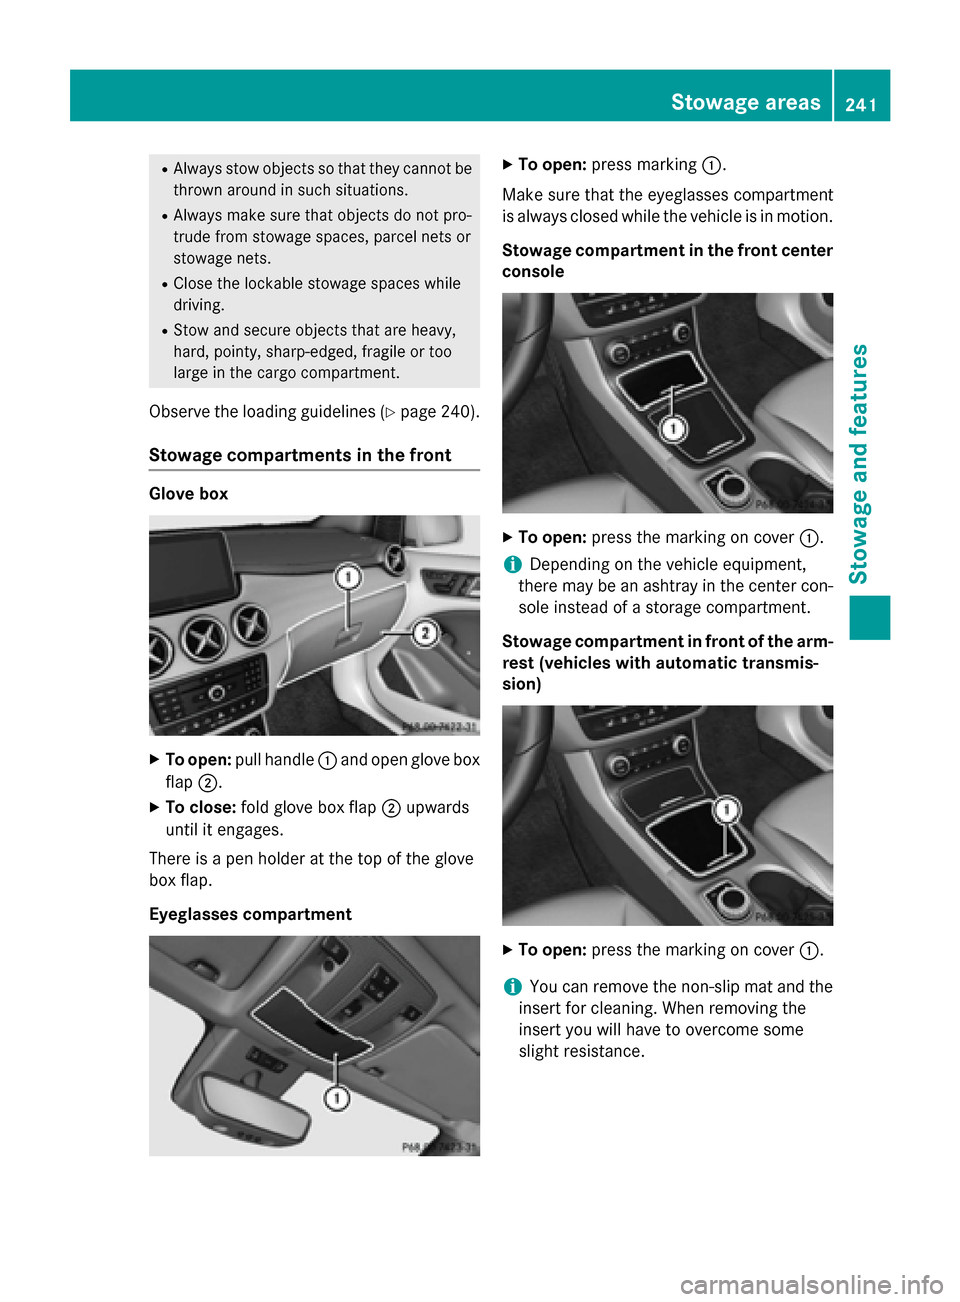
Stowage compartments in the front Glove box
X
To open: pull handle :and open glove box
flap ;.
X To close: fold glove box flap ;upwards
until it engages.
There is a pen holder at the top of the glove
box flap.
Eyeglasses compartment X
To open: press marking :.
Make sure that the eyeglasses compartment
is always closed while the vehicle is in motion.
Stowage compartment in the front centerconsole X
To open: press the marking on cover :.
i Depending on the vehicle equipment,
there may be an ashtray in the center con-
sole instead of a storage compartment.
Stowage compartment in front of the arm-
rest (vehicles with automatic transmis-
sion) X
To open: press the marking on cover :.
i You can remove the non-slip mat and the
insert for cleaning. When removing the
insert you will have to overcome some
slight resistance. Stowage areas
241Stowage an d features Z
Page 247 of 338
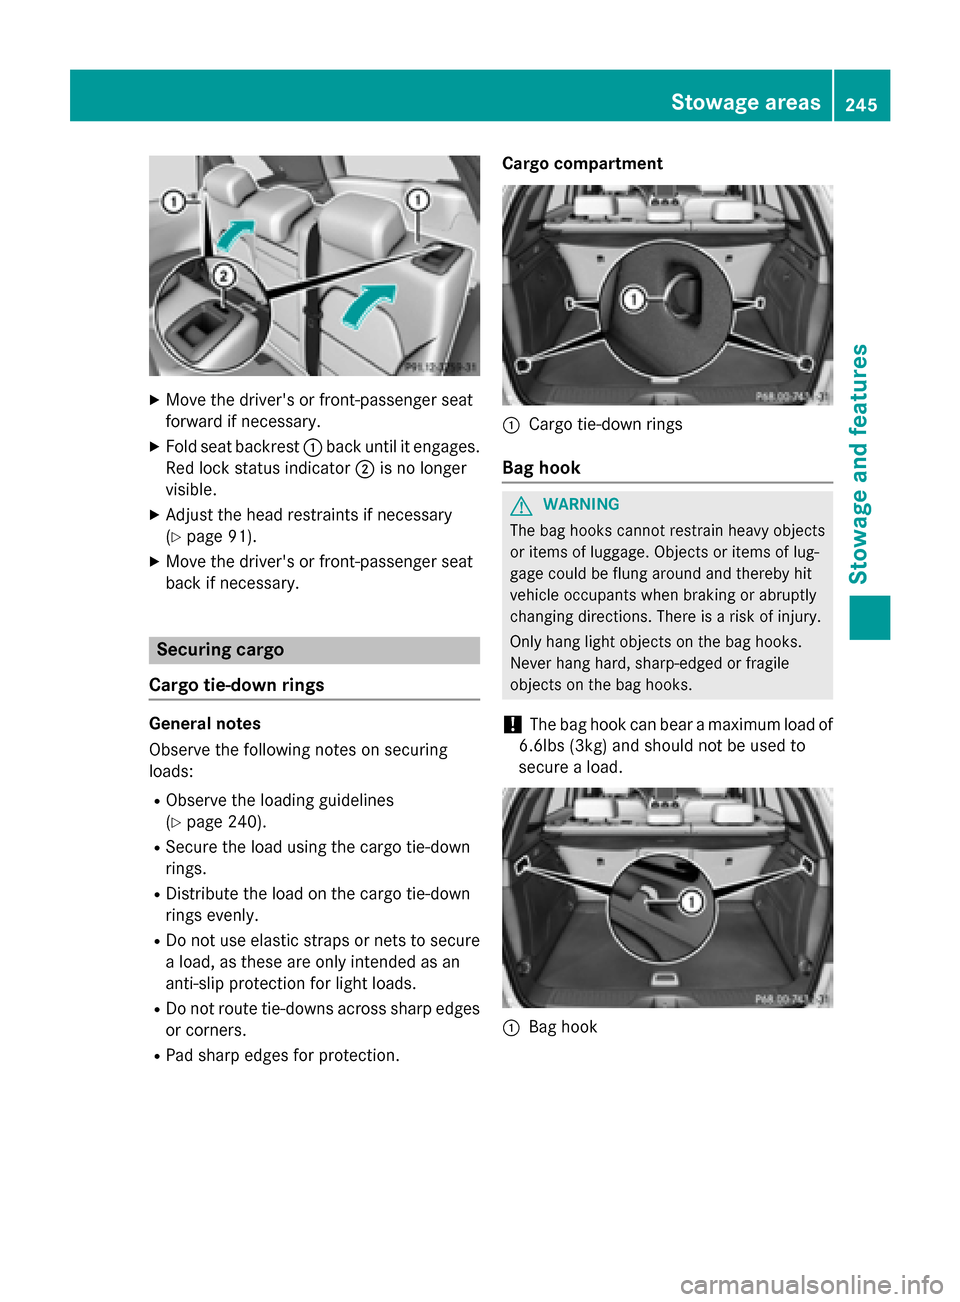
X
Move the driver's or front-passenger seat
forward if necessary.
X Fold seat backrest :back until it engages.
Red lock status indicator ;is no longer
visible.
X Adjust the head restraints if necessary
(Y page 91).
X Move the driver's or front-passenger seat
back if necessary. Securing cargo
Cargo tie-down rings General notes
Observe the following notes on securing
loads:
R Observe the loading guidelines
(Y page 240).
R Secure the load using the cargo tie-down
rings.
R Distribute the load on the cargo tie-down
rings evenly.
R Do not use elastic straps or nets to secure
a load, as these are only intended as an
anti-slip protection for light loads.
R Do not route tie-downs across sharp edges
or corners.
R Pad sharp edges for protection. Cargo compartment
:
Cargo tie-down rings
Bag hook G
WARNING
The bag hooks cannot restrain heavy objects
or items of luggage. Objects or items of lug-
gage could be flung around and thereby hit
vehicle occupants when braking or abruptly
changing directions. There is a risk of injury.
Only hang light objects on the bag hooks.
Never hang hard, sharp-edged or fragile
objects on the bag hooks.
! The bag hook can bear a maximum load of
6.6lbs (3kg) and should not be used to
secure a load. :
Bag hook Stowage areas
245Stowage and features Z
Page 248 of 338
Cargo compartment cover
Important safety notes G
WARNING
On its own, the cargo compartment cover
cannot secure or restrain heavy objects,
items of luggage and heavy loads. You could
be hit by an unsecured load during sudden
changes in direction, braking or in the event of an accident. There is an increased risk of
injury or even fatal injury.
Always store objects so that they cannot be
flung around. Secure objects, luggage or
loads against slipping or tipping over, e.g. by
using tie downs, even if you are using the
cargo compartment cover.
! When loading the vehicle, make sure that
you do not stack the load in the cargo com-
partment higher than the lower edge of the side windows. Do not place heavy objects
on top of the cargo compartment cover.
! When removing and installing the cargo
compartment cover, ensure that its end
caps do not scrape the light-colored parts
of the vehicle.
The cargo compartment cover is located
behind the rear bench seat backrest.
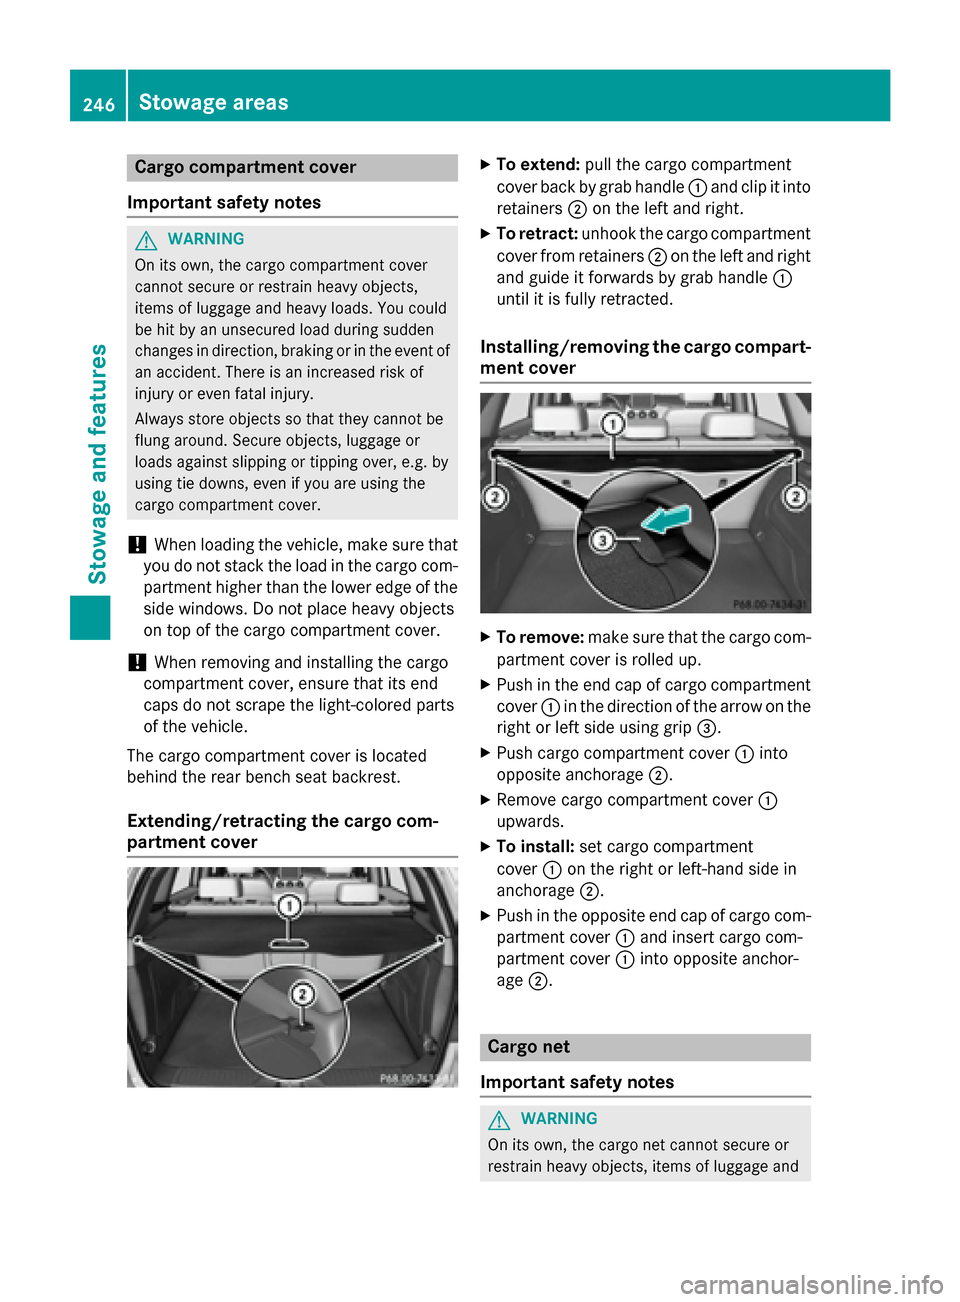
Extending/retracting the cargo com-
partment cover X
To extend: pull the cargo compartment
cover back by grab handle :and clip it into
retainers ;on the left and right.
X To retract: unhook the cargo compartment
cover from retainers ;on the left and right
and guide it forwards by grab handle :
until it is fully retracted.
Installing/removing the cargo compart-
ment cover X
To remove: make sure that the cargo com-
partment cover is rolled up.
X Push in the end cap of cargo compartment
cover :in the direction of the arrow on the
right or left side using grip =.
X Push cargo compartment cover :into
opposite anchorage ;.
X Remove cargo compartment cover :
upwards.
X To install: set cargo compartment
cover :on the right or left-hand side in
anchorage ;.
X Push in the opposite end cap of cargo com-
partment cover :and insert cargo com-
partment cover :into opposite anchor-
age ;. Cargo net
Important safety notes G
WARNING
On its own, the cargo net cannot secure or
restrain heavy objects, items of luggage and 246
Stowage areasStowage and features
Page 251 of 338
floor away so that it engages in the guide on
the upper level.
Cargo compartment floor ;engages in
the upper position.
i Carry out this step using both hands.
X To lower: raise cargo compartment
floor ;slightly using handle :and pull it
towards you.
X Lower cargo compartment floor ;again
slowly. Whilst doing so, press the cargo
compartment floor into the lower level.
Cargo compartment floor ;engages in
the lower position. Roof carrier
Important safety notes G
WARNING
When you load the roof, the center of gravity
of the vehicle rises and the driving character- istics change. If you exceed the maximum roof
load, the driving characteristics, as well as
steering and braking, will be greatly impaired. There is a risk of an accident.
Never exceed the maximum roof load and
adjust your driving style.
You will find information on the maximum roof
load in the "Technical data" section
(Y page 334).
An incorrectly secured roof carrier or roof
load may become detached from the vehicle.
You must therefore ensure that you observe
the roof carrier manufacturer's installation
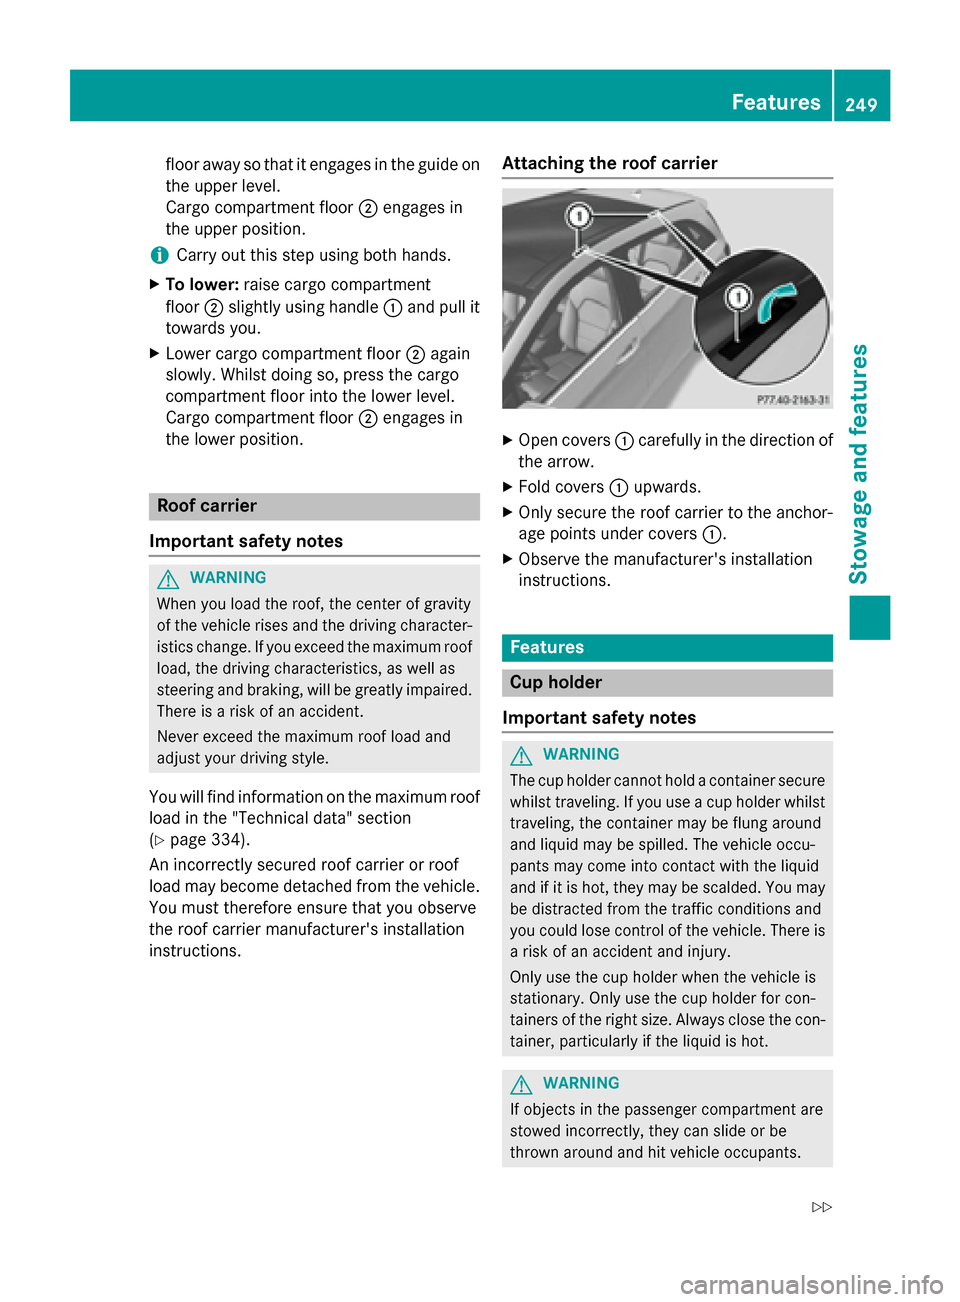
instructions. Attaching the roof carrier X
Open covers :carefully in the direction of
the arrow.
X Fold covers :upwards.
X Only secure the roof carrier to the anchor-
age points under covers :.
X Observe the manufacturer's installation
instructions. Features
Cup holder
Important safety notes G
WARNING
The cup holder cannot hold a container secure whilst traveling. If you use a cup holder whilsttraveling, the container may be flung around
and liquid may be spilled. The vehicle occu-
pants may come into contact with the liquid
and if it is hot, they may be scalded. You may
be distracted from the traffic conditions and
you could lose control of the vehicle. There is a risk of an accident and injury.
Only use the cup holder when the vehicle is
stationary. Only use the cup holder for con-
tainers of the right size. Always close the con-
tainer, particularly if the liquid is hot. G
WARNING
If objects in the passenger compartment are
stowed incorrectly, they can slide or be
thrown around and hit vehicle occupants. Features
249Stowage and features
Z