2015 MERCEDES-BENZ B-Class ELECTRIC change wheel
[x] Cancel search: change wheelPage 24 of 338
the Service and Guarantee booklet or simply
call the Mercedes-Benz Customer Assistance
Center (USA) at the hotline number
1-800-FOR-MERCede s(1-800-367-6372 )or
Customer Service (Canada) at
1-800-387-0100. Vehicle operation outside the USA
If you drive your vehicle abroad, please note
that service facilities or replacement parts
may not be immediately available.
Some Mercedes-Benz models are available
for delivery in Europe through our European
Delivery Program. Please consult an author-
ized Mercedes-Benz Center for further infor-
mation, or write to the following address:
Mercedes-Benz USA, LLC
European Delivery Department
One Mercedes Drive
Montvale, NJ 07645-0350 Operating safety
Important safety notes
Important safety notes G
WARNING
If you do not have the prescribed service/
maintenance work or any required repairs
carried out, this can result in malfunctions or system failures. There is a risk of an accident.
Always have the prescribed service/mainte-
nance work as well as any required repairs
carried out at a qualified specialist workshop. G
WARNING
If you switch off the ignition while driving,
safety-relevant functions are only available
with limitations, or not at all. This could affect, for example, the power steering and the brake
boosting effect. You will require considerably
more effort to steer and brake. There is a risk of an accident. Do not switch off the ignition while driving.
G
WARNING
Modifications to electronic components, their software as well as wiring can impair their
function and/or the function of other net-
worked components. In particular, systems
relevant to safety could also be affected. As a
result, these may no longer function as inten-
ded and/or jeopardize the operating safety of
the vehicle. There is an increased risk of an
accident and injury.
Never tamper with the wiring as well as elec-
tronic components or their software. You
should have all work to electrical and elec-
tronic equipment carried out at a qualified
specialist workshop.
! There is a risk of damage to the vehicle if:
R the vehicle becomes stuck, e.g. on a high
curb or an unpaved road
R you drive too fast over an obstacle, e.g. a
curb or a hole in the road
R a heavy object strikes the undercarriage
or parts of the chassis
In situations like this, the body, the under-
carriage, chassis parts, wheels or tires
could be damaged without the damage
being visible. Components damaged in this
way can unexpectedly fail or, in the case of
an accident, no longer withstand the strain
they are designed to.
In such situations, have the vehicle
checked and repaired immediately at a
qualified specialist workshop. If on con-
tinuing your journey you notice that driving safety is impaired, pull over and stop the
vehicle immediately, paying attention to
road and traffic conditions. In such cases,
consult a qualified specialist workshop.
If you make changes to electronic compo-
nents, their software or wiring, the general
operating permit for your vehicle may be ren- dered invalid. 22
Introduction
Page 95 of 338
Problems with the seat heating
Problem
Possible causes/consequences and
M
MSolutions The seat heating has
switched off prema-
turely or cannot be
switched on. The on-board voltage is too low because too many electrical con-
sumers are switched on.
X Switch off electrical consumers that you do not need, such as
the rear window defroster or interior lighting.
Once the battery is sufficiently charged, the seat heating will
switch back on automatically. Steering wheel
Important safety notes
G
WARNING
You could lose control of your vehicle if you do the following while driving:
R adjust the driver's seat, head restraint,
steering wheel or mirrors
R fasten the seat belt
There is a risk of an accident.
Adjust the driver's seat, head restraint, steer-
ing wheel and mirror and fasten your seat belt before starting the vehicle's drive system. G
WARNING
Children could injure themselves if they
adjust the steering wheel. There is a risk of
injury.
When leaving the vehicle, always take the
SmartKey with you and lock the vehicle. Never leave children unsupervised in the vehicle. Adjusting the steering wheel
G
WARNING
If the steering wheel is unlocked while the
vehicle is in motion, it could change position
unexpectedly. This could cause you to lose
control of the vehicle. There is a risk of an
accident. Before starting off, make sure the steering
wheel is locked. Never unlock the steering
wheel while the vehicle is in motion.
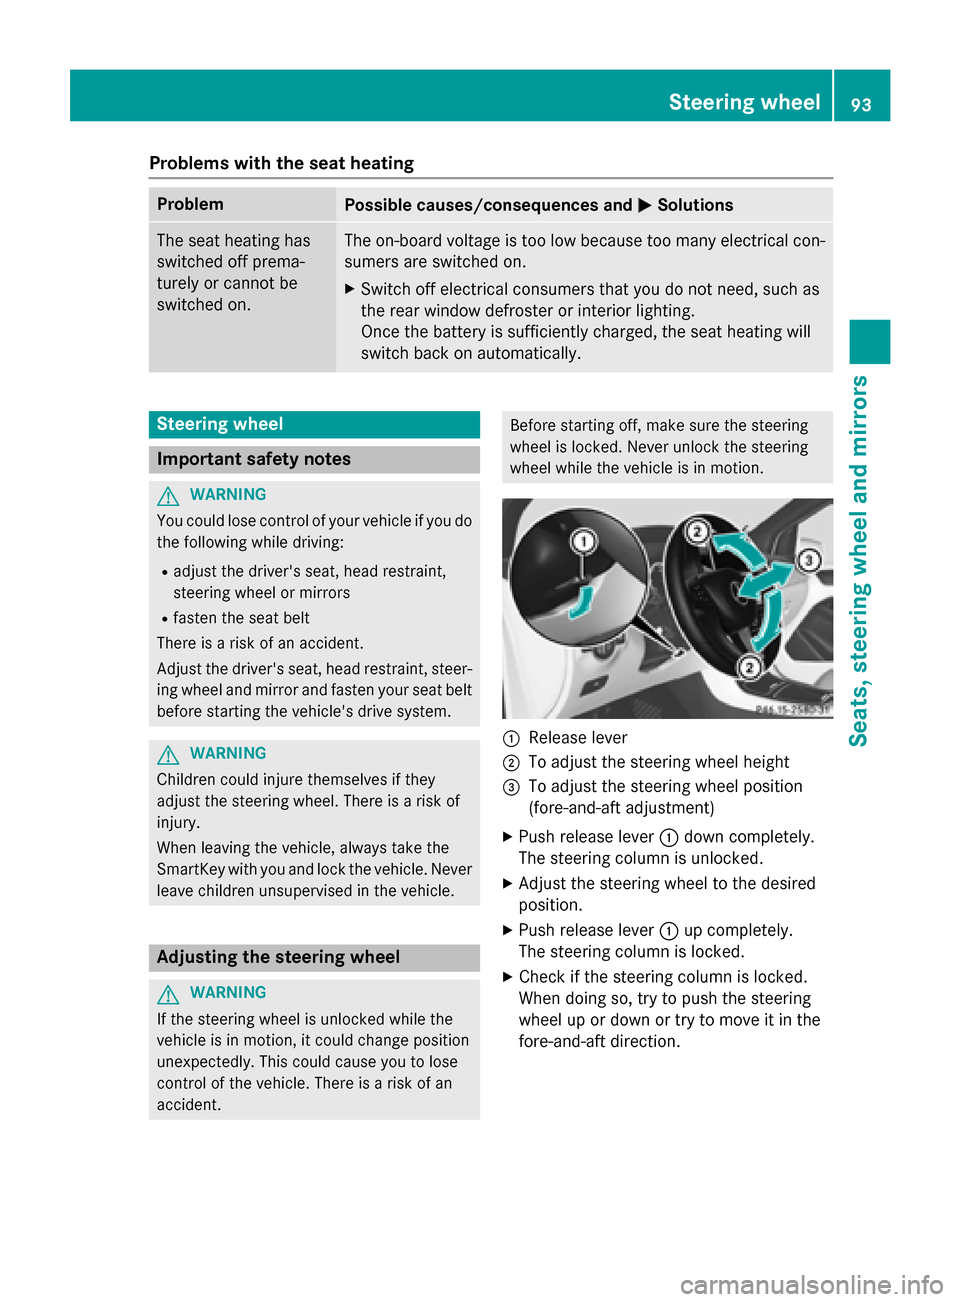
:
Release lever
; To adjust the steering wheel height
= To adjust the steering wheel position
(fore-and-aft adjustment)
X Push release lever :down completely.
The steering column is unlocked.
X Adjust the steering wheel to the desired
position.
X Push release lever :up completely.
The steering column is locked.
X Check if the steering column is locked.
When doing so, try to push the steering
wheel up or down or try to move it in the
fore-and-aft direction. Steering wheel
93Seats, steering wheel and mirrors Z
Page 97 of 338
Automatic anti-glare mirrors
G
WARNING
Electrolyte may escape if the glass in an auto- matic anti-glare mirror breaks. The electrolyte
is harmful and causes irritation. It must not
come into contact with your skin, eyes, res-
piratory organs or clothing or be swallowed.
There is a risk of injury.
If you come into contact with the electrolyte,
observe the following:
R Rinse off the electrolyte from your skin
immediately with water.
R Immediately rinse the electrolyte out of
your eyes thoroughly with clean water.
R If the electrolyte is swallowed, immediately
rinse your mouth out thoroughly. Do not
induce vomiting.
R If electrolyte comes into contact with your
skin or hair or is swallowed, seek medical
attention immediately.
R Immediately change out of clothing which
has come into contact with electrolyte.
R If an allergic reaction occurs, seek medical
attention immediately.
The "Automatic anti-glare mirrors" function is
only available if the vehicle is equipped with
the "Mirrors package".
The rear-view mirror and the exterior mirror
on the driver's side automatically go into anti-
glare mode if:
R the ignition is switched on and
R incident light from headlamps strikes the
sensor in the rear-view mirror
The mirrors do not go into anti-glare mode if
reverse gear is engaged or the interior lighting is switched on. Parking position for the exterior mir-
ror on the front-passenger side
General notes The "Parking position of the exterior mirror on
the front-passenger side" function is only
available if the vehicle is equipped with the
"Mirrors package".
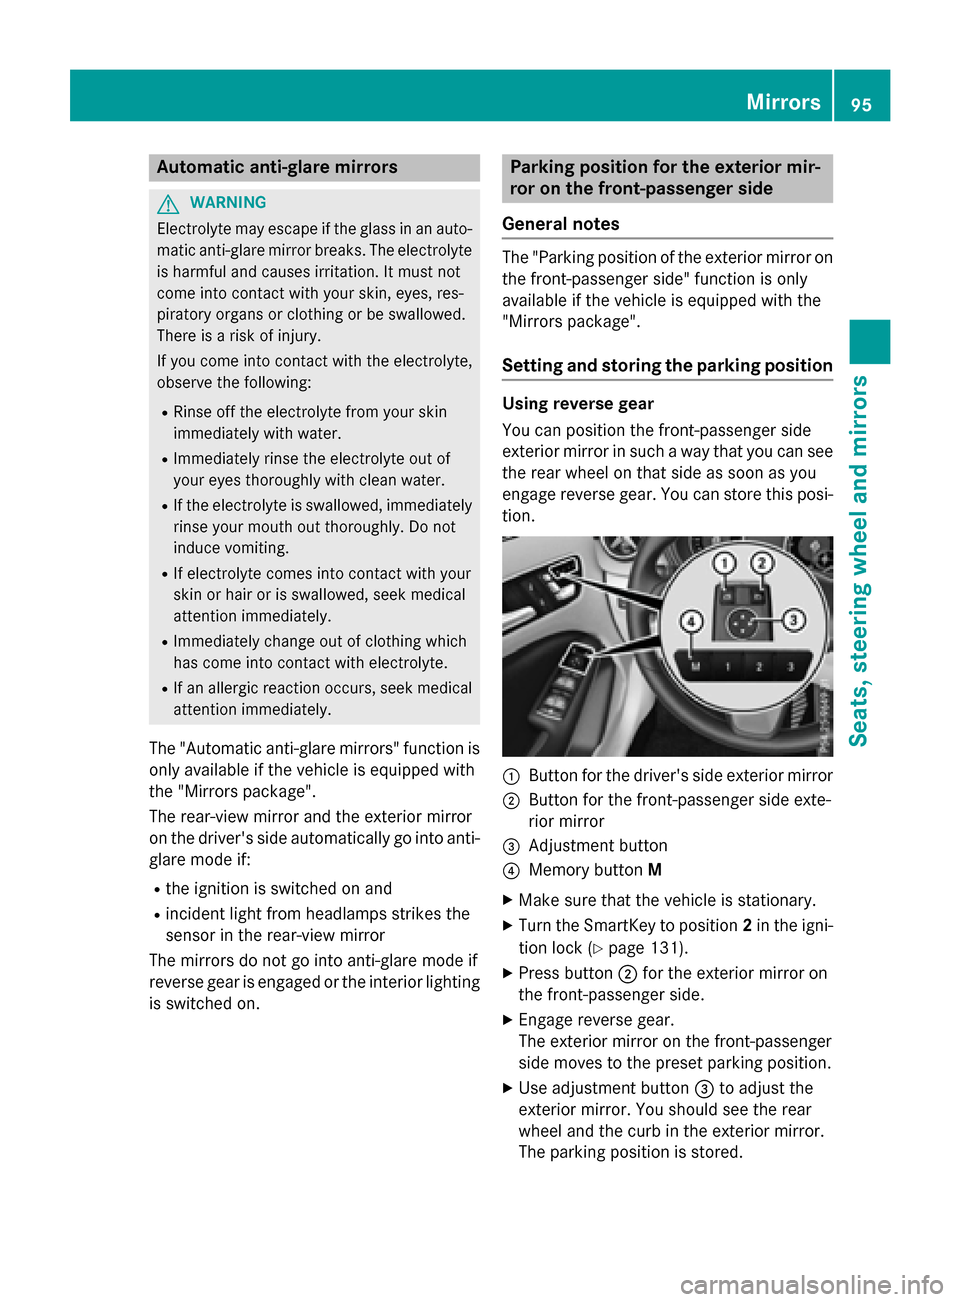
Setting and storing the parking position Using reverse gear
You can position the front-passenger side
exterior mirror in such a way that you can see
the rear wheel on that side as soon as you
engage reverse gear. You can store this posi-
tion. :
Button for the driver's side exterior mirror
; Button for the front-passenger side exte-
rior mirror
= Adjustment button
? Memory button M
X Make sure that the vehicle is stationary.
X Turn the SmartKey to position 2in the igni-
tion lock (Y page 131).
X Press button ;for the exterior mirror on
the front-passenger side.
X Engage reverse gear.
The exterior mirror on the front-passenger
side moves to the preset parking position.
X Use adjustment button =to adjust the
exterior mirror. You should see the rear
wheel and the curb in the exterior mirror.
The parking position is stored. Mirrors
95Seats, steering wheel and mirrors Z
Page 105 of 338
Cornering light function
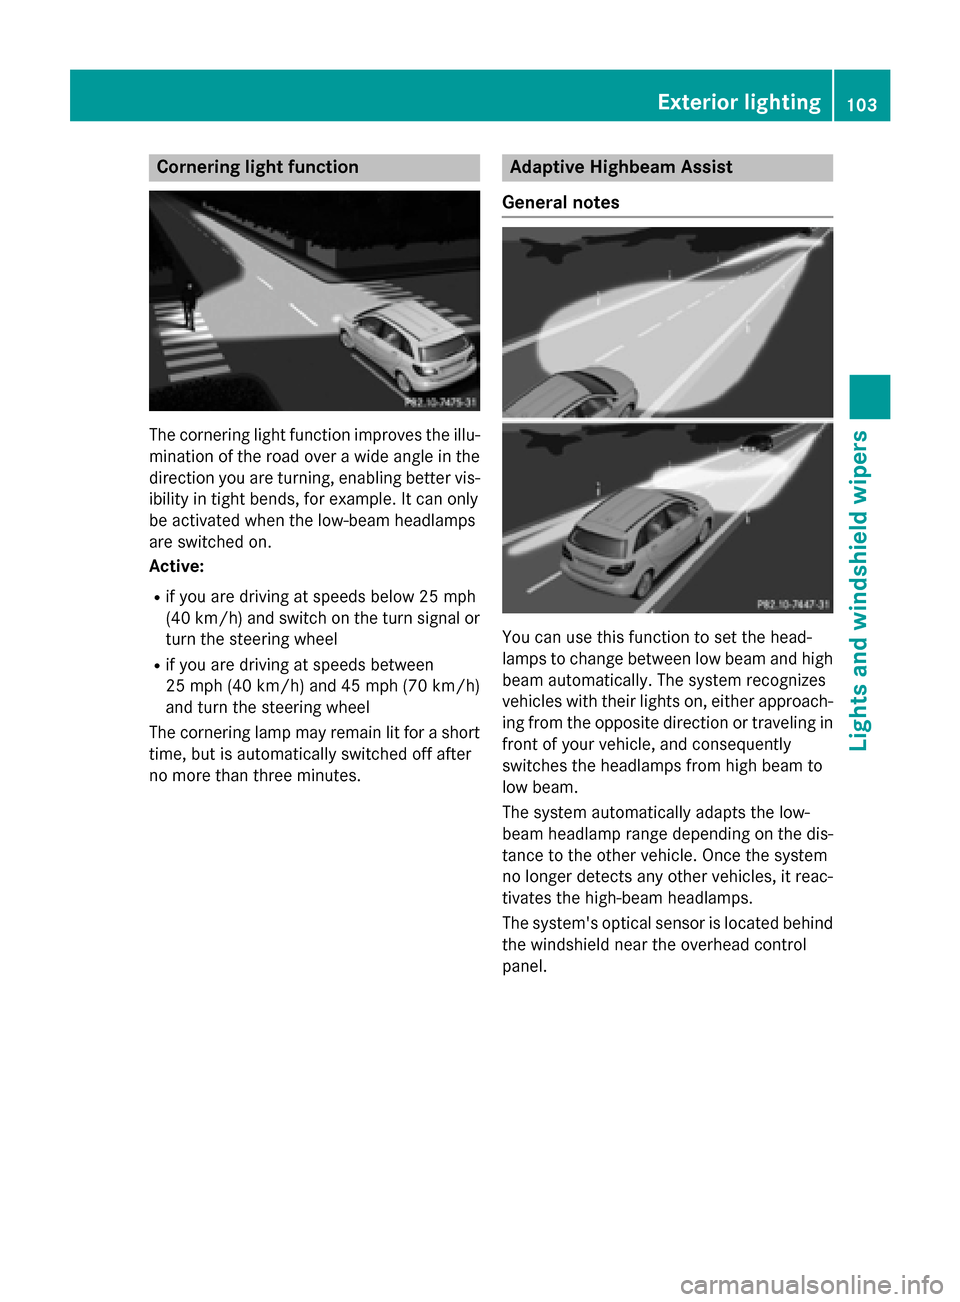
The cornering light function improves the illu-
mination of the road over a wide angle in the direction you are turning, enabling better vis-
ibility in tight bends, for example. It can only
be activated when the low-beam headlamps
are switched on.
Active:
R if you are driving at speeds below 25 mph
(40 km/h) and switch on the turn signal or
turn the steering wheel
R if you are driving at speeds between
25 mph (40 km/ h)and 45 mph (70 km/h)
and turn the steering wheel
The cornering lamp may remain lit for a short
time, but is automatically switched off after
no more than three minutes. Adaptive Highbeam Assist
General notes You can use this function to set the head-
lamps to change between low beam and high beam automatically. The system recognizes
vehicles with their lights on, either approach-
ing from the opposite direction or traveling in front of your vehicle, and consequently
switches the headlamps from high beam to
low beam.
The system automatically adapts the low-
beam headlamp range depending on the dis-
tance to the other vehicle. Once the system
no longer detects any other vehicles, it reac-
tivates the high-beam headlamps.
The system's optical sensor is located behind
the windshield near the overhead control
panel. Exterior lighting
103Lights and windshield wipers Z
Page 109 of 338
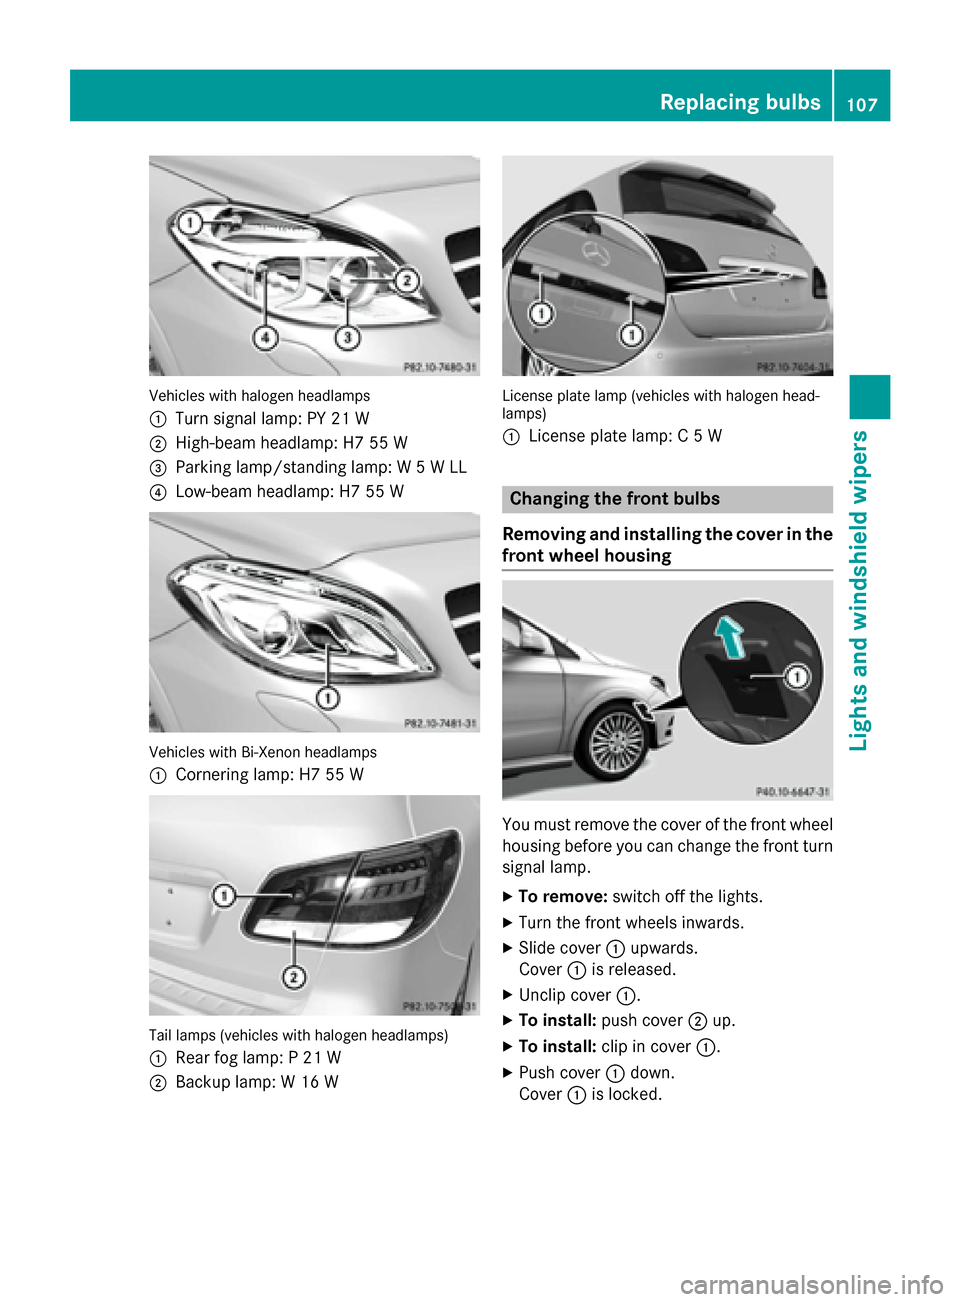
Vehicles with halogen headlamps
:
Turn signal lamp: PY 21 W
; High-beam headlamp: H7 55 W
= Parking lamp/standing lamp: W 5 W LL
? Low-beam headlamp: H7 55 W Vehicles with Bi-Xenon headlamps
:
Cornering lamp: H7 55 W Tail lamps (vehicles with halogen headlamps)
: Rear fog lamp: P 21 W
; Backup lamp: W 16 W License plate lamp (vehicles with halogen head-
lamps)
:
License plate lamp: C 5 W Changing the front bulbs
Removing and installing the cover in the
front wheel housing You must remove the cover of the front wheel
housing before you can change the front turn signal lamp.
X To remove: switch off the lights.
X Turn the front wheels inwards.
X Slide cover :upwards.
Cover :is released.
X Unclip cover :.
X To install: push cover ;up.
X To install: clip in cover :.
X Push cover :down.
Cover :is locked. Replacing bulbs
107Lights and windshield wipers Z
Page 122 of 338
Problems with the "Cooling with air dehumidification" function
Problem
Possible causes/consequences and
M
MSolutions The indicator lamp in
the
¿ button
flashes three times or
remains off. The "Cool-
ing with air dehumidifi-
cation" function cannot
be switched on. Cooling with air dehumidification has been deactivated due to a
malfunction.
X Visit a qualified specialist workshop. Setting climate control to automatic
General notes In automatic mode, the set temperature is
maintained automatically at a constant level.
The system automatically regulates the tem-
perature of the dispensed air, the airflow and
the air distribution.
The automatic mode functions optimally
when the "Cooling with air dehumidification"
function is activated. If necessary, cooling
with air dehumidification can be deactivated.
If you deactivate the "Cooling with air-dehu-
midification" function, the air inside the vehi-
cle will not be cooled. The air inside the vehi- cle will also not be dehumidified. The win-
dows can fog up more quickly. Therefore, only deactivate the "Cooling with air-dehumidifi-
cation" function briefly.
Setting climate control to automatic X
Turn the SmartKey to position 2in the igni-
tion lock (Y page 131).
X Set the desired temperature.
X To activate: press theÃbutton.
The indicator lamp in the Ãbutton lights
up. Automatic air distribution and airflow
are activated. X
To switch to manual mode: press the
É orË button.
or X Press the KorI button.
The indicator lamp in the Ãbutton goes
out. Automatic air distribution and airflow
are deactivated. Setting the temperature
Different temperatures can be set for the
driver's and front-passenger sides. The set
temperature is automatically maintained at a
constant level.
X Turn the SmartKey to position 2in the igni-
tion lock (Y page 131).
X To increase/reduce: turn thumbwheel:
or E counter-clockwise or clockwise. Only
change the temperature setting in small
increments. Start at 72 ‡ (22 †). Setting the air distribution
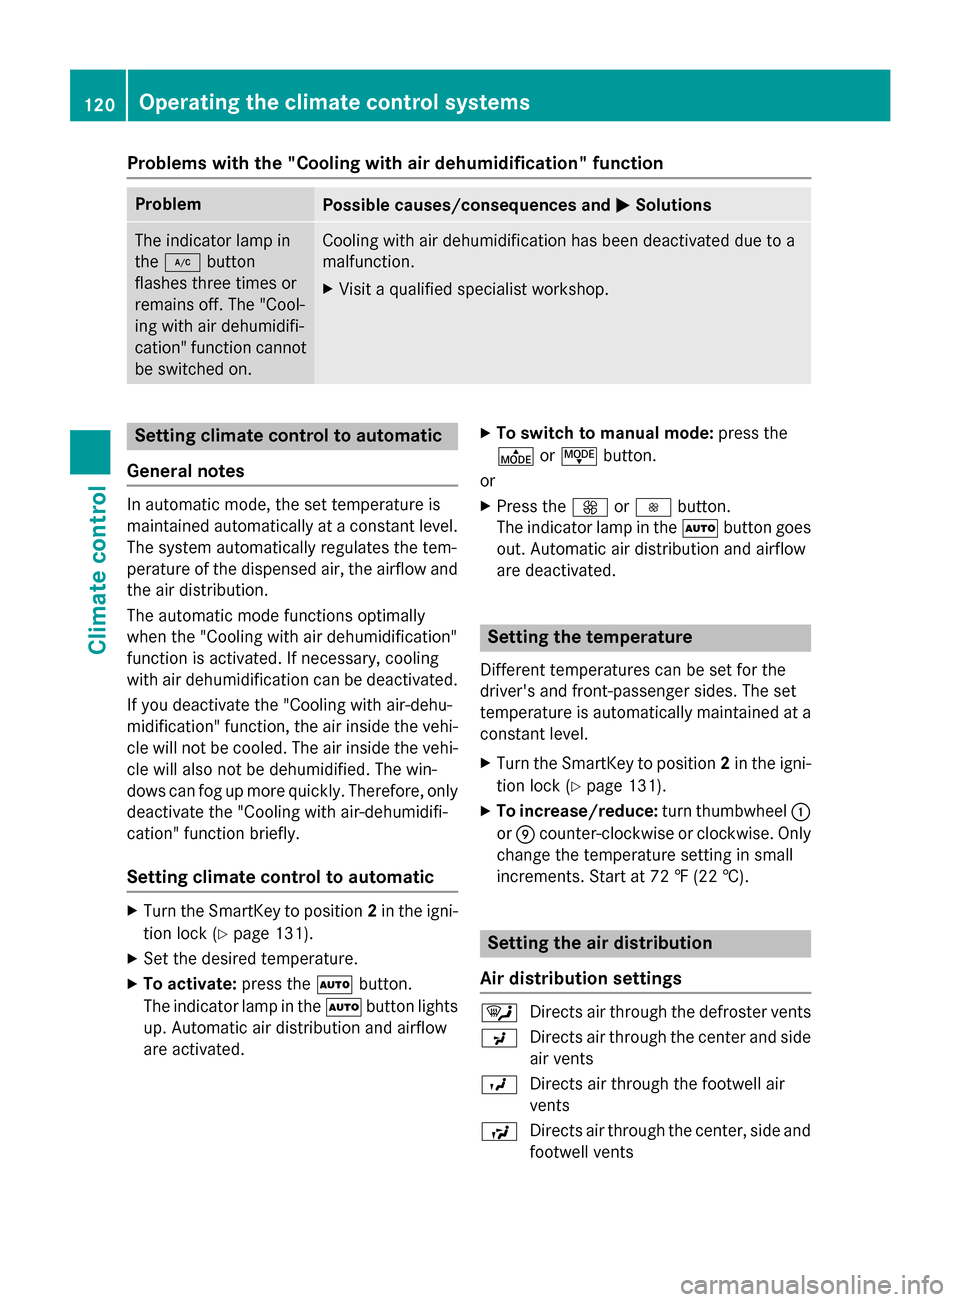
Air distribution settings ¯
Directs air through the defroster vents
P Directs air through the center and side
air vents
O Directs air through the footwell air
vents
S Directs air through the center, side and
footwell vents 120
Operating the climate control systemsClimate control
Page 141 of 338
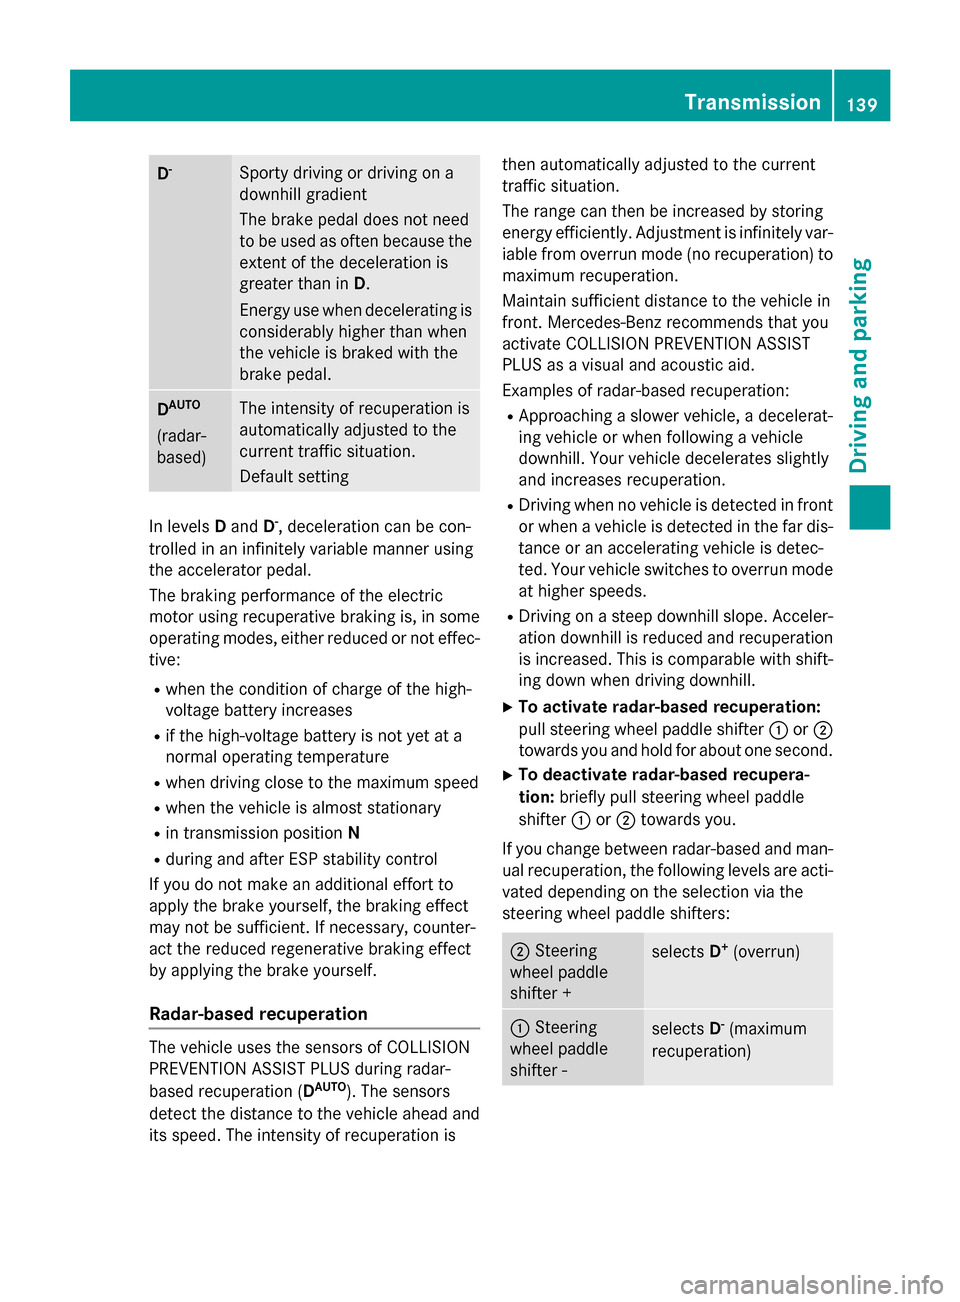
D
- Sporty driving or driving on a
downhill gradient
The brake pedal does not need
to be used as often because the
extent of the deceleration is
greater than in D.
Energy use when decelerating is
considerably higher than when
the vehicle is braked with the
brake pedal. D
AUTO
(radar-
based) The intensity of recuperation is
automatically adjusted to the
current traffic situation.
Default setting
In levels
Dand D-
, deceleration can be con-
trolled in an infinitely variable manner using
the accelerator pedal.
The braking performance of the electric
motor using recuperative braking is, in some
operating modes, either reduced or not effec-
tive:
R when the condition of charge of the high-
voltage battery increases
R if the high-voltage battery is not yet at a
normal operating temperature
R when driving close to the maximum speed
R when the vehicle is almost stationary
R in transmission position N
R during and after ESP stability control
If you do not make an additional effort to
apply the brake yourself, the braking effect
may not be sufficient. If necessary, counter-
act the reduced regenerative braking effect
by applying the brake yourself.
Radar-based recuperation The vehicle uses the sensors of COLLISION
PREVENTION ASSIST PLUS during radar-
based recuperation (D
AUTO
). The sensors
detect the distance to the vehicle ahead and
its speed. The intensity of recuperation is then automatically adjusted to the current
traffic situation.
The range can then be increased by storing
energy efficiently. Adjustment is infinitely var-
iable from overrun mode (no recuperation) to maximum recuperation.
Maintain sufficient distance to the vehicle in
front. Mercedes-Benz recommends that you
activate COLLISION PREVENTION ASSIST
PLUS as a visual and acoustic aid.
Examples of radar-based recuperation:
R Approaching a slower vehicle, a decelerat-
ing vehicle or when following a vehicle
downhill. Your vehicle decelerates slightly
and increases recuperation.
R Driving when no vehicle is detected in front
or when a vehicle is detected in the far dis- tance or an accelerating vehicle is detec-
ted. Your vehicle switches to overrun mode
at higher speeds.
R Driving on a steep downhill slope. Acceler-
ation downhill is reduced and recuperation is increased. This is comparable with shift-
ing down when driving downhill.
X To activate radar-based recuperation:
pull steering wheel paddle shifter :or;
towards you and hold for about one second.
X To deactivate radar-based recupera-
tion: briefly pull steering wheel paddle
shifter :or; towards you.
If you change between radar-based and man- ual recuperation, the following levels are acti-
vated depending on the selection via the
steering wheel paddle shifters: ;
Steering
wheel paddle
shifter + selects
D+
(overrun) :
Steering
wheel paddle
shifter - selects
D-
(maximum
recuperation) Transmission
139Driving and parking Z
Page 160 of 338
The ECO display does not indicate the actual
fuel consumption. A fixed percentage count
in the ECO display does not indicate a fixed
consumption.
Apart from driving style, consumption is
dependent on many factors such as, e.g.:
R load
R tire pressure
R cold start
R choice of route
R electrical consumers switched on
These factors are not included in the ECO dis-
play.
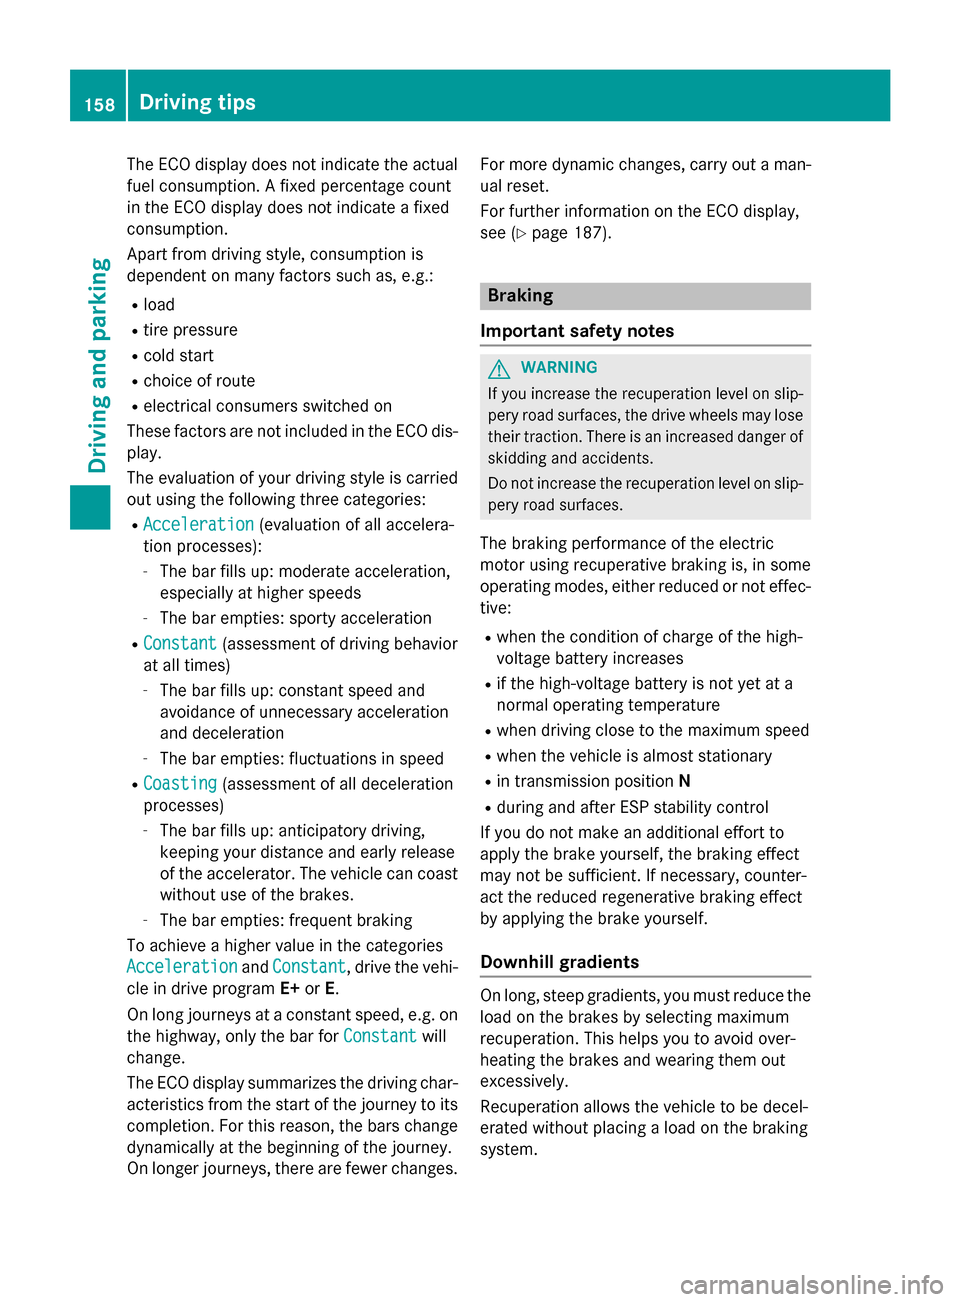
The evaluation of your driving style is carried
out using the following three categories:
R Acceleration
Acceleration (evaluation of all accelera-
tion processes):
- The bar fills up: moderate acceleration,
especially at higher speeds
- The bar empties: sporty acceleration
R Constant
Constant (assessment of driving behavior
at all times)
- The bar fills up: constant speed and
avoidance of unnecessary acceleration
and deceleration
- The bar empties: fluctuations in speed
R Coasting
Coasting (assessment of all deceleration
processes)
- The bar fills up: anticipatory driving,
keeping your distance and early release
of the accelerator. The vehicle can coast
without use of the brakes.
- The bar empties: frequent braking
To achieve a higher value in the categories
Acceleration Acceleration andConstant
Constant, drive the vehi-
cle in drive program E+orE.
On long journeys at a constant speed, e.g. on
the highway, only the bar for Constant
Constantwill
change.
The ECO display summarizes the driving char- acteristics from the start of the journey to its completion. For this reason, the bars change
dynamically at the beginning of the journey.
On longer journeys, there are fewer changes. For more dynamic changes, carry out a man-
ual reset.
For further information on the ECO display,
see (Y page 187). Braking
Important safety notes G
WARNING
If you increase the recuperation level on slip- pery road surfaces, the drive wheels may lose
their traction. There is an increased danger of skidding and accidents.
Do not increase the recuperation level on slip-
pery road surfaces.
The braking performance of the electric
motor using recuperative braking is, in some
operating modes, either reduced or not effec- tive:
R when the condition of charge of the high-
voltage battery increases
R if the high-voltage battery is not yet at a
normal operating temperature
R when driving close to the maximum speed
R when the vehicle is almost stationary
R in transmission position N
R during and after ESP stability control
If you do not make an additional effort to
apply the brake yourself, the braking effect
may not be sufficient. If necessary, counter-
act the reduced regenerative braking effect
by applying the brake yourself.
Downhill gradients On long, steep gradients, you must reduce the
load on the brakes by selecting maximum
recuperation. This helps you to avoid over-
heating the brakes and wearing them out
excessively.
Recuperation allows the vehicle to be decel-
erated without placing a load on the braking
system. 158
Driving tipsDriving and parking