Page 137 of 220
4. Turn “Show Notifications” to On.
Android Devices
1. Push the Menu button on the mobile phone.
2. Select Settings.
3. Select Connections.
4. Turn “Show Notifications” to On.
• A pop up will appear asking you to accept a request for permission to connect
to your messages. Select “Don’t ask again” and press OK.
NOTE:
All incoming text messages received dur-
ing the current ignition cycle will be de-
leted from the Uconnect®system when
the ignition is turned to the Off position.
Enable iPhone® Incoming Text Messages
Enable Android Device Incoming TextMessages
ELECTRONICS
135
Page 138 of 220

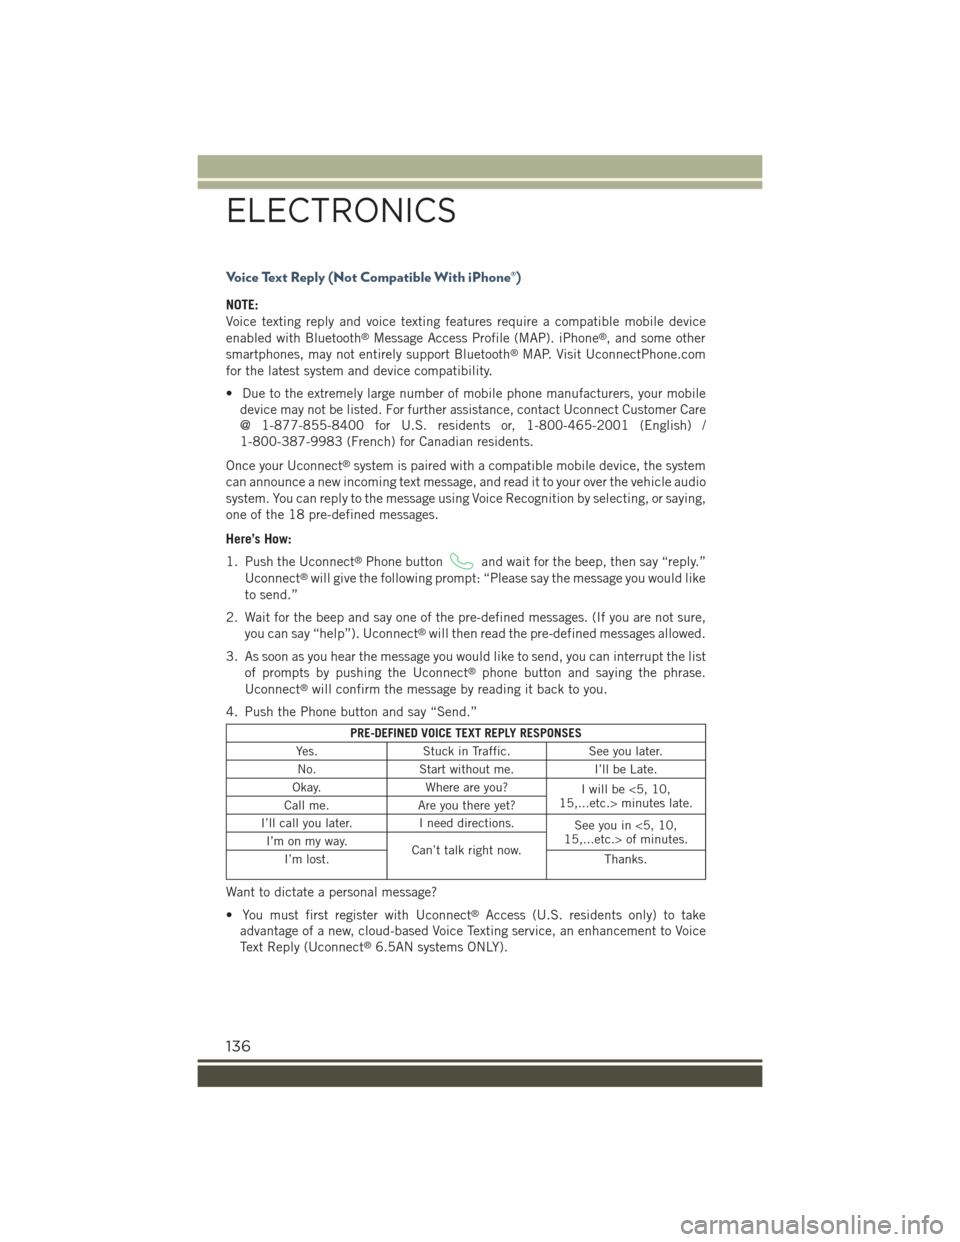
Voice Text Reply (Not Compatible With iPhone®)
NOTE:
Voice texting reply and voice texting features require a compatible mobile device
enabled with Bluetooth®Message Access Profile (MAP). iPhone®, and some other
smartphones, may not entirely support Bluetooth®MAP. Visit UconnectPhone.com
for the latest system and device compatibility.
• Due to the extremely large number of mobile phone manufacturers, your mobile
device may not be listed. For further assistance, contact Uconnect Customer Care
@ 1-877-855-8400 for U.S. residents or, 1-800-465-2001 (English) /
1-800-387-9983 (French) for Canadian residents.
Once your Uconnect®system is paired with a compatible mobile device, the system
can announce a new incoming text message, and read it to your over the vehicle audio
system. You can reply to the message using Voice Recognition by selecting, or saying,
one of the 18 pre-defined messages.
Here’s How:
1. Push the Uconnect®Phone buttonand wait for the beep, then say “reply.”
Uconnect®will give the following prompt: “Please say the message you would like
to send.”
2. Wait for the beep and say one of the pre-defined messages. (If you are not sure,
you can say “help”). Uconnect®will then read the pre-defined messages allowed.
3. As soon as you hear the message you would like to send, you can interrupt the list
of prompts by pushing the Uconnect®phone button and saying the phrase.
Uconnect®will confirm the message by reading it back to you.
4. Push the Phone button and say “Send.”
PRE-DEFINED VOICE TEXT REPLY RESPONSES
Yes.Stuck in Traffic.See you later.
No.Start without me.I’ll be Late.
Okay.Where are you?Iwillbe<5,10,15,...etc.> minutes late.Call me.Are you there yet?
I’ll call you later.I need directions.See you in <5, 10,15,...etc.> of minutes.I’m on my way.Can’t talk right now.I’m lost.Thanks.
Want to dictate a personal message?
• You must first register with Uconnect®Access (U.S. residents only) to take
advantage of a new, cloud-based Voice Texting service, an enhancement to Voice
Text Reply (Uconnect®6.5AN systems ONLY).
ELECTRONICS
136
Page 139 of 220

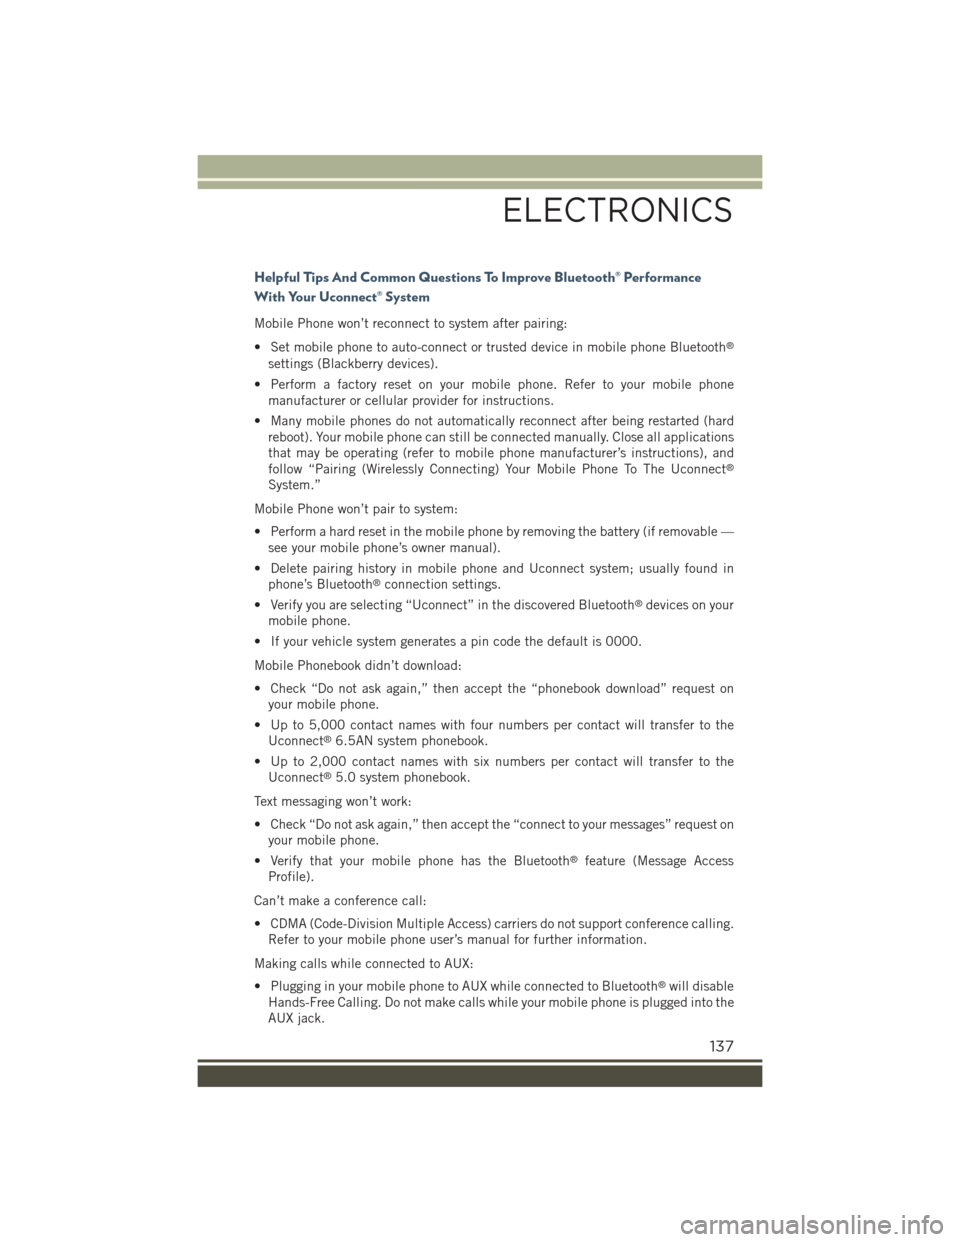
Helpful Tips And Common Questions To Improve Bluetooth® Performance
With Your Uconnect® System
Mobile Phone won’t reconnect to system after pairing:
• Set mobile phone to auto-connect or trusted device in mobile phone Bluetooth®
settings (Blackberry devices).
• Perform a factory reset on your mobile phone. Refer to your mobile phone
manufacturer or cellular provider for instructions.
• Many mobile phones do not automatically reconnect after being restarted (hard
reboot). Your mobile phone can still be connected manually. Close all applications
that may be operating (refer to mobile phone manufacturer’s instructions), and
follow “Pairing (Wirelessly Connecting) Your Mobile Phone To The Uconnect®
System.”
Mobile Phone won’t pair to system:
• Perform a hard reset in the mobile phone by removing the battery (if removable —
see your mobile phone’s owner manual).
• Delete pairing history in mobile phone and Uconnect system; usually found in
phone’s Bluetooth®connection settings.
• Verify you are selecting “Uconnect” in the discovered Bluetooth®devices on your
mobile phone.
• If your vehicle system generates a pin code the default is 0000.
Mobile Phonebook didn’t download:
• Check “Do not ask again,” then accept the “phonebook download” request on
your mobile phone.
• Up to 5,000 contact names with four numbers per contact will transfer to the
Uconnect®6.5AN system phonebook.
• Up to 2,000 contact names with six numbers per contact will transfer to the
Uconnect®5.0 system phonebook.
Text messaging won’t work:
• Check “Do not ask again,” then accept the “connect to your messages” request on
your mobile phone.
• Verify that your mobile phone has the Bluetooth®feature (Message Access
Profile).
Can’t make a conference call:
• CDMA (Code-Division Multiple Access) carriers do not support conference calling.
Refer to your mobile phone user’s manual for further information.
Making calls while connected to AUX:
• Plugging in your mobile phone to AUX while connected to Bluetooth®will disable
Hands-Free Calling. Do not make calls while your mobile phone is plugged into the
AUX jack.
ELECTRONICS
137
Page 140 of 220

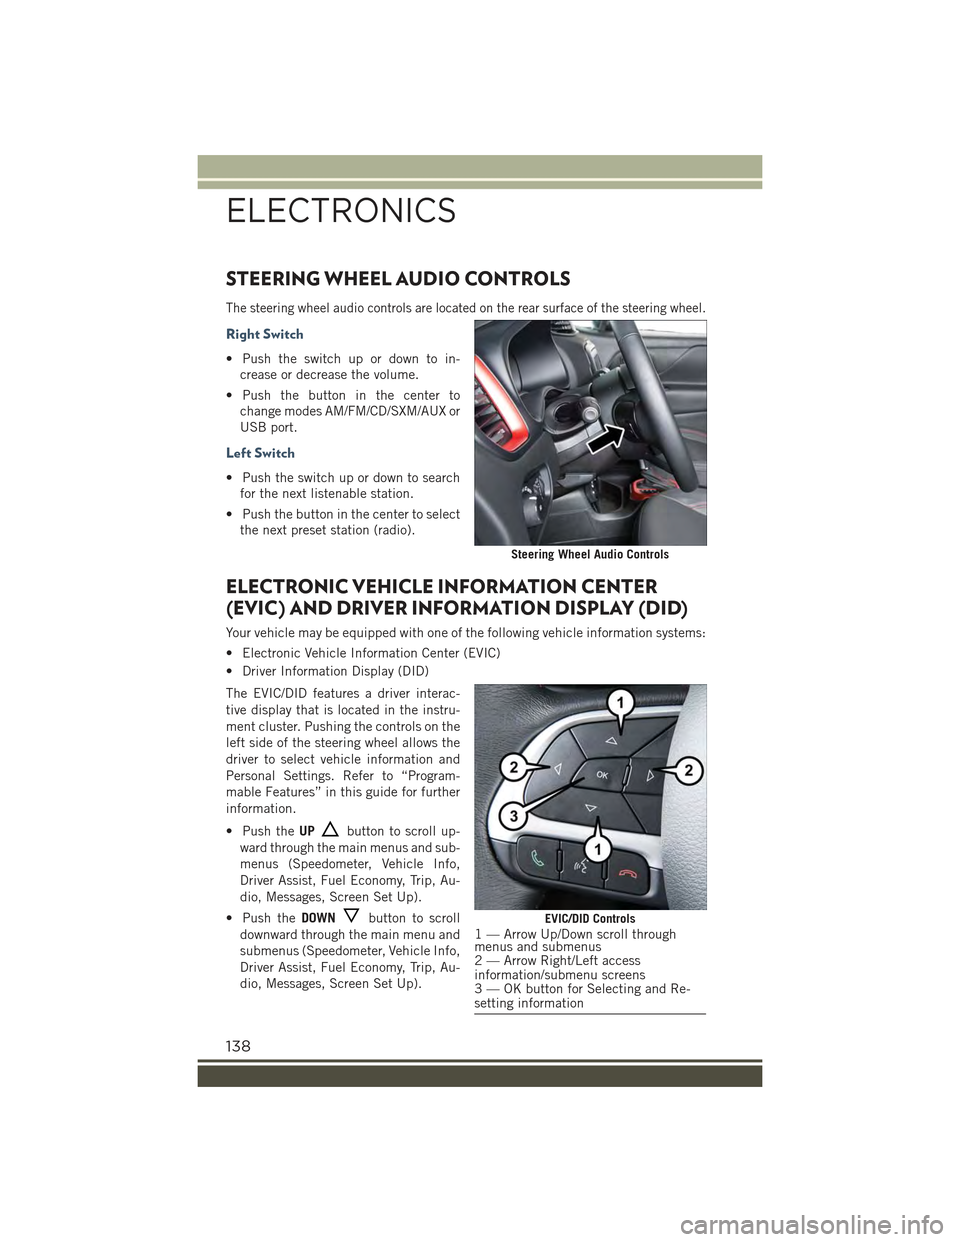
STEERING WHEEL AUDIO CONTROLS
The steering wheel audio controls are located on the rear surface of the steering wheel.
Right Switch
• Push the switch up or down to in-
crease or decrease the volume.
• Push the button in the center to
change modes AM/FM/CD/SXM/AUX or
USB port.
Left Switch
• Push the switch up or down to search
for the next listenable station.
• Push the button in the center to select
the next preset station (radio).
ELECTRONIC VEHICLE INFORMATION CENTER
(EVIC) AND DRIVER INFORMATION DISPLAY (DID)
Your vehicle may be equipped with one of the following vehicle information systems:
• Electronic Vehicle Information Center (EVIC)
• Driver Information Display (DID)
The EVIC/DID features a driver interac-
tive display that is located in the instru-
ment cluster. Pushing the controls on the
left side of the steering wheel allows the
driver to select vehicle information and
Personal Settings. Refer to “Program-
mable Features” in this guide for further
information.
• Push theUPbutton to scroll up-
ward through the main menus and sub-
menus (Speedometer, Vehicle Info,
Driver Assist, Fuel Economy, Trip, Au-
dio, Messages, Screen Set Up).
• Push theDOWNbutton to scroll
downward through the main menu and
submenus (Speedometer, Vehicle Info,
Driver Assist, Fuel Economy, Trip, Au-
dio, Messages, Screen Set Up).
Steering Wheel Audio Controls
EVIC/DID Controls1 — Arrow Up/Down scroll throughmenus and submenus2 — Arrow Right/Left accessinformation/submenu screens3 — OK button for Selecting and Re-setting information
ELECTRONICS
138
Page 141 of 220

• Push theRIGHTbutton to access the information screens or submenu screens
of a main menu item.
• Push theBACK/LEFTbutton to access the information screens or submenu
screens of a main menu item.
• Push theOKbutton to access/select the information screens or submenu screens
of a main menu item. Push and hold the OK arrow button for two seconds to reset
displayed/selected features that can be reset.
EVIC/DID Main Menu
The Main Menu is composed of several options that can be selected using the control
buttons above.
NOTE:
• The display mode of the menu items varies depending on the type of display.
• For some items, a submenu is provided.
• In the Uconnect®system, some items on the menu are not shown on the
instrument panel display.
Menu Items
The Menu has the following options:
• Speedometer
• Vehicle Info
• Driver Assist
• Fuel Consumption
• Trip
• Audio
• Alerts
• Display Setup
• Vehicle Setup
Speedometer
Push and release the UP or DOWN arrow button until “Speedometer” is highlighted
in the EVIC or DID. Push the OK button to change the speedometer scale from MPH
to km/h (km/h to MPH).
ELECTRONICS
139
Page 142 of 220

Vehicle Info (Information About The Status Of The Car)
Push and release the UP or DOWN arrow button until "Vehicle Info" is highlighted in
the EVIC/DID. Push and release the RIGHT arrow button and Coolant Temp will be
displayed. Push the RIGHT or LEFT arrow button to scroll through the following
information displays:
Tire Pressure
• View the information relating to the TPMS system (if equipped).
Engine Coolant Temperature
• View the engine coolant temperature.
Tr a n s m i s s i o n Te m p e r a t u r e
• Display the temperature of the automatic transmission (if equipped).
Engine Oil Temperature
• View the engine oil temperature.
Battery Voltage
• View the voltage value (state of charge) of the battery.
Driver Assist
This menu item allows you to change the settings ("Notice LaneSense" and "Intensity
LaneSense") relating to the LaneSense system (if equipped).
Notice LaneSense
• By selecting this function, you can select the "readiness" of LaneSense, choosing
between the options "Near," "Medium," or "Far."
Intensity LaneSense
• Using this function, you can select the force applied to the steering wheel to keep
the car in the roadway through the electrical drive system due to LaneSense.
Fuel Consumption
This menu item allows you to set the unit of measurement for the "Fuel Consumption
and Range."
Average Consumption/Instantaneous Consumption
• By selecting these options, you can choose the unit of measurement of the average
consumption and the instantaneous, choosing between "MPG" or "l/100 km" or
"km/l."
Range
• By selecting this option, you can choose the unit of measurement for Range,
choosing between “miles” or "km."
Trip
This menu item allows you to view information about the "Trip Computer."
The information displayed, for Trip A and for Trip B, are:
Distance
• (Miles or Km)
ELECTRONICS
140
Page 143 of 220

Average Consumption
• (MPG, or l/ 100km or km/l)
Travel Time
• (Hour/Minute)
Audio (Viewing Audio Information)
This menu item allows you to view the instrument cluster display and the information
present on the display of the Uconnect®system.
The information displayed is:
“Radio (AM or FM)”
• View Radio Station Name (if equipped), frequency, and graphical icon
"MP3”
• Title display or number song playing
"USB"
• Title display or number song playing
"Ipod"
• Display song title (if equipped)
See Phone
The instrument cluster display can also display the information concerning phone
mode.
The information that can be displayed is the connection status of the mobile phone
(phone connected or disconnected), the active telephone calls/incoming/on hold,
and the management of double calls (first incoming second waiting, etc.).
Alerts (Messages Stored)
This menu item allows you to display the information messages/malfunction stored.
Vehicles With Multi-Functional Display Reconfigurable
The background color of the display varies according to the priorities of the failure:
Failed Messages with low priority
• Displays in yellow
Failed Messages with high priority
• Displays in red
Display Setup (Edit Settings Cluster Display)
This menu item allows you to change the position of the information on the display.
ELECTRONICS
141
Page 144 of 220

Display Gears (Vehicles With Reconfigurable Multi-Functional Display And Automatic
Transmission)
By selecting this item, you can select the display mode, the particulars relating to the
automatic transmission, and choose between the following options:
"Single digit"
• The right side of the display will show the letter concerning the automatic
transmission shift lever (P,N,R or D) position. After approximately two seconds, the
letter will be displayed in a central position.
"Full PNRD"
• (Default): The right side of the display the letters PNRD, the position assumed by
the shift lever will be highlighted in the display. During the operation in sequential
mode ("AutoStick"), in place of the letter D, the gear will be will be displayed.
In The Top Left/Top Right
The information relating to the following can be displayed:
• External temperature
• Compass (If Equipped)
• Date (Month/Day)
• Time (Hours/Minutes)
In the central area of the display, you can view all of the information listed above as
well as the following:
• Audio Information
• Speed Display (If Equipped)
• Date (Day/Month/Year)
• Range To Empty
• Menu Item
• Average Consumption
• Current Consumption
• Distance Traveled (Trip)
• Distance Traveled B (Trip B)
Restore Default Settings
Selecting this item, and you can reset and restore the default settings.
Vehicle Setup (Edit Settings Of The Car)
This menu item allows you to change the settings for the following:
• Display
• Units of measure
• Clock and Data
• Safety
ELECTRONICS
142