2015 INFINITI QX60 HYBRID change time
[x] Cancel search: change timePage 8 of 36

6
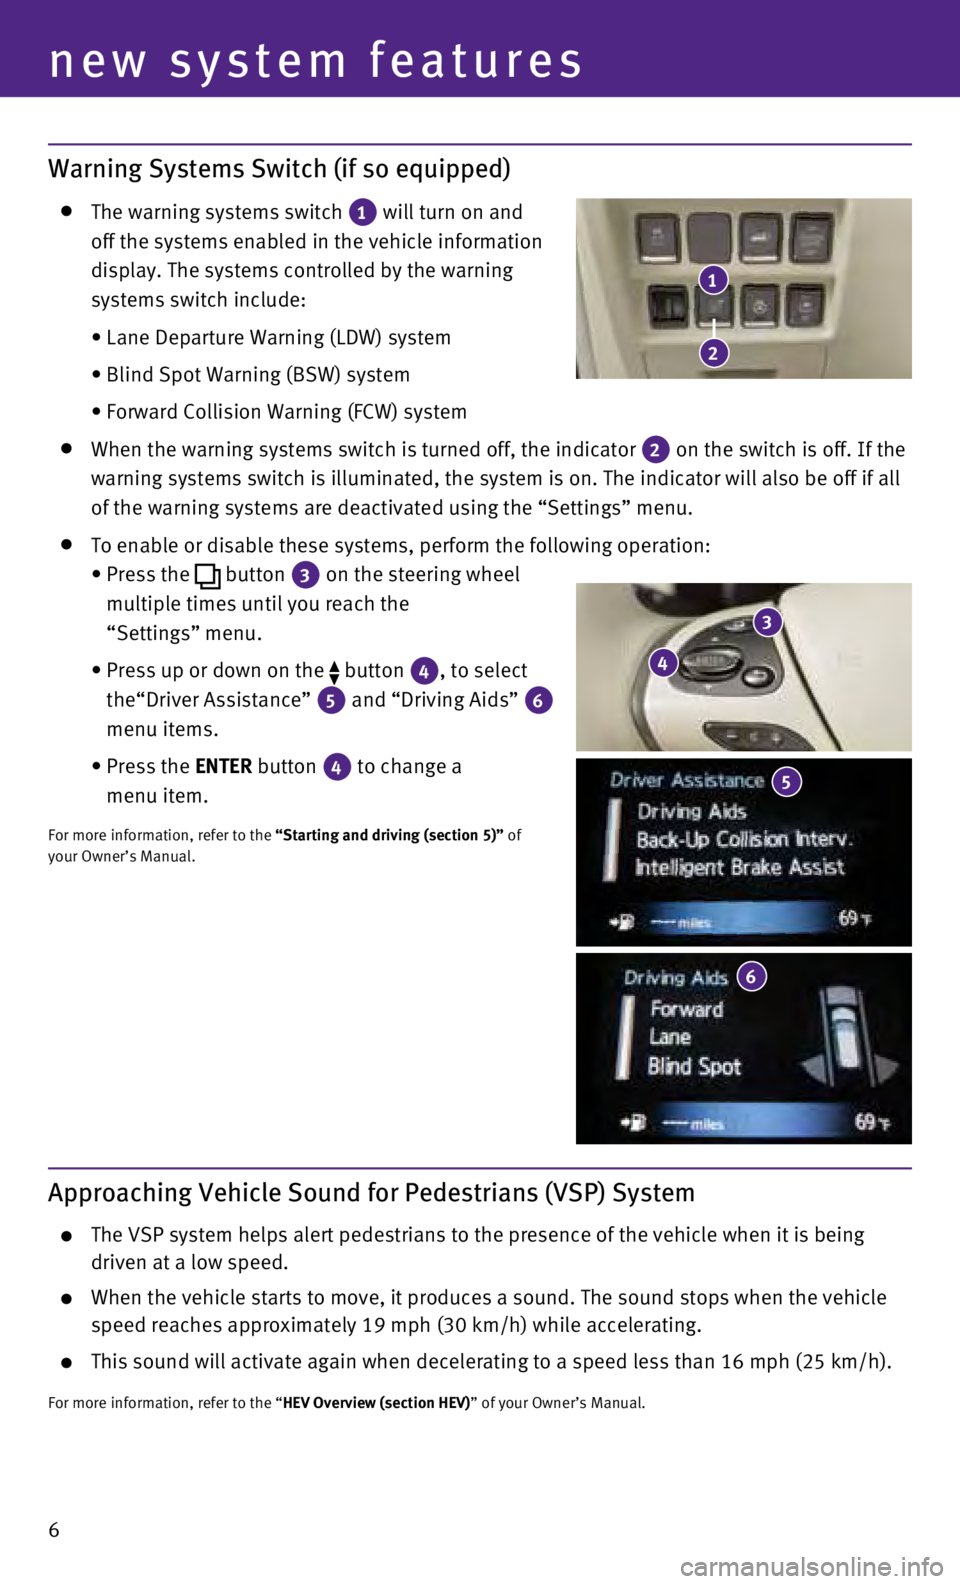
Warning Systems Switch (if so equipped)
The warning systems switch
1 will turn on and
off the systems enabled in the vehicle information
display. The systems controlled by the warning
systems switch include:
•
Lane Departure Warning (LDW) system
•
Blind Spot Warning (BSW) system
•
Forward Collision Warning (FCW) system
When the warning systems switch is turned off, the indicator
2 on the switch is off. If the
warning systems switch is illuminated, the system is on. The indicator w\
ill also be off if all
of the warning systems are deactivated using the “Settings” menu.
To enable or disable these systems, perform the following operation:
•
Press the button
3 on the steering wheel
multiple times until you reach the
“Settings” menu.
•
Press up or down on the button
4, to select
the“Driver Assistance”
5 and “Driving Aids” 6
menu items.
•
Press the
ENTER button
4 to change a
menu item.
For more information, refer to the “Starting and driving (section 5)” of
your Owner’s Manual.
new system features
3
4
6
1
2
5
Approaching Vehicle Sound for Pedestrians (VSP) System
The VSP system helps alert pedestrians to the presence of the vehicle wh\
en it is being
driven at a low speed.
When the vehicle starts to move, it produces a sound. The sound stops wh\
en the vehicle
speed reaches approximately 19 mph (30 km/h) while accelerating.
This sound will activate again when decelerating to a speed less than 16\
mph (25 km/h).
For more information, refer to the “HEV Overview (section HEV)” of your Owner’s Manual.
Page 17 of 36

15
Headlight Control Switch
HEADLIGHT CONTROL
Turn the headlight control switch to the
position
1 to turn on the front parking, tail, license plate and
instrument panel lights. Turn the switch to the
position 2 to turn on the headlights.
AUTOLIGHT SYSTEM
The autolight system will automatically turn the headlights on when it i\
s da
rk and off when
it is light. The system will keep the headlights on for a period of time\
after you turn the
ignition off and all doors are closed.
To activate the autolight system, turn the headlight control switch to t\
he AUTO
position
3
then push the ignition switch to ON. To deactivate the autolight system, turn the headlight
control switch to the OFF,
position
1 or
position
2.
HIGH BEAM SELECT
Push the headlight control switch forward
4 to
select the high beam function. The blue indicator
light
illuminates in the instrument panel.
Pull the headlight switch back to the original
position to select the low beam. The blue
indicator light extinguish.
Pull and release the headlight control switch
5 to
flash the headlight high beams on and off.
FOG LIGHT SWITCH
T
he headlights must be switched to AUTO, or the low
beams
selected for the fog lights to operate.
Turn the switch (inside collar) to the
position
6
to turn the fog lights on.
Turn the switch (inside collar)
to the
OFF position to
turn the fog lights off.
LANE CHANGE SIGNAL
Move the lever up or down until the turn signal begins to flash, but the\
lever does
not latch, to signal a lane change. Hold the lever until the lane change\
is completed.
Move the lever up or down until the turn signal begins to flash, but the\
lever does
not latch, and release the lever. The turn signal will automatically fla\
sh 3 times.
Choose the appropriate method to signal a lane change based on the road \
and
traffic conditions.
For more information, refer to the “Instruments and controls (section 2)” of your Owner’s Manual.
3
4
6
1
5
2
Page 25 of 36

23
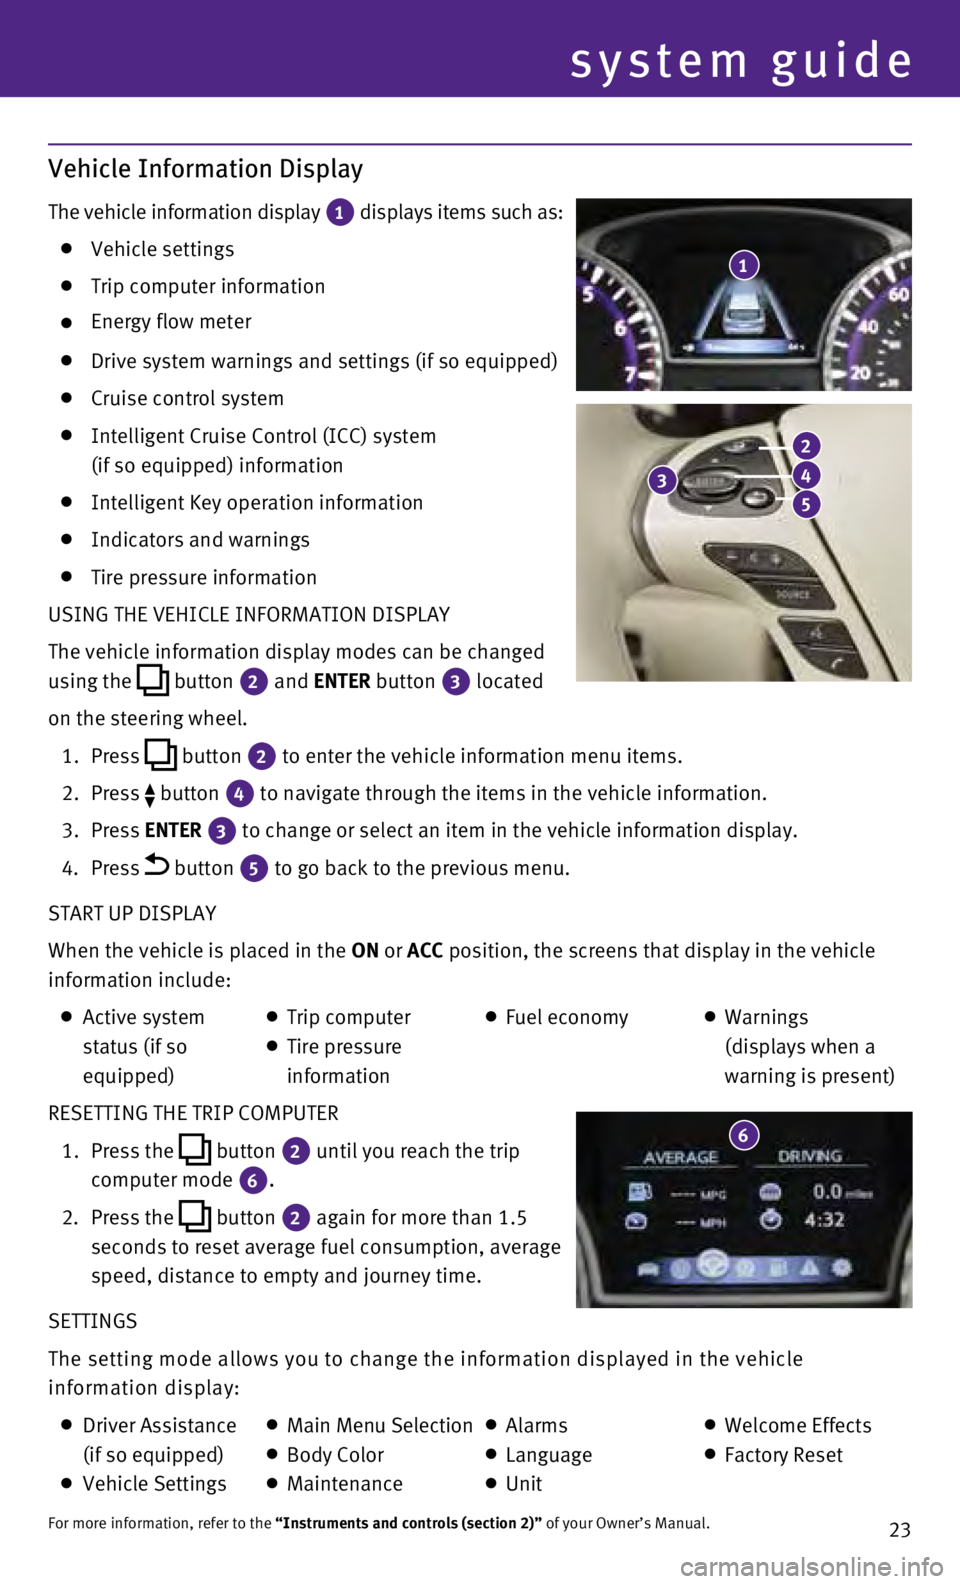
Vehicle Information Display
The vehicle information display 1 displays items such as: Vehicle settings
Trip computer information
Energy flow meter
Drive system warnings and settings (if so equipped)
Cruise control system
Intelligent Cruise Control (ICC) system
(if so equipped) information
Intelligent Key operation information
Indicators and warnings
Tire pressure information
USING THE VEHICLE INFORMATION DISPLAY
The vehicle information display modes can be changed
using the
button
2 and ENTER button 3
located
on the steering wheel.
1.
Press
button
2 to enter the vehicle information menu items.
2.
Press button
4 to navigate through the items in the vehicle information.
3.
Press
ENTER
3 to change or select an item in the vehicle information display.
4.
Press button 5 to go back to the previous menu.
START UP DISPLAY
When the vehicle is placed in the ON or ACC position, the screens that display in the vehicle
information include:
Active system
status (if so
equipped) Trip computer
Tire pressure
information
Fuel economy
Warnings
(displays when a
warning is present)
RESETTING THE TRIP COMPUTER
1.
Press the
button
2 until you reach the trip
computer mode 6.
2.
Press the button 2 again for more than 1.5
seconds to reset average fuel consumption, average
speed, distance to empty and journey time.
SETTINGS
The setting mode allows you to change the information displayed in the v\
ehicle
information display:
Driver Assistance
(if so equipped)
Vehicle Settings
Main Menu Selection Body Color
Maintenance
Alarms
Language
Unit
Welcome Effects
Factory Reset
For more information, refer to the “Instruments and controls (section 2)” of your Owner’s Manual.
1
system guide
3
2
4
5
6
Page 31 of 36

29
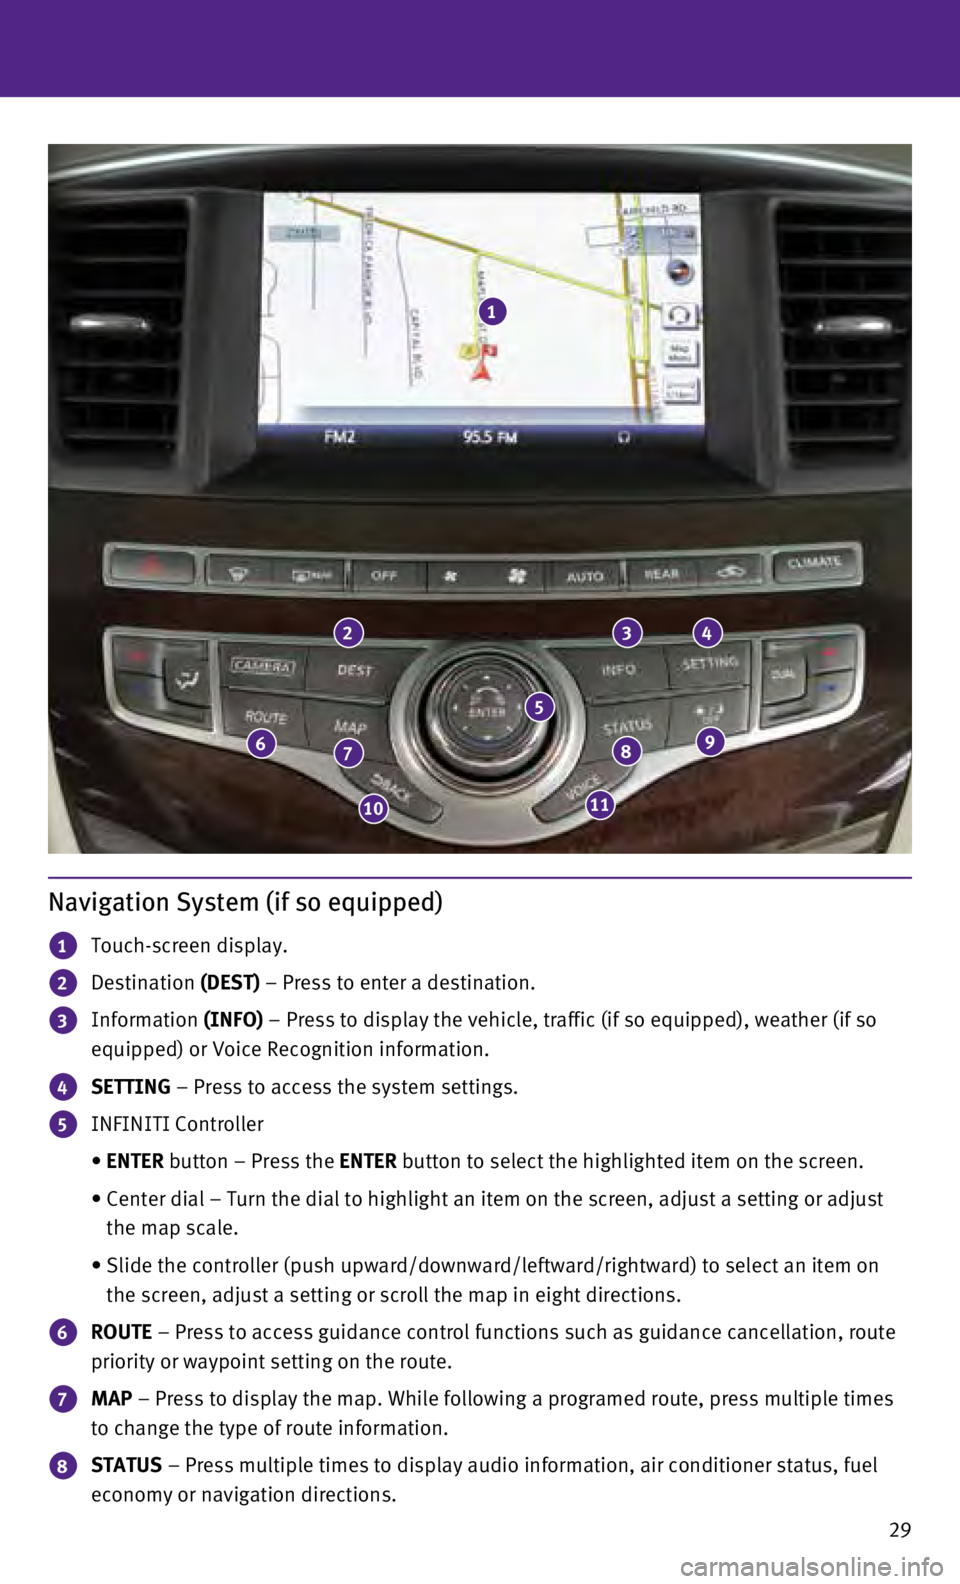
Navigation System (if so equipped)
1 Touch-screen display.
2 Destination (DEST) – Press to enter a destination.
3 Information (INFO) – Press to display the vehicle, traffic (if so equipped), weather \
(if so
equipped) or Voice Recognition information.
4 SETTING – Press to access the system settings.
5 INFINITI Controller
•
ENTER
button – Press the ENTER button to select the highlighted item on the screen.
•
Center dial – Turn the dial to highlight an item on the screen, adjus\
t a setting or adjust
the map scale.
•
Slide the controller (push upward/downward/leftward/rightward) to sele\
ct an item on
the screen, adjust a setting or scroll the map in eight directions.
6 ROUTE – Press to access guidance control functions such as guidance cancel\
lation, route
priority or waypoint setting on the route.
7 MAP – Press to display the map. While following a programed route, press\
multiple times
to change the type of route information.
8 STATUS – Press multiple times to display audio information, air conditioner\
status, fuel
economy or navigation directions.
1
234
98
1110
76
5
Page 36 of 36

Printing: August 2014 (03) /
QR15EA HL
50U0 / Printed in USA
This Quick Reference Guide is intended to provide an overview of some of\
the unique features of
your new vehicle. Please see your Owner’s Manual for important safety\
information and system
operation limitations. Features and equipment in your vehicle may vary d\
epending on model,
trim level, options selected, order, date of production, region or avail\
ability. Therefore, you may
find information about features or equipment that are not included or in\
stalled on your vehicle.
All information, specifications and illustrations in this Quick Referenc\
e Guide are those in effect
at the time of printing. NISSAN reserves the right to change specificati\
ons, performance, design
or component suppliers without notice and without obligation. From time \
to time, NISSAN
may update or revise this Quick Reference Guide to provide owners with t\
he most accurate
information currently available. Please carefully read and retain, with this Quick Reference Guide,
all revision updates sent to you by NISSAN to ensure you have access to \
accurate and up-to-date
information regarding your vehicle. Current versions of vehicle Quick Re\
ference Guides, Owner’s
Manuals and any updates can also be found in the Owner section of the IN\
FINITI website at
https://owners.infinitiusa.com/iowners/navigation/manualsAndGuides. If you have questions
concerning any information in your Owner’s Manual, contact INFINITI C\
onsumer Affairs. See
the INFINITI CUSTOMER CARE PROGRAM page in the Owner’s Manual for con\
tact information.
To view detailed instructional videos, go to
www.infinitiownersinfo.mobi/2015/qx60
or snap this barcode with an appropriate
barcode reader.