Page 368 of 573
367
uuBluetooth ® HandsFreeLink ®u Using HFL
Features
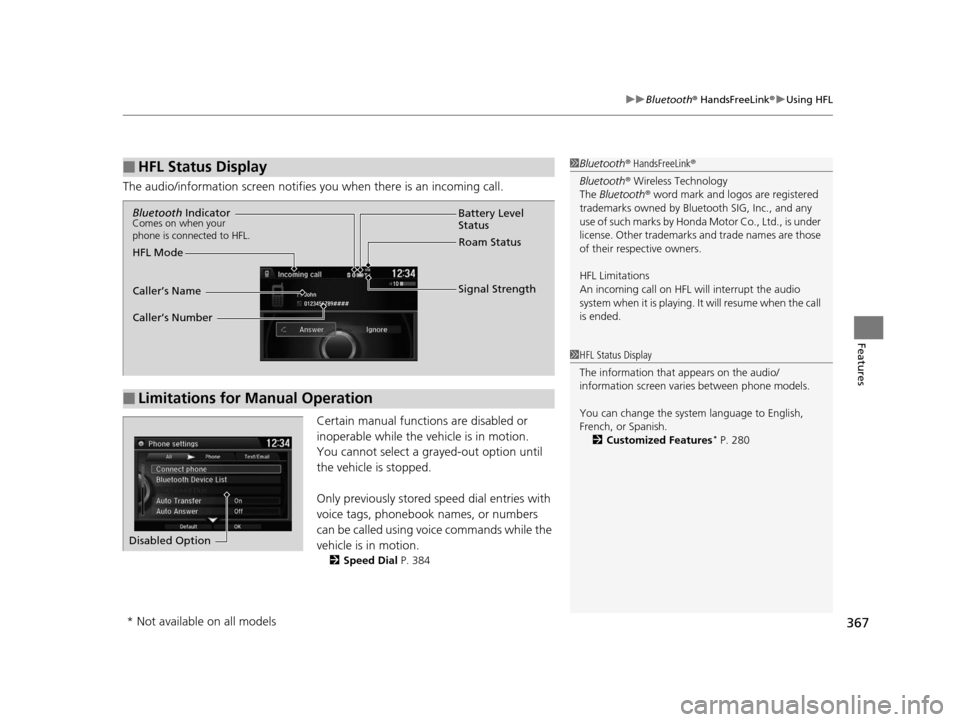
The audio/information scr een notifies you when there is an incoming call.
Certain manual functions are disabled or
inoperable while the ve hicle is in motion.
You cannot select a grayed-out option until
the vehicle is stopped.
Only previously stored speed dial entries with
voice tags, phonebook names, or numbers
can be called using voice commands while the
vehicle is in motion.
2 Speed Dial P. 384
■HFL Status Display1Bluetooth ® HandsFreeLink ®
Bluetooth ® Wireless Technology
The Bluetooth ® word mark and logos are registered
trademarks owned by Blue tooth SIG, Inc., and any
use of such marks by Honda Motor Co., Ltd., is under
license. Other trademarks and trade names are those
of their respective owners.
HFL Limitations
An incoming call on HFL will interrupt the audio
system when it is playing. It will resume when the call
is ended.
1 HFL Status Display
The information that appears on the audio/
information screen vari es between phone models.
You can change the system language to English,
French, or Spanish. 2 Customized Features
* P. 280
■Limitations for Manual Operation
Bluetooth IndicatorComes on when your
phone is connected to HFL.
Signal Strength
HFL Mode Battery Level
Status
Roam Status
Caller’s Name
Caller’s Number
Disabled Option
* Not available on all models
15 CROSSTOUR-31TP66500.book 367 ページ 2014年7月31日 木曜日 午後3時23分
Page 373 of 573
uuBluetooth ® HandsFreeLink ®u HFL Menus
372
Features
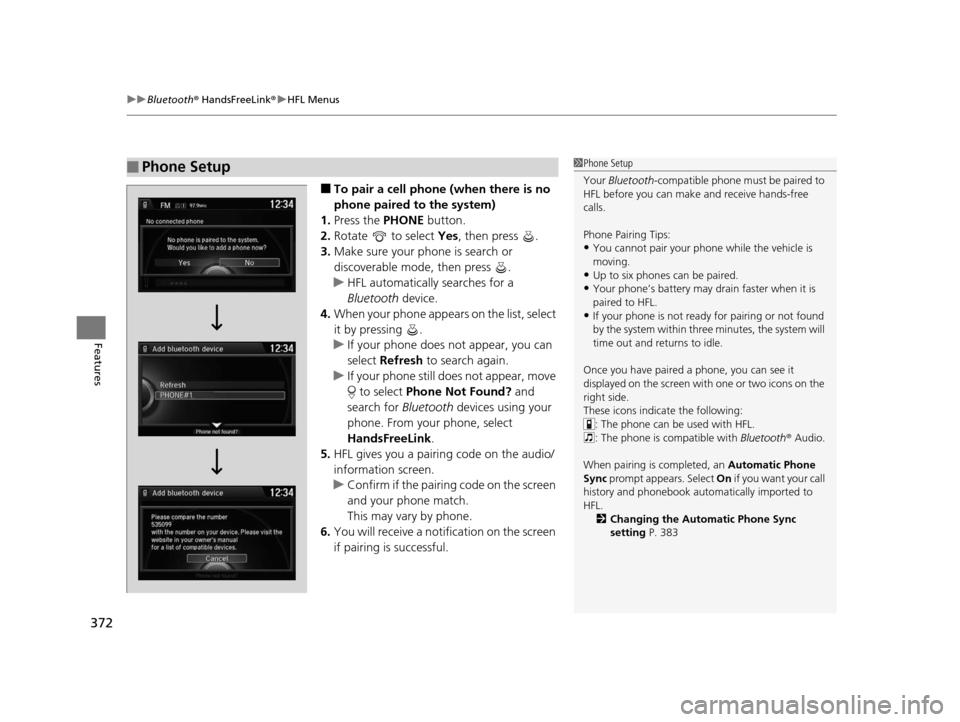
■To pair a cell phone (when there is no
phone paired to the system)
1. Press the PHONE button.
2. Rotate to select Yes, then press .
3. Make sure your phone is search or
discoverable mode, then press .
u HFL automatically searches for a
Bluetooth device.
4. When your phone appears on the list, select
it by pressing .
u If your phone does not appear, you can
select Refresh to search again.
u If your phone still does not appear, move
to select Phone Not Found? and
search for Bluetooth devices using your
phone. From your phone, select
HandsFreeLink .
5. HFL gives you a pairing code on the audio/
information screen.
u Confirm if the pairing code on the screen
and your phone match.
This may vary by phone.
6. You will receive a notifi cation on the screen
if pairing is successful.
■Phone Setup1 Phone Setup
Your Bluetooth -compatible phone must be paired to
HFL before you can make and receive hands-free
calls.
Phone Pairing Tips:
•You cannot pair your phone while the vehicle is
moving.
•Up to six phones can be paired.
•Your phone’s battery may dr ain faster when it is
paired to HFL.
•If your phone is not ready for pairing or not found
by the system within three minutes, the system will
time out and returns to idle.
Once you have paired a phone, you can see it
displayed on the screen with one or two icons on the
right side.
These icons indicate the following: : The phone can be used with HFL.
: The phone is compatible with Bluetooth ® Audio.
When pairing is completed, an Automatic Phone
Sync prompt appears. Select On if you want your call
history and phonebook au tomatically imported to
HFL. 2 Changing the Automatic Phone Sync
setting P. 383
15 CROSSTOUR-31TP66500.book 372 ページ 2014年7月31日 木曜日 午後3時23分
Page 374 of 573
373
uuBluetooth ® HandsFreeLink ®u HFL Menus
Continued
Features
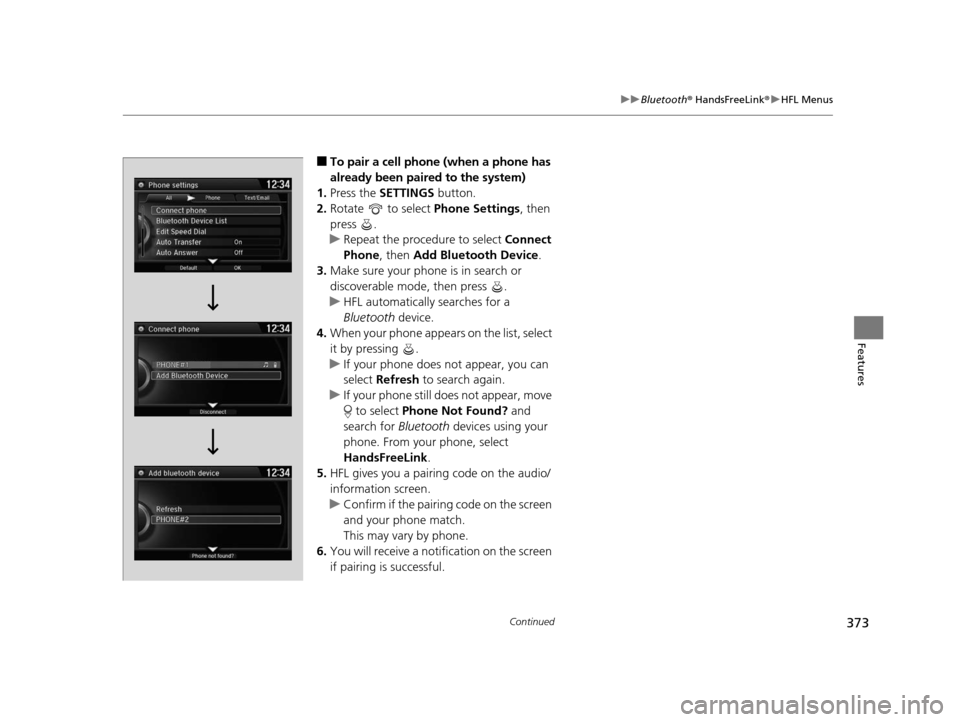
■To pair a cell phone (when a phone has
already been paired to the system)
1. Press the SETTINGS button.
2. Rotate to select Phone Settings, then
press .
u Repeat the procedure to select Connect
Phone , then Add Bluetooth Device .
3. Make sure your phone is in search or
discoverable mode, then press .
u HFL automatically searches for a
Bluetooth device.
4. When your phone appears on the list, select
it by pressing .
u If your phone does not appear, you can
select Refresh to search again.
u If your phone still does not appear, move
to select Phone Not Found? and
search for Bluetooth devices using your
phone. From your phone, select
HandsFreeLink .
5. HFL gives you a pairing code on the audio/
information screen.
u Confirm if the pairing code on the screen
and your phone match.
This may vary by phone.
6. You will receive a notifi cation on the screen
if pairing is successful.
15 CROSSTOUR-31TP66500.book 373 ページ 2014年7月31日 木曜日 午後3時23分
Page 393 of 573
uuBluetooth ® HandsFreeLink ®u HFL Menus
392
Features
You can make calls by inputting any phone
number, or by using the imported
phonebook, call history, speed dial entries, or
redial.
■Making a Call1 Making a Call
Any voice-tagged speed di al entry, phonebook name,
or number can be dialed by voice from most screens.
Press the button and say “Call” and the
phonebook name, phone number, or stored voice
tag.
The maximum range be tween your phone and
vehicles is 30 fe et (10 meters).
Once a call is connected, you can hear the voice of
the person you are call ing through the audio
speakers.
15 CROSSTOUR-31TP66500.book 392 ページ 2014年7月31日 木曜日 午後3時23分
Page 405 of 573
404
Features
Compass*
When you turn the ignition switch to ON (w, the compass self-calibrates, and the
compass display appears.
Compass Calibration
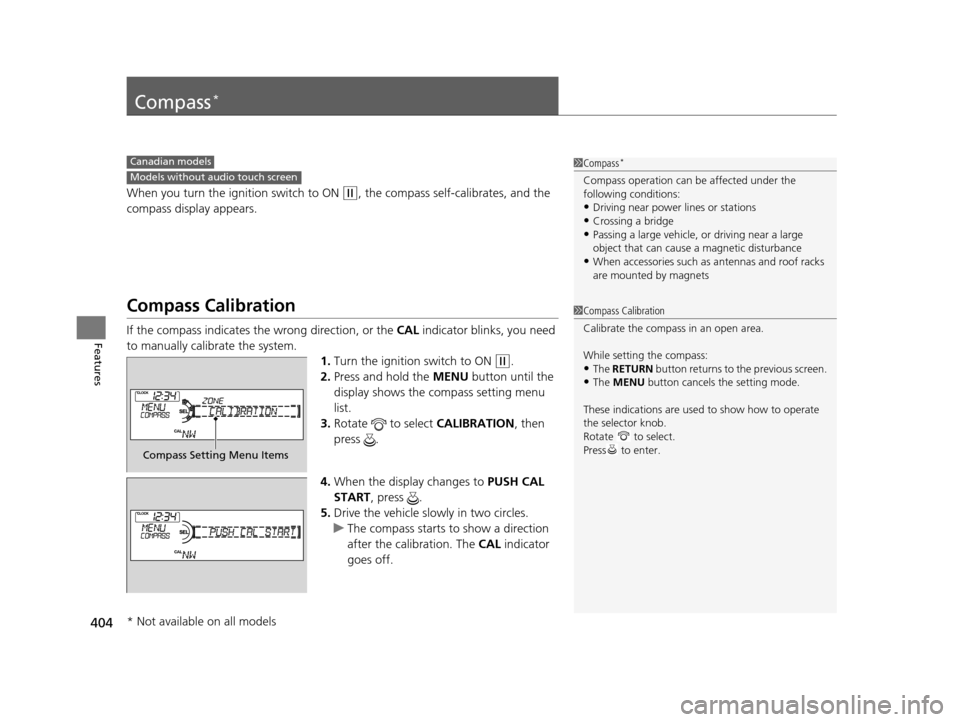
If the compass indicates the wrong direction, or the CAL indicator blinks, you need
to manually calibrate the system. 1.Turn the ignition switch to ON
(w.
2. Press and hold the MENU button until the
display shows the compass setting menu
list.
3. Rotate to select CALIBRATION, then
press .
4. When the display changes to PUSH CAL
START, press .
5. Drive the vehicle slowly in two circles.
u The compass starts to show a direction
after the calibration. The CAL indicator
goes off.
1 Compass*
Compass operation can be affected under the
following conditions:
•Driving near power lines or stations
•Crossing a bridge•Passing a large vehicle, or driving near a large
object that can cause a magnetic disturbance
•When accessories such as antennas and roof racks
are mounted by magnets
Canadian models
Models without audio touch screen
1 Compass Calibration
Calibrate the compass in an open area.
While setting the compass:
•The RETURN button returns to the previous screen.
•The MENU button cancels the setting mode.
These indications are used to show how to operate
the selector knob.
Rotate to select.
Press to enter.
Compass Setting Menu Items
* Not available on all models
15 CROSSTOUR-31TP66500.book 404 ページ 2014年7月31日 木曜日 午後3時23分
Page 406 of 573
405
uuCompass*uCompass Zone Selection
Features
Compass Zone Selection
1. Turn the ignition switch to ON (w.
2. Press and hold the MENU button until the
display shows the compass setting menu
list.
3. Rotate to select ZONE, then press .
The display shows the current zone
number.
4. Rotate to select the zone number of
your area (See Zone Map), then press .1Compass Zone Selection
The zone selection is done to compensate the
variation between magneti c north and true north.
If the calibration starts while the audio system is in
use, the display returns to normal after the calibration
is completed.
Zone Number
2
3
4 5678910
111213
14
15
Zone Map
Guam Island: Zone 8
Puerto Rico: Zone 11
15 CROSSTOUR-31TP66500.book 405 ページ 2014年7月31日 木曜日 午後3時23分
Page 407 of 573
406
Features
Compass*
When you turn the ignition switch to ON (w*1, the compass self-calibrates, and the
compass display appears.
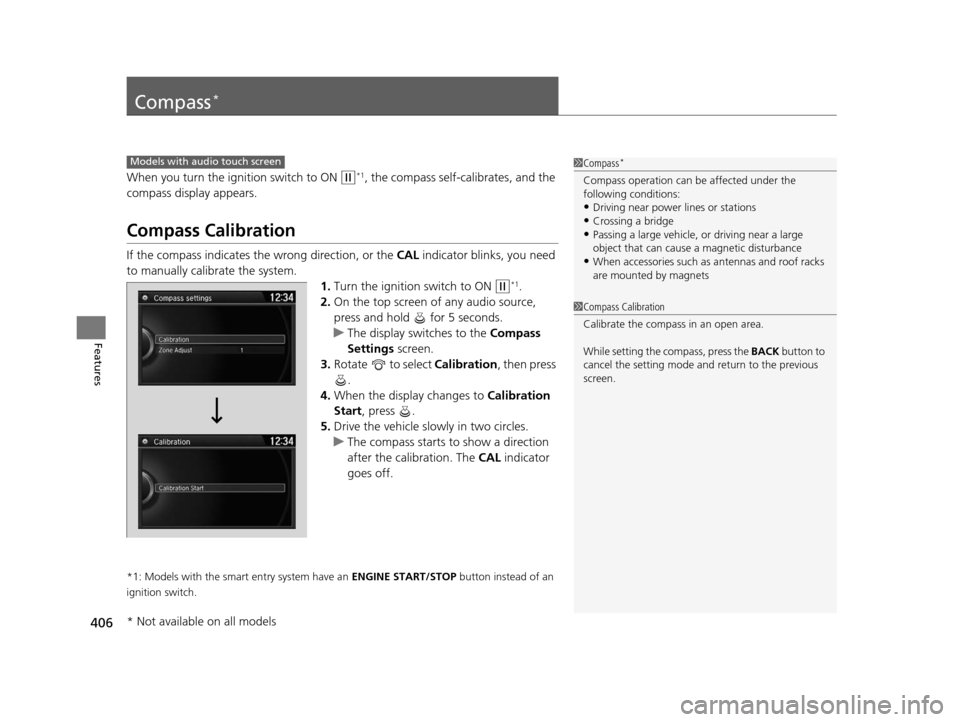
Compass Calibration
If the compass indicates the wrong direction, or the CAL indicator blinks, you need
to manually calibrate the system. 1.Turn the ignition switch to ON
(w*1.
2. On the top screen of any audio source,
press and hold for 5 seconds.
u The display switches to the Compass
Settings screen.
3. Rotate to select Calibration , then press
.
4. When the display changes to Calibration
Start, press .
5. Drive the vehicle slowly in two circles.
u The compass starts to show a direction
after the calibration. The CAL indicator
goes off.
*1: Models with the smart entry system have an ENGINE START/STOP button instead of an
ignition switch.
Models with audio touch screen1 Compass*
Compass operation can be affected under the
following conditions:
•Driving near power lines or stations
•Crossing a bridge•Passing a large vehicle, or driving near a large
object that can cause a magnetic disturbance
•When accessories such as antennas and roof racks
are mounted by magnets
1 Compass Calibration
Calibrate the compass in an open area.
While setting the compass, press the BACK button to
cancel the setting mode a nd return to the previous
screen.
* Not available on all models
15 CROSSTOUR-31TP66500.book 406 ページ 2014年7月31日 木曜日 午後3時23分
Page 408 of 573
407
uuCompass*uCompass Zone Selection
Features
Compass Zone Selection
1. Turn the ignition switch to ON (w*1.
2. On the top screen of any audio source,
press and hold for 5 seconds.
u The display swit ches to the Compass
Settings screen.
3. Rotate to select Zone Adjust, then
press .
u The display shows the current zone
number.
4. Rotate to select the zone number of
your area (See Zone Map), then press .
*1: Models with the smart entry system have an ENGINE START/STOP button instead of an
ignition switch.
2
3
4 5678910
111213
14
15Zone Map
Guam Island: Zone 8
Puerto Rico: Zone 11
1 Compass Zone Selection
The zone selection is done to compensate the
variation between magneti c north and true north.
If the calibration starts while the audio system is in
use, the display returns to normal after the calibration
is completed.
15 CROSSTOUR-31TP66500.book 407 ページ 2014年7月31日 木曜日 午後3時23分