Page 315 of 433
Black plate (34,1)GMC Canyon Owner Manual (GMNA-Localizing-U.S./Canada-7587000) -
2015 - CRC - 3/17/15
10-34 Vehicle Care
Fuses
The wiring circuits in the vehicle are
protected from short circuits by
fuses. This greatly reduces the
chance of fires caused by electrical
problems.
Look at the silver-colored band
inside the fuse. If the band is broken
or melted, replace the fuse. Be sure
you replace a bad fuse with a new
one of the identical size and rating.
If a fuse goes out, replace the fuse
as soon as you can.
Engine Compartment
Fuse Block
The engine compartment fuse block
is in the engine compartment, on
the driver side of the vehicle.
Lift the cover to access the fuse
block.
{Caution
Spilling liquid on any electrical
component on the vehicle may
damage it. Always keep the
covers on any electrical
component.
A fuse puller is available inside this
fuse block.
Page 318 of 433
Black plate (37,1)GMC Canyon Owner Manual (GMNA-Localizing-U.S./Canada-7587000) -
2015 - CRC - 3/17/15
Vehicle Care 10-37
Mini Fuses(2 pin) Usage
F52 Not Used
F53 Not Used
F54 Not Used
F55 Not Used
F56 Washer Pump
F57 Not Used
F58 Not Used
F60 Mirrors Defogger
F61 Not Used
F62 Canister Vent Solenoid
F63 Not Used
F64 Trailer Reverse Lamp
F65 Left Trailer Stop/ Turn Lamps
F66 Right Trailer Stop/ Turn Lamps Mini Fuses
(2 pin) Usage
F67 Electric Power Steering
F68 Not Used
F69 Battery Regulated Voltage Control
F70 Not Used
F71 Not Used
J-Case Fuses
(Low Profile) Usage
F06 Wipers
F12 Starter
F21 Front Blower
F22 Antilock Brake System Valves
F24 Trailer
F25 Transfer Case Electronic Control J-Case
Fuses
(Low Profile) Usage
F26 Antilock Brake System Pump
F27 Trailer Brake Control Module
F28 Rear Window Defogger
F41 Not Used
F42 Not Used
F43 Cooling Fan
F44 Not Used
F45 Brake Vacuum Pump
F59 Not Used
Midi Fuses Usage F72 Not Used
F73 Not Used
F74 Generator
Page 319 of 433
Black plate (38,1)GMC Canyon Owner Manual (GMNA-Localizing-U.S./Canada-7587000) -
2015 - CRC - 3/17/15
10-38 Vehicle Care
Midi Fuses UsageF75 Not Used
Micro
Relays Usage
K01 Air Conditioning Compressor Clutch
K02 Starter
K03 Not Used
K04 Wipers Speed
K05 Wipers Control
K06 Cargo Lamp
K08 Not Used
K09 Not Used
K10 Not Used K11 Center High Mounted
Stop Lamp
K12 Not Used
K13 Vacuum Pump
K14 Park Lamps Mini Relays Usage
K07 Powertrain
K15 Run/Crank
K17 Rear Window Defogger
Solid State Relay Usage
K16 Not Used
Instrument Panel Fuse
Block
The instrument panel fuse block is
behind the passenger side cowl side
trim panel. Remove the plastic nut
at the front of the cover, then pull
the cover away from the trim panel
to access the fuse block.
Page 335 of 433

Black plate (54,1)GMC Canyon Owner Manual (GMNA-Localizing-U.S./Canada-7587000) -
2015 - CRC - 3/17/15
10-54 Vehicle Care
3. If the vehicle has an uplevelDIC, make sure the Tire
Pressure info page option is
turned on. The info pages on the
DIC can be turned on and off
through the Settings menu. See
Driver Information Center (DIC)
(Base Level) on page 5-27 or
Driver Information Center (DIC)
(Uplevel) on page 5-29.
4. If the vehicle has an uplevel DIC, use the DIC controls on the
right side of the steering wheel
to scroll to the Tire Pressure
screen under the DIC info page.
If the vehicle has a base level
DIC, use the MENU button to
select the Vehicle Information
menu in the DIC. Use the
thumbwheel to scroll to the Tire
Pressure Menu item screen. 5. If the vehicle has an uplevel
DIC, press and hold the
V(Set/
Reset) button located in the
center of the DIC controls.
If the vehicle has a base level
DIC, press the SET/CLR button
to begin the sensor matching
process.
A message asking if the process
should begin should appear.
Press the SET/CLR button again
to confirm the selection.
The horn sounds twice to signal
the receiver is in relearn mode
and the TIRE LEARNING
ACTIVE message displays on
the DIC screen.
6. Start with the driver side front tire.
7. Place the relearn tool against the tire sidewall, near the valve
stem. Then press the button to
activate the TPMS sensor.
A horn chirp confirms that the sensor identification code has
been matched to this tire and
wheel position.
8. Proceed to the passenger side front tire, and repeat the
procedure in Step 7.
9. Proceed to the passenger side rear tire, and repeat the
procedure in Step 7.
10. Proceed to the driver side rear tire, and repeat the procedure
in Step 7. The horn sounds two
times to indicate the sensor
identification code has been
matched to the driver side rear
tire, and the TPMS sensor
matching process is no longer
active. The TIRE LEARNING
ACTIVE message on the DIC
display screen goes off.
11. Turn the ignition switch to LOCK/OFF.
12. Set all four tires to the recommended air pressure
level as indicated on the Tire
and Loading Information label.
Page 340 of 433

Black plate (59,1)GMC Canyon Owner Manual (GMNA-Localizing-U.S./Canada-7587000) -
2015 - CRC - 3/17/15
Vehicle Care 10-59
Vehicles that have a tire
pressure monitoring system
could give an inaccurate
low-pressure warning if non-TPC
Spec rated tires are installed.
SeeTire Pressure Monitor
System on page 10-50.
The Tire and Loading
Information label indicates the
original equipment tires on the
vehicle. See Vehicle Load Limits
on page 9-14 for the label
location and more information
about the Tire and Loading
Information label.
Different Size Tires and
Wheels
If wheels or tires are installed that
are a different size than the original
equipment wheels and tires, vehicle
performance, including its braking,
ride and handling characteristics,
stability, and resistance to rollover may be affected. If the vehicle has
electronic systems such as antilock
brakes, rollover airbags, traction
control, electronic stability control,
or All-Wheel Drive, the performance
of these systems can also be
affected.
{Warning
If different sized wheels are used,
there may not be an acceptable
level of performance and safety if
tires not recommended for those
wheels are selected. This
increases the chance of a crash
and serious injury. Only use GM
specific wheel and tire systems
developed for the vehicle, and
have them properly installed by a
GM certified technician.
See Buying New Tires on
page 10-57 andAccessories and
Modifications on page 10-3.
Uniform Tire Quality
Grading
The following information relates
to the system developed by the
United States National Highway
Traffic Safety Administration
(NHTSA), which grades tires
by treadwear, traction, and
temperature performance. This
applies only to vehicles sold in
the United States. The grades
are molded on the sidewalls of
most passenger car tires. The
Uniform Tire Quality Grading
(UTQG) system does not apply
to deep tread, winter tires,
compact spare tires, tires with
nominal rim diameters of
10 to 12 inches (25 to 30 cm),
or to some limited-production
tires.
While the tires available on
General Motors passenger cars
and light trucks may vary with
respect to these grades, they
Page 345 of 433

Black plate (64,1)GMC Canyon Owner Manual (GMNA-Localizing-U.S./Canada-7587000) -
2015 - CRC - 3/17/15
10-64 Vehicle Care
Warning (Continued)
To help prevent the vehicle from
moving:1. Set the parking brake firmly.
2. Put an automatic transmission in P (Park) or a
manual transmission in
1 (First) or R (Reverse).
3. For four-wheel-drive vehicles, be sure the
transfer case is in a drive
gear– not in N (Neutral).
4. Turn off the engine and do not restart while the vehicle
is raised.
5. Do not allow passengers to remain in the vehicle.
6. Place wheel blocks, if equipped, on both sides of
the tire at the opposite
corner of the tire being
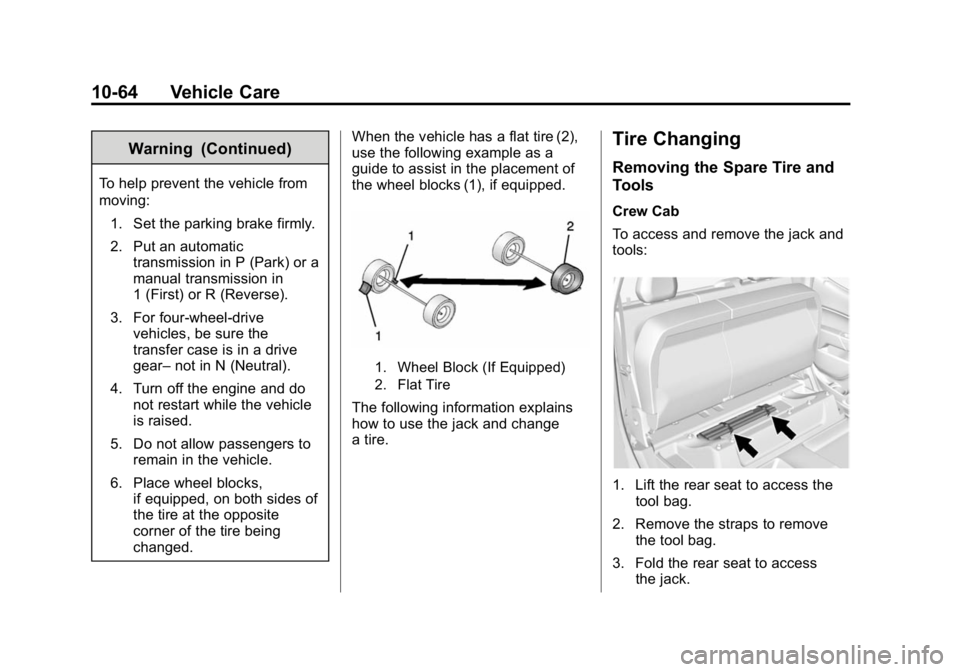
changed. When the vehicle has a flat tire (2),
use the following example as a
guide to assist in the placement of
the wheel blocks (1), if equipped.
1. Wheel Block (If Equipped)
2. Flat Tire
The following information explains
how to use the jack and change
a tire.
Tire Changing
Removing the Spare Tire and
Tools
Crew Cab
To access and remove the jack and
tools:
1. Lift the rear seat to access the
tool bag.
2. Remove the straps to remove the tool bag.
3. Fold the rear seat to access the jack.
Page 346 of 433
Black plate (65,1)GMC Canyon Owner Manual (GMNA-Localizing-U.S./Canada-7587000) -
2015 - CRC - 3/17/15
Vehicle Care 10-65
4. Turn the knob on the jack (2)counterclockwise to lower the
jack head to release the jack
from its holder.
5. Turn the wing nut (1) counterclockwise to remove the
jack and wheel blocks. Extended Cab
1. Jack Cover
2. Tool Bag Cover
To access and remove the jack and
tools:
1. Pull the bottom of the jack
cover (1) forward to remove it.
2. Pull the lower access pocket forward and then upward to
remove the tool bag cover (2).
3. Turn the knob on the jack (1)counterclockwise to lower the
jack head to release the jack
from its holder.
4. Turn the wing nut (2) counterclockwise to remove the
jack and wheel blocks.
5. Turn the wing nut (3) counterclockwise to remove the
tool bag.
Use the jack handle extensions and
the wheel wrench to remove the
underbody-mounted spare tire.
Page 347 of 433

Black plate (66,1)GMC Canyon Owner Manual (GMNA-Localizing-U.S./Canada-7587000) -
2015 - CRC - 3/17/15
10-66 Vehicle Care
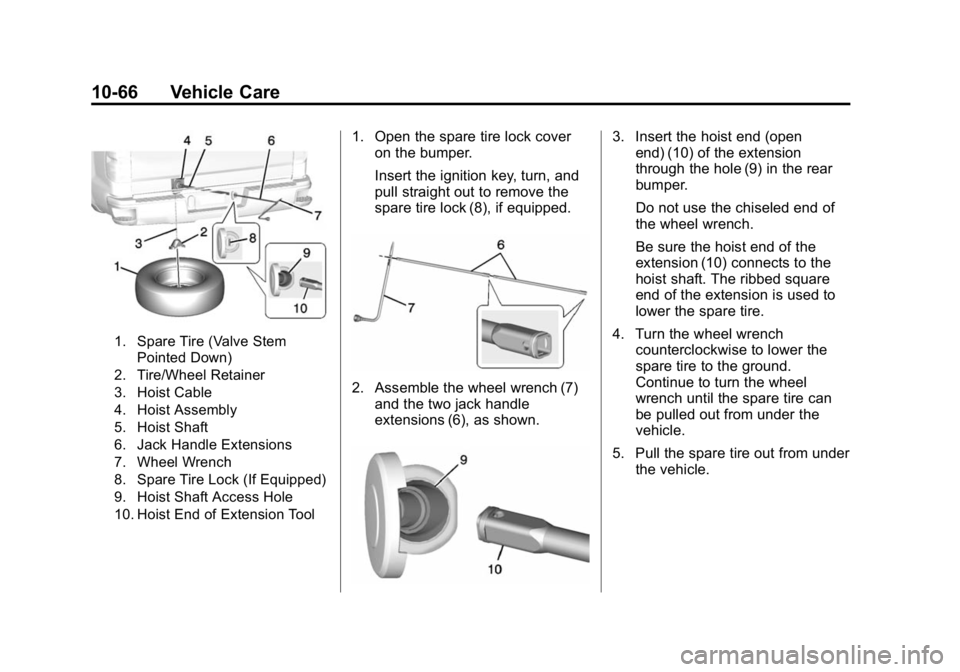
1. Spare Tire (Valve StemPointed Down)
2. Tire/Wheel Retainer
3. Hoist Cable
4. Hoist Assembly
5. Hoist Shaft
6. Jack Handle Extensions
7. Wheel Wrench
8. Spare Tire Lock (If Equipped)
9. Hoist Shaft Access Hole
10. Hoist End of Extension Tool
1. Open the spare tire lock cover on the bumper.
Insert the ignition key, turn, and
pull straight out to remove the
spare tire lock (8), if equipped.
2. Assemble the wheel wrench (7)
and the two jack handle
extensions (6), as shown.
3. Insert the hoist end (openend) (10) of the extension
through the hole (9) in the rear
bumper.
Do not use the chiseled end of
the wheel wrench.
Be sure the hoist end of the
extension (10) connects to the
hoist shaft. The ribbed square
end of the extension is used to
lower the spare tire.
4. Turn the wheel wrench counterclockwise to lower the
spare tire to the ground.
Continue to turn the wheel
wrench until the spare tire can
be pulled out from under the
vehicle.
5. Pull the spare tire out from under the vehicle.