2015 GMC CANYON seat adjustment
[x] Cancel search: seat adjustmentPage 8 of 433

Black plate (1,1)GMC Canyon Owner Manual (GMNA-Localizing-U.S./Canada-7587000) -
2015 - CRC - 3/17/15
In Brief 1-1
In Brief
Instrument Panel
Instrument Panel . . . . . . . . . . . . . . 1-2
Initial Drive Information
Initial Drive Information . . . . . . . . 1-4
Remote Keyless Entry (RKE)System . . . . . . . . . . . . . . . . . . . . . . 1-4
Remote Vehicle Start . . . . . . . . . 1-5
Door Locks . . . . . . . . . . . . . . . . . . . 1-5
Windows . . . . . . . . . . . . . . . . . . . . . . 1-6
Seat Adjustment . . . . . . . . . . . . . . 1-6
Heated Seats . . . . . . . . . . . . . . . . . 1-8
Head Restraint Adjustment . . . . 1-8
Safety Belts . . . . . . . . . . . . . . . . . . . 1-8
Passenger Sensing System . . . 1-9
Mirror Adjustment . . . . . . . . . . . . . 1-9 Steering Wheel
Adjustment . . . . . . . . . . . . . . . . . 1-10
Interior Lighting . . . . . . . . . . . . . . 1-11
Exterior Lighting . . . . . . . . . . . . . 1-11
Windshield Wiper/Washer . . . . 1-12
Climate Controls . . . . . . . . . . . . . 1-12
Transmission . . . . . . . . . . . . . . . . 1-14
Four-Wheel Drive . . . . . . . . . . . . 1-15
Vehicle Features
Infotainment System . . . . . . . . . 1-16
Radio(s) . . . . . . . . . . . . . . . . . . . . . 1-16
Satellite Radio . . . . . . . . . . . . . . . 1-16
Portable Audio Devices . . . . . . 1-17
Bluetooth
®. . . . . . . . . . . . . . . . . . . 1-17
Steering Wheel Controls . . . . . 1-17
Cruise Control . . . . . . . . . . . . . . . 1-17
Driver Information Center (DIC) (Base Level) . . . . . . . . . 1-18 Driver Information Center
(DIC) (Uplevel) . . . . . . . . . . . . . 1-18
Forward Collision Alert (FCA) System . . . . . . . . . . . . . . . . . . . . . 1-19
Lane Departure
Warning (LDW) . . . . . . . . . . . . . 1-19
Rear Vision Camera (RVC) . . . . . . . . . . . . . 1-19
Power Outlets . . . . . . . . . . . . . . . 1-19
Performance and Maintenance
Traction Control/Electronic Stability Control . . . . . . . . . . . . 1-20
Tire Pressure Monitor . . . . . . . . 1-20
Engine Oil Life System . . . . . . 1-21
Driving for Better Fuel Economy . . . . . . . . . . . . . . . . . . . 1-21
Roadside Assistance Program . . . . . . . . . . . . . . . . . . . . 1-22
OnStar
®. . . . . . . . . . . . . . . . . . . . . 1-22
Page 13 of 433
Black plate (6,1)GMC Canyon Owner Manual (GMNA-Localizing-U.S./Canada-7587000) -
2015 - CRC - 3/17/15
1-6 In Brief
Windows
Power Windows
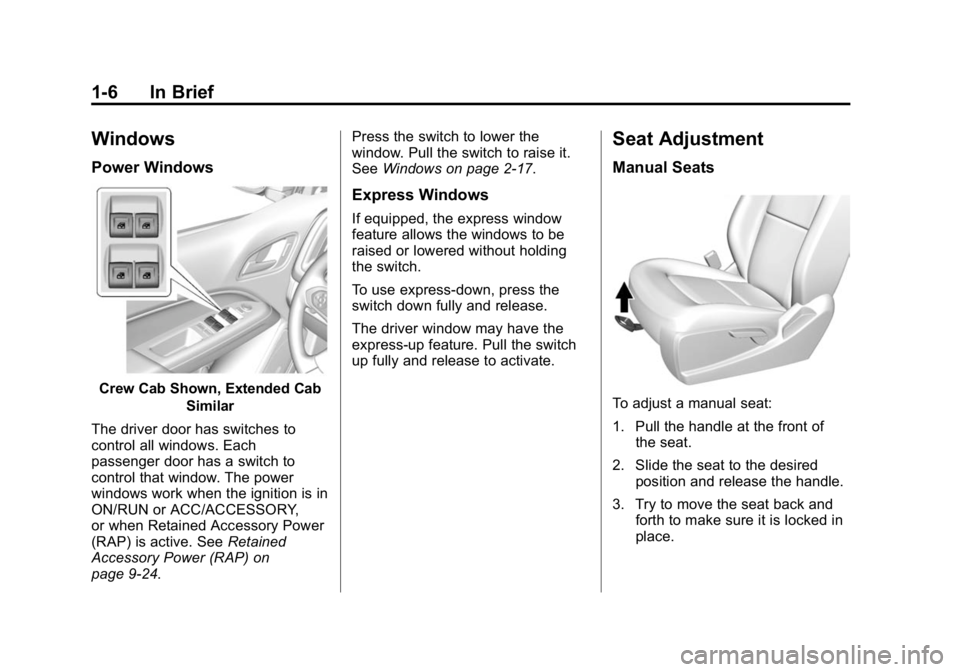
Crew Cab Shown, Extended CabSimilar
The driver door has switches to
control all windows. Each
passenger door has a switch to
control that window. The power
windows work when the ignition is in
ON/RUN or ACC/ACCESSORY,
or when Retained Accessory Power
(RAP) is active. See Retained
Accessory Power (RAP) on
page 9-24. Press the switch to lower the
window. Pull the switch to raise it.
See
Windows on page 2-17.
Express Windows
If equipped, the express window
feature allows the windows to be
raised or lowered without holding
the switch.
To use express-down, press the
switch down fully and release.
The driver window may have the
express-up feature. Pull the switch
up fully and release to activate.
Seat Adjustment
Manual Seats
To adjust a manual seat:
1. Pull the handle at the front of
the seat.
2. Slide the seat to the desired position and release the handle.
3. Try to move the seat back and forth to make sure it is locked in
place.
Page 14 of 433
Black plate (7,1)GMC Canyon Owner Manual (GMNA-Localizing-U.S./Canada-7587000) -
2015 - CRC - 3/17/15
In Brief 1-7
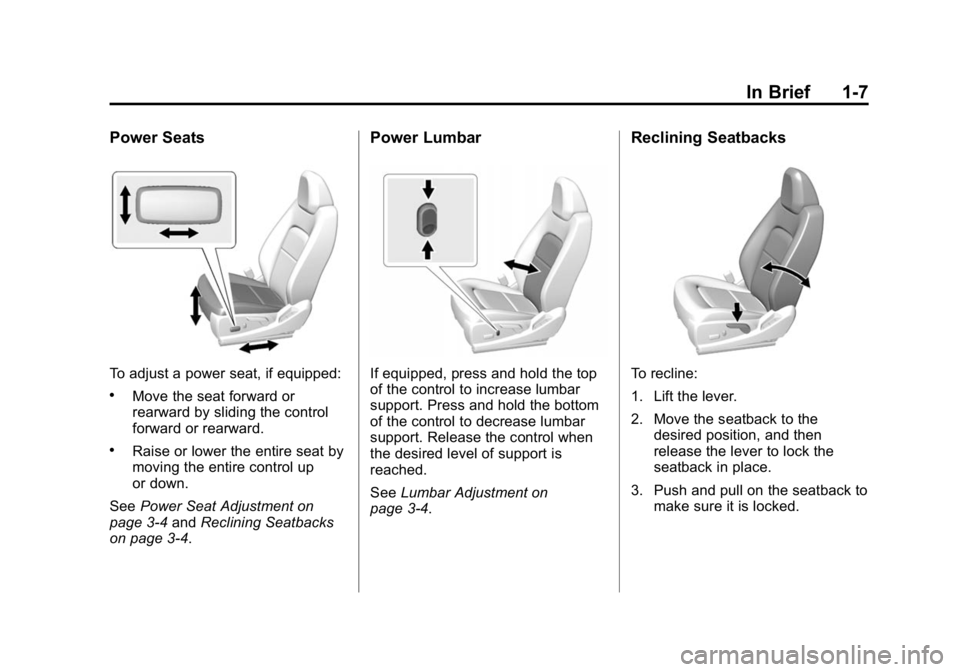
Power Seats
To adjust a power seat, if equipped:
.Move the seat forward or
rearward by sliding the control
forward or rearward.
.Raise or lower the entire seat by
moving the entire control up
or down.
See Power Seat Adjustment on
page 3-4 andReclining Seatbacks
on page 3-4.
Power Lumbar
If equipped, press and hold the top
of the control to increase lumbar
support. Press and hold the bottom
of the control to decrease lumbar
support. Release the control when
the desired level of support is
reached.
See Lumbar Adjustment on
page 3-4.
Reclining Seatbacks
To recline:
1. Lift the lever.
2. Move the seatback to the
desired position, and then
release the lever to lock the
seatback in place.
3. Push and pull on the seatback to make sure it is locked.
Page 15 of 433

Black plate (8,1)GMC Canyon Owner Manual (GMNA-Localizing-U.S./Canada-7587000) -
2015 - CRC - 3/17/15
1-8 In Brief
To return the seatback to the upright
position:
1. Lift the lever fully withoutapplying pressure to the
seatback.
2. Push and pull on the seatback to make sure it is locked.
See Reclining Seatbacks on
page 3-4.
Heated Seats
If equipped, the buttons are on the
center stack. To operate, the engine
must be running.
This feature will heat the cushion
and back of the seats.
Press
+to heat the driver or
passenger seatback only.
Press
zto heat the driver or
passenger cushion and seatback.
The indicator light comes on when
this feature is on.
See Heated Front Seats on
page 3-6.
Head Restraint
Adjustment
Do not drive until the head restraints
for all occupants are installed and
adjusted properly.
To achieve a comfortable seating
position, change the seatback
recline angle as little as necessary while keeping the seat and the head
restraint height in the proper
position.
See
Head Restraints on page 3-2
and Seat Adjustment on page 3-3.
Safety Belts
Refer to the following sections for
important information on how to use
safety belts properly:
.Safety Belts on page 3-9.
.How to Wear Safety Belts
Properly on page 3-10.
Page 50 of 433
Black plate (1,1)GMC Canyon Owner Manual (GMNA-Localizing-U.S./Canada-7587000) -
2015 - CRC - 3/17/15
Seats and Restraints 3-1
Seats and
Restraints
Head Restraints
Head Restraints . . . . . . . . . . . . . . . 3-2
Front Seats
Seat Adjustment . . . . . . . . . . . . . . 3-3
Power Seat Adjustment . . . . . . . 3-4
Lumbar Adjustment . . . . . . . . . . . 3-4
Reclining Seatbacks . . . . . . . . . . 3-4
Heated Front Seats . . . . . . . . . . . 3-6
Rear Seats
Rear Seats (Crew Cab) . . . . . . . 3-7
Safety Belts
Safety Belts . . . . . . . . . . . . . . . . . . . 3-9
How to Wear Safety BeltsProperly . . . . . . . . . . . . . . . . . . . . 3-10
Lap-Shoulder Belt . . . . . . . . . . . . 3-11 Safety Belt Use During
Pregnancy . . . . . . . . . . . . . . . . . . 3-14
Safety Belt Extender . . . . . . . . . 3-15
Safety System Check . . . . . . . . 3-15
Safety Belt Care . . . . . . . . . . . . . 3-15
Replacing Safety Belt System Parts after a Crash . . . . . . . . . 3-15
Airbag System
Airbag System . . . . . . . . . . . . . . . 3-16
Where Are the Airbags? . . . . . 3-18
When Should an AirbagInflate? . . . . . . . . . . . . . . . . . . . . . 3-20
What Makes an Airbag Inflate? . . . . . . . . . . . . . . . . . . . . . 3-21
How Does an Airbag Restrain? . . . . . . . . . . . . . . . . . . . 3-21
What Will You See after an Airbag Inflates? . . . . . . . . . . . . 3-21
Passenger Sensing System . . . . . . . . . . . . . . . . . . . . . 3-23
Servicing the Airbag-Equipped Vehicle . . . . . . . . . . . . . . . . . . . . . 3-27 Adding Equipment to the
Airbag-Equipped Vehicle . . . 3-28
Airbag System Check . . . . . . . . 3-29
Replacing Airbag System Parts after a Crash . . . . . . . . . 3-29
Child Restraints
Older Children . . . . . . . . . . . . . . . 3-30
Infants and Young
Children . . . . . . . . . . . . . . . . . . . . 3-32
Child Restraint Systems . . . . . 3-34
Where to Put the Restraint . . . 3-36
Lower Anchors and Tethers for Children (LATCH
System) . . . . . . . . . . . . . . . . . . . . 3-38
Replacing LATCH System Parts After a Crash . . . . . . . . . 3-53
Securing Child Restraints (Rear Seat) . . . . . . . . . . . . . . . . . 3-53
Securing Child Restraints (Front Passenger Seat) . . . . 3-59
Page 52 of 433
Black plate (3,1)GMC Canyon Owner Manual (GMNA-Localizing-U.S./Canada-7587000) -
2015 - CRC - 3/17/15
Seats and Restraints 3-3
Rear Head Restraints
Crew Cab
The vehicle’s rear seats have head
restraints in the outboard seating
positions that cannot be adjusted up
or down.
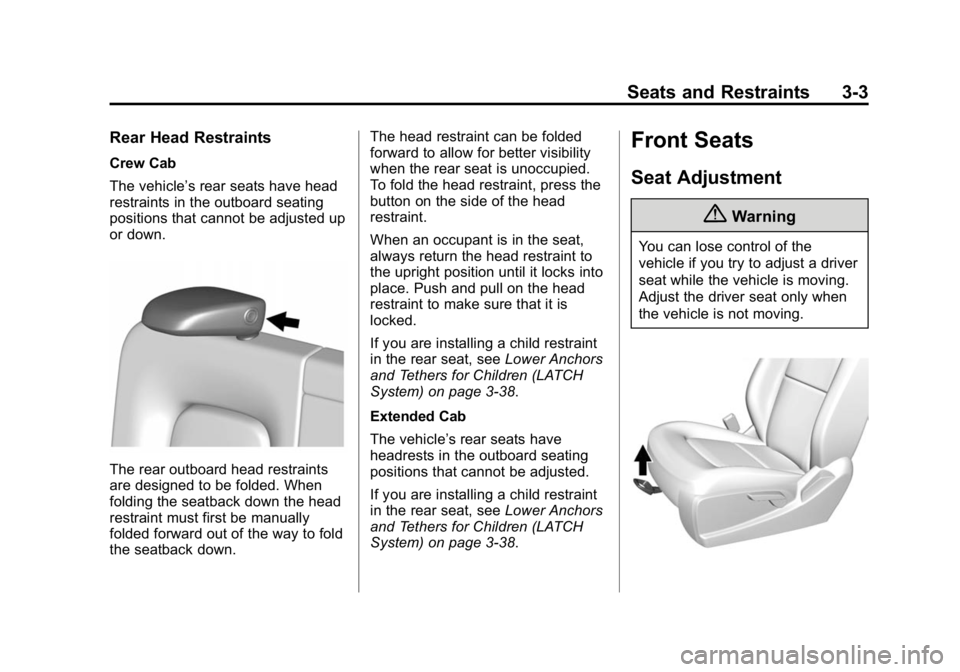
The rear outboard head restraints
are designed to be folded. When
folding the seatback down the head
restraint must first be manually
folded forward out of the way to fold
the seatback down.The head restraint can be folded
forward to allow for better visibility
when the rear seat is unoccupied.
To fold the head restraint, press the
button on the side of the head
restraint.
When an occupant is in the seat,
always return the head restraint to
the upright position until it locks into
place. Push and pull on the head
restraint to make sure that it is
locked.
If you are installing a child restraint
in the rear seat, see
Lower Anchors
and Tethers for Children (LATCH
System) on page 3-38.
Extended Cab
The vehicle’s rear seats have
headrests in the outboard seating
positions that cannot be adjusted.
If you are installing a child restraint
in the rear seat, see Lower Anchors
and Tethers for Children (LATCH
System) on page 3-38.
Front Seats
Seat Adjustment
{Warning
You can lose control of the
vehicle if you try to adjust a driver
seat while the vehicle is moving.
Adjust the driver seat only when
the vehicle is not moving.
Page 53 of 433
Black plate (4,1)GMC Canyon Owner Manual (GMNA-Localizing-U.S./Canada-7587000) -
2015 - CRC - 3/17/15
3-4 Seats and Restraints
To adjust the seat:
1. Pull the handle at the front ofthe seat.
2. Slide the seat to the desired position and release the handle.
3. Try to move the seat back and forth to be sure the seat is
locked in place.
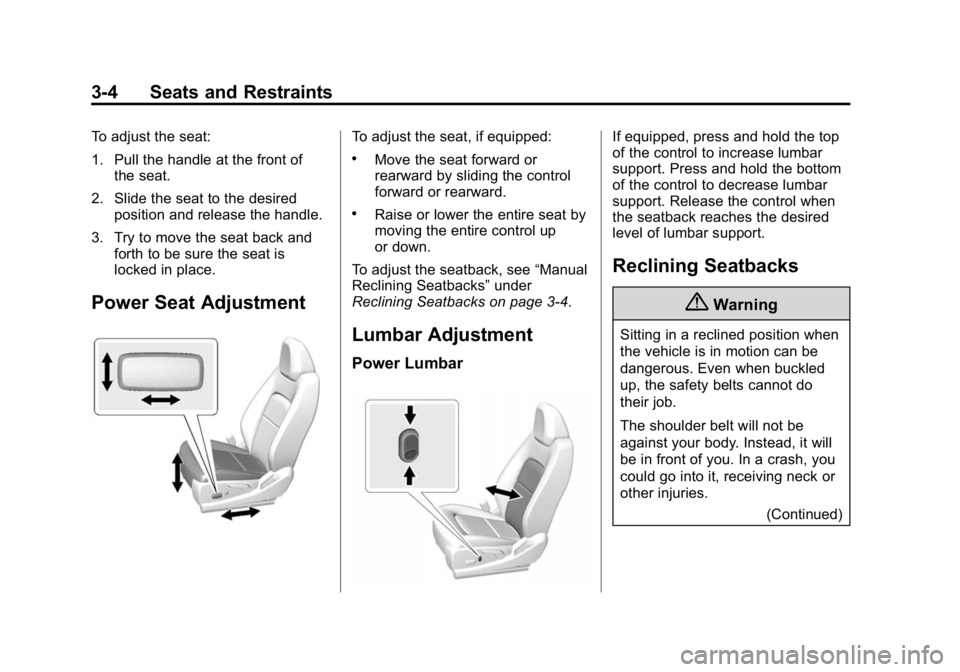
Power Seat Adjustment
To adjust the seat, if equipped:
.Move the seat forward or
rearward by sliding the control
forward or rearward.
.Raise or lower the entire seat by
moving the entire control up
or down.
To adjust the seatback, see “Manual
Reclining Seatbacks” under
Reclining Seatbacks on page 3-4.
Lumbar Adjustment
Power Lumbar
If equipped, press and hold the top
of the control to increase lumbar
support. Press and hold the bottom
of the control to decrease lumbar
support. Release the control when
the seatback reaches the desired
level of lumbar support.
Reclining Seatbacks
{Warning
Sitting in a reclined position when
the vehicle is in motion can be
dangerous. Even when buckled
up, the safety belts cannot do
their job.
The shoulder belt will not be
against your body. Instead, it will
be in front of you. In a crash, you
could go into it, receiving neck or
other injuries.
(Continued)
Page 62 of 433
Black plate (13,1)GMC Canyon Owner Manual (GMNA-Localizing-U.S./Canada-7587000) -
2015 - CRC - 3/17/15
Seats and Restraints 3-13
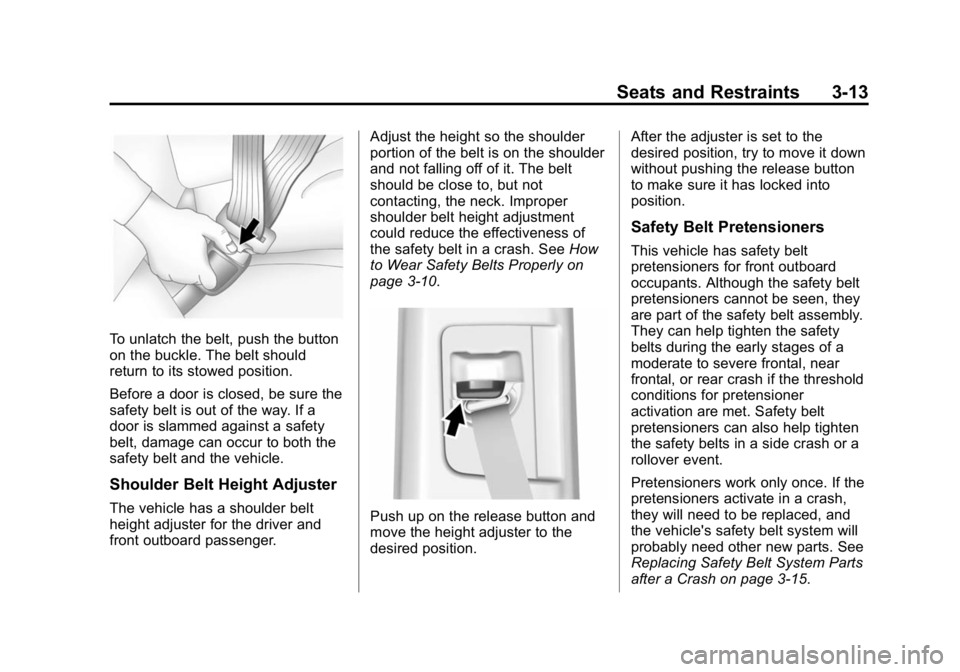
To unlatch the belt, push the button
on the buckle. The belt should
return to its stowed position.
Before a door is closed, be sure the
safety belt is out of the way. If a
door is slammed against a safety
belt, damage can occur to both the
safety belt and the vehicle.
Shoulder Belt Height Adjuster
The vehicle has a shoulder belt
height adjuster for the driver and
front outboard passenger.Adjust the height so the shoulder
portion of the belt is on the shoulder
and not falling off of it. The belt
should be close to, but not
contacting, the neck. Improper
shoulder belt height adjustment
could reduce the effectiveness of
the safety belt in a crash. See
How
to Wear Safety Belts Properly on
page 3-10.Push up on the release button and
move the height adjuster to the
desired position. After the adjuster is set to the
desired position, try to move it down
without pushing the release button
to make sure it has locked into
position.
Safety Belt Pretensioners
This vehicle has safety belt
pretensioners for front outboard
occupants. Although the safety belt
pretensioners cannot be seen, they
are part of the safety belt assembly.
They can help tighten the safety
belts during the early stages of a
moderate to severe frontal, near
frontal, or rear crash if the threshold
conditions for pretensioner
activation are met. Safety belt
pretensioners can also help tighten
the safety belts in a side crash or a
rollover event.
Pretensioners work only once. If the
pretensioners activate in a crash,
they will need to be replaced, and
the vehicle's safety belt system will
probably need other new parts. See
Replacing Safety Belt System Parts
after a Crash on page 3-15.