2015 GMC CANYON fold seats
[x] Cancel search: fold seatsPage 52 of 433
Black plate (3,1)GMC Canyon Owner Manual (GMNA-Localizing-U.S./Canada-7587000) -
2015 - CRC - 3/17/15
Seats and Restraints 3-3
Rear Head Restraints
Crew Cab
The vehicle’s rear seats have head
restraints in the outboard seating
positions that cannot be adjusted up
or down.
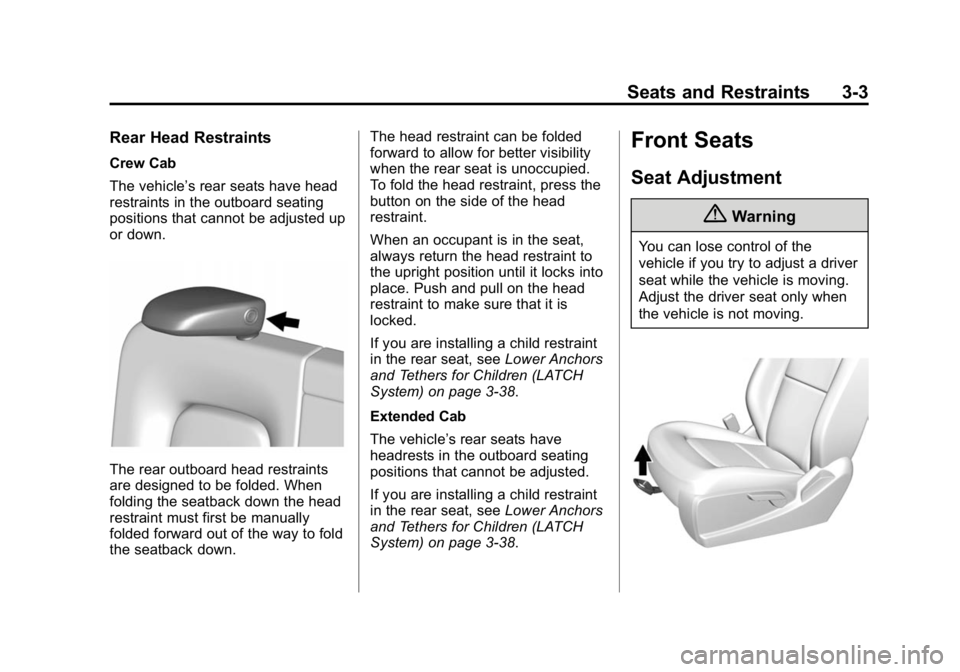
The rear outboard head restraints
are designed to be folded. When
folding the seatback down the head
restraint must first be manually
folded forward out of the way to fold
the seatback down.The head restraint can be folded
forward to allow for better visibility
when the rear seat is unoccupied.
To fold the head restraint, press the
button on the side of the head
restraint.
When an occupant is in the seat,
always return the head restraint to
the upright position until it locks into
place. Push and pull on the head
restraint to make sure that it is
locked.
If you are installing a child restraint
in the rear seat, see
Lower Anchors
and Tethers for Children (LATCH
System) on page 3-38.
Extended Cab
The vehicle’s rear seats have
headrests in the outboard seating
positions that cannot be adjusted.
If you are installing a child restraint
in the rear seat, see Lower Anchors
and Tethers for Children (LATCH
System) on page 3-38.
Front Seats
Seat Adjustment
{Warning
You can lose control of the
vehicle if you try to adjust a driver
seat while the vehicle is moving.
Adjust the driver seat only when
the vehicle is not moving.
Page 56 of 433
Black plate (7,1)GMC Canyon Owner Manual (GMNA-Localizing-U.S./Canada-7587000) -
2015 - CRC - 3/17/15
Seats and Restraints 3-7
The heated seat indicator lights do
not turn on during a remote start.
The temperature performance of an
unoccupied seat may be reduced.
This is normal.
The heated seats will not turn on
during a remote start unless they
are enabled in the vehicle
personalization menu. SeeRemote
Vehicle Start on page 2-6 and
Vehicle Personalization on
page 5-41.Rear Seats
Rear Seats (Crew Cab)
On crew cab models, the rear
seatbacks can be folded forward.
{Caution
Folding a rear seat with the safety
belts still fastened may cause
damage to the seat or the safety
belts. Always unbuckle the safety
belts and return them to their
normal stowed position before
folding a rear seat.
To fold a rear seatback:
1. Fold the head restraint. See Head Restraints on page 3-2.
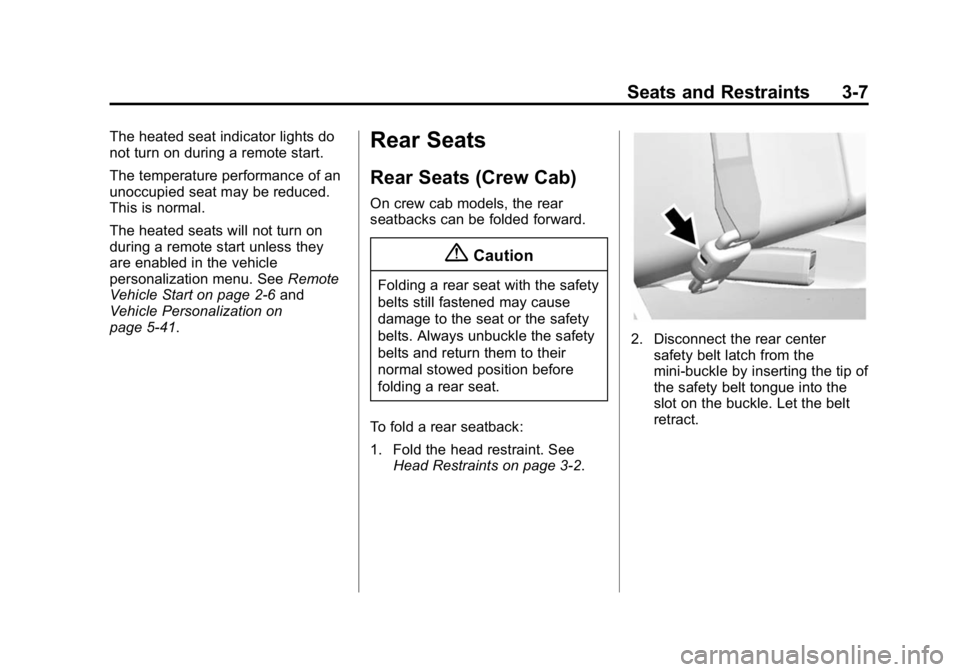
2. Disconnect the rear center
safety belt latch from the
mini-buckle by inserting the tip of
the safety belt tongue into the
slot on the buckle. Let the belt
retract.
Page 57 of 433
Black plate (8,1)GMC Canyon Owner Manual (GMNA-Localizing-U.S./Canada-7587000) -
2015 - CRC - 3/17/15
3-8 Seats and Restraints
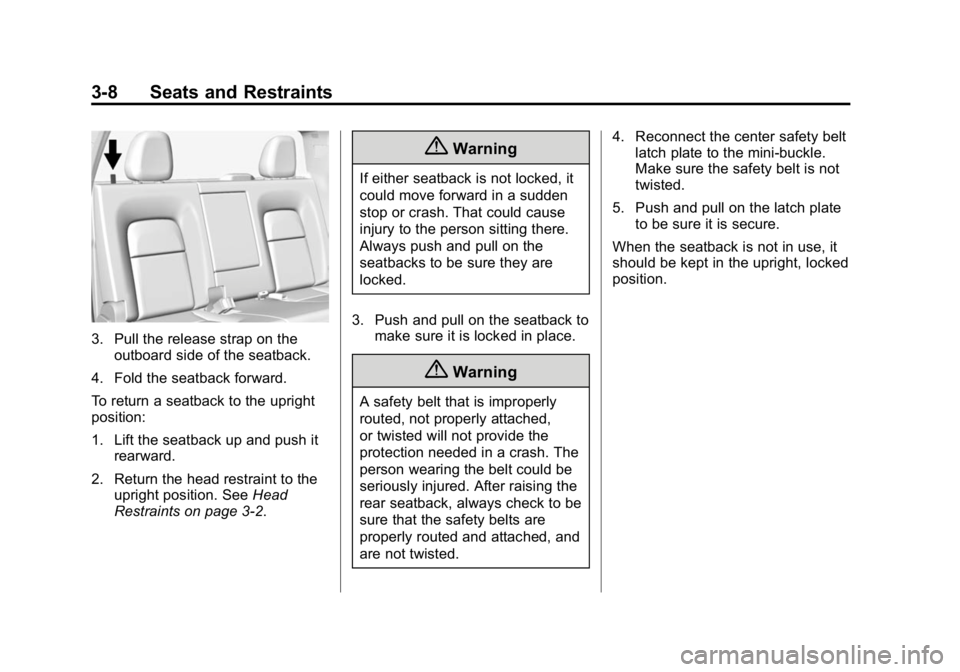
3. Pull the release strap on theoutboard side of the seatback.
4. Fold the seatback forward.
To return a seatback to the upright
position:
1. Lift the seatback up and push it rearward.
2. Return the head restraint to the upright position. See Head
Restraints on page 3-2.
{Warning
If either seatback is not locked, it
could move forward in a sudden
stop or crash. That could cause
injury to the person sitting there.
Always push and pull on the
seatbacks to be sure they are
locked.
3. Push and pull on the seatback to make sure it is locked in place.
{Warning
A safety belt that is improperly
routed, not properly attached,
or twisted will not provide the
protection needed in a crash. The
person wearing the belt could be
seriously injured. After raising the
rear seatback, always check to be
sure that the safety belts are
properly routed and attached, and
are not twisted. 4. Reconnect the center safety belt
latch plate to the mini-buckle.
Make sure the safety belt is not
twisted.
5. Push and pull on the latch plate to be sure it is secure.
When the seatback is not in use, it
should be kept in the upright, locked
position.
Page 90 of 433
Black plate (41,1)GMC Canyon Owner Manual (GMNA-Localizing-U.S./Canada-7587000) -
2015 - CRC - 3/17/15
Seats and Restraints 3-41
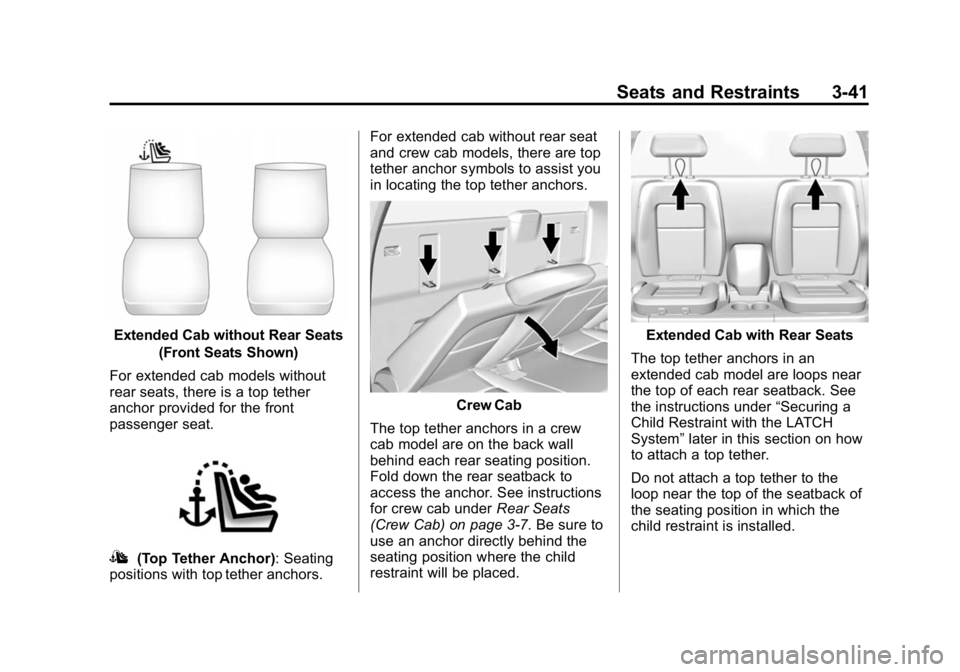
Extended Cab without Rear Seats(Front Seats Shown)
For extended cab models without
rear seats, there is a top tether
anchor provided for the front
passenger seat.
I(Top Tether Anchor): Seating
positions with top tether anchors. For extended cab without rear seat
and crew cab models, there are top
tether anchor symbols to assist you
in locating the top tether anchors.
Crew Cab
The top tether anchors in a crew
cab model are on the back wall
behind each rear seating position.
Fold down the rear seatback to
access the anchor. See instructions
for crew cab under Rear Seats
(Crew Cab) on page 3-7. Be sure to
use an anchor directly behind the
seating position where the child
restraint will be placed.
Extended Cab with Rear Seats
The top tether anchors in an
extended cab model are loops near
the top of each rear seatback. See
the instructions under “Securing a
Child Restraint with the LATCH
System” later in this section on how
to attach a top tether.
Do not attach a top tether to the
loop near the top of the seatback of
the seating position in which the
child restraint is installed.
Page 92 of 433
Black plate (43,1)GMC Canyon Owner Manual (GMNA-Localizing-U.S./Canada-7587000) -
2015 - CRC - 3/17/15
Seats and Restraints 3-43
{Warning
Children can be seriously injured
or strangled if a shoulder belt is
wrapped around their neck. The
shoulder belt can tighten but
cannot be loosened if it is locked.
The shoulder belt locks when it is
pulled all the way out of the
retractor. It unlocks when the
shoulder belt is allowed to go all
the way back into the retractor,
but it cannot do this if it is
wrapped around a child’s neck.
If the shoulder belt is locked and
tightened around a child’s neck,
the only way to loosen the belt is
to cut it.
Buckle any unused safety belts
behind the child restraint so
children cannot reach them. Pull
the shoulder belt all the way out
of the retractor to set the lock,
and tighten the belt behind the
child restraint after the child
restraint has been installed.
{Caution
Do not let the LATCH
attachments rub against the
vehicle’s safety belts. This may
damage these parts. If necessary,
move buckled safety belts to
avoid rubbing the LATCH
attachments.
Do not fold the empty rear seat
with a safety belt buckled. This
could damage the safety belt or
the seat. Unbuckle and return the
safety belt to its stowed position,
before folding the seat.
If you need to secure more than one
child restraint in the rear seat, see
Where to Put the Restraint on
page 3-36.
Crew Cab
1. When installing a rear-facing child restraint, it may be
necessary to move the front seat
forward to properly install per the
child restraint manufacturer
instructions. See Seat
Adjustment on page 3-3 or
Power Seat Adjustment on
page 3-4.
2. For rear outboard seating positions, if the head restraint
interferes with the proper
installation of the child restraint,
the head restraint may be
removed. See “Head Restraint/
Headrest Removal and
Reinstallation” at the end of this
section.
Page 100 of 433
Black plate (51,1)GMC Canyon Owner Manual (GMNA-Localizing-U.S./Canada-7587000) -
2015 - CRC - 3/17/15
Seats and Restraints 3-51
Head Restraint/Headrest
Removal and Reinstallation
{Warning
With head restraints that are not
installed and adjusted properly,
there is a greater chance that
occupants will suffer a neck/
spinal injury in a crash. Do not
drive until the head restraints for
all occupants are installed and
adjusted properly.
Crew Cab
The rear outboard head restraints
can be removed if they interfere with
the proper installation of the child
restraint. To remove the head restraint:
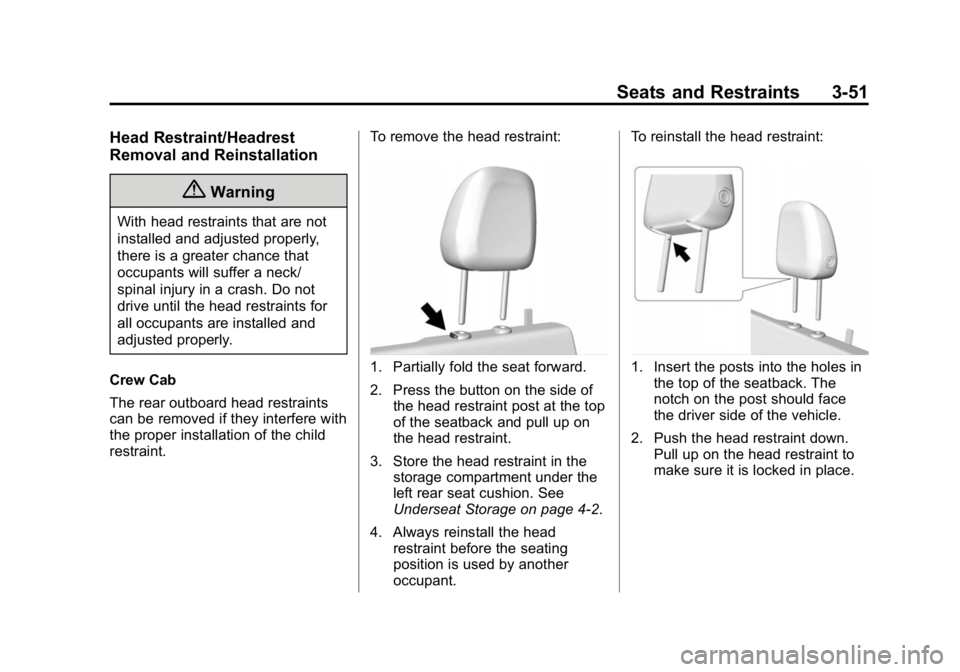
1. Partially fold the seat forward.
2. Press the button on the side of
the head restraint post at the top
of the seatback and pull up on
the head restraint.
3. Store the head restraint in the storage compartment under the
left rear seat cushion. See
Underseat Storage on page 4-2.
4. Always reinstall the head restraint before the seating
position is used by another
occupant. To reinstall the head restraint:1. Insert the posts into the holes in
the top of the seatback. The
notch on the post should face
the driver side of the vehicle.
2. Push the head restraint down. Pull up on the head restraint to
make sure it is locked in place.
Page 234 of 433
Black plate (19,1)GMC Canyon Owner Manual (GMNA-Localizing-U.S./Canada-7587000) -
2015 - CRC - 3/17/15
Driving and Operating 9-19
vehicle goes. If you have to stop
or turn quickly, or if there is a
crash, they will keep going.
{Warning
Things you put inside the
vehicle can strike and injure
people in a sudden stop or
turn, or in a crash.
.Put things in the cargo
area of the vehicle. Try to
spread the weight evenly.
.Never stack heavier
things, like suitcases,
inside the vehicle so that
some of them are above
the tops of the seats.
.Do not leave an
unsecured child restraint
in the vehicle.
(Continued)
Warning (Continued)
.When you carry something
inside the vehicle, secure
it whenever you can.
.Do not leave a seat folded
down unless you need to.
There is also important loading
information for off-road driving in
this manual. See “Loading the
Vehicle for Off-Road Driving“
under Off-Road Driving on
page 9-5.
Two-Tiered Loading
Depending on the model of the
pickup, an upper load platform
can be created by positioning
three or four 5 cm (2 in) by
15 cm (6 in) wooden planks
across the width of the pickup
box. The planks must be
inserted in the pickup box
depressions. When using this upper load
platform, be sure the load is
securely tied down to prevent it
from shifting. The load's center
of gravity should be positioned
in a zone over the rear axle.
The zone is located in the area
between the front of each wheel
well and the rear of each wheel
well. The center of gravity height
must not extend above the top
of the pickup box flareboard.
Any load that extends beyond
the vehicle's taillamp area must
be properly marked according to
local laws and regulations.
Remember not to exceed
the Gross Axle Weight
Rating (GAWR) of the front or
rear axle.
Page 424 of 433

Black plate (5,1)GMC Canyon Owner Manual (GMNA-Localizing-U.S./Canada-7587000) -
2015 - CRC - 3/17/15
INDEX i-5
FluidAutomatic Transmission . . . . 10-13
Brakes . . . . . . . . . . . . . . . . . . . . . . 10-22
Four-Wheel Drive
Transfer Case . . . . . . . . . . . . . . . 9-36
Washer . . . . . . . . . . . . . . . . . . . . . 10-21
Fog Lamps . . . . . . . . . . . . . . . . . . . . . 6-5
Folding Mirrors . . . . . . . . . . . . . . . . 2-15
Forward Collision Alert
(FCA) System . . . . . . . . . . . . . . . . 9-48
Four-Wheel Drive . . . . . . . 9-36, 10-25
Frequency Statement
Radio . . . . . . . . . . . . . . . . . . . . . . . 13-12
Front Axle . . . . . . . . . . . . . . . . . . . . 10-25
Front Fog Lamp Light . . . . . . . . . . . . . . . . . . . . . . . . . . 5-26
Front Seats Adjustment . . . . . . . . . . . . . . . . . . . . 3-3
Heated . . . . . . . . . . . . . . . . . . . . . . . . 3-6
Fuel . . . . . . . . . . . . . . . . . . . . . . . . . . . 9-54 Additives . . . . . . . . . . . . . . . . . . . . . 9-55
Economy Driving . . . . . . . . . . . . . 1-21
Filling a Portable Fuel
Container . . . . . . . . . . . . . . . . . . . 9-57
Filling the Tank . . . . . . . . . . . . . . . 9-55
Foreign Countries . . . . . . . . . . . . 9-55 Fuel (cont'd)
Gauge . . . . . . . . . . . . . . . . . . . . . . . . 5-14
Low Fuel Warning Light . . . . . . . 5-25
Requirements, California . . . . . 9-55
System Messages . . . . . . . . . . . . 5-36
Full-Size Spare Tire . . . . . . . . . . 10-74
Fuses . . . . . . . . . . . . . . . . . . . . . . . . 10-34 Engine CompartmentFuse Block . . . . . . . . . . . . . . . . 10-34
Instrument Panel Fuse Block . . . . . . . . . . . . . . . . . . . . . . 10-38
G
GaugesEngine CoolantTemperature . . . . . . . . . . . . . . . . 5-15
Fuel . . . . . . . . . . . . . . . . . . . . . . . . . . 5-14
Odometer . . . . . . . . . . . . . . . . . . . . . 5-13
Speedometer . . . . . . . . . . . . . . . . . 5-13
Tachometer . . . . . . . . . . . . . . . . . . . 5-13
Trip Odometer . . . . . . . . . . . . . . . . 5-13
Warning Lights and Indicators . . . . . . . . . . . . . . . . . . . . 5-7 General Information
Service and Maintenance . . . . . 11-1
Towing . . . . . . . . . . . . . . . . . . . . . . . . 9-57
Vehicle Care . . . . . . . . . . . . . . . . . . 10-2
Glove Box . . . . . . . . . . . . . . . . . . . . . . 4-1
GM Mobility Reimbursement Program . . . . . . . . . . . . . . . . . . . . . . 13-5
H
Halogen Bulbs . . . . . . . . . . . . . . . . 10-30
Hazard Warning Flashers . . . . . . . 6-4
Head Restraints . . . . . . . . . . . . . . . . 3-2
Headlamps
Aiming . . . . . . . . . . . . . . . . . . . . . . 10-30
Automatic . . . . . . . . . . . . . . . . . . . . . . 6-3
Bulb Replacement . . . . . . . . . . 10-30
Daytime RunningLamps (DRL) . . . . . . . . . . . . . . . . . 6-3
Flash-to-Pass . . . . . . . . . . . . . . . . . . 6-3
Headlamps, Front Turn Signal, Sidemarker, and
Parking Lamps . . . . . . . . . . . . 10-30
High-Beam On Light . . . . . . . . . . 5-25
High/Low Beam Changer . . . . . . 6-2
Lamps On Reminder . . . . . . . . . 5-26
Heated Front Seats . . . . . . . . . . . . . 3-6