2015 FORD EXPLORER ECO mode
[x] Cancel search: ECO modePage 129 of 596
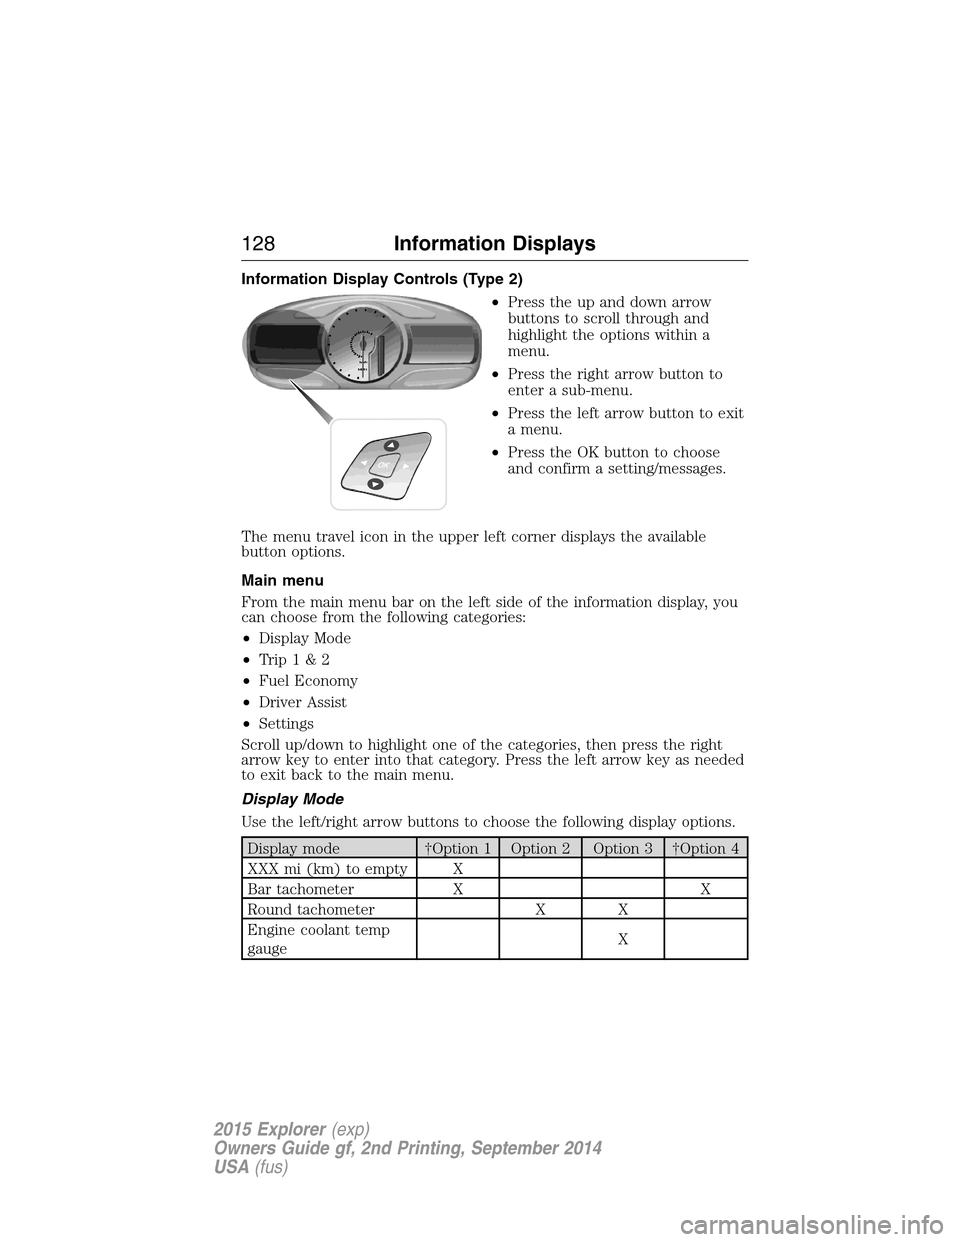
Information Display Controls (Type 2)
•Press the up and down arrow
buttons to scroll through and
highlight the options within a
menu.
•Press the right arrow button to
enter a sub-menu.
•Press the left arrow button to exit
a menu.
•Press the OK button to choose
and confirm a setting/messages.
The menu travel icon in the upper left corner displays the available
button options.
Main menu
From the main menu bar on the left side of the information display, you
can choose from the following categories:
•Display Mode
•Trip1&2
•Fuel Economy
•Driver Assist
•Settings
Scroll up/down to highlight one of the categories, then press the right
arrow key to enter into that category. Press the left arrow key as needed
to exit back to the main menu.
Display Mode
Use the left/right arrow buttons to choose the following display options.
Display mode †Option 1 Option 2 Option 3 †Option 4
XXX mi (km) to empty X
Bar tachometer X X
Round tachometer X X
Engine coolant temp
gaugeX
128Information Displays
2015 Explorer(exp)
Owners Guide gf, 2nd Printing, September 2014
USA(fus)
Page 130 of 596
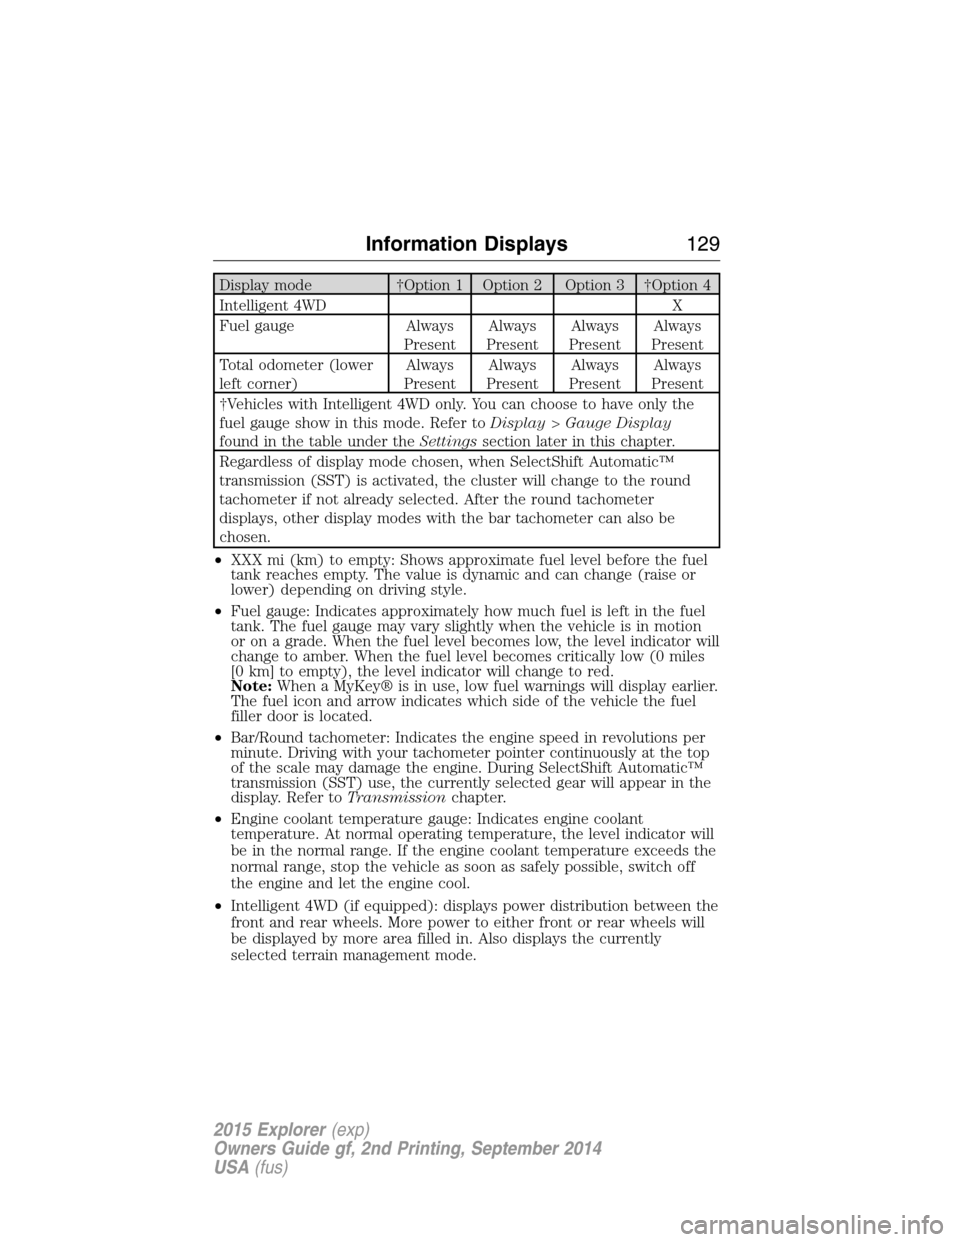
Display mode †Option 1 Option 2 Option 3 †Option 4
Intelligent 4WD X
Fuel gauge Always
PresentAlways
PresentAlways
PresentAlways
Present
Total odometer (lower
left corner)Always
PresentAlways
PresentAlways
PresentAlways
Present
†Vehicles with Intelligent 4WD only. You can choose to have only the
fuel gauge show in this mode. Refer toDisplay>Gauge Display
found in the table under theSettingssection later in this chapter.
Regardless of display mode chosen, when SelectShift Automatic™
transmission (SST) is activated, the cluster will change to the round
tachometer if not already selected. After the round tachometer
displays, other display modes with the bar tachometer can also be
chosen.
•XXX mi (km) to empty: Shows approximate fuel level before the fuel
tank reaches empty. The value is dynamic and can change (raise or
lower) depending on driving style.
•Fuel gauge: Indicates approximately how much fuel is left in the fuel
tank. The fuel gauge may vary slightly when the vehicle is in motion
or on a grade. When the fuel level becomes low, the level indicator will
change to amber. When the fuel level becomes critically low (0 miles
[0 km] to empty), the level indicator will change to red.
Note:When a MyKey® is in use, low fuel warnings will display earlier.
The fuel icon and arrow indicates which side of the vehicle the fuel
filler door is located.
•Bar/Round tachometer: Indicates the engine speed in revolutions per
minute. Driving with your tachometer pointer continuously at the top
of the scale may damage the engine. During SelectShift Automatic™
transmission (SST) use, the currently selected gear will appear in the
display. Refer toTransmissionchapter.
•Engine coolant temperature gauge: Indicates engine coolant
temperature. At normal operating temperature, the level indicator will
be in the normal range. If the engine coolant temperature exceeds the
normal range, stop the vehicle as soon as safely possible, switch off
the engine and let the engine cool.
•Intelligent 4WD (if equipped): displays power distribution between the
front and rear wheels. More power to either front or rear wheels will
be displayed by more area filled in. Also displays the currently
selected terrain management mode.
Information Displays129
2015 Explorer(exp)
Owners Guide gf, 2nd Printing, September 2014
USA(fus)
Page 133 of 596
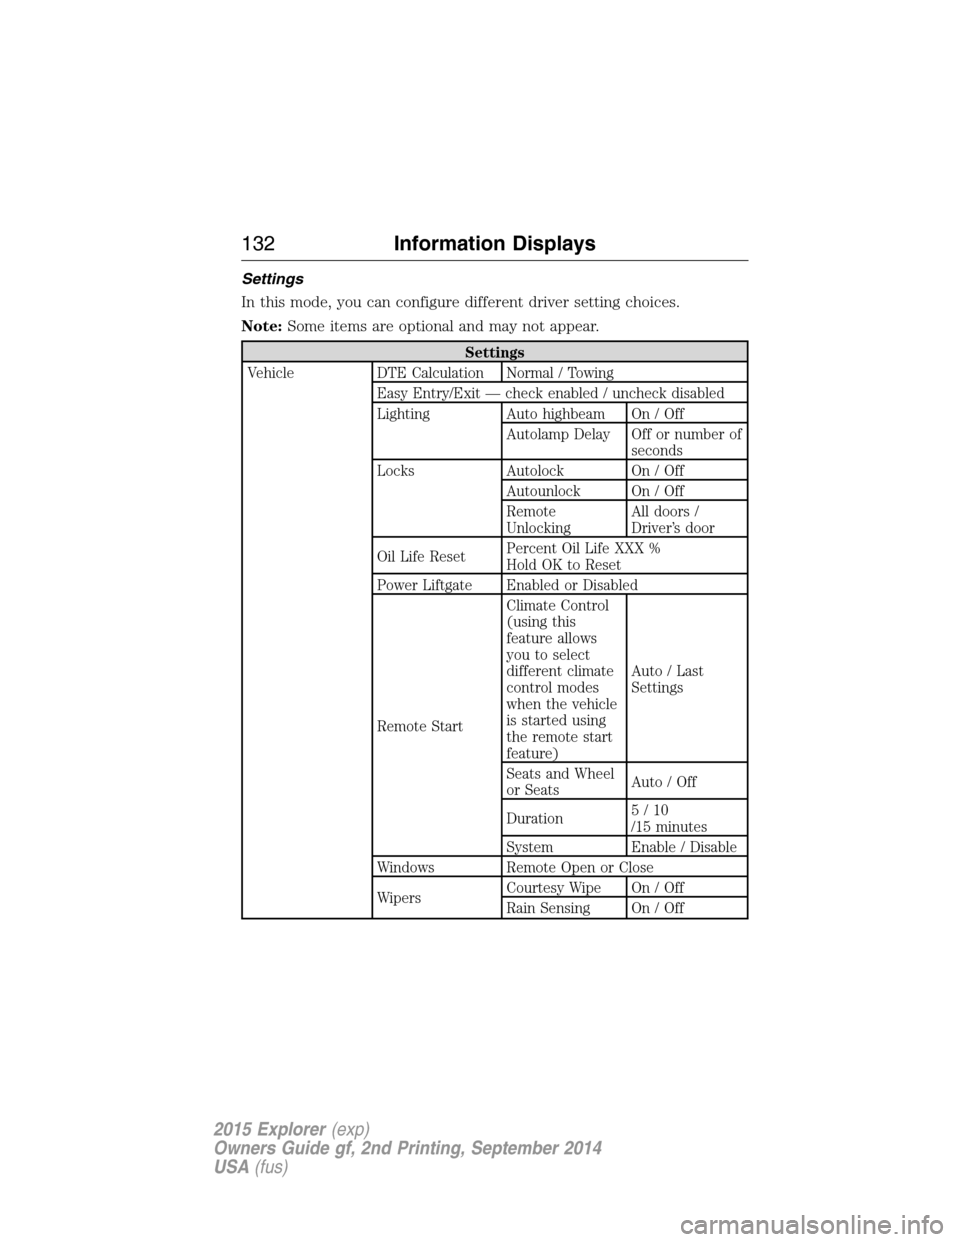
Settings
In this mode, you can configure different driver setting choices.
Note:Some items are optional and may not appear.
Settings
Vehicle DTE Calculation Normal / Towing
Easy Entry/Exit — check enabled / uncheck disabled
Lighting Auto highbeam On / Off
Autolamp Delay Off or number of
seconds
Locks Autolock On / Off
Autounlock On / Off
Remote
UnlockingAll doors /
Driver’s door
Oil Life ResetPercent Oil Life XXX %
Hold OK to Reset
Power Liftgate Enabled or Disabled
Remote StartClimate Control
(using this
feature allows
you to select
different climate
control modes
when the vehicle
is started using
the remote start
feature)Auto / Last
Settings
Seats and Wheel
or SeatsAuto / Off
Duration5/10
/15 minutes
System Enable / Disable
Windows Remote Open or Close
WipersCourtesy Wipe On / Off
Rain Sensing On / Off
132Information Displays
2015 Explorer(exp)
Owners Guide gf, 2nd Printing, September 2014
USA(fus)
Page 137 of 596
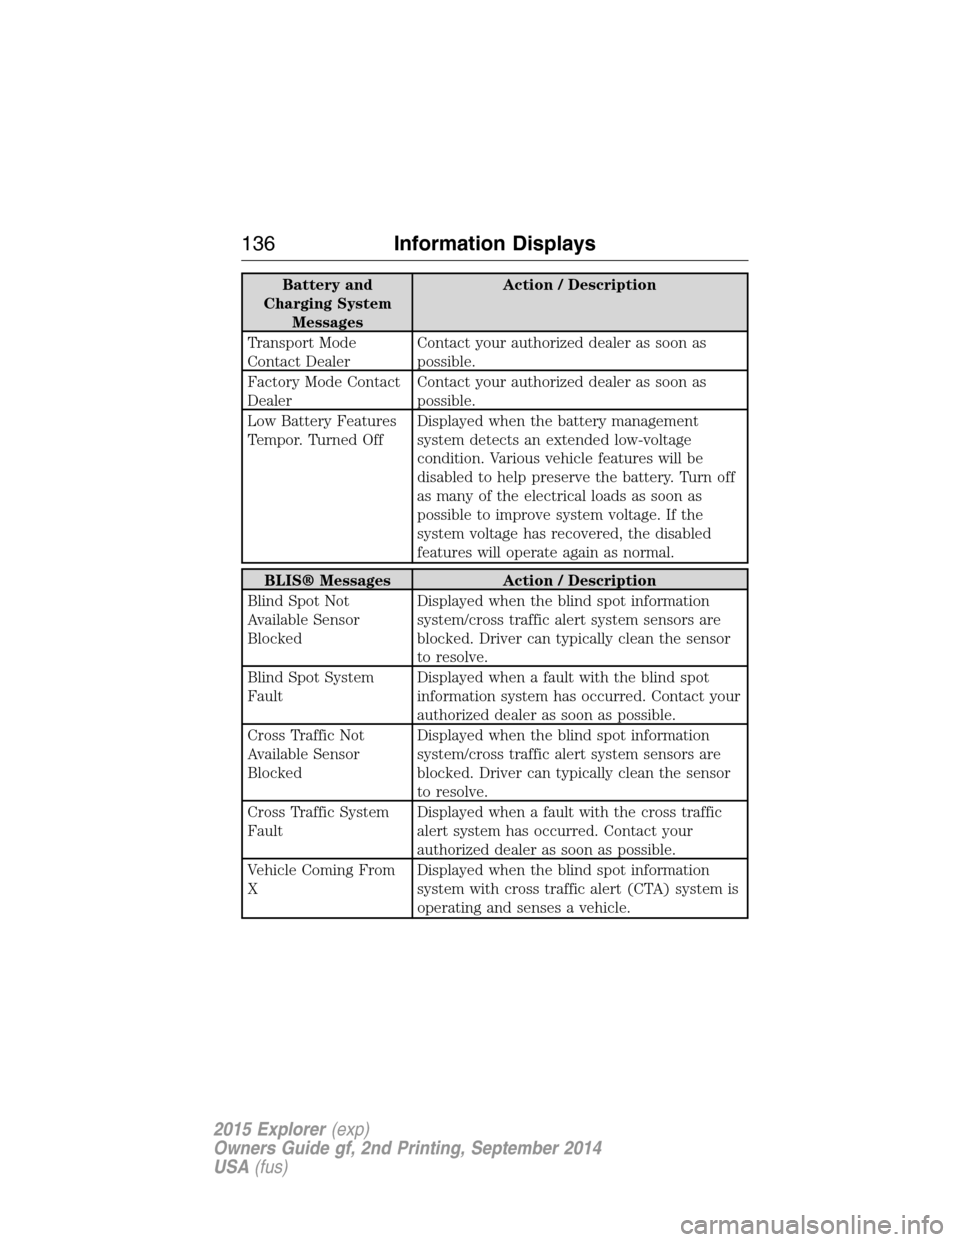
Battery and
Charging System
MessagesAction / Description
Transport Mode
Contact DealerContact your authorized dealer as soon as
possible.
Factory Mode Contact
DealerContact your authorized dealer as soon as
possible.
Low Battery Features
Tempor. Turned OffDisplayed when the battery management
system detects an extended low-voltage
condition. Various vehicle features will be
disabled to help preserve the battery. Turn off
as many of the electrical loads as soon as
possible to improve system voltage. If the
system voltage has recovered, the disabled
features will operate again as normal.
BLIS® Messages Action / Description
Blind Spot Not
Available Sensor
BlockedDisplayed when the blind spot information
system/cross traffic alert system sensors are
blocked. Driver can typically clean the sensor
to resolve.
Blind Spot System
FaultDisplayed when a fault with the blind spot
information system has occurred. Contact your
authorized dealer as soon as possible.
Cross Traffic Not
Available Sensor
BlockedDisplayed when the blind spot information
system/cross traffic alert system sensors are
blocked. Driver can typically clean the sensor
to resolve.
Cross Traffic System
FaultDisplayed when a fault with the cross traffic
alert system has occurred. Contact your
authorized dealer as soon as possible.
Vehicle Coming From
XDisplayed when the blind spot information
system with cross traffic alert (CTA) system is
operating and senses a vehicle.
136Information Displays
2015 Explorer(exp)
Owners Guide gf, 2nd Printing, September 2014
USA(fus)
Page 181 of 596
Programming HomeLink to a Genie Intellicode 2 garage door opener
Note:The Genie Intellicode 2 transmitter must already be programmed
to operate with the garage door opener.
Programing the transmitters
To program HomeLink to the transmitter you must first put the
transmitter into programming mode. To do this:
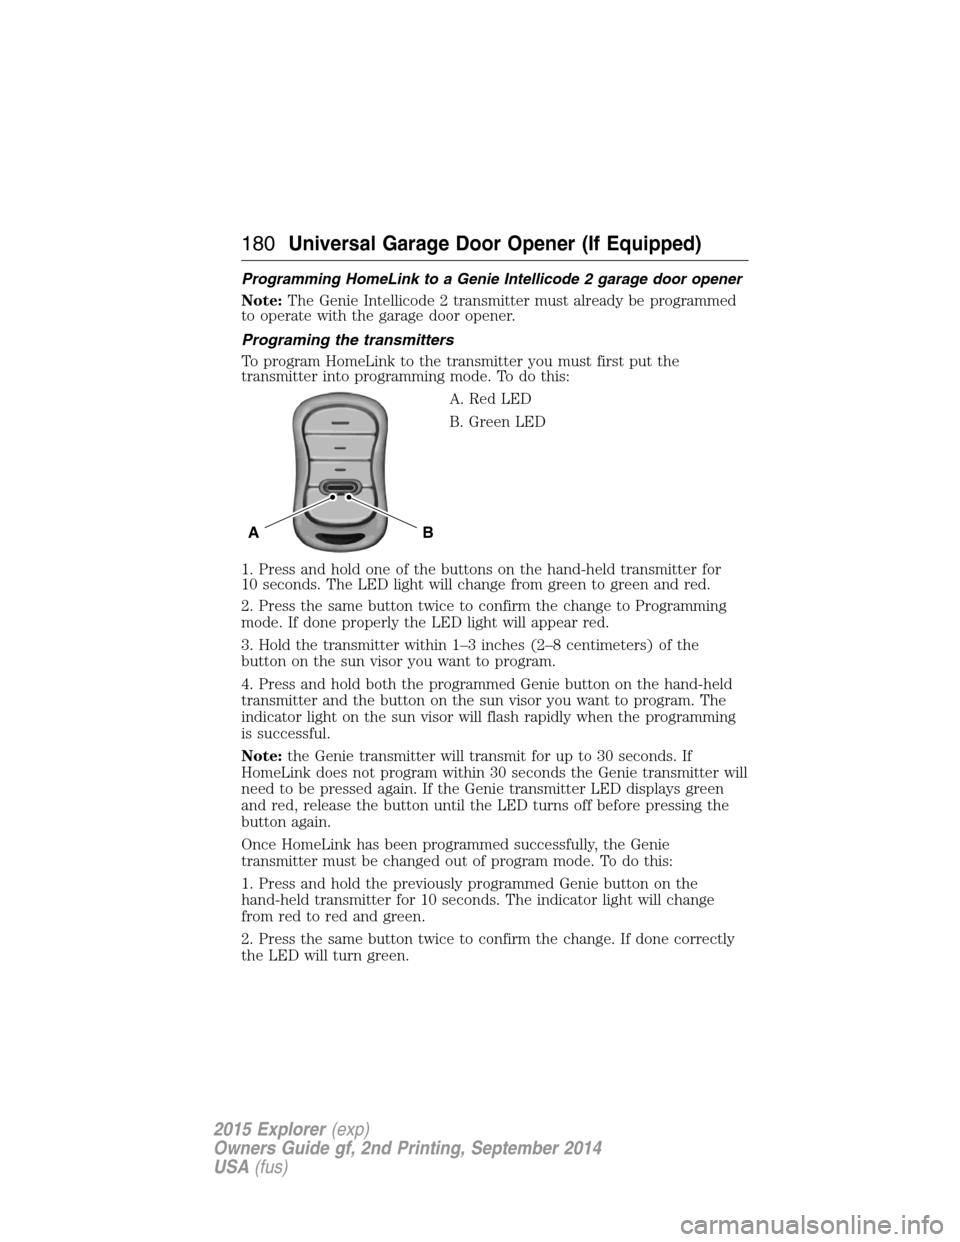
A. Red LED
B. Green LED
1. Press and hold one of the buttons on the hand-held transmitter for
10 seconds. The LED light will change from green to green and red.
2. Press the same button twice to confirm the change to Programming
mode. If done properly the LED light will appear red.
3. Hold the transmitter within 1–3 inches (2–8 centimeters) of the
button on the sun visor you want to program.
4. Press and hold both the programmed Genie button on the hand-held
transmitter and the button on the sun visor you want to program. The
indicator light on the sun visor will flash rapidly when the programming
is successful.
Note:the Genie transmitter will transmit for up to 30 seconds. If
HomeLink does not program within 30 seconds the Genie transmitter will
need to be pressed again. If the Genie transmitter LED displays green
and red, release the button until the LED turns off before pressing the
button again.
Once HomeLink has been programmed successfully, the Genie
transmitter must be changed out of program mode. To do this:
1. Press and hold the previously programmed Genie button on the
hand-held transmitter for 10 seconds. The indicator light will change
from red to red and green.
2. Press the same button twice to confirm the change. If done correctly
the LED will turn green.
BA
180Universal Garage Door Opener (If Equipped)
2015 Explorer(exp)
Owners Guide gf, 2nd Printing, September 2014
USA(fus)
Page 182 of 596
Programming HomeLink to the Genie Intellicode garage door
opener motor
Note:You may need a ladder to access the garage door opener motor.
To program HomeLink to the garage
door opener motor:
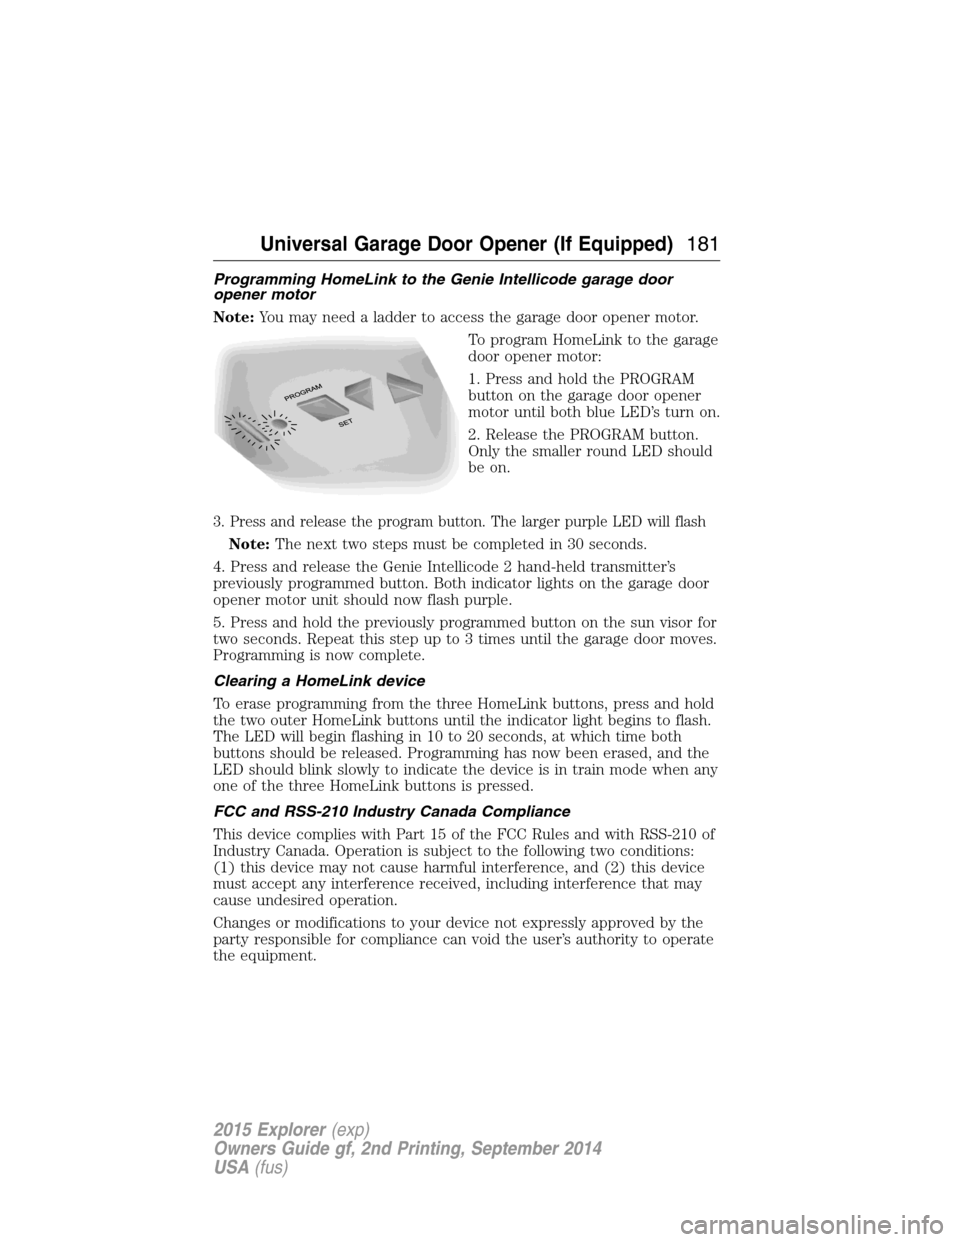
1. Press and hold the PROGRAM
button on the garage door opener
motor until both blue LED’s turn on.
2. Release the PROGRAM button.
Only the smaller round LED should
be on.
3. Press and release the program button. The larger purple LED will flash
Note:The next two steps must be completed in 30 seconds.
4. Press and release the Genie Intellicode 2 hand-held transmitter’s
previously programmed button. Both indicator lights on the garage door
opener motor unit should now flash purple.
5. Press and hold the previously programmed button on the sun visor for
two seconds. Repeat this step up to 3 times until the garage door moves.
Programming is now complete.
Clearing a HomeLink device
To erase programming from the three HomeLink buttons, press and hold
the two outer HomeLink buttons until the indicator light begins to flash.
The LED will begin flashing in 10 to 20 seconds, at which time both
buttons should be released. Programming has now been erased, and the
LED should blink slowly to indicate the device is in train mode when any
one of the three HomeLink buttons is pressed.
FCC and RSS-210 Industry Canada Compliance
This device complies with Part 15 of the FCC Rules and with RSS-210 of
Industry Canada. Operation is subject to the following two conditions:
(1) this device may not cause harmful interference, and (2) this device
must accept any interference received, including interference that may
cause undesired operation.
Changes or modifications to your device not expressly approved by the
party responsible for compliance can void the user’s authority to operate
the equipment.
Universal Garage Door Opener (If Equipped)181
2015 Explorer(exp)
Owners Guide gf, 2nd Printing, September 2014
USA(fus)
Page 190 of 596
Ignition Modes
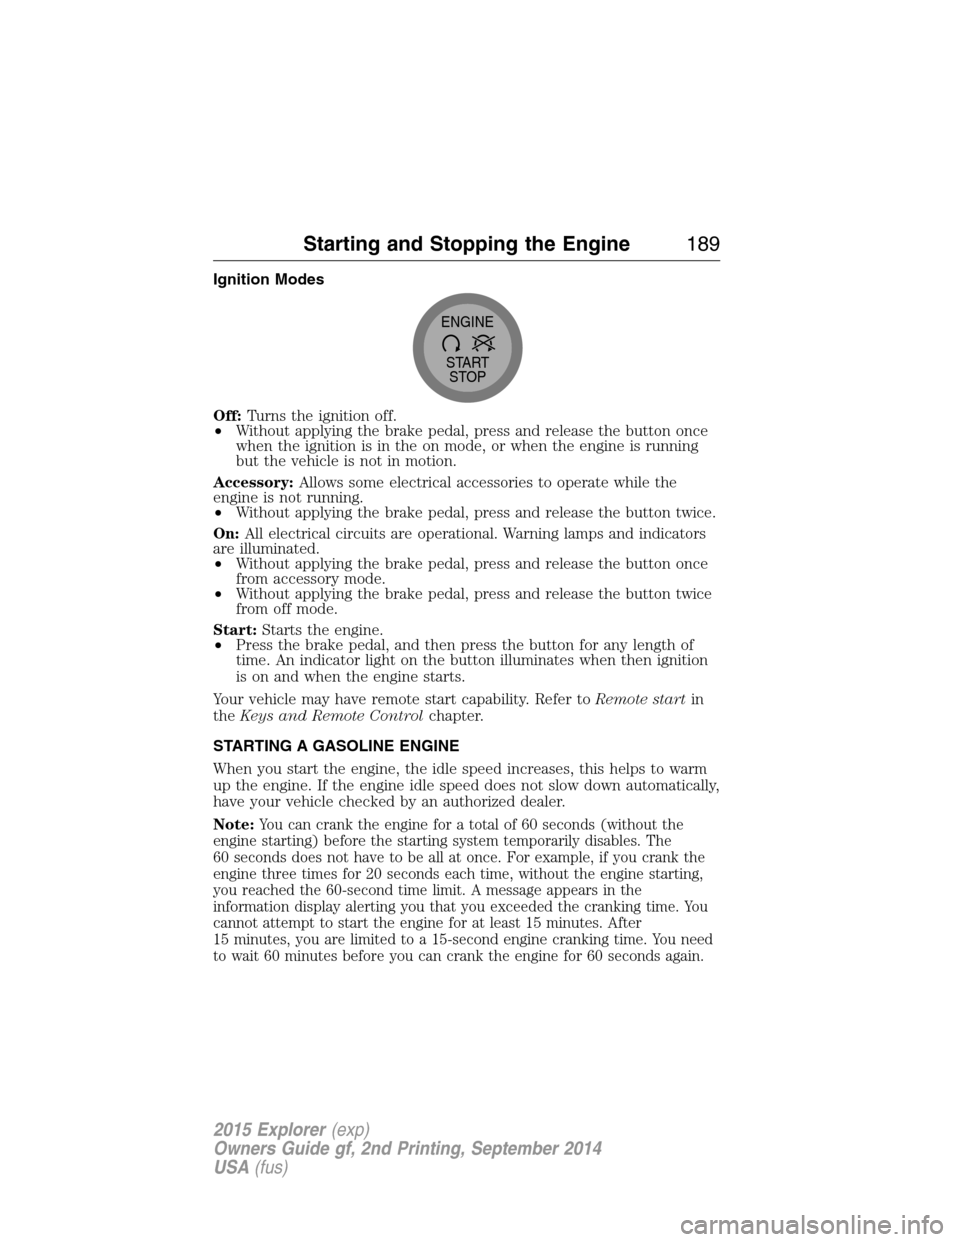
Off:Turns the ignition off.
•Without applying the brake pedal, press and release the button once
when the ignition is in the on mode, or when the engine is running
but the vehicle is not in motion.
Accessory:Allows some electrical accessories to operate while the
engine is not running.
•Without applying the brake pedal, press and release the button twice.
On:All electrical circuits are operational. Warning lamps and indicators
are illuminated.
•Without applying the brake pedal, press and release the button once
from accessory mode.
•Without applying the brake pedal, press and release the button twice
from off mode.
Start:Starts the engine.
•Press the brake pedal, and then press the button for any length of
time. An indicator light on the button illuminates when then ignition
is on and when the engine starts.
Your vehicle may have remote start capability. Refer toRemote startin
theKeys and Remote Controlchapter.
STARTING A GASOLINE ENGINE
When you start the engine, the idle speed increases, this helps to warm
up the engine. If the engine idle speed does not slow down automatically,
have your vehicle checked by an authorized dealer.
Note:
You can crank the engine for a total of 60 seconds (without the
engine starting) before the starting system temporarily disables. The
60 seconds does not have to be all at once. For example, if you crank the
engine three times for 20 seconds each time, without the engine starting,
you reached the 60-second time limit. A message appears in the
information display alerting you that you exceeded the cranking time. You
cannot attempt to start the engine for at least 15 minutes. After
15 minutes, you are limited to a 15-second engine cranking time. You need
to wait 60 minutes before you can crank the engine for 60 seconds again.
START
STOP ENGINE
Starting and Stopping the Engine189
2015 Explorer(exp)
Owners Guide gf, 2nd Printing, September 2014
USA(fus)
Page 207 of 596
D (Drive) with Overdrive
The normal driving position for the best fuel economy. Transmission
operates in gears one through six.
The automatic transmission shift strategy has the ability to detect hilly
terrain or mountainous areas and will provide a limited amount of grade
assist features automatically. Refer toD(Drive) with Grade assist or
SelectShift for more information.
D (Drive) with Tow on
Press theTOWswitch located on the instrument panel by the headlamp
control to activate tow. TheTOW/HAULmessage will illuminate in the
instrument cluster.
The tow feature improves transmission operation when towing a trailer or a
heavy load. All transmission gear ranges are available when using tow.
The tow feature delays upshifts to reduce frequency of transmission
shifting. Tow also provides engine braking in all forward gears when the
transmission is in theD(Overdrive) position. This engine braking will
slow the vehicle and assist the driver in controlling the vehicle when
descending a grade. Depending on driving conditions and load
conditions, the transmission may downshift, slow the vehicle and control
the vehicle speed when descending a hill, without the accelerator pedal
being pressed. The amount of downshift braking provided will vary based
upon the amount the brake pedal is depressed.
Press theTOWbutton to deactivate the tow feature and return to
normal driving mode. The tow light will no longer be illuminated.
When you shut-off and restart the engine, the transmission will
automatically return to normalD(Overdrive) mode (tow off).
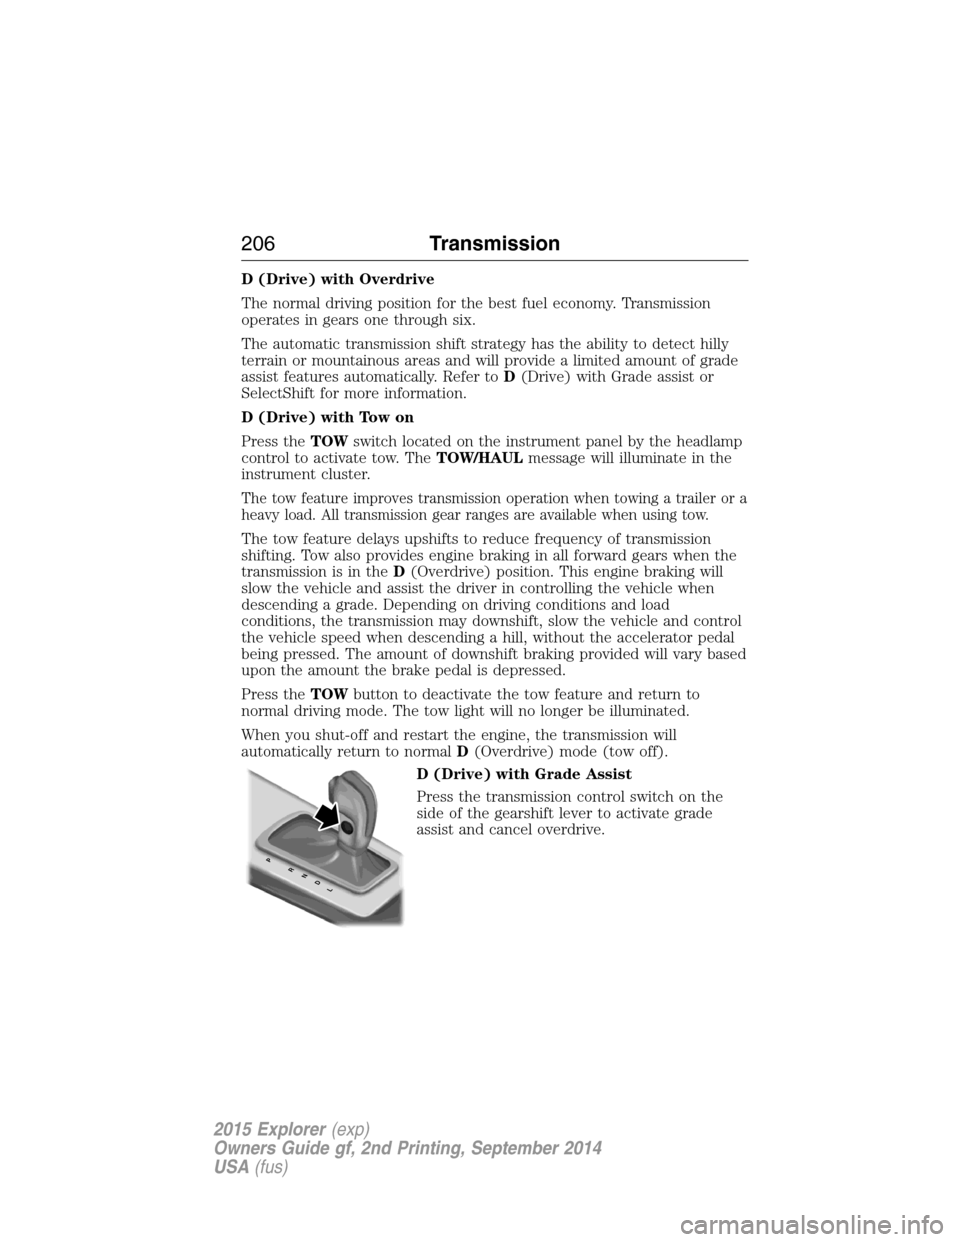
D (Drive) with Grade Assist
Press the transmission control switch on the
side of the gearshift lever to activate grade
assist and cancel overdrive.
PRNDL
206Transmission
2015 Explorer(exp)
Owners Guide gf, 2nd Printing, September 2014
USA(fus)