2015 FORD EXPLORER ECO mode
[x] Cancel search: ECO modePage 208 of 596
Grade assist:
•Provides additional grade (engine) braking and extends
lower gear operation on uphill climbs for hilly terrain or
mountainous areas.
•Provides additional engine braking through the automatic transmission
shift strategy which reacts to vehicle inputs (vehicle acceleration,
accelerator pedal, brake pedal and vehicle speed).
•Allows the transmission to select gears that will provide the desired
engine braking based on the vehicle inputs mentioned above. This will
increase engine RPM during engine braking.
•The grade assist lamp in the instrument cluster is illuminated.
Grade assist is designed to aid the driver with optimal gear selection in
hilly terrain or mountainous areas but is not intended for normal operation.
It is recommended that you return to O/D (overdrive mode) on flat terrain
to provide the best fuel economy and transmission function.
Press the transmission control switch again to return to normal D
(Drive) position (with O/D).
•The grade assist lamp in the instrument cluster will not be illuminated.
•The transmission will operate in gears one through six.
L (Low)
•Provides maximum engine braking.
•Will downshift to the lowest available gear for the current vehicle
speed; allows for first gear when vehicle reaches slower speeds.
•Is not intended for use under extended or normal driving co nditions
and results in lower fuel economy.
M (Manual) (if equipped)
Moving the gearshift lever to M (Manual):
•
Provides additional grade (engine) braking and extends lower gear
operation to enhance performance for uphill climbs, hilly terrain or
mountainous areas. This will increase engine RPM during engine braking.
•Provides additional lower gear operation through the automatic
transmission shift strategy which reacts to vehicle inputs (vehicle
acceleration, accelerator pedal, brake pedal and vehicle speed).
•Gears are selected more quickly and at higher engine speeds.
Note:The system will stay in M (Manual) until the gear shift lever is
moved into another gear for example P (park) or D (Drive).
Transmission207
2015 Explorer(exp)
Owners Guide gf, 2nd Printing, September 2014
USA(fus)
Page 213 of 596
USING YOUR FOUR WHEEL DRIVE (4WD) SYSTEM
The intelligent 4WD system continuously monitors vehicle conditions and
automatically adjusts the power distribution between the front and rear
wheels. It combines transparent all-surface operation with highly capable
four-wheel drive.
The 4WD system is always active and requires no driver input. It is
capable of handling all road conditions, including street and highway
driving as well as off-road and winter driving. The driver can optimize
more 4WD control by moving the terrain management switch for the
correct terrain. See theTerrain Managementchapter for more
information.
Note:When an 4WD system fault is present, the warning Check AWD
will display in the information display. The 4WD system is not
functioning correctly and will default to front-wheel drive. When this
warning is displayed, have your vehicle serviced at an authorized dealer.
Note:The AWD Off message may also be displayed in the information
display if the 4WD system has overheated and defaulted to front-wheel
drive. This condition may occur if the vehicle was operated in extreme
conditions with excessive wheel slip, such as deep sand. To resume
normal 4WD function as soon as possible, stop the vehicle in a safe
location and stop the engine for at least 10 minutes. After the engine has
been restarted and the 4WD system has adequately cooled, the AWD Off
message will turn off and normal 4WD function will return. The AWD Off
message will turn off when the system cools and normal 4WD function
returns.
If your vehicle is equipped with 4WD, a spare tire of a different size
other than the tire provided should never be used. If the mini-spare tire
is installed, the 4WD system may disable automatically and enter
front-wheel drive only mode to protect driveline components. This
condition may be indicated by an AWD Off message in the information
display. If there is an AWD Off message in the information display from
using the spare tire, this indicator should turn off after reinstalling the
repaired or replaced normal road tire and cycling the ignition off and on.
It is recommended to reinstall the repaired or replaced road tire as soon
as possible. Major dissimilar tire sizes between the front and rear axles
could cause the 4WD system to stop functioning and default to
front-wheel drive or damage the 4WD system.
212Four-Wheel Drive (If Equipped)
2015 Explorer(exp)
Owners Guide gf, 2nd Printing, September 2014
USA(fus)
Page 227 of 596
If the system becomes inoperable, selecting some modes may not be
possible and a message is displayed. If it becomes inoperable due to a
system malfunction, all of the mode indicators on the control turn off
and one of the following messages appears in the information display:
TERRAIN MANAGEMENT SYSTEM FAULT:Cycling the key may
clear the fault. If key cycling does not work, have the system serviced by
an authorized dealer.
MODE CHANGE NOT ACCEPTED, RETRY:A mode change cannot
be made at the time of driver request. Try the mode change again.
HILL DESCENT CONTROL™ (IF EQUIPPED)
WARNING:Hill descent control cannot control descent in all
surface conditions and circumstances, such as ice or extremely
steep grades. Hill descent control is a driver assist system and cannot
substitute for good judgment by the driver. Failure to do so may result
in loss of vehicle control, crash or serious injury.
WARNING:Hill descent control does not provide hill hold at
zero mph (0 km/h). When stopped, the parking brake must be
applied and/or the vehicle must be placed in P (Park) or it may roll
away.
Hill descent control allows the driver to set and maintain vehicle speed
while descending steep grades in various surface conditions.
Hill descent control can maintain vehicle speeds on downhill grades
between 3 mph (5 km/h) and 20 mph (32 km/h). Above 20 mph
(32 km/h), the system remains armed, but descent speed cannot be set
or maintained.
Hill descent control requires a cooling down interval after a period of
sustained use. The amount of time that the feature can remain active
before cooling varies with conditions. The system will provide a warning
in the message center and a chime will sound when the system is about
to disengage for cooling. At this time, manually apply the brakes as
needed to maintain descent speed.
226Terrain Response
2015 Explorer(exp)
Owners Guide gf, 2nd Printing, September 2014
USA(fus)
Page 228 of 596
To enable hill descent control and set the descent speed, do the
following:
1. Press and release the hill descent button located in the
center of the terrain management control. A light in the
control will illuminate and chime will sound when this feature
is activated.
2. To increase descent speed, press the accelerator pedal until the
desired speed is reached. To decrease descent speed, press the brake
pedal until the desired speed is reached.
Whether accelerating or decelerating, once the desired descent speed is
reached, remove your feet from the pedals and the chosen vehicle speed
will be maintained.
Note:Noise from the ABS pump motor may be observed during hill
descent control operation. This is a normal characteristic of the ABS and
should be no reason for concern.
Hill descent modes
•At speeds below 20 mph (32 km/h): When the HDC button is pressed
and HDC is active, HILL DESCENT CONTROL ACTIVE will appear in
the message center for several seconds.
•At speeds below 20 mph (32 km/h): When the HDC button is pressed
and conditions are not correct for hill descent activation, the HDC
system will be enabled, the light on the button will be on solid and
HILL DESCENT CONTROL READY will be displayed in the message
center for several seconds.
•At speeds above 20 mph (32 km/h): When the HDC button is pressed,
the HDC system will be enabled, the light on the button will be
illuminated, and FOR HILL CNTRL, 20 MPH OR LESS will be
displayed in the message center for several seconds.
•For HDC to enable, the vehicle must be in a drive gear or (R)
Reverse. If the vehicle is in P (Park) or N (Neutral) and the HDC
button is pressed, FOR HILL CNTRL, SELECT GEAR will be displayed
in the message center for several seconds.
Refer toWarning lamps and indicatorsin theInstrument Cluster
chapter for hill descent control messages.
Terrain Response227
2015 Explorer(exp)
Owners Guide gf, 2nd Printing, September 2014
USA(fus)
Page 254 of 596
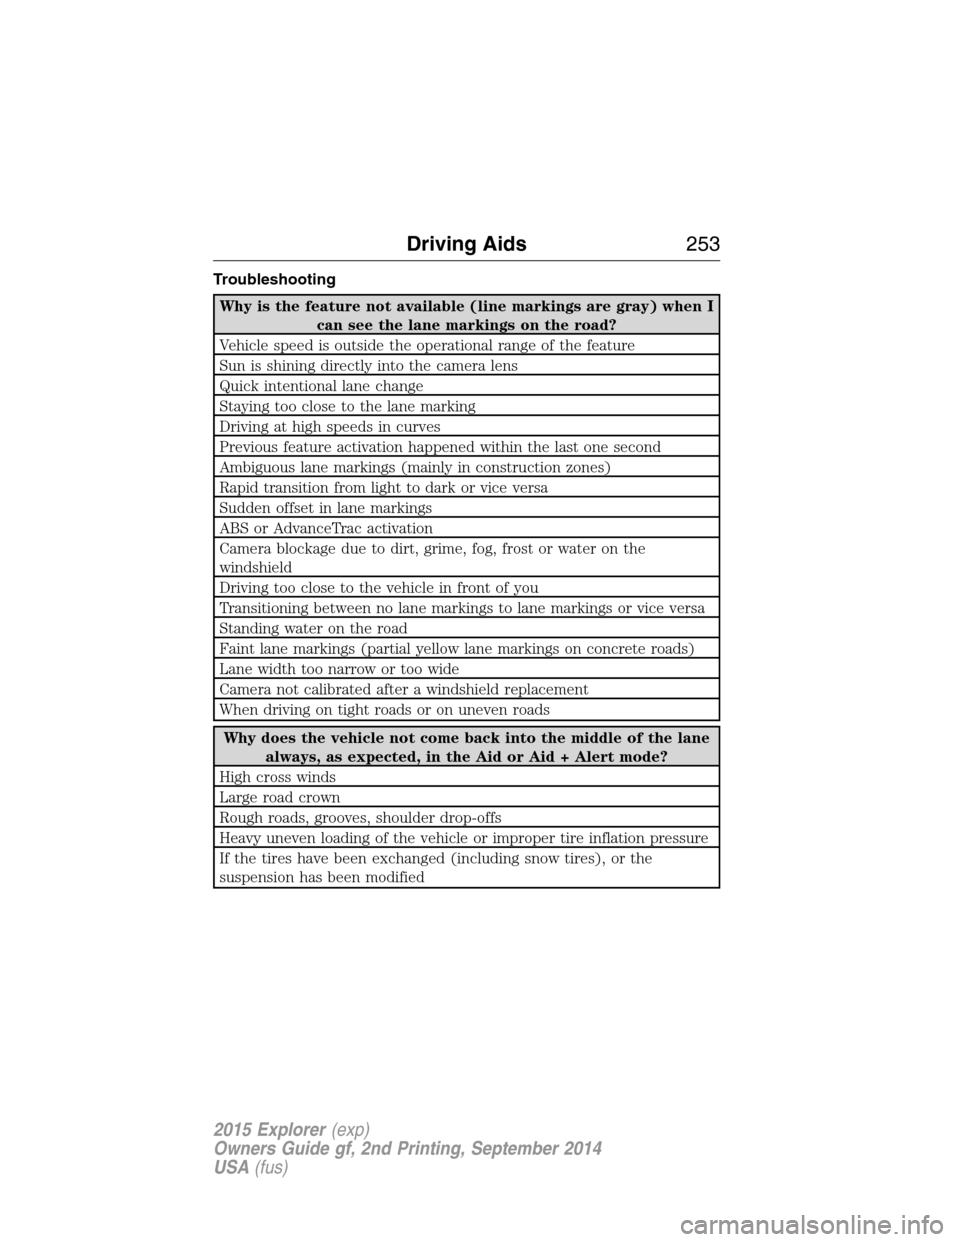
Troubleshooting
Why is the feature not available (line markings are gray) when I
can see the lane markings on the road?
Vehicle speed is outside the operational range of the feature
Sun is shining directly into the camera lens
Quick intentional lane change
Staying too close to the lane marking
Driving at high speeds in curves
Previous feature activation happened within the last one second
Ambiguous lane markings (mainly in construction zones)
Rapid transition from light to dark or vice versa
Sudden offset in lane markings
ABS or AdvanceTrac activation
Camera blockage due to dirt, grime, fog, frost or water on the
windshield
Driving too close to the vehicle in front of you
Transitioning between no lane markings to lane markings or vice versa
Standing water on the road
Faint lane markings (partial yellow lane markings on concrete roads)
Lane width too narrow or too wide
Camera not calibrated after a windshield replacement
When driving on tight roads or on uneven roads
Why does the vehicle not come back into the middle of the lane
always, as expected, in the Aid or Aid + Alert mode?
High cross winds
Large road crown
Rough roads, grooves, shoulder drop-offs
Heavy uneven loading of the vehicle or improper tire inflation pressure
If the tires have been exchanged (including snow tires), or the
suspension has been modified
Driving Aids253
2015 Explorer(exp)
Owners Guide gf, 2nd Printing, September 2014
USA(fus)
Page 282 of 596
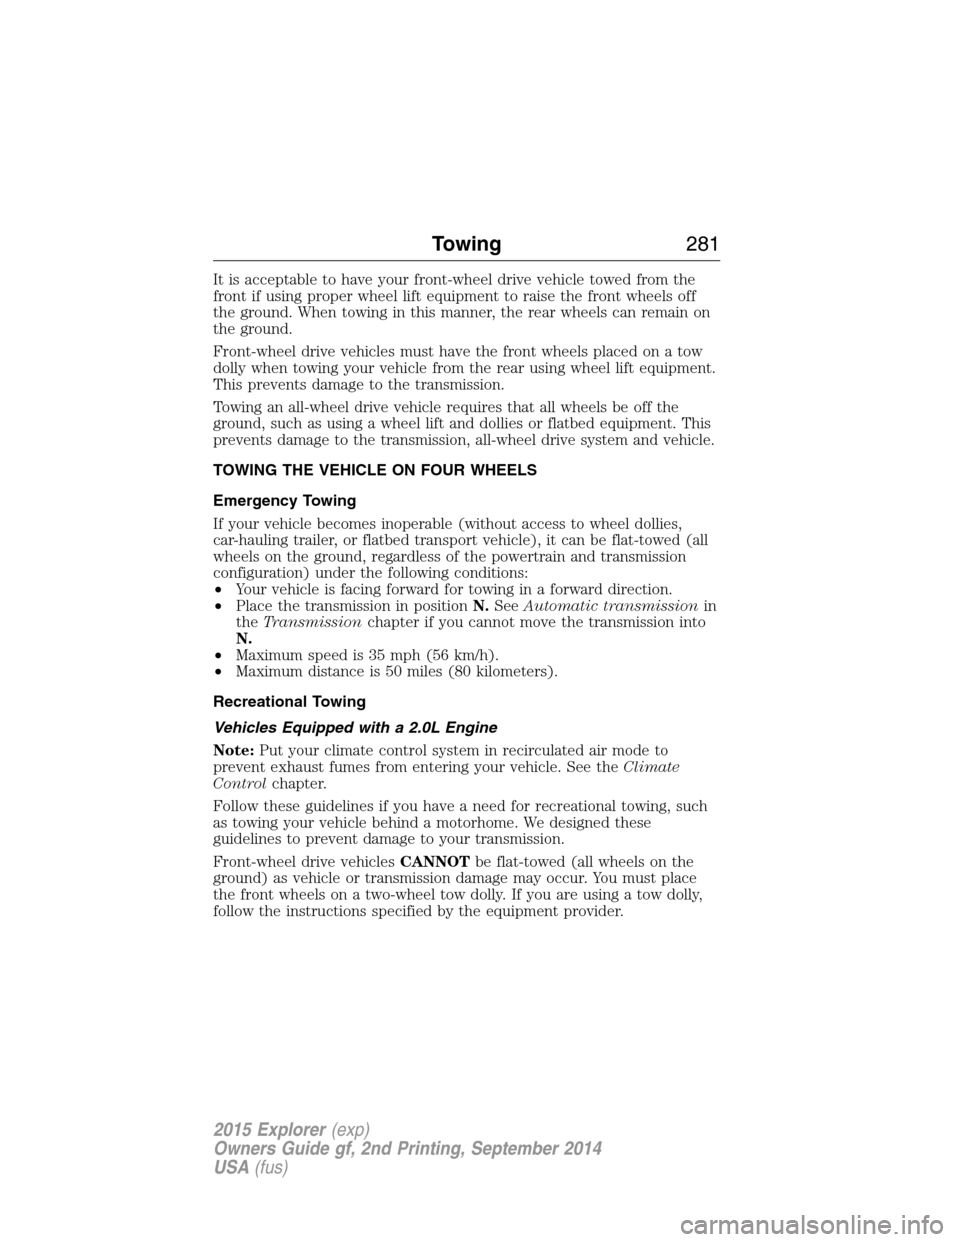
It is acceptable to have your front-wheel drive vehicle towed from the
front if using proper wheel lift equipment to raise the front wheels off
the ground. When towing in this manner, the rear wheels can remain on
the ground.
Front-wheel drive vehicles must have the front wheels placed on a tow
dolly when towing your vehicle from the rear using wheel lift equipment.
This prevents damage to the transmission.
Towing an all-wheel drive vehicle requires that all wheels be off the
ground, such as using a wheel lift and dollies or flatbed equipment. This
prevents damage to the transmission, all-wheel drive system and vehicle.
TOWING THE VEHICLE ON FOUR WHEELS
Emergency Towing
If your vehicle becomes inoperable (without access to wheel dollies,
car-hauling trailer, or flatbed transport vehicle), it can be flat-towed (all
wheels on the ground, regardless of the powertrain and transmission
configuration) under the following conditions:
•Your vehicle is facing forward for towing in a forward direction.
•Place the transmission in positionN.SeeAutomatic transmissionin
theTransmissionchapter if you cannot move the transmission into
N.
•Maximum speed is 35 mph (56 km/h).
•Maximum distance is 50 miles (80 kilometers).
Recreational Towing
Vehicles Equipped with a 2.0L Engine
Note:Put your climate control system in recirculated air mode to
prevent exhaust fumes from entering your vehicle. See theClimate
Controlchapter.
Follow these guidelines if you have a need for recreational towing, such
as towing your vehicle behind a motorhome. We designed these
guidelines to prevent damage to your transmission.
Front-wheel drive vehiclesCANNOTbe flat-towed (all wheels on the
ground) as vehicle or transmission damage may occur. You must place
the front wheels on a two-wheel tow dolly. If you are using a tow dolly,
follow the instructions specified by the equipment provider.
Towing281
2015 Explorer(exp)
Owners Guide gf, 2nd Printing, September 2014
USA(fus)
Page 284 of 596
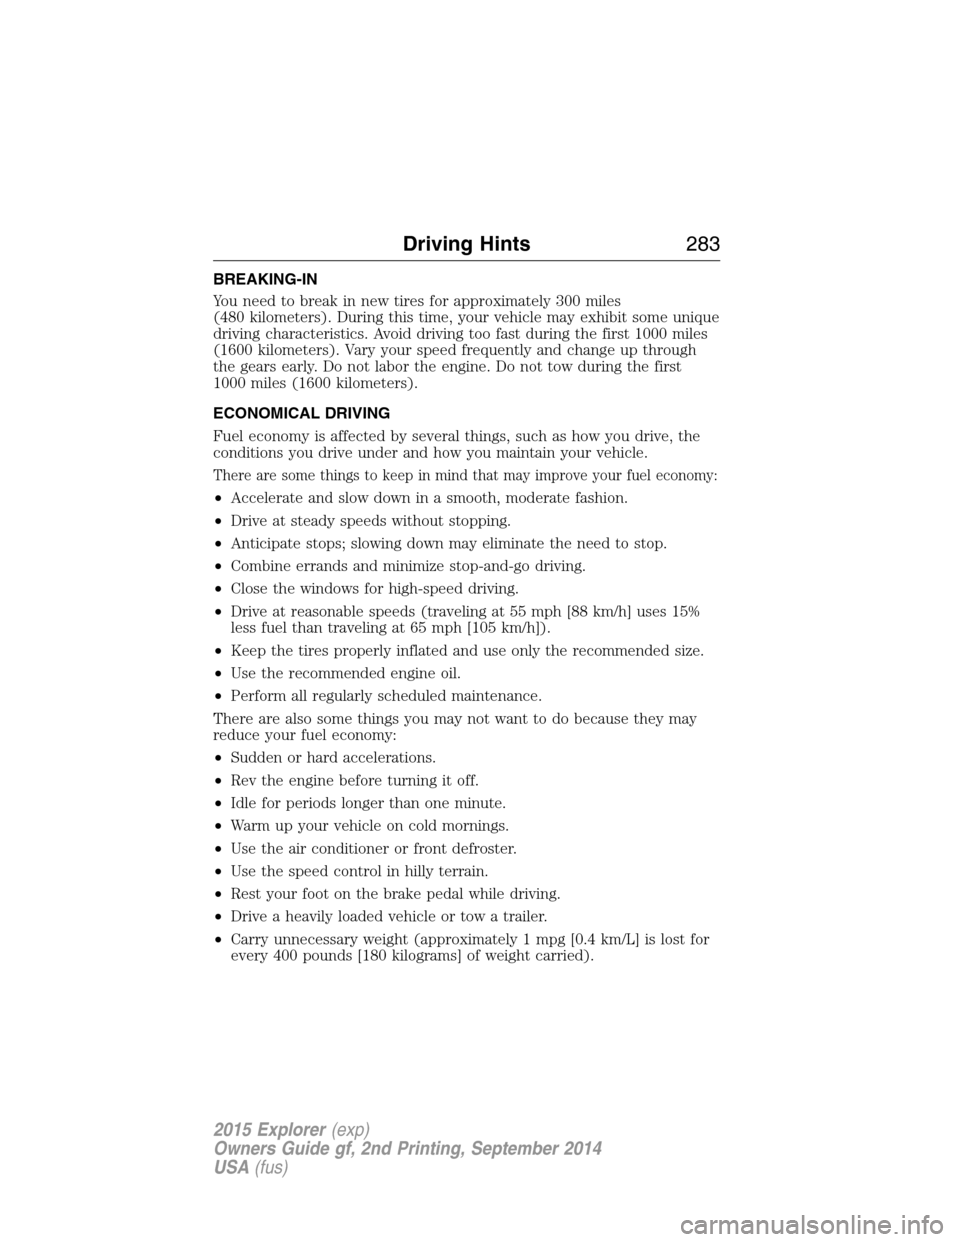
BREAKING-IN
You need to break in new tires for approximately 300 miles
(480 kilometers). During this time, your vehicle may exhibit some unique
driving characteristics. Avoid driving too fast during the first 1000 miles
(1600 kilometers). Vary your speed frequently and change up through
the gears early. Do not labor the engine. Do not tow during the first
1000 miles (1600 kilometers).
ECONOMICAL DRIVING
Fuel economy is affected by several things, such as how you drive, the
conditions you drive under and how you maintain your vehicle.
There are some things to keep in mind that may improve your fuel economy:
•Accelerate and slow down in a smooth, moderate fashion.
•Drive at steady speeds without stopping.
•Anticipate stops; slowing down may eliminate the need to stop.
•Combine errands and minimize stop-and-go driving.
•Close the windows for high-speed driving.
•Drive at reasonable speeds (traveling at 55 mph [88 km/h] uses 15%
less fuel than traveling at 65 mph [105 km/h]).
•Keep the tires properly inflated and use only the recommended size.
•Use the recommended engine oil.
•Perform all regularly scheduled maintenance.
There are also some things you may not want to do because they may
reduce your fuel economy:
•Sudden or hard accelerations.
•Rev the engine before turning it off.
•Idle for periods longer than one minute.
•Warm up your vehicle on cold mornings.
•Use the air conditioner or front defroster.
•Use the speed control in hilly terrain.
•Rest your foot on the brake pedal while driving.
•Drive a heavily loaded vehicle or tow a trailer.
•Carry unnecessary weight (approximately 1 mpg [0.4 km/L] is lost for
every 400 pounds [180 kilograms] of weight carried).
Driving Hints283
2015 Explorer(exp)
Owners Guide gf, 2nd Printing, September 2014
USA(fus)
Page 289 of 596
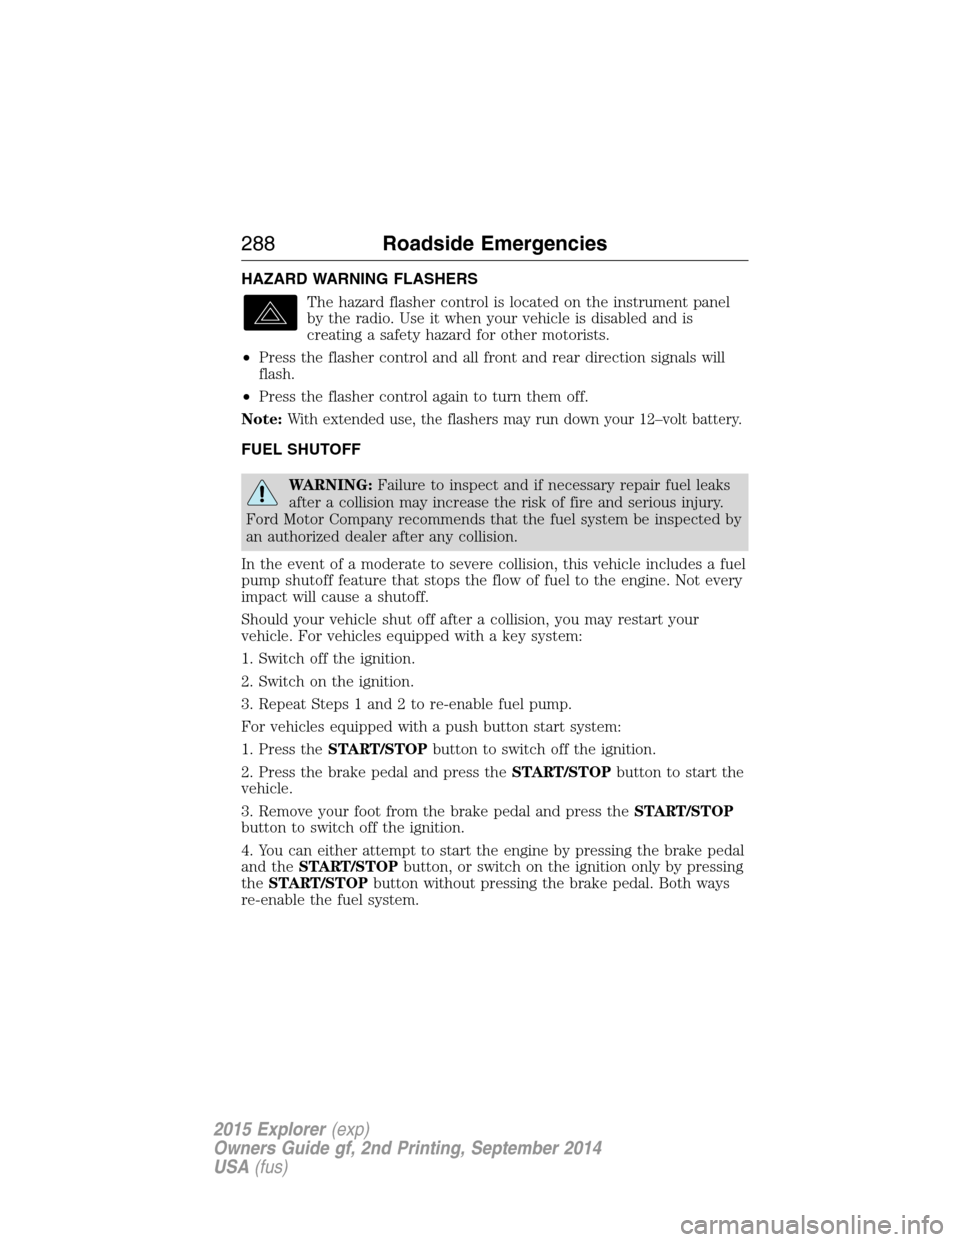
HAZARD WARNING FLASHERS
The hazard flasher control is located on the instrument panel
by the radio. Use it when your vehicle is disabled and is
creating a safety hazard for other motorists.
•Press the flasher control and all front and rear direction signals will
flash.
•Press the flasher control again to turn them off.
Note:
With extended use, the flashers may run down your 12–volt battery.
FUEL SHUTOFF
WARNING:Failure to inspect and if necessary repair fuel leaks
after a collision may increase the risk of fire and serious injury.
Ford Motor Company recommends that the fuel system be inspected by
an authorized dealer after any collision.
In the event of a moderate to severe collision, this vehicle includes a fuel
pump shutoff feature that stops the flow of fuel to the engine. Not every
impact will cause a shutoff.
Should your vehicle shut off after a collision, you may restart your
vehicle. For vehicles equipped with a key system:
1. Switch off the ignition.
2. Switch on the ignition.
3. Repeat Steps 1 and 2 to re-enable fuel pump.
For vehicles equipped with a push button start system:
1. Press theSTART/STOPbutton to switch off the ignition.
2. Press the brake pedal and press theSTART/STOPbutton to start the
vehicle.
3. Remove your foot from the brake pedal and press theSTART/STOP
button to switch off the ignition.
4. You can either attempt to start the engine by pressing the brake pedal
and theSTART/STOPbutton, or switch on the ignition only by pressing
theSTART/STOPbutton without pressing the brake pedal. Both ways
re-enable the fuel system.
288Roadside Emergencies
2015 Explorer(exp)
Owners Guide gf, 2nd Printing, September 2014
USA(fus)