Page 33 of 108
AUTOMATIC TEMPERATURE CONTROLS (ATC)
Automatic Operation
1. Push the AUTO button.
2. Select the desired temperature by pushing the temperature control buttons.
• The system will maintain the set temperature automatically.
Air Recirculation
• Use recirculation for maximum A/C operation.
• For window defogging, turn the air recirculation button off.
Heated Mirrors
• The mirrors are heated to melt frost or ice. This feature is activated when you turn
on the rear window defroster, which is located in the center of the instrument
panel, below the radio.
Automatic Temperature Controls
1 — Push Auto Button2 — Push A/C Button3 — Push OFF Button4 — Push Air Recirculation Button5 — Push Temperature Control Up/Down Button
6 — Push Blower Control Up/DownButton7 — Push Rear Defrost Button8 — Push Mode Control Buttons9—Push Front Window DefrosterButton
OPERATING YOUR VEHICLE
31
Page 34 of 108

SPORT MODE
In Sport mode, the engine is more responsive to the accelerator pedal, and pro-
vides more power by increasing turbo boost.
This mode increases steering feedback to the driver with slight increases in effort
and throttle pedal-to-engine response. Changes to the transmission shift schedules
for more aggressive shifting will occur on automatic transmission versions.
Sport mode driving is useful while driving on winding roads where more steering
precision is desired.
Manual Transmission
1. Press the SPORT button, located
above the climate controls.
2. Momentarily release the accelerator
pedal.
3. Press the accelerator pedal again to
activate.
Automatic Transmission
Press the SPORT button, located above
the climate controls.
NOTE:
• Once SPORT mode is activated, a
“SPORT” message will be displayed in
the boost gauge.
• For maximum aerodynamics and handling, your vehicle has a lowered ride height.
Use caution when entering steep driveways and parking spaces to prevent
damage.
MANUAL TRANSMISSION
Be sure the transmission is in first gear, not third, when starting from a standing po-
sition. Damage to the clutch can result from starting in third gear.
Never drive with your foot resting on the clutch pedal, and never try to hold the ve-
hicle on a hill with the clutch pedal partially engaged. This will cause abnormal wear
on the clutch.
NOTE:
• Never shift into REVERSE until the vehicle has come to a complete stop.
• During cold weather, until the transmission lubricant is warm, you may experience
slightly higher shift efforts. This is normal and not harmful to the transmission.
Sport Button
OPERATING YOUR VEHICLE
32
Page 35 of 108

POWER SUNROOF
The power sunroof roof switch is located in the overhead console.
To Open
• Press and hold the POWER SUN-
ROOF switch rearward for approxi-
mately two seconds and the sunroof
will stop at the vented position. Press
the switch a second time and hold for
approximately one second and re-
lease, the sunroof will open fully, then
stop automatically. This is called “Ex-
press Open.” During Express Open
operation, any movement of the sun-
roof switch will stop the sunroof.
To Close
• With the sunroof in the full open posi-
tion, pull the power sunroof button
and hold it for approximately one second, the sunroof will return to the vented
position. Pull the switch a second time and hold for approximately one second to
completely close the sunroof.
Pinch Protection Feature
• This feature will detect an obstruction in the opening of the sunroof during Ex-
press Close operation. If an obstruction in the path of the sunroof is detected, the
sunroof will automatically retract. Remove the obstruction if this occurs. Next,
press the switch forward and release to Express Close.
NOTE:
If three consecutive sunroof close attempts result in Pinch Protect reversals, the fourth
close attempt will be a Manual Close movement with Pinch Protect disabled.
Sun Shade
• For vehicles equipped with a power sunroof, there is a sun shade that can be
open or closed. To open the sun shade press the tab and move the shade to a
full open position.
Power Sunroof Switch
OPERATING YOUR VEHICLE
33
Page 36 of 108
. Occupa")
WARNING!
• Do not let children play with the sunroof, or leave children unattended in the
vehicle, and do not leave the key in or near the vehicle (or in a location ac-
cessible to children). Occupants, particularly unattended children, can be-
come entrapped by the power sunroof while operating the power sunroof
switch. Such entrapment may result in serious injury or death.
• In a collision, there is a greater risk of being thrown from a vehicle with an
open sunroof. You could also be seriously injured or killed. Always fasten
your seat belt properly and make sure all passengers are properly secured.
• Do not allow small children to operate the sunroof. Never allow your fingers,
other body parts, or any object to project through the sunroof opening. Injury
may result.
POWER CONVERTIBLE TOP
On vehicles equipped with a power convertible top, the power convertible top
switch is located on the overhead console. The switch contains two buttons. The
passenger side button, is used to open the power top, and the driver side button, is
used to close the power top.
NOTE:
• The power top buttons will operate when the ignition switch is turned to the ACC/
ON/RUN position.
• The power top can be remotely operated with the key fob. Refer to “Opening
Power Top Remote Function” in “Things To Know Before Starting” in the Owner’s
Manual on the DVD for more information.
Lowering The Power Top
Auto Open
Push the top open button approximately one second for the three-quarter open/
spoiler position. Push the top open button for approximately one second a second
time to fully open the convertible top.
Manual Open
For manual open, push and hold the open button until desired roof position or until
spoiler position.
NOTE:
Vertical movement only operates in auto open/close mode.
OPERATING YOUR VEHICLE
34
Page 37 of 108

Raising The Power Top
Auto Close
From the convertible top fully open position, push the top close button for approxi-
mately one second for the three-quarter open/spoiler position. Push the top close
button for approximately one second a second time for the one-quarter open posi-
tion. Push and hold close button to fully close convertible top.
Manual Close
For manual close, push and hold the close button until desired position until one-
quarter open position. Push and hold again for full close position.
NOTE:
Rail lubrication is recommended every 2000 cycles, or if scratching noises due to
dust are present. Refer to “Fluids, Lubes, and Genuine Part” in “Maintaining Your
Vehicle” in the Owner’s Manual on the DVD for information.
CAUTION!
Failure to follow these cautions may cause interior water damage, stains or mil-
dew on the top material:
• Avoid high-pressure car washes, as they can damage the top material. Also,
increased water pressure may force water past the weather strips.
• Remove any standing water from the top and dry the surface before opening
it. Operating the top, opening a door or lowering a window while the top is
wet may allow water to drip into the vehicle’s interior.
• Use care when washing the vehicle, water pressure directed at the weather
strip seals may cause water to leak into the vehicle’s interior.
WARNING!
The convertible top does not provide the structural protection that a reinforced
metal roof does and the fabric top cannot be expected to prevent the ejection
of the occupants in a collision. Therefore, it is important that all occupants wear
their seat belts at all times. Death or serious injuries could occur if you are
ejected from the vehicle during a collision.
OPERATING YOUR VEHICLE
35
Page 38 of 108

Power Convertible Top Relearn Procedure
If your power convertible top does not operate in the Auto Opening/Closing mode
(automatically opening/closing to the one-quarter open and three-quarter open
comfort stops), or if the remote keyless power top function is inoperable, or if the
trunk lid does not open - the following relearn procedure may be necessary.
1. Confirm that the door/trunk lid are closed.
2. Begin with the top in the fully closed position (using manual mode).
3. Hold the OPEN button to move the top to the fully open position.
4. CONTINUE to hold the OPEN button for an additional three seconds.
5. Release the OPEN button.
6. Hold the CLOSED button to move the top to the fully closed position.
7. CONTINUE to hold the CLOSED button until the top begins to cycle fully open,
then release the CLOSED button.
At the end of step 7 the top will automatically cycle to the fully open position, and
then close to the 1/4 open position.
This will confirm that the relearn procedure was successful.
Auto Open/Close will now be functional. Trunk lid operation will be functional. Re-
mote Keyless Power Top Function will be functional.
NOTE:
DO NOT interrupt this activity.
If the power convertible top does not relearn repeat the procedure a second time.
Wind Stop
The Wind Stop installs in the backseat area of the vehicle. The Wind Stop will not inter-
fere with power top operation. Therefore, it can remain installed when the top is up.
OPERATING YOUR VEHICLE
36
Page 39 of 108
WIND BUFFETING
• Wind buffeting can be described as a helicopter-type percussion sound. If buffet-
ing occurs with the windows down, adjust one or both windows up or down
slightly.
• If buffeting occurs with the sunroof open, adjust the sunroof opening, or adjust
any window. This will minimize buffeting.
ENGINE BLOCK HEATER
• To prevent possible engine damage while starting at low temperatures, this ve-
hicle will inhibit engine cranking when the ambient temperature is less than –22°
F (–30° C) and the oil temperature sensor reading indicates an engine block
heater has not been used. An externally-powered electric engine block heater is
available as optional equipment or from your authorized dealer.
• The message "plug in engine heater" will be displayed in the instrument cluster
when the ambient temperature is below 5° F (–15° C) at the time the engine is
shut off as a reminder to avoid possible crank delays at the next cold start.
OPERATING YOUR VEHICLE
37
Page 40 of 108
YOUR VEHICLE'S SOUND SYSTEM
1. BLUE&ME™ Handsfree Communication pg. 43
2. Steering Wheel Audio Controls (Right) pg. 42
3. Steering Wheel Audio Controls (Left) pg. 42
4. Audio System Mute Button
5. Uconnect® Radio pg. 40
ELECTRONICS
38
 1
1 2
2 3
3 4
4 5
5 6
6 7
7 8
8 9
9 10
10 11
11 12
12 13
13 14
14 15
15 16
16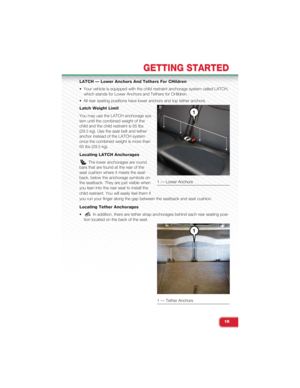 17
17 18
18 19
19 20
20 21
21 22
22 23
23 24
24 25
25 26
26 27
27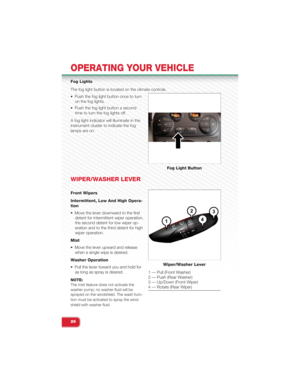 28
28 29
29 30
30 31
31 32
32 33
33 34
34 35
35 36
36 37
37 38
38 39
39 40
40 41
41 42
42 43
43 44
44 45
45 46
46 47
47 48
48 49
49 50
50 51
51 52
52 53
53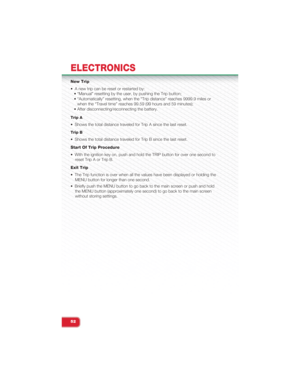 54
54 55
55 56
56 57
57 58
58 59
59 60
60 61
61 62
62 63
63 64
64 65
65 66
66 67
67 68
68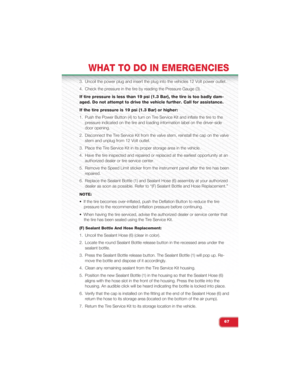 69
69 70
70 71
71 72
72 73
73 74
74 75
75 76
76 77
77 78
78 79
79 80
80 81
81 82
82 83
83 84
84 85
85 86
86 87
87 88
88 89
89 90
90 91
91 92
92 93
93 94
94 95
95 96
96 97
97 98
98 99
99 100
100 101
101 102
102 103
103 104
104 105
105 106
106 107
107
Automatic Operation
1. Push the AUTO button.
2. Select the desired temperature by pushing the temperature control buttons.
• The system will maintain the set tem")

 pg. 42
3. Steering Wheel Audio Controls (Left) pg. 42
4. Audio System Mute Button
5. U")