Page 9 of 108
4. Fuel Gauge
5. Fuel Economy Gauge
6. Warning Lights
(See page 60 for Instrument Cluster Warning Indicators.)
CONTROLS AT A GLANCE
7
Page 10 of 108

KEY FOB
Locking and Unlocking the Doors
and Liftgate
• Push the LOCK button once to lock all
the doors and the liftgate.
• Push the UNLOCK button once to
unlock the driver’s door only and
twice within five seconds to unlock all
the doors and liftgate.
• All doors can be programmed to un-
lock on the first push of the UNLOCK
button. Refer to “Programmable Fea-
tures” in this guide.
Open Power Top Remote Function
The remote keyless power top function
can only be used with the engine off.
NOTE:The remote control can be used to openthe power top to the spoiler position.
Open Power Top Remote Function:
•OPEN— Push and hold the unlock button down on the key fob for a minimum
of three seconds to initiate Power Top Open. The roof will stop opening when-
ever the unlock button on the key fob is released, or when it reaches the spoiler
position.
NOTE:If your power convertible top does not open with the remote, please refer to the "PowerConvertible Top Relearn Procedure” in “Operating Your Vehicle” in this guide for addi-tional information.
Key Fob
1 — Liftgate2 — Unlock/Open Power Top — IfEquipped3 — Key Release4 — Lock
GETTING STARTED
8
Page 11 of 108

WARNING!
Failure to follow these warnings can result in injuries that are serious or fatal to
you, your passengers, and others around you:
• Before operating the power top, make sure that no moving parts of the con-
vertible top can injure a person or animal.
•Never place any extremities (hands, feet, etc.) near the convertible top compo-
nents, the upper windshield area, the shelf area behind the rear seats, or the con-
vertible top stowage area while raising or lowering the convertible top.
• When using the power top button on RKE transmitter, if potential danger
exists while lowering the top, release the button immediately to interrupt the
operation.
• Only drive the vehicle with the convertible top completely closed and latched
or fully lowered into its stowage compartment.
• Do not operate the power top when the vehicle is in motion.
Opening The Liftgate
To open the liftgate, push the LIFTGATE release handle located on the underside of
the license plate bar and pull the liftgate open with one fluid motion.
WARNING!
Never leave children alone in a vehicle, or with access to an unlocked vehicle.
Allowing children to be in a vehicle unattended is dangerous for a number of rea-
sons. A child or others could be severely injured or killed. Children should be
warned not to touch the parking brake, brake pedal, or the transmission gear se-
lector. Do not leave the Key Fob in the vehicle, or in a location accessible to chil-
dren. A child could operate power windows, other controls, or move the vehicle.
GETTING STARTED
9
Page 12 of 108

VEHICLE SECURITY ALARM
The Vehicle Security Alarm monitors the vehicle doors for unauthorized entry and
the Keyless Enter-N-Go™ START/STOP button for unauthorized operation. While
the Vehicle Security Alarm is armed, interior switches for door locks and decklid
release are disabled. If something triggers the alarm, the Vehicle Security Alarm will
provide the following audible and visible signals: the horn will pulse, the park lamps
and/or turn signals will flash, and the Vehicle Security Light in the instrument cluster
will flash.
To Arm:
Push the Key Fob LOCK button.
To Disarm The System:
Push the Key Fob UNLOCK button or cycle the ignition to the ON/RUN position.
The Vehicle Security Alarm is designed to protect your vehicle. However, you can
create conditions where the Vehicle Security Alarm will give you a false alarm. If one
of the previously described arming sequences has occurred, the Vehicle Security
Alarm will arm regardless of whether you are in the vehicle or not. If you remain in
the vehicle and open a door, the alarm will sound. If this occurs, disarm the Vehicle
Security Alarm.
If the Vehicle Security Alarm is armed and the battery becomes disconnected, the
Vehicle Security Alarm will remain armed when the battery is reconnected. The ex-
terior lights will flash, and the horn will sound. If this occurs, disarm the Vehicle Se-
curity Alarm.
POWER DOOR LOCKS
The vehicles power door locks are activated by moving the inside door handles.
Push or pull the driver’s door handle to lock or unlock the doors and liftgate when
the doors are closed.
SEAT BELT SYSTEMS
Lap/Shoulder Belts
• All seating positions in your vehicle are equipped with lap/shoulder belts.
• Be sure everyone in your vehicle is in a seat and using a seat belt properly.
• Position the lap belt so that it is snug and lies low across your hips, below your
abdomen. To remove slack in the lap belt portion, pull up on the shoulder belt. To
loosen the lap belt if it is too tight, tilt the latch plate and pull on the lap belt. A
snug seat belt reduces the risk of sliding under the seat belt in a collision.
• Position the shoulder belt across the shoulder and chest with minimal, if any slack
so that it is comfortable and not resting on your neck. The retractor will withdraw
any slack in the shoulder belt.
GETTING STARTED
10
Page 13 of 108

Seat Belt Pretensioner
• The front seat belt system is equipped with pretensioning devices that are de-
signed to remove slack from the seat belt in the event of a collision.
• A deployed pretensioner or a deployed air bag must be replaced immediately.
WARNING!
• In a collision, you and your passengers can suffer much greater injuries if you
are not properly buckled up. You can strike the interior of your vehicle or
other passengers, or you can be thrown out of the vehicle. Always be sure
you and others in your vehicle are buckled up properly.
• A shoulder belt placed behind you will not protect you from injury during a
collision. You are more likely to hit your head in a collision if you do not wear
your shoulder belt. The lap and shoulder belt are meant to be used together.
• A seat belt that is too loose will not protect you properly. In a sudden stop,
you could move too far forward, increasing the possibility of injury. Wear your
seat belt snugly.
• A frayed or torn seat belt could rip apart in a collision and leave you with no
protection. Inspect the seat belt system periodically, checking for cuts, frays,
or loose parts. Damaged parts must be replaced immediately. Do not disas-
semble or modify the system. Seat belt assemblies must be replaced after a
collision.
SUPPLEMENTAL RESTRAINT SYSTEM (SRS) — AIR
BAGS
Air Bag System Components
Your vehicle may be equipped with the following air bag system components:
• Occupant Restraint Controller (ORC)
• Air Bag Warning Light
• Steering Wheel and Column
• Instrument Panel
• Knee Impact Bolsters
• Advanced Front Air Bags
• Supplemental Side Air Bags
• Supplemental Knee Air Bags
• Front and Side Impact Sensors
• Seat Belt Pretenioners
• Seat Belt Buckle Switch
• Seat Track Position Sensors
GETTING STARTED
11
Page 14 of 108

Advanced Front Air Bags
• This vehicle has Advanced Front Air Bags for both the driver and front passenger
as a supplement to the seat belt restraint systems. The Advanced Front Air Bags
will not deploy in every type of collision.
• Advanced Front Air Bags are designed to provide additional protection by supple-
menting the seat belts. Advanced Front Air Bags are not expected to reduce the
risk of injury in rear, side, or rollover collisions.
• The Advanced Front Air Bags will not deploy in all frontal collisions, including
some that may produce substantial vehicle damage — for example, some pole
collisions, truck underrides, and angle offset collisions.
• On the other hand, depending on the type and location of impact, Advanced
Front Air Bags may deploy in crashes with little vehicle front-end damage but that
produce a severe initial deceleration.
• Because air bag sensors measure vehicle deceleration over time, vehicle speed
and damage by themselves are not good indicators of whether or not an air bag
should have deployed.
• Seat belts are necessary for your protection in all collisions, and also are needed
to help keep you in position, away from an inflating air bag.
• The air bags must be ready to inflate for your protection in a collision. The Occu-
pant Restraint Controller (ORC) monitors the internal circuits and interconnecting
wiring associated with air bag system electrical components.
• The ORC turns on the Air Bag Warning Light in the instrument panel for approxi-
mately four to eight seconds for a self-check when the ignition switch is first
turned to the ON/RUN position. After the self-check, the Air Bag Warning Light
will turn off. If the ORC detects a malfunction in any part of the system, it turns on
the Air Bag Warning Light, either momentarily or continuously. A single chime will
sound to alert you if the light comes on again after initial startup.
• The ORC monitors the readiness of the electronic parts of the air bag system
whenever the ignition switch is in the START or ON/RUN position. If the ignition
switch is in the OFF position or in the ACC position, the air bag system is not on
and the air bags will not inflate.
• If the Air Bag Warning Light in the instrument panel is not on during the four to
eight seconds when the ignition switch is first turned to the ON/RUN position,
stays on, or turns on while driving, have the vehicle serviced by an authorized
service center immediately.
NOTE:If the speedometer, tachometer, or any engine related gauges are not working, the Oc-cupant Restraint Controller (ORC) may also be disabled. In this condition the air bagsmay not be ready to inflate for your protection. Have an authorized dealer service the airbag system immediately.
• After any collision, the vehicle should be taken to an authorized dealer immedi-
ately.
GETTING STARTED
12
Page 15 of 108

• Do not drive your vehicle after the air bags have deployed. If you are involved in
another collision, the air bags will not be in place to protect you.
• If it is necessary to modify the air bag system for persons with disabilities, contact
your authorized dealer.
• Refer to the Owner's Manual on the DVD for further details regarding the Supple-
mental Restraint System (SRS).
Supplemental Knee Air Bags
This vehicle is equipped with a Supplemental Driver Knee Air Bag mounted in the
instrument panel below the steering column. The Supplemental Driver Knee Air Bag
provides enhanced protection during a frontal impact by working together with the
seat belts, pretensioners, and Advanced Front Air Bags.
WARNING!
• Relying on the air bags alone could lead to more severe injuries in a collision.
The air bags work with your seat belt to restrain you properly. In some colli-
sions, the air bags won't deploy at all. Always wear your seat belts even
though you have air bags.
• Being too close to the steering wheel or instrument panel during Advanced
Front Air Bag deployment could cause serious injury, including death. Air
bags need room to inflate. Sit back, comfortably extending your arms to
reach the steering wheel or instrument panel.
• No objects should be placed over or near the air bag on the instrument
panel or steering wheel because any such objects could cause harm if the
vehicle is in a collision severe enough to cause the air bag to inflate.
Supplemental Side Air Bags
• This vehicle is equipped with Supplemental Seat-Mounted Side Air Bags (SABs)
located in the outboard side of the front seats. The SABs are marked with a SRS
AIRBAG or AIRBAG label sewn into the outboard side of the seats.
• This vehicle is equipped with Supplemental Side Air Bag Inflatable Curtains
(SABICs) located above the side windows. The trim covering the SABICs is la-
beled SRS AIRBAG or AIRBAG. The SABICs may help reduce the risk of partial
or complete ejection of vehicle occupants through side windows in certain side
impact events.
• The SABICs and SABs (“Side Air Bags”) are designed to activate in certain side
impacts. The Occupant Restraint Controller (“ORC”) determines whether the de-
ployment of the Side Air Bags in a particular impact event is appropriate, based
on the severity and type of collision. Vehicle damage by itself is not a good indi-
cator of whether or not Side Air Bags should have deployed.
GETTING STARTED
13
Page 16 of 108

WARNING!
• Side Air Bags need room to inflate. Do not lean against the door or window.
Sit upright in the center of the seat.
• Being too close to the Side Air Bags during deployment could cause you to
be severely injured or killed.
• Relying on the Side Air Bags alone could lead to more severe injuries in a
collision. The Side Air Bags work with your seat belt to restrain you properly.
In some collisions, Side Air Bags won’t deploy at all. Always wear your seat
belt even though you have Side Air Bags.
• This vehicle is equipped with left and right Supplemental Side Air Bag Inflat-
able Curtains (SABICs). Do not stack luggage or other cargo up high enough
to block the deployment of the SABICs. The trim covering above the side
windows where the SABIC and its deployment path are located should re-
main free from any obstructions.
• This vehicle is equipped with SABICs. In order for the SABICs to work as
intended, do not install any accessory items in your vehicle which could alter
the roof. Do not add an aftermarket sunroof to your vehicle. Do not add roof
racks that require permanent attachments (bolts or screws) for installation on
the vehicle roof. Do not drill into the roof of the vehicle for any reason.
• Do not use accessory seat covers or place objects between you and the
Side Air Bags; the performance could be adversely affected and/or objects
could be pushed into you, causing serious injury.
CHILD RESTRAINTS
Children 12 years or younger should ride properly buckled up in a rear seat, if avail-
able. According to crash statistics, children are safer when properly restrained in the
rear seats rather than in the front.
Every state in the United States and all Canadian provinces require that small chil-
dren ride in proper restraint systems. This is the law, and you can be prosecuted for
ignoring it.
NOTE:
• For additional information, refer to www.Seatcheck.org or call 1-866-
SEATCHECK.
• Canadian residents should refer to Transport Canada’s website for additional in-
formation:
http://www.tc.gc.ca/eng/motorvehiclesafety/safedrivers-childsafety-index-53.htm
GETTING STARTED
14
 1
1 2
2 3
3 4
4 5
5 6
6 7
7 8
8 9
9 10
10 11
11 12
12 13
13 14
14 15
15 16
16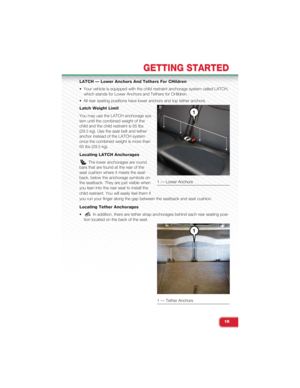 17
17 18
18 19
19 20
20 21
21 22
22 23
23 24
24 25
25 26
26 27
27 28
28 29
29 30
30 31
31 32
32 33
33 34
34 35
35 36
36 37
37 38
38 39
39 40
40 41
41 42
42 43
43 44
44 45
45 46
46 47
47 48
48 49
49 50
50 51
51 52
52 53
53 54
54 55
55 56
56 57
57 58
58 59
59 60
60 61
61 62
62 63
63 64
64 65
65 66
66 67
67 68
68 69
69 70
70 71
71 72
72 73
73 74
74 75
75 76
76 77
77 78
78 79
79 80
80 81
81 82
82 83
83 84
84 85
85 86
86 87
87 88
88 89
89 90
90 91
91 92
92 93
93 94
94 95
95 96
96 97
97 98
98 99
99 100
100 101
101 102
102 103
103 104
104 105
105 106
106 107
107
CONTROLS AT A GLANCE
7")