Page 49 of 236

The specified following distance for ACC can be set by varying the distance setting
between four bars (longest), three bars (long), two bars (medium) and one bar (short).
U")
Distance Setting (ACC Only)
The specified following distance for ACC can be set by varying the distance setting
between four bars (longest), three bars (long), two bars (medium) and one bar (short).
Using this distance setting and the vehicle speed, ACC calculates and sets the distance
to the vehicle ahead. This distance setting displays in the DID.
•Toincreasethedistancesetting,pushtheDistanceSetting—Increasebuttonand
release. Each time the button is pushed, the distance setting increases by one bar
(longer).
•Todecreasethedistancesetting,pushtheDistanceSetting—Decreasebuttonand
release. Each time the button is pushed, the distance setting decreases by one bar
(shorter).
Changing Modes (ACC Only)
If desired, the Adaptive Cruise Control mode can be turned off and the system can be
operated as a normal (Fixed Speed) Speed Control mode. When in the normal (Fixed
Speed) Speed Control mode the distance setting feature will be disabled and the system
will maintain the speed you set.
•Tochangebetweenthedifferentcruisecontrolmodes,pushtheADAPTIVECRUISE
CONTROL (ACC) ON/OFF button which turns the ACC and the normal (Fixed Speed)
Speed Control OFF.
•Pushingthenormal(FixedSpeed)SPEEDCONTROLON/OFFbuttonwillresultin
turning ON (changing to) the normal (Fixed Speed) Speed Control mode.
Refer to your Owner's Manual on the DVD for further information.
OPERATING YOUR VEHICLE
47
Page 50 of 236
 is a convenience system. It is not a substitute for active
driving involvement. It is always the driver’s responsibility to be attentive of road,
traffic, and")
WARNING!
Adaptive Cruise Control (ACC) is a convenience system. It is not a substitute for active
driving involvement. It is always the driver’s responsibility to be attentive of road,
traffic, and weather conditions, vehicle speed, distance to the vehicle ahead; and, most
importantly, brake operation to ensure safe operation of the vehicle under all road
conditions. Your complete attention is always required while driving to maintain safe
control of your vehicle. Failure to follow these warnings can result in a collision and
death or serious personal injury.
The ACC system:
•Doesnotreacttopedestrians,oncomingvehicles,andstationaryobjects(e.g.,
astoppedvehicleinatrafficjamoradisabledvehicle).
•Cannottakestreet,traffic,andweatherconditionsintoaccount,andmaybelimited
upon adverse sight distance conditions.
•Doesnotalwaysfullyrecognizecomplexdrivingconditions,whichcanresultin
wrong or missing distance warnings.
•Willbringthevehicletoacompletestopwhilefollowingatargetvehicleandhold
the vehicle for 2 seconds in the stop position. If the target vehicle does not start
moving within two seconds the ACC system will display a message that the system
will release the brakes and that the brakes must be applied manually. An audible
chime will sound when the brakes are released.
Yo u s h o u l d s w i t c h o f f t h e A C C s y s t e m :
•Whendrivinginfog,heavyrain,heavysnow,sleet,heavytraffic,andcomplex
driving situations (i.e., in highway construction zones).
•Whenenteringaturnlaneorhighwayofframp;whendrivingonroadsthatare
winding, icy, snow-covered, slippery, or have steep uphill or downhill slopes.
•Whentowingatrailerupordownsteepslopes.
•Whencircumstancesdonotallowsafedrivingataconstantspeed.
The Cruise Control system has two control modes:
•AdaptiveCruiseControlmodeformaintaininganappropriatedistancebetween
vehicles.
•Normal(fixedspeed)electronicspeedcontrolmodeforcruisingataconstant
preset speed. For additional information, refer to “Normal (Fixed Speed) Cruise
Control Mode” in this section.
Normal (fixed speed) electronic speed control will not react to preceding vehicles.
Always be aware of the mode selected.
Yo u c a n c h a n g e t h e m o d e b y u s i n g t h e C r u i s e C o n t r o l b u t t o n s . T h e t w o c o n t r o l m o d e s
function differently. Always confirm which mode is selected.
OPERATING YOUR VEHICLE
48
Page 51 of 236
 WITH MITIGATION
The Forward Collision Warning (FCW) system with mitigation provides the driver with audible
warnings, visual warnings (within the DID), and may apply a")
FORWARD COLLISION WARNING (FCW) WITH MITIGATION
The Forward Collision Warning (FCW) system with mitigation provides the driver with audible
warnings, visual warnings (within the DID), and may apply a brake jerk to warn the driver
when it detects a potential frontal collision. The warnings and limited braking are intended to
provide the driver with enough time to react, avoid or mitigate the potential collision.
•FCWmonitorstheinformationfromtheforwardlookingsensorsaswellasthe
Electronic Brake Controller (EBC), to calculate the probability of a forward collision.
When the system determines that a forward collision is probable, the driver will be
provided with audible and visual warnings and may provide a brake jerk warning.
•Ifthedriverdoesnottakeactionbasedupontheseprogressivewarnings,thenthe
system will provide a limited level of active braking to help slow the vehicle and mitigate
the potential forward collision. If the driver reacts to the warnings by braking and the
system determines that the driver intends to avoid the collision by braking but has not
applied sufficient brake force, the system will compensate and provide additional brake
force as required.
Turning FCW ON Or OFF
NOTE:
The default status of FCW is “On,” this allows the system to warn you of a possible
collision with the vehicle in front of you when you are farther away and it applies limited
braking. This gives you the most reaction time to avoid a possible collision.
The forward collision button is on the switch panel that is located in the center of the
instrument panel.
•To t u r n t h e F C W s y s t e m O F F, p u s h t h e f o r w a r d c o l l i s i o n b u t t o n o n c e ( L E D t u r n s o n ) .
•To t u r n t h e F C W s y s t e m b a c k O N , p u s h t h e f o r w a r d c o l l i s i o n b u t t o n a g a i n ( L E D t u r n s o f f ) .
Changing FCW Status
The FCW feature has two settings and can be changed within the Uconnect®System
Screen:
•Far
•Near
NOTE:
The FCW and active braking settings can only be changed when the vehicle is in PARK.
Far
The default status of FCW is the “Far” setting.
The far setting provides warnings for potential collisions more distant in front of the
vehicle, allowing the driver to have the most reaction time to avoid a collision.
OPERATING YOUR VEHICLE
49
Page 52 of 236
 recommendations.
More cautious drivers that do not mind frequent warnings may prefer this")
This setting is designed to provide early warnings per NHTSA (National Highway Traffic
Safety Administration) recommendations.
More cautious drivers that do not mind frequent warnings may prefer this setting.
NOTE:
This setting gives you the most reaction time.
Near
Changing the FCW status to the “Near” setting, allows the system to warn you of a
potential frontal collision when you are much closer.
This setting provides less reaction time than the “Far” setting, which allows for a more
dynamic driving experience.
More dynamic or aggressive drivers that want to avoid frequent warnings may prefer this
setting.
Off
Changing the FCW status to “Off” prevents the system from warning you of a possible
collision with the vehicle in front of you.
Turning Active Braking ON Or OFF
The Active Braking feature has two settings and can be changed within the Uconnect®
System Screen:
•On
•Off
Changing the Active Braking status to “Off” prevents the system from providing limited
autonomous braking, or additional brake support if the driver is not braking adequately in
the event of a potential frontal collision.
NOTE:
If FCW is set to “Off,” “FCW OFF” will be displayed in the DID.
Refer to the Owner's Manual on the DVD for further details.
WARNING!
Forward Collision Warning (FCW) is not intended to avoid a collision on its own, nor can
FCW detect every type of potential collision. The driver has the responsibility to avoid
acollisionbycontrollingthevehicleviabrakingandsteering.Failuretofollowthis
warning could lead to serious injury or death.
OPERATING YOUR VEHICLE
50
Page 53 of 236

LANESENSE
The LaneSense system can be enabled and disabled with the LaneSense button, located
on the switch panel below the Uconnect®display.
•PushtheLaneSensebuttonto turn the system ON (LED turns off).
The LaneSense system is operational at speeds above 37 mph (60 km/h) and below
112 mph (180 km/h). The LaneSense system uses a forward looking camera to detect
lane markings and measure vehicle position within the lane boundaries.
When both lane markings are detected and the driver unintentionally drifts out of the lane
(no turn signal applied), the LaneSense system provides a haptic warning in the form of
torque applied to the steering wheel to prompt the driver to remain within the lane
boundaries. If the driver continues to unintentionally drift out of the lane, the LaneSense
system provides a visual warning through the Driver Information Display (DID) to prompt
the driver to remain within the lane boundaries.
The driver may manually override the haptic warning by applying torque into the steering
wheel at any time.
When only a single lane marking is detected and the driver unintentionally drifts across
the lane marking (no turn signal applied), the LaneSense system provides a visual warning
through the Driver Information Display (DID) to prompt the driver to remain within the
lane. When only a single lane marking is detected, a haptic (torque) warning will not be
provided.
Refer to your Owner's Manual on the DVD for further details.
NOTE:
When operating conditions have been met, the LaneSense system will monitor if the
driver’s hands are on the steering wheel and provides an audible warning to the driver
when the driver’s hands are not detected on the steering wheel. The system will cancel if
the driver does not return their hands to the wheel.
OPERATING YOUR VEHICLE
51
Page 54 of 236

PARKVIEW® REAR BACK-UP CAMERA
Yo u c a n s e e a n o n - s c r e e n i m a g e o f t h e r e a r o f y o u r v e h i c l e w h e n e v e r t h e t r a n s m i s s i o n i s
shifted into REVERSE. The ParkView®Rear Back-Up Camera image will be displayed on
the radio display screen, located on the center stack of the instrument panel.
If the radio display screen appears foggy, clean the camera lens located on the rear of the
vehicle above the rear license plate.
Refer to your Owner's Manual on the DVD for further details.
WARNING!
Drivers must be careful when backing up; even when using the ParkView®RearBack-Up Camera. Always check carefully behind your vehicle, and be sure to check forpedestrians, animals, other vehicles, obstructions, or blind spots before backing up.Yo u m u s t c o n t i n u e t o p a y a t t e n t i o n w h i l e b a c k i n g u p . F a i l u r e t o d o s o c a n r e s u l t i nserious injury or death.
BLIND SPOT MONITORING
The Blind Spot Monitoring (BSM) system uses two radar-based sensors, located inside the
rear bumper fascia, to detect Highway licensable vehicles (automobiles, trucks, motor-
cycles etc.) that enter the blind spot zones from the rear/front/side of the vehicle.
The Blind Spot Monitoring (BSM) system warning light, located in the outside mirrors, will
illuminate if a vehicle moves into a blind spot zone.
The BSM system can also be configured to sound an audible (chime) alert and mute the
radio to notify you of objects that have entered the detection zones.
Refer to “Blind Spot Monitoring” in “Understanding The Features Of Your Vehicle” in your
Owner's Manual on the DVD for further details.
OPERATING YOUR VEHICLE
52
Page 55 of 236
 is displayed both on the shift lever and in the Driver
Information Display (DID).
To s e l e c t a g e a r r a n g e , p r e s s")
EIGHT-SPEED AUTOMATIC TRANSMISSION
The transmission gear range (PRNDM) is displayed both on the shift lever and in the Driver
Information Display (DID).
To s e l e c t a g e a r r a n g e , p r e s s t h e l o c k b u t t o n o n t h e s h i f t l e v e r a n d m o v e t h e l e v e r r e a r w a r d
or forward. You must also press the brake pedal to shift the transmission out of PARK, or
to shift from NEUTRAL into DRIVE or REVERSE when the vehicle is stopped or moving at
low speeds (refer to “Brake/Transmission Shift Interlock System” within the “Starting And
Operating” chapter in your Owner’s Manual on the DVD for further information). Select the
DRIVE range for normal driving.
The electronically-controlled transmission
provides a precise shift schedule. The trans-
mission electronics are self-calibrating;
therefore, the first few shifts on a new vehicle
may be somewhat abrupt. This is a normal
condition, and precision shifts will develop
within a few hundred miles (kilometers).
Only shift from DRIVE to PARK or RE-
VERSE when the accelerator pedal is re-
leased and the vehicle is stopped. Be sure
to keep your foot on the brake pedal when
shifting between these gears.
The transmission shift lever has PARK, RE-
VERSE, NEUTRAL, DRIVE, and MANUAL
(Autostick) shift positions. Manual shifts
can be made using the Autostick shift con-
trol (refer to “AutoStick” in this section for
further information). Toggling the shift lever
forward (-) or rearward (+) while in the
MANUAL (AutoStick) position (beside the DRIVE position) will manually select the
transmission gear, and will display the current gear in the instrument cluster as M1, M2,
M3, etc.
NOTE:
If the shift lever cannot be moved to the PARK, REVERSE, or NEUTRAL position (when
pushed forward) it is probably in the MANUAL (AutoStick, +/-) position (beside the DRIVE
position). In MANUAL (AutoStick) mode, the transmission gear is displayed in the
instrument cluster (as M1, M2, M3, etc.). Move the shift lever to the right (into the DRIVE
[D] position) for access to PARK, REVERSE, and NEUTRAL.
NOTE:
For more information, refer to Automatic Transmission in the Owner’s Manual on your
DVD.
Transmission Shift Lever
1—LockButton2—ShiftLever
OPERATING YOUR VEHICLE
53
Page 56 of 236

AUTOSTICK/STEERING WHEEL MOUNTED PADDLE SHIFTERS
•AutoStickisadriver-interactivetrans-
mission feature that offers manual gear
shifting to provide you with more control
of the vehicle. AutoStick allows you to
maximize engine braking, and improve
overall vehicle performance.
•This system can also provide you with more
control during passing, city driving, cold
slippery conditions, mountain driving,
trailer towing, and many other situations.
Operation
When the shift lever is in the DRIVE (D) position, the transmission will operate automati-
cally, shifting between the eight available gears. To activate AutoStick, move the shift lever
into the MANUAL (M) position (beside the DRIVE position). The current transmission gear
will be displayed in the instrument cluster, along with a highlighted "M" (Manual)
indication. When the shift lever is in the MANUAL (M) position, tap the shift lever forward
(-) (or tap the (-) shift paddle on the steering wheel, if equipped) to downshift the
transmission to the next lower gear, or tap the lever rearward (+) (or tap the (+) shift
paddle, if equipped) to command an upshift.
NOTE:
Ta p p i n g o n e o f t h e s t e e r i n g w h e e l - m o u n t e d s h i f t p a d d l e s ( + / - ) , i f e q u i p p e d , w h i l e t h e s h i f t
lever is in DRIVE, will activate a temporary AutoStick mode. Tapping (-) to enter AutoStick
mode will downshift the transmission to the next lower gear, while using (+) to enter
AutoStick mode will retain the current gear. The current gear will be displayed in the
instrument cluster, but the "M" will not be highlighted. The transmission will revert back
to normal operation (if the shift lever remains in DRIVE) after a period of time, depending
on accelerator pedal activity.
In AutoStick mode, the transmission will shift up or down when (+/-) is manually selected
by the driver (using the shift lever, or the shift paddles [if equipped]), unless an engine
lugging or overspeed condition would result. It will remain in the selected gear until
another upshift or downshift is chosen, except as described below.
•IntemporaryAutoStickmode(shiftleverinDRIVE),thetransmissionwillautomatically
shift up when maximum engine speed is reached. If the accelerator is fully depressed,
the transmission will downshift when possible (based on current vehicle speed and
gear, except 6.4L models). Lack of accelerator pedal activity will cause the transmis-
sion to revert to automatic operation.
•IfnormalAutoStickmodeisengaged(shiftleverinMANUALposition),manualgear
selection will be maintained until the shift lever is returned to DRIVE, or as described
below. The transmission will not upshift automatically at redline in this mode, nor will
downshifts be obtained if the accelerator pedal is pressed to the floor.
1—(–)ShiftPaddle2—(+)ShiftPaddle
OPERATING YOUR VEHICLE
54
 1
1 2
2 3
3 4
4 5
5 6
6 7
7 8
8 9
9 10
10 11
11 12
12 13
13 14
14 15
15 16
16 17
17 18
18 19
19 20
20 21
21 22
22 23
23 24
24 25
25 26
26 27
27 28
28 29
29 30
30 31
31 32
32 33
33 34
34 35
35 36
36 37
37 38
38 39
39 40
40 41
41 42
42 43
43 44
44 45
45 46
46 47
47 48
48 49
49 50
50 51
51 52
52 53
53 54
54 55
55 56
56 57
57 58
58 59
59 60
60 61
61 62
62 63
63 64
64 65
65 66
66 67
67 68
68 69
69 70
70 71
71 72
72 73
73 74
74 75
75 76
76 77
77 78
78 79
79 80
80 81
81 82
82 83
83 84
84 85
85 86
86 87
87 88
88 89
89 90
90 91
91 92
92 93
93 94
94 95
95 96
96 97
97 98
98 99
99 100
100 101
101 102
102 103
103 104
104 105
105 106
106 107
107 108
108 109
109 110
110 111
111 112
112 113
113 114
114 115
115 116
116 117
117 118
118 119
119 120
120 121
121 122
122 123
123 124
124 125
125 126
126 127
127 128
128 129
129 130
130 131
131 132
132 133
133 134
134 135
135 136
136 137
137 138
138 139
139 140
140 141
141 142
142 143
143 144
144 145
145 146
146 147
147 148
148 149
149 150
150 151
151 152
152 153
153 154
154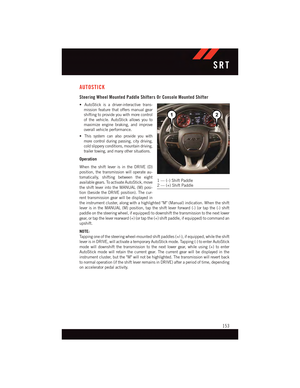 155
155 156
156 157
157 158
158 159
159 160
160 161
161 162
162 163
163 164
164 165
165 166
166 167
167 168
168 169
169 170
170 171
171 172
172 173
173 174
174 175
175 176
176 177
177 178
178 179
179 180
180 181
181 182
182 183
183 184
184 185
185 186
186 187
187 188
188 189
189 190
190 191
191 192
192 193
193 194
194 195
195 196
196 197
197 198
198 199
199 200
200 201
201 202
202 203
203 204
204 205
205 206
206 207
207 208
208 209
209 210
210 211
211 212
212 213
213 214
214 215
215 216
216 217
217 218
218 219
219 220
220 221
221 222
222 223
223 224
224 225
225 226
226 227
227 228
228 229
229 230
230 231
231 232
232 233
233 234
234 235
235