Page 49 of 176

47
C-zero_en_Chap04_conduite_ed01-2014
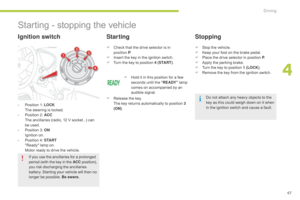
Starting - stopping the vehicle
- Position 1: LOCK The steering is locked.
-
Po
sition 2: ACC
Th
e ancillaries (radio, 12 V socket...) can
be used.
-
Po
sition 3: ON
Ig
nition on.
-
Po
sition 4: S TA R T
"R
eady" lamp on.
Mo
tor ready to drive the vehicle.
Ignition switch
F Check that the drive selector is in
position P.
F In
sert the key in the ignition switch.
F
Tu
rn the key to position 4 (S TA R T ) .
Starting Stopping
F Stop the vehicle.
F Ke ep your foot on the brake pedal.
F
Pl
ace the drive selector in position P .
F
Ap
ply the parking brake.
F
Tu
rn the key to position 1 (LOCK) .
F
Re
move the key from the ignition switch.
F
Ho
ld it in this position for a few
seconds until the " RE ADY " lamp
comes on accompanied by an
audible signal.
F
Re
lease the key.
Th
e key returns automatically to position 3
(ON) . Do not attach any heavy objects to the
key as this could weigh down on it when
in the ignition switch and cause a fault.
If you use the ancillaries for a prolonged
period (with the key in the ACC position),
you risk discharging the ancillaries
battery. Starting your vehicle will then no
longer be possible. Be aware .
4
Driving
Page 50 of 176
48
C-zero_en_Chap04_conduite_ed01-2014
Parking brake
Applying
F Pull the parking brake lever fully up to
immobilise your vehicle.
When parking on a slope, direct your
wheels against the kerb, apply the
parking brake, place the drive selector
in position P and switch off the ignition.
Releasing
F Pull the parking brake lever up slightly,
press the release button then lower the
lever fully.
When the vehicle is being driven, if
the parking brake is still on or has
not been fully released, this warning
lamp comes on.
Driving
Page 51 of 176
49
C-zero_en_Chap04_conduite_ed01-2014
P. Park.
This position is used for starting the vehicle.
To come out of the P position, you must have
your foot on the brake.
R. Reverse.
N. Neutral.
D. Drive (For ward).
drive selector
Selector positions
When you move the drive selector through the
grille to select a position, the corresponding
indicator is displayed in the instrument panel.
Displays in the instrument panel
With the motor running, P appears in the
instrument panel screen.
F
Pr
ess the brake pedal to come out of
position P .
F
Se
lect for ward ( D) or reverse ( R) gear.
F
Re
lease the parking brake.
F
Ta
ke your foot off the brake pedal, the
vehicle then moves off slowly to facilitate
manoeuvring.
F
Ac
celerate to go for wards or backwards.
F
"D" o
r "R" appears in the instrument panel
screen.
Moving off
4
Driving
Page 52 of 176
50
C-zero_en_Chap04_conduite_ed01-2014
To tow your vehicle, the drive selector
must be in position N, refer to "Practical
Information".
Parking the vehicle
To stop the motor, you must select position P .
You must apply the parking brake to immobilise
the vehicle.
To remove the key from the ignition switch, the
drive selector must be in position P .
Driving
Page 53 of 176

51
C-zero_en_Chap05_visibilite_ed01-2014
Lighting controls
Main lighting
The various front and rear lamps of the vehicle
are designed to adapt the lighting progressively
in relation to the climatic conditions and so
ensure the best visibility for the driver:
-
si
delamps, to be seen,
-
di
pped beam headlamps to see without
dazzling other drivers,
-
ma
in beam headlamps to see clearly when
the road is clear.
Additional lighting
Other lamps are provided to fulfil the
requirements of particular driving conditions:
-
a re
ar foglamp to be seen from a distance,
-
fr
ont foglamps for even better visibility,
-
da
ytime running lamps to be seen during
the day.
Selection ring for main lighting
mode
Turn the ring to position the symbol required
facing the mark.
Automatic illumination of headlamps. Sidelamps only.
Dipped or main beam headlamps.
Stalk for switching headlamp beam
Pull the stalk to switch the lighting between
dipped / main beam headlamps.
In the lighting off and sidelamps modes, the
driver can switch on the main beam headlamps
temporarily ("headlamp flash") by maintaining a
pull on the stalk.
Displays
Illumination of the corresponding indicator lamp
in the instrument panel confirms the lighting
switched on.
Lighting off.
5
Visibility
Page 54 of 176

52
C-zero_en_Chap05_visibilite_ed01-2014
Front and rear foglamps
Foglamps selection ring.
The foglamps operate with the sidelamps and
dipped and main beam headlamps.Front and rear foglamps.
In good or rainy weather, both day
and night, the front foglamps and the
rear foglamp is prohibited. In these
situations, the power of its beam may
dazzle other drivers.
Do not forget to switch off the front
foglamps and the rear foglamp when
they are no longer necessary.
Lighting on reminder
There is an audible signal when the
driver's door is opened, to warn the
driver if the vehicle lighting is on, with
the ignition off.
Switching off the lighting stops the
audible signal.
F
To s
witch on the front foglamps, turn the
ring for wards once.
F
To s
witch on the rear foglamp, turn the ring
for wards twice.
F
To s
witch off the rear foglamp, turn the ring
rear wards twice.
F
To s
witch off the front foglamps, turn the
ring rear wards once.
The ring returns to its initial position automatically.The rear foglamp is switched off automatically
when you switch off the sidelamps, or the
dipped or main beam headlamps.
Visibility
Page 55 of 176

53
C-zero_en_Chap05_visibilite_ed01-2014
Daytime running lamps
Special daytime lighting so that the vehicle can
be seen more easily.
The daytime running lamps come on
automatically when starting the motor, if no
other lighting is on.
They cannot be deactivated.Automatic illumination of headlamps
With the main lighting control ring in the AUTO
position, the sidelamps and dipped beam headlamps
come on automatically, without any action by the
driver, when a low level of ambient light is detected.
When the light returns to a sufficient level or the
wipers are switched off, the lighting is switched off
automatically.
The sensor is located at the base of the windscreen.
Automatic illumination of
headlamps
Automatic lighting off
When the lighting stalk is in the
"AUTO" p osition, if the ignition switch is in
the "LOCK" or "ACC" position or if the key
has been removed, the lighting switches off
automatically when the driver's door is
opened . The initial setting is position "0"
.
Headlamp
adjustment
To avoid causing a nuisance to other road
users, the height of the halogen headlamps
should be adjusted according to the load in
the
v
ehicle.
0.
Dr
iver only or driver + 1 front passenger.
1 or 2.
4 pe
ople (including the driver).
3.
4 pe
ople (including the driver) + maximum
authorised load.
4.
Dr
iver + maximum authorised load.
Although these lamps are located in
the same unit as the front foglamp, they
operate with a specific bulb.
Their use is covered by road vehicle
lighting regulations.
In foggy weather or in snow, the
sunshine sensor may detect sufficient
light. The lighting will not come on
automatically.
do no
t cover the sunshine sensor, the
associated functions will no longer be
controlled.
5
Visibility
Page 56 of 176

54
C-zero_en_Chap05_visibilite_ed01-2014
Wiper control
Windscreen wipers
The wipers are controlled directly by the driver
by means of the stalk A and its ring B.Single wipe.
Park.
Intermittent (the speed can be set
manually),
Slow.
Fast.
B.
In
termittent operation adjustment ring.
F
Tu
rn this ring to increase or reduce the
wiping frequency in intermittent mode.
A.
Wi
ping speed selection stalk: raise or lower
the stalk to the desired position.
Windscreen wash
Pull the wiper stalk towards you.
The w indscreen wash, then the windscreen
wipers, operate for a pre-determined time.
Rear wiper
Park.
Intermittent wipe.
The wiper wipes twice then switches to
intermittent mode with an interval of a few
seconds. Wipe with screenwash
Keep the ring in this position to operate the
screenwash with several wipes of the wiper.
Do not operate the wipers on a dry
windscreen. Under extremely hot or
cold conditions, ensure that the wiper
blades are not stuck to the windscreen
before operating the wipers. In wintry conditions, remove snow, ice
or frost present on the windscreen,
around the wiper arms and blades and
the windscreen seal, before operating
the wipers. C.
Re
ar wiper selection ring.
Visibility