Page 97 of 176

95
C-zero_en_Chap08_info-pratiques_ed01-2014
Charging the battery using
a battery charger
F Start the other vehicle and wait a few
minutes.
F
Tu
rn the ignition key on your vehicle, until
the "Ready" lamp comes on.
F
Di
sconnect the cables in the reverse order.
F
Re
fit the battery protective cover and
tighten the fixing screw.
If the "Ready" lamp does not come on, proceed
as follows:
F
Le
ave the cables connected.
F
Re
turn the ignition switch on your vehicle
to the " LOCK" position.
F
Pu
t the main battery on charge, following
the procedure for normal charging (see the
"charging the main battery" section).
F
Wh
en the charging warning lamp in
the instrument panel comes on fixed,
disconnect the cables.
F
Le
ave the battery on charge for at least
one hour.
F
Tu
rn the ignition key on your vehicle, until
the "Ready" lamp comes on.
If the problem persists, contact a
CITROËN
d
ealer or a qualified workshop. F Re
move the protective cover from the
battery.
Ensure that the electrolyte is not frozen.
Check the electrolyte level and top up
with distilled water if necessary (refer to
the "checking levels" section). F
Sl
acken nut 1 and lift off the retaining bar.
8
Practical information
Page 98 of 176

96
C-zero_en_Chap08_info-pratiques_ed01-2014
Never charge the battery without
first disconnecting the terminals and
removing it from the vehicle.
Do not disconnect the terminals when
the "Ready" lamp is on, nor when the
vehicle is being charged.
Before disconnecting
You must wait 2 minutes after switching
off the ignition before disconnecting the
battery.Batteries contain harmful substances
such as sulphuric acid and lead. They
must be disposed of in line with legal
requirements and never put out with
household waste.
Take used batteries to an authorised
collection point.
F
Di
sconnect the negative (-) terminal.
F
Li
ft the protective cover on the (+) terminal 2 .
F
Sl
acken nut 3 .
F
Di
sconnect the positive (+) terminal.
F
Re
move the battery.
F
Ch
arge the battery following the
instructions given by the manufacturer of
the battery charger.
F
Re
connect the battery starting with the (+)
cable.
After reconnecting
After reconnecting the battery, switch
on the ignition and wait 1 minute
before starting, to allow initialisation
of the electronic systems. However,
if minor problems persist after doing
this, contact a CITROËN dealer or a
qualified workshop.
Remember to enter the radio code
yourself, referring to the relevant
section.
Ensure that the battery posts and cable
terminals are clean. If they are covered
with sulphates (whitish or greenish
deposit), disconnect and clean them.
Practical information
Page 99 of 176
97
C-zero_en_Chap08_info-pratiques_ed01-2014
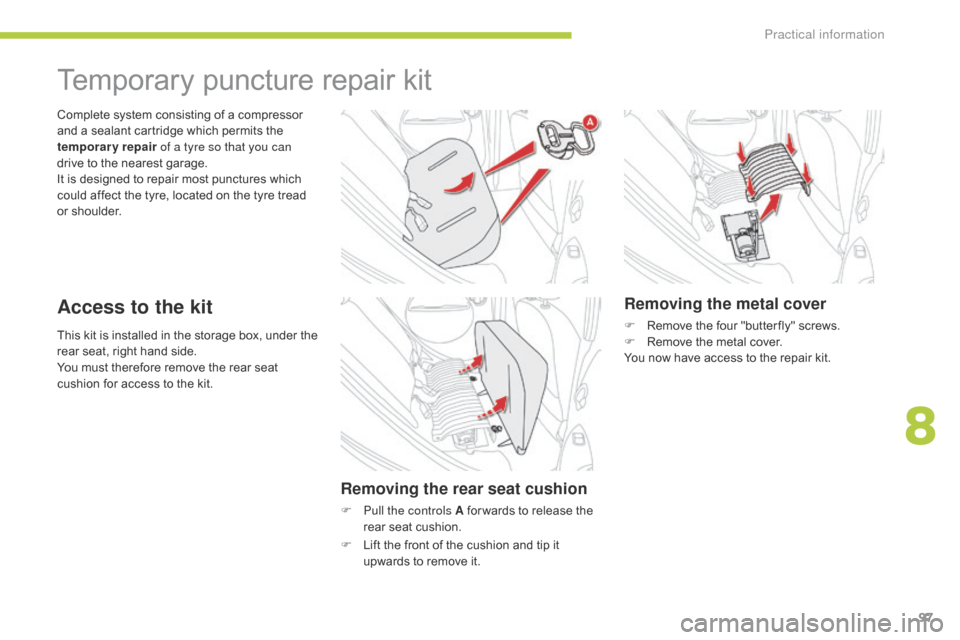
This kit is installed in the storage box, under the
rear seat, right hand side.
You must therefore remove the rear seat
cushion for access to the kit. Complete system consisting of a compressor
and a sealant cartridge which permits the
temporary repair of a tyre so that you can
drive to the nearest garage.
It is designed to repair most punctures which
could affect the tyre, located on the tyre tread
or shoulder.
Temporary puncture repair kit
Access to the kit
Removing the rear seat cushion
F Pull the controls A for wards to release the
r ear seat cushion.
Removing the metal cover
F Remove the four "butter fly" screws.
F Re move the metal cover.
You now have access to the repair kit.
F
Li
ft the front of the cushion and tip it
upwards to remove it.
8
Practical information
Page 100 of 176
98
C-zero_en_Chap08_info-pratiques_ed01-2014
1. 12 V compressor with integral pressure gauge, to measure and adjust the tyre
pressure.
Composition of the kit
2. Sealant cartridge for the temporary repair
o f a tyre.
3.
In
jection pipe.
4.
Su
ction pipe, to remove the sealant product
if necessary.
5.
Sa
chet containing a replacement valve
core, a tool for removing/refitting the valve
core and a speed restriction sticker.
The speed restriction sticker must be
affixed to the vehicle's steering wheel to
remind you that a wheel is in temporary
use.
Do not exceed a speed of 50
m
ph
(80
k
m/h) when driving with a tyre
repaired using this type of kit.
Refitting the rear seat cushion
F Put the metal cover back into place.
F Re fit the four "butter fly" screws.
F
In
sert the metal hooks into the seat
backrest.
F
Fo
ld the seat cushion down until it locks in
place.
When refitting the cushion, take care
not to trap the seat belt buckles.
Practical information
Page 101 of 176

99
C-zero_en_Chap08_info-pratiques_ed01-2014
Repair procedure
1. Sealing
F Switch off the ignition.
F In dicate on the speed restriction sticker
provided, the wheel to be repaired, then fix
it to the steering wheel as a reminder that a
wheel is in temporary use.
F
Sh
ake the sealant cartridge, remove the
cap and screw on the injection pipe. F
Re
move the valve cap for the tyre to be
repaired.
F Re move the valve core using the tool
provided, and store in in a clean place.
F
Co
nnect the injection pipe to the valve of
the tyre to be repaired. F
Ta
p the sealant cartridge (top down)
several times with your hand, so as to
inject all of the product into the tyre.
F
Re
move the injection pipe.
F
Re
fit the valve core and tighten it using the
tool provided.
Take care, this product is harmful (e.g. ethylene-glycol, colophony...) if swallowed and
causes irritation to the eyes.
Keep it out of reach of children.
The use-by date of the sealant is marked on the cartridge.
After use, do not discard the empty cartridge but take it to a CITROËN dealer (France) or an
authorised waste disposal site.
Don't forget to obtain a replacement cartridge; they are available from a CITROËN dealer or
a qualified workshop.
Avoid removing any foreign bodies
which have penetrated into the tyre.
8
Practical information
Page 102 of 176

100
C-zero_en_Chap08_info-pratiques_ed01-2014
2. Inflation
F Check that the compressor switch A is in
the "OFF " position.
F
Un
coil the compressor pipe B .F
Co
nnect this pipe to the valve of the
repaired wheel.
F
Co
nnect the compressor's electric plug to
the vehicle's 12
V s
ocket (ignition switch in
position "ON" or "ACC").
F
St
art the compressor by turning the switch A
to the " ON" position.
F
Us
ing the compressor, adjust the pressure
in accordance with the vehicle's tyre
pressure label (located in the driver's door
aperture).
A lo
ss of pressure indicates that the
puncture has not been fully plugged;
contact a CITROËN dealer or a qualified
workshop for assistance.
F
Re
move the compressor and stow the kit.
F
Dr
ive off straight away at reduced
speed (50
m
ph [80
k
m/h] max) limiting
the distance travelled to approximately
120
m
iles (200
k
m).As soon as possible, go to a CITROËN
dealer or a qualified workshop.
Tell the technician that you have used
the kit. After checking, the technician
will advise you whether the tyre can be
repaired or must be replaced. If after around 5 to 7 minutes the
pressure is not attained, this indicates
that the tyre is not repairable; contact
a CITROËN dealer or a qualified
workshop for assistance.
Practical information
Page 103 of 176

101
C-zero_en_Chap08_info-pratiques_ed01-2014
Changing a wheel
Tools required
- A jack: for lifting the vehicle.
- A wh eelbrace: for removing and refitting
the wheel bolts.
-
A ha
ndle: for operating the jack.
These tools are not supplied with your vehicle.Parking the vehicle
Immobilise the vehicle where it does not
block traffic: the ground must be level,
stable and not slippery.
Apply the parking brake, switch off the
ignition and put the drive selector in
position P to lock the wheels.
If necessary, place a chock under the
wheel diagonally opposite the wheel to
be changed.
You must ensure that the occupants get
out of the vehicle and wait where they
are safe.
Never go underneath a vehicle raised
using a jack; use an axle stand.
Wheel with wheel trim
When removing the wheel , first
remove the wheel trim using the
wheelbrace, by pulling at the valve hole.
When fitting the wheel , refit the wheel
trim starting by aligning the valve hole
with the valve, and then press on the
edge of the trim with the palm of your
hand.
8
Practical information
Page 104 of 176
102
C-zero_en_Chap08_info-pratiques_ed01-2014
F Extend the jack until its head comes into contact with the jacking point A or B used. The
vehicle's contact sur face A or B must be engaged with the central part of the head of the jack.
F
Ra
ise the vehicle until there is sufficient space between the wheel and the ground.
F Sl
acken the bolts using the wheelbrace.
F Po
sition the foot of the jack on the ground
and ensure that it is directly below the
front
A
or rear B jacking point provided on
the underbody, whichever is closest to the
wheel to be changed.
Removing a wheel
Practical information