Page 145 of 220

Start Pairing Procedure On Mobile Phone
• Search for available devices on your Bluetooth® enabled mobile phone. This is usually withinSettings or Options under “Bluetooth.” See your mobile phone’s manual for details.
• When your phone finds the system, select “Uconnect” as the paired device. You may be prompted by your phone to download the phonebook. This is so you can make calls by saying
the name of your contact (PBAP-Phone Book Access Profile).
Complete The Pairing Procedure
• When prompted on the phone, verify with radio password shown on the Uconnect® Screen.
• If your phone asks you to accept a connection request from Uconnect®, select “Yes.” If available, check the box telling it not to ask again – that way your phone will automatically
connect each time you start the vehicle.
Select The Mobile Phone's Priority Level
• When the pairing process has successfully completed, the system will prompt you to choose whether or not this is your favorite phone. Selecting “Yes” will make this phone the highest
priority. This phone will take precedence over other paired phones within range. Only one
phone can be paired at a time.
• You are now ready to make hands-free calls. Push the “Uconnect® Phone” button on your steering wheel to begin.
Making A Phone Call
• Push the Uconnect® Phone button.
• After the BEEP, say “dial” then the number (or “call” then the name as listed in your phone; see Phonebook).
NOTE:
You can also initiate a call by using the touchscreen on the Phone main screen.
Receiving A Call – Accept (And End)
• When an incoming call rings/is announced on Uconnect®, push the Phone button.
• To end a call, push the Hang Up or Phone button
.
Mute (Or Unmute) Microphone During Call
To mute the Uconnect® Phone microphone during a call:
• Press the “Mute” button on the main Phone screen to mute and unmute the call.
Transfer Ongoing Call Between Handset And Vehicle
To transfer an on-going Uconnect® phone call:
• Press the “Transfer” button on the main Phone screen to transfer an on-going call between the handset and the vehicle.
ELECTRONICS
143
Page 146 of 220

• “Call John Smith”
• “Call John Smith mobile”
• “Dial 1 248 555 1212”
• “Redial”
Phonebook
Uconnect® radios automatically downloads your phon")
Common Phone Commands (Examples)
• “Call John Smith”
• “Call John Smith mobile”
• “Dial 1 248 555 1212”
• “Redial”
Phonebook
Uconnect® radios automatically downloads your phonebook from your paired phone, if this
feature is supported by your phone. Entries are updated each time that the phone is connected.
If your phone book entries do not appear, check the settings on your phone. Some phones require
you to enable this feature manually.
• Your phonebook can be browsed on your radio screen, but editing can only be done on yourphone. To browse, press the “Phone” button on the touchscreen, then the “Phonebook” button
on the touchscreen.
Favorite phonebook entries can be saved as Favorites for quicker access. Favorites are shown at
the top of your main phone screen.
Voice Command Tips
• Speaking complete names (i.e; Call John Doe vs. Call John) will result in greater system accuracy.
• You can “chain” commands together for faster results. Say “Call John Doe, mobile,” for example.
• If you are listening to available voice command options, you do not have to listen to the entire list. When you hear the command that you need, push the
button on the steering
wheel, wait for the beep and say your command.
Changing The Volume
• Start a dialogue by pushing the Phone button, then say a command for example -
"Help".
• Use the radio ON/OFF VOLUME rotary knob to adjust the volume to a comfortable level while the Uconnect® system is speaking. Please note the volume setting for Uconnect® is
different than the audio system.
NOTE:
To access help, push the Uconnect® Phone
button on the steering wheel and say "help."
Press the display or push either the Phone
or VRbutton and say "cancel" to cancel
the help session.
Voice Text Reply (Not Compatible With iPhone®)
Once your Uconnect® system is paired with a compatible mobile device, the system can
announce a new incoming text message, and read it to your over the vehicle audio system. You
can reply to the message using Voice Recognition by selecting, or saying, one of the 18
pre-defined messages.
ELECTRONICS
144
Page 147 of 220

•Here’s How: Push the Uconnect® Phone buttonand wait for the beep, then say “reply.”
Uconnect® will give the following prompt: “ Please say the message you would like to send.”
Wait for the beep and say one of the pre-defined messages. (If you are not sure, you can say
“help”). Uconnect® will then read the pre-defined messages allowed. As soon as you hear the
message you would like to send, you can interrupt the list of prompts by pushing the
Uconnect® phone button and saying the phrase. Uconnect® will confirm the message by
reading it back to you. Push the Phone button and say “Send.”
PRE-DEFINED VOICE TEXT REPLY RESPONSES
Yes. Stuck in Traffic. See you later.
No. Start without me. I’ll be Late.
Okay. Where are you?
I will be minutes late.
Call me. Are you there yet?
I’ll call you later. I need directions.
See you in of min-
utes.
I’m on my way.
Can’t talk right now.
I’m lost. Thanks.
NOTE:
Voice texting reply and voice texting features require a compatible mobile device enabled with
Bluetooth® Message Access Profile (MAP). iPhone® and some other smartphones do not
currently support Bluetooth® MAP. Visit UconnectPhone.com for system and device compat-
ibility.
• Want to dictate a personal message? You must first register with Uconnect® Access (U.S.
residents only) to take advantage of a new, cloud-based Voice Texting service, an enhance-
ment to Voice Text Reply.
STEERING WHEEL AUDIO CONTROLS
The steering wheel audio controls are located
on the rear surface of the steering wheel.
Right Switch
• Push the switch up or down to increase ordecrease the volume.
• Push the button in the center to change modes AM/FM/CD/SXM.
Left Switch
• Push the switch up or down to search for thenext listenable station or select the next or
previous CD track.
• Push the button in the center to select the next preset station (radio) or to change CDs
if equipped with a CD Changer.
Steering Wheel Audio Controls
ELECTRONICS
145
Page 148 of 220
 AND DRIVER INFORMATION
DISPLAY (DID)
The EVIC/DID features a driver interactive
display that is located in the instrument cluster.
Pushing the controls on")
ELECTRONIC VEHICLE INFORMATION
CENTER (EVIC) AND DRIVER INFORMATION
DISPLAY (DID)
The EVIC/DID features a driver interactive
display that is located in the instrument cluster.
Pushing the controls on the left side of the
steering wheel allows the driver to select ve-
hicle information and Personal Settings. For
additional information, refer to “Programmable
Features” located in “Electronics” in this guide.
• Push the UP
button to scroll upward
through the main menus (Main Gauge,
Speedometer, Vehicle Info, Driver Assist
(DID Only), Fuel Economy, Trip Info, Start/
Stop Info, Audio, Messages, Screen Set Up,
Settings (EVIC Only).
• Press the DOWN
button to scroll
downward through the main menu and sub-
menus (Main Gauge, Speedometer, Vehicle
Info, Driver Assist (DID Only), Fuel Economy, Trip Info, Start/Stop Info, Audio, Messages,
Screen Set Up, Settings (EVIC Only).
• Push the RIGHT
button to access the information screens or sub-menu screens of a main
menu item.
• Push the BACK/LEFT
button to access the information screens or sub-menu screens of
a main menu item.
• Push the OKbutton to access/select the information screens or sub-menu screens of a main
menu item. Push and hold the OKarrow button for two seconds to reset displayed/selected
features that can be reset.
NOTE:
Identify the Electronic Vehicle Information Center (EVIC) and Driver Information Display (DID)
as described:
• Electronic Vehicle Information Center (EVIC) — 3.5” Instrument Cluster
• Driver Information Display (DID) — 7” Instrument Cluster
EVIC/DID Controls
ELECTRONICS
146
Page 149 of 220

EVIC/DID Main Menu Selectable Items
The EVIC/DID can be used to view the following main menu items:
• Speedometer• Stop/Start Info – If Equipped
• Vehicle Info • Audio
• Driver Assist ** • Messages
• Fuel Economy • Screen Setup
• Trip Info • Settings *
NOTE:
• Electronic Vehicle Information Center (EVIC) — 3.5” Instrument Cluster — *
• Driver Information Display (DID) — 7” Instrument Cluster — **
Refer to your Owner's Manual on the DVD for further information.
EVIC/DID Screen Setup
Push the UP or DOWN arrow button to scroll through the Menu Items till Screen Setup displays
in the EVIC/DID. Push the OK button to enter Screen Setup. The Screen Setup feature allows
you to change what information is displayed in the instrument cluster as well as the location that
information is displayed.
Configurable Screen Setup Menu Titles
• Compass • Trip A Distance
• Outside Temp • Trip B Distance
• Time • Audio Info
• Range to Empty • Menu Title
• Average MPG • Speedometer (Digital Speedo)
• Current MPG • Current Gear (ON/OFF)
• Defaults (defaults: Compass UR, Outside Temp
UL, Center Menu Title, Gear Display Off )
ELECTRONICS
147
Page 150 of 220

PROGRAMMABLE FEATURES
Uconnect® Customer Programmable Features
The Uconnect® system allows you to access Customer Programmable feature settings such as
Display, Clock, Safety/Assistance, Lights, Doors & Locks, Auto-On Comfort & Remote Start,
Engine Off Operation, Compass Settings, Audio, Trailer Brake, Phone/Bluetooth®, Suspension
and SiriusXM Setup and System Information through buttons on the touchscreen.
• Push the “Controls” button located near the bottom of the touchscreen, then push the“Settings” button on the touchscreen to access the Settings screen. When making a selection,
scroll up or down until the preferred setting is highlighted, then press and release the preferred
setting until a check-mark appears next to the setting, showing that setting has been selected.
The following feature settings are available:
• Display • Voice
• Units • Doors & Locks
• Safety/Assistance • Engine Off Options
• Auto-On Comfort & Remote Start • Audio
• Phone/Bluetooth® • SiriusXM Setup
• Lights • System Information
• Clock • Compass
Refer to “Uconnect Settings/Customer Programmable Features” found within “Understanding
Your Instrument Panel” located in your Owner's Manual on the DVD for further information.
UNIVERSAL GARAGE DOOR OPENER
(HomeLink®)
HomeLink® replaces up to three hand-held
transmitters that operate devices such as ga-
rage door openers, motorized gates, lighting or
home security systems. The HomeLink® unit is
powered by your vehicles 12 Volt battery.
The HomeLink® buttons that are located in the
overhead console or sunvisor designate the
three different HomeLink® channels.
The HomeLink® indicator is located above the
center button.
Homelink® Indicator
ELECTRONICS
148
Page 151 of 220

Before You Begin Programming HomeLink®
Ensure that your vehicle is parked outside of the garage before you begin programming.
For efficient programming and accurate transmission of the radio-frequency signal, it is recom-
mended that a new battery be placed in the hand-held transmitter of the device that is being
programmed to the HomeLink® system.
To erase the channels, place the ignition switch into the ON/RUN position, then push and hold the
two outside HomeLink® buttons (I and III) for up to 20 seconds or until the red indicator flashes.
NOTE:
Erasing all channels should only be performed when programming HomeLink® for the first time.
Do not erase channels when programming additional buttons.
If you have any problems, or require assistance, please call toll-free 1-800-355-3515 or, on the
Internet at for information or assistance.
Programming A Rolling Code
NOTE:
For programming Garage Door Openers that were manufactured after 1995. These Garage
Door Openers can be identified by the “LEARN” or “TRAIN” button located where the hanging
antenna is attached to the Garage Door Opener. It is NOT the button that is normally used to
open and close the door. The name and color of the button may vary by manufacturer.
1. Place the ignition switch into the ON/RUN position.
2. Place the hand-held transmitter 1 to 3 inches (3 to 8 cm) away from the HomeLink® button youwish to program while keeping the HomeLink® indicator light in view.
3. Push and hold the HomeLink® button you want to program while you push and hold the hand-held transmitter button.
4.
Continue to hold both buttons and observe the indicator light. The HomeLink® indicator will flash
slowly and then rapidly after HomeLink® has received the frequency signal from the hand-held
transmitter. Release both buttons after the indicator light changes from slow to rapid.
5. At the garage door opener motor (in the garage), locate the “LEARN” or “TRAINING” button. This can usually be found where the hanging antenna wire is attached to the garage
door opener motor. Firmly push and release the “LEARN” or “TRAINING” button.
NOTE:
You have 30 seconds in which to initiate the next step after the LEARN button has been pushed.
6. Return to the vehicle and push the programmed HomeLink® button twice (holding the button for two seconds each time). If the device is plugged in and activates, programming is
complete.
ELECTRONICS
149
Page 152 of 220
 to complete the
training.
7. To program the remaining two HomeLink® buttons, repeat each step for each remainingb")
NOTE:
If the device does not activate, push the button a third time (for two seconds) to complete the
training.
7. To program the remaining two HomeLink® buttons, repeat each step for each remainingbutton. DO NOT erase the channels.
Programming A Non-Rolling Code
NOTE:
For programming Garage Door Openers manufactured before 1995.
1. Turn the ignition switch to the ON/RUN position.
2. Place the hand-held transmitter 1 to 3 inches (3 to 8 cm) away from the HomeLink® button you wish to program while keeping the HomeLink® indicator light in view.
3. Push and hold the HomeLink® button you want to program while you push and hold the hand-held transmitter button.
4. Continue to hold both buttons and observe the indicator light. The HomeLink® indicator will flash slowly and then rapidly after HomeLink® has received the frequency signal from the
hand-held transmitter. Release both buttons after the indicator light changes from slow to
rapid.
5. Push and hold the programmed HomeLink® button and observe the indicator light. If the indicator light stays on constantly, programming is complete and the garage door (or device)
should activate when the HomeLink® button is pushed.
6. To program the two remaining HomeLink® buttons, repeat each step for each remaining button. DO NOT erase the channels.
Using HomeLink®
To operate, push and release the programmed HomeLink® button. Activation will now occur for the
programmed device (i.e., garage door opener, gate operator, security system, entry door lock,
home/office lighting, etc.,). The hand-held transmitter of the device may also be used at any time.
WARNING!
•Your motorized door or gate will open and close while you are programming the universal
transceiver. Do not program the transceiver if people or pets are in the path of the door or gate.
• Do not run your vehicle in a closed garage or confined area while programming the transceiver. Exhaust gas from your vehicle contains Carbon Monoxide (CO) which is
odorless and colorless. Carbon Monoxide is poisonous when inhaled and can cause you
and others to be severely injured or killed.
ELECTRONICS
150
 1
1 2
2 3
3 4
4 5
5 6
6 7
7 8
8 9
9 10
10 11
11 12
12 13
13 14
14 15
15 16
16 17
17 18
18 19
19 20
20 21
21 22
22 23
23 24
24 25
25 26
26 27
27 28
28 29
29 30
30 31
31 32
32 33
33 34
34 35
35 36
36 37
37 38
38 39
39 40
40 41
41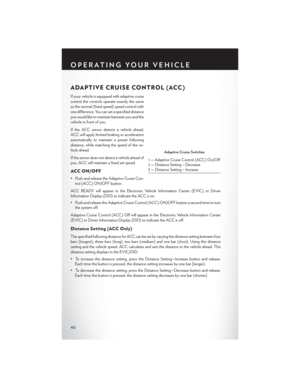 42
42 43
43 44
44 45
45 46
46 47
47 48
48 49
49 50
50 51
51 52
52 53
53 54
54 55
55 56
56 57
57 58
58 59
59 60
60 61
61 62
62 63
63 64
64 65
65 66
66 67
67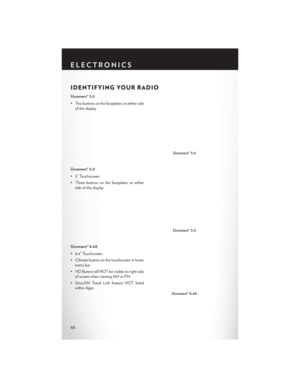 68
68 69
69 70
70 71
71 72
72 73
73 74
74 75
75 76
76 77
77 78
78 79
79 80
80 81
81 82
82 83
83 84
84 85
85 86
86 87
87 88
88 89
89 90
90 91
91 92
92 93
93 94
94 95
95 96
96 97
97 98
98 99
99 100
100 101
101 102
102 103
103 104
104 105
105 106
106 107
107 108
108 109
109 110
110 111
111 112
112 113
113 114
114 115
115 116
116 117
117 118
118 119
119 120
120 121
121 122
122 123
123 124
124 125
125 126
126 127
127 128
128 129
129 130
130 131
131 132
132 133
133 134
134 135
135 136
136 137
137 138
138 139
139 140
140 141
141 142
142 143
143 144
144 145
145 146
146 147
147 148
148 149
149 150
150 151
151 152
152 153
153 154
154 155
155 156
156 157
157 158
158 159
159 160
160 161
161 162
162 163
163 164
164 165
165 166
166 167
167 168
168 169
169 170
170 171
171 172
172 173
173 174
174 175
175 176
176 177
177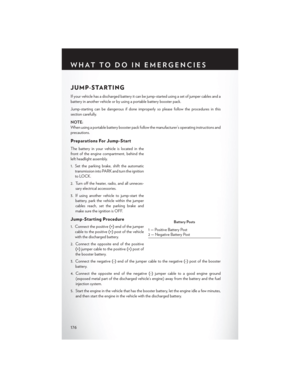 178
178 179
179 180
180 181
181 182
182 183
183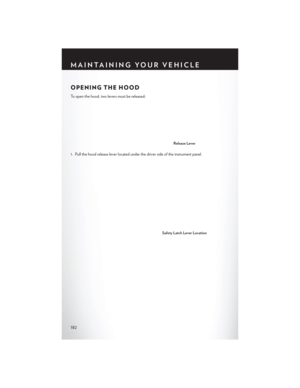 184
184 185
185 186
186 187
187 188
188 189
189 190
190 191
191 192
192 193
193 194
194 195
195 196
196 197
197 198
198 199
199 200
200 201
201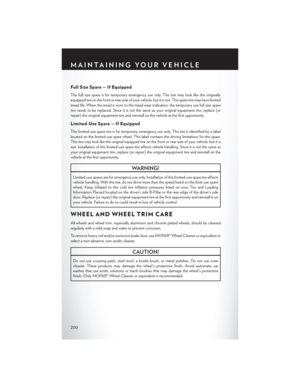 202
202 203
203 204
204 205
205 206
206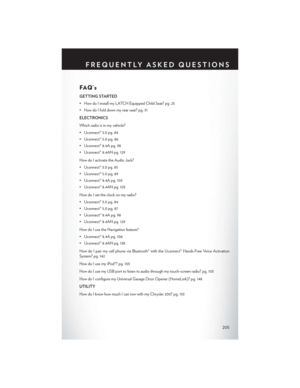 207
207 208
208 209
209 210
210 211
211 212
212 213
213 214
214 215
215 216
216 217
217 218
218 219
219