2015 AUDI S3 SEDAN airbag
[x] Cancel search: airbagPage 5 of 282
M N
0 > co ,...., \!) ..,.,
..,.,
..,., ,....,
Adjusting the disp lay and the warning
tones .... .. .. .. .... .... ... .. .. .... . 121
Error messages . . . . . . . . . . . . . . . . . . . . . 121
Intelligent Technology . . . . . . . . . . 122
Notice about data recorded by the Event
Data Recorder and vehicle cont rol
modules . . . . . . . . . . . . . . . . . . . . . . . . . . . 122
Electronic stabilization control (ESC) . . . . 123
Brakes . . . . . . . . . . . . . . . . . . . . . . . . . . . . . 125
Electromechanical steering . . . . . . . . . . . . 126
All wheel drive (quatt ro) . . . . . . . . . . . . . . 127
En ergy management 128
Safety . . . . . . . . . . . . . . . . . . . . . . . . . . . . 130
Driving safety . . . . . . . . . . . . . . . . . . . . 130
Basics . . . . . . . . . . . . . . . . . . . . . . . . . . . . . 130
Correct passenger seating positions..... 131
Driver's and front passenger's footwe ll . . 13 5
Pedal area . . . . . . . . . . . . . . . . . . . . . . . . . . 135
Storing cargo correct ly . . . . . . . . . . . . . . . 136
Reporting Safety Defects . . . . . . . . . . . . . . 138
Safety belt s . . . . . . . . . . . . . . . . . . . . . . 140
General notes . . . . . . . . . . . . . . . . . . . . . . . 140
Why use safety belts? . . . . . . . . . . . . . . . . 141
Safety belts . . . . . . . . . . . . . . . . . . . . . . . . 143
Belt tensioners . . . . . . . . . . . . . . . . . . . . . . 146
Airb ag sy stem . . . . . . . . . . . . . . . . . . . . 148
Important information . . . . . . . . . . . . . . . 148
Front airbags . . . . . . . . . . . . . . . . . . . . . . . 152
Monito ring the Advanced Airbag System . 160
Knee airbags . . . . . . . . . . . . . . . . . . . . . . . . 164
Side airbags . . . . . . . . . . . . . . . . . . . . . . . . 166
Side curtain airbags . . . . . . . . . . . . . . . . . . 169
Child safety . . . . . . . . . . . . . . . . . . . . . . 172
I mportant information . . . . . . . . . . . . . . . 172
Child seats . . . . . . . . . . . . . . . . . . . . . . . . . 178
Securing child seats . . . . . . . . . . . . . . . . . . 182
LATCH system (Lower anchorages and
tethers for children) . . . . . . . . . . . . . . . . . . 185
Additional information . . . . . . . . . . . . . . . 189
Table of contents
Maintenance and Care . . . . . . . . . . .
190
Checking and Filling . . . . . . . . . . . . . 190
Gasoline . . . . . . . . . . . . . . . . . . . . . . . . . . . 190
Diesel f uel . . . . . . . . . . . . . . . . . . . . . . . . . 191
Refueling . . . . . . . . . . . . . . . . . . . . . . . . . . 192
Catalytic co nverter . . . . . . . . . . . . . . . . . . . 194
D ie sel particulate filter . . . . . . . . . . . . . . . 195
Selective catalytic reduction . . . . . . . . . . . 195
En gine compartm ent . . . . . . . . . . . . . . . . . 198
Eng ine oil . . . . . . . . . . . . . . . . . . . . . . . . . . 20 1
Cooling system . . . . . . . . . . . . . . . . . . . . . . 205
Brake fluid . . . . . . . . . . . . . . . . . . . . . . . . . 207
Battery . . . . . . . . . . . . . . . . . . . . . . . . . . . . 208
Windshield washer system . . . . . . . . . . . . 212
Serv ice interval display
212
Tires and wheels . . . . . . . . . . . . . . . . . 214
Wheels . . . . . . . . . . . . . . . . . . . . . . . . . . . . 214
Tire pressure monitoring system . . . . . . . 232
Care and cleaning . . . . . . . . . . . . . . . . 235
General information . . . . . . . . . . . . . . . . . 23S
Car washes . . . . . . . . . . . . . . . . . . . . . . . . . 23S
Cleaning and care information 236
Troubleshooting . . . . . . . . . . . . . . . . . 240
Emergency assistance . . . . . . . . . . . 240
Luggage compartment lid emergency
re lease . . . . . . . . . . . . . . . . . . . . . . . . . . . . 240
General informat ion . . . . . . . . . . . . . . . . . 240
Equipm ent . . . . . . . . . . . . . . . . . . . . . . . . . 241
Replacing wheels . . . . . . . . . . . . . . . . . . . . 241
Spare tire . . . . . . . . . . . . . . . . . . . . . . . . . . 246
Fu se s and bulbs . . . . . . . . . . . . . . . . . . 248
El ectrica l fuses . . . . . . . . . . . . . . . . . . . . . . 24 8
Bulbs. . . . . . . . . . . . . . . . . . . . . . . . . . . . . . 250
Emergency situation s . . . . . . . . . . . . 252
General . . . . . . . . . . . . . . . . . . . . . . . . . . . . 252
Starting by pushing or towing . . . . . . . . . . 252
Starting with jumper cables . . . . . . . . . . . 252
Using jump start cables . . . . . . . . . . . . . . . 253
Towing with a tow truck . . . . . . . . . . . . . . . 254
Raising the vehicle . . . . . . . . . . . . . . . . . . . 256
3
Page 11 of 282

M N
0 > co ...... \!) ..,.,
..,.,
..,., ......
CD
@
®
©
®
®
(J)
®
Power windows
Door hand le
Aud i side assist
........ .... .. .
Centra l locking switch ... .. .. .. .
Powe r exter ior mir ro r adjustment
H ead light cont rol swit ch .. .. .. .
Vents
L ever fo r:
- Turn si gnals and high beams . . .
- Audi act ive lane assis t ... .. .. .
® Steer ing whee l w ith horn and
@
©
@
- Driver's airbag ....... .. .. .. .
- On-board computer controls .. .
- MMI, telephone , nav igat ion and
vo ice recogn ition system controls
- tiptron ic shift paddles (automatic
transmission)
I ns trumen t clus te r ..... .. .. .. .
W indshield washer system lever .
Steer ing column with:
- Ignit ion emergency operation (in
vehicles with conve nience key) .
- Ignit ion loc k (in vehicles wi th me-
chanical key) . ..... ... .. .. .. .
@ Adjustable steer ing column
(B) D epending on equipment: 4
0
109
37
47
4 3
64
45
106
152 28
87
1 0
49
7 7
73
72
- Cruise contro l lever . . . . . . . . . . 94
- adaptive cruise cont ro l . .. .. .. .
Driver's knee a irbag .... .. .. .. .
I ns trumen t illum ination . .. .. .. .
Hood re lease
. .. .... ... .. .. .. .
Luggage compartment release ..
C hild safety loc k bu tton . .. .. .. .
MMI disp lay (navigation, radio, TV/
video)
Glove compartment ( lockable) .. .
F ront passenger's airbag . ... .. .
Treble speakers Fr ont passenger's knee airbag .. .
Depending on equipment, b uttons
f or:
- Audi dr ive select ...... .. .. .. .
- Pa rking aid plus (o r with rearview
camera) 9
6
164
4 7
199
39
40
58
152
164
1 12
1 16
Co ckpit over view
-Eme rgency flashers ..... ... . .
- Elect ron ic St abiliza tion Control
( E SC) ..... .. .. .... .... ... . .
- MMI Displ ay
- Airbag Off indicato r ..... .... .
@ Depending on eq uipment:
- Manual climate contro l system .
- Automatic climate control
system ... .. ............. . .
@ Socket . .... .. .. ........... . .
S tronic se lector lever
. .... ... ..
Cup ho lde r .. .. .......... .... .
MM I On/ Off button
MMI control panel
Parking bra ke
@) I S TAR T ENGI NE STOPI button
(vehicles with convenie nce key)
(J} Tips
- Some the eq uipment listed here is only in
sta lled in certa in models or is available as
an option . 44
123
160
6S
66
5 7
82
58
78
75
- Ope rat ion of the Multi Med ia In terface
(MMI) is described in a separate o perating
instructions manual. You can a lso find infor
mation on A udi connect there.
9
Page 55 of 282
M N
0 > co ...... \!) 1.1'1
1.1'1
1.1'1
......
Seats and storage
General information
Important information
A WARNING
Refer to the chapter Driving Safely
c::> page 130, Driving safety for important in
formation, tips, suggestions and warnings
that you should read and follow for your own
safety and the safety of your passengers.
Why is your seat adjustment so important?
The safety belts and the airbag system con only
provide maximum protection if the front seats
ore correctly adjusted.
There are various ways of adjusting the front
seats to provide safe and comfortable support
for the driver and the front passenger. Adjust
your seat properly so that:
- you can easily and quickly reach all the switches
and controls in the instrument panel
-your body is properly supported thus reducing
physical stress and fatigue
- the safety belts and airbag system can offer
maximum protection
c::> page 148.
In the following sections, you will see exactly
how you can best adjust your seats.
There are special regulations and instructions for
installing a child seat on the front passenger's
seat . Always follow the information regarding
child safety provided in
c::> page 172, Child safe
ty.
A WARNING
Incorrect seating position of the driver and all
other passengers can result in serious person
al injury.
- Always keep your feet on the floor when the
vehicle is in motion -never put your feet on
top of the instrument panel, out of the win
dow or on top of the seat cushion. This ap
plies especially to the passengers. If your
seating position is incorrect, you increase
Seats and storage
the risk of injury in the case of sudden brak
ing or an accident.
If the airbag inflates and
the seating position is incorrect, this could result in personal injury or even death.
- It is important for both the driver and front
passenger to keep a distance of at least
10 inches (25 cm) between themselves and
the steering wheel and/or instrument panel.
If you're sitting any closer than this, the air
bag system cannot protect you properly. In
addition, the front seats and head restraints
must be adjusted to your body height so
that they can give you maximum protection.
- Always try to keep as much distance as pos
sible between yourself and the steering
wheel or instrument panel.
- Do not adjust the driver's or front passeng
er's seat while the vehicle is moving. Your
seat may move unexpectedly, causing sud
den loss of vehicle control and personal in
jury. If you adjust your seat while the vehicle is moving, you are out of position .
Driver's seat
The correct seat position is important for safe
and relaxed driving.
We recommend that you adjust the driver's seat
in the following manner:
.,. Adjust the seat in fore and aft direction so that
you can easily push the pedals to the floor
while keeping your knees slightly bent
c::, A in
Why is your seat adjustment so important? on
page
53.
.,. Adjust the backrest so that when you sit with
your back against the backrest, you can still grasp the top of the steering wheel.
.,. For adjustable head restraints: adjust the head
restraint so the upper edge is as even as possi
ble with the top of your head.
If that is not pos
sible, try to adjust the head restraint so that it
is as close to this position as possible
c::> page 56. Move the head restraint so that it
is as close to the back of the head as possible. ..,.
53
Page 56 of 282
Seats and storag e
_& WARNING
Never place any objects in the driver's foot
well. An object could get into the pedal area and interfere w ith pedal function. In case of
sudden brak ing or an accident, yo u wou ld not
be able to brake or acce lerate.
Front passenger's seat
Always move the front passenger seat into the
rearmost position.
To avo id contact wit h the airbag while it is de
p loying, do not sit any closer to the instrument
panel than necessary and always wear the three
poi nt safety belt provided ad justed correctly . We
recommend that you adjust the passe nger's sea t
in the fol low ing manner:
• Bring the backrest up to an (a lmost) upright
pos ition .
Do not ride w ith the seat reclined .
• Fo r adjus table head restraints: adjust the head
rest rain t so the upper edge is as even as possi
ble with the top of your head . If that is not pos
s ible, try to adjust the head restraint so that it
is as close to this position as possib le
c> page 56. Move the head restraint so that it
is as close to the back of the head as possib le.
• Place your feet on the floor in front of the pas
senger's seat.
Front seats
Manual seat adjustment
Applies to veh icles: w ith manu ally a dju stable seats
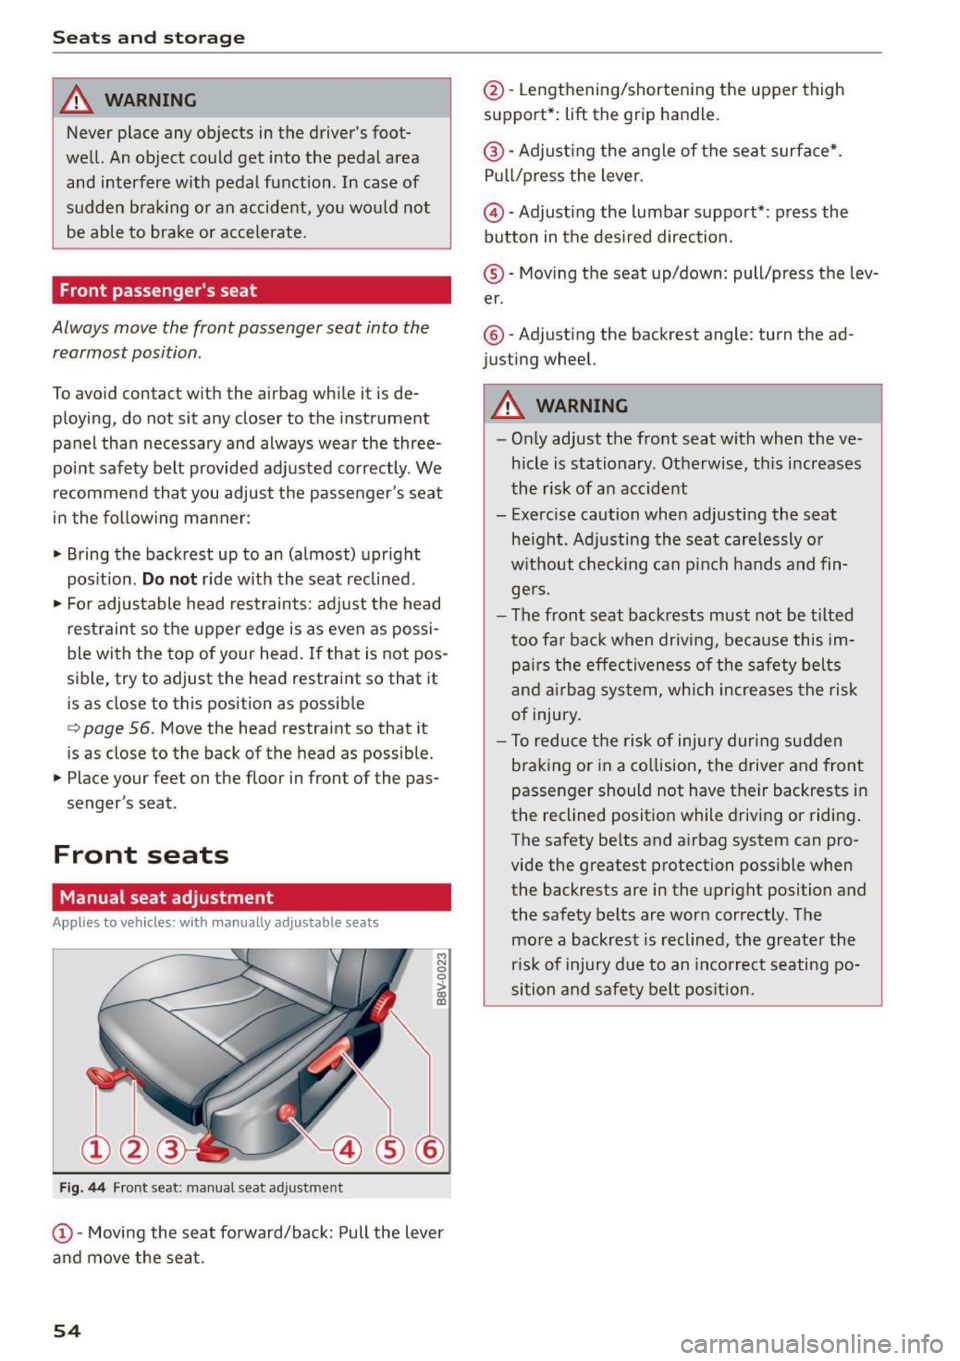
Fig . 44 F ront seat: manual seat adjustment
~ 0
>
"' m
@ -Movi ng the seat fo rward/ba ck: Pull the lever
a nd move the seat.
54
@ -Lengthening/shorten ing the upper thigh
support*:
lift the grip handle.
@ -Adjust ing the a ngle of the seat surface* .
P ull /press the lever.
© -Adjust ing the lumbar support*: press the
button in the des ired direction.
® -Moving t he seat up/down: pull/press the lev
er.
® -Adjusting the backrest angle: turn the ad
justing wheel.
_& WARNING
- On ly adjust the fro nt seat with whe n the ve
hicle is stationary . Otherwise, th is i ncreases
t he risk of an accident
- Exerc ise caution when adjusting the seat
he igh t. Ad justing the seat care lessly o r
w it h out check ing ca n pinch hands and fin
ge rs.
- The front seat back rests must not be t ilted
too fa r ba ck when driv ing, beca use thi s im
pa irs the effec tiveness of the s afety belts
a nd airbag system, which incre ases the risk
of injury.
- To reduce t he risk of injury dur ing su dden
braking or in a co llision, the driver and front
passenger should not have t heir backrests i n
the reclined posit io n while driving or riding .
The safety be lts and airbag system can pro
vide the greatest p rotection poss ible when
the backrests are in the upright position and
the safety belts are worn correctly . The
mo re a backrest is reclined , the greater the
r is k of i njury d ue t o an incorrec t seating po
si tion and safety belt pos ition.
Page 57 of 282
....,
N
0 > co
rl I.O
"'
"'
"'
rl
Power seat adjustment
Applies to vehicles: with power adjustable seats
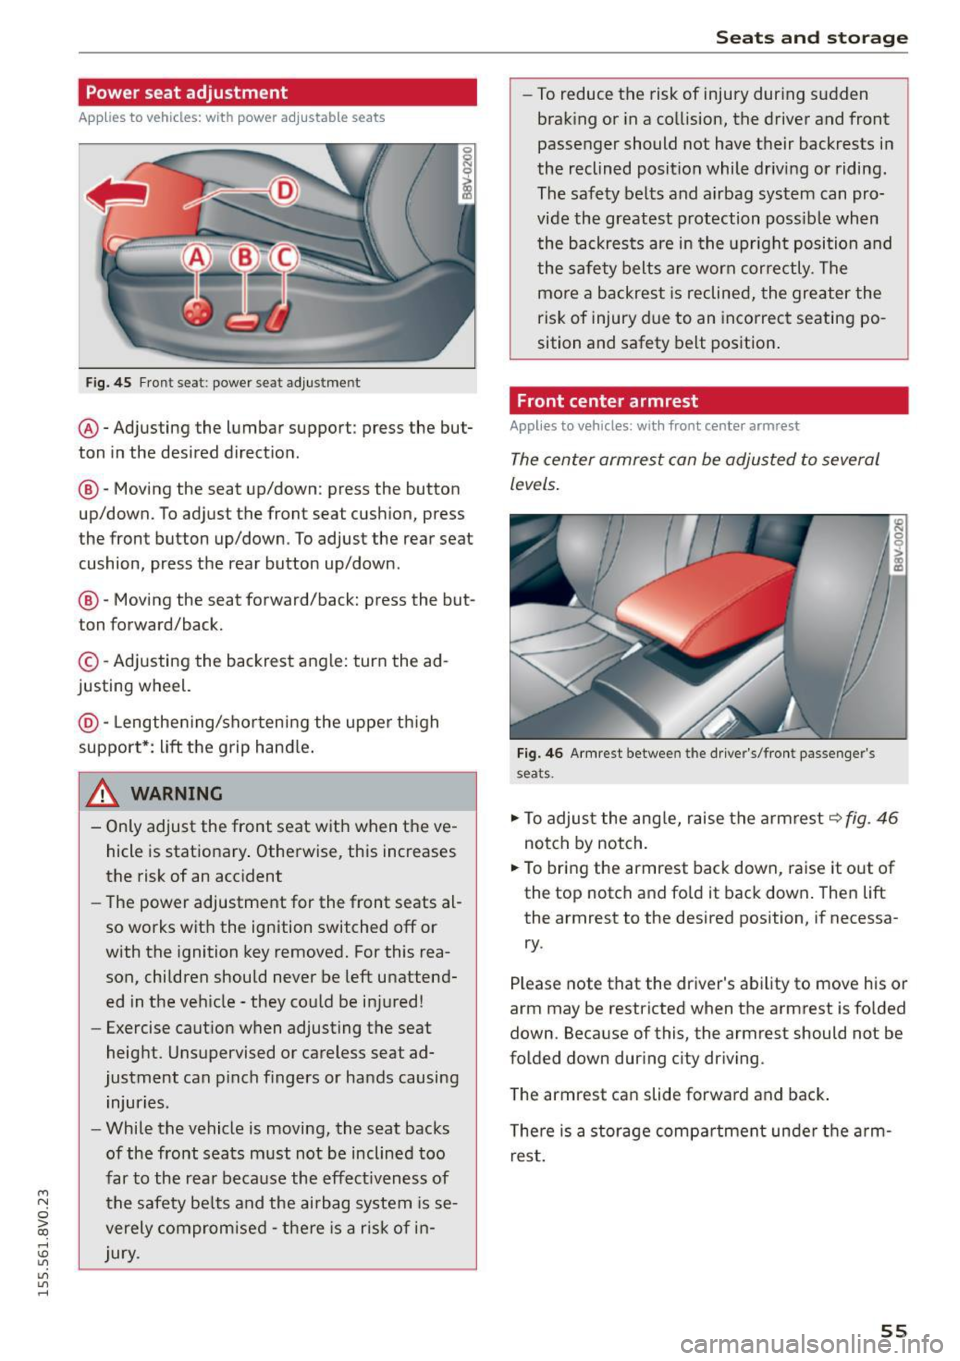
Fig. 45 Front seat: power seat adjus tment
@ -Adjusting the lumbar support: press the but
ton in the desired direction .
®-Moving the seat up/down: press the button
up/down. To adjust the front seat cush ion, press
the front button up/down . To adjust the rear seat
cushion, press the rear button up/down.
@ -Moving the seat forward/back: press the but
ton forward/back.
© -Adjusting the backrest angle: turn the ad
justing wheel.
@ -Lengthening/shortening the upper thigh
support*: lift the grip hand le.
A WARNING
- Only adjust the front seat with when the ve
hicle is stationary . Otherwise, this increases
the risk of an accident
- The power adjustment for the front seats al
so works with the ignition switched off or
with the ignition key removed. For this rea
son, children should never be left unattend ed in the vehicle - they could be injured!
- Exercise caution when adjusting the seat
height. Unsupervised or careless seat ad
justment can pinch fingers or hands causing
injuries.
- While the vehicle is moving, the seat backs
of the front seats must not be inclined too
far to the rear because the effect iveness of
the safety be lts and the airbag system is se
verely compromised -there is a risk of in
jury.
Seats and storage
- To reduce the risk of injury during sudden
braking or in a collision, the driver and front
passenger should not have their backrests in
the reclined position while driving or riding.
The safety belts and airbag system can pro
vide the greatest protection possible when
the backrests are in the upright position and
the safety belts are worn correctly. The
more a backrest is reclined, the greater the
risk of injury due to an incorrect seating po
sition and safety belt position.
Front center armrest
Applies to vehicles: wit h front center armrest
The center armrest can be adjusted to several
levels.
Fig. 46 Armrest between the driver's/front passenger's
seats .
.,.. To adjust the angle, raise the armrest ~fig. 46
notch by notch.
.,.. To bring the armrest back down, raise it out of
the top notch and fold it back down. Then lift
the armrest to the desired position, if necessa
ry.
Please note tha t the driver's ability to move his or
arm may be restricted when the armrest is folded
down. Because of this, the armrest should not be
folded down during city driving.
The armrest can slide forward and back.
There is a storage compartment under the arm
rest.
55
Page 61 of 282
....,
N
0 > co
rl I.O
"'
"'
"'
rl
_& WARNING
Always leave the lid on the glove compartment cover closed while driving to reduce the
risk of injury.
Additional storage compartments
There are additional storage compartments,
compartments and holders at other locations in
the vehicle :
- In the upper part of the glove compartment.
- In the center console under the center arm-
rest* .
- On the back of the right front seat . The com
partment* can hold a maximum weight of
2 lbs
(1 kg).
- Garment hooks on the B-pillar ¢
&.
_& WARNING
-Do not place any objects on the instrument
panel. Objects that are not stored securely
can slide around in the vehicle while driving,
when accelerating or braking or when turn
ing.
- Make sure that objects cannot fall out of the
center console storage compartment or oth
er compartments and into the footwell
while driving. These objects could prevent
you from braking or accelerating during sud
den braking maneuvers.
- Garments hung on the hooks must not ob
struct the driver's view. The garment hooks
are only designed for light objects . Do not
hang any garments with hard, sharp or
heavy objects in the pockets on the garment
hooks . These objects could injure vehicle oc
cupants during sudden brak ing or in a colli
sion - especially if the airbags deploy.
- Always keep the glove compartment closed
while driving to reduce the risk of injury dur
ing a collision or heavy brak ing.
- Read and following the WARNINGS in
¢ page 168, Important safety instructions
on the side airbag system.
-Hang garments so that they do not obstruct
the driver's view.
Seats and storage
-The garment hooks should only be used for
light articles of clothing . Do not leave any
heavy or sharp-edged objects in the pockets
that could interfere with the side airbags unfolding and cause injuries in the event of
a collision .
- Do not use coat hangers to hang garments,
because this could reduce the effectiveness
of the side curtain airbags.
- Do not hang any heavy objects on the gar
ment hooks, because they could cause injury
during heavy braking.
- Because of their load capacity, the hooks
should only be used to secure objects that
weigh a max imum of 10 lb (5 kg). Heavy ob
jects will not be secured sufficiently, and
this increases the risk of injury.
luggage compartment
Loading luggage compartment
Luggage items must be stowed securely.
Fig. 55 Place heavy objects as far forward as poss ib le.
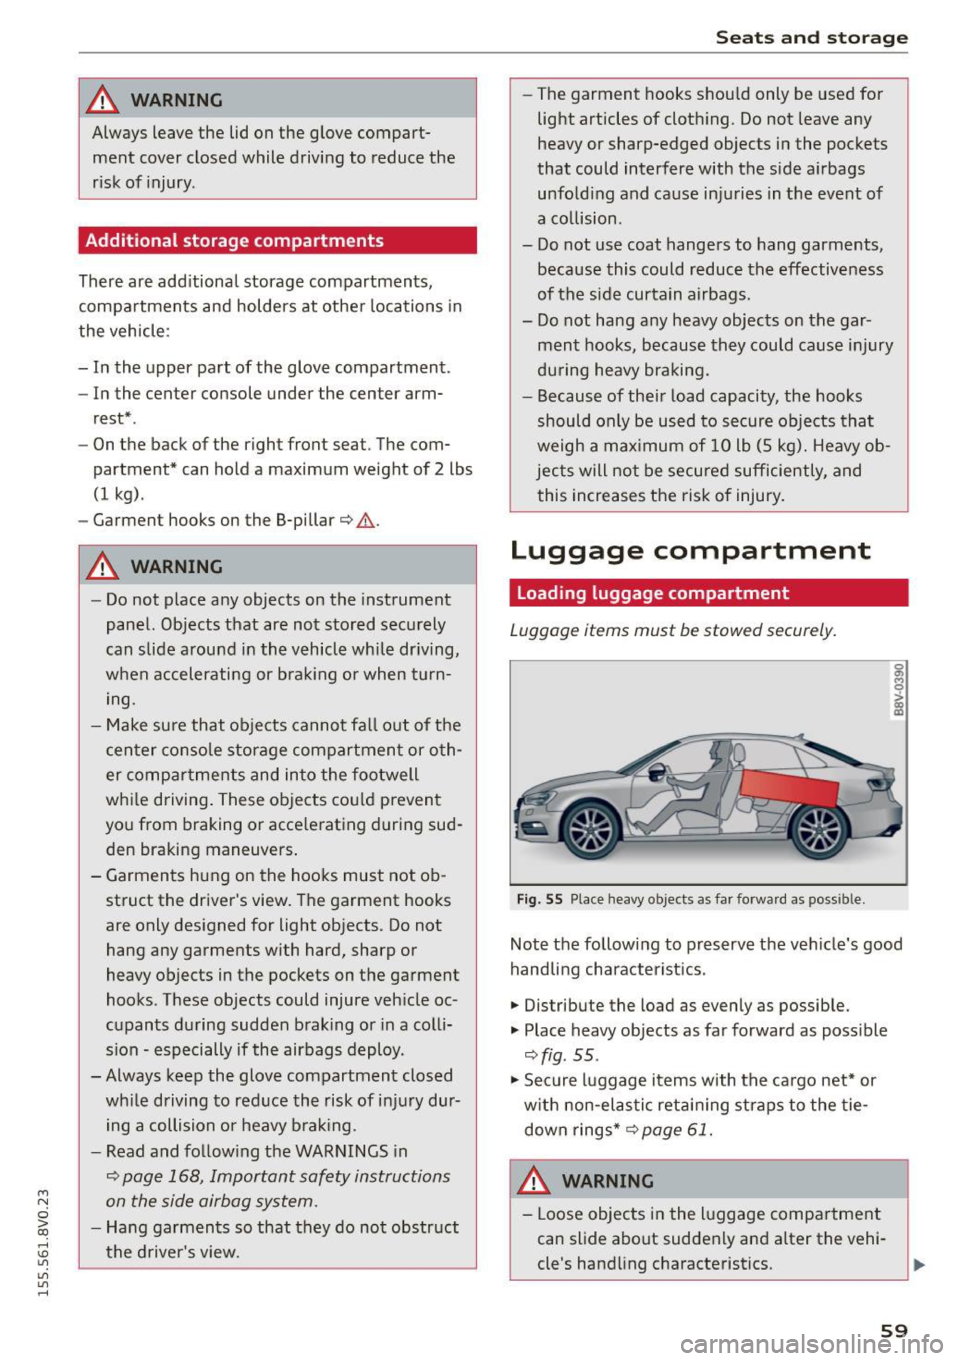
Note the following to preserve the vehicle's good
handling characteristics .
.,. Distribute the load as evenly as possible.
.,. Place heavy objects as far forward as possible
¢ fig . 55 .
.,. Secure luggage items with the cargo net* or
with non-elastic retaining straps to the tie
down rings* ¢
page 61.
WARNING
-Loose objects in the luggage compartment
can slide about suddenly and alter the vehi
cle's handling characteristics.
59
Page 74 of 282
Driving
You must drive your vehicle about 3,000 miles (5,000 kilometers) before you can properly as
sess oil consumption.
This also applies to fuel consumption and engine
output.
@ Note
- Have your vehicle maintained properly and
in accordance w ith the service recommenda
tions in your Warranty
& Maintenance book
let. Lack of proper maintenance as well as
improper use of the vehicle will impair the
function of the emission control system and
could lead to damage.
- Do not alter or remove any component of the Emission Control System unless approved by the manufacturer.
- Do not alter or remove any device, such as heat shields, switches, ignition wires,
valves, which are designed to protect your
vehicle's Emission Control System and other important vehicle components.
Fewer short trips
Fuel consumption will always be relatively high
on short trips.
.,. Try to avoid driving short distances with a cold
engine.
The eng ine and catalytic converter have to reach
their optimal
operating temperature to reduce
fuel consumption and noxious emissions effec
tively .
Just after starting, a cold engine in a mid-size car only achieves a fuel economy of 6-8 miles per
gallon (30-40 l/100 km). After about a half a mile, fuel economy climbs to 12 mpg (20
l/
100 km) . After about 2.5 miles (4 km), the en
gine is at its proper operating temperature and
fuel economy has reached a normal level. So you
can see that you should avoid short trips whenev
er possible.
The
outside temperature is also critical in this re
gard. Your car consumes more fuel in the winter
than in the summer.
72
Steering
Adjusting the steering wheel position
The steering wheel position is fully adjustable up
and down and forward and back .
Fig. 67 Ste ering co lumn : steer ing colu mn adjus tmen t l eve r
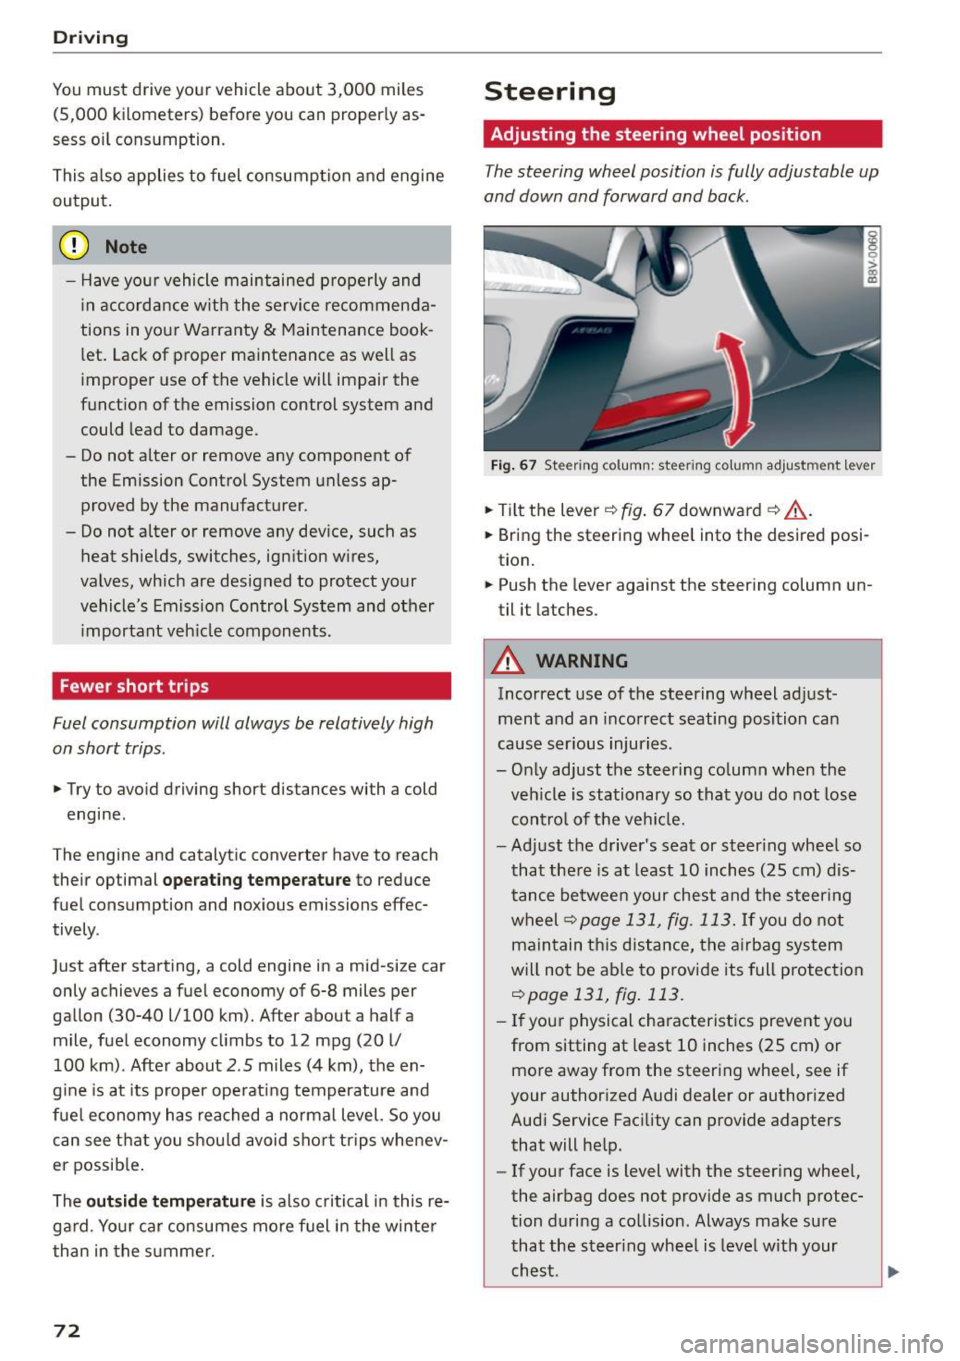
.,. Tilt the lever ¢ fig. 67 downward ¢.&, .
.,. Bring the steering wheel into the desired posi
tion.
.,. Push the lever against the steering column un
til it latches .
A WARNING
Incorrect use of the steering wheel adjust
ment and an incorrect seating position can
cause serious injuries.
- Only adjust the steering column when the
vehicle is stationary so that you do not lose
control of the vehicle.
-
-Adjust the driver's seat or steer ing wheel so
that there is at least 10 inches (25 cm) dis
tance between your chest and the steering
wheel ¢
page 131, fig. 113. If you do not
maintain this distance, the airbag system
will not be able to provide its full protection
¢page 131, fig. 113.
-If your physical characteristics prevent you
from sitting at least 10 inches (25 cm) or
more away from the steering wheel, see if
your authorized Audi dealer or authorized
Audi Service Facility can provide adapters that will help.
- If your face is level with the steering wheel,
the airbag does not provide as much protec
tion during a collision . Always make sure
that the steering wheel is level with your
chest .
Page 75 of 282

....,
N
-Always hold the steering wheel with your
hands in the 9 o'clock and 3 o'clock posi
tions to reduce the risk of injury if the airbag
deploys .
- Never hold the steer ing wheel in the 12
o'clock position or w ith both hands on the
rim or the center of the steering wheel.
Holding the stee ring wheel incorrectly sig
nificantly increases the risk of injury to the
hands, arms and head if the airbag deploys.
Starting and stopping
the engine (vehicles with an ignition lock)
Starting the engine with the key
Applies to vehicles: with mechanical ignit ion lock
The ignition is switched on and the engine start
ed with the key in the ignition .
Fig . 68 Ignit io n key pos it io n s
Stee ring l ock
If the steering wheel wil l not turn, the steering
lock is engaged.
To engage the steering wheel lock : the selector
l ever must be in the P position.
.,. To engage the steering w heel lock, turn the
whee l until it locks whe n the ignition key is re
moved.
.,. To re lease the steering wheel lock , insert the
key in the ignition lock and turn the key in the
-direction of the arrow-while turning the steer
ing wheel.
~ Swit ching the ignition on /off or prew arming co
rl I.O
"'
"'
"'
rl
.,. To sw itch the ignition on, turn the ignition key
to position @.
Dr ivi ng
.,. To switch the ignition off, turn the ignition key
to posit ion @.
Diesel vehicles are preheated while the ignition is
swi tched on
m .
Starting the engine
Your vehicle is equipped with launch control. As
soon as you have turned the ign ition key to posi
tion @, the engine will start automatically.
.,. Press the brake pedal and move the selector
lever to the P or
N position .
.,. Turn the key br iefly to position @. The ign ition
key automatically retu rns to position @. Do not
press the a cce le rator pedal when doing this.
Major electrical equipment switches off tempora
rily when start ing the engine .
It is possible that there w ill be a slight delay
when starting the eng ine in diesel vehicles in
colder temperatures . T herefore, you must hold
the brake pedal down unti l the engine starts . The
indicator light turns on wh ile the engine is pre
hea ting
lJ .
The prewarming time depends on the coolant
temperature and outside temperatu re. The glow
pl ug indicato r light
IJ will only turn on for ap
proximate ly 1 second when the eng ine is warm or
the outside tempe rature is higher than 8
°C. That
means you can start the engine
immediately .
If the engine does no t st art immediately, stop
the start ing procedure by turning the ignition key
to position @and repeat after 30 seconds.
Automatic start malfunction
If the (m (gasoline engine) or IJ (diesel engine)
i ndicato r light turns on and the message
Engine
start sy ste m malfunction . Plea se c ontact S erv
i c e
appea rs, there is an automatic sta rt malfunc
t ion .
T o start the engine, hold the ignit io n key in posi
tio n@ unt il the engine r uns.
Drive to an authorized Audi dealer or authorized
Audi Se rv ice Facility immed iately to have the
malfunction corrected. ..,.
73