2015 AUDI S3 SEDAN heating
[x] Cancel search: heatingPage 8 of 282
About this Owner's Manual
This manual contains important information,
tips, suggestions and warnings for using your ve h icle.
Keep th is manual in your veh icle at all times. Th is
is especially important if you loan your vehicle to
others or sell it.
This owner's manua l describes the
equipment
range
specified for this mode l at the tim e of
printing. Individua l equipment options described
may only be available at a later date or may only
be offered in certain countries.
Some sect ions in this manua l do not apply to all
vehicles. When this is the case, the beginning of
the section indicates the
validity, for example
"Applies to vehicles: with auxiliary heating". Op
tional or vehicle-specific equipment is a lso identi
fied with an asterisk"*".
The
illustrations are designed as a general guide
and on your vehicle may look slight ly different
than what is illustrated.
There is a
Table of Contents at the beginning of
this owner's manua l that lists all of the topics
covered in this book in the order that they ap
pear. There is also an alphabetical
Inde x at the
end of this owner's manual.
All
directions, such as "left", "right", "front" and
"rear", are based on the vehicle's direction of
travel.
* Optiona l or vehicle -specific equipment
.,._ The section continues on the next page.
~ .&. Cross reference to a "WARNI NG"within a
section. If a page number is indicated, the
WARNING is located outs ide of the sect ion.
&, WARNING
Text with this symbol contains information
about safety and how to reduce the risk of se
rious persona l injury or death.
([) Note
6
Text with this symbol contains information
about reducing the risk of damage to your ve
hicle.
-
® For the sake of the environment
Text with this symbo l contains information on
protecting the environment.
@ Tips
Text with this symbo l contains additional use
ful information.
Page 14 of 282

Instruments and indicator lights
reached the reserve mark, the bottom LED will
turn red and the
ljJ indicator light turns on
¢
page 23. The bottom LED blinks red when
the fuel level is very low.
The on-board computer shows the range based
on the fuel level¢
page 28, On-board comput
er display.
For the tank capacity in your vehicle, refer to the
Technical Data
¢ page 260.
(D Note
Never drive until the tank is completely emp
ty. The irregular supply of fuel that results
from that can cause engine misfires. Uncom
busted fuel will then enter the exhaust sys
tem. This can cause overheating and damage
to the catalytic converter.
Coolant temperature indicator
In vehicles without a coolant temperature indica
tor, an indicator light. will turn on when the
coolant temperature is too high ¢
page 19. Re
fer to ¢(1) .
The coolant temperature indicator @c:>
page 10,
fig . 3 only works when the ignition is switched
on . To prevent engine damage, please observe
the following notes about the temperature rang
es.
Cold range
If only the LEDs at the bottom of the gauge turn
on, the engine has not reached operating tem perature yet. Avoid high engine speeds, full accel
erating and heavy engine loads.
Normal range
The engine has reached its operating tempera
ture once the LEDs up to the center of the gauge
turn on under normal driving conditions . The
LEDs higher up may turn on if the engine is under
heavy load or the outside temperature is high.
This is no cause for concern as long as the. in
dicator light in the instrument cluster does not
turn on.
12
Hot range
If the LEDs in the upper area of the display and
the . indicator light in the instrument cluster
display turn on, the coolant temperature is too
high
c:> page 19 .
A WARNING
-Never open the hood if you can see or hear
steam or coolant escaping from the engine
compartment. This increases the risk of
burns. Wait until you no longer see or hear
steam or coolant escaping.
- The engine compartment in any vehicle can
be a dangerous area . Stop the engine and al
low it to cool before working in the engine
compartment. Always follow the informa
tion found in ¢
page 198, Working in the
engine compartment.
(D Note
- In vehicles with a boost pressure indicator* ,
this indicator replaces the temperature dis
play. To promote a long engine service life,
avoiding high engine speeds, full accelera
tion and heavy engine loads during approxi
mately the first 15 minutes when the en
gine is cold is recommended . The amount of
time until the engine is warm depends on
the outside temperature . Check the engine
oil temperature* if necessary .
c:> page 30
-Auxiliary headlights and other accessories in
front of the cooling-air intake impair the
cooling effect of the coolant. This increases
the risk of the engine overheating during
high outside temperatures and heavy engine
load.
- The front spoiler also helps to distribute
cooling air correctly while driving. If the
spoiler is damaged, the cooling effect will
be impaired and the risk of the engine over
heating will increase. See an authorized
Audi dealer or authorized Audi Service Fa
cility for assistance.
Page 49 of 282
....,
N
0 > co
rl I.O
"'
"'
"'
rl
Instrument illumination
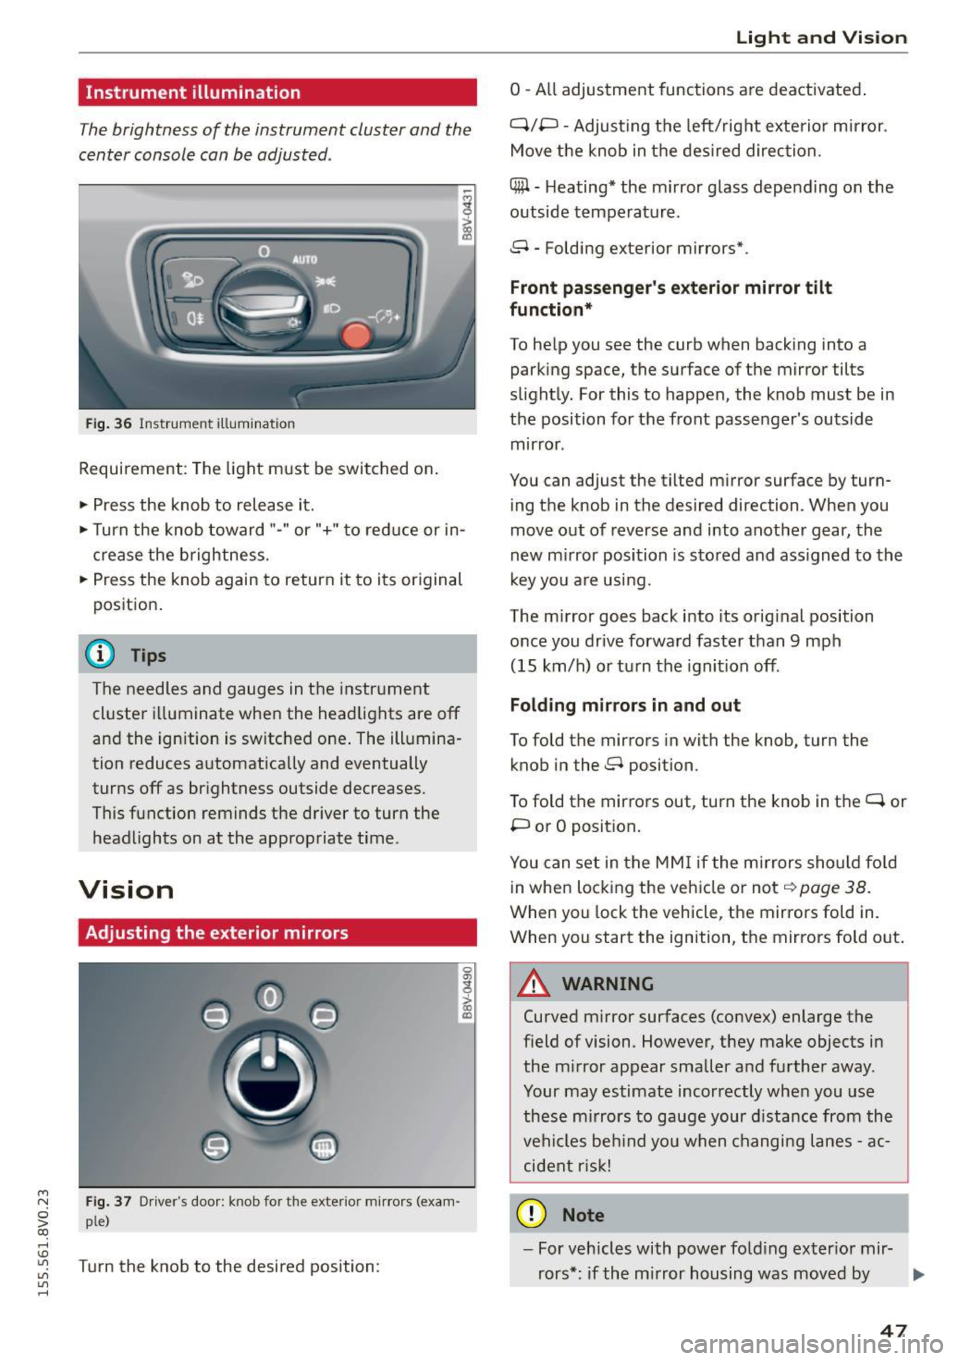
The brightness of the instrument cluster and the
center console can be adjusted .
Fig. 36 Instrument illum ination
Requirement: The light must be switched on.
.. Press the knob to release it.
.. Turn the knob toward"-" or"+" to red uce or in
crease the brightness.
.. Press the knob again to return it to its original
posit ion .
@ Tips
The needles and gauges in the instrument
cluster illuminate when the headlights are off
and the ignition is switched one . The illumina·
tion reduces automatically and eventually
turns off as br ightness outside decreases.
This function reminds the driver to turn the
headlights on at the appropriate time .
Vision
Adjusting the exterior mirrors
Fig. 37 Driver's door: knob for the exterior mirrors (exam
ple)
Turn the knob to the desired position:
0
g
> a, (X)
Light and Visio n
0 -A ll adjustment functions are deactivated .
Q/P -Adjusting the left/rig ht exterior mirror.
Move the knob in the des ired direction.
C@ · Heating* the m irror glass depending on the
outside temperature.
8 • Folding exterior mirrors*.
Front pa ss e ng er's ex te rior mirror tilt
functio n*
To help you see the curb when backing into a
parking space, the surface of the mirror tilts
slight ly. For this to happen, the knob must be in
the position for the front passenger's outside
mirror .
You can adjust the tilted mirror surface by turn·
i ng the knob in the desired direction . When you
move out of reverse and into another gear, the
new m irror position is stored and ass igned to the
key yo u are us ing .
The mirror goes back into its orig inal position
once you drive forward faster than 9 mph
(15 km/h) o r turn the ignition off.
Folding m ir rors in and out
To fold the mirrors in with the knob, turn the
knob in the 8 position.
To fold the mirrors out, turn the knob in the
q or
P or O posit ion .
You can set in the MM I if the mirrors sho uld fo ld
in when locking the vehicle or not
q page 38.
When you lock the vehicle, the mirrors fold in.
When you start the ignition, the mirrors fold out.
A WARNING -,.
Curved m irror surfaces (convex) enlarge the
field of vision. However, they make objects in
the m irror appear smaller and further away.
Your may estimate incorrectly when you use
these m irrors to gauge your d istance from the
vehi cles be hind you when changi ng lanes -ac·
cident risk!
@ Note
- For vehicles with power fo ld ing exter ior mir·
rors*: if the mirror housing was moved by
IJI,-
47
Page 66 of 282
Warm and cold
Warm and cold Climate control system
Description
Different systems could be installed.
- manual climate control system* or
- automatic climate control system*
The
climate control system* cools and removes
humidity from the air in the vehic le interior. It is
the most effective when the windows and panor
ama sunroof* are closed.
If there is a build-up of
heat inside the vehicle, ventilation can help to
speed up the cooling process . For this reason, the
windows and panorama sunroof can be opened
from the outside .~
page 41, Convenience open
ing/closing
Pollutant filter
The pollutan t filter removes pollutants such as
dust and pollen from the air.
Key recognition
You can store various settings for the manua l and
automatic
climate control system* and assign
them to the key being used .
A WARNING
Poor visibility can lead to acc idents.
- For safer driving, keep all w indows free of
ice, snow and fog.
- Become familiar as quickly as possible with
the correct use and function of the climate
control system, espec ially with the defrost
ing and defogging function .
- When the temperature is below freezing,
only use the windsh ield washer system after
the windsh ield has been warmed by the cli -
64
mate control system. The washer f luid could
freeze on the w indshield and impair visibili
ty.
(D Note
- If you suspect that the climate control sys
tem is damaged, switch the system off to
prevent further damage and have it checked
by an authorized Audi dealer or authorized
Audi Service Facility .
- Repairs to the Audi climate control system
require special technical knowledge and
special tools. See an author ized Audi dealer
or authorized Audi Service Facility .
@ For the sake of the environment
Reducing the amount of fuel used also re
duces the amount of pollutants that enter the
a ir .
@ Tips
- To prevent interference with the heating
and cooling output and to prevent the win
dows from fogg ing over, the air intake in
front of the w indshield must be free of ice,
snow or leaves.
- Condensation from the cooling system* can
dr ip and form a pudd le of water under the
vehicle . This is normal and does not mean
there is a leak .
- Th e energy management system may switch
the seat heating* or rear window defroster
off temporarily. These systems are available
again as soon as the energy balance has
been restored.
- The f lows through the vents under the rear
window. Make sure the openings are not
covered when p lacing clothing on the lug
gage compartment cover.
Page 67 of 282
....,
N
0 > co
rl I.O
"'
"'
"'
rl
Climate control system controls
Applies to vehicles: with manual climate control system
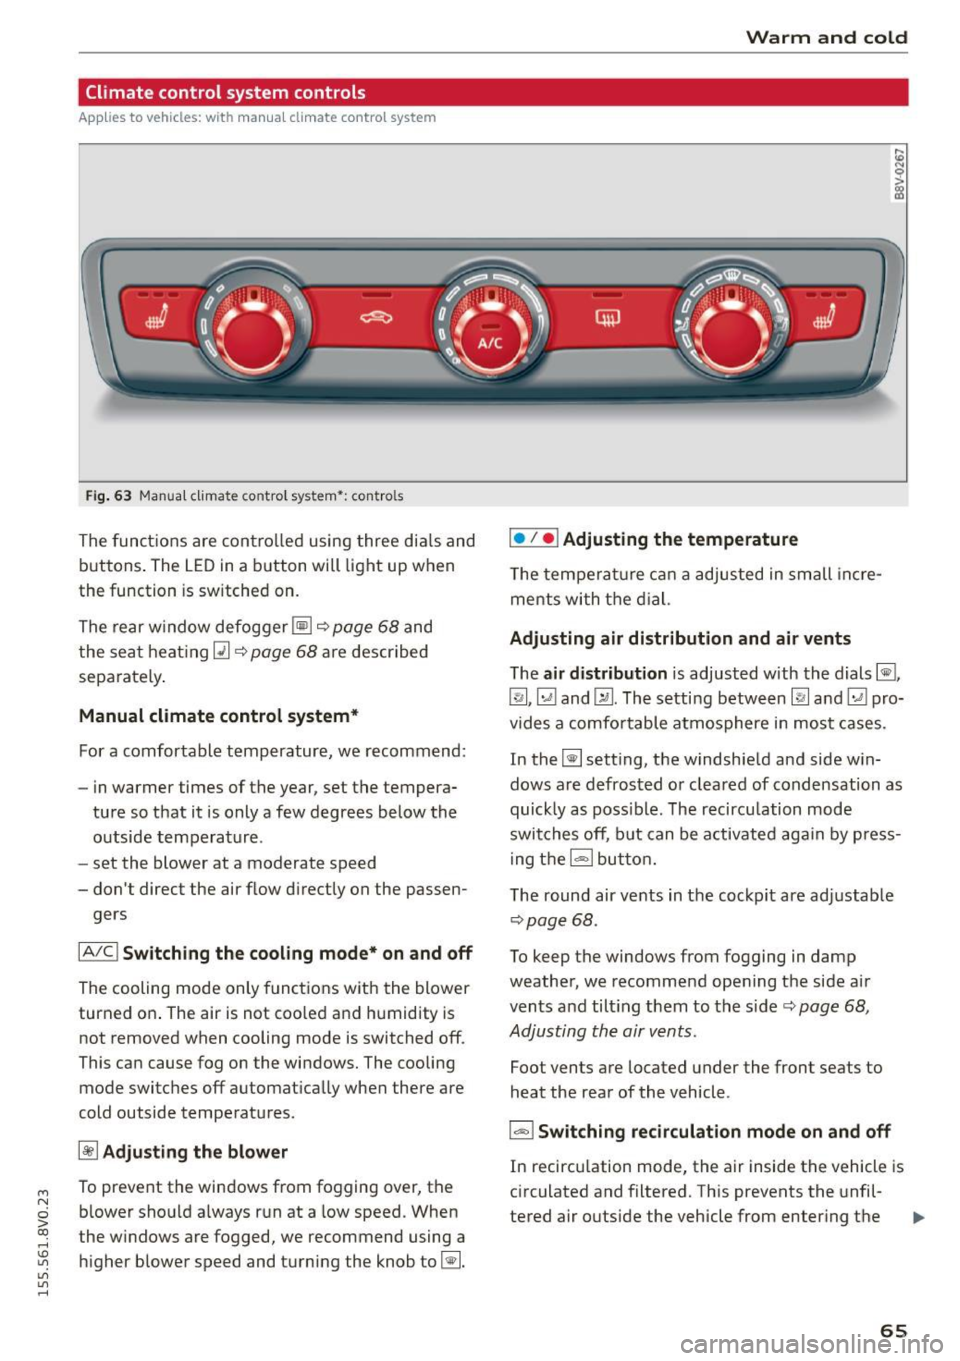
F ig. 63 Manua l clima te co ntro l system *: contro ls
The functions are controlled using three dia ls and
buttons . The LED
in a button will light up when
the function is sw itched on.
The rear window defogger ~~
page 68 and
the seat heating~~
page 68 are described
sepa rately .
Manual climate control system*
For a comfortable temperature, we recommend:
- in warmer time s of the year, set the tempera-
ture so that it is only a few degrees below the outside temperature .
- set the blower at a moderate speed
- don't direct the air flow d irectly on the passen-
gers
IA/C l Switching the cooling mode* on and off
The cooling mode only functions with the blower
turned on . The air is not coo led and humidity is
not removed when cooling mode is switched off .
This can cause fog on the windows. The cooling
mode switches off automat ically when there are
cold outside temperatures.
~ Adjusting the blower
To prevent the windows from fogging over, the b lower should a lways run at a low speed. When
t he w indows are fogged, we recommend using a
higher blower speed and turning the knob to~-
Warm and cold
I• I • I Adjusting the temperature
T he temperature can a adjusted in small incre
me nts with the dial.
Adjusting air distribution and air vents
The air distribution is adjusted with the dials ~.
~.~ and~-The setting between
IR! and ~ pro
vides a comfo rtable atmosphere in most cases.
In the~ setting, the windshield and side win
dows are defrosted or cleared of condensation as
quickly as poss ible. The recircu lation mode
switches off, but can be activated again by press
ing the
l = I button.
The round air vents in the cockpit are adjustab le
¢ page 68 .
To keep the windows from fogging in damp
weather, we recommend opening the side air
vents and tilt ing them to the side ¢
page 68,
Adjusting the air vents .
Foot vents are located under the front seats to
heat the rear of the vehicle .
I-I Switching recirculation mode on and off
In recirculation mode, the air inside the vehicle is
circulated and filtered. This prevents the unfil-
tered air outside the vehicle from enter ing the .,..
65
Page 68 of 282
Warm and col d
vehicle interior . We recommend switching recir
culation mode on when driving through a tunne l
or when s itting in traffic¢.&. .
Recircula tion mode is sw itched off in the defrost
setting ~.
Automatic climate control system controls
Applies to vehicles: with automatic air conditioner
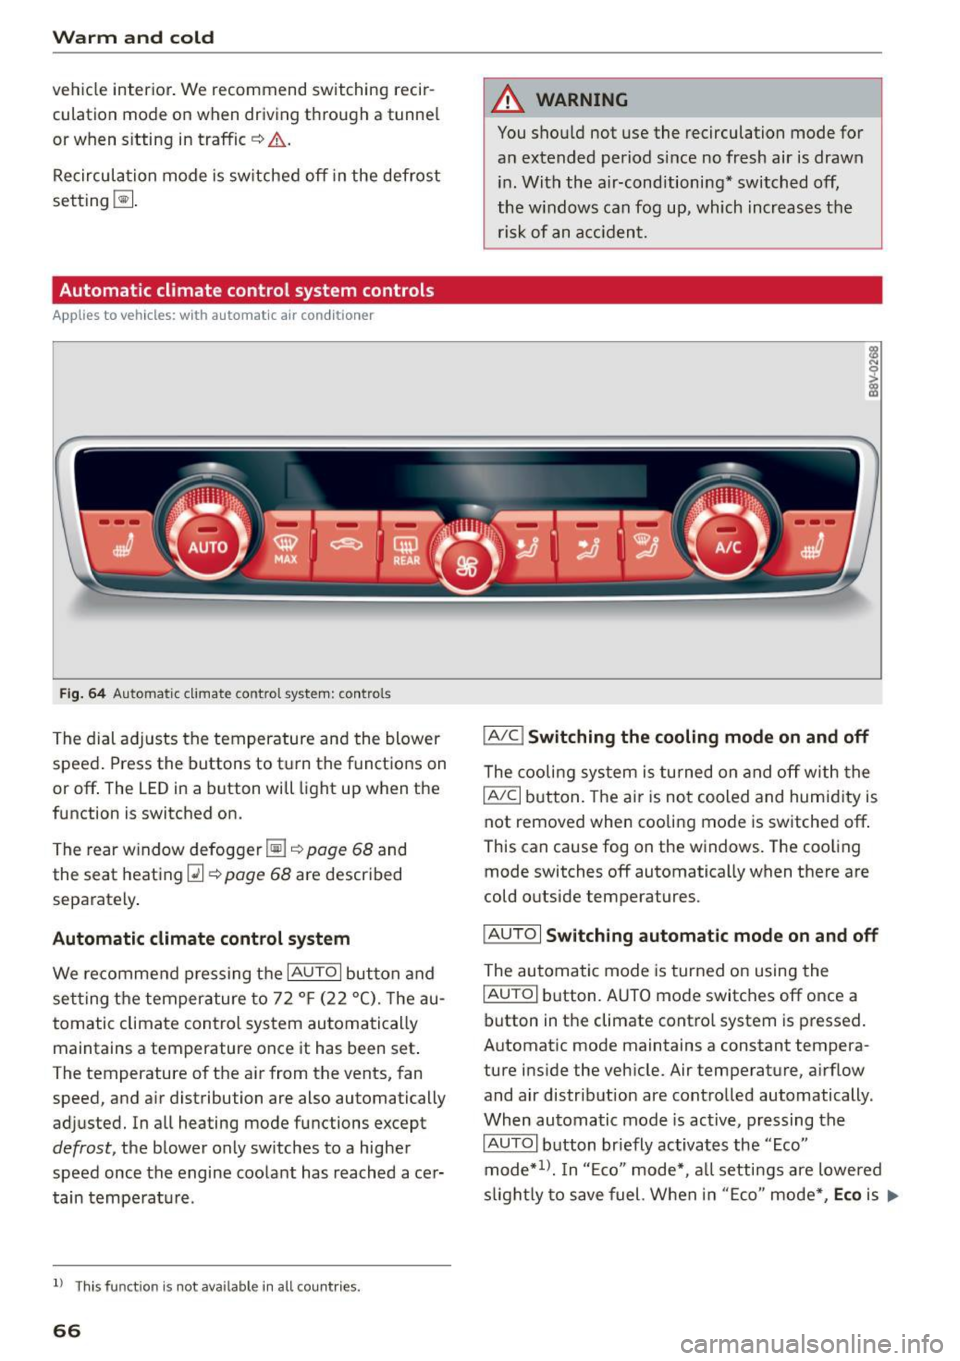
Fig. 6 4 Automa tic climat e co ntro l system : contro ls
The dial ad justs the temperature and the blower
speed . Press the buttons to turn the functions on
or off . The LED in a button will light up when the
function is switched on.
T he rear w indow defogger ~¢
page 68 and
the seat heat ing
Q] ¢ page 68 are described
separately .
Automatic climate cont rol system
We recommend p ress ing t he IAU TOI button and
se tting the temperature to 72
°F (22 °(). T he au
tomatic climate control system au tomatically
maintains a temperature once it has been set .
The temperature of the ai r from the vents, fan
speed, and a ir distribution are also automatically
adjusted. In all heating mode functions except
defrost, the b lower only sw itches to a higher
speed once the engine coo lant has reached ace r
tain tempe rat ure.
ll Thi s fun ctio n is not ava ilable in a ll countries.
66
A WARNING
You shou ld not use the recirculation mode for
an extended period s ince no fresh air is drawn
i n . With the air-conditioning* switched off,
the w indows can fog up, which increases the
risk of an a cciden t.
IA/C l Switching the cooling mode on and off
The cooli ng sys tem is turned on a nd off with the
IAJC I button. The ai r is no t cooled and humid ity is
not removed when cooling mode is switched off .
This can cause fog on the windows. The coo ling
mode switches off automatically when there are
cold o utside temperatures.
IAU TO I Switching automatic mode on and off
The au tomatic mode is turned on using the
IAU TO I button. A UTO mode switches off once a
button in the climate contro l system is pressed.
Automat ic mode maintains a constant tempera
ture i nside the vehicle. Air temperature, a irflow
and air distribut ion are contro lled automatically.
When automatic mode is active, pressing the
IAUTOI b utton briefly activates the "Eco"
mode*
1> . I n "E co" mode*, a ll setti ngs are lowered
s ligh tly to save fuel. Whe n in "E co" mode *,
Eco is .,..
Page 70 of 282
Warm and col d
Adjusting the air vents
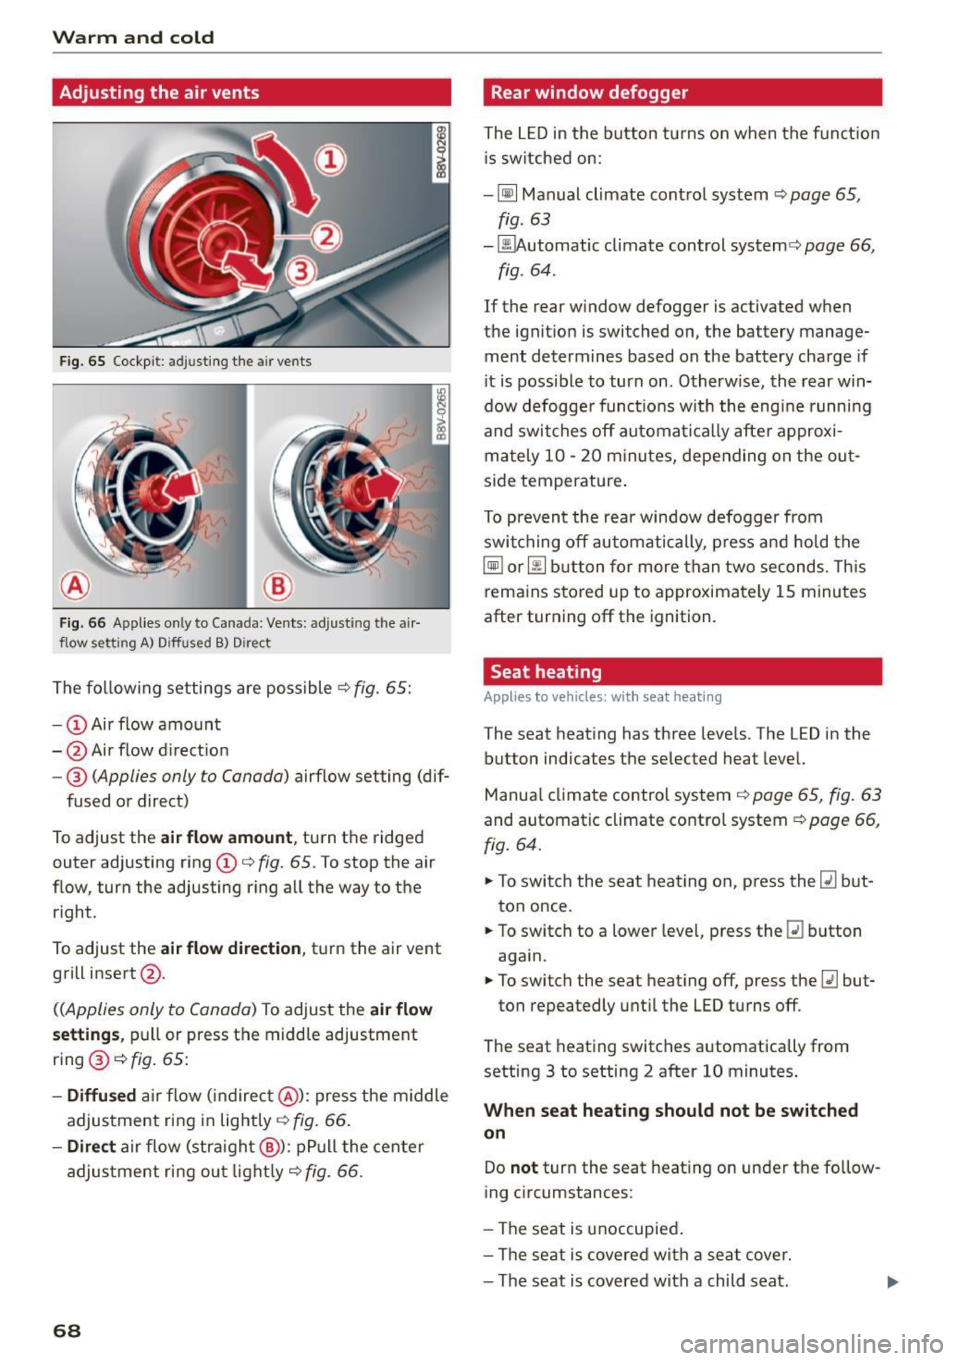
Fig. 65 Cockp it: adjusting the air vents
®
Fig. 66 Applies on ly to Canada: Ven ts: adjusting the air
flow setting A) Diffused B) Dire ct
The fo llow ing settings are possible .:;> fig. 65:
- CD Air flow amount
- @ Air flow d irection
- @
(Applies only to Canada) airflow setting (dif-
fused or direct)
To adjust the
air flow amount , turn the ridged
outer adjusting ring CD¢
fig. 65. To stop the air
flow, turn the adjusting r ing all the way to the
right .
To adjust the
air flow di rection , tu rn the air vent
grill insert @.
((Applies only to Canada) To adjust the air flow
s etting s,
pull or press the midd le adjustment
ring @¢
fig. 65:
-Diffu sed ai r flow (indirec t@ ): press the m iddle
adjustment ring in lightly¢
fig. 66 .
-Direct air flow (stra ight @): pP ull the center
adjus tment ri ng ou t light ly¢
fig. 66 .
68
Rear window defogger
The L ED in the button tu rns on when the funct ion
i s sw itched on:
- ~ Manual climate contro l system ¢
page 65,
fig. 63
- ~ utomatic climate control system¢ page 66,
fig . 64 .
If the rear window defogger is activated when
the ignit ion is switched on, the battery manage
ment determines based on the battery charge if
i t is possible to turn on . Otherw ise, the rear win
dow defogge r funct ions w ith the eng ine runni ng
and swit ches off automat ically afte r approxi
mately 10 -20 m inu tes, depending o n the ou t
s ide temperature .
To p revent the rear window defogger from
swi tching off automatically, p re ss and hold t he
~ or~ button fo r more than two seconds. Th is
rema ins stored up to approximately 1 5 minutes
after turning off the ignition .
Seat heating
Applies to vehicles: with seat heating
The seat heat ing has three leve ls. The LED in the
button indicates the selected heat level.
Manua l climate control system ¢
page 65, fig. 63
and automatic climate control system ¢ page 66,
fig. 64.
.. To swi tch the seat heat ing on, press the~ but
ton once.
.. To switch to a lowe r leve l, p ress the ~ button
aga in.
.. To switch the seat heating off, press the~ but-
ton repeatedly unti l the LED turns off.
The seat heating switches automatically from
setting 3 to setting 2 after 10 minutes .
When seat heating should not be switched
on
Do not turn the seat heating on under t he fo llow
ing circumstances:
- The seat is unoccupied .
- The se at is covered wit h a seat cover.
- The seat is covered with a child seat.
Page 71 of 282
M N
0 > co ,...., \!) ,.,.,
,.,.,
,.,., ,....,
-The seat is damp or wet.
~ WARNING
Individuals with reduced sensitivity to pain or
temperature could develop burns when using
the seat heating function. To reduce the risk
of injury, these individuals should not use seat
heating.
(D Note
To avoid damage to the heating elements in the seats, do not kneel on the seats or place
heavy loads on a small area of the seat.
(D Tips
- The setting for the seat heating on the driv
er's side is assigned to the key that is in use.
- If the front passenger's seat heating is
turned on, it will not turn on again automat
ically if more than 10 minutes have passed
between switching the ignition
off and
switching it on again.
Auxiliary heater
Appl ies to vehicles: with diesel engine
In cool outside temperatures, the electric auxili
ary heater helps the vehicle interior to warm
more quickly. The auxiliary heater switches on
and
off automatically according to the vehicle
heating settings.
The "auxiliary heater" function can be switched
on and
off in the MMI. Select: the !MENUI button
> Car > Systems* control button > AC > Auxiliary
heater.
Warm and cold
69